Solaxx Precision UV User manual

Installation and
Operating Instructions
PRECISION
PRECISION
www.solaxx.com
PRECISION
PRECISION
AUTOMATIC
REGULATOR
FLOW

WARNING – Risk of Electric Shock. Connect only to a branch circuit protected by a ground-fault circuit-interrupter (GFCI).
Contact a qualified electrician if you cannot verify that the circuit is protected by a GFCI.
The unit must be connected only to a supply circuit that is protected by a ground-fault circuit-interrupter (GFCI). Such a GFCI
should be provided by the installer and should be tested on a routine basis. To test the GFCI, push the test button. The GFCI
should interrupt power. Push the reset button. Power should be restored. If the GFCI fails to operate in this manner, the GFCI is
defective. If the GFCI interrupts power to the pump without the test button being pushed, a ground current is flowing, indicating
the possibility of an electric shock. Do not use this pump. Disconnect the pump and have the problem corrected by a qualified
service representative before using.
WARNING - To reduce the risk of injury, do not permit children to use this product unless they are closely supervised at all times.
CAUTION - This product should be installed by a professional service technician or similar person who is qualified in electrical
equipment installation. Improper installation and/or operation could cause serious personal injury, property damage or death.
Improper installation and/or operation will void the warranty.
CAUTION - To reduce the risk of personal injury the power supply must be installed on and wired to the load side of the time clock,
electronically controlled switch, or relay load side, so that it will receive power only when the pool pump is on. The Power supply
should never be energized when water is not flowing through the unit.
WARNING - ELECTRIC SHOCK - Disconnect all AC power during installation or performing any service work.
CAUTION - To prevent possible fire or electrical shock, use only replacement lamp specified by the manufacturer.
CAUTION - Do not use system if cord is damaged or frayed.
CAUTION - Lamps and quartz sleeves are made of glass and are extremely delicate. Care should be taken when handling or
replacing these components. Wear cotton gloves when handling lamps or sleeves. Hold lamps by the ends only. Never touch
the glass with bare hands. Wipe any fingerprints from lamps and sleeves with rubbing alcohol.
CAUTION - This device is for use on swimming pools less then 40,000 gallons. Do not use this device for potable (drinking) water
sanitization.
DANGER - ULTRAVIOLET RADIATION. Disconnect Power Before Replacing Lamp . This device contains an ultraviolet lamp
that can cause discomfort, irritation and damage to the eyes if viewing occurs while device is in operation. Prolonged exposure
to the eyes can cause serious injury to the eyes, including blindness. DO NOT DIRECTLY VIEW UV LAMP WHILE THE
DEVICE IS IN OPERATION. LAMP FUNCTION CAN BE VIEWED THROUGH QUARTZ VIEW CAP SAFELY.
ENVIRONMENTAL NOTICE - Hg-Lamp CONTAINS MERCURY. Manage in accordance with disposal laws. See:
www.lamprecycle.org
Specifications:
Max Pool Size: Pools up to 40,000 Gallons
Shipping Weight: 16 pounds
Connections: Two inch pipe connections on manifold with two inch unions included
Location Requirements: Power supply is wall mounted near the manifold and wired to the
same source power as the pump. Cord length between power supply and manifold is 9 Feet.
Input Power: 120/240VAC
Power Consumption: 60 Watt max.
Max Operating Pressure: 50 psi
Operating Flow Range: up to120 GPM
Lamp: 13,000 hour life expectancy
SAFETY INSTRUCTIONS
2
SAVE THESE INSTRUCTIONS
READ AND FOLLOW ALL INSTRUCTIONS
The system utilizes an Ultraviolet Sterilization Chamber to treat your water. This powerful process
eliminates contaminants in water and reduces the use of pool chemicals. No toxic chemicals are used,
no metals or minerals, only pure light.
Using the existing pool pump, a specific amount of water is diverted into the UV chamber where it is
sterilized to the quality of drinking water. A microscopic residual of chlorine (.5-1.0 ppm) is
recommended for use with this system as a supplemental source of disinfection. For best results, the
pool pump should run at least 12 hours daily, (optimally 24 hours daily) for highest savings in chemical
usage and cost.
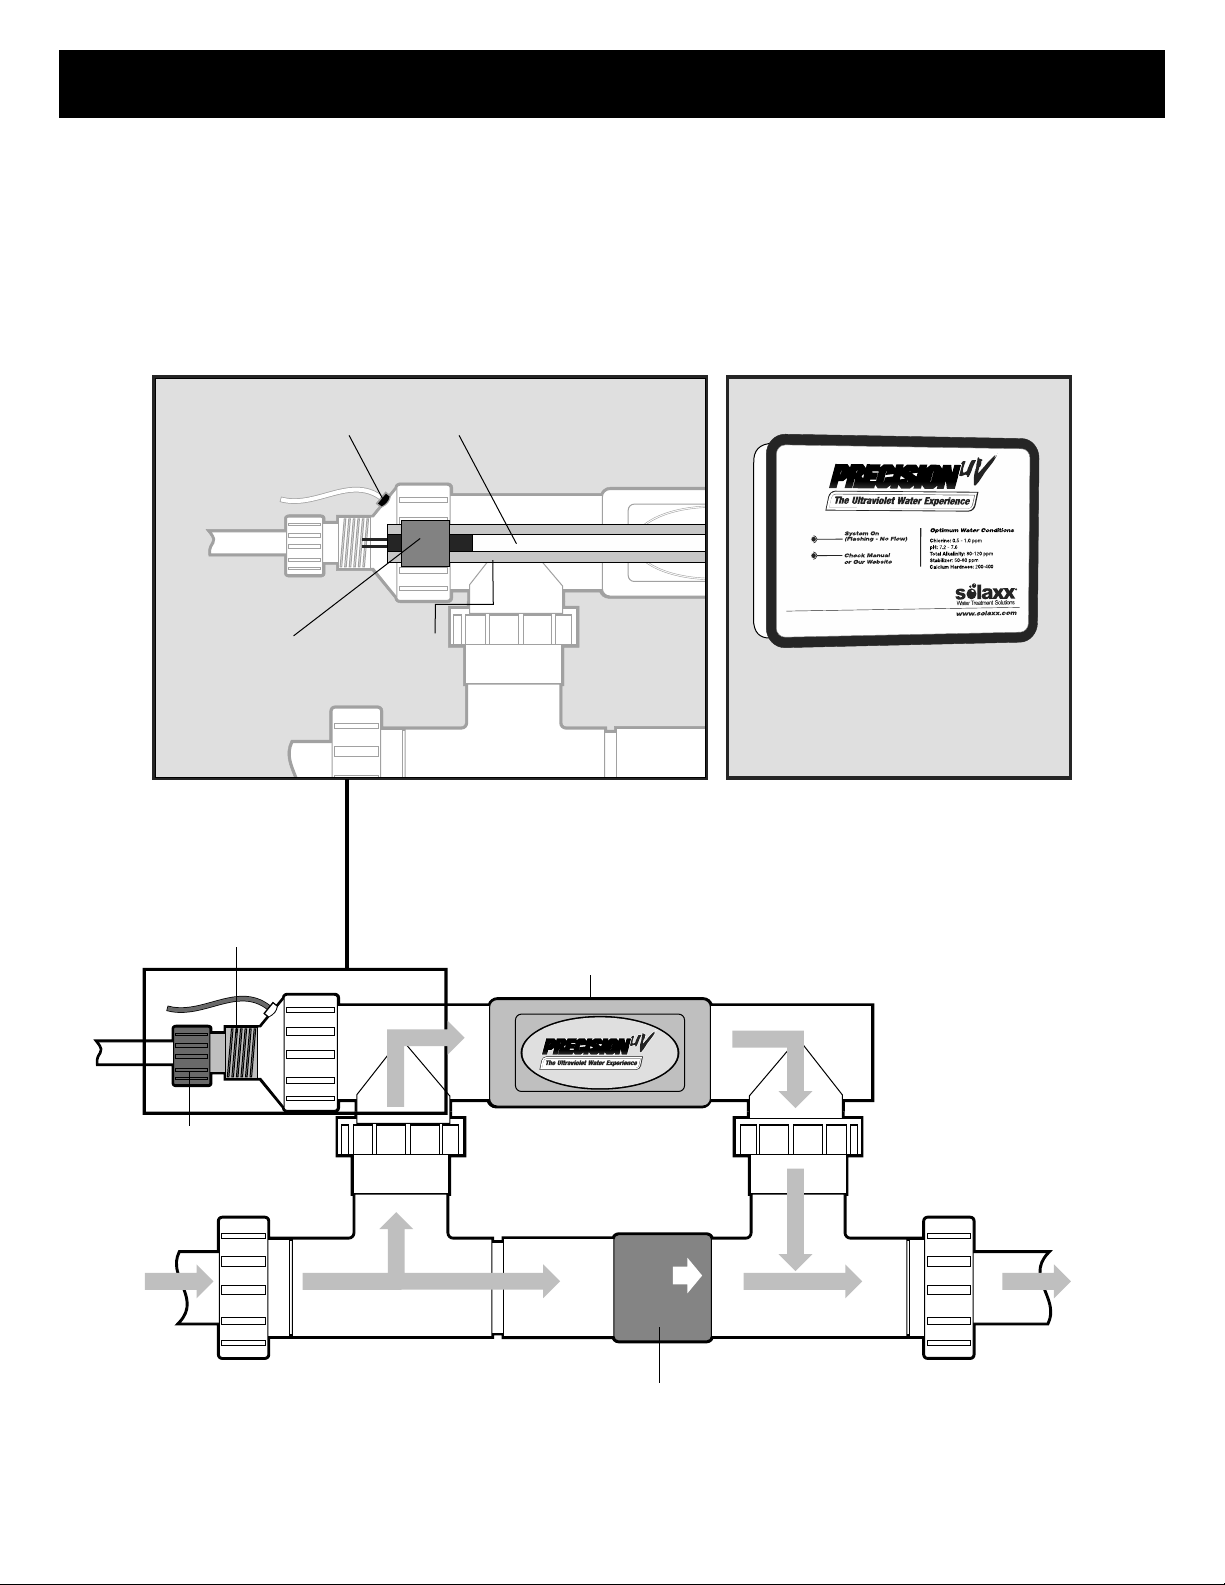
DESCRIPTION
Power Supply
UV4000A-020 220v
UV4010A-020 110v
Quartz
Sleeve
Lamp
Rubber Seal
Temp.
Sensor
3
PRECISION
PRECISION
PRECISION
PRECISION
AUTOMATIC
REGULATOR
FLOW
Flow Regulator
UV Chamber
Quartz View
Cap
strain
relief
Pure
Water
To Pool
Water
From
Pool
ŸTURN OFF ALL POWER TO EXISTING EQUIPMENT AT THE BREAKER SWITCH.
ŸBEFORE STARTING INSTALLATION, YOU MUST READ THIS MANUAL IN ITS
ENTIRETY TO ASSURE A SAFE INSTALLATION.
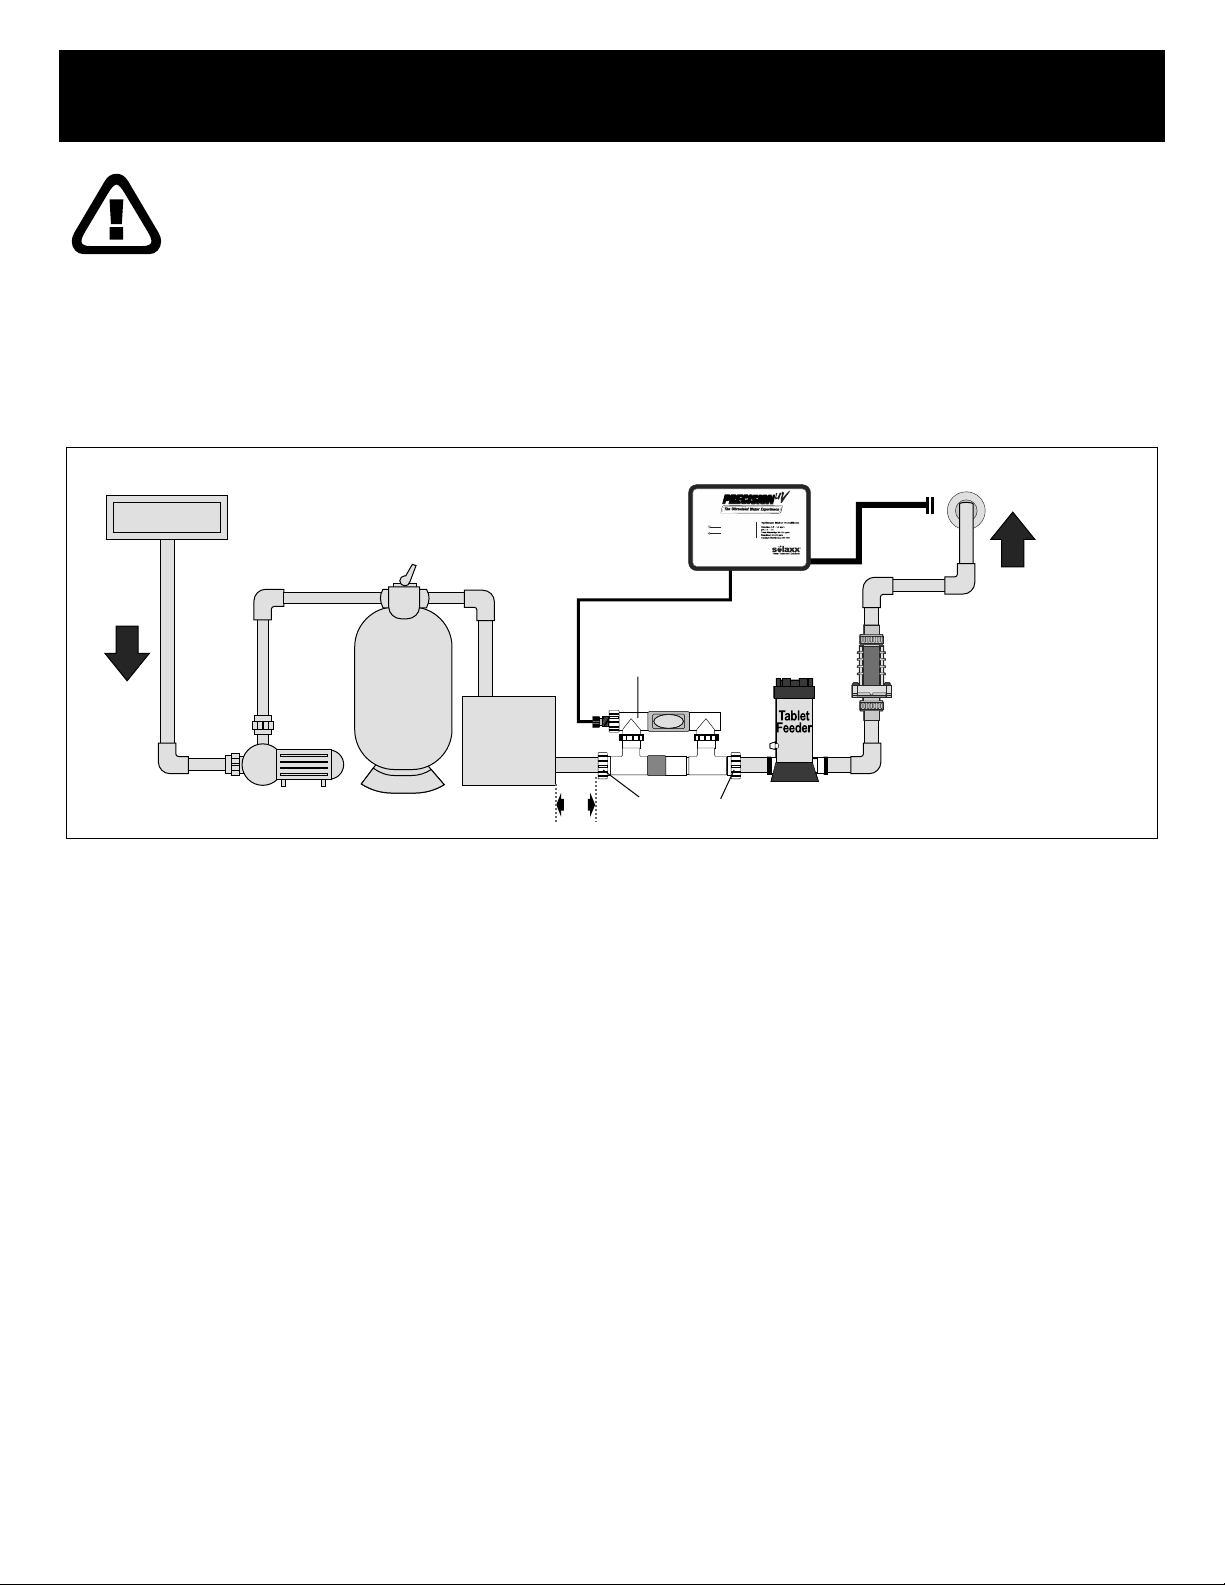
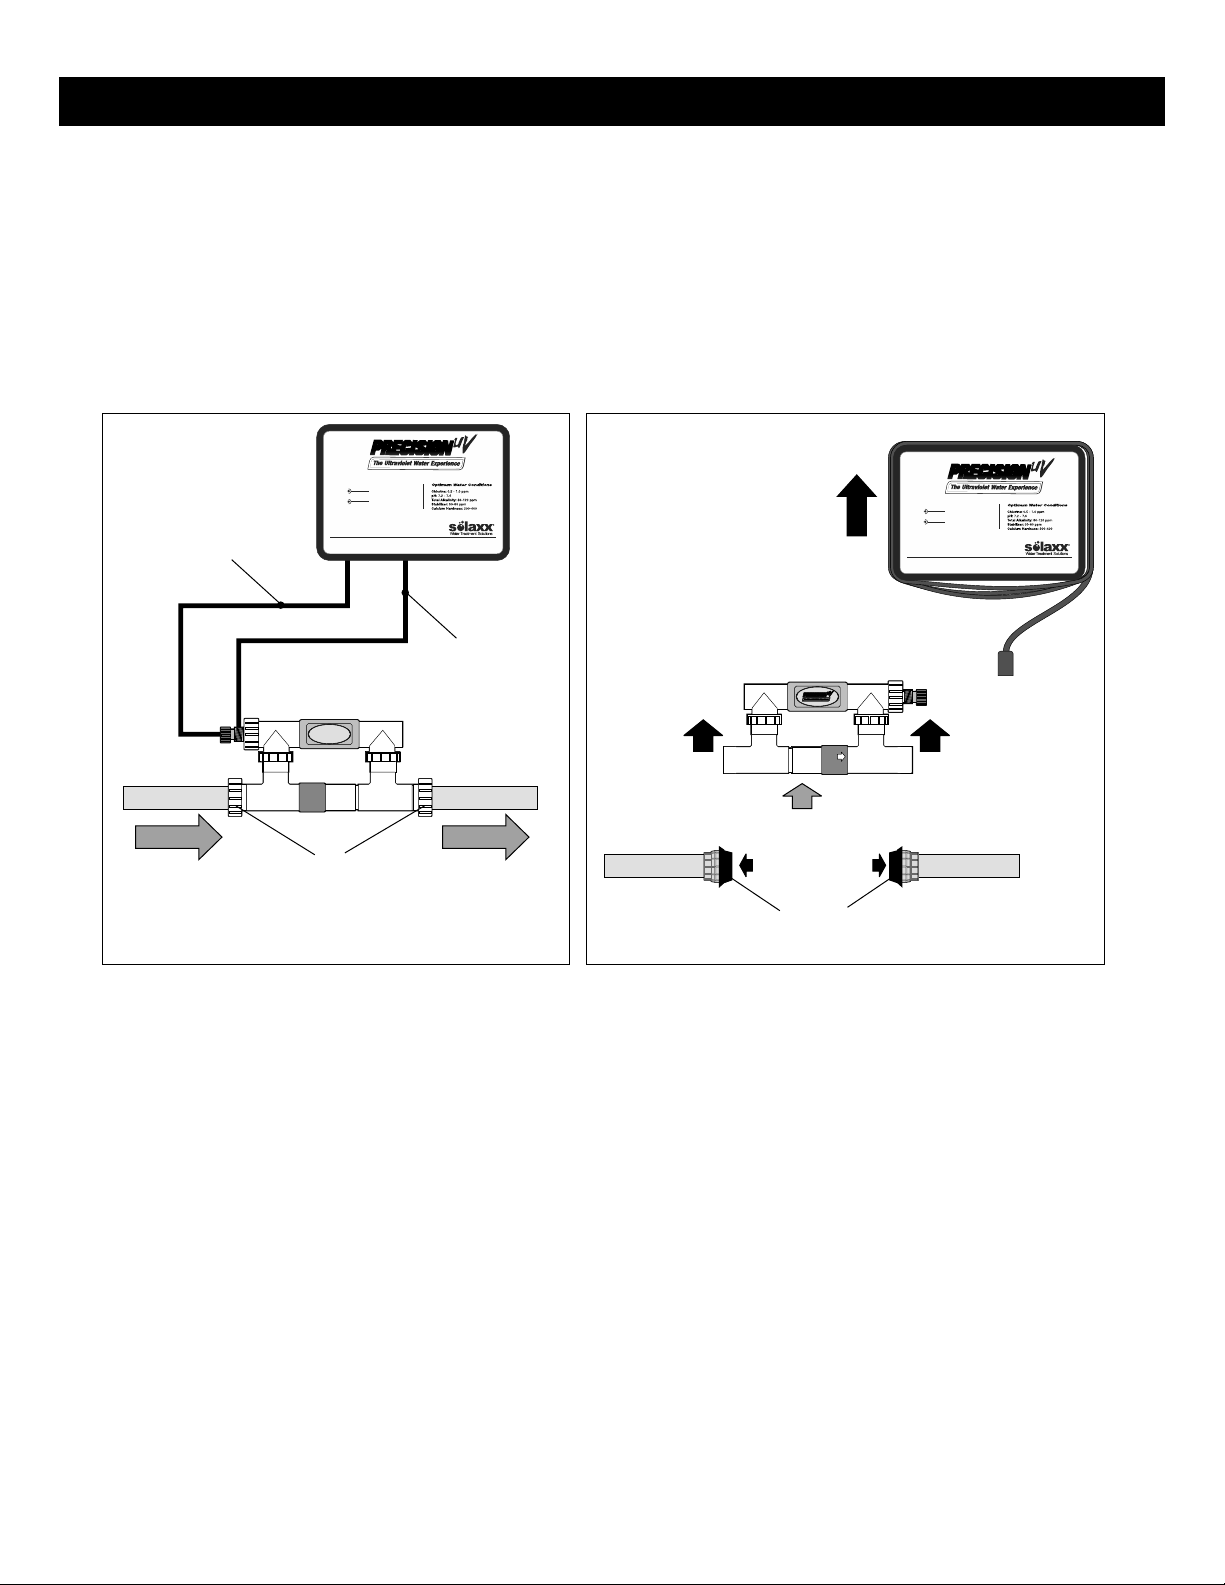
INSTALLATION
A) Install the Precision into a 1⁸ ¹⁄ inch opening with a union on both sides to facilitate easy removal should it
become necessary. Unions are provided for easy servicing and removal.
B) Clean the ends of the PVC pipe and glue the manifold into opening in the horizontal position shown above.
C) If existing pipe is sized smaller or larger than 2 inch, use adapters to install manifold (not provided)
D) Water flow is automatically diverted into the UV chamber at the proper flow rates. Restriction to the
plumbing is nominal when the manifold is inserted into the plumbing and is comparable to adding a heater to
the pool. See below:
o
DO NOT ATTACH MANIFOLD DIRECTLY TO A 90 ELBOW. ALLOW AT LEAST 6 INCHES OF
STRAIGHT PIPE ON EACH SIDE.
Filter
Skimmer
Water
from
pool
Water
return
to pool
Heater
Manifold Optional
Salt Cell
(not provided)
To Power
Source
Ÿ1. PLUMBING:
Install manifold downstream of the heater and before chlorine tablet feeder. If space allows, install
manifold minimum two feet away from the heater to avoid possible safety shutdown of the system due to
hot water conditions in the chamber.
4
2 Ft.
Unions
(provided)
System On
(Flashing - No Flow)
Check Manual
or Our Website
www.solaxx.com
PRECISION
PRECISION
INSTALLATION
5
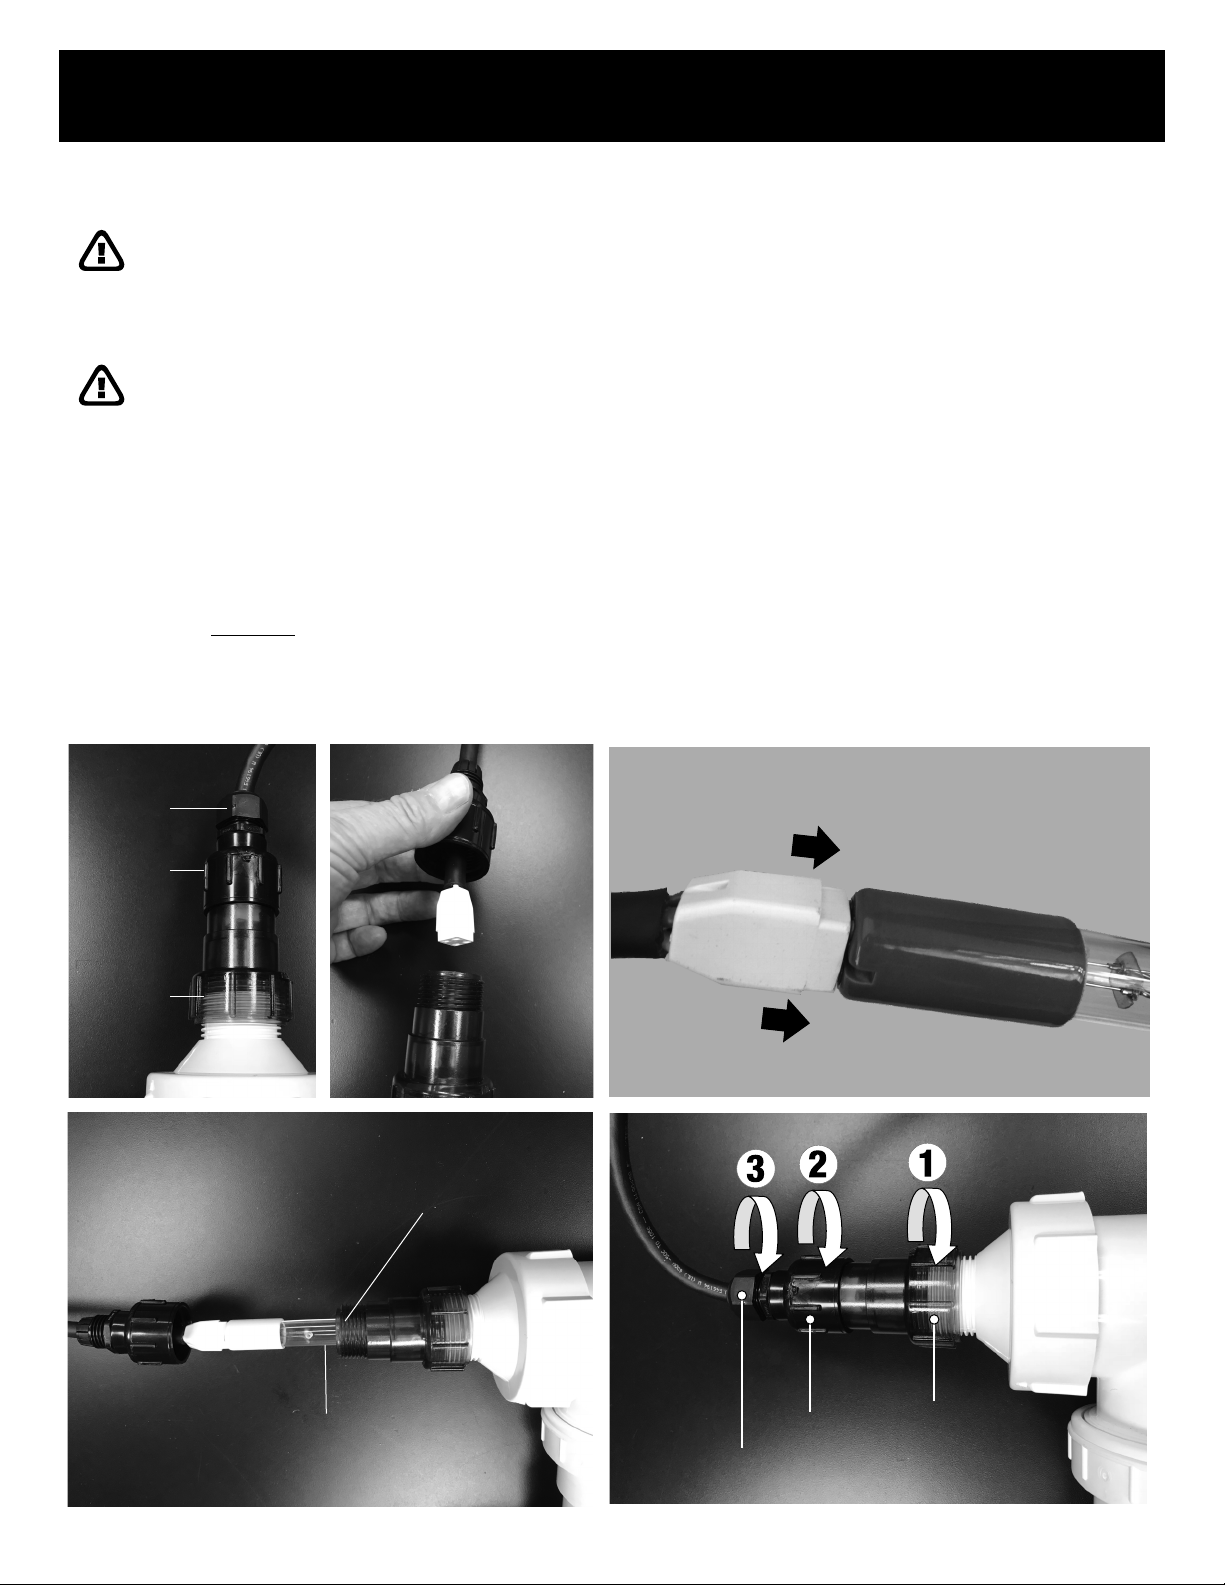
2. INSERT BULB INTO CHAMBER:
IMPORTANT:
HANDLE THE LAMP BY THE ENDS ONLY AND AVOID TOUCHING THE CLEAR GLASS OF THE
LAMP. IF POSSIBLE USE COTTON GLOVES TO HANDLE LAMP TO AVOID GETTING OILS FROM
HANDS ON THE LAMP. SKIN OILS ATTACH TO THE LAMP AND SHORTEN ITS EFFECTIVE LIFE. IF
LAMP IS TOUCHED, WIPE CLEAN WITH A SOFT CLOTH AND RUBBING ALCOHOL.
THIS ULTRAVIOLET RADIATION APPLIANCE CONFORMS TO THE APPLICABLE PROVISIONS OF
THE CODE OF FEDERAL REGULATIONS (CFR) REQUIREMENTS, INCLUDING TITLE 21, CHAPTER 1,
SUBCHAPTER J, RADIOLOGICAL HEALTH
A. Unthread and remove the end cap with the wire attached from the end of the UV chamber, by first
loosening the small black plastic nut, then the larger black nut to pull out plug.
B. Pull gently until lamp is visible and unplug from each other.
C. Plug the 4 prong plug into the end of the UV lamp. If lamp is not fully plugged in, damage to the unit
may occur.
D. Slide lamp straight into chamber - Be careful, inserting the lamp at an angle, even a slight angle
can crack the quartz sleeve.
E. Rethread blue cap back onto chamber fitting very snug to assure tight seal. BE SURE ALL THESE
CONNECTIONS ARE SNUG. HAND TIGHTEN ONLY!
C
D E
Quartz
sleeve
Push
snug
snug
BA
loosen
first
loosen
second
DO NOT
LOOSEN
Insert bulb carefully snug
6
INSTALLATION
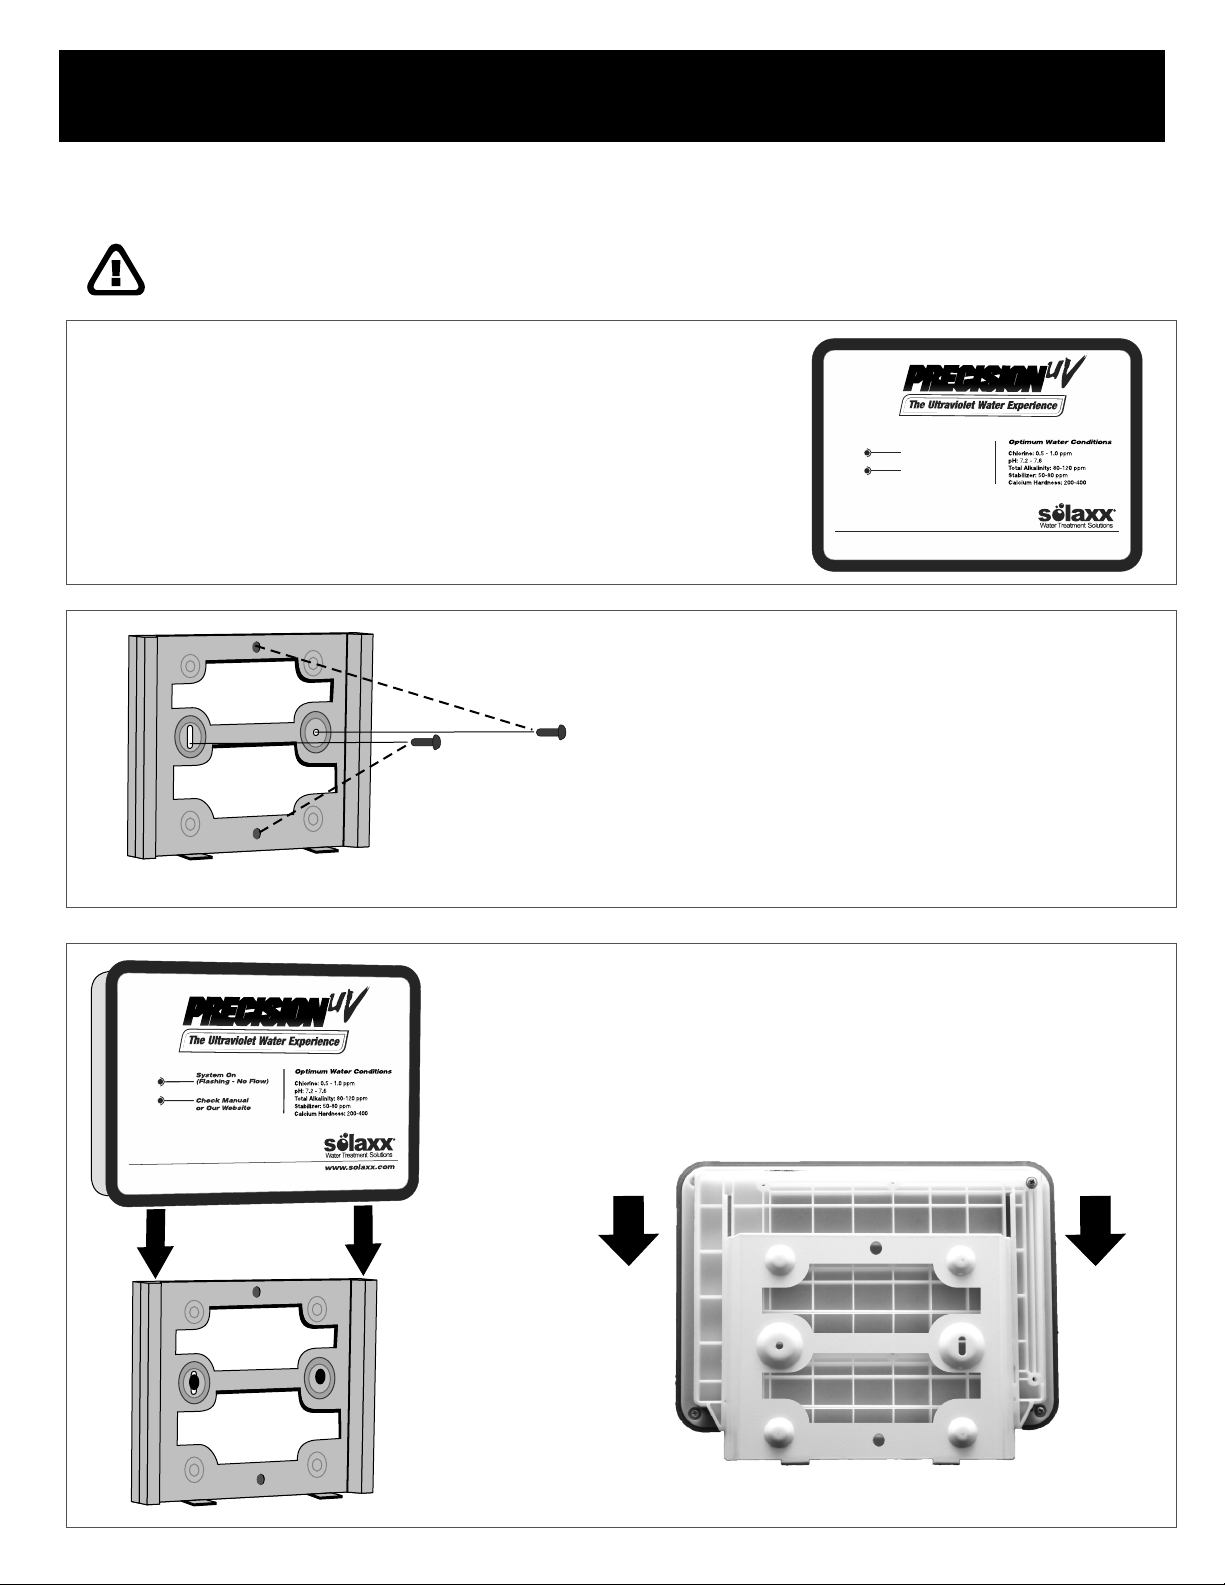
Mounting the Power Supply
CAUTION: FOLLOW ALL APPLICABLE BUILDING AND ELECTRICAL CODES
1. Before making any electrical connections, mount the power
supply to a vertical surface. Since Precision is designed to turn on
only when the pump is running, locate this power supply within 8
feet of the source power for the pump. The Precision power
supply is wired to the same source power as the pump. See page
8 for electrical connections after mounting power supply.
2. Mount the aluminum bracket first on a
vertical surface at a height of approximately five (5)
feet above the ground using the screws provided
with the spacers against wall to allow air flow behind
bracket. Level the bracket using the oval hole for a
clean installation.
Dotted lines show alternate mounting holes for
mounting on a post.
3. Once bracket is secured, slide the power
supply down onto the bracket using slots on back of
the power supply. Push down onto bracket gently
until it hits the stops and is mounted securely in
place.
System On
(Flashing - No Flow)
Check Manual
or Our Website
www.solaxx.com
PRECISION
PRECISION
PRECISION
PRECISION
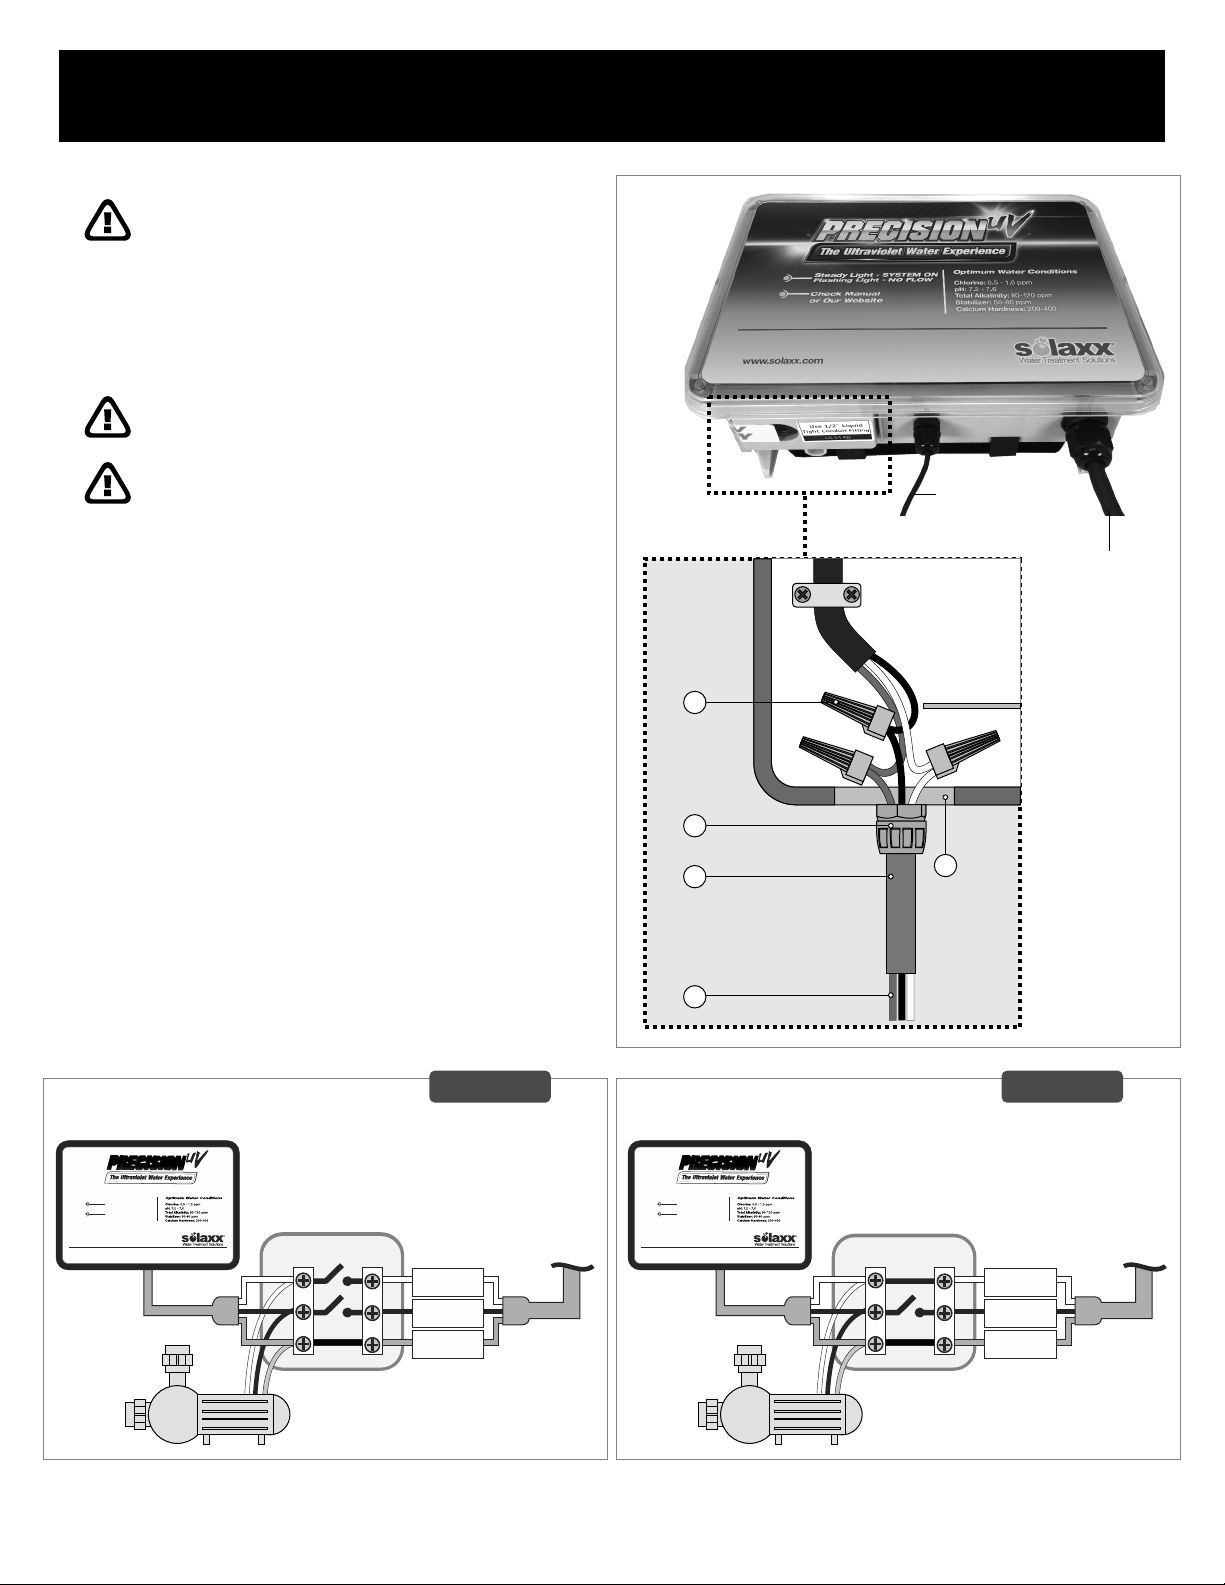
3. ELECTRICAL CONNECTIONS:
CAUTION: TURN OFF ALL POWER TO
THE POOL EQUIPMENT BEFORE
CONNECTING THE POWER SUPPLY TO
ANY ELECTRICAL SOURCE. FAILURE
TO DO SO COULD RESULT IN SERIOUS
INJURY OR DEATH!
USE COPPER CONDUCTORS ONLY
FOLLOW ALL APPLICABLE
ELECTRICAL CODES.
1. Cover of the Junction Box
2. Wire Nut Connections
3. Liquid-Tight Conduit Fitting (1/2 inch)
(UL514B)
4. Liquid-Tight Conduit (1/2 inch) (UL514B)
5. Wires
6. Items 3,4,5 Not supplied
INSTALLATION
1
2
3
4
5
Ground
L1
L2
Line
Pump
Power Supply Box
240V Install
Ground
L1
N
Line
Pump
Power Supply Box
110V Install
Wires to be connected to either a circuit breaker,
or automation system relay.
For variable speed pump connection see below
for 240 and 110 Volt install.
7
Internal Wire Connections
Temperature
Sensor Wire
Lamp
Connector
Wire
System On
(Flashing - No Flow)
Check Manual
or Our Website
www.solaxx.com
PRECISION
PRECISION
System On
(Flashing - No Flow)
Check Manual
or Our Website
www.solaxx.com
PRECISION
PRECISION

System On
(Flashing - No Flow)
Check Manual
or Our Website
www.solaxx.com
PRECISION
PRECISION
System On
(Flashing - No Flow)
Check Manual
or Our Website
www.solaxx.com
PRECISION
PRECISION
1. CHLORINE FROM CHEMICALS OR SALT SYSTEMS ARE NOT A PROBLEM AND THE SYSTEM MAY
BE STARTED WHILE USING CHLORINE.
2. Test pool water and adjust pH, total alkalinity and calcium hardness levels before starting system. See
Table below.
POOL WATER PREPARATION
OPERATION
WARNING: DO NOT ATTEMPT TO
OPEN THE POWER SUPPLY FOR ANY
REASON. IT IS SEALED AND NOT
DESIGNED TO BE REPAIRED IN THE
FIELD. A DEFECTIVE OR NON
FUNCTIONING POWER SUPPLY IS
REPLACED WITH A NEW UNIT ONLY.
- Steady Blue LED = system has power and is
operating normally
- Flashing Blue LED = no flow to chamber. This
could be caused by the pool pump losing its
prime or from blockage in the plumbing. Check
water flow through system.
Note: The flow is determined using a
temperature sensor. Therefore, it may take a
few minutes to recognize that flow has
stopped when the system turns off. This is
not harmful to the Precision chamber.
- Steady Red LED = system error. This means
an error has occurred in the power supply.
Please go to www.solaxx.com to create an RMA
form which will be answered within 24 hours or
next business day to resolve this issue.
System On
(Flashing - No Flow)
Check Manual
or Our Website
8
9
WINTERIZING
In areas where the pool and the equipment is winterized (equipment drained and pool covered), Precision should
be winterized also. This is done by removing the entire Precision manifold from the plumbing and storing in a
warm, dry place.
First, blow out all pipes with air while the Precision is still installed on the pipe. Then:
A. Unplug the lamp in reverse order of inserting it as shown on page 6.
B. Coil the wire around the power supply which is mounted to the wall and slide up off of mounting bracket.
C. Unthread the union nuts and remove the entire manifold from the pipe and store safely inside.
D. Cover opening in pipes with red caps provided. Secure caps with a little duct tape.
A
System On
(Flashing - No Flow)
Check Manual
or Our Website
www.solaxx.com
D
Close openings with
red caps provided
Remove and store
MAINTENANCE
System On
(Flashing - No Flow)
Check Manual
or Our Website
www.solaxx.com
PRECISION
PRECISION
C
PRECISION
PRECISION
AUTOMATIC
REGULATOR
FLOW
PRECISION
PRECISION
Slide Power supply up
off of mounting bracket
and store.
B
FLOW FLOW

MAINTENANCE
LAMP REPLACEMENT
The UV lamp is rated for 13,000 hours of service and can be monitored through the blue viewing caps at
the end of the chamber. DO NOT VIEW LAMP DIRECTLY - ALWAYS USE VIEWING CAP. When the
lamp requires replacement, follow this simple procedure:
Shut off AC power before performing maintenance
Allow lamp to cool for 10 minutes before handling
A. Unthread and remove the end cap with the wire attached from the end of the UV chamber, by first
loosening the small black plastic nut, then the larger black nut to remove lamp.
B. Plug the 4 prong plug into the end of the UV lamp. If lamp is not fully plugged in, damage to the unit
may occur.
C. Slide lamp straight into chamber - Be careful, inserting the lamp at an angle, even a slight angle
can crack the quartz sleeve.
D. Rethread black cap back onto chamber fitting by hand to assure tight seal.
IMPORTANT:
HANDLE THE LAMP BY THE ENDS ONLY AND AVOID TOUCHING THE CLEAR GLASS OF THE
LAMP. IF POSSIBLE USE COTTON GLOVES TO HANDLE LAMP TO AVOID GETTING OILS FROM
HANDS ON THE LAMP. SKIN OILS ATTACH TO THE LAMP AND SHORTEN ITS EFFECTIVE LIFE.
IF LAMP IS TOUCHED, WIPE CLEAN WITH A SOFT CLOTH AND RUBBING ALCOHOL.
CLEANING THE QUARTZ SLEEVE
The quartz sleeve inside the UV chamber encases the UV lamp and
should be cleaned while winterizing the system, or annually if
system is installed on a pool running 12 months. The quartz sleeve
is brittle and can be cracked, chipped or broken if it is not handled
with care. Do not remove the sleeve or attempt to scrape or scrub
the sleeve as it could crack or break it.
-After removing the manifold as shown in WINTERIZING section,
unthread the top chamber and turn the chamber over so the
openings face up.
-Using CLR or Lime Away or a comparable cleaning product
(available at grocery stores or home centers), pour into the chamber
to cover the quartz sleeve with the liquid and allow to soak for 30
minutes. Dispose of cleaning solution by following instruction on
the cleaning solution container.
-Rinse the quartz sleeve with isopropyl alcohol to remove any
remaining residue from the sleeve.
-Rinse the sleeve again with water.
C
Fill to here so
quartz sleeve
is covered.
10
Push
A
loosen
first
loosen
second
DO NOT
LOOSEN
BD
1. Introduction
This limited warranty is applicable to certain UV/Ozone systems installed for pools up to 40,000 gallons. This warranty is transferable to
subsequent owners of the system during the warranty period provided the location of the system is unchanged from the original installed
location.
2. Two Year Limited Warranty
This warranty applies to this UV/Ozone System and their factory-supplied components (the "System") when purchased from an authorized
dealer and used for residential pools up to 40,000 gallons. The System is warranted to be free from defects in material and workmanship
manufacturing process for a period of Two (2) years from the original purchase date. Should the System exhibit a manufacturing defect within
two years of installation, when properly installed and operated in accordance with the relevant manuals, the manufacturer will supply
comparable replacement parts for the System according to its judgment without charge for parts. This warranty is applicable only if the System
is installed, operated and maintained in accordance with the procedures outlined in the Owner's Manual. Failure to do so will void this limited
warranty. Warranty work should be performed by the authorized dealer who made initial installation. Pool water must be tested regularly in order
to properly maintain its chemical balance. Problems or equipment failure resulting from the failure to maintain pool water chemistry in
accordance with guidelines set forth in the Operation manual will void the warranty. Customer releases and holds the manufacturer harmless
from any and all claims attributable in whole or part to their failure to comply with the foregoing guidelines concerning maintenance of pool
chemistry.
3. Exceptions & Liability Limitations
The manufacturer, and their suppliers, dealers, and distributors SHALL NOT BE LIABLE FOR INCIDENTAL OR CONSEQUENTIAL
DAMAGES; DAMAGE OF ANY SORT OR NATURE RESULTING FROM ABUSE, MISUSE, NEGLIGENCE, LIGHTNING, ABNORMAL
WEATHER CONDITIONS, OR ACT OF GOD; OR DAMAGE CAUSED BY IMPROPER OR UNAUTHORIZED USE, INSTALLATION OR
REPAIR. This warranty applies only to components supplied by the factory and only where such components have been installed and
maintained in compliance with the respective installation and operation manuals and instructions and applicable ordinances and codes. In no
event shall the liability exceed the purchase price of the product. THE CONSUMER SHALL BE LIABLE AT STANDARD RATES FOR ANY
SERVICE VISIT WHERE NO MANUFACTURING DEFECT WAS PRESENT AND FOR ALL SERVICE REQUESTED. This warranty shall be
void if Customer modifies the Unit in any respect including, but not limited to the use of parts other than genuine manufacturer parts. If this
System is installed for use on non residential pools or pools bigger than 35,000 gallons, this warrant is void. The UV bulb and quartz sleeve are
excluded from the System warranty and are warranted for a period of one year when properly installed and operated in accordance with the
relevant manuals.
4. How To Make A Claim
An authorized representative will repair or replace, at its option, a system or part proved to be defective within the warranty periods and under
the conditions of this limited warranty. This limited warranty is void if the Control Center has been tampered with (there are no user serviceable
parts inside). The Customer must arrange prepaid shipping for servicing of the warranted items after proper authorization (call 561-455-0252
ext 2). You may also make a warranty claim online by going to: www.solaxx.com to create an RMA. No packages will be accepted without a
manufacturer issued Returned Merchandise Authorization (RMA).
5. Entire Warranty
The express warranty above constitutes the sole and complete warranty and takes precedence over all other warranties, whether expressed
or implied, including a warranty for fitness for a particular purpose. No sales representative, dealer, distributor, or other person is authorized to
give any warranty on behalf of the manufacturer. Some states do not allow limitations on how long an implied warranty lasts, prohibit the
exclusion or limitation of incidental or consequential damages, or impose limitations on the scope of implied or express warranties (and the
waivers therein) that may be inconsistent with the express limitations set forth in this warranty. In such states, the above limitations may not
apply to you, or their application to you may be limited. This limited warranty shall be enforceable to the fullest extent permitted by applicable
federal, state and local law. This limited warranty is valid only in the United States of America and Canada. You may have other rights
depending on the state in which you live.
6. Proof of Purchase
The consumer is responsible for establishing the original purchase date and the purchaser's identity for warranty purposes. The consumer is
responsible for filling out the Warranty form and to send it to the manufacturer or completing the warranty registration form on www.solaxx.com.
We recommend that a bill of sale or some other appropriate payment record be kept for that purpose.
7. Warranty Registration
It is not necessary to register your product in order to activate your warranty. If a warranty claim is made, proof of purchase will be required in
order to process the claim. SAVE ANY RECEIPTS AND PROOF OF PURCHASE ASSOCIATED WITH THIS PRODUCT.
WARRANTY
Power Supply and Sensor 2yrs UV Lamp and Quartz Sleeve 1yr.
Chamber and Manifold 2yrs

MAN6000 12/17
PRECISION
PRECISION
www.solaxx.com
Table of contents
Popular Water Dispenser manuals by other brands

WaterLogic
WaterLogic 4 Firewall user manual

Vidalux
Vidalux SS1700 Installation and operating manual

Murdock
Murdock A171.8 Series installation instructions

Elba
Elba ETP-F5082 owner's manual

BWT
BWT 2005 user guide

Hague Quality Water
Hague Quality Water WaterMax ST Series Owner's manual and installation guide

Hengst
Hengst Blue.care plus user manual

GreenTech
GreenTech pureWash ProX2 owner's manual

Intex
Intex Krystal Clear CS7220 owner's manual

Lancaster Water Treatment
Lancaster Water Treatment 7-LECS-50 Installation, operating and service manual

Haier
Haier WDQS055 installation instructions

Elkay
Elkay EFW16 2HJO Series Installation, care & use manual


