Soleus Air AHU-800J1 Technical manual

舒乐氏加湿器
使用说明书
感谢您购买本产品!使用产品前请仔细阅读本说明书,并妥善保管。
执行标准:
GB 4706.1-2005 / GB 4706.48-2009
Operation Instruction
Thank you for purchasing this product! Please read this manual carefully
before using the product and keep it properly.
Implementation standard: GB 4706.1-2005 / GB 4706.48-2009
SOLEUSAIR HUMIDIFIER
AHU-800J1
400-8083-081
佛山方信网络科技有限公司
广东省佛山市顺德区大良街道北区社区绿田路12号A栋3层304号
(商标持有人)
: :
:
www.soleusair.net.cn
Soleus Commercial Consulting (Shanghai) Co., Ltd. (Trademark Holder)
Foshan Fangxin Network Technology Co., Ltd.
After-sales service hotline: 400-8083-081 Official website: www.soleusair.net.cn
Manufacturer's address: No. 304, Floor 3, Building A, No. 12, Lvtian Road, Beiqu Community, Daliang
Subdistrict Shunde District, Foshan, Guangdong Province,

SOLEUSA I R BRIN G S YOU A G OOD LI F E!
好生活 值得舒乐氏
使用注意事项 01
产品结构示意图 02
技术参数 03
使用前注意事项 03
控制面板说明 04
显示面板说明 05
装箱清单 05
故障分析及排除 09
10
加湿器加水指引
11
环保说明 13
保修卡 14
功能操作说明 06-08
电气原理图 08
12
12
请在使⽤前仔细阅读使⽤说明书,以使正确使⽤本产品;
请妥善保管好使⽤说明书,以备后⽤;
产品以包装内实物为准。
加湿滤网日常清洁和更换
空气滤网日常使用和更换
维护和保养

使用注意事项
01
备注:为了持续优化及升级产品,购买的实物与示意图可能略有差异,请以实物为准。
1
2
3
4
5
6
7
8
9
01 02
SOLEUSA I R BRIN G S YOU A G OOD LI F E!
好 生 活 值 得 舒 乐 氏 SOLEUSA I R BRIN G S YOU A G OOD LI F E!
好生活 值得舒乐氏
使用本产品前请详细阅读此说明书,并妥善保管以作日后参考之用。
为预防因使用不当而造成不必要人身伤害和财产损失,请用户在使用时务必注意以下事项:
①请使⽤单独的电源插座,以避免插座过热造成危险。
②请勿让⼉童单独操作使⽤,要放在婴幼⼉不能触及的地⽅,以避免触电、烫伤等危险事故发⽣。
③禁⽌在存放易燃易爆物品的环境下使⽤,使⽤过程中请勿靠近发热或⾼温物体,以免引起⽕灾。
④禁⽌靠近柔软物体使⽤,如窗帘等,并保证产品附近有10cm的空间距离。
⑤禁⽌在加湿器⼯作的时候,对整机进⾏搬移、倾斜等不良操作;如需对⽔箱进⾏加⽔或搬移整机时,请务必先关闭电
源并拔下电源插头。
⑥请勿在倾斜的台⾯使⽤本机器,应放置在平坦坚固的地⽅。
⑦禁⽌在⼾外或潮湿地⾯使⽤,以降低电击⻛险。
⑧禁⽌使⽤潮湿的双⼿开关电源或移动产品,应保持双⼿⼲燥,避免触电。
⑨禁⽌使⽤含有汽油、酒精或其他易燃清洁剂进⾏产品清洗以免引起⽕灾。
⑩加⽔时不要超过⽔箱容量,以免加⽔过多⽽溢出。
⑪当室内湿度过⼤,室内的窗⼝或家具上会出现⽔滴时,请及时关闭加湿器。
⑫底座电器仓要谨慎防溅⽔、严禁浸⽔,如不慎溅⽔,请使⽤电吹⻛将其吹⼲(电吹⻛不得紧靠底座),等完全吹⼲后
⽅可使⽤,如不能使⽤请返回当地经销点处理或⼯⼚处理。
⑬如果电源软线损坏,为了避免危险,必须由制造商、其维修部或类似部⻔的专业⼈员更换。
⑭禁⽌将热⽔加⼊⽔箱内,只能使⽤冷⽔(⾃来⽔、蒸馏⽔、或其他饮⽤⽔)
⑮在清洁、维护及维修前,请务必拔掉电源插头。
⑯当机器⻓时间不使⽤时,请套上防尘袋,然后放置在安全阴凉及⼲燥的地⽅收藏,避免阳光直射。
⑰产品使⽤前,请按照说明书指导操作,先拆除产品及滤⽹包装,并正确安装滤⽹。
⑱注⽔和清洁时拔掉电源插头。
产品结构示意图
02
顶盖 操作面板
后壳 滤网面盖 空气滤网
12345水箱
底座
风轮
前壳
6
789
10
加湿滤网
10
11
导流盘
11

技术参数
03
使用前注意事项
04
1. 请拆除空气滤网包装袋再使用!
2. 滤网面盖未安装到位机器无法启动工作。
3. 本机器中含有UV-C紫外线杀菌灯。
4. 在使用本机器前,请先阅读使用说明书。
5. 对机器进行清洁或其他的保养前必须先关闭电源并拔下电源插头,避免受到紫外灯照射和其他危险。
6. 当机器加湿滤网或空气滤网指示灯闪烁时,请及时更换滤网,以免影响机器的使用效果。
7. 用户不可自行维修和更换UV-C杀菌灯,必须联系专业的维修人员进行操作。
控制面板说明
05
03 04
SOLEUSA I R BRIN G S YOU A G OOD LI F E!
好生活 值得舒乐氏 SOLEUSA I R BRIN G S YOU A G OOD LI F E!
好 生 活 值 得 舒 乐 氏
产品名称
额定电压/频率
额定加湿量
产品尺寸
执行标准
产品型号
额定功率
加湿器
220V~/50Hz
1200mL/h
334*344*697mm
GB 4706.1-2005、GB 4706.48-2009
AHU-800J1
230W
电源键:轻触此键开启或关闭机器电源
除菌功能:轻触此键开启或关闭除菌模式
电源键 除菌功能
睡眠按键
智能按键
WiFi功能
风速调节按键 定时关机按键
辅助加热按键
湿度控制按键
童锁按键
睡眠按键:轻触此键开启或关闭睡眠模式
智能按键/Wi-Fi功能:轻触此键开启或关闭智能模式/长按3秒进入WiFi连接
风速调节按键:轻触此键调节风速可以在1-2-3-4-5五个档位之间循环切换
定时关机按键:轻触此键可以设定1-24h定时关机功能
辅助加热按键:轻触此键开启或关闭辅助加热功能
湿度控制按键:轻触此键可设定目标值湿度
童锁按键:长按此键开启或关闭童锁

装箱清单
07
部件名称 数量序号
主机 11
2
3
4
1
1
1
除垢剂
说明书
Wi-Fi操作指导书
显示面板说明
06
05
SOLEUSA I R BRIN G S YOU A G OOD LI F E!
好生活 值得舒乐氏
湿度
定时
档位
空气滤网更换提示
加湿滤网更换提示
缺水提示
UV灯
等离子
Wi-Fi图标
辅助加热
SOLEUSA I R BRIN G S YOU A G OOD LI F E!
好生活 值得舒乐氏
06
功能操作说明
08
待机模式:
接通电源听到机器“嘀”声后, 所有灯全亮3秒后熄灭,电源指示灯亮红色,表示机器已正常通电,进入待机状态。
1.电源按键
通电后,轻按此键进行开机或待机功能。在正常有水情况下,开机默认启动智能模式,除菌功能开启,风速根据当前
湿度对应变化运行,同时相关指示灯点亮。Wi-Fi图标闪烁,灯环圈根据实测湿度显示对应颜色。
2.风速调节按键
轻按此键可进行1档-2档-3档-4档-5档风速循环切换,并进入手动设定模式。档位图标跟随档位变化显示。
3.智能按键
轻触此键可进行开启或关闭智能模式,长按此键3秒可进行Wi-Fi配对,配网成功后Wi-Fi图标常亮,未成功则闪烁。
在智能模式下,湿度40-65%RH范围内,风速与湿度,灯环圈的对应显示如下表:
湿度范围 风速档位 灯环圈颜色
>65%RH
57-65%RH
48-56%RH
40-47%RH
<40%RH
睡眠档
>60%RH :蓝色
40-60%RH :绿色
<40%RH :橙色
1档
2档
3档
4档

电气原理图仅供参考,如有更新恕不另行通知。
07 08
SOLEUSA I R BRIN G S YOU A G OOD LI F E!
好 生 活 值 得 舒 乐 氏 SOLEUSA I R BRIN G S YOU A G OOD LI F E!
好生活 值得舒乐氏
轻按此键可进入睡眠模式,睡眠指示灯亮,风速在睡眠档运行。5秒后,除睡眠指示灯亮外,其它灯光熄灭。此时按任意
键可唤醒所有指示灯,如5秒内不再按其它按键,机器将再次进入关闭指示灯状态。如5秒内按睡眠按键、智能按键或风
速按键,机器退出睡眠模式,进入相应模式。
4.睡眠按键
5.除菌按键
轻按此键可开启和关闭UV灯和等离子功能。开机默认开启除菌功能,UV灯图标+等离子图标亮。
当导流盘取出或者缺水的状态下,机器自动关闭UV灯。当检测到机器没有导流盘或者缺水的状态下开启除菌功能,会有
蜂鸣 3 声提示缺水或导流盘不在位。
6.定时关机按键
轻按此键机器进入设定定时功能,可在0-24小时之间设定;选定时间后,开始计时,显示面板显示倒计时时间,在设定
时间5秒后,自动转为显示湿度,每隔25秒显示10秒定时时间。如需取消定时设定,可长按定时按键3秒。
7.辅助加热按键
轻按此键可开启或关闭辅助加热功能,正常状态下,启动辅助加热后,辅助加热指示灯与辅助加热图标点亮;当缺水或者
导流盘拿走时,辅助加热会暂停,屏幕加热图标会闪烁提示。
8.恒湿功能按键
轻按此键机器退出智能模式或者睡眠模式,进入恒湿控制功能。轻按恒湿功能按键,可在C0-->30%-->35%-->40%
-->45%-->50%-->55%-->60%-->65%-->70%-->75%-->80%-->C0 循环切换湿度目标值,显示面板上显
示所设定的湿度值,机器将根据设定的湿度值自动调节风速。
9.童锁按键
长按童锁按键3秒,开启童锁功能。在童锁功能开启期间,按任意键童锁指示灯闪烁 3 次,蜂鸣器鸣叫 3 声。再长按童锁按
键3秒,关闭童锁功能。
10.滤网门功能
机器通电情况下,当检测到滤网面盖打开时,电源指示灯闪烁,提示滤网面盖没有装配到位。
电气原理图
09
11.缺水检测功能
机器通电后,当检测到机器缺水时,缺水指示灯闪烁,同步蜂鸣器响3次,提示缺水状态。
12.加湿滤网和空气滤网寿命报警及复位按键
开机状态下,当加湿滤网图标闪烁时,提醒需要更换加湿滤网。更换加湿滤网后,再次开机后,长按童锁按键+恒湿按键
3秒,加湿滤网图标长亮 3 秒,同时蜂鸣器响 3 次,加湿滤网累计时间复位清零,加湿滤网图标熄灭。
开机状态下,当空气滤网图标闪烁时,提醒需要更换空气滤网(注意:空气滤网不可清洗)。更换空气滤网后,再次开机
后,长按睡眠按键+除菌按键 3 秒后,空气滤网图标长亮 3 秒,同时蜂鸣器响 3 次,空气滤网累计时间复位清零,空气滤
网图标熄灭。
13.导流盘检测功能
当检测到导流盘拿走时,机器会停止加热并关闭UV灯杀菌功能。
输入220V~ /50Hz PTC加热器 杀菌UV灯
电源板
CN4
GND2
CN2
CN1
CN5 CN3 CN7
CN6
直流无刷马达 等离子 门开关
触摸板
CN1
CN7
CN1
CN4
CN2
CN3CN6
CN5
湿度板
水位检测开关
水盘检测开关
温度传感器 三色灯灯带
显示板
GND

09 10
故障现象 检查事项 故障排除
机器无任何反应
异常噪音
WiFi无法连接
出风口异味
漏水
电源插座是否有电
电源插头是否松动
空气滤网塑料袋是否拆除
机器与放置的台面发生共振
检查网络是否正常
检查路由器信号是否稳定
检查WiFi密码是否正确
滤网吸附了太多异味和烟雾
滤网已累计达到更换时间
水箱加水过多或机器倾侧过大
故障分析及排除
10
异常处理
开关按键是否已打开
SOLEUSA I R BRIN G S YOU A G OOD LI F E!
好 生 活 值 得 舒 乐 氏 SOLEUSA I R BRIN G S YOU A G OOD LI F E!
好 生 活 值 得 舒 乐 氏
在遇到如下一般性问题时,用户可自行排查。
开启电源
接好插头
空气滤网塑料袋重新安装
请将机器移动至坚实的台面上
重新连接或重启路由器
请及时清洁或更换滤网
检查水量是否已超过最高水位标记
加湿器加水指引
11
1.打开加湿器的顶盖;
2.握住水箱提手,向上取出水箱;
3.水龙头对准水箱加水,加至最高水位请停止加水。
温馨提示:
1.水位保持在最高水位线时加湿效果最佳,建议每隔3天换水。
2.为了达到更好的加湿效果,请将加湿滤网完全浸泡30分钟后再使用。

SOLEUSA I R BRIN G S YOU A G OOD LI F E!
好生活 值得舒乐氏 SOLEUSA I R BRIN G S YOU A G OOD LI F E!
好 生 活 值 得 舒 乐 氏
导流盘
空气滤网日常使用和更换
13
1.双手紧握滤网面盖的左右扣手位,向外拉取拆卸滤网面盖;
2.取出空气滤网,拆除空气滤网上的包装袋;
3.将空气滤网放入机器中;
4.安装好滤网面盖。
11 12
维护和保养
14
加湿滤网日常清洁和更换
12
1.打开加湿器的顶盖;
2.握住水箱提手,向上取出水箱;
3.用手抓住加湿套件内侧,取出加湿套件;
4.将加湿滤网从加湿套件上取出;
5.取下的加湿滤网用清水冲洗除垢。
温馨提示:加湿滤网清洗完毕后,请依次安装复位。
5
1.清洗前务必先关闭电源并拔下电源插头;
2.机身可直接用干净软湿布擦拭干净,建议每周清洁一次;
3.内部水垢清洗(建议每周清洗一次):
a.取出水箱,向底部水箱槽倒入柠檬酸溶液(10g柠檬酸、200mL水)或倒入
100mL白醋,然后放回水箱(水箱不需要装水),接通电源工作20分(需开
辅助加热功能)。
b.取出水箱和滤网组件,直接用清水冲洗;
c.根据导流盘的旋转方向,逆时针旋转取出导流盘直接用清水冲洗;
d.水箱槽内需要用吸水毛巾清洗干净,清洗时避免水从四周的过风孔流入产品内部。
温馨提示:整机清洗完毕后,请依次安装复位即可使用;
因水箱槽的清洗不良而导致的内部进水,请及时与售后人员联系。

本产品实⾏整机保修,保修期为⼀年,起始⽇期⾃开具产品发票或购物凭证之⽇起计算,整机及主要零部件
保修同国家三包政策。
在保修期内,凡属产品本⾝质量引起的性能故障,请顾客凭已填好的保修卡及购物凭证到指定维修点免费修理。
请妥善保存购机发票或凭证。
以下情况恕不免费维修
放弃保修卡及有效发票或购物凭证。
发票型号与维修产品型号不符或者有涂改。
未按说明书的要求操作机器所引起的故障。
产品信息:
1
2
3
1
2
3
保修卡
16
14
环保说明
15
SOLEUSA I R BRIN G S YOU A G OOD LI F E!
好生活 值得舒乐氏
部件名称
有毒有害物质或元素
铅(Pb) 汞(Hg) 镉(Cd) 六价铬
(Cr(VI))
多溴联苯
(PBB)
多溴⼆苯醚
(PB ED )
塑料件
五金件
密封圈
电子元件
电源线
本表格依据SJ/T11364的规定编制。
〇表⽰该物质在该部件所有均质材料中的含量均在GB/T26572规定的限量要求以下。
×表⽰该有害物质⾄少在该部件的某⼀均质材料中的含量超出GB/T26572规定的限量要求。
*环保清单为总表数据,各产品包含部件有所不同,请选择阅读。
1.本产品满足《电器电子产品有害物质限制使用管理办法》的要求;
2. 在环保使用期限内,消费者在正常使用过程中不会出现有害物质泄露、析出等影响消费者健康的问题,可以放心使用;
3.本公司产品环保使用期限为10年,只有在本说明书所述的正常情况下使用本产品时,"环保使用期限"才有效。
环保使用期限10年:
表示本产品中含有的有害物质不会发生外泄或突 变,用户在产品说明书所述情况下正常使用本产品不会对环境造成严重污
染或对其人身、财产造成严重损害的期限。
箭头循环标志:
表示本产品可回收利用。超过使用期限或经过维修无法正常工作后,不应被随意丢弃,请交由正规回收渠道以及有废弃电
器 电子产品处理资格的企业处理,正确的处理方法请查阅国家或当地有关旧电器电子产品的处理规定。
SOLEUSA I R BRIN G S YOU A G OOD LI F E!
好 生 活 值 得 舒 乐 氏
13

S O L E U S A I R B R I N G S Y O U A G O O D L I F E !
Precautions for Use ----------------------------01
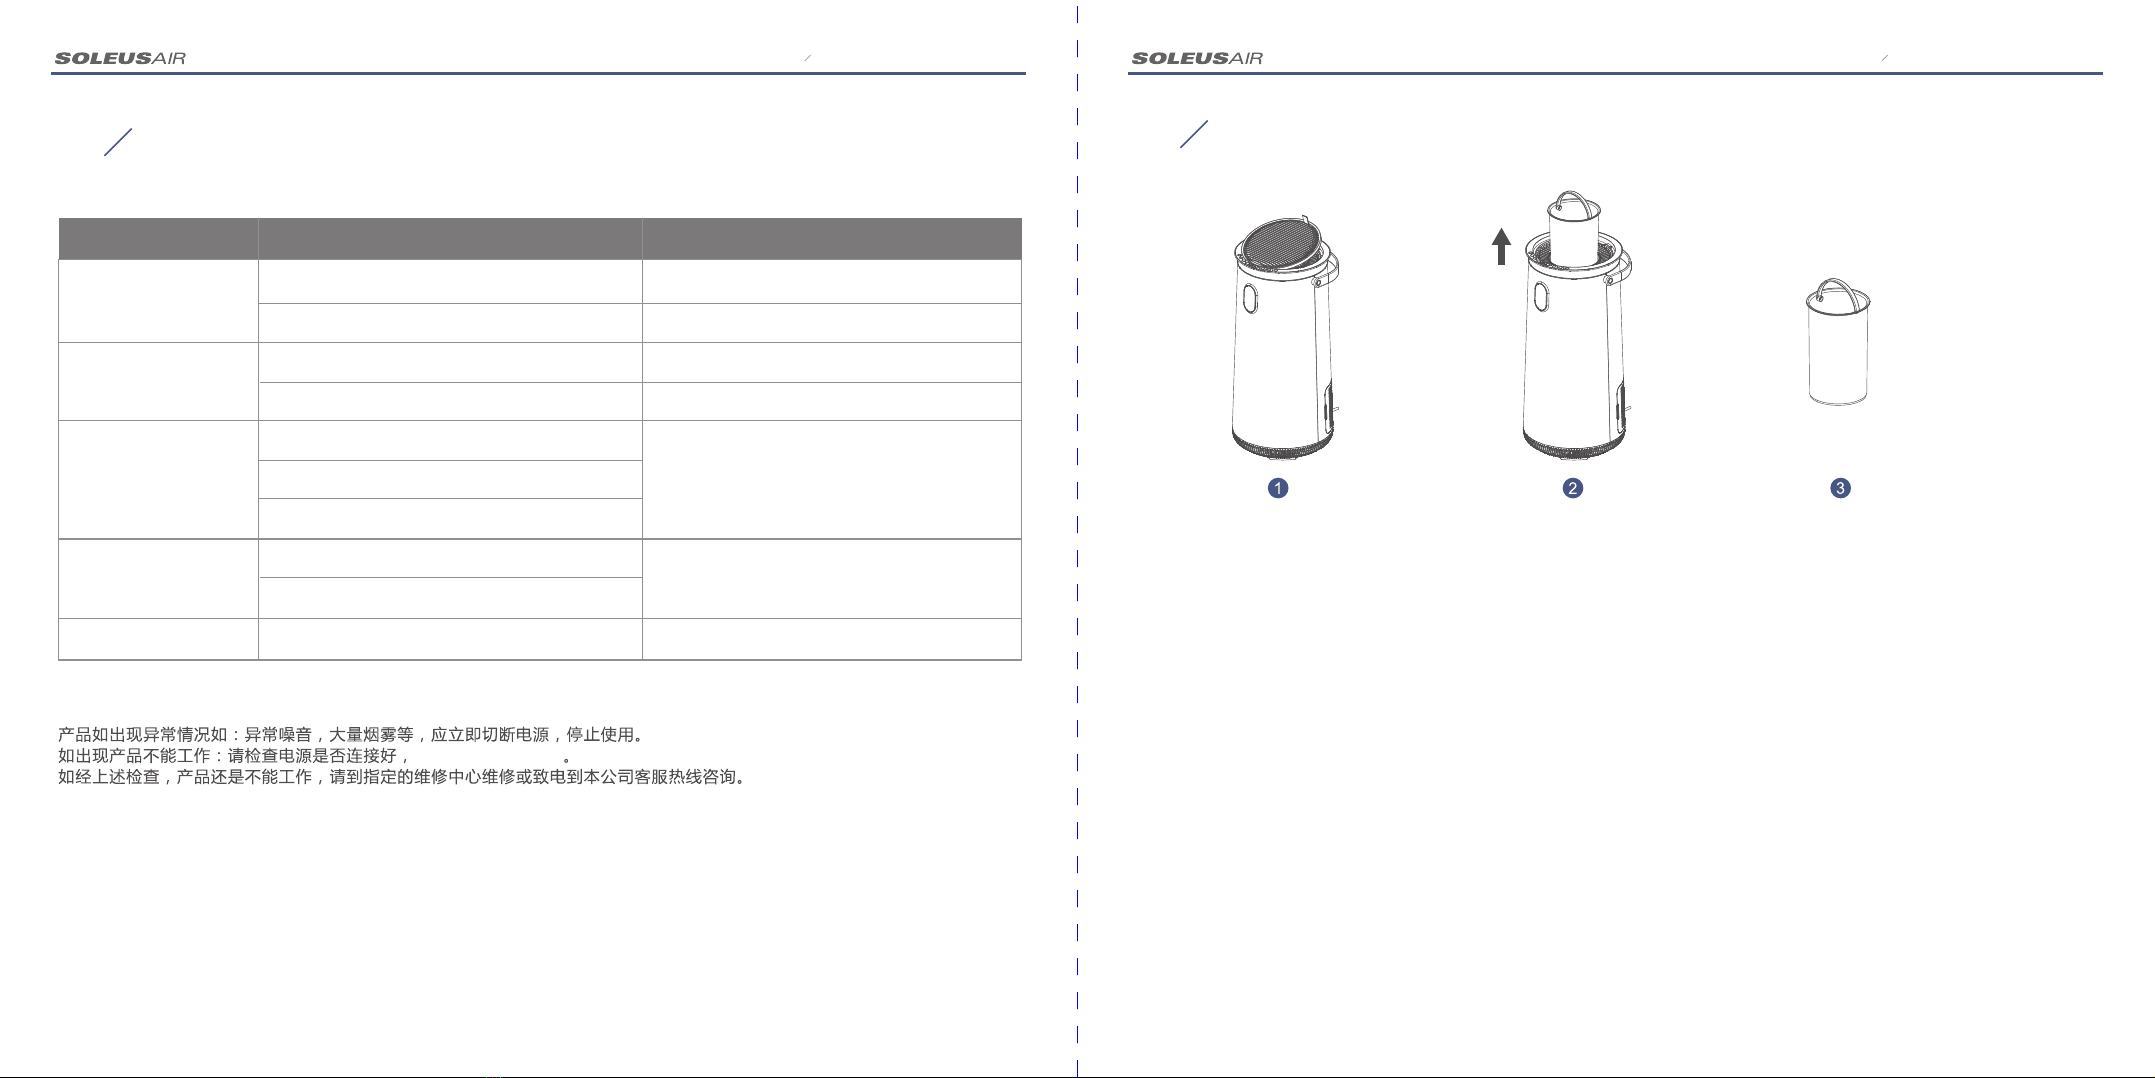
Schematic Diagram of Product Structure ---02
Technical Parameters --------------------------03
Precautions before Use ------------------------03
Control Panel Instructions --------------------04
Display Panel Instructions --------------------05
Packing List ------------------------------------- 05
Fault Analysis and Troubleshooting -------------09
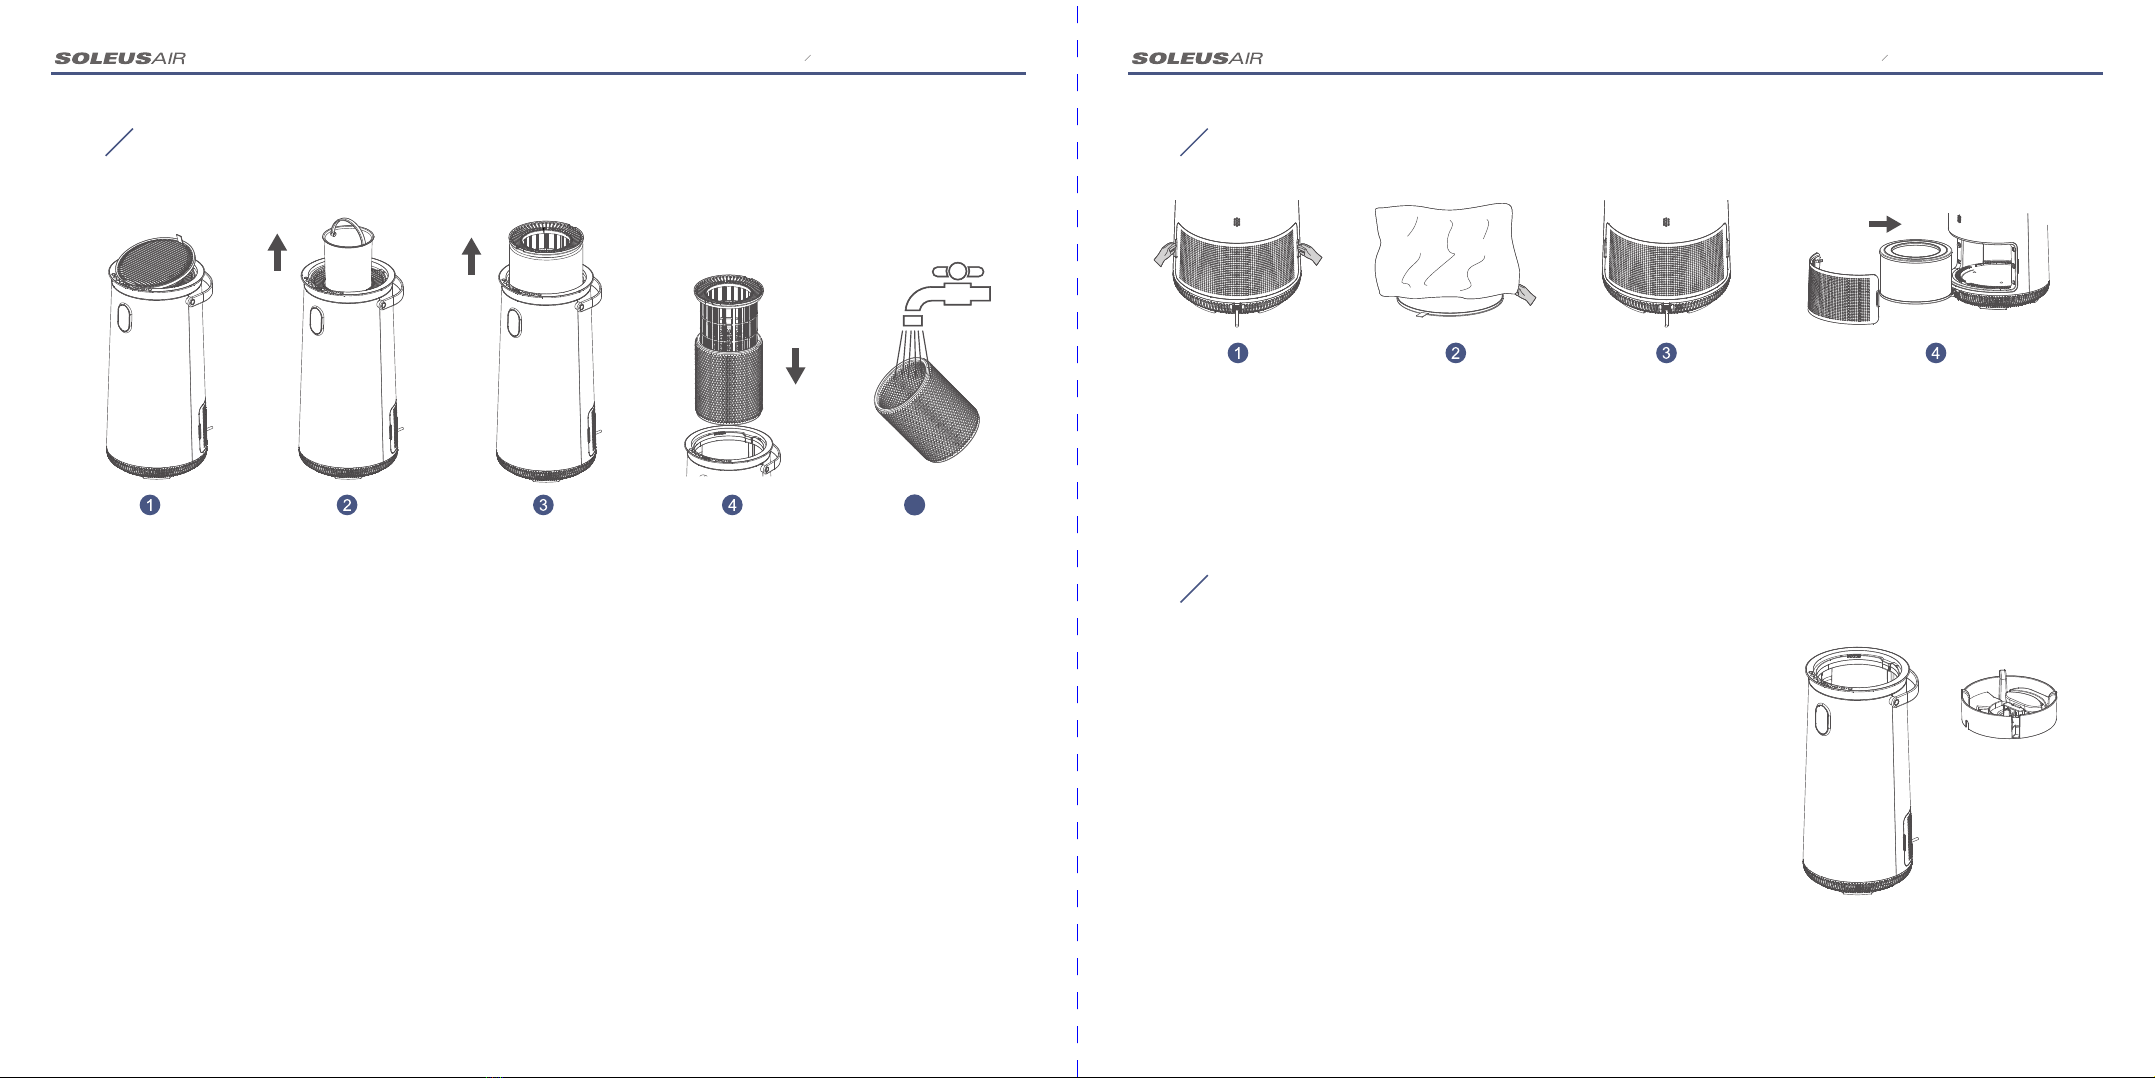
Guide to Add Water into Humidifier ------------10
Daily Cleaning and Replacement of Humidifying
Filter Screen ----------------------------------------- 11
Daily Use and Replacement of Air Filter Screen
--------------------------------------------------------- 12
Maintenance and Service -------------------------12
Environmental Protection Description ---------- 13
Warranty Card -------------------------------------- 14
Functions and Operation Instructions ----06-08
Electrical Schematic Diagram --------------------08
Please read this manual carefully for proper use of the product.
Please keep this manual properly for future reference.
The product shall be subject to the actual object in the package.
Thank you for choosing this product!
Contents

01/ Precautions for Use
Note: To continuously optimize and upgrade the product, the physical object purchased may be slightly different from the schematic
diagram, so the physical object shall prevail.
S O L E U S A I R B R I N G S Y O U A G O O D L I F E ! S O L E U S A I R B R I N G S Y O U A G O O D L I F E !
Please read the manual carefully before using this product, and keep it properly for future reference.
Please pay attention to the following during use to prevent unnecessary personal injury and property loss caused by improper use:
① Please use a separate power socket to avoid danger caused by overheating of the socket.
② Do not allow children to operate and use it alone. Keep it out of the reach of infants to avoid dangerous accidents such as electric shock and
scald.
③ Do not use it in an environment where flammable and explosive articles are stored. Please keep away from hot or high-temperature objects
during use to avoid fire.
④ Do not use it near soft objects, such as curtains, and ensure that there is a distance of 10 cm near the product.
⑤ Do not move or tilt it when it is working. If it is necessary to add water to the water tank or move the humidifier, please turn off and unplug
the humidifier.
⑥ Do not use it on an inclined table. Place it on a flat and firm place.
⑦ Do not use it outdoors or on wet ground to reduce the risk of electric shock.
⑧ Do not turn on/off the power supply or move the product with wet hands. Keep your hands dry to avoid electric shock.
⑨ Do not use gasoline, alcohol or other flammable detergents for cleaning to avoid fire.
⑩ Do not add more water than the water tank capacity to avoid overflow.
⑪ Please turn off the humidifier in time when the indoor humidity is too high, and water drops appear on the indoor windows or furniture.
⑫ Please protect the electrical appliance compartment at the base from splashing and water immersion. In case of splashing, please use an
electric hair dryer (which shall not be close to the base) to dry it. It can only be used after being completely dried. If it cannot be used, please
return it to the local distributor or plant for treatment.
⑬ Please have the damaged power cord replaced by professionals from the manufacturer, its maintenance department or similar departments to
avoid danger.
⑭ Do not add hot water into the water tank. Only cold water (tap water, distilled water or other drinking water) can be used.
⑮ Please unplug the power plug before cleaning, maintenance and repair.
⑯ Please cover the machine with a dustproof bag when it is not in use for a long time and then place it in a safe, cool and dry place to avoid
direct sunlight.
⑰ Please follow the manual to remove the packages of the product and filter screen first and install the filter screen correctly before use.
⑱ Unplug the machine before adding water and cleaning.
02 Schematic Diagram of Product Structure
4 Top cover Operation panel
Rear housing
156 Water tank
7 Front housing 10 Humidifying filter screen
11
01 02
Deflector
11
2Filter screen cover
8Rotor
3Air filter screen
9Base
1
2
3
4
5
6
7
8
9
10
11

Technical Parameters
03
04 Precautions before Use
1. Please remove the packaging bag of the air filter screen before use!
2. The machine will fail to start if the filter screen cover is not installed in place.
3. The machine contains a UV-C germicidal lamp.
4. Please read the manual before using the machine.
5. Turn off and unplug the machine to avoid exposure to ultraviolet light and other hazards before cleaning or other maintenance.
6. Please clean the filter screen in time when the indicator of the humidifying filter screen or air filter screen of the machine flashes, so as not to affect
the use effect of the machine.
7. Do not repair or replace the UV-C germicidal lamp by yourself. Please contact professional maintenance personnel for operation.
Control Panel Instructions
05
S O L E U S A I R B R I N G S Y O U A G O O D L I F E ! S O L E U S A I R B R I N G S Y O U A G O O D L I F E !
Power: Tap this button to turn on or off the machine
Intelligent Mode/Wi-Fi: Tap this button to turn on or off the intelligent mode/long press this button for 3s for WiFi
connection
Sleep: Tap this button to turn on or off the sleep mode.
Sterilization: Tap this button to turn on or off the sterilization mode
Power Sterilization
Sleep
Intelligent Mode
WIFI Function
Air Speed
Adjustment
Timed
Shutdown
Auxiliary
Heating
Humidity
Control
Child Safety Lock
Air Speed Adjustment: Tap this button to adjust the air speed which can be switched cyclically among the five gears
1-2-3-4-5.
Timed Shutdown: Tap this button to set the 1-24h timed shutdown function.
Auxiliary Heating: Tap this button to enable or disable the auxiliary heating function
Humidity Control: Tap this button to set the target humidity
Child Safety Lock: Long press this button to turn on or off the child safety lock
03 04
Name Humidifier
Model AHU-800J1
Rated voltage/frequency 220V~/50Hz
Rated power 230W
Rated humidification capacity 1200mL/h
Product dimensions 334*344*697mm
Implementation standards GB 4706.1-2005 and GB 4706.48-2009

07 Packing List
Display Panel Instructions
06
05
S O L E U S A I R B R I N G S Y O U A G O O D L I F E !
Humidity
Timing
Gear
Air filter screen replacement
reminder
Water shortage reminder
Humidifying filter screen
replacement reminder
UV lamp
Plasma
WiFi icon
Auxiliary heating
S O L E U S A I R B R I N G S Y O U A G O O D L I F E !
Functions and Operation Instructions
08
Standby Mode:
After the machine is powered on, a "beep" sound will be heard. In this case, all lights will be on for 3s and then off, and the power indicator will
be red, indicating that the machine has been powered on normally and in a standby state.
1. Power
After the power connection, tap this button to turn on the machine or make it enter standby mode. Normally, the machine with water will enter
intelligent mode by default after startup, with its sterilization function enabled, the air speed changing according to the current humidity, and
relevant indicators on. The WiFi icon flashes, and the light ring displays the corresponding color according to the measured humidity.
06
2. Air Speed Adjustment
Tap this button to switch among gear 1, gear 2, gear 3, gear 4 and gear 5 in a cyclic manner, and enter the manual setting mode.
The gear icon is displayed with the gear change.
3. Intelligent Mode
Tap this button to turn on or off the Intelligent Mode. Long press this button for 3s for WiFi pairing. After a successful connection, the WiFi
icon will be normally on; otherwise, it will flash. In the Intelligent Mode, the corresponding display of air speed, humidity and light ring in the
humidity range of 40-65%RH is as follows:
S/N Component Name Quantity
1 Main unit 1
2 Descaling agent 1
3 Operating Instructions for WiFi 1
4 User's Manual 1
Humidity Range Air Speed Gear Color of Light Ring
>65%RH Sleep mode
>60%RH: blue
40-60%RH: green
<40%RH: orange
57-65%RH Gear 1
48-56%RH Gear 2
40-47%RH Gear 3
<40%RH Gear 4

The Electrical Schematic Diagram is for reference only and is subject to update without notice.
S O L E U S A I R B R I N G S Y O U A G O O D L I F E ! S O L E U S A I R B R I N G S Y O U A G O O D L I F E !
4. Sleep: Tap this button to enter Sleep Mode. The sleep indicator will be on, and the air speed will be in the sleep
mode. After 5s, all lights will be off except for the sleep indicator. At this time, press any button to wake up all indicators. If no other buttons are
pressed within 5s, the machine will enter the indicator off state again. If the Sleep, Intelligent Mode or Air Speed is pressed within 5s, the machine
will exit from the Sleep Mode and enter the corresponding mode.
5. Sterilization
Tap this button to turn on and off the UV lamp and plasma function. By default, the sterilization function is enabled after startup, and the UV light
icon and plasma icon are on.
When the deflector is taken out or lack of water, the machine will automatically turn off the UV lamp. When it is detected that the machine has no
deflector or the sterilization function is enabled in the state of water shortage, there will be 3 buzzes to prompt that the water is insufficient or the
deflector is not in place.
6. Timed Shutdown
Tap this button, and the machine will enter the time setting mode, which can be set from 0-24 hours. After the time is selected, the timing starts,
and the display panel displays the countdown time. The machine will automatically turn to display humidity 5s after the time is set and display the
set time for 10s every 25s. To cancel the timing setting, long press the timing button for 3s.
7. Auxiliary Heating
Tap this button to enable or disable the auxiliary heating function. Under normal conditions, after the auxiliary heating is started, the auxiliary
heating indicator and icon will be on. When the water is insufficient or the deflector is taken away, the auxiliary heating will be suspended, and the
heating icon on the screen will flash for prompt.
8. Constant Humidity
Tap this button to exit from the Intelligent Mode or Sleep Mode and enable the constant humidity control function. Tap the Constant Humidity, and
the target humidity can be switched circularly in C0-->30%-->35%-->40%-->45%-->50%-->55%-->60%-->65%-->70%-->75%-->80%-->C0, and
the set humidity value will be displayed on the display panel. The machine will automatically adjust the air speed according to the set humidity
value.
9. Child Safety Lock
Long press this button for 3s to enable the Child Safety Lock. When the Child Safety Lock is enabled, press any button, the Child Safety Lock
indicator will flash 3 times, and the buzzer will sound 3 times. Long press this button again for 3s to disable the function.
10. Filter Screen Door
When the filter screen cover is detected to be open in the power-on state of the machine, the power indicator will flash to indicate that the filter
screen cover is not assembled in place.
09 Electrical Schematic Diagram
11. Water Shortage Detection
After the machine is powered on, the water shortage indicator will flash when a water shortage is detected, and the buzzer will sound 3 times
synchronously to prompt the water shortage state.
12. Service Life Alarm and Reset Button of Humidifying Filter Screen and Air Filter Screen
When the humidifying filter screen icon flashes in the power-on state, it reminds you that the filter screen needs to be replaced. After replacing the
humidifying filter screen, turn on the machine again, long press the Child Safety Lock and Constant Humidity for 3s, and the humidifying filter
screen icon will be on for 3s. At the same time, the buzzer will sound 3 times, the accumulated time of the filter screen will be reset to zero, and
the icon will be off.
When the air filter screen icon flashes in the power-on state, it reminds you that the air filter screen needs to be replaced (note: the air filter screen
cannot be cleaned). After replacing the air filter screen, turn on the machine again, long press the Sleep Mode and Sterilization for 3s, and the air
filter screen icon will be on for 3s. At the same time, the buzzer will sound 3 times, the accumulated time of the air filter screen will be reset to zero,
and the icon will be off.
13. Deflector Detection
When the deflector is detected to be taken away, the machine will stop heating and disable the UV lamp sterilization function.
Input 220V~/50Hz PTC heater
GND
07 08
Sterilization
UV lamp
Power
board
CN4
CN2 GND2
CN1
CN5 CN3 CN7
CN6
DC brushless
motor Plasma
Door
switch
Touchpad
CN1
CN7
CN1
CN4
CN2
CN3CN6
CN5
Humidity
board
Water level
detection switch
Water pan
detection switch
Temperature
sensor
Tricolor light
strip
Display
panel

10 Fault Analysis and Troubleshooting
S O L E U S A I R B R I N G S Y O U A G O O D L I F E ! S O L E U S A I R B R I N G S Y O U A G O O D L I F E !
In case of the following general problems, you can troubleshoot them by yourself.
11 Guide to Add Water into Humidifier
09 10
Fault Symptoms Check Items Troubleshooting
No response of the
machine
Whether the power socket is electrified Turn on the power supply
Whether the power plug is loose Connect the plug well
Abnormal noise
Whether the plastic bag of the air filter screen
is removed
Reinstall the plastic bag of the air filter
screen
The machine resonates with the table Please move the machine to a solid table
Failure to connect to
WiFi
Check whether the network is normal
Reconnect or restart the router
Check whether the router signal is stable
Check whether the WiFi password is correct
Odor at the air outlet
The filter screen absorbs too much odor and
smoke Please clean or replace the filter screen in
timeThe filter screen has reached the end of its
service life
Water leakage The water tank is filled with too much water or
the machine tilts too much
Check whether the water volume has
exceeded the maximum water level mark
Handling of abnormalities
Cut off the power supply immediately and stop using the product in case of abnormal conditions,
such as abnormal noise and excessive smoke.
Please check whether the power supply is connected and the switch button is pressed if the product
cannot work.
Please go to the designated maintenance center for repair and contact us via our hotline if the
product still fails to work after the above inspection.
1. Open the top cover of the humidifier.
2. Hold the water tank handle and remove the tank upwards.
3. Align the faucet to the water tank to add water, and keep doing so until the highest water
level is reached.
Tips:
1. The humidification effect is the best when the water level is kept at the highest level. It is
recommended to change the water every 3 days.
2. Please soak the humidifying filter screen completely for 30 minutes before use for a better
humidification effect.

S O L E U S A I R B R I N G S Y O U A G O O D L I F E ! S O L E U S A I R B R I N G S Y O U A G O O D L I F E !
13 Daily Use and Replacement of Air Filter Screen
1. Hold the left and right clasps of the filter screen cover with both hands to pull out and remove the filter screen cover.
2. Take out the air filter screen and remove the packaging bag on the air filter screen.
3. Put the air filter screen into the machine.
4. Install the filter screen cover.
14 Maintenance and Service
12 Daily Cleaning and Replacement of Humidifying Filter Screen
1. Open the top cover of the humidifier.
2. Hold the water tank handle and remove the tank upwards.
3. Remove the humidifier kit by grasping its inside with your hand.
4. Remove the humidifying filter screen from the humidification kit.
5. Rinse the humidifying filter screen with clean water.
Tips: After cleaning the humidifying filter screen, please install and reset the parts in turn.
1. Turn off and unplug the machine before cleaning.
2. Use a clean soft damp cloth to directly wipe the machine body once a week.
3. Remove limescale inside once a week:
a. Take out the water tank, pour citric acid solution (10g citric acid, 200mL water) or
100mL white vinegar into its bottom, then put it back (with no water), and power on the
machine to make it work for 20 minutes (with auxiliary heating).
b. Remove the water tank and filter screen components and rinse them directly with clean water.
c. Rotate the deflector counterclockwise to remove and rinse it directly with clean water.
d. Use an absorbent towel to wipe clean the water tank and prevent water from flowing into the
machine via the air holes around during cleaning.
11 12
Tips: After cleaning the whole machine, please reinstall all the parts in turn before use.
Please contact our after-sales service personnel in time if water flows into the
machine due to improper cleaning of the water tank.
导流盘
5

Warranty Card
16
15 Environmental Protection Description
S O L E U S A I R B R I N G S Y O U A G O O D L I F E !
1. This product meets the requirements of the Administrative Measures for the Restriction of the Use of Hazardous Substances in Electrical and
Electronic Products.
2. During the environmental protection use period, consumers can use the product at ease without any leakage or precipitation of harmful substances
that may affect their health during normal use.
3. The environmental protection use period of our products is 10 years and is valid only when this product is used under the normal conditions
described in this manual.
S O L E U S A I R B R I N G S Y O U A G O O D L I F E !
13 14
Component
Name
Toxic and hazardous substances or elements
Lead (Pb) Mercury (Hg) Cadmium (Cd)
Hexavalent
chromium
(Cr (VI) )
Polybrominated
biphenyls
(PBB)
Polybrominated
diphenyl ethers
(PBDE)
Plastic parts
Hardware
Sealing ring
Electronic
component
Power cord
This form is prepared according to SJ/T 11364.
"○" indicates that the content of the substance in all homogeneous materials of the component is below the limit specified in
GB/T26572.
"×" indicates that the content of the hazardous substance in at least one homogeneous material of the component exceeds the
limit specified in GB/T26572.
*The environmental protection list provides the data of the summary table, and the components contained in each product vary.
Please read it as needed.
The environmental protection use period is 10 years:
It refers to the period during which the hazardous substances contained in this product will not leak or have a sudden
change and will not result in serious environmental pollution or cause serious personal injuries to users or damage to
their assets during normal use under the conditions described in the manual.
Arrow circle:
It indicates that the product is recyclable. After the service life expires or the product cannot work normally after
maintenance, it shall not be discarded at will. In this case, please send it to a regular recycling channel or an
enterprise qualified for the disposal of waste electrical and electronic products. For the correct disposal methods,
please refer to the national or local regulations on the disposal of used electrical and electronic products.
The warranty period of the complete machine is one year, starting from the date of issuing the product invoice or
purchase voucher. The warranty of the complete machine and main parts is subject to China's national warranty policy.
During the warranty period, for any performance failure caused by the quality of the product itself, please go to the designated
maintenance point for free repair with the filled warranty card and shopping receipt.
Please keep the purchase invoice or shopping receipt properly.
Free repair will not be provided in the following cases
The warranty card and valid invoice or shopping receipt are waived.
The model on the invoice is inconsistent with that of the product to be repaired or has been altered.
The faults are caused by failure to operate the machine according to the requirements of the manual.
Product information: Repair record (s):
Name Repaired on Repair details
Model
Purchased on
Purchased at
Table of contents
Other Soleus Air Humidifier manuals