Solid Green 6M PVC PRO 50 User manual

6x6 6x8 6x10 6x12
6 9 12 15
NL koppeling B
FR raccord B
ENG fitting B
8 10 12 14
NL koppeling F
FR raccord F
ENG fitting F
4444
NL spiraalharing
FR piquet spirale
ENG spiral peg
8 10 12 14
NL middellange pikket
FR piquet moyen
ENG middle peg
36 42 48 54
NL korte pikket
FR piquet court
ENG short peg
94 112 130 148
NL lange elastiek
FR élastique long
ENG long bungee ball
8 10 12 14
NL haak
FR crochet à xer
ENG hook
4444
NL scheerlijn
FR hauban
ENG rope
6M PVC PRO 50 |FEESTTENT | TONNELLE | PARTYTENT
6x6 6x8 6x10 6x12
16 20 24 28
NL buis 1
FR tube 1
ENG pole 1
9 12 15 18
NL buis 2
FR tube 2
ENG pole 2
8 10 12 14
NL buis 3
FR tube 3
ENG pole 3
4
10 12 14
NL buis 4
FR tube 4
ENG pole 4
8
5 6 7
NL buis 5
FR tube 5
ENG pole 5
4 5 6 7
NL buis 6
FR tube 6
ENG pole 6
8 10 12 14
NL buis 7
FR tube 7
ENG pole 7
6666
NL koppeling A
FR raccord A
ENG fitting A
6x6 6x8 6x10 6x12
2222
NL gereedschap
FR outil
ENG tool
M8x70mm
66 80 94 108
NL bout
FR boulon
ENG bolt
M6x35mm
4 5 6 7
NL bout
FR boulon
ENG bolt
M6x15mm
4 5 6 7
NL bout
FR boulon
ENG bolt
1111
NL dakzeil
FR toit
ENG roof
6 8 10 12
NL zijwand
FR panneau latéral
ENG sidewall
2222
NL kopse zijwand
FR panneau transversal
ENG endwall
Selecteer een vlakke ondergrond voor uw tent, pak uit en vergelijk de inhoud
met de bovenstaande lijst.
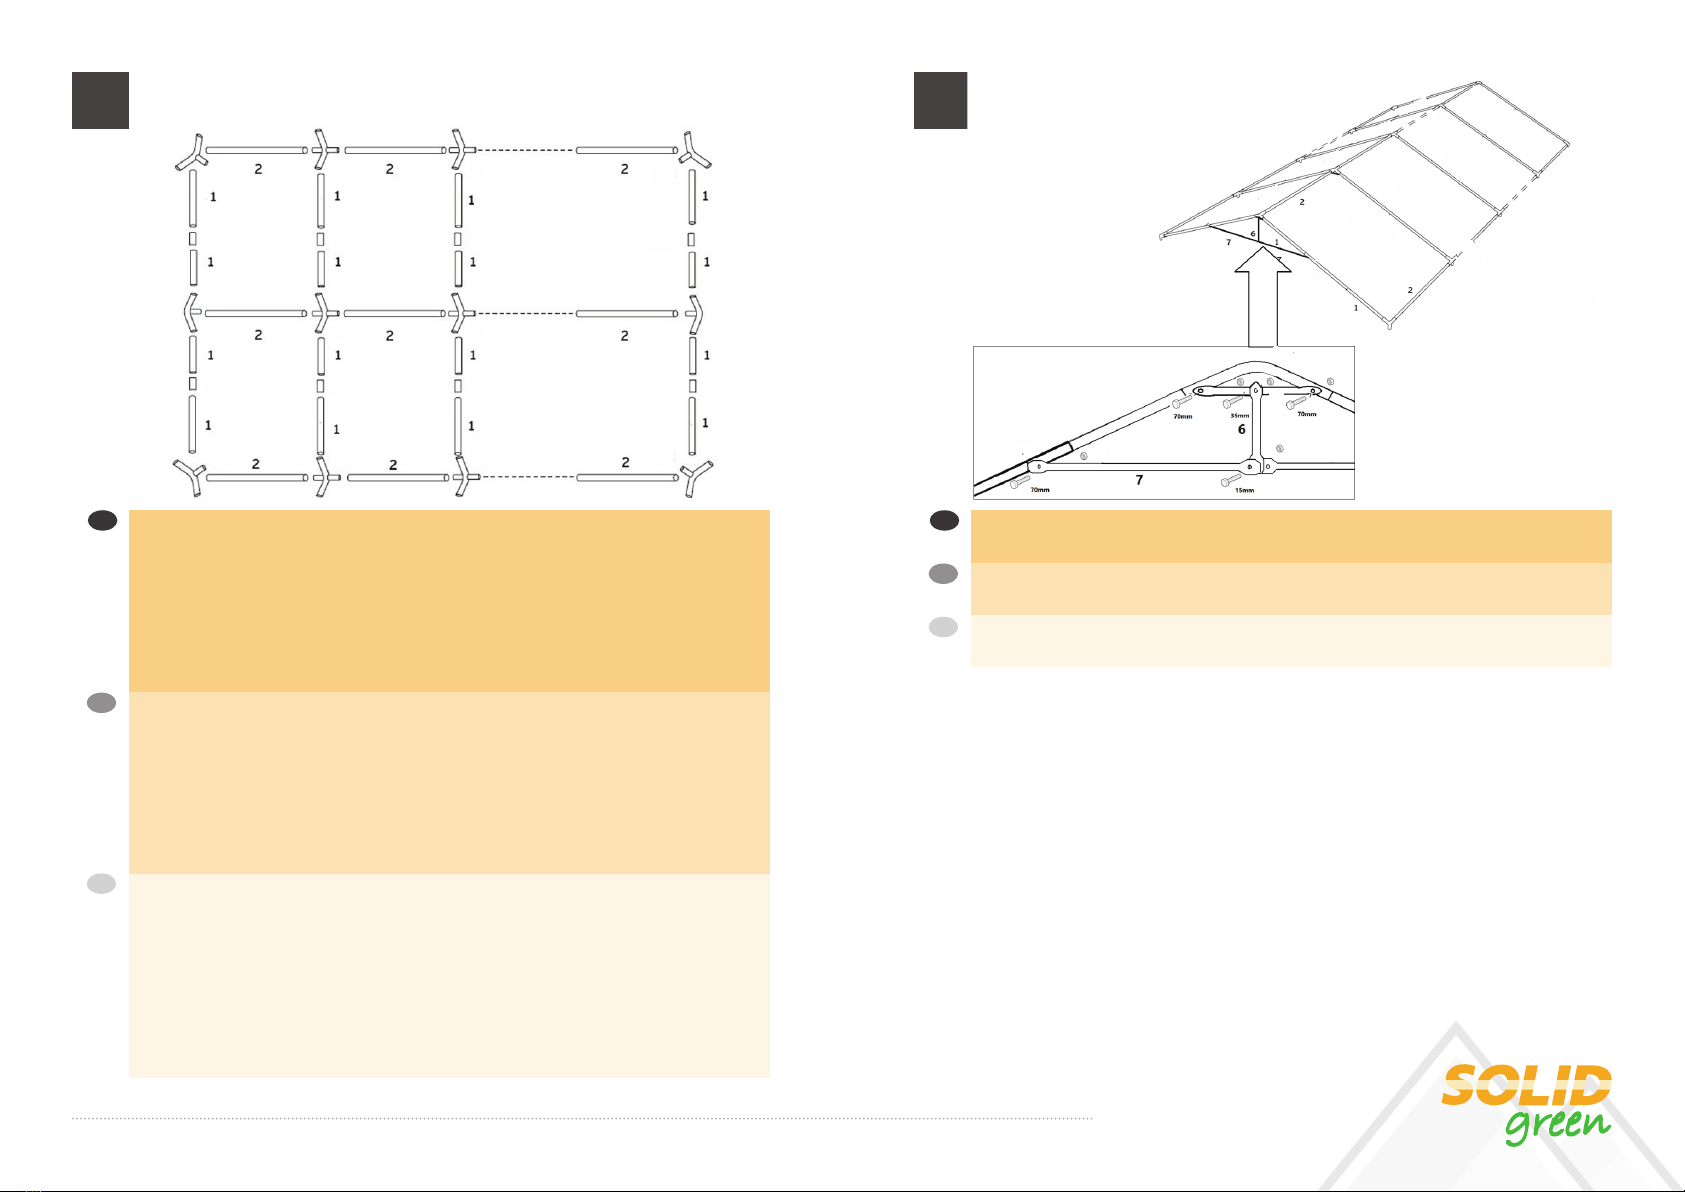
Assembleer de dakconstructie door de koppelingen (A & B) te verbinden met
buizen (1 & 2). Fixeer mbv de schroeven.
Extra dakversteviging mbv staaldraden en opspanners.
Utilisez une surface plate pour monter votre tente. Deballez le contenu et
comparez le avec la liste ci-dessus.
Assemblez les tubes (1 & 2) avec les éléments de raccord (A & B) afin de
former la structure du toit. Fixez avec les crochets de visser.
Renforcez le toit avec les ls d’acier et les ridoirs.
Select a at surface for the tent, unpack the carton and match against the
packing list above.
Assemble the framework of the roof by joining the connectors (A & B )
together with the poles (1 & 2). To ensure stability, please use the screws to
fix every pole tightly.
Use steel wires and turnbuckles for extra roof enforcement.
Monteer de structuur van het dak.
Assemblez la structure du toit.
Install the roof frame structure.
1 2
6M PVC PRO 50 |FEESTTENT | TONNELLE | PARTYTENT
NL
FR
ENG
NL
FR
ENG
A
A
A
A
AB
B
B
B
B
B
A
C/D
A
B
B
B
A
A
B
B
B
A
4
4
4
4
4
4
4
4
4
5
4
5

Leg het dak over het frame en bevestig met de lange elastieken. Om een
correcte spanning te garanderen, dient u de elastieken tegelijkertijd aan de
rechter- en linkerkant van de tent aan te brengen.
Positionnez la toile sur la structure montée.
Fixez la toile à la structure du toit à l’aide des longues sangles élastiques.
Put the roof cover on the frame, and attach it properly by using the long
bungee balls. To ensure a correct tension on both sides of the tent please
attach the bungee balls simultaneously on the left and right side.
Vervolledig het frame en installeer de staanders (3) aan de andere zijde van de
tent door ze te verbinden met koppelingen. Gebruik de middellange haringen
om de staanders te xeren. Bevestig de paalbedekking met de haak aan elke
staander. Installeer het grondframe zoals hierboven:
Assemblez les autres supports (3) à l’autre côté de la tente.
Fixez-les aux éléments de raccord.
Fixez les supports au sol avec les moyens piquets.
Attachez les couvertures des supports au cadrement avec les crochets à xer.
Montez l’armature de sol comme visible sur l’illustration.
Install the opposite leg poles (3) to the connectors to complete the framework,
use the middle pegs to x each pole to the ground. Use the hook to attach the
leg cover to the leg. Install the grounbars as illustrated above:
3 4
6M PVC PRO 50 |FEESTTENT | TONNELLE | PARTYTENT
NL
FR
ENG
NL
FR
ENG
F
F
F
F
F
F

Aanbrengen van zijwanden en kopse kanten doet u met de lange elastieken.
De korte elastieken dienen om de kopse kanten te bevestigen aan het dakdoek.
Opgepast: gebruik slechts 1 elastiek waar 2 zijwanden of een zijwand en het
dak bij elkaar komen. Gebruik de korte haringen om te verankeren.
De même manière, attachez les panneaux latéraux
grâce aux sangles élastiques.
Fixez les panneaux transversaux à la toile du toit avec
les courts tendeurs élastiques.
Attention: utilisez un seul tendeur élastique a l’endroit où 2 panneaux latéraux
et le toit se réunissent. Fixez au sol à l’aide des longs piquets.
Sidewalls and endwalls are attached to the frame by using the long bungee
balls, use short bungee balls to attach the endwall panels to the roof cover.
Attention: please use only 1 bungee ball where both sidewall and roof cover or
two sidewalls come together. Fix to the ground by using the short pegs.
Iedere hoek van de tent dient te worden verankerd mbv een scheerlijn en een
lange haring.
Chaque coin d’armature se xe au sol à l’aide d’un long piquet et un hauban.
Each corner of the tent should be xed to the ground using 1 rope and 1 long
peg.
5 6
6M PVC PRO 50 |FEESTTENT | TONNELLE | PARTYTENT
NL
FR
ENG
NL
FR
ENG

Aanbevolen | Accèssoires recommandés | Advised accessories
Verankering
Ancrage
Anchoring
NL
FR
ENG
Grondframe
Armature de sol
Groundbars
NL
FR
ENG
Draagtassen
Sacs de transport
Carrybags
NL
FR
ENG
Andere producten | Autres produits | Other products
Verlichting
Éclairage
Lighting
NL
FR
ENG
Regengoot
Gouttière de pluie
Gutter
NL
FR
ENG
Terrasverwarming
Radiateurs de terrasse
Patio heaters
NL
FR
ENG
Reparatie kit
Kit de réparation
Repairkit
NL
FR
ENG

Waarschuwing
1. Het frame werd ingeolied om het te beschermen
tijdens transport. Gelieve zorgvuldig te reinigen
zodat dak en zijwanden proper blijven.
2.Behandel de tent steeds voorzichtig om schade te
vermijden.
3.Installeer de tent met minimum 2 personen.
Probeer dit nooit alleen, u kan het frame forceren
en schade toebrengen.
4. Elke tent is bedoeld als tijdelijke beschutting
en moet tijdig worden verwijderd bij extreme
weersomstandigheden.
5. Kies een geschikte plaats om uw tent op te zetten
om schade te voorkomen aan ondergrondse water-,
gas- of elektrische leidingen.
6. Extra verankering is aangeraden. U kan hiervoor
zware haringen in combinatie met spanbanden
gebruiken. Deze worden niet standaard
meegeleverd met uw tent, maar zijn wel optioneel
verkrijgbaar bij TecTronic.
7. Berg uw tent altijd droog op.
8. Gebruik nooit de oogringen van het dakzeil om de
tent te verankeren. Bevestig de spanband rond de
liggers van het frame.
Attention
1.Les tubes sont protégés par une couche de l’huile.
Avant d’ériger votre tente, nettoyez-les pour tenir
les toiles propre.
2. Soyez prudents pour éviter du dommage.
3. Erigez votre tente avec un minimum de deux
personnes. N’essayez jamais de le faire tout seul.
4. Des tentes sont des refuges temporales. C’est
nécessaire de l’abbatre s’il y a des circonstances
climatiques mals.
5. Choisissez un endroit adéquat pour ériger votre
tente. Ainsi vous évitez du dommage aux tuyaux
souterrains de gaze, d’eau ou d’électricité.
6. C’est conseillé de prendre d’ancrage
supplémentaire. Vous pouvez utiliser des piquets
lourdes en combination avec des haubans. Ils ne
sont pas inclus par défaut, mais on peut les obtenir
chez TecTronic.
7. Rangez votre tente toujours à un endroit sec.
8. Veuillez ne jamais utiliser les points d'attache de la
bâche de toit pour fixer la tonnelle. Fixez les
sangles autour les poutres de la construction.
Warning
1.In order to protect during transport, the pipes have
been lubricated. Before setting up your party tent,
please remove the oil carefully to keep the cover
clean.
2. Take note that the tent needs to be handled
carefully to avoid damage.
3. Install the tent by at least 2 persons. Do not try on
your own, you could force the frame and damage it.
4. Tents are meant as temporary shelters and must be
dismantled under extreme weather conditions.
5. Please select a suitable place to erect your tent to
avoid damage to underground sprinkler systems,
water, gas or electrical lines.
6. Extra strong anchoring is advised at all times. You
can use additional strong stakes and storm straps
to achieve this. These are not delivered with your
party tent by default. TecTronic however sells
suitable stormsets for every tent.
7. Make sure cover and frame are completely dry
before putting them away.
8. Do not use the eyelets of the roof to anchor your
tent. Attach the tension belts to the horizontal
tubes of the construction.
This manual suits for next models
1
Other Solid Green Tent manuals

Popular Tent manuals by other brands

ShelterLogic
ShelterLogic 58432 Assembly & instruction manual

Extreme marquees
Extreme marquees PAVILION Instructions & Care

nomad
nomad DOGON 3 AIR LIMITED installation instructions

mothercare
mothercare family user guide

Caravan canopy
Caravan canopy MAGNUM Series Reference manual

GigaTent
GigaTent Prospect Rock FT049 owner's manual


