Sollatek GMC5 Installation instructions

CMYK
92/58/8/0
RGB
0/106/170
Web
006AAA
INTE L L IGE N T R E F R I G E R A T I O N C O NTR O L S
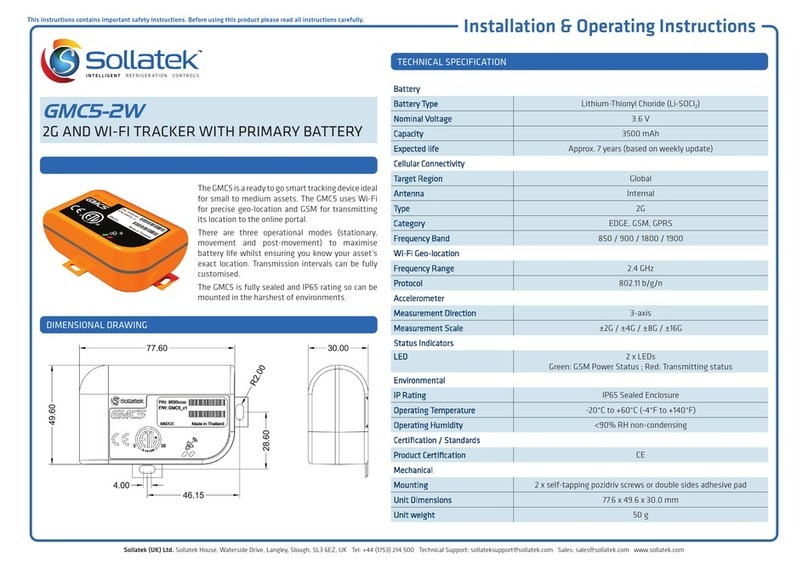
The GMC5 is a ready to go smart tracking device ideal for small to medium assets. The
GMC5 uses Wi-Fi for precise geo-location and GSM for transmitting its location to the
online portal.
The GMC5T has an embedded temperature sensor to provide accurate temperature
measurements to the online portal.
There are three operational modes (stationary, movement and post-movement) to maximise
battery life. Transmission intervals can be fully customised Over The Air via the online portal.
The GMC5 is fully sealed and rated IP65 (TBC), so can be mounted in the harshest of
environments. The GMC5 can be mounted via industrial adhesive pads or the screw
mounting base (sold separately).
GMC5 & GMC5T
INSTALLATION & OPERATING MANUAL
This instructions contains important safety instructions. Before using this product please read all instructions carefully.
OPERATION SETTINGS
LED OPERATIONAL DESCRIPTION
Parameter Default Setting Description
Movement duration to state
a movement 30 Seconds The period of constant movement to trigger movement mode
Post stopping duration to
transmit 1 Hour The period the GMC5 must remain stationary after sensing movement before transmitting (post-
movement mode)
Transmission settings Transmission on movement
and post stopping
The GMC5 will send data once a movement has been sensed and again once movement has
stopped
Server ping interval 7 Days The duration between transmissions when the GMC5 is in stationary mode
Daily allowed movement 5 Minutes
The total duration throughout the day which the GMC5 can be moved without triggering a
movement event. All movement after this, which is greater than movement duration will trigger a
movement event
Temperature threshold
alarm -14°C The maximum allowed temperature before the GMC5 reports an alarm. When the temperature
falls below the threshold, the GMC5 will cancel the alarm
Temperature measurement
interval 1 Hour The duration between the GMC5 recording temperature measurements
Description Meaning
ON for 2 s, then OFF Tracker turning ON
Flashing twice (250ms ON/250ms OFF) Tracker turning OFF
OFF, OFF Cellular Communication Powered Down
ON, Flashing (64ms ON/800ms OFF) Searching for Network
ON, Flashing (64ms ON/200ms OFF) Registered with Network
ON, Flashing (64ms ON/600ms OFF) Data Transfer in Progress
Sollatek (UK) Ltd. Sollatek House, Waterside Drive, Langley, Slough, SL3 6EZ, UK
Tel: +44 (1753) 214 500 Technical Support: [email protected] Sales: [email protected] www.sollatek.com
TURNING THE TRACKER ON
Align the arrow on the magnet to the activation area of the GMC5
marked by an arrow on the device.
1
2The Green LED will light for 2 seconds, then turn OFF.
3The GMC5 will then be turned ON.
Note: to test transmission and force the GMC5 to send data to the portal,
place the magnet close to the activation point 3 times.
Supplied Magnet
English

Clean any contaminates from
the installation surface with the
alcohol wipe.
5
Fully dry the installation surface
with paper towels.
6
Remove the lining from both of
the adhesive pads.
7
Ensure the base of the GMC5 is
clean using the alcohol wipe and
then dry.
21
Remove any accumulation of ice
from the mounting surface
GMC5T
Sollatek (UK) Ltd. Sollatek House, Waterside Drive, Langley, Slough, SL3 6EZ, UK
Tel: +44 (1753) 214 500 Technical Support: [email protected] Sales: [email protected] www.sollatek.com
MOUNTING THE GMC5
This instructions contains important safety instructions. Before using this product please read all instructions carefully.
Remove the retaining screws from the base of the GMC5
and remove the end cap.
1
2Disconnect the battery pack connector and remove the old
battery.
Battery Replacement
Note: the GMC5 needs to be removed (unstuck from the panel/ unclipped
from the mount) before battery replacement
Note: illustrations are for guide only of mounting orientation and placement but depends on available space within the freezer. For further details on GMC5 place-
ment, please refer to GMC5 Freezer Compatibilty Document
Batteries must be replaced with batteries of the same type.
The device cannot be disposed of as municipal waste therefore
such waste should be collected and disposed of separately in
accordance to EU directive 202/96/EC.
For best signal, avoid mounting the GMC5(T) near/behind metal surfaces and mount with the square end pointing towards/close to the
outside of the cabinet.
Isolate power if installing the GMC5 in areas where live electrical equipment are housed.
Avoid hot/moving parts when positioning.
3Insert and connect the new battery pack, replace the end
cap and secure in place with the retaining screw.
GMC5 PLACEMENT GMC5T PLACEMENT
Horizonal Freezers
Mount within the compressor
compartment as close to the grill
as possible
Vertical Freezers
Mount in either the top hat or
compressor compartment as close
to the grill / edge
Horizonal Freezers
Mount on the oor or on the
compressor step along any wall
depending on basket positioning.
Vertical Freezers
Mount along the side walls on
either the bottom or to of the
cabinet.
IMPORTANT: When choosing a mounting location, check the surface atness rst using the GMC5. If the surface has an extreme
curvature where the entire GMC5 base can not stick to the surface, consider an alternative surface.
Note: While preparing the surfaces, ensure the adhesive pad is kept at ambient temperature, hot or cold temperatures could
result in the adhesive losing adhesion.
Immediately press and hold the
GMC5 for 10 seconds to secure
it to the surface.
10
SEC
Peel off the liner on one side,
then stick them to the base at
either end.
4
Remove the back lining from the
adhesive pad and stick 2 pads
together (x2).
3
8
MBA 25/08/2022
GMC5(T) Installation Manual v6
A/I: 10910717
This manual suits for next models
1
Other Sollatek GPS manuals
