Carscop CCTR-809A User manual

-1-
CCTR-809A Animal GPS Tracker User Manual ---V1 201706
Welcome to use this animal GPS tracker. This product is with GPS module and GSM module, it use
internal high capacity battery, it is not necessary external power supply, it will weak up every day by setting
time interval(normally every day 1-2 times), it receive GPS Location (outdoor,10-20m precision) & LBS location
(indoor,50-500m precision) and upload the location to internet server, and then sleep automatically, user login
server with given user name & password can locate the tracker. If the tracker break the setting geo-fence, it will
send sms to notice owner, the working time can reach 3-5 years, it is water-proof with strong magnet, specially
suit for rent machine, vehicle, instrument, engineer sets tracking.
The proximity sensor built in will add the new function, like the remove alarm which will be triggered if the
unit is removed from its installation place.
The tracking website is www.999gps.net , visiting this website & login with the given use name &
password, the last location will display on the map (the default given user name & password is the last 7 digital
of the tracker ID, the ID label is on the back of the tracker case), using Android App or iOS iPhone App also can
tracking the tracker, the user name & password is same with the website.
Scan the following QR code can download & install app on mobile phone.
iPhone App Download Android App Download
Scan the following QR code or click the following link can download or read online the manual in Word or
Pdf format.
Word Version: http://www.999gps.org/en/CCTR-809A-GPStracker-en-V1.doc
PDF Version: http://www.999gps.org/en/CCTR-809A-GPStracker-en-V1.pdf
QR-Manual Download (Word) QR-Manual Download (Pdf)

-2-
Manual
Product Picture:
Optional accessories :Collar (L size for cattle,horse, M size for sheep )
Function Specification:
3-5 Years battery working time (1-2 location / Day);
No installation,No power supply, Easy using;
IP67 Water-proof, can be used in open air;
4 low self-consuming Li-battery (6000mAH);
App/Web/Wechat Locate;
Geo-fence alarm can be set;
User change working mode by sms
GPS + LBS can be used indoor locate;
Universal 4 Band GSM module;
Suit for personal or vehicle tracking.
Packing
Main Unit
Battery
L size
M size

-3-
Remove alarm based on the high sensitive proximity sensor built in.
LED Flash Indicator:
Green Power LED Flash once : working well
Green Power LED Flash twice : GSM working well and GPS signal weak
Green Power LED Flash three times : GSM and GPS working well but battery is low
Green Power LED Flash four times : GSM working well, battery low & no GPS signal
Green Power LED ON continuously : GSM Searching network
Green Power LED OFF continuously : Power off
Red GSM LED Flash once : Upload location to server OK
Red GSM LED Flash twice : Upload location to server Fail
Before Using:
1. Install SIM card:
Buy a GSM SIM card which have SMS service and incoming caller ID service & GPRS data service, in
which the SIM card phone number is the very tracker number and all the operation for the tracker is to this
number, such as locating immediately, add & delete preset number, change password, set alarm etc.
Note: this tracker use 2G GSM network, some 3G & 4G SIM card have 2G GSM network, these kind of 3G
& 4G SIM card can be used in this tracker, some SIM card need send SMS to active the GPRS data service.
Every month need about 10M-30M GPRS data according the different working mode, order an data package
can save money.
Open the case with screw-driver, the battery holder & PCB can be seen, the SIM card holder is on the
PCB board, pull the metal cover to “OPEN” direction, the metal cover can be opened, put the SIM card into the
the holder (Pay attention to that the SIM card metal pin need face to the PCB), and push the metal cover to
“LOCK” direction, a click sound can be heard to indicate that the SIM card has been locked.
Note: Before install or uninstall the SIM card, please uninstall the battery.
Note:
1. The tracker will power on automatically after the battery is installed.
2. Please install GSM SIM card before install battery.
3. The SIM card need enable GPRS internet data service, every locating data cost is lower than 1K
byte, every day 1-2 locating will cost 60K byte every month, the lowest data package is suit for suing.
4. Please put the unit on a flat surface(15mm from the unit) to make sure the proximity sensor work
well.

-4-
2. Power ON / OFF
When the battery is installed in the tracker(Please note all the battery in the battery holder are same
direction, all the batteries are parallel connection, please see the “+” and “-” indicator in the battery holder), the
tracker will power on automatically , the tracker will power on 5 minutes, and then go to sleep, after the setting
time interval (default is 24 hours), the tracker will power on again and upload the location and sleep again, and
so on.
Only uninstall the battery can power off the tracker all the time.
3. Battery Low Alarm
When the battery voltage in the tracker is too low, the tracker GREEN LED will send battery low alarm
information to authorized number automatically.
Note: This battery is not rechargeable battery, it can not be recharged.
4. Back to Factory Setting (Default Setting)
Sending SMS “FACTORY*123456” to the tracker SIM card number, the tracker , the tracker will delete all
the user setting (authorized number / Alarm setting / Password / APN / Working mode etc), reset to factory
default setting, and then re-power on.
5. Antenna
The Antenna of GSM and GPS are built in the tracker.
Pleas leave the tracker away from big metal, this will reduce the GSM and GPS signal.
6. Using Condition
The working temperature is -20 0C to 60 0C, over this range the specification of the tracker maybe can not
reach the standard level, the storage temperature can reach to -40 0C to 80 0C.
Simply Using Step
1. First to buy a 2G GSM phone SIM card and enable GPRS service, order a data package (Normally will
use about 10M-30M GPRS data every month), install in the tracker, please refer the above Before Using 1.
Please put this bottom
side of the unit on a
flat surface !

-5-
2. Install the battery the tracker will power on, first time using please put the tracker outdoor for easy get
GPS & GSM signal.
3. Check the LED flashing to confirm the tracker work well (Refer the above LED Flash Indicator).
4. This tracker default working mode is 1, it will upload location one time every 24 hours, the other time
the tracker is sleep. User send SMS to tracker can change the working mode (please refer the “Set System
Working Mode” in the “Locate Operation & Setting”). Change to the other working mode will make the
battery time reduce very fast.
5. Please add the authorized number, otherwise the alarm can not be noticed to user (please refer the
“Add authorized phone number” in the “Locate Operation & Setting”).
6. Geo-fence alarm can be set, the alarm only can be checked after the tracker weak up, and the alarm
information will send to user by SMS (Please refer “Geo-fence Alarm” in the “Locate Operation & Setting”).
7. On the platform geo-fence and over speed alarm also can be set, but this kind of alarm information only
can be checked on the platform, can not send to mobile phone by sms.
8. Visit & login the tracking platform www.999gps.net, display current location, playback history tracking
etc can be operated, platform user name and password is the last 7 digital numbers of the tracker’s ID (the ID
is print on the battery, for example ID is : 809201512345678, and then the user name is : 2345678, password
is :2345678 or 123456, user can change the password).
9. iPhone Android App also use the same user name and password with website login, downloading &
installation please refer the platform operation guide.
10. This tracker can auto download & configure APN & GPRS user name & password, if the auto
configure is not right, the tracker can not upload location to server, then you need send SMS to tracker to
change the APN & GPRS manually, and send “CHECK*123456” to tracker can check the tracker setting, call
the tracker SIM card supplier to confirm the APN & GPRS is right, please refer “Set APN & GPRS User name
and Password” in the “Locate Operation & Setting” to set APN & GPRS username and password.
In the following content, all the SMS content is mark by “”, and this “” is not include
in the SMS content, it is only to used to mark the SMS content.
Locate Operation & Setting
1.Add authorized phone number
Send SMS“ADDPHONE*123456*A*phonenumber” or “401*123456*A*phonenumber” to tracker is OK,
“ADDPHONE” and “401” are fixed command; “123456” is password; “A” is authorized number location, every
tracker have 3 authorized phone number locations, A and B, and C, so you can set 3 phone numbers,
phonenumber means the mobile phone number you want to set, if the add operation is success, the tracker will
send back the information ”Add Preset Phone OK”, if the password is not right, the operation is fault, the
tracker will send back information “Wrong Password”.
2.Check Authorized Phone Number by SMS

-6-
Send SMS “CHECKPHONE*123456” or “400*123456” to the tracker number, “CHECKPHONE” & “400”
are command; “123456” is password; the tracker will send back the information “Authorized Phone A:
13987654321;B:13876543210;C:13765432100 , the phone number is just an example.
3. Delete Authorized Phone Number by SMS
Send SMS “DELETEPHONE*123456*A” or “402*123456*A” to the tracker number, “DELETEPHONE” &
“402” are command; “123456” is password; “A” is authorized phone number location, there are 3 locations “A”
and “B” and “C”; if the delete operation is success, the tracker will send back the information ”Delete
Authorized Phone OK”.
4. Check Tracker Password
Send SMS “CHECKPASSWORD#” or “500#” to the tracker number, “CHECKPASSWORD” & “500” are
command, if the operation is success, the tracker will send back the information “Password :888888”;
“888888”is an example.
The tracker password is used to protect the tracker only can be operated by owner, every SMS command
need follow tracker password, the default tracker password is 123456, for higher security please change the
tracker password, this password is different with the tracking platform login password.
Note: Only The authorized phone can check the password.
5.Change Tracker Password
Send SMS “CHANGEPASSWORD*123456*888888” to the tracker number, “CHANGEPASSWORD” is
command; “123456” is old password; “888888” is new password; if the operation is success, the tracker will
send the information “ New Password:888888” to every preset phone number”.
Note: Only the authorized phone can change the password.
6. Set System Working Mode
This Tracker has 3 working mode, mode 1 is timing on off (default factory mode), mode 2 is keep working,
mode 3 is shock control.
Sending SMS “MODE*123456*X*Y” to the tracker, “MODE” is command, “123456” is the tracker
password, “X” is the working mode, it is 1 or 3, “Y” is the sleep time interval, from 01-99, unit is hour, only when
the X is 1, the Y is available, other wise there is no “*Y”, when the X is 2 or 3, the SMS will be
“MODE*123456*X”. after receive the command, the tracker will reply SMS “Working mode set to X (1 Timing
on off,2 keep working, 3 shock control)” . The working modes are described below:.
Mode 1 (Factory Default Mode) ------ Timing ON Off Mode
SMS is : MODE*123456*1*XX*YY*ZZ
This mode is the default working mode. under this mode, the tracker normally is powered off, and will
power on automatically according to the settings. After it wakes up, it will upload the the current location to
server, and then go to sleep again.
You can set the unit power on at the fixed time or the working frequency everyday.
“XX” stands for the interval time in hour. For example, 3 means the unit will 8 times everyday, and 12

-7-
means it work twice everyday.
“YY” stands for the fixed time when the unit will start working, in 24 hours.
“ZZ” stands for the local timezone.
For example:
“MODE*123456*1*24” means the unit will work once everyday, and it will start working at the time when it
is powered on at the first time.
“MODE*123456*1*2*20*11” means the unit will start working from 20:00(at eastern 11 time zone), and
re-start working per 2hours automatically, like,20:00, 22:00, 24:00, 2:00, 4:00, 6:00, 8:00, 10:00, 12:00, 14:00,
16:00, 18:00, 20:00.
“MODE*123456*1*24*1*-6” means the unit will start working from 1:00(at western 6time zone) everyday,
and restart working at this fixed time in the next day.
Under this mode the battery working time can be reached 3-5 years(Every day one time).
If the XX is lower than 24, the battery life would be short, lower and shorter.
Mode 2 ------ Keep working
SMS is : MODE*123456*2
Under this mode, the tracker will powered on all the time, if the tracker is moved or is triggered by shock
sensor, the tracker will locate and upload the location to the server by setting time interval, after the tracker
stop moving or no shock sensor trigger, the tracker will turn off GPS & GPRS, and stop upload location to
server, at this condition the tracker can receive the sms & calling.
The time interval default is 30 seconds, and it can be changed by sending SMS “INTERVAL*1234568*T”
(T is from 030 to 999, unit is seconds).
Under this working mode, the battery working time will reduce to only about 40 hours.
Mode 3 ------ Shock Control ON/OFF
SMS is : MODE*123456*3
Under this mode, the tracker normally is power off, if the tracker is triggered by shock sensor, the tracker
will power on automatically, and then locate and upload the location to the server by setting time interval, if no
shock sensor trigger, the tracker will turn off GPS & GPRS, and stop upload location to server, and then power
off, at this condition the tracker can not receive any sms & calling.
The time interval default is 30 seconds, and it can be changed by sending SMS “INTERVAL*1234568*T”
(T is from 030 to 999, unit is seconds).
Under this working mode, the battery working time will reduce to only about 40 hours.
7. Set Upload Interval Time
Send SMS “INTERVAL*123456*T” to the tracker, “INTERVAL” is command, “123456” is password, “T” is

-8-
the interval time from 30 to 999, unit is seconds. The tracker will send back information “Set Interval time T OK”,
if the password is not right, the operation is fault, the tracker will send back information “Wrong Password”. 30
seconds is the default interval time. Longer upload interval time can save battery and GPRS data cost, the total
mileage on the platform will have big error if the interval time is bigger than 30 seconds.
8. Start / Stop Upload Location to Server by SMS
This command is only suit for working mode 2 & 3.
Send SMS “STOP*123456” to the tracker, “STOP” is command, “123456” is password. The tracker will
send back information “Stop upload location to server”, if the password is not right, the operation is fault, the
tracker will send back information “Wrong Password”. After receive this command the tracker will stop upload
location to server under working mode 2 & 3.
Send SMS “START*123456” to the tracker, “START” is command, “123456” is password. The tracker will
send back information “Start upload location to server”, if the password is not right, the operation is fault, the
tracker will send back information “Wrong Password”. The tracker default will upload location to server under
working mode 2 & 3.
9. Check Tracker ID:
The tracker ID is print on the label of the tracker, if the label is missing, send SMS “ID*123456” to tracker,
in which, “ID” is the fixed command and “123456”is the password. The tracker will reply SMS “ID:
809201512345678”, in which, “809201512345678” is the ID and every tracker corresponds to the only number.
This number is used to differ the tracking uploaded to the website from others. the last 7 digital number of the
tracker ID is the user name and password of the tracker on the tracking platform www.999gps.net , for example
the tracker ID is : 809201512345678, and then the user name on the platform of this tracker is : 2345678, and
the platform password for this user name also is :2345678,user can change the password after login.
10. Set APN & GPRS User name and Password
This tracker can download & configure APN & GPRS username password automatically after power on, if
the APN & GPRS user name password are not right, then you need sending SMS to tracker to change them, if
the tracker can not upload location to platform (Red LED flash twice), please confirm the auto configuration of
APN & GPRS user name password is right, the APN name and GPRS user name & password please call your
tracker SIM card mobile phone company to confirm, the auto configuration APN & GPRS of the tracker please
sending SMS “CHECK*123456” to the tracker to check. if the APN & GPRS are not right, please set by the
following description.
Send SMS “APN*123456*apnname” to the tracker, in which, “APN” is the fixed command, “123456” is the
password and “apnname” is the APN name of a mobile phone company. Having successfully been made, there
will be a SMS “APN: apnname”.
Send SMS “USERNAME*123456*username*password” to the tracker, “USERNAME” is a command,

-9-
“123456” is the password of the tracker; “username” is the mobile company GPRS user name, “password” is
the mobile company GPRS password, if the operation is success, the tracker will send back the information
“Username:username, Password:password”, if the password is not right, the operation is fault, the tracker will
send back information “Wrong Password”.
11. Set Website Server IP address
The tracker IP address has been set to default : 58.64.155.133,8011 in factory, For normally this is not
necessary to change, If our server IP is changed, we will notice on the website. But if you need upload location
to your own server, send SMS “IP*123456*100.101.102.103,8888” or “IP*123456*www.yourdomain.com,8888”
to the tracker, in which, “IP” is the fixed command, “123456” is the password and “100.101.102.103,8888” or
“www.yourdomain.com,8888” is the IP address or domain name & port of the your own server. Having
successfully been set, there will be a SMS “IP: 100.101.102.103,8888”.
12. Check Tracker Setting
Send SMS “CHECK*123456” to the tracker number, “CHECK” is the fixed command, “123456” is
password. The tracker will send back information including software version, ID S/N number, IP address,
authorized phone number, GPS and GSM signal etc, normally this command is used to test the tracker is
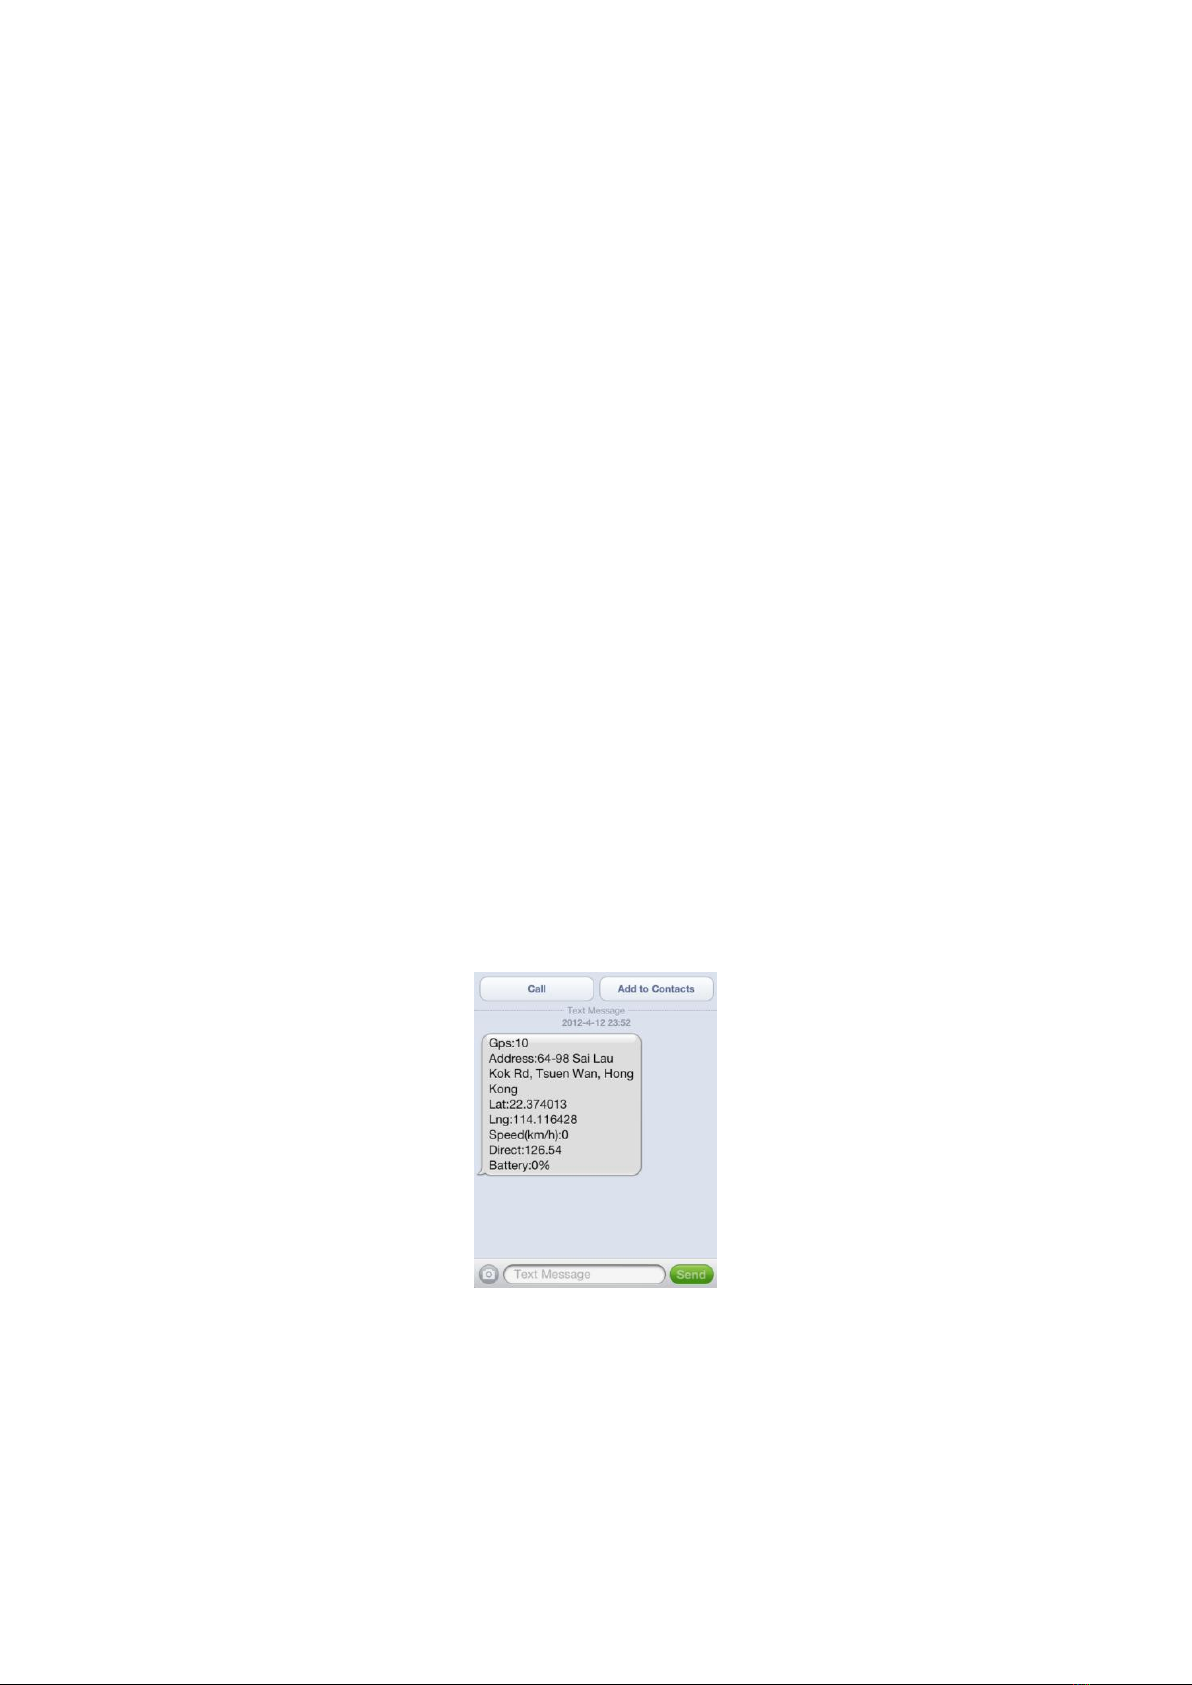
working well or not. The following is an example :
809,V 04 28 2015,CC830,800201412345678,d3.igps.info,58.64.155.133,8011,300,A:13987654321,
B:13876543210,C:13765432101,M1:24,GPS 9,GPSON,GSM:-95dBm,CMNET,User,Password,
460,00,255,1,9376,3613,07,88%
809 :Product model
V 09 28 2015 :Software version
CC830 :Protocol(CC800/CC828/CC830/CC630 etc)
800201512345678 :ID number
58.64.155.133,8011 :Server IP & Port
300 :Upload Time Interval
A:13987654321,B:13876543210,C:13765432101 :Authorized Number
M1,24 :Working mode 1, 24 hours
GPS 9 :GPS signal (Satellite)
GPSON :GPS module is ON
GSM:-95dBm :GSM signal
CMNET :Current APN
User :GPRS User Name
Password :GPRS Password
460,00,255,1,9376,3613,07
:GSM Base Station Information
"MCC,MNC,TA,NUM,LAC, CID,RXLEV ,LAC2,CID2,RXLEV2..."
88% :Built in Battery Power

-10-
13. Re-power On & Reset Tracker
Send SMS “RESET*123456” to the tracker number, “RESET” is a command, “123456” is password. The
tracker will send back information “Reset Tracker and cancel all alarm setting”, then the tracker will power off
and then power on automatically, and this command will not cancel user setting.
14. Back to Factory Default Configuration
Send SMS “FACTORY*123456” to the tracker number, “FACTORY” is the fixed command, “123456” is
password. The tracker will send back information “Set factory setting OK”, then the tracker will cancel all the
alarm setting in the tracker, and also delete all the authorized phone number, delete the APN and GPRS user
name and password,change the tracker password to 123456, reset the IP address, reset the system working
mode and the interval time, and so on.
If the tracker password is forgotten, use the authorized the mobile phone can change the password, but if
no authorized phone is added, then user can not reset the tracker to factory mode.
Senior Operation & Setting
1. Making a call trigger reply Location Description by Text (Platform is not necessary):
Call the tracker SIM card number, after ring 3 times, the tracker will hang up the call automatically and
locate immediately, a few seconds later, the tracker will send back SMS with current location text description,
If the tracker has set the authorized phone number, only authorized number calling the tracker can trigger the
tracker locate and reply SMS, if the other phone number call to the tracker, the tracker will hang up the calling
immediately without ring & will not reply SMS.
The SMS information sample is as follow:
If the tracker can not get the location text description, the tracker will reply the location with Google map
link SMS to user, please refer the following 3. And If no GPS signal in that place the tracker will locate by
LBS (Cell ID GSM network base station), and reply the LBS location with Google map link. please refer the
following 4.
2. Sending SMS trigger reply Location Text Description SMS(Platform is not necessary):
Send SMS “LOCATE*123456” to the tracker also can trigger the tracker locate & reply SMS with current
location text description, “LOCATE” is a command, “123456” is password; if the password is not right, the

-11-
operation is fault, the tracker will send back information “Wrong Password. The SMS examples is same as
above.
3. Sending SMS trigger reply Google map link SMS(Platform is not necessary):
Send SMS “URL*123456” to the tracker also can trigger the tracker locate & reply SMS with current
location with Google map link, “URL” is a command, “123456” is password; if the password is not right, the
operation is fault, the tracker will send back information “Wrong Password.
The SMS examples is same as follow:
http://maps.google.com/maps?q=40.756441,-73.986378
Battery:91%
4. LBS Located (GSM network Cell ID Locate):
When the tracker is triggered to locate, if the tracker is in the place where there is no GPS signal, such as
underground park, indoor room, the tracker will reply SMS with CELL ID location to user, and the precision is
about 50-500m, according to the around mobile phone base station density. The location SMS is like below,
click the link the map is same with the above 2.
No GPS signal, just LBS Cell ID Location
http://maps.google.com/maps?q=40.756441,-73.986378
Battery:91%
Note: The LBS location precision is not very high, in the city maybe 30-50 meters, in country side maybe
over 300 meters according the GSM base station density. So this location only can be used as a reference. If
the LBS can not locate either, the tracker will reply “Can not Locate now, Please Try Later !”.
5. Arm (Shock Alarm) by sending SMS (No Platform Necessary)
Send SMS “SHOCKALARMON*123456” to tracker, “SHOCKALARMON” is command, “123456” is
password, the tracker will send back the information “Set Shock Alarm ON” to indicate the operation is success
and go to arm state, if the password is not right, the operation is fault, the tracker will send back information
“Wrong Password”.
After go to shock alarm state, the system will check shock sensor, if the shock sensor is trigger (only
continuously shock can trigger the shock alarm to avoid trigger by mistake), the tracker will send alarm

-12-
and location information by SMS to the authorized phone number, also the tracker will call the authorized
number A first, if no answered then B and C, if 3 authorized all no answered, then stop calling, If the tracker is
triggered continually, every authorized phone will receive max 3 alarm SMS per hour.
The shock alarm SMS is as follow:
Shock Alarm
https://maps.google.com/maps?q=22.67680,114.15188
Battery:88%
Send SMS “SHOCKALARMOFF*123456” to the tracker, “SHOCKALARMOFF” is command, “123456” is
password, the tracker will send back the information “Set Shock Alarm OFF” to indicate the operation is
success and disable the shock alarm, After disable the shock alarm, the system will not check shock sensor
again.
Normally this function is used in working mode 2 & 3. Default the shock alarm is set to off.
6. Enable And Disable Overspeed Alarm (No Platform Necessary)
Send SMS “OVERSPEEDALARMON*123456*SSS” to the tracker number, “OVERSPEEDALARMON” is
command, “123456” is password, “SSS” is the setting alarm speed, unit is km/hour. The tracker will send back
the information “Set Overspeed Alarm On :SSS km/h” .
After enable overspeed alarm, the system will check the speed every 5 minutes. If the speed is higher
than the setting speed, the tracker will send alarm and location information by SMS to the authorized phone
number A (only send to A), The authorized phone will receive max 3 alarm SMS per hour, one hour later it will
be active again.
The overspeed alarm SMS is as follow:
Overspeed Alarm
Current Speed:110km/h,Setting:100km/h
Battery:88%
Send SMS “OVERSPEEDALARMOFF*123456*” to the tracker will disable the over speed alarm setting,
“OVERSPEEDALARMOFF” is command, “123456” is tracker password, the tracker will send back the
information “Set Overspeed Alarm Off ” .
Normally this function is used in working mode 2 & 3. Default the over speed alarm is set to off.
7. Break Geo-fence Alarm (No Platform Necessary)
The geo-fence is a circle area on the map, the center of the circle is set by tracker current location (If the
tracker can not located by GPS, then the setting geo-fence command fail), and the radius is set by SMS. When
the tracker move out the area, the tracker will send alarm information to user by SMS.
Send SMS “GEOFENCEALARMON*123456*RRR” to the tracker number, “GEOFENALARMON” is
command, “123456” is password, “RRR” is the radius of the geo-fence circle (the center of the circle is the
tracker current location), unit is km, it is from 001 to 999. After receive the command, the tracker will locate

-13-
immediately, after located, the tracker will set current location as the geo-fence center and RRR as the
geo-fence radius (unit is km), the tracker will send back the information “Geofence (A) Alarm On, RRRkm”, if
the tracker can not locate, the tracker will reply “Can not locate, Set Geofence Alarm Fail”.
After set the geo-fence alarm, the tracker will locate every 5 minutes to check the tracker is in the
geo-fence circle or not (in working mode 1, only after the tracker weak up it will check the geo-fence alarm), if
the tracker is out of the geo-fence circle, the tracker will send out geo-fence alarm information to all authorized
number.
The geo-fence alarm SMS is as follow:
Break Geofence Alarm
https://maps.google.com/maps?q=22.67680,114.15188
Battery:88%
8. Move Alarm (No Platform Necessary)
The move alarm is a geo-fence alarm with 500 meters radius and current location center , it is similar with
geo-fence alarm.
Send SMS “MOVEALARMON*123456” to the tracker number, “MOVEALARMON” is command, “123456”
is password, After receive the command, the tracker will locate immediately, after located, the tracker will set
current location as the geo-fence center and 500 meters as the geo-fence radius (unit is meters), the tracker
will send back the information “Move Alarm On”, if the tracker can not locate, the tracker will reply “Can not
locate, Set Move Alarm Fail”.
After set the move alarm, the tracker will locate every 5 minutes to check the tracker is in the 500 meters
geo-fence circle or not (in working mode 1, only after the tracker weak up it will check the move alarm), if the
tracker is out of the geo-fence circle, the tracker will send out move alarm information to all authorized number.
The move alarm SMS is as follow:
Move Alarm
https://maps.google.com/maps?q=22.67680,114.15188
Battery:88%
9. Remove Alarm
The built-in proximity sensor will detect the unit work after it powers on. If it is removed from the installtion
place with above 15 mm, this would trigger the remove alarm. Then it will send alarm sms to the authorized
phone and tcp alrm message to the platform.
The remove alarm SMS is as follow:
Device removed Alarm
https://maps.google.com/maps?q=22.67680,114.15188
Battery:88%
The platform will get the emergency SOS alarm when the remove alarm happens.
Note:
The bottom side of the unit must be placed on the flat surface with the distance below 10mm from the

-14-
surface to avoid the mistake alarm.
The actived lable must be removed before this function work well.
10. Check Alarm Setting
Send SMS “ALARM*123456” to the tracker number, “ALARM” is command, “123456” is password, the
tracker will send back the information of the alarm setting, for example:
Shock Alarm:OFF,Move Alarm:OFF,Device removed Alarm:ON,Geo-Fence:OFF,OverSpeed:OFF,Power
Down Alarm:ON,Alarm calling:ON,Alarm SMS:ON.
11. Cancel All Alarm Setting
Send SMS “CANCELALARM*123456” to tracker, “CANCELALARM” is a command, “123456” is password,
the tracker will send back information “ Cancel All Alarm Setting”, and cancel all alarm setting.
Note: RESET and FACTORY also can cancel all alarm setting.
12. Set Alarm by Calling: ON/OFF
Send SMS “CALLON*123456” (Call to authorized number) or “CALLOFF*123456” (No calling) to the
tracker, “CALLON” or “CALLOFF” is a command, “123456” is the tracker password, the tracker will send back
the information “Alarm by calling : ON” or “Alarm by calling :OFF”, If the alarm by calling is ON, then when the
alarm is triggered, the tracker will call the authorized number to notice the alarm, the default setting is ON.
13. Set Alarm by SMS: ON/OFF
Send SMS “SMSON*123456” (Sending SMS to authorized number) or “SMSOFF*123456” (No SMS) to
the tracker, “SMSON” or “SMSOFF” is a command, “123456” is the tracker password, the tracker will send
back the information “Alarm by SMS : ON” or “Alarm by SMS :OFF”, If the alarm by SMS is ON, then when the
alarm is triggered, the tracker will send SMS to the authorized number to notice the alarm.the default setting is
ON
Platform Operation
The platform operation please refer the platform operation guide, scan the following QR code or click the
website link to download the platform manual, visit website www.999gps.net and click the Manual icon also can
download the platform manual.
Platform User Guide Word Version Platform User Guide Word Version
Trouble Shooting
1. Please confirm that the SIM card PIN code has been disabled, it means if mobile phone use
this SIM card, it is not necessary to input any password.

-15-
2. This tracker use 2G GSM network, and it upload tracking only through 2G GPRS, some 3G &
4G card have 2G GSM network, this kind of SIM card can be used in this tracker.
3. The tracking data on our server will keep 6-12 months, the old data will be deleted.
4. After power on the tracker, call the tracker, no response, and no ring, please confirm the SIM
card has been installed properly, and the SIM card has enough charge, and the mobile phone
can work well in that place.
5. If the tracker can not upload location to website, please confirm the SIM card GPRS function
is activated, and the APN or GPRS username & password have been set properly (call the
mobile phone to confirm the APN & GPRS username and password).
6. If the tracker can not send back information by SMS, please confirm the SIM card has ID
caller display function and SMS service function, and you have set the center or slave center
number (only center or slave center number can send SMS), and please read the SMS
information of the tracker sending back, and check the instruction & password is right or not.
7. Can not login the platform: use SMS to check the ID of the tracker, and try it again, if not
success please contact distributor to reset password.
8. After go out the under ground park, some tracking maybe lost, the GSM and GPS module will
take a few minutes to receive signal and re-locate, some tracking maybe lost, this is normal.
9. Some time some location point is lost, this is normal, in the transmit process, some point
maybe is lost, but this will not happen very often.
Specification:
GSM Module
SIMCOM
GPS Module
U-Blox
GSM Frequency
850/900/1800/1900Mhz (4 Band)
GPS channel
24 channels
GSM / GPS Antenna
Built in
Locate precision
5-10 Meters
GPS Cold Start Time
36 seconds
GPS Hot Start Time
1 second
Working Voltage
3V DC
Standby Current
< 1 uA
Uploading Current
<150mA / 3V
Battery
6000mAh
Working Temperature
-20 0C to +55 0C
Absolute Temperature
-35 0C to +70 0C
Storage Temperature
-40 0C to +80 0C
Packing List:
Tracker Main Unit
1 set
Animal Collar (L or M)
1 set
Optional

-16-
User Guide Card
1 pcs
Print
Tracker & Platform Manual
1 pcs
CD or Print
Battery
4 pcs
CR123A, Panasonic
Warranty
This system has been tested before sold. We strongly recommend you to get this system installed by
professional. There is a one-year warranty except the following condition:
1. Installed, fixed, or changed by personally or unprofessional.
2. Warranty will eliminate if the ownership of the tracker has been changed.
3. Parts damaged by man-made.
4. Battery, adapter, wires, etc.
Warning: this device is just a auxiliary product that applying the location of current object, we have not any
responsibility if you have damage or lost in using this tracker.
Customer
User Mobile Phone
Tracker SIM card
Date
Year month day
Model
CCTR-809A
ID Number
Distributor
Notes: The explanation of this manual is belonged to our company, some small changes may not notice
customer, if you have any problem please contact us, thanks !
Table of contents
Other Carscop GPS manuals

Carscop
Carscop CCTR-630 User manual

Carscop
Carscop CCTR-821 Guide

Carscop
Carscop CCTR-803G User manual

Carscop
Carscop CCTR-800+ User manual

Carscop
Carscop CCTR-626 User manual

Carscop
Carscop CCTR-803B User manual

Carscop
Carscop CCTR-623 User manual

Carscop
Carscop CCTR-810 User manual

Carscop
Carscop CCTR-831 Guide

Carscop
Carscop CCTR-828 Guide

Carscop
Carscop CCTR-803BT User manual

Carscop
Carscop CCTR-800G User manual

Carscop
Carscop CCTR-820 Guide

Carscop
Carscop CCTR-805 User manual

Carscop
Carscop CCTR-620 User manual

Carscop
Carscop CCTR-800 User manual

Carscop
Carscop CCTR-809P User manual

Carscop
Carscop CCTR-632 User manual

Carscop
Carscop CCTR-830C Guide

Carscop
Carscop CCTR-801B User manual