Solo DTCK-1 User manual

Copyright © 2011 Solo Music Gear. All rights reserved
Solo Tele Style DIY
Electric Double Neck
Guitar Kit
Assembly Manual
DTCK-1
V 1.02

Solo Tele Style DIY Electric Double Neck Guitar Kit
Copyright © 2011 Solo Music Gear. All rights reserved | v1.02
1
Show Off Your Custom Built Guitar!
W
hen you have your guitar finished, please take a few pictures and send them to us.
Post your photos to our Facebook page
http://Facebook.com/SoloMusicGear
Post your photos to The Solo Café
http://TheSoloCafe.com
Remember, you can always find us online at http://SoloMusicGear.com to upgrade your parts, try a new kit, or ask us a
question.

Solo Tele Style DIY Electric Double Neck Guitar Kit
Copyright © 2011 Solo Music Gear. All rights reserved | v1.02
2
Thank you for purchasing a Solo DIY guitar kit. This unfinished guitar kit has everything for building an
electric guitar –you will need only some basic tools and finishing supplies. All challenging wood cutting,
drilling and shaping is already professionally done, as well as fret leveling and dressing.
1. CHECKLIST
Before you start working on your DIY guitar project, please check all the parts received in this kit.
2. TOOLS AND MATERIALS NEEDED
You will need the following tools and materials:
1. Sand Paper (180, 240 and 320 grit)
2. Sanding Block
3. Soldering Iron & Solder
4. Masking Tape
5. Finishing Supplies
6. Screwdrivers
3. SAFETY MEASURES
Some woodworking skills are required to complete this project. Always be aware of the necessary safety
precautions and follow them –be sure to use safety glasses and a dust mask when you are working with any
tools. If you are a novice, you should look for help and guidance of a more experienced friend. And never
forget that it’s always better safe than sorry.
4. FINISHING THE BODY AND NECKS
Before you start finishing the neck, please inspect the frets and the fingerboard. Even though all wood is kiln-
dried it may still shrink a little so you may get sharp fret edges.
In this case you need to use a fine needle file (Emory boards for finger nails can be used instead) to remove all
sharp edges: first make all fret edges flat with the fretboard edges on both sides, than use masking tape on
the top of the fretboard to protect it, and work on each fret’s edge to smooth it by slightly rounding it. Before
removing the masking tape, consider polishing the frets with fine steel wool.
STEP 1 –The body and neck have been coated with a poly resin sealant. They need to be sanded before
finishing. DO NOT SAND THE FINGERBOARD.
For sanding both neck and body, use a flat sanding block for all flat surfaces and by hand for edges and

Solo Tele Style DIY Electric Double Neck Guitar Kit
Copyright © 2011 Solo Music Gear. All rights reserved | v1.02
3
rounded/curved surfaces. Start with 180 grit sandpaper, continue with 240 and finish with 320, always
moving along the grain only. Before the final sanding, wipe the wood with a damp cloth and let it dry to raise
the wood grain.
STEP 2 –There are many different ways to apply finish to your guitar. Do a little research to decide which
type of finish you want to use. One good starting point is to review tutorials at the Project Guitar website:
http://www.projectguitar.com/tut/tutorial5.htm
STEP 3 - For any type of spraying finish (lacquer or paint) you will need to mask three areas with masking
tape: neck pocket on the body, neck’s fingerboard and truss rod nut. Press the tape tightly to the wood, not
allowing any gaps at the edges, to completely prevent the finish leaking to these areas.
STEP 4 - You will also need to make hangers for both the body and neck (if you want to apply
any spraying finish). Make them from a strong metal wire (wire dress/coat hanger can be used for it).
STEP 5 –Apply the finish by following the manufacturer instructions. Remember that spraying the finish is not
an easy process as it requires certain skill and experience –you might want to practice first on some scrap
wood. Always remember your safety –work only in a well ventilated area, away from any open fire and wear
a respirator mask and safety glasses.
STEP 6 –Final polishing for high gloss finishes can be done manually or using a power drill with a foam
polishing pad. The finishing tools and materials are readily available in many automotive/hardware supplies
stores.
TIP: Consider an oil rubbed finish (sometimes called “wipe-on oil finish”) as a good and safe alternative.
Tru-Oil® (known as a “Gun Stock Finish”, based on Linseed Oil) or Waterlox® (Processed Tung Oil) is highly
recommended. Oil finishing takes longer, but it is very safe and easy to apply and a high quality finish can
be achieved, even by a novice.
5. ASSEMBLY
Notes: Before you start assembling the DTCK-1, make sure of a couple things...this is physically a much larger
instrument, and although it seems obvious, make sure your work table is large enough to accommodate the
body/necks with extra space for parts! It is too easy to start and then end up scratching the finish because
you are cramped for space! Also, make sure the table top is covered with a cushion blanket to protect your
finish!
STEP 1 –Install the Machine Heads on both headstocks. Organize all the parts for the 18 tuners you are
about to install, making sure you have them in the correct order for both headstocks. Insert the post of each
tuner through the hole in the back of the headstock, taking care that the pilot hole on the back of the
headstock lines up with the screw hole on the tuner body. Place the washer over the post and then thread
the hex-head bushing finger tight to the headstock. Now install the screw on the backside and tighten the

Solo Tele Style DIY Electric Double Neck Guitar Kit
Copyright © 2011 Solo Music Gear. All rights reserved | v1.02
4
hex-bushing on the front using a socket wrench or a hex-wrench. Do this for all 18 tuners on the 6 and 12
string headstocks. Both necks of the DCTK-1 are 'tilt-back' headstocks so there will not be any string
retainers required.
STEP 2 –Install the necks. Now, you can attach the necks to the body using the 8 neck screws, the neck plates
and the neck plate cushions. Remember, when you are holding the guitar in playing position, the upper neck is
the 12 string neck. Once again organize all the required parts to make sure you have everything and that they
fit properly. Make sure the necks fit snugly in the neck pockets and that they are neither loose, nor so tight
that you have to force it in. The factory fit should be satisfactory! Rubbing a little bees wax on the screws will
make this job easier, and will not compromise the holding power of the screws. Install a screw through the
neck-plate and cushion, through the appropriate hole in the body and start to thread it into the correct hole in
the back of the neck....screw it in just far enough that it holds, and then repeat for the remaining screws of the
first neck. Now, tighten the screws enough that the neck holds in place... do not tighten completely until you
have made sure the neck aligns with the holes for the bridge (take two straight edged and hold them against
the sides of the neck and make sure the holes for the bridge are centered between your straight edges. You
may want to use a piece of painters tape to protect the top of the body while doing this) When you are
satisfied that the neck is correctly aligned, finish tightening the screws, and repeat the process for the second
neck.
STEP 3 –Install the bridges. Assemble all the parts for the 6 and 12 string bridges and ensure you have
everything required. Your bridge pickups are already fastened to the bridges so you only have to make
sure that you include the ground wire that must contact the under-surface of the bridge, and then be
soldered to one of the pots. Strip about 3/8" - 1/2" of the insulation from the ground wire and insert the
wire through the hole which goes from the guitar surface to the bridge pickup cavity, leaving only the
stripped wire on the surface of the guitar. Now, thread both the ground wire and the pickup wire through
the supplied hole, into the control cavity and start to install the bridge screws. Make sure the bridge sits
flat and that it's position conforms with your neck alignment....finish tightening the bridge screws and
repeat for the second bridge. Note that the 12 string bridge has 6 strings that thread through the back of
the plate, and 6 strings that thread through the body....you can install the 6 string ferrules into the back of
the body at this time as well.
STEP 4 –Install the pickguard. Before you start this process, 'dry fit' the pick-guard to the body to ensure
the cut-outs for the necks align properly...you may have to make some small adjustments with a file to
the pick-guard in order for it to fit 100%. There are no pilot holes for the pick-guard screws, so once you
are satisfied with the location and fit of the pick-guard, use some painters tape to hold the pick-guard in
place, and mark/pre-drill the pick-guard screw holes. Now, you will have to install both neck pickups
and the 3-way switch into the pick-guard with the supplied screws before installing the pick-guard itself,
ensuring that you insert all the wires through the appropriate holes into either the control cavity or the
3-way switch cavity before you install the pick-guard screws. (Make sure you mark the wires as they
come through the cavities, so there is no confusion as to which wire belongs to which pick-up!) You will
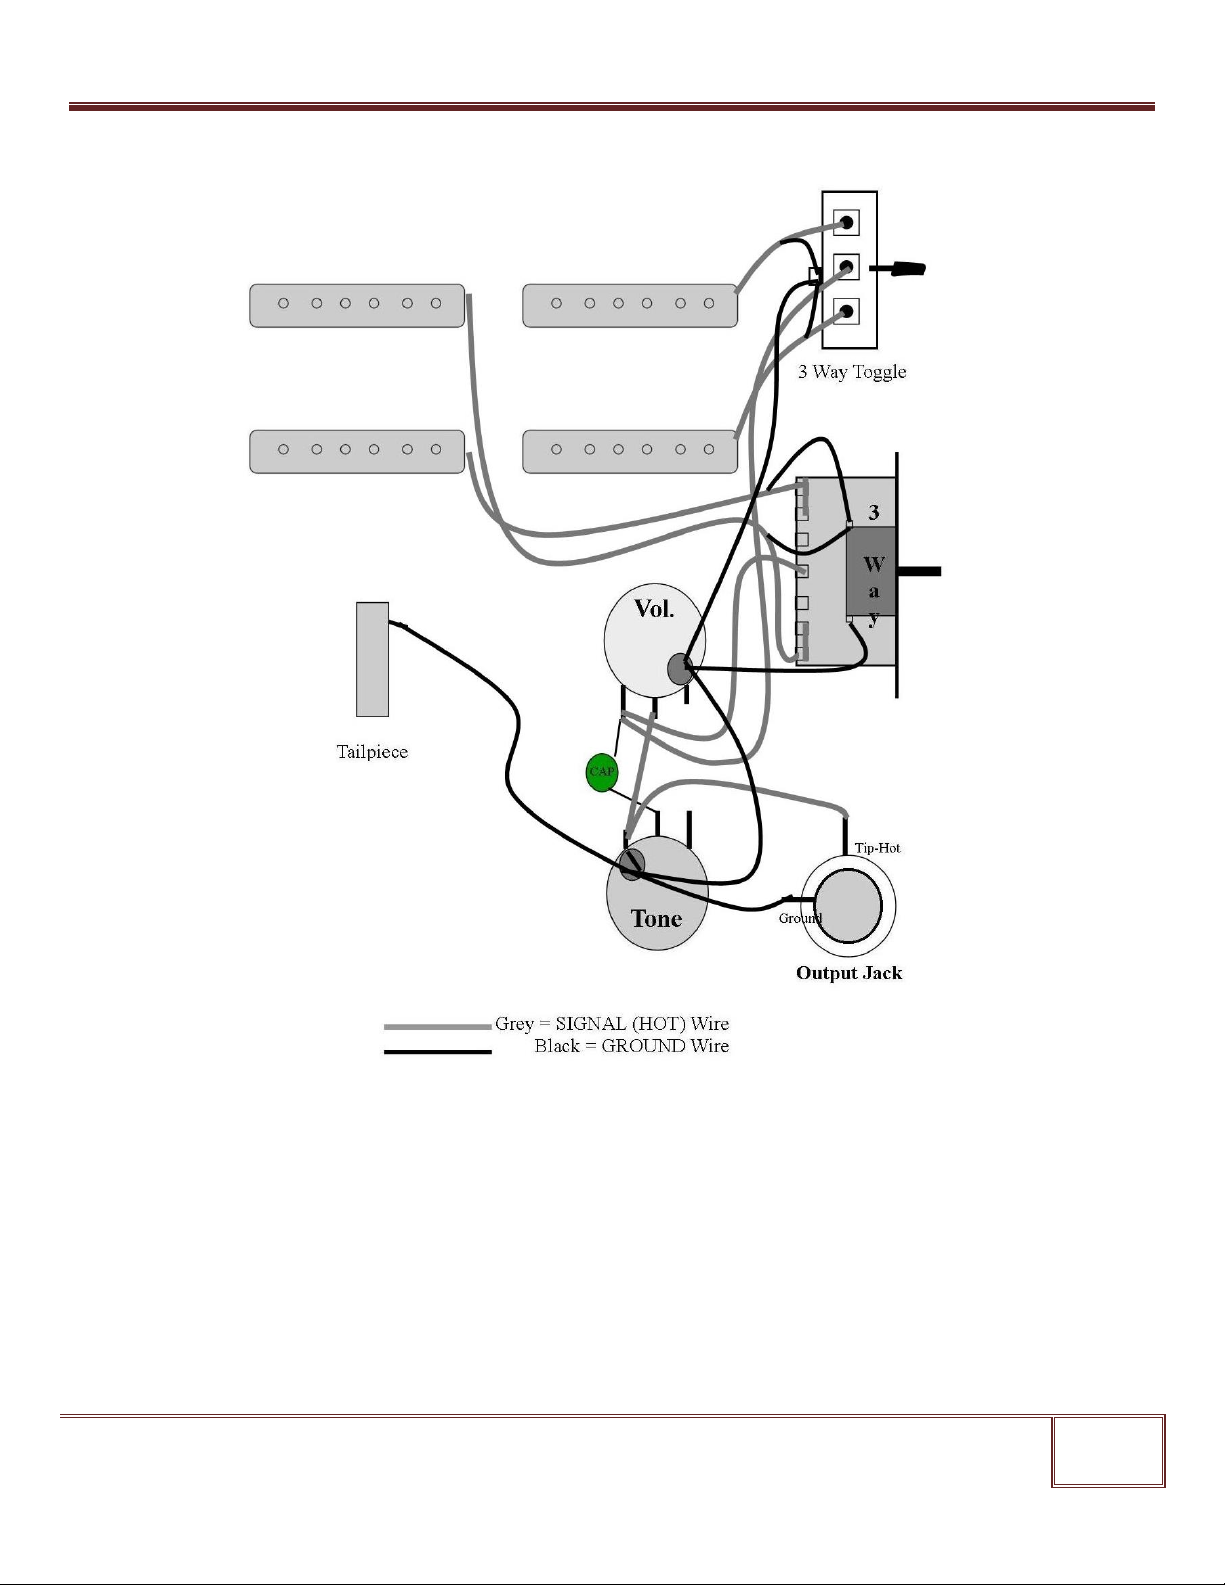
have to refer to your wiring diagram to make sure your pick-up wires are correctly located. When you
are satisfied that everything is properly located, install the pick-guard with the supplied screws.

Solo Tele Style DIY Electric Double Neck Guitar Kit
Copyright © 2011 Solo Music Gear. All rights reserved | v1.02
5
STEP 5 –Wire the guitar. The wiring on the DTCK-1 is somewhat more complex than a normal single
neck guitar, so lay out all your wiring as per the wiring diagram and proceed in a logical manner....if
you don't have experience soldering, enlist the help of a friend/expert to assist at this time. Assemble
the switch and pots with the control plate, and the input jack with the input jack plate and proceed
with your wiring. Once you are satisfied that everything is properly soldered and you have tested the
electronics to ensure they work, fasten the control plate to the body with the supplied screws, and
the input jack plate to the edge of the body again, with the supplied screws.
STEP 6 –Locate and install the strap pins in their appropriate holes with the supplied screws. Do not install
the truss rod covers until after you have set up the guitar.
STEP 7 –Install the strings. You are now ready to install your strings. Just before you start, if you have a
rosewood fret-board, it is a good idea to treat it with a light oil. This keeps the fret-board from shrinking
and cracking, plus reduces discoloration and dirt from entering the pores in the wood. You can purchase
fret-board oil, or you can use any light non-food oils, like tung oil or walnut oil or lemon oil. If you have a
maple fret-board, you may proceed...
Six String Neck: The strings are numbered from the thinnest to the thickest from 1-6. (This means the top
string when you are playing the guitar is the thickest and is number 6) In standard tuning the open notes are
1-E, 2-B, 3-G, 4-D, 5-A, 6-E. The strings are installed by inserting the bare end through the appropriate hole
at the back of the bridge beside the saddle adjustment screws, over the saddle and over the appropriate slot
in the nut. Winding the string onto the tuning post can be accomplished in various ways....you may already
have your own preferred method, or you may defer to a friend or expert to show you the correct method.
Having the proper number of winds on the tuning post helps to keep your strings from slipping and/or
stretching, and therefore keeps your strings in tune.
12 String Neck: Aside from the fact there are twice as many strings on a 12 string, each pair of strings are
tuned to the same note (although the EADG strings are tuned an octave apart). The six regular strings will
be installed as they are on a six string....through the back, over the saddle and nut and then connected to
the tuning post. The octave strings will be installed through the back plate of the bridge....you will see 6
holes that correspond with the extra six saddles (they should have the ferrules installed)...then over the
saddle and the appropriate slot in the nut. The order these strings are installed in (starting from the top or
6th string) starts with the thinner octave string, then the regular string etc, and the order they attach to the
tuners is the same...6th octave string, 6th regular string, 5th octave string, 5th regular string starting at the
nut and going to the end of the headstock and then returning, so the two tuners closest to the nut are both
E strings.

Solo Tele Style DIY Electric Double Neck Guitar Kit
Copyright © 2011 Solo Music Gear. All rights reserved | v1.02
6
6. TUNING AND SETUP
Tuning a 6-string guitar:
The open strings of a guitar, from the thickest to thinnest, in standard tuning are:
•E (2nd octave) –the thickest (or lowest sounding) string - is the 6th string
•A (2nd octave) –is the 5th
•D (3rd octave) –is the 4th
•G (3rd octave) –is the 3rd
•B (3rd octave) –is the 2nd
•E (4th octave) –the thinnest (or highest sounding) is the 1st string.
Standard tuning of a 12-string guitar:
The open strings are tuned in pairs as follows:
•2 E strings (2nd octave and 3rd octave
•2 A strings (2nd octave and 3rd octave)
•2 D strings (3rd octave and 4th octave)
•2 G strings (3rd octave and 4th octave)
•2 B strings (3rd octave)
•2 E strings (4th octave)
There are different methods to tune a guitar. Using a digital tuner is the easiest way. However, it is good
to learn tuning (and checking the accuracy of tuning) by ear with natural harmonics, unisons, octaves etc.
Guitar playability and intonation depends on its setup, so you may want to spend some time mastering
the necessary skills –be persistent in finding the optimal action (string height), neck relief and intonation
throughout the entire neck.

Solo Tele Style DIY Electric Double Neck Guitar Kit
Copyright © 2011 Solo Music Gear. All rights reserved | v1.02
7
Adjusting Strings Height:
String height is adjusted by the bridge saddle screws (use included Allen key). Since the fretboard has a radius
(12”), the heights of all strings should also match it. Thicker strings need more room for vibration without
“buzzing” (touching frets) and must be set up higher than thinner strings. Low action allows easier fretting and
faster playing. Recommended measurements for electric guitar with low action:
For the 1st String (the thinnest) –height at the 1st fret: 0.01” – 0.016” (0.25 – 0.4mm); at the 12th fret:
.063” – .078” (1.6 - 2mm).
For the 6th String (the thickest) –height at the 1st fret: 0.016” – 0.024” (0.4 – 0.6mm); at the 12th fret:
.078” – .01” (2 – 2.5mm).
The height at the first fret can be adjusted by cutting deeper slots for strings at the nut. However, it needs a
very precise job not to spoil the nut. If you are not sure that you can do it properly, stay with a factory pre-cut
nut.
A higher string action makes the guitar harder to play, yet some musicians may prefer it.
Adjusting Neck Relief:
Neck relief is the amount of bend in the neck to allow for proper string vibration. The physical properties
involved here are the strings pulling the headstock forward (toward the front of the guitar), the thickness
of the strings (heavier gauges obviously have more tension and will pull the headstock forward more
forcibly), and string height (a combination of how the nut is cut and how high the bridge and or saddles
are adjusted). Because of the relationship between string height and neck relief, you ma y have to go
back and forth between adjusting the neck relief and adjusting the string height a couple times.
Your Solo Guitar neck has a built in truss rod which counter-acts the forward pull of the strings...in other
words, when you tighten your truss rod, you straighten the neck, or pull the headstock toward the back
of the guitar. You will have to make truss rod adjustments usually when setting up the guitar for the first
time, and then in spring and fall when there are major humidity changes in the weather (remember,
humidity affects the wood of the guitar neck, either swelling or shrinking it).
String up the guitar as normal with your chosen gauge of strings....make sure the strings sit properly in
the nut slots at the headstock of the neck, and that the strings are brought to tension (tune the guitar).
The strings should sit easily in the nut slots, not be loose, and especially not sit on top of the slot ( if
either the slots are too loose or too small, you will want to consult an expert to either fill or file out the
slots). Now, take a couple minutes and refer to 'Adjusting String Height' to ensure the bridge and/or
saddles are correctly adjusted. Place a capo at the first fret and press down on the 16th fret....now place
a straight edge (which is at least 12"/30cm long) on top of the frets between the capo and the 16th fret
and measure the gap between the ruler and the 8th fret. Use the 6th (heaviest) string to measure.
Optimally, you will look for a gap of .001" - .002" 0.25 - 0.5 mm) but slightly more could still be
acceptable. By turning the truss rod screw with the supplied allen key clockwise, you will reduce the gap,

Solo Tele Style DIY Electric Double Neck Guitar Kit
Copyright © 2011 Solo Music Gear. All rights reserved | v1.02
8
and by turning counter-clockwise you will increase the gap. Never turn the truss rod screw more than
1/4 turn at a time! Now return to the 'Adjusting String Height' section and re-adjust your string height so
you have nice low action on the strings without buzzing on the frets! If you do have 'string or fret buzz',
you will either have to increase the neck relief slightly, or increase you string height.
Adjusting Intonation:
There are several factors that come into play when setting the intonation on your guitar. For this kit, we
will adjust to the basics and leave you to research the rest for yourself. Essentially, e ach string played
open, should have exactly the same pitch as that string fretted on the 12fth fret (the 12fth fret is the
halfway point between the nut and the saddle). You will want to use your guitar tuner for this
adjustment.....play each string open and adjust them to their prescribed notes (E,A,D,G,B,E thickest to
thinnest or 6th - 1st). Now play each string while you fret at the 12fth fret and adjust each saddle
toward the 12fth fret or away until the fretted note matches the open note. If the fre tted note is sharp,
you must move the saddle away from the neck.....if the fretted note is flat, you must move the saddle
closer. Intonating your guitar properly will help to ensure that it plays in tune up and down the neck,
and that chords sound correct.
Adjusting Pickup Height:
The final step in your guitar set-up is setting the pickup height. Pickups work on a magnetic field that is
affected by the vibration of each string. You can be too close to the strings and you can also be too far away
from the strings with the pickup....too close will create 'ghost tones' that will make tuning your guitar difficult
and will also affect the sound of your guitar in a negative way. Adjusting the pickups too far away reduces the
effect of the magnetic field and therefore reduces the output of the pickup....so the guitar will sound quieter
and have less dynamics.
You will find one or both of two types of pickups in your kit....either single coil or humbucker. Because
humbuckers use opposing magnets, they can be adjusted much closer to the strings than single coils can... Set
your volume on full for each pickup and the tone control at halfway...plug your guitar into an amplifier and
start adjusting the pickup height closer and away from the body while you play each string or strum.....you
should notice an obvious difference in volume and tone by doing so. Adjust each pickup to where it sounds
best. There is no universal rule for pickup height because it relies on string height, string gauge, pickup type,
magnet type etc...so by experimenting, you will find an adjustment that provides the best sound.
Recommended Books
1. Melvyn Hiscock. Make Your Own Electric Guitar. NBS Publications, 2003. ISBN: 0953104907
2. Dennis Waring. Make your own Electric Guitar & Bass. Sterling/Tamos, 2001, ISBN: 1895569702
3. Martin Koch. Building Electric Guitars: How to Make Solid-Body, Hollow-Body and Semi- Acoustic Electric Guitars
and Bass Guitars. Koch Verlag; 2001, ISBN: 3901314075

Solo Tele Style DIY Electric Double Neck Guitar Kit
Copyright © 2011 Solo Music Gear. All rights reserved | v1.02
9
DTCK-1 Wiring Diagram
Table of contents