SOMFY i700 User manual
Ref:
7
000301
User Guide
www.somfy.com
Touch Panel Controller – i700

Copyright © 2010 Somfy SAS. All rights reserved – V0 – 06/2010 2
SAFETY
oThis Somfy Touch Panel Controller – i700 must be installed, serviced, and maintained only
by a qualified installer.
oBefore installation, check that this product is compatible with the associated equipments and
accessories.
oThese instructions describe how to install this product.
oThe installer must comply with current standards and legislation in the country in which the
product is being installed, and inform his customers of the operating and maintenance
conditions for the product.
oAny use outside the sphere of application specified by Somfy is not approved. Such use, or
any failure to comply with the instructions given herein will invalidate the warranty, and Somfy
refuses to accept liability.

Copyright © 2010 Somfy SAS. All rights reserved – V0 – 06/2010 3
TABLE OF CONTENTS
SAFETY........................................................................................................................................... 2
TABLE OF CONTENTS.................................................................................................................. 3
INTRODUCTION............................................................................................................................. 4
Overview ..................................................................................................................................... 4
System Configuration.................................................................................................................. 4
OPERATION ................................................................................................................................... 5
Touch Panel at a Glance............................................................................................................. 5
My Item........................................................................................................................................ 7
My Scenarios............................................................................................................................... 8
My Week ..................................................................................................................................... 9
SETTING....................................................................................................................................... 10
SET My Touch Panel ................................................................................................................ 10
SET My Scenario ...................................................................................................................... 11
SET My Week ........................................................................................................................... 12
SPECIFICATION........................................................................................................................... 13
CARE AND CLEANING INSTRUCTION...................................................................................... 13
APPENDIX .................................................................................................................................... 14

Copyright © 2010 Somfy SAS. All rights reserved – V0 – 06/2010 4
INTRODUCTION
Overview
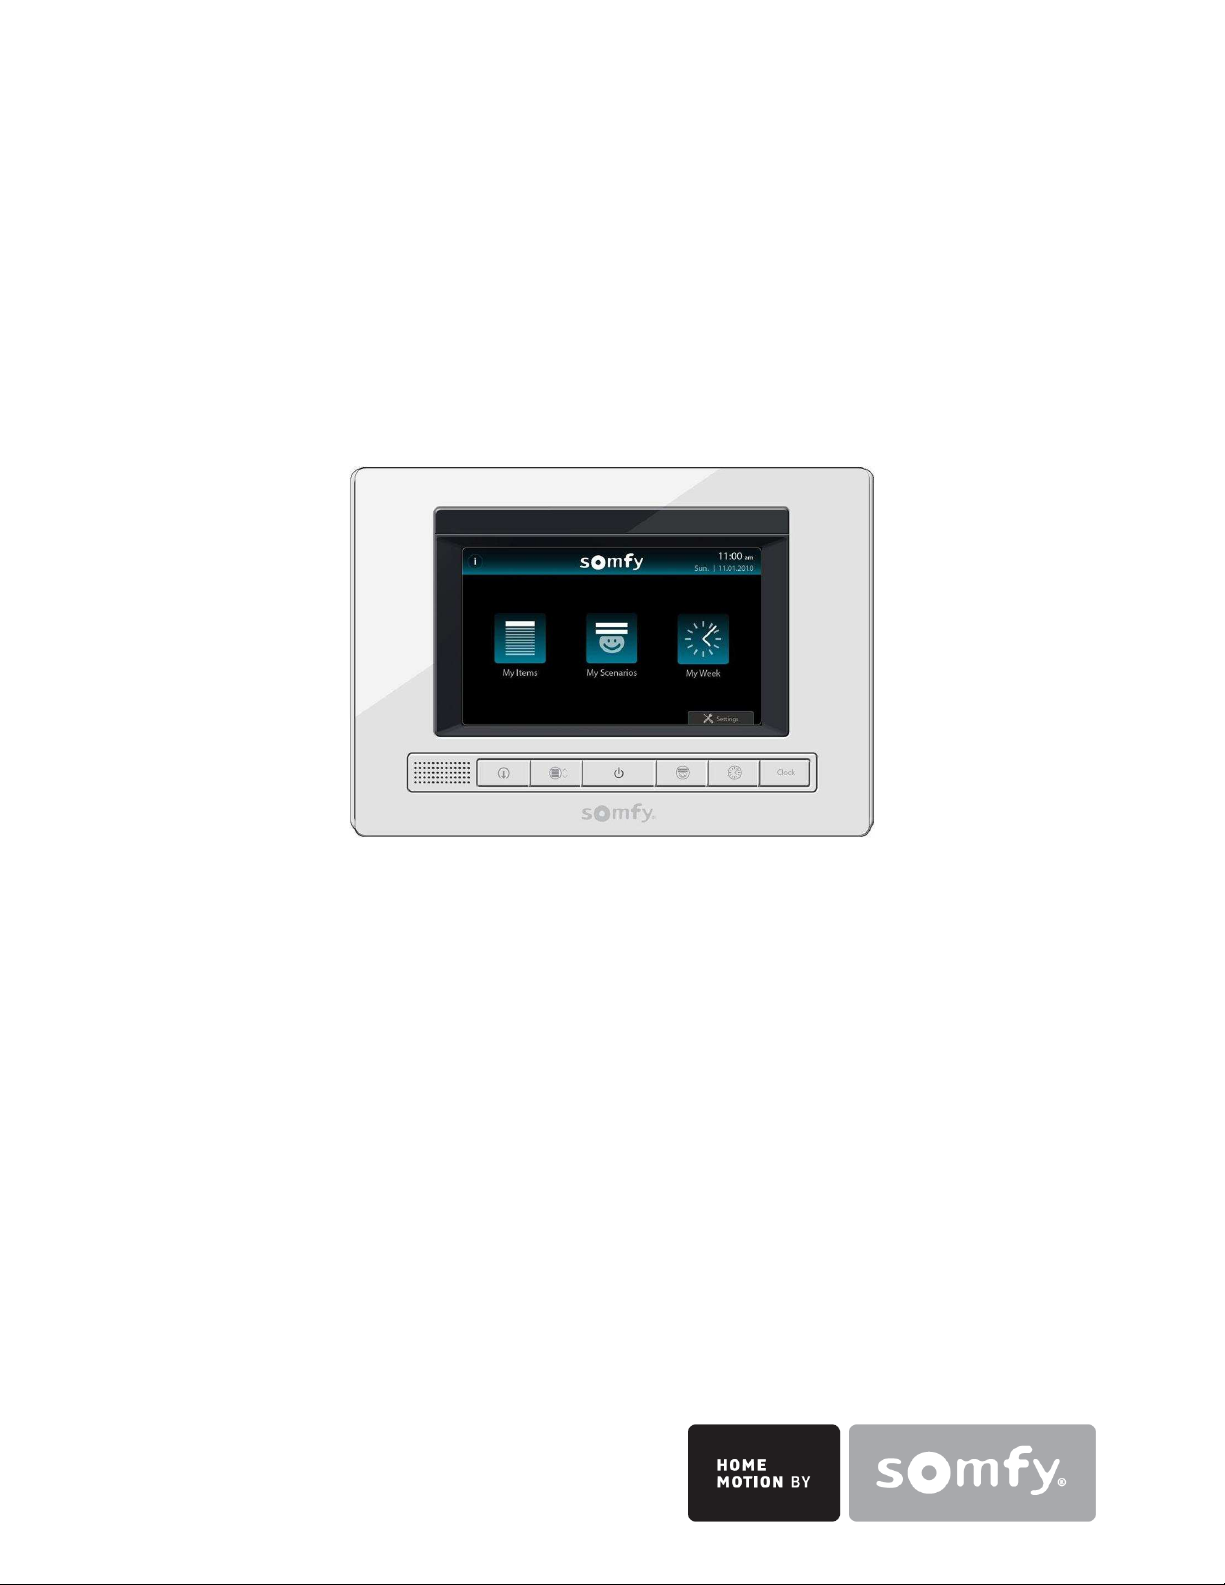
The Somfy Touch Panel Controller – i700 is a Somfy controller with Microsoft Windows
®
operating system built in. The speed of the processor and the LAN-enabled architecture allow the
i700 Controller to function as an integrated home gateway. The i700 Controller is equipped with a
FreeScale i.MX31 523 MHz processor, a 7" touchscreen display that provides controlling
capabilities for a home/building automation solution.
Somfy motorized products can be controlled through the Touch Panel Controller which provides
the following functions:
oControl movement of motorized product individually, or as a group.
oSimultaneously control multiple openings from a single button using the scenario function.
oAutomatically control opening through a programmed schedule.
oPerform specific function base on the product nature, such as tilting for venetian blinds,
and sun automation for sensors.
System Configuration
A system diagram of the Somfy Touch Panel Controller – i700 is shown in the following diagram:

Copyright © 2010 Somfy SAS. All rights reserved – V0 – 06/2010 5
OPERATION
NOTE:
The Touch Panel Controller must be set up by your installer for the first time through
custom configuration software.
The setup and configuration of every Touch Panel Controller i700 is unique so the display
may look different than the examples provided in this User’s Manual.
Touch Panel at a Glance
When the Somfy Touch Panel i700 is powered ON, a startup screen is displayed
A. Function icons
B. Setting button
C. Current time and date
D. Technical support icon
E. Shortcut buttons
F. Screen on / off button
B
D
C
A
F
E

Copyright © 2010 Somfy SAS. All rights reserved – V0 – 06/2010 6
Icon Description
MY ITEMS: Control each item individually, or all the items in a room together.
You can easily locate the items which are categorized by “space” or by “item”.
MY SCENARIOS: Recall the pre-programmed scenario with one touch of the
button. Combination of items can be saved as one scenario to give you the
convenience.
MY WEEK: The timer function which allows you to turn on or off a pre-
programmed daily schedule for a week. It could automatically activate
multiple items according to schedule.
SETTING: Enter setting mode to configure Touch Panel screen setting,
create scenario and form weekly schedule.
INFO: Access information about installer or support hotline.
ALL CLOSE: A shortcut button to let you close all connected openings by
one button.
Shortcut to “MY ITEM”:
Shortcut to “MY ITEM”:
Shortcut to “MY WEEK”:
CLOCK: Show the current time.
HOME: Tab anytime to return to the Home screen.
BACK: Tab to go back to previous page.

Copyright © 2010 Somfy SAS. All rights reserved – V0 – 06/2010 7
My Item
You can easily relate screen icons to items and places according to your own premise, and label
them as you wish, eg Amy’s Room.
Tap MY ITEMS to locate an item.
oTap My Space and choose an area, you can control together all items belonging to this
area or tap an item to control it individually.
oTap My Items directly, and then choose an item.
Different function icons will be displayed according to the application. For example, UP and
DOWN control for roller blinds, while OPEN and CLOSE control for curtain. You would also have
the option to tilt the slats angle for Venetian blinds, turn on/off sun automation and dim the lights.
Functions you can perform:
Control the “UP” and “DOWN”
movement of the item
Control the “OPEN” and
“CLOSE” movement of the
item
Bring the item to the favourite
position
Stop the moving item
Control the tilting movement of
the venetian blind
Activate / deactivate sun
automation function
Turn ON / OFF the light
Control the dimming of the light

Copyright © 2010 Somfy SAS. All rights reserved – V0 – 06/2010 8
My Scenarios
A scenario allows you to define a special atmosphere for your home by combining the movement
of various products independently of each other. In one scenario, some products will open, others
will clsoe, some will be positioned at the favourite position – My (favorite position must be pre-
defined by installer) and others will not be affected.
For example, to preserve the coolness inside the after-summer afternoons, the blind of the rooms
facing south will bring in favorite position, the shade of the terrace will go down to protect the
furniture from direct sunlight in the living room.
Note: To update a scenario, for instance changing the command of an item, adding or removing
an item from a scenario, please follow the instruction explained in <Set My Scenario> section.
Empty space for
new scenario
Tap to recall a pre-set
scenario immediately
View the pre
-
set position of
the associated items.

Copyright © 2010 Somfy SAS. All rights reserved – V0 – 06/2010 9
My Week
A schedule is used to activate the movement of various products at a specific time. Schedules
include periodically turning the shades up and down when no one is home to make a house
appear lived in.
Tap the Clock to toggle on/off of a pre-programmed daily schedule.
When the status is ON, the assigned scenario will be automatically
performed by the set time.
View the full day schedule by scenario.
Within the day schedule, you may also view the details of individual
scenario.
In this example, Monday, Tuesday, Thursday and Friday are turned on, meaning the scenarios
assigned for these days will be automatically performed by the set time. By tapping on the zoom
icon for Thursday, it shows 3 scenarios assigned at their specified time.
Wednesday, Saturday and Sunday are set to OFF; there will be no automatic movement on these
days.
Days of the week
and its status.
Daily schedule by
scenario

Copyright © 2010 Somfy SAS. All rights reserved – V0 – 06/2010 10
SETTING
Tap SETTING to configure screen setting, create scenario and form weekly schedule.
You will be asked to enter a password if you have enabled this function. Tap your password and
then tap OK to proceed.
You have three options:
SET My Touch Panel
Tap SET My Touch Panel to configure your screen setting.
Date and Time setting applies to the time
shown at the top of the screen.
Power save sets how long before the
screen turns off. To turn the screen back
on, simply press
located on the front
panel.
Brightness refers to the brightness of the
screen by percentage.
Password, when protection is set to ON, you will be required to enter a password to unlock
the screen setting.
Adjust your setting by tapping next to each field.
Tap to save setting, or to go back to the previous screen without saving.
Copyright © 2010 Somfy SAS. All rights reserved – V0 – 06/2010 11
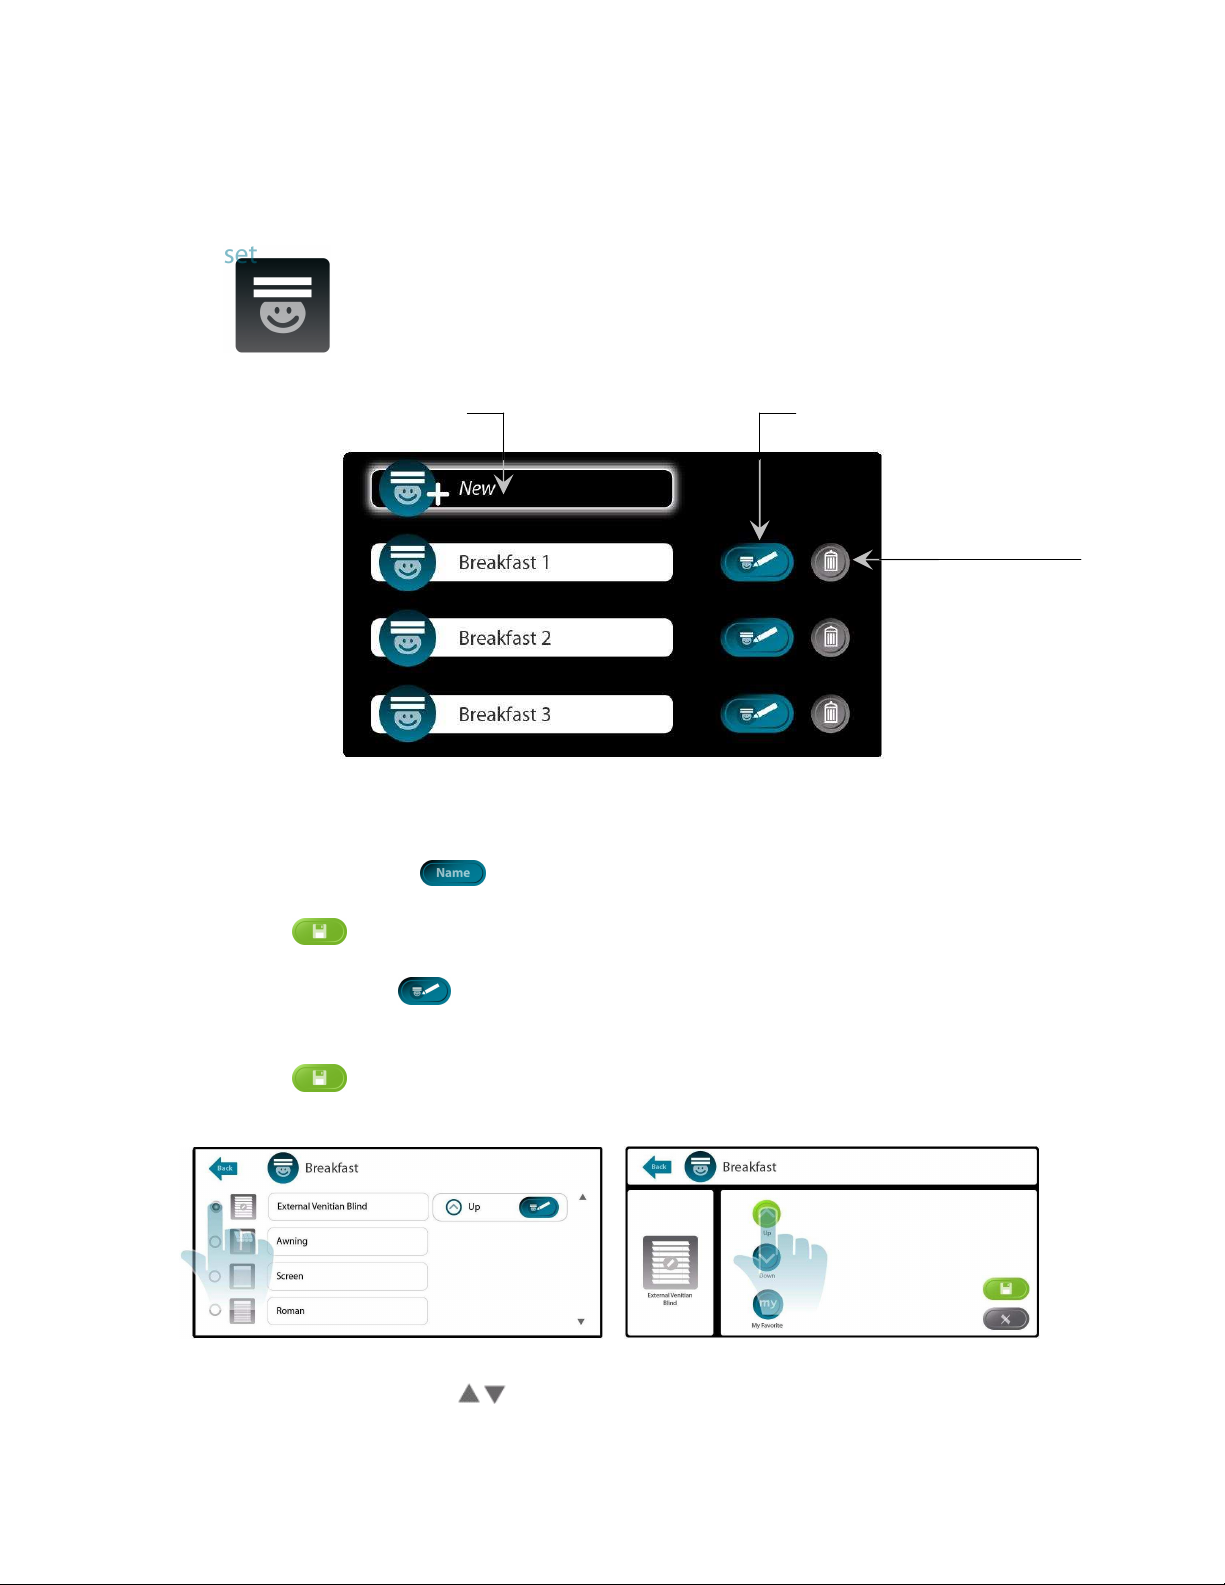
SET My Scenario
Tap Set My Scenario to create, modify or delete scenario.
Create a new scenario:
1. Tap New, then tap to enter your scenario name on the keypad.
Note : the accepted number of characters depends on the chosen characters.
2. Tap to save the name.
3. Choose the item you would like to include in the scenario by tapping on its option button.
(Fig 1), then tap .
4. Tap the desired command of this item, the action button would appear green (Fig 2).
Note: Tilting, dimming and sun function is not applicable in scenario.
5. Tap to save.
6. Choose other items and repeat the steps for this scenario.
Fig 1 Select Item Fig 2 Assign command
7. To find other items, tap to scroll to the next pages.
8. The scenario is automatically saved. Tap Back to go back to the setting main page.
Tap to create a
new scenario
Delete the scenario
Modify the scenario.
Copyright © 2010 Somfy SAS. All rights reserved – V0 – 06/2010 12
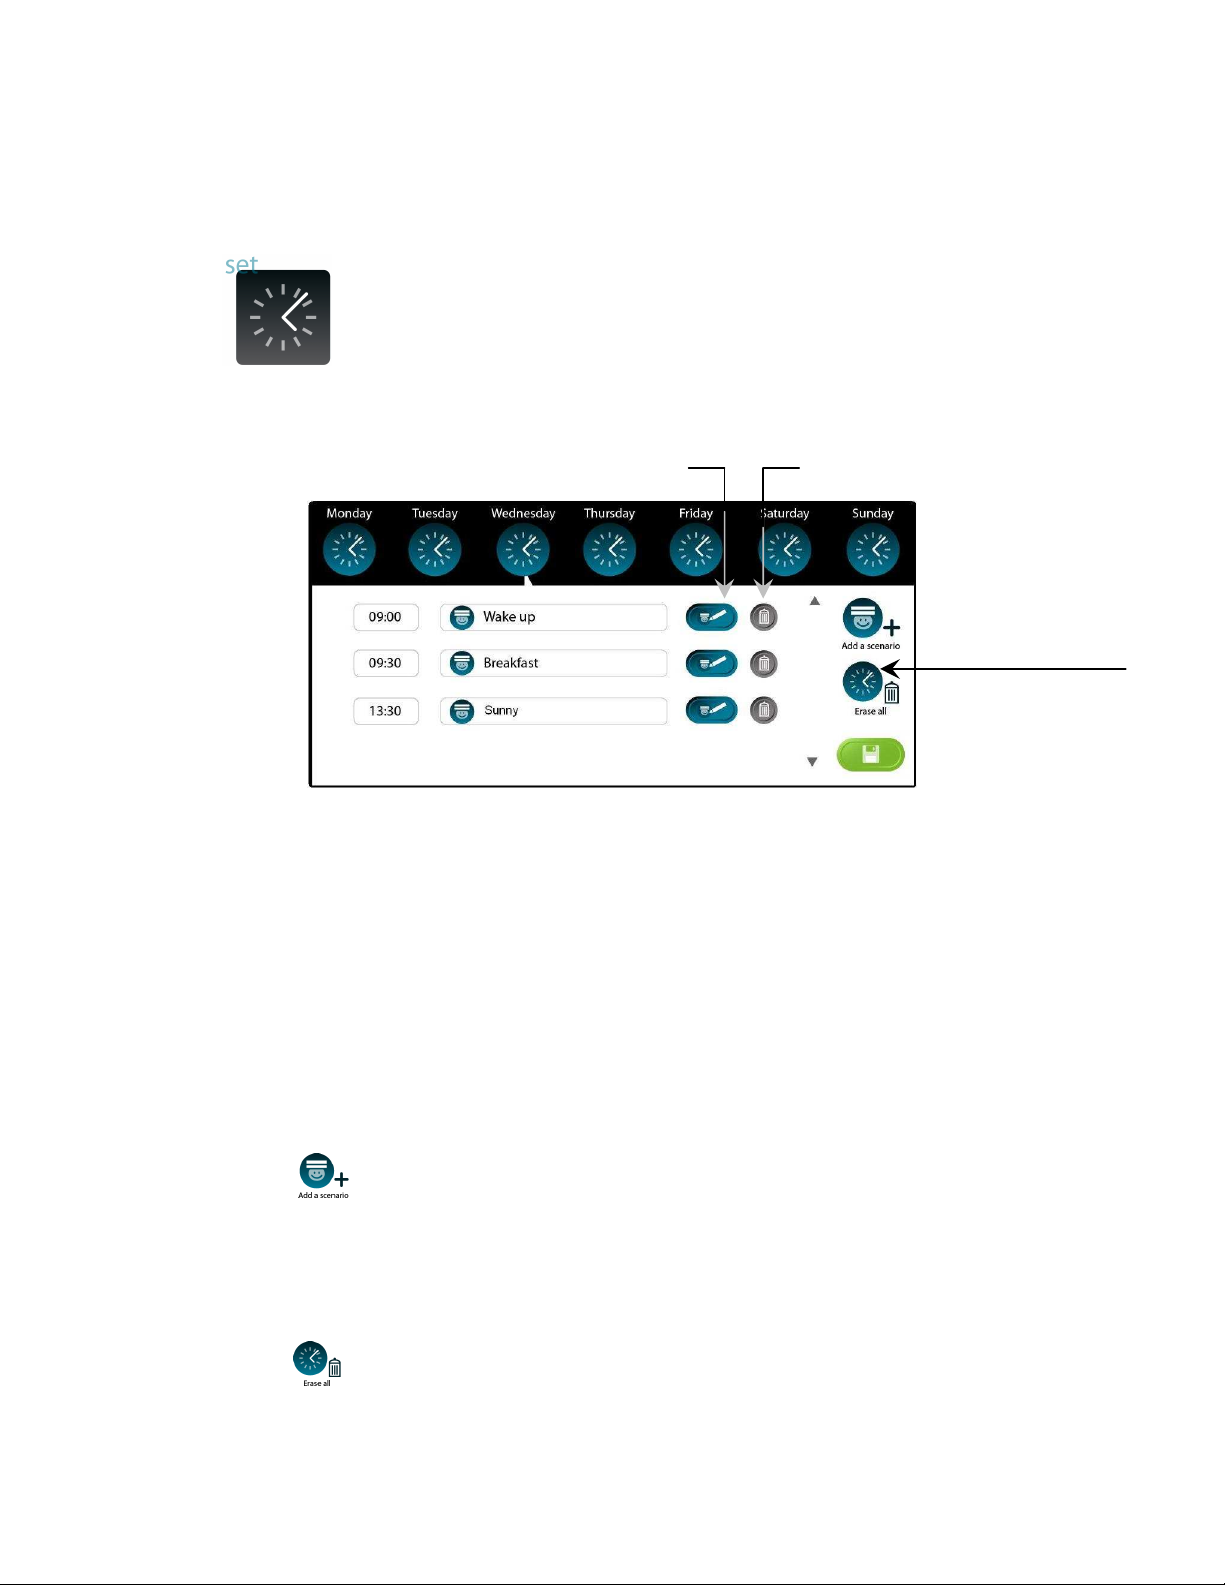
SET My Week
Tap Set My Week to create, modify or delete scenario
You will set your schedule based on pre-set scenarios.
You may check the daily schedule by tapping the clock icons.
Each day is allowed 10 different time range.
In the above example: on Wednesday, there has been 3 time range set.
At 9am, <Wake Up> scenario will go off, all the openings concerned in the <Wake Up>
scenario will be activated according to the program.
At 9:30am, <Breakfast> scenario will go off to allow enough sun light to enjoy the first
meal of the day.
At 01:30pm, <Sunny> scenario will go off for furniture protection from the sun.
Schedule your day:
1. Tap to add a scenario to a time range.
2. Enter the time, and tap Select Scenario.
3. Choose a scenario from your list, then tap OK.
4. Tap Save.
Erase all time range:
1. Tap to erase all time range of a selected day.
2. Tap OK to confirm.
Modify the time or select another
scenario to this time range.
Delete single time range of
a selected day.
Erase all time range
of a selected day.
Copyright © 2010 Somfy SAS. All rights reserved – V0 – 06/2010 13
SPECIFICATION
Max # of Items: 30
Max # of Space 10
Max # of Scenario 20
Max # of time range per day 10, one scenario can be programmed in more than 1 time
range.
Clock format 12-hour clock format
CARE AND CLEANING INSTRUCTION
Follow the precautions below to properly clean and care for the Touch Panel.
Clean regularly using a soft lint free cloth.
Only use a mild, non-abrasive cleaner such as window cleaner lightly sprayed onto the
lint free cloth to clean the Touch Screen.
Ensure hands are dry and clean before operating the Touch Screen.
Only use nonabrasive objects to operate the Touch Screen. Hard, sharp objects will
cause damage.
Leave the Touch Screen uncovered to allow adequate ventilation.
Only use the Touch Screen indoors.
Properly shade the Touch Screen so that it is not exposed to direct sunlight for extended
periods.

Copyright © 2010 Somfy SAS. All rights reserved – V0 – 06/2010 14
APPENDIX
Icon options for Items
1. Roller Blind 9. Louvres
2. Pleated / Cellular Blind 10. Skylight
3. Roman Shade 11. Gate
4. Exterior Venetian Blind 12. Window Opener
5. Interior Venetian Blind 13. Awning
6. Roller Shutter 14. Garage Door Opener
7. Projection Screen 15. Lighting
8. Curtain
Icon options for Space
~~~~~~~~
Contact your local Somfy representative or Somfy certified installer for technical support and
service.
Bedroom
Kitchen & Guests
Family Room
Patio
Garage
Living Room
Garden
Study
Bathroom
Conference Room
General
Theatre
1 2 3 4 5 6 7
9 10 11 12 13 14 15
12
Table of contents
Popular Touch Panel manuals by other brands


Advantech
Advantech Intel XScale PXA Touch Panel Computer TPC-66... user manual

Sunricher
Sunricher SR-2300TR-G3-RGBW-US user manual

InFocus
InFocus MONDOPAD INF5720 Hardware guide

panel
panel PSG3-EP Series user manual

Panduit
Panduit ATLONA AT-VSP-800 Series installation guide

Eizo
Eizo DuraVision FDS1782T user manual


