Sonardyne ROVNAV 6 User manual
QUICK START GUIDEROVNAV 6FIRMWARE UPGRADE GUIDETo access more information on the firmware, download a free QR code app on your Smartphone and then scan this code.
QSG-UP-8310-A108/2013910-0004
SAFETYIt is recommended the operator complies with the Health and Safety Regulations applicable to the vessel and the region before operating any equipment.PRODUCT SUPPORTEmail: [email protected]Tel: +44 (0) 1252 872288Should you require NON-EMERGENCY product support for your firmware upgrade, email and telephone product support is available during normal UK office hours (08:00-17:00). Alternatively, please contact your nearest Sonardyne Office. Visit www.sonardyne.com for full details.In emergency situations, the Sonardyne 24 hour helpline is answered during normal office hours - 08:00-17:00. Outside these hours, your call is automatically transferred to an agency who will log the details of your emergency and alert the appropriate Sonardyne personnel. Our aim is to ensure that emergency requests are dealt with immediately during office hours and are responded to within 30 minutes at all other times.SONARDYNE 24HR EMERGENCY HELPLINE: UK +44 (0) 1252 877600Make sure the correct firmware is being installed to correctly.Do not use the test cables to lift the equipment.make the equipment operate CAUTIONSSTEP 1Heavy equipment. The ROVNav 6 transceiver, when out of water, weighs 13 kg. Manual handling Equipment (MHE) must be used to move the transceiver. If MHE is not available, then a manual handling assessment must be carried out prior to carrying out manual lifting / handling. Personal Protective Equipment such as protective footwear and gloves must be worn before lifting the equipment.Make sure the equipment is clean and dry before removing the connection point cover and connecting any test cables.Electric shock. Electric shock hazard risk is if the Remote Transducer output connector contacts are touched whilst the transducer cable is disconnected, the unit is powered and if instructed to transmit. Never touch the connector contacts whilst the power is on.WARNINGS

EQUIPMENT SUPPLIEDSTEP 2This Quick Start Guide gives instruction on how to upgrade the HOST firmware, used on the ROVNav 6 (8310) Transceiver, using the Test Box (8300-066) (shown below) supplied with the equipment.If the Test Box is not available, please contact Sonardyne for product support. Refer to Step 1for details.Drivers are required to enable operation of the Test Box. These are supplied on the Utilities CD (920-2000) and require installation onto the PC before the Test Box is connected to the ROVNav 6. For any further information please refer to the ROVNav 6 User Manual (UM-8310), Section 9.Make sure all Warnings and Caution labels on the equipment are read and understood. Refer to the equipment manual for further information and assistance.
CONNECTING THE EQUIPMENTSTEP 3
1
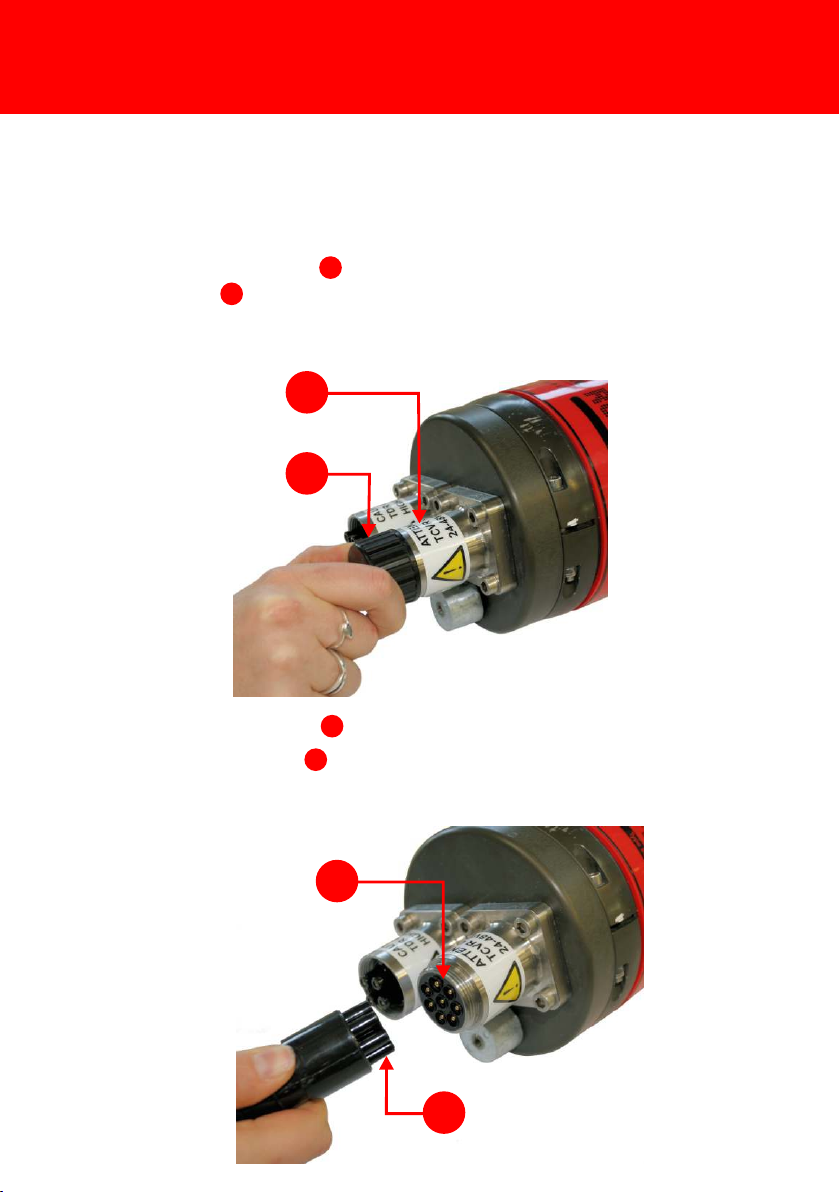
234Use the following instructions to connect the 6G Instrument Test Box (Type 8300-066) to the Transceiver.1Remove the protective cover from the TCVR Power and Comms 8-Way AGP connection point .122Check the connection points are free from obstructions and dirt.3Position the Test Box cable in the correct orientation and insert into the connection point.34

STEP 4CONNECTING THE EQUIPMENT
1
2345To make sure the Transceiver has sufficient power to be able to upgrade the firmware, an external power source can be connected to the red and black connection points on the Test Box.44Using a USB connection lead , connect the Test Box to a PC.132NOTEAs soon as the Test Box is connected to the PC, the two mode lights on the Test Box will illuminate: Red for RS232, Blue for RS485. If the mode lights do not illuminate Red refer to the ROVNav 6 User Manual UM-8310 Section 10.3 for details on checking the internal switches of the Test Box.2

OPERATING THE EQUIPMENT3Two USB Serial Ports will be listed within the Comms Ports; the first port is the primary port. Make a note of these ports to assist in selecting a Comms Port for the 6G Terminal Lite download.4Once the Comms Ports have been identified, close the Computer Management.STEP 51To assist in upgrading the firmware, it is recommended that the PC Comms Port the Test Box is connected to, is identified. 2To identify the Comms Port go to Device Manager on the PC Computer Management. 2NOTEThe Test Box to PC USB connection provides two Comms ports on the PC. It is important to identify these ports, so one can be selected for the firmware upgrade process.
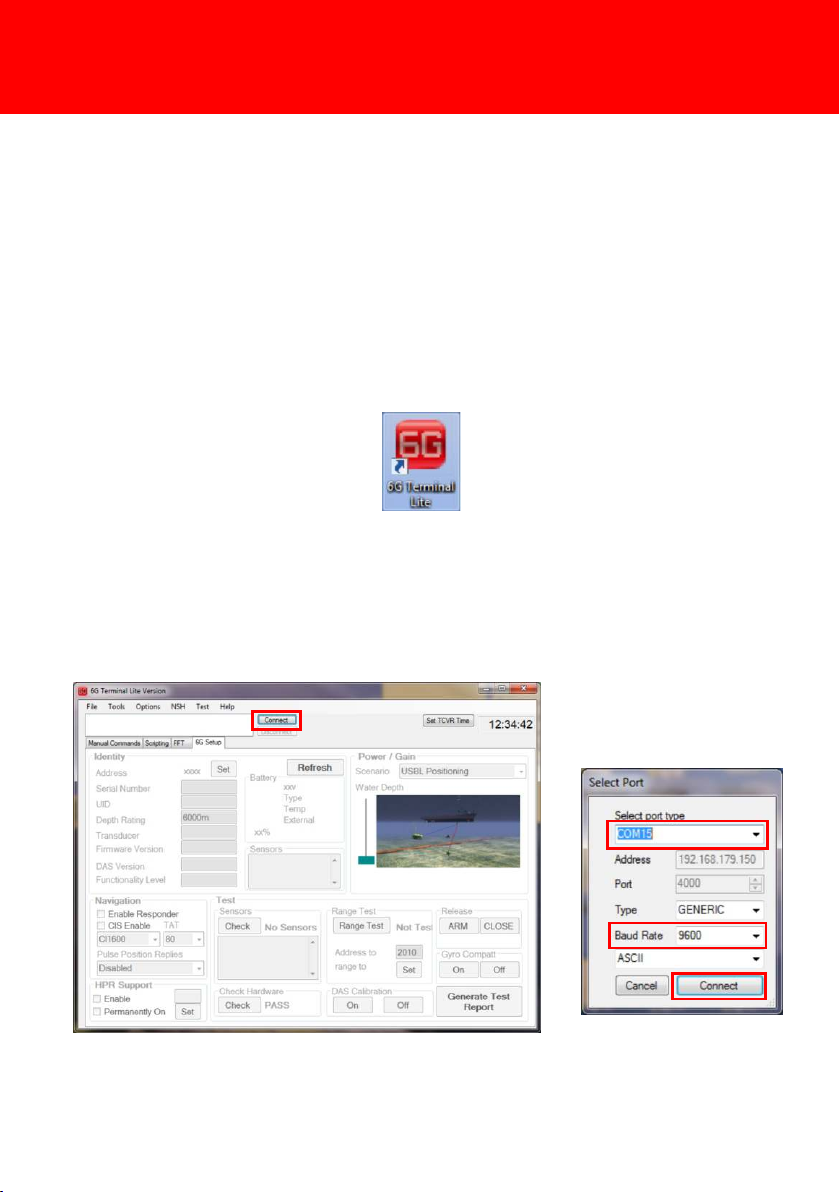
STEP 6To make sure the ROVNav 6 maintains full operation it may be necessary to carry out an upgrade of the HOST firmware. The firmware upgrade is carried out using the 6G Terminal Lite software.1Open the 6G Terminal Lite software by double clicking on the desktop icon.HOST FIRMWARE UPGRADE PROCEDURE2Click Connect to connect the ROVNav 6 to the software. 3In the Select Port window, select the correct port the PC is connected to and the Baud Rate from the drop down menu. Click Connect. OPERATING THE EQUIPMENT

OPERATING THE EQUIPMENTSTEP 7When connected correctly, the Comms Log window will appear. The green writing indicates a CS and FS (in green) request sent to the ROVNav 6. If connection is successful the ROVNav 6 will reply (in blue). Do not delete or close this window. It is used for diagnostic purposes.2NOTE4The 6G Setup tab will populate with ROVNav 6 information.5A Comms Log window will appear.HOST FIRMWARE UPGRADE PROCEDURE6Select the Manual Command tab to also see the ROVNav 6 communication readings.7If no response is indicated in the Comms window from the ROVNav 6 this would indicate the incorrect Baud Rate, refer to Step 11 for instructions on Determining the Baud Rate.
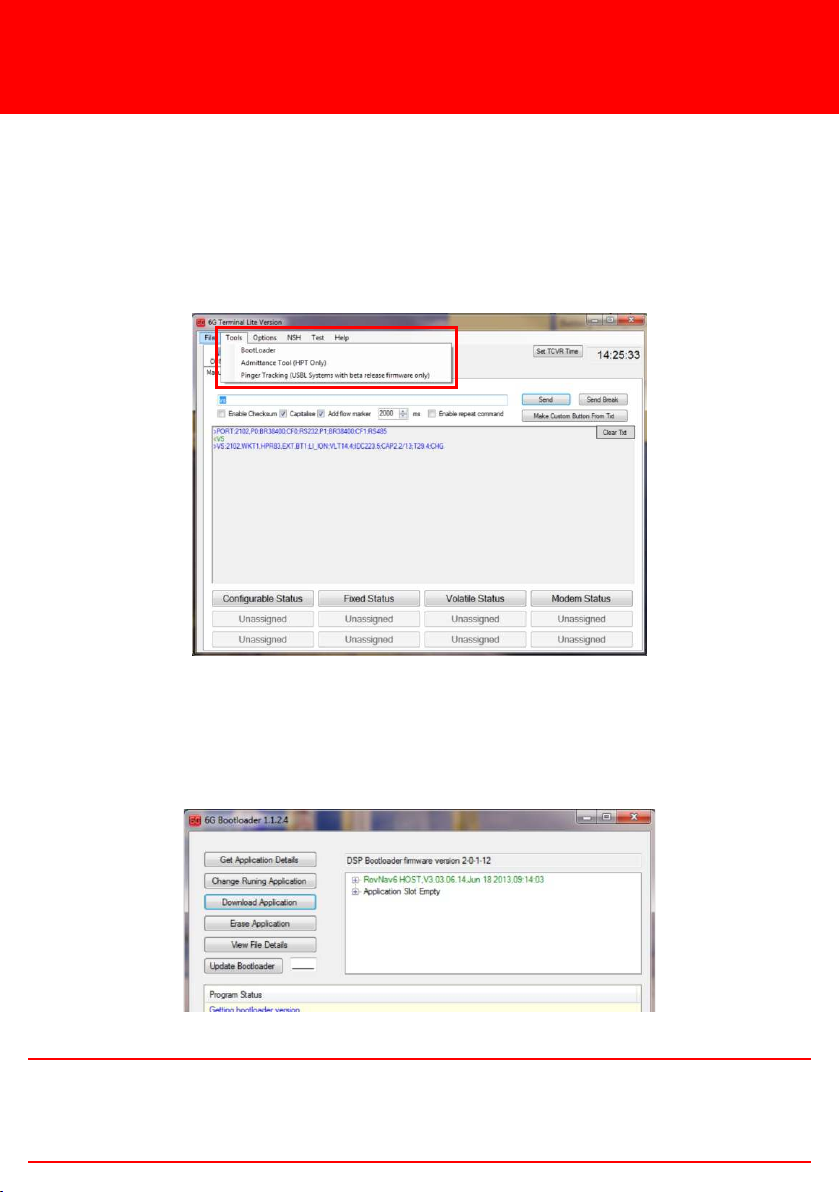
OPERATING THE EQUIPMENTSTEP 89The 6G Bootloader screen will display the versions of HOST firmware currently installed in the ROVNav 6.HOST FIRMWARE UPGRADE PROCEDURE8On the 6G Terminal Lite screen toolbar select Tools then Bootloader.The ROVNav 6 can have up to two versions of the firmware installed at one time. The firmware highlighted in green is the version currently in operation. If only one version of firmware is installed the application slot will be empty.2NOTE

OPERATING THE EQUIPMENTSTEP 910If two versions of firmware are installed, select the firmware to be replaced. If only one version of firmware is installed select the Application Slot Empty. Click Download Application.HOST FIRMWARE UPGRADE PROCEDURE12In the Open window navigate to the location of the new firmware.13Select the required firmware and click Open.11If a version of firmware is to be replaced a warning window will appear to make sure the firmware selected is the correct version to be replaced. Click OK to accept and close this window.

OPERATING THE EQUIPMENTSTEP 10HOST FIRMWARE UPGRADE PROCEDURE15The Open window will close and the 6G Bootloader screen will appear. A green progress line will indicate the firmware download.
1
214The new firmware will immediately start to download as indicated by the green TX/RX light on the Test Box .21New versions of firmware will either be issued directed by Sonardyne and supplied on a CD, or can be downloaded from the Sonardyne website at: www.sonardyne.com.2NOTE

STEP 1117Close the Bootloader screen and return to the 6G Terminal Lite screen.18On the 6G Terminal Lite Manual Command tab select Send Break. This will reset the transceiver with the new firmware.16On completion of the firmware upgrade the new version of firmware will appear in the Bootloader main screen in green.HOST FIRMWARE UPGRADE PROCEDUREOPERATING THE EQUIPMENT

OPERATING THE EQUIPMENTSTEP 12DETERMINING THE BAUD RATEDuring the firmware upgrade of the ROVNav 6 if there is no response in the Comms Log window when clicking Connect, it is possible the Baud Rate is incorrect. Carry out the following procedure to determine the Baud Rate.1On the 6G Terminal Lite software double click on the Comm port icon in the top left window and select Change Baud Rate.2The Select Port window will appear. Change the Baud Rate to 9600 then click Connect.
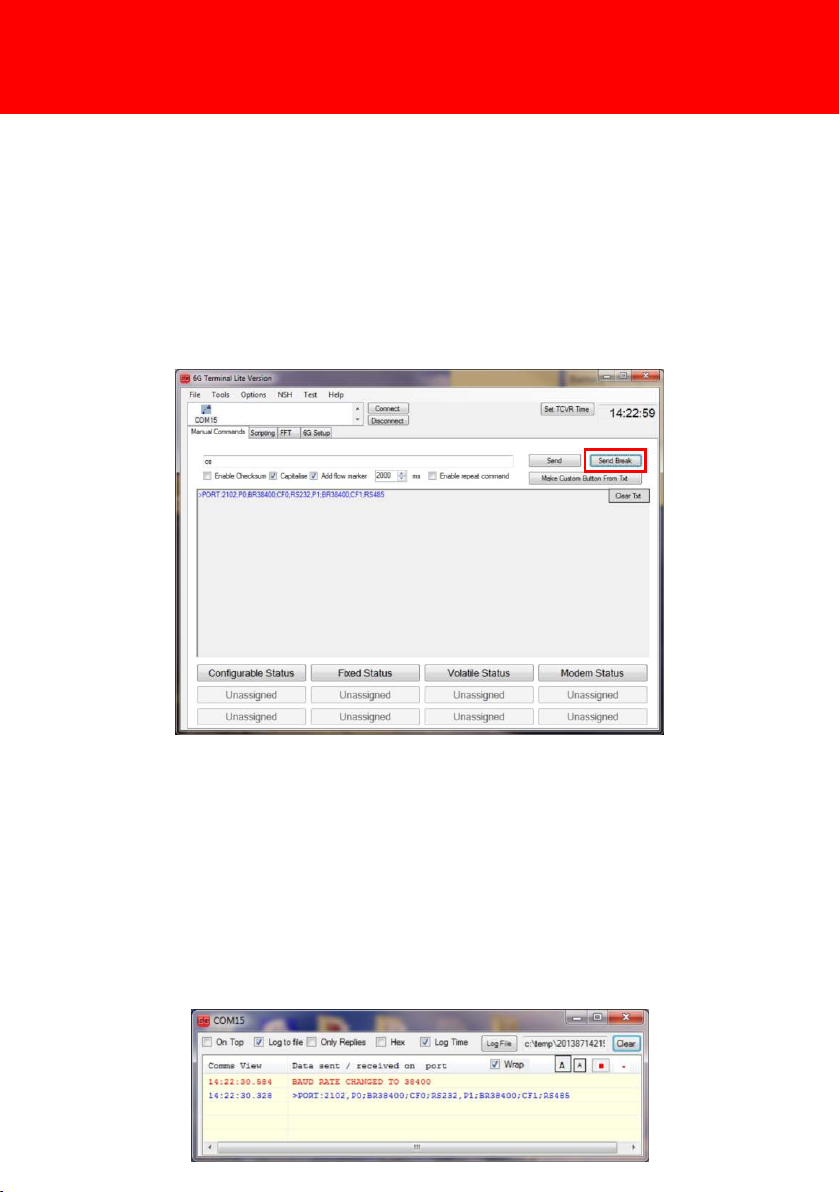
STEP 13DETERMINING THE BAUD RATE4The 6G Terminal Lite software will now detect the Baud Rate and, if necessary, change the Baud Rate of the software to match.5The Comms Log window will appear with notification that the Baud Rate has successfully changed.3On the 6G Terminal Lite Manual Command page click Send Break to send communication to the ROVNav 6.OPERATING THE EQUIPMENT

RETRIEVAL & PACKING1On completion of the firmware upgrade make sure the all programmes are closed.2Make sure any power supplied to the equipment is switched OFF at source.3Disconnect the red and black power leads from the Test Box, if used.4Disconnect the USB cable from the Test Box and the PC.5Disconnect the Test Box from the Transponder.6Refit the protective cover to the TCVR Power and Comms 8-Way AGP connection.7Stow the Test Box in the protective packaging supplied with the transceiver for further use.STEP 14For further information on the Sonardyne equipment and firmware upgrades go to: http://www.sonardyne.com/support/product-support/product-support-table.html.2NOTE

Global Headquarters, UKT. +44 (0) 1252 872288F. +44 (0) 1252 876100[email protected]Houston, USAT. +1 281 890 2120F. +1 281 890 7047[email protected]24/7 Emergency Hotline+44 (0) 1252 877600Email Support[email protected]Websitewww.sonardyne.comTwitter@sonardyneAberdeen, UKT. +44 (0) 1224 707875F. +44 (0) 1224 707876[email protected]Singapore, AsiaT. +65 6542 1911F. +65 6542 6937[email protected]ACOUSTIC POSITIONINGINERTIAL NAVIGATIONllWIRELESS COMMUNICATIONlSONAR IMAGINGQSG-UP-8310-A108/2013910-0004Rio das Ostras, BrazilT. +55 22 2123 4950F. +55 22 2123 4951[email protected]
Table of contents
Other Sonardyne Transceiver manuals


