SONIQ Qmedia DVP1000 User manual

This lightning flash with arrow
head symbol, within an
equilateral triangle,is intended
to alertthe userto the presence
of uninsulated “Dangerous
voltage”within the product ’s
enclosure that may beof
sufficient magnitude to
constitute a risk of electric
shock topersons.
CAUTION
RISK OF ELECTRIC SHOCK
DO NOT OPEN
Warning: To reduce the risk of
electric shock, do not remove
cover (or back) no user-
serviceable parts inside.
Refer servicing to qualified
service personnel.
The exclamationpoint within
an equilateral triangle is
intended to the user to
the presence of Important
operating and maintenance
instructions in the literature
accompanying the appliance.
alert
Notices and Safety Instructions
The symbol for Class II (Double Insulation)
This symbol means that the unit complies with
European safety and electrical interference directives.
- TO PREVENT FIREOR SHOCK HAZARD, DO NOTUSE THIS PLUG WITHAN EXTENSION CORD, RECEPTACLE
OR OTHER OUTLET UNLESS THEBLADES CAN BE FULLY INSERTED TOPRESENT BLADE EXPOSURE.
- TO PREVENT FIREOR SHOCK HAZARD. DO NOTEXPOSE THIS APPLIANCETO RAIN OR MOISTURE.
- TO PREVENT ELECTRICALSHOCK, MATCH WIDEBLADE PLUG TO WIDE SLOT FULLYINSERT.
IMPORTANT SAFETYINSTRUCTIONS
1. Read these instructions.
2. Keep these instructions.
3. Heed all warnings.
4. Follow all instructions.
5. Do not usethis apparatus near water.
6. Clean only withdry cloth.
7. Do not blockany ventilation openings. Install in accordance with the manufacturer’s instructions.
8. Do not installnear any heat sources such as radiators, heat registers, stoves, or other apparatus
(including amplifiers) thatproduce heat.
9. Do not defeatthe safety purpose of the polarized or grounding type plug. Apolarized plug has
two blades with one wider than the other. A grounding type plug has two blades and a third
grounding prong.
The wide blade orthe third prong are provided for your safety.If the provided plug does not fit
into your outlet, consult an electrician for replacement of the obsolete outlet.
10. Protect the power cord from being walked on or pinched particularly at the plugs,convenience
receptacles, and at the point where they exit from the apparatus.
11. Onlyuse attachments/accessories specified by the manufacturer.
12. Unplug the apparatus during lightening sorts or when unused for long periods of time.
13. Refer all servicing to qualified personnel. Servicing is required when the apparatus has been
damaged in any way, suck as power supply cord or plug is damaged, liquid has been spilled or
objects have fallen into the apparatus, the apparatus has been exposed to rain or moisture, does
not operate normally,or has been dropped.
.
This appliance shall not be exposed to dripping or splashing water and that no objectfilled with
liquids such as vases shallbe placed on apparatus
- 1 -
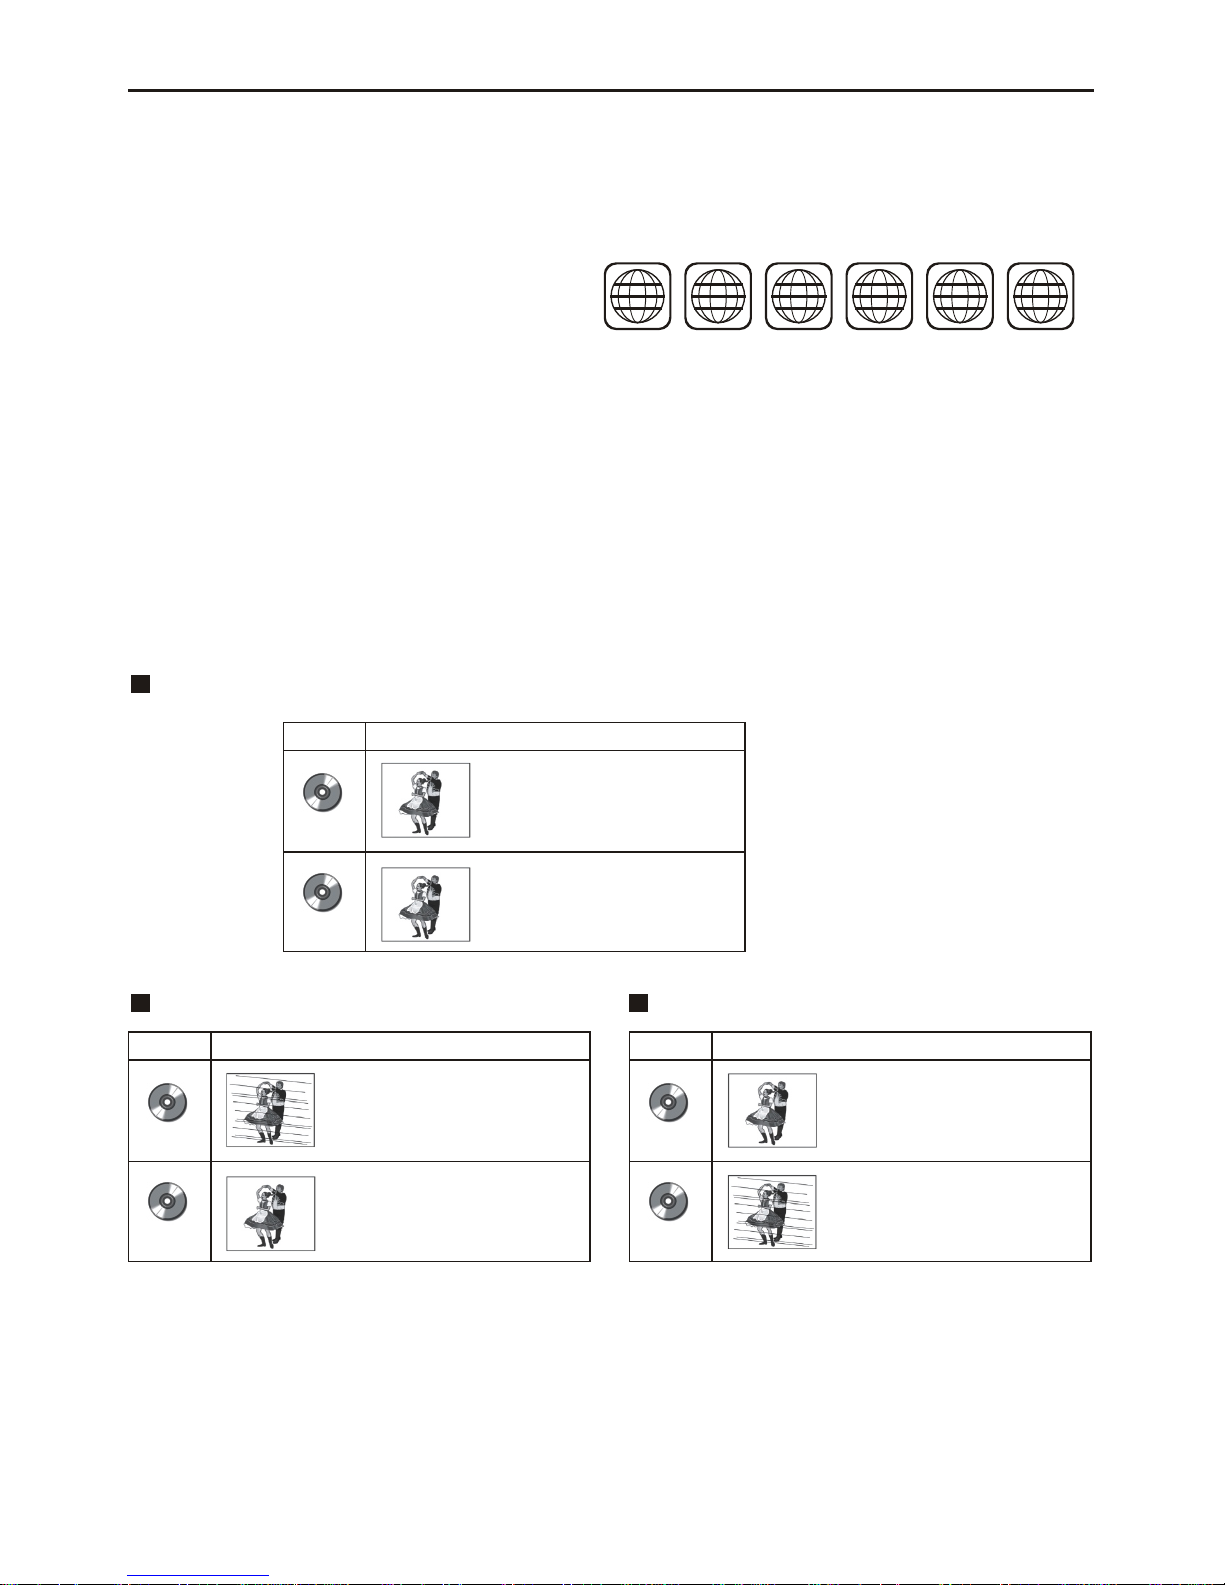
Toprotect intellectual property, the involved organizations partition the world into six regions,
each of which can only use the DVD player and DVD disc with the given regional code.
The illustration on the right shows symbols of the six regions. One DVD player with a given
regional code cannot play disc of another regional code. The partition of regional codes
is shown as follows:
1. Canada, USA;
2. Japan, Europe, South Africa, MiddleEast
3. Southeast Asia, EastAsia
4. Australia,New Zealand, Oceania, Central America, Mexico,Latin America,Caribbean Sea;
5. Russia, India, Africa,Korea, Mongolia.
6. China.
1 2 3456
Progressive scan and Interlacing scan
In the past, because of the relative technology being immature, the TV set employed interlacing
scanning mode. That is, each picture is created by scanning twice, first the odd field and then the
even field. Therefore images are illegible and flickering. Nowadays, the top graded TV sets
generally have progressive scanning function, that is, each picture is created by scanning once,
and images are clear.This unit can provide two scanning modes.
Connecting to themulti-system TV
Connecting to NTSCTV Connecting to PAL TV
DISC
PAL
NTSC
TV MONITOR
Play in PAL system
Play in NTSCsystem
DISC
PAL
NTSC
TV MONITOR
No clear imagesare shown
on the screen.
Play in NTSCsystem
DISC
PAL
NTSC
TV MONITOR
Play in PAL system
No clear imagesare shown
on the screen.
Notices and Safety Instructions
TV connections for DVD discs recorded in PAL and NTSC systems
Generally, DVD discs arerecorded in PAL or NTSC systems, please refer to the following table:
- 2 -

Important Safety Instructions
1. Read Instructions- Allthe safety and operating instructions should be read beforethe
appliance is operated.
2. Retain Instructions- The safetyand operating instructionsshould be retained for future
Reference.
3. Hewed Warnings- Allwarnings on the appliance and in the operating instructions should
be adhered to.
4. Follow Instructions- Alloperating and use instructions should be followed.
5. Water and Moisture- The appliance shouldnot be used near water.
6. Carts andStands- The appliance shouldbe used onlywith a cartor stand thatis
recommended by themanufacturer.
7. Wall or Ceiling Mounting- The appliance shouldbe mounted to a wall or ceiling only as
recommended by themanufacturer.
8. Ventilation-The appliance shouldbe well situatedthat its locationor position doesnot
interfere with itsproper ventilation.
9. Heat- The appliance shouldbe situated awayfrom heat sources such as radiators, heat
registers, stoves thatproduce heat.
10. Power Sources-The appliance shouldbe connected toa power supplyonly of thetype
described in theoperating instructions oras marked onthe appliance.
11. Groundingor Polarization- Precautions should betaken.
12. Power- CordProtection- Power supply cordshould be routedso they are not likely to
be walked onor pinched byitem placed upon or against them, pay plugs, and the point
where they exitfrom the appliance.
13. Cleaning- The appliance shouldbe cleaned onlyby ways recommended by the manufacturer.
14. Power Lines-An outdoor antennashould be located away from power lines.
15. Outdoor Antenna Grounding- If an outside antenna is connectedto the receiver, be
sure the antennasystem is groundedso as to provide protection against voltage surges and to
build up staticcharges.
16. Non-use Periods-The power cordof the applianceshould be unpluggedfrom the
Outlet when leftunused for aling period of time.
17. Object andLiquid Entry- Care should betaken so thatobjects do notfall, and liquids
are not spilled,into the enclosurethrough openings.
18. Conditions RequiringService- The Applianceshould be servicedby qualified service
Personnel when:
A. The power-suppl cordor the plughas been damaged.
B. Objects have fallenor liquid hasbeen spilled into the appliance.
C. The appliance hasbeen exposed torain.
D. The appliance doesnot appear tooperate normally orexhibit a markedchange in performance.
E. The appliance hasbeen dropped orthe enclosure isdamaged.
- 3 -

If the pick-up lens or disk drive gets dirty, the video quality will decrease.
Assuring the Finest Performance
Condensation may form inside this player under following conditions:
•If warm air comes in contact with any cold parts inside the player;
•If the player is located in a room with high humidity; and
•If the player is exposed to sudden temperature changesfrom cold to hot.
When condensation forms inside the player, the player may not operate correctly.
If this occurs, leave the player at room temperature until the inside of the player becomes
dry and operational.
Moisture Condensation
Important safety instructions
Copy Protecion
This product incorporates copyright protection technology that is protected by method claims
of certain U.S. patents and other intellectual property rights owned by Macrovision
Corporation and other rights owners. Use of this copyright technology must be authorised by
Macrovision Corporation, and is intended for home and other limited viewing uses only,
unless otherwise authorised by Macrovision Corporation. Reverse engineering or
disassembly is prohibited.
- 4 -

Table of Contents
Features
Accessories
Disc Type and Characteristics
Description-Front Panel
Tour of the Remote Control
Using the Remote Control Unit
Setup
6
7
8
9
10
11
Using the AC adapter
Battery level display
Using the battery pack
Adapter directions
19
20
21
Playing a Disc
Using the Search & Skip Functions
Using the Function Menu
Basic Functions
22
24
25
Using the Setup Menu
Setup the Language Menu
Setup the Video Menu
Setup the Audio Menu
Setup the Parental Menu
Using the Setup Menu
30
31
33
35
35
Cautionary Notes
Troubleshooting
Reference
37
39
Important safety instructions 3-4
Notices and Safety Instructions 1-2
- 5 -
Connecting Headphones to the DVD
Connecting to an External Component (Input Select)
Connecting to a TV
Connecting to a Stereo Component
Connecting to TV Component
Digital Card Play Operation
Connections
12
13
14
15
17
18

Plays DVD discs and audio CDs
•CD-R/RW discs containing MP3/WMA files can be played.
20.32cm LCD display and built-in stereo speakers
•With the built-in 20.32cm LCD display and stereo speakers, you can enjoy a DVD movie
without requiring a separateTV.
Convenient 2-Way power supply
•Youcan use your DVD player virtually anywhere by using the supplied AC adapter indoors
and the battery packoutdoors.
Compact size/light-weight design
•Compact and lightweight design makes the player easy to carry.
High-resolution image
•High-resolution LCD screen pixels provides a clear picture.
AV input/output, coaxial digital output jack
•* Dolby Digital 5.1-CH audio and * DTS digital audio can be output through the coaxial
digital output jack. You can enjoy unsurpassed surround sound when a Dolby Digital/DTS
digital surround processor or amplifier is connect to this jack.
•Youcan connect a VCR or camcorder to your DVD player using the AV input/output jacks
or you can connect to a TV for a larger screen.
*1 Manufactured under licensefrom Dolby Laboratories. “Dolby”,“Pro Logic”, and the
double-D symbol ( ) are trademarks of Dolby Laboratories. Confidential unpublished
works ©1992-1997. Dolby Laboratories. Inc. Allrights reserved.
*2 “DTS”and “DTS Digital Out”are trademarks of Digital Theater Systems,Inc.
INPUT : For viewing a video from an external component such as a VCR, Camcorder etc..
12
Features
- 6 -

Accessories
Lithium battery
(For Remote Control)
Users Manual
AC Adapter
Battery pack
Car Adapter
If disc featuresdiffer from the explanation in the manual
•Some functions oroperations are disc-dependent and may not work in allcases.
Follow the instructions shown on the screen. This manual only coversbasic disc operations.
•may appear duringsome operations. This mark indicates that the discin use does not
currently support operations explained in this manual.
Headphone
AV Cable
Remote control
Manual
- 7 -
RETURN
MUTE
SEARCH
SOURCE
SUBTITLE
AUDIO
CLEAR PROG
VIDEO OUTPUT
LCD
TITLE
SETUP
MENU/PBC
OSD ZOOM
PLAY
PAUSE/STEP
STOP SLOW
FB FF PREV NEXT
REPEAT A-B VOL
ENTER
123
456
ANGLE
789
0 10+
YUV Cable

Disc Type Contents Disc size Maximum
playback time
DVD videos with
appropriate region
number orALL
Digital Audio
+
Digital Video
(MPEG2)
Approx. 240minutes
(Single sided disc)
Approx. 480minutes
(Double sided disc)
12Cm
Approx. 80minutes
(Single sided disc)
Approx. 160minutes
(Double sided disc)
8Cm
12Cm
8Cm
(CD Single)
Approx. 74minutes
Approx. 20minutes
Digital Audio
Audio Cds
(PCM)
CD-Rs
CD-RWs
12Cm
8Cm
(CD Single)
Approx. 74minutes
Approx. 20minutes
Digital Audio
This unit canplay the followingdiscs.
Disc Type and Characteristics
Both the DVD player and the discs are coded by region. These regional codes must match
in order for the disc to play. If the codes do not match, the disc will not play.
The Region Number for this player is described on the housing bottom of the player.
Play Region Number
•
•The LCD display does not support Closed Captions. However, you can view captions by
connecting this unit to a TVwith the caption function.
This unit uses PAL/NTSC color system, and cannot play DVD videos recorded in
any other color system(SECAM, etc).
- 8 -

- 9 -
11
12
13
14
15
16
1817
19
20
21
22
1.Title button
2.Menu button
3.Source button
4.Power button
5.LCD button
6.Setup button
7. ( )/Direction up
8. /Direction right
9.Enter button
10. ( )/Direction down
11. /Direction left
12.Angle button
13.Subtitle button
14.Audio button
15.Stop button
16.Play/pause button
17.Remote control sensor
18.Open/close button
19.DVD door
20.Speakers
21.TFT Display(10”TFT)
Previous button
FWD-SKIP( )
Next button
REV-SKIP( )
12
3456789
1.Headphone 1
2.Headphone 2
3.Volume
4.Multi Media card/SD/
/Memory stick
5.Component
6.AV Input
7.AV Output
8.Coaxial
9.DC input
Tour of the Remote Contol
- 10 -
RETURN
MUTE
SEARCH
SOURCE
SUBTITLE
AUDIO
CLEAR PROG
VIDEO OUTPUT
LCD
TITLE
SETUP
MENU/PBC
OSD ZOOM
PLAY
PAUSE/STEP
STOP SLOW
FB FF PREV NEXT
REPEAT A-B VOL
ENTER
123
456
ANGLE
789
0 10+
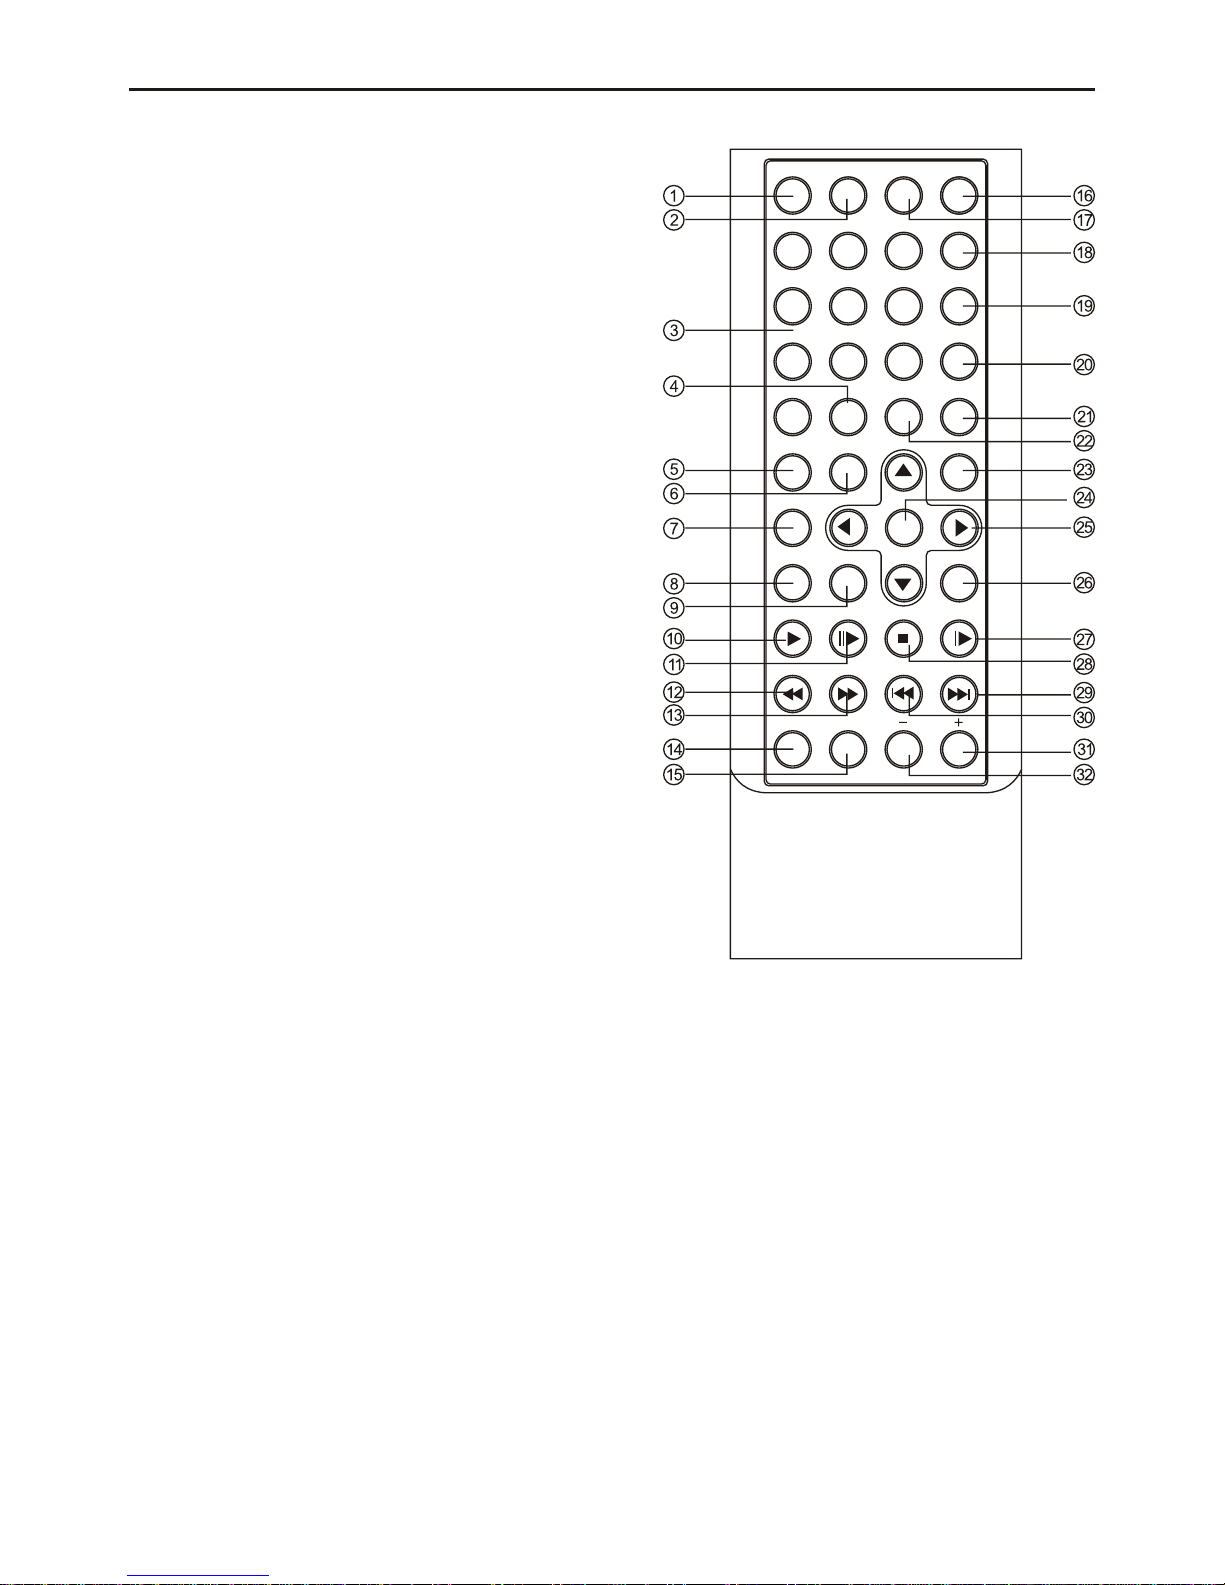
1. Return button
Return to the previous menu.
2. Mute button
3. Number (0-9) buttons
4. Number (10+) button
5. Video output button
6. LCD button
7. Title button
8. Menu/PBC button
Brings up the DVD setup menu.
9. OSD button
Display the current disc mode
10. Play button
11. Pause/Step button
12. Fast Backward button
13. Fast Forward button
14. Repeat button
To repeat play a title, chapter, track or disc.
15. A-B button
Use to mark a segment to repeat between A an B.
16. Source button
17. Search button
18. Subtitle button
19. Audio button
To access various audio functions on a disc
20. Angle button
To access various camera angles on a DVD
21. Programme button
22. Clear button
23. Setup button
24. Enter button
25. Direction buttons
This button functions as a toggle seitch
26. Zoom button
27. Slow button
28. Stop button
29. Next button
30. Previous button
31. Volume up button
32. Volume down button
Using the Remote Control Unit
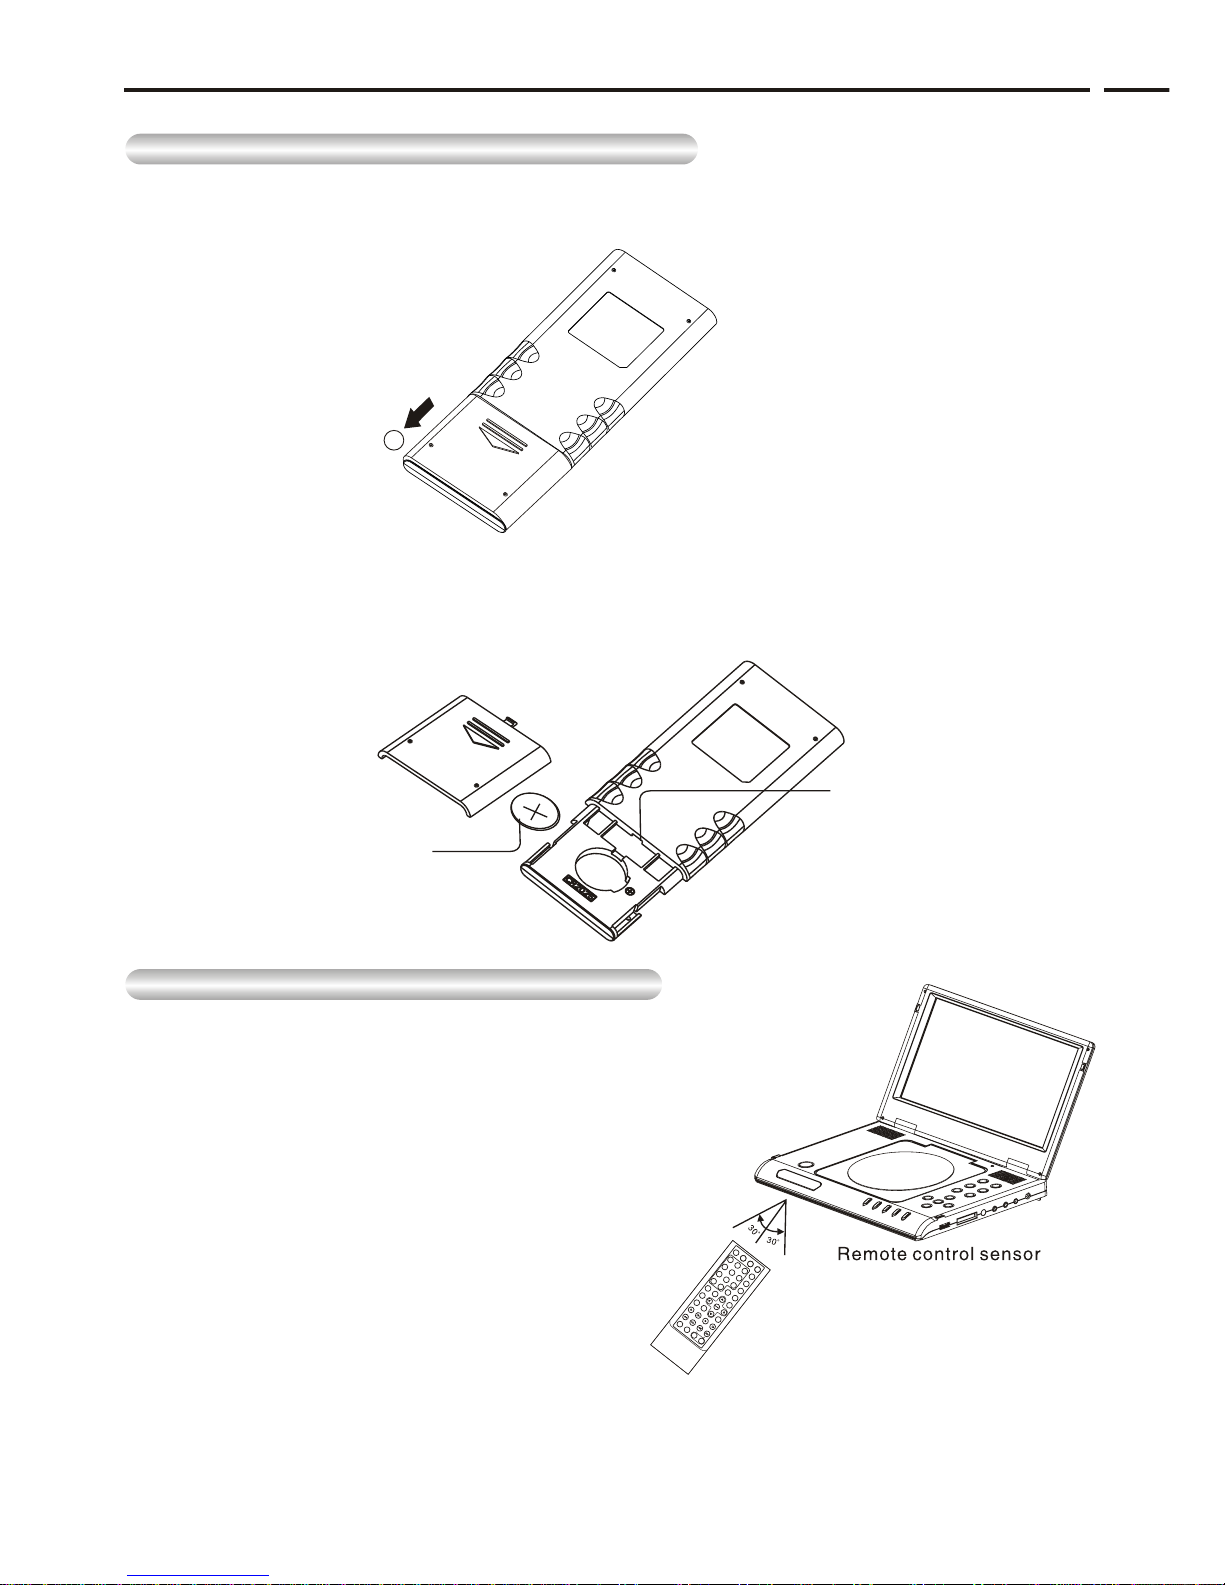
Installing the Battery inside the Remote Control
1.Remove the battery compartment in the direction of the arrow.
(Back of the remote control)
2.Place the battery inside the battery compartment and put the battery compartment cover
back on the remote.
Match the polarities (+ and -) on the battery with the marks in the battery compartment.
If the battery is inserted in the wrong direction, your remote control may not work correctly.
•
Operating Range of Remote Control Unit
Important!
Do not subject the remote control unit to strong vibration or shock.
Keep the remote control unit free from moisture and water.
•
•
Caution
It may be difficult to operate the remote control unit if
the remote control sensor on the DVD player is
exposed to direct sunlight or strong artificial light.
Try operating away from such light sources.
Remove the battery when not planning to use the
remote control unit for a long period of time.
•
•
•
If the remote control unit does not work after battery
replacement, remove and re-insert the battery in about
5 minutes.
1
Hole
Lithium battery
RETURN
MUTE
SEARCH
SOURCE
SUBTITLE
AUDIO
CLEARP
ROG
VIDEOO UTPUT
LCD
TITLE
SETUP
MENU/PBC
OSD ZOOM
PLAY
PAUSE/STEP
STOPSLOW
FBFF
PREVNEXT
REPEA
TA-BVOL
123
456
ANGLE
789
010+
- 11 -

You can attach headphones with a stereo mini-jack plug to the
PHONES jack for private listening. There are two jacks available.
Connecting Headphones to the DVD
How to use headphones
1.Insert headphones into the 1 or 2 PHONES jack.
Important!
•Turn the headphone volume down to the minimum setting before connecting
This jack is a stereo mini-jack
2.Adjust the volume level by using the VOLUME control dial.
Caution
•Once you connect headphones to the DVD, your DVD player’s speakers will be
disconnected.
- 12 -

When connecting to an external component
Important!
•Always turn off the DVD Player and other components before you connect any cables.
• Make sure switch to AV IN.
•Refer to owner’s manual of the components you are connecting for more information on
those particular components.
You can enjoy video from your VCR or Camcorder on your DVD player.
Connecting to an External Component (Input Select)
- 13 -

You can enjoy high-resolution video using a VIDEO cable when connecting your DVD player to a
TV equipped with a VIDEO input jack.
•Always turn off the DVD Player and TV before you connect any cables.
1.Turn on the TV.
2.Press the TV/VIDEO button on your TV to select the input from the DVD player.
3.Turn on the DVD player, and start playback.
Caution
•If you wish to view video on your TV only, close the display panel of your DVD player.
Playback will continue
• Turn volume control at main unit to minimum to cut of the speaker output.
Connecting to a TV
To view video with a TV
- 14 -
Connecting to a Stereo Component
- 15 -
YCBCR
COMPONENT
COMPONENT
1. Connect theMini-plug of thecomponent video cableto the COMPONENTjack of
the unit.
2. Connect theother three plugsto the correspondingcomponent video or
progressive scan video input jacks of the TV.
Jack/Plug Color:
Y Jack: Green
Cb Jack: Blue
Cr Jack: Red
YUV Cable

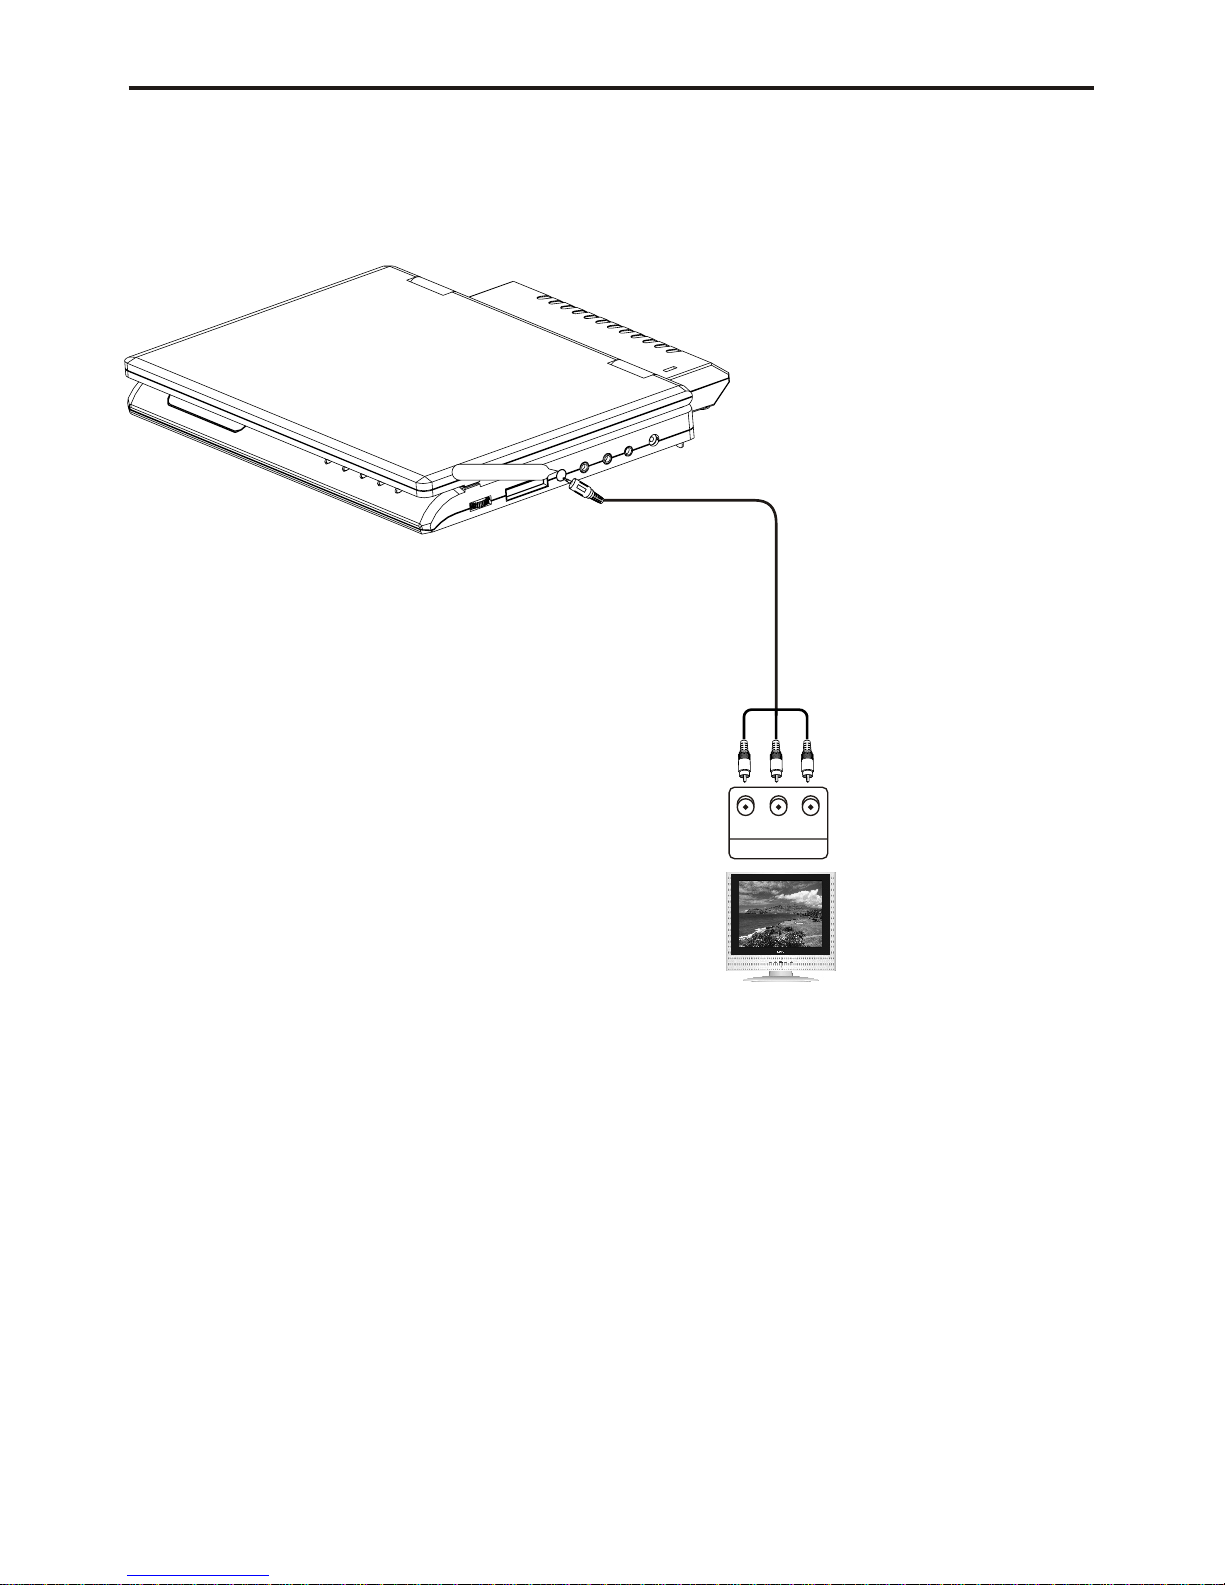
When you connect the DVD player to an audio system, you can listen to higher quality sound.
Connecting to a Stereo Component
2-CH Audio Playback
Connect the suppliedaudio cable tothe AUDIOconnecter located onthe right sideof the
unit. The audio cable isidentified by havinga 3.5mm stereo(3 section) connectoron one
end and red/whiteRCA connectorson the otherend. Connect thered/white RCA
connectors to anaudio input onyour stereo receiveror TV. Consult your stereo receiver
or TV owner’s manual forfurther information.
- 16 -
Jack/plug color:
Audio(Left): White
Audio(Right):Red
Video input: Yellow
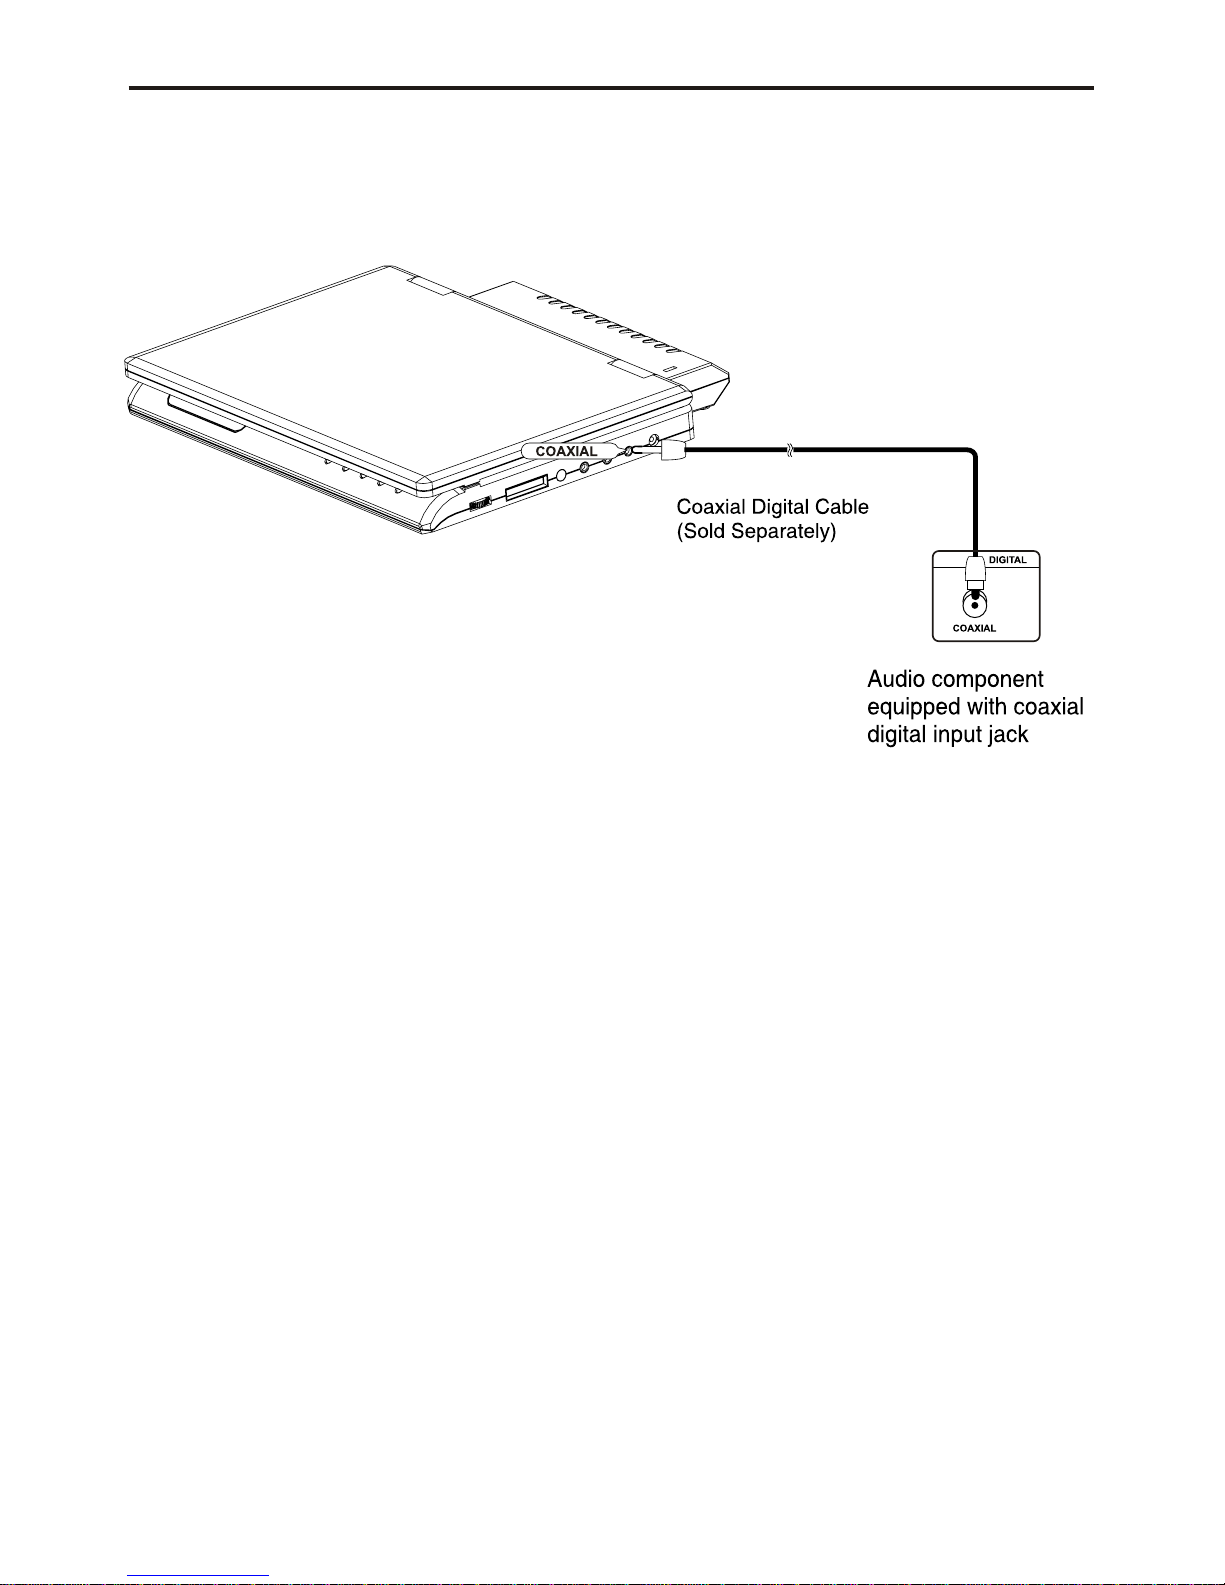
After the completion of above connections;
Digital connection to audio component without Dolby Digital decoder
•DVD Disc
When playing a Linear PCM Audio encoded disc, you must use the digital connection
method shown above
NOTE:
Only use an coaxial digital cable which has been designed for use with portable DVD.•
Connecting to TV Component
- 17 -
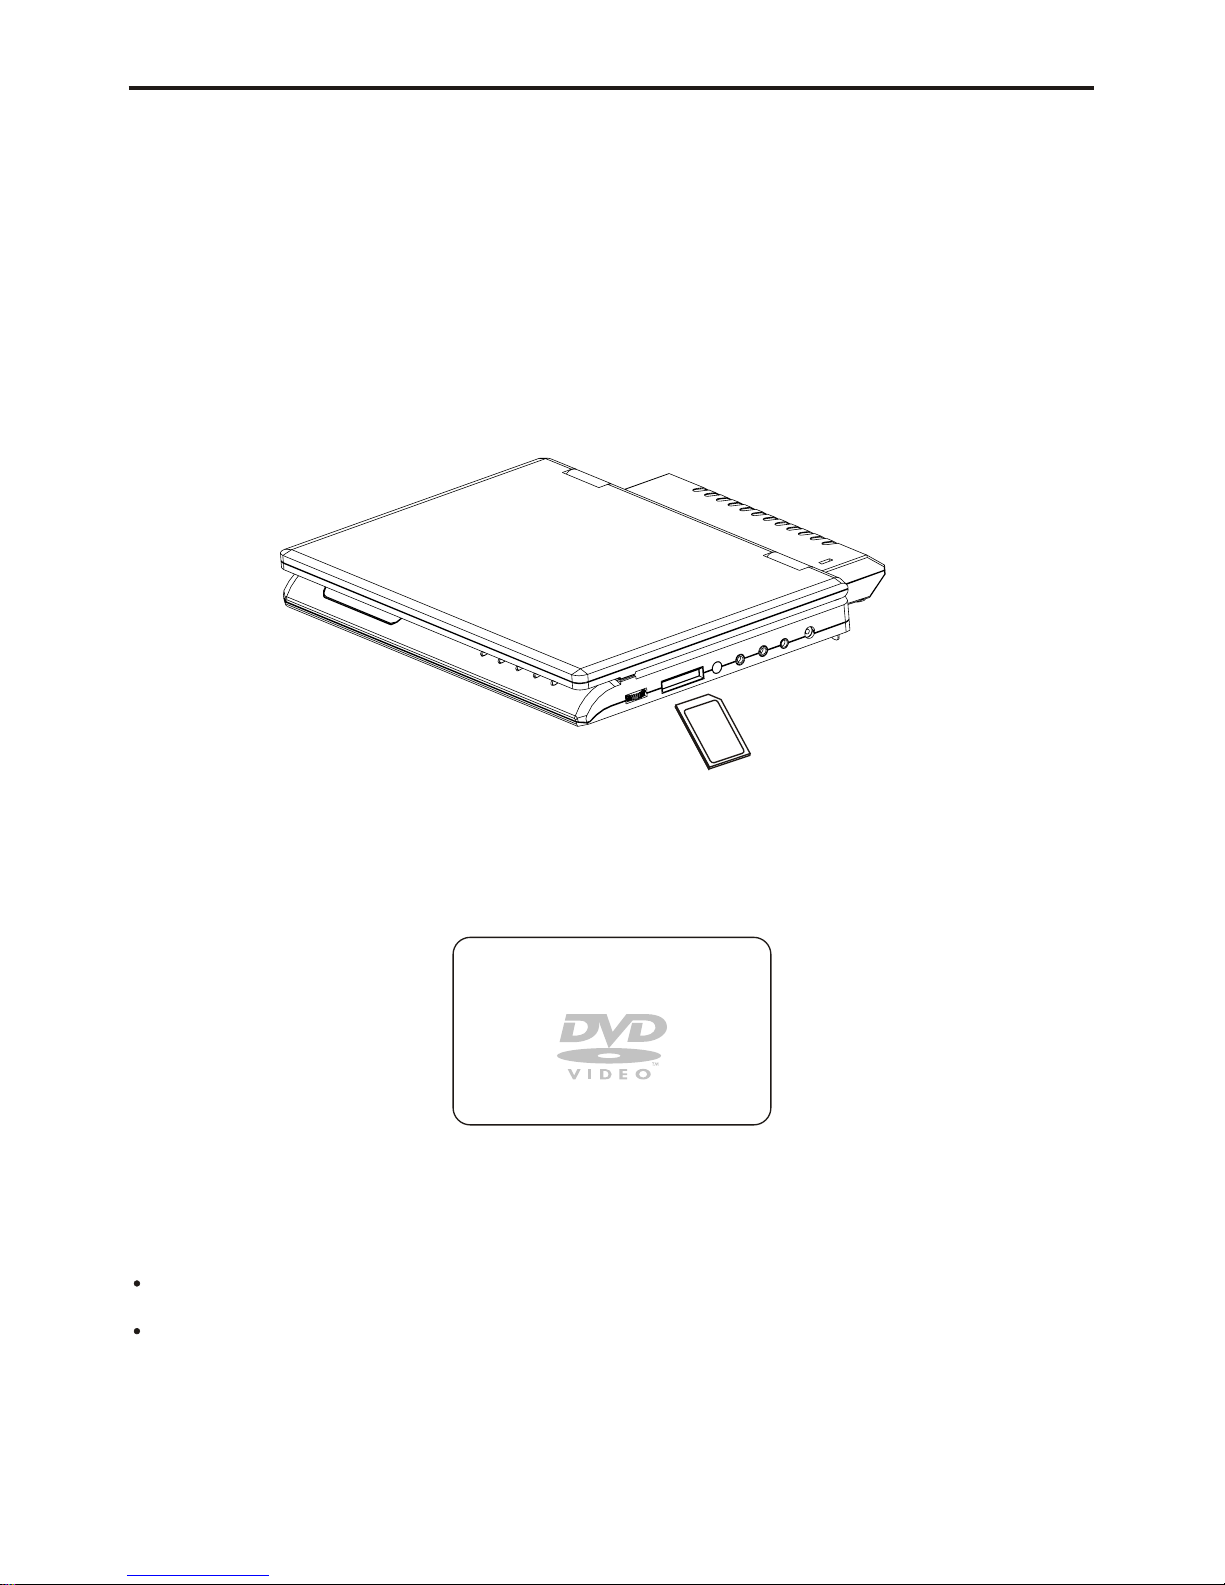
Digital Card Play Operation
- 18 -
SD/MMC/MS Card
Digital card (SD/MMC/MS) can memory Mp3 songs anddigital pictures.
How to selectDigtal card to play
1. Turnon the power of this unit.
2. Insert SD/MMC/MScard and slide the card unit in clicks intoplace.
3. Press “SOURCE”button on the unit or on the remote control to switch: DVD/CARD.
How to playDigital card
1. Press “SOURCE”button on the remote control to switch:
Loading card...
2. When playingMP3 songs and digital pictures in Digital card, the unit features mute, repeat,
and zoom play. Operations arethe same as MP3 operation.
NOTE:
Do not face the slot towards your face when inserting and removingcards. The slot mechanism
has a spring so the card may eject with force.
Please press STOPbutton if you want to pull out the Digital card.

Using the AC adapter
Important!
•Always turn off the DVD player before connecting or disconnecting the AC cord.
•Be sure to use the supplied AC adapter. Using a different type of adapter may cause
malfunction or damage to the product.
•When the AC adapter is used for prolonged periods of time, the adapter may heat up.
This is normal and is not a cause for concern.
•When not using the adapter, unplug it from the wall outlet.
•Keep the AC adapter free from moisture, cold, and dust. Otherwise, this can result in
a risk of fire or electric shock.
Warning
•Only use the AC adapter supplied with this player.
•Be sure to unwind the AC adapter cable (DC output cable) before using, as electromagnetic
interference may cause problems with other devices.
- 19 -
Table of contents
Other SONIQ Portable DVD Player manuals


