SONIX MP5 Plus Writer Product information sheet


MP5 Plus Writer Easy Guide
SONIX TECHNOLOGY CO., LTD. Page 1 Version 1.0
Preface
Welcome to use MP5 Plus Writer, We will try our best to provide excellent development tools and after-sales
services.
This guide not only helps you to be familiar with all the main functions of MP5 Plus Writer, but also makes you
realize the solution for trouble shooting. For better using, please refer to this guide before using.
There might be some oversight or insufficiency in this guide even though we made great efforts to ensure that
the information was comprehensive and correct. If you find any errors or confusion, please contact with us or
e-mail to: [email protected]om.tw . SONiX tools and documentation are constantly evolving to meet customer
needs, so if the information is changed that caused by the update of the product, we will not inform you separately.
You could refer to the latest information in our website or contact with the agent or SONiX directly.

MP5 Plus Writer Easy Guide
SONIX TECHNOLOGY CO., LTD. Page 2 Version 1.0
Amendment History
version
Date
Description
V1.0 2019.4 First issue.

MP5 Plus Writer Easy Guide
SONIX TECHNOLOGY CO., LTD. Page 3 Version 1.0
Table of Content
1
1
1Introduction...................................................................................................................................................... 4
1.1 Features.................................................................................................................................................. 4
1.2 Functions................................................................................................................................................ 4
1.3 Standard configurations.......................................................................................................................... 5
1.4 Appearance ............................................................................................................................................ 6
2
2
2Installation........................................................................................................................................................ 9
2.1 Software Installation ............................................................................................................................... 9
2.2 Hardware Installation............................................................................................................................ 10
3
3
3On-line Operations......................................................................................................................................... 12
3.1 Operations steps................................................................................................................................... 12
3.2 Programming quantity statistics............................................................................................................ 19
3.3 Rolling Code Setting............................................................................................................................. 19
3.4 Pin Assignment..................................................................................................................................... 20
3.5 One key download SN8........................................................................................................................ 23
3.6 Language setting.................................................................................................................................. 24
3.7 Default mode in off-line mode............................................................................................................... 25
3.8 Keyless Mode....................................................................................................................................... 26
3.9 Parsing the programming file................................................................................................................ 26
3.10 Quantity limit......................................................................................................................................... 27
3.10.1 Encrypt .SN8/ .Hex file ............................................................................................................. 27
3.10.2 Download the programming file (.SN8D / .HexD)..................................................................... 29
3.10.3 Programming success counting................................................................................................ 30
3.10.4 Reach max quantity.................................................................................................................. 31
4
4
4Off-line Operations......................................................................................................................................... 32
4.1 Operations steps................................................................................................................................... 32
4.2 Functions.............................................................................................................................................. 32
5
5
5Troubleshooting ............................................................................................................................................. 34
5.1 Test Mode............................................................................................................................................. 34
5.2 Online Problems and solutions ............................................................................................................. 35
5.3 Offline problems and solutions.............................................................................................................. 37
6
6
6Warranty ........................................................................................................................................................ 38

MP5 Plus Writer Easy Guide
SONIX TECHNOLOGY CO., LTD. Page 4 Version 1.0
1
1
1
Introduction
MP5 Plus Writer is a new generation writer updated on the basis of the MP-III Writer and the MP PRO Writer, and
supports to program all series MCUs of SONiX.
1.1 Features
Plug and play;
Support program in Online and Offline Mode;
Removable transition board;
Download the programming file only USB Power;
Switch the programming voltage automatically;
Analyze MCU without downloading the programming file;
Support programming limit quantity.
1.2 Functions
Auto(Blank check + Program + Verify);
Blank Check(Erase);
Program(Program + Verify);
Verify(Verify);
Read(Read ROM);
Rolling Code;
Program with Handler;
Keyless in off-line Mode;
Quantity Limit;

MP5 Plus Writer Easy Guide
SONIX TECHNOLOGY CO., LTD. Page 5 Version 1.0
1.3 Standard configurations
Fig1-1 MP5 Plus Writer and accessories

MP5 Plus Writer Easy Guide
SONIX TECHNOLOGY CO., LTD. Page 6 Version 1.0
1.4 Appearance
Fig1-2 MP5 Plus Writer Appearance (1)
OLED
OLED, display the functions, programming information and results.
LED
OK (Green): Complete the operation successfully;
FAIL (Red): Complete the operation unsuccessfully;
BUSY (Yellow): The operation is in process.
KEY
Enter: Executing key, for executing the function or stopping the warning;
Mode: Mode key, for selecting the functions.
Fig1-3 MP5 Plus Writer Appearance (2)
Power Outlet
Connect with the power adapter DC 7.5V.
USB Port
Provide B and Micro ports.
Slot Transition board Outlet
Connect with the Slot Transition board.

MP5 Plus Writer Easy Guide
SONIX TECHNOLOGY CO., LTD. Page 7 Version 1.0
Package
<=48PIN Package
There are two kinds transition board:
First,MP Transition board
Put the corresponding MP transition board (Fig 1-4) on JP5&JP6, as shown in Fig 1-5.
Fig1-4 MP Transition board Fig1-5 MP5 Plus Writer + MP Transition board
Second,Slot Transition board
Insert the corresponding Slot transition board (Fig1-6) into JP8 which is on the side of the Writer, as shown in
Fig1-7.
Fig1-6 Slot Transition board Fig1-7 MP5 Plus Writer + Slot Transition board
Put the MCU on the text tool, then can program.
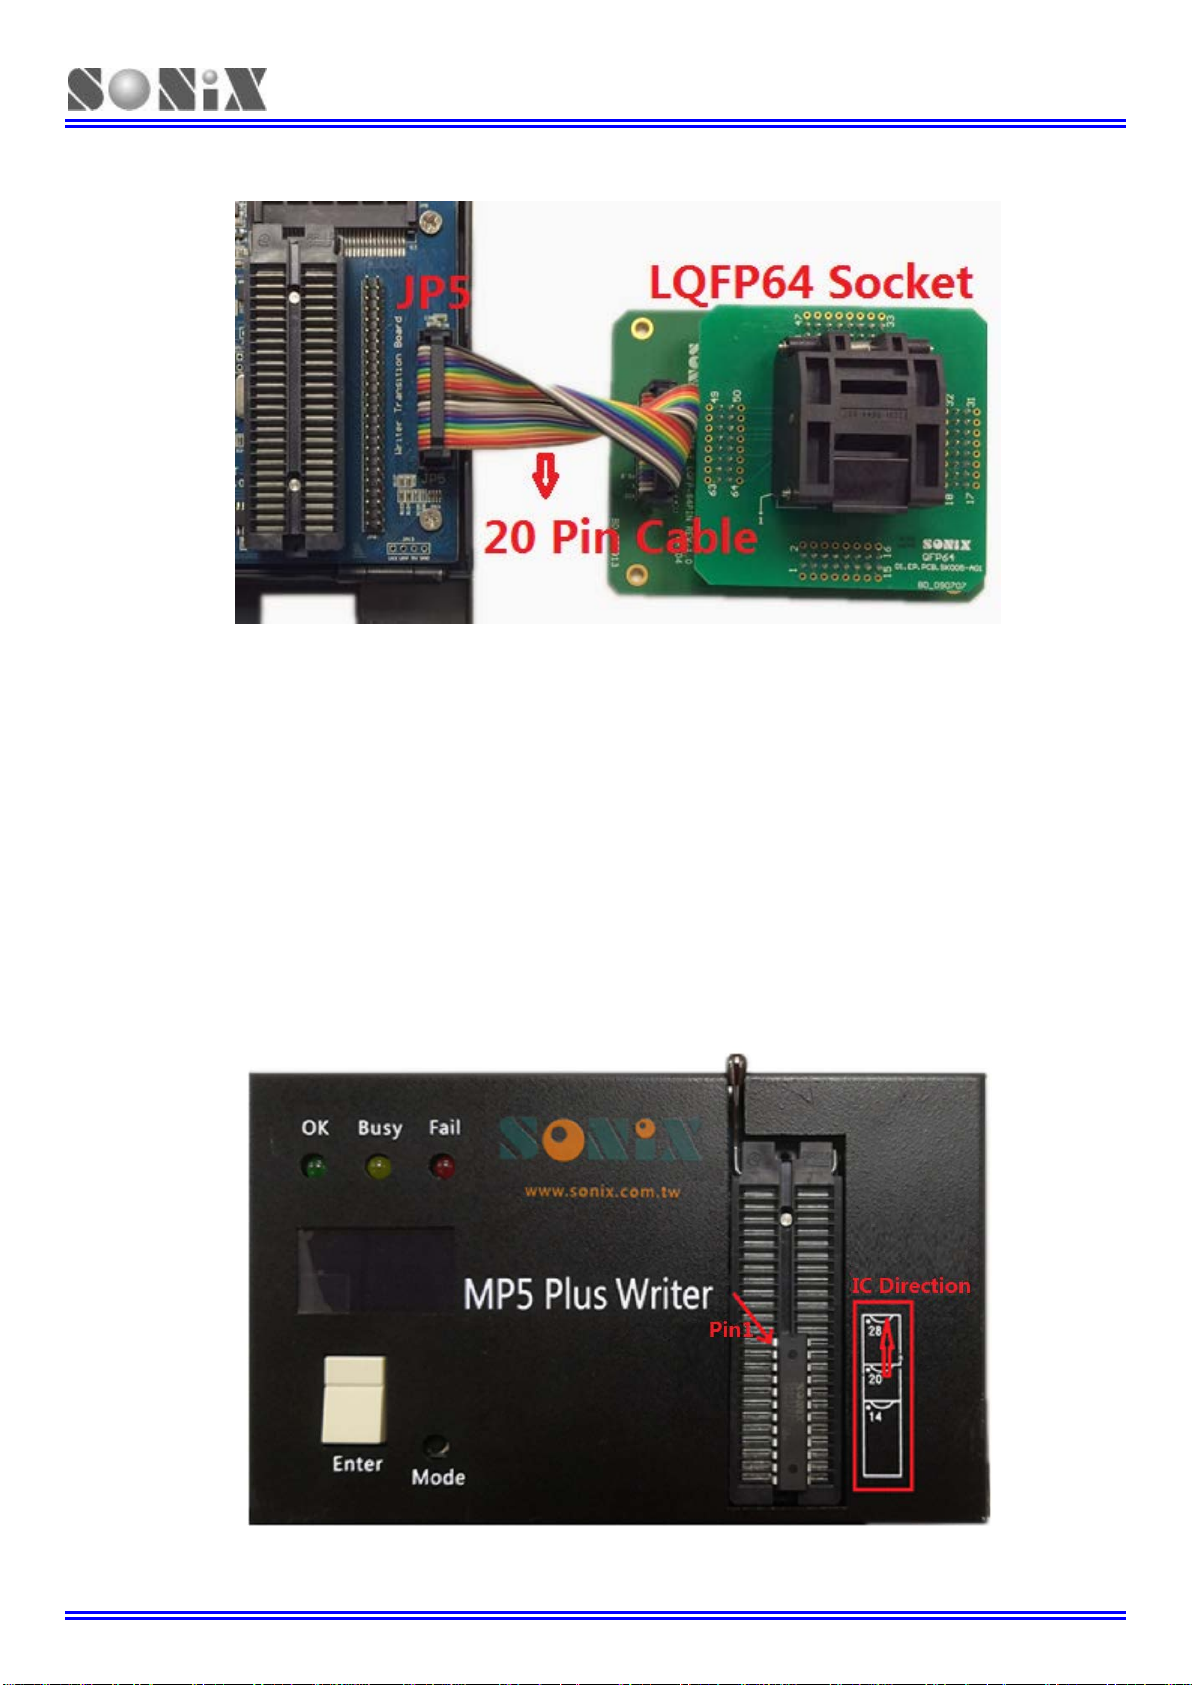
>48PIN Package
In the case of LQFP64/LQFP80, Connect the corresponding WR Transition board and LQFP64/80PIN
Socket(Fig1-8) with the JP5 via 20PIN cable, as shown in Fig1-9.
Put the MCU into the Socket, then can program.

MP5 Plus Writer Easy Guide
SONIX TECHNOLOGY CO., LTD. Page 8 Version 1.0
Fig1-8 Transition board + LQFP64 Socket
Fig1-9 MP5 Plus Writer + Transition board + Socket
COB
COB, MCU connects with JP5 via 20 Pin cable.

MP5 Plus Writer Easy Guide
SONIX TECHNOLOGY CO., LTD. Page 9 Version 1.0
2
2
2
Installation
2.1 Software Installation
First, Download MP5 Plus Writer installation file from the website: www.sonix.com.tw;
Execute MP5 WriterVxxx.exe, and select an install language (simplified Chinese, English), and then
install according to prompts;
There are two methods to start the programming software of MP5 Plus Writer:
Methods I: Execute the shortcut on the desktop;
Methods II: Execute “Start->All programs->MP5 Writer->MP5 Writer”;
The system will install the USB driver automatically;
The installation times are varied from different Hosts.
Use this software and MP5 Plus Writer, can load the programming file and some programming operations.
Please refer to the related parts for detailed operations.
Note:
If pop-up the window below when installing, click “Ignore”, and go on with the installation!
Fig2-1 Abnormal installation of MP5 Plus Writer software

MP5 Plus Writer Easy Guide
SONIX TECHNOLOGY CO., LTD. Page 10 Version 1.0
2.2 Hardware Installation
Install the Transition board
SONiX provide two kinds of transition board:
MP Transition board
Open the cover of MP5 Plus Writer, install the corresponding MP transition board on the JP5/JP6, as
shown in Fig2-2;
Fig2-2 MP5 Plus Writer + MP transition board
Slot transition board
Install the corresponding Slot transition board in the outlet which is on the side of the Writer;
As shown in Fig 2-3.
Fig2-3 MP5 Plus Writer + Slot transition board
MP5 Plus Writer Easy Guide
SONIX TECHNOLOGY CO., LTD. Page 11 Version 1.0
If MCU is more than 48 Pin, Connect the corresponding WR transition board and Socket with JP5 via the
20PIN cable (No need MP or Slot Transition board), as shown in Fig2-4.
Fig2-4 MP5 Plus Writer + WR Transition board + Socket
Insert the power adapter DC 7.5V/ 2A into the MP5 Plus Writer;
Connect the MP5 Plus Writer with PC via A-B or Micro USB cable;
The on-line operations can be performed until “USB” displayed in OLED(If USB isn’t displayed, please plug
the USB cable again);
Execute MP5 Writer.exe, download the programming file into the MP5 Plus Writer;
In off-line mode, OLED displays “MCU type- Firmware version” firstly, and then “MCU type-Checksum”. If the
data in writer is blank or error, writer display “ErrF”, the red led is on, and the buzzer is ringing in the
meantime.
At this time, please reload the programming file.
The location and direction of MCU is shown in Fig2-5.
Fig2-5 MCU’s location and direction
MP5 Plus Writer Easy Guide
SONIX TECHNOLOGY CO., LTD. Page 12 Version 1.0
3
3
3
On-line Operations
3.1 Operations steps
Connect the MP5 Plus Writer with PC via A-B or Micro USB Cable;
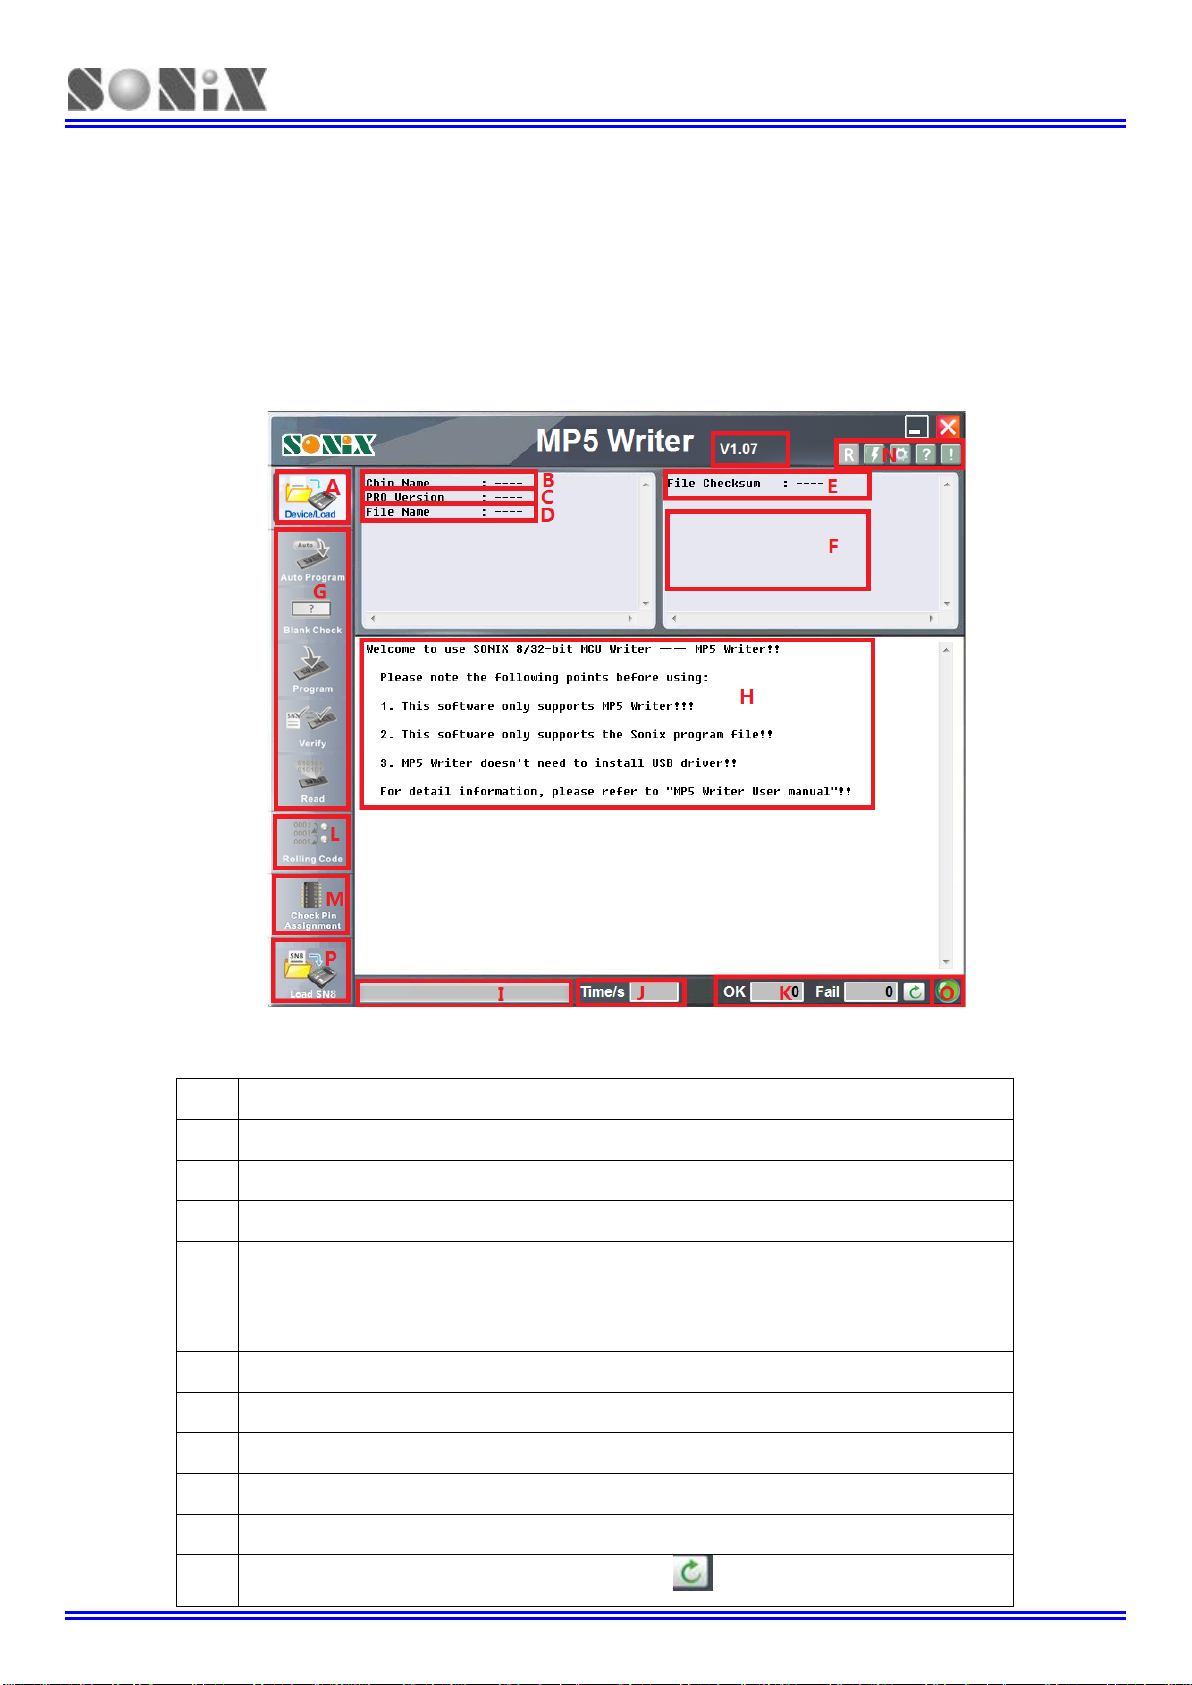
Open the MP5 Plus Writer AP, as shown in Fig3-1:
Fig3-1 MP5 Plus Writer Interface
Interface information is described in Table 3-1:
A The Menu of selecting MCU type and downloading programming file;
B The region for MCU type;
C The region for programming firmware version;
D The region for programming file name and path;
E
The region for checksum of programming file;
If security is enable, display security checksum and EPROM checksum;
Otherwise, display the EPROM checksum;
F The region for Code Option information of programming file;
G The region for function buttons;
H The region for operation process and results;
I The region for bar of operation process;
J The region for time of operation;
K The region for number of Auto program, click” ” can clear the number;

MP5 Plus Writer Easy Guide
SONIX TECHNOLOGY CO., LTD. Page 13 Version 1.0
L
Set Rolling Code parameters; (Note: Only the Rolling Code is enable; )
M Query pin assignment, programming pin, transition board;
N
Auxiliary function selection region, include:
Check checksum in offline mode, Encrypt the SN8/Hex file, Language setting,
Default mode setting in off-line mode, User Manual, and so on;
O
USB connection status(Green: connecting; Red: unconnected);
P
One key download SN8;
Q
Software version;
Table3-1 MP5 Plus Writer Interface description
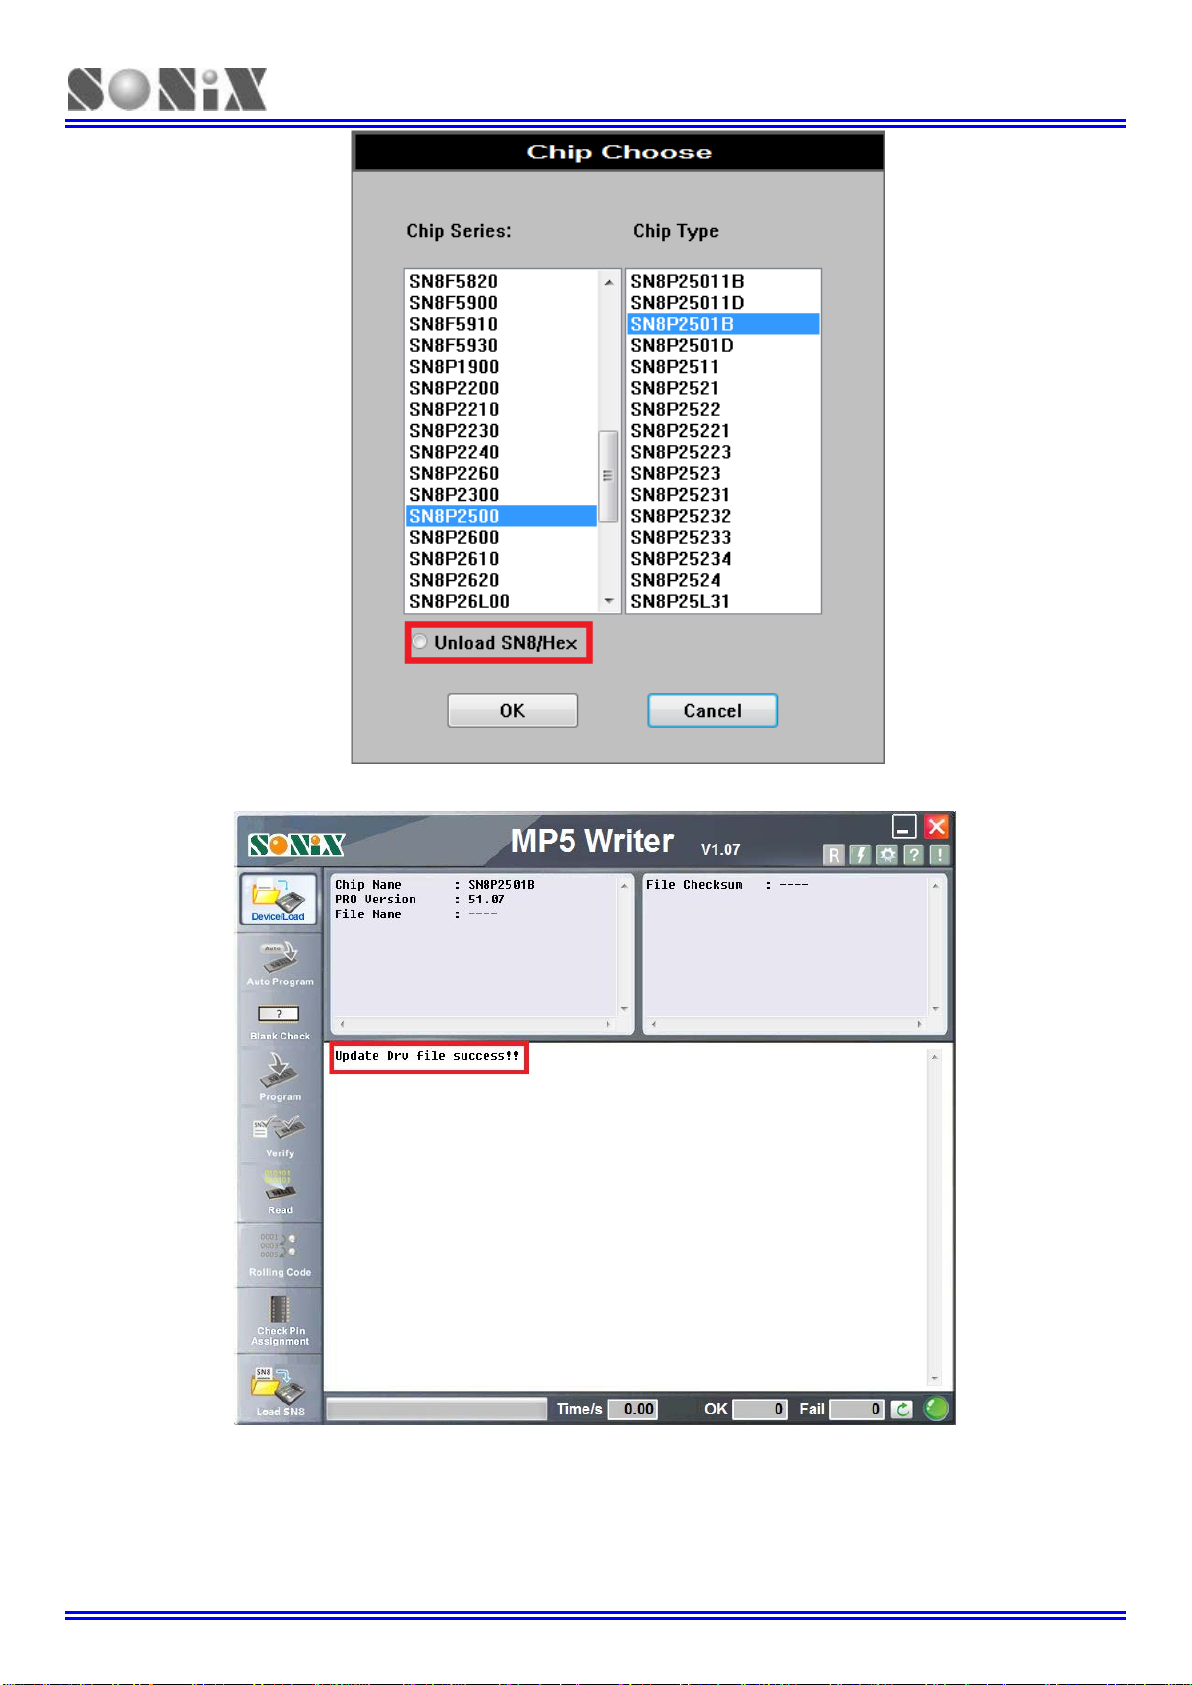
Click “Device/Load”,select the MCU series, type and programming file in the pop-up window; (For example
SN8P2501B); as shown in Fig3-2,3-3:
Fig3-2 Select MCU series and type
Fig3-3 Select the programming file
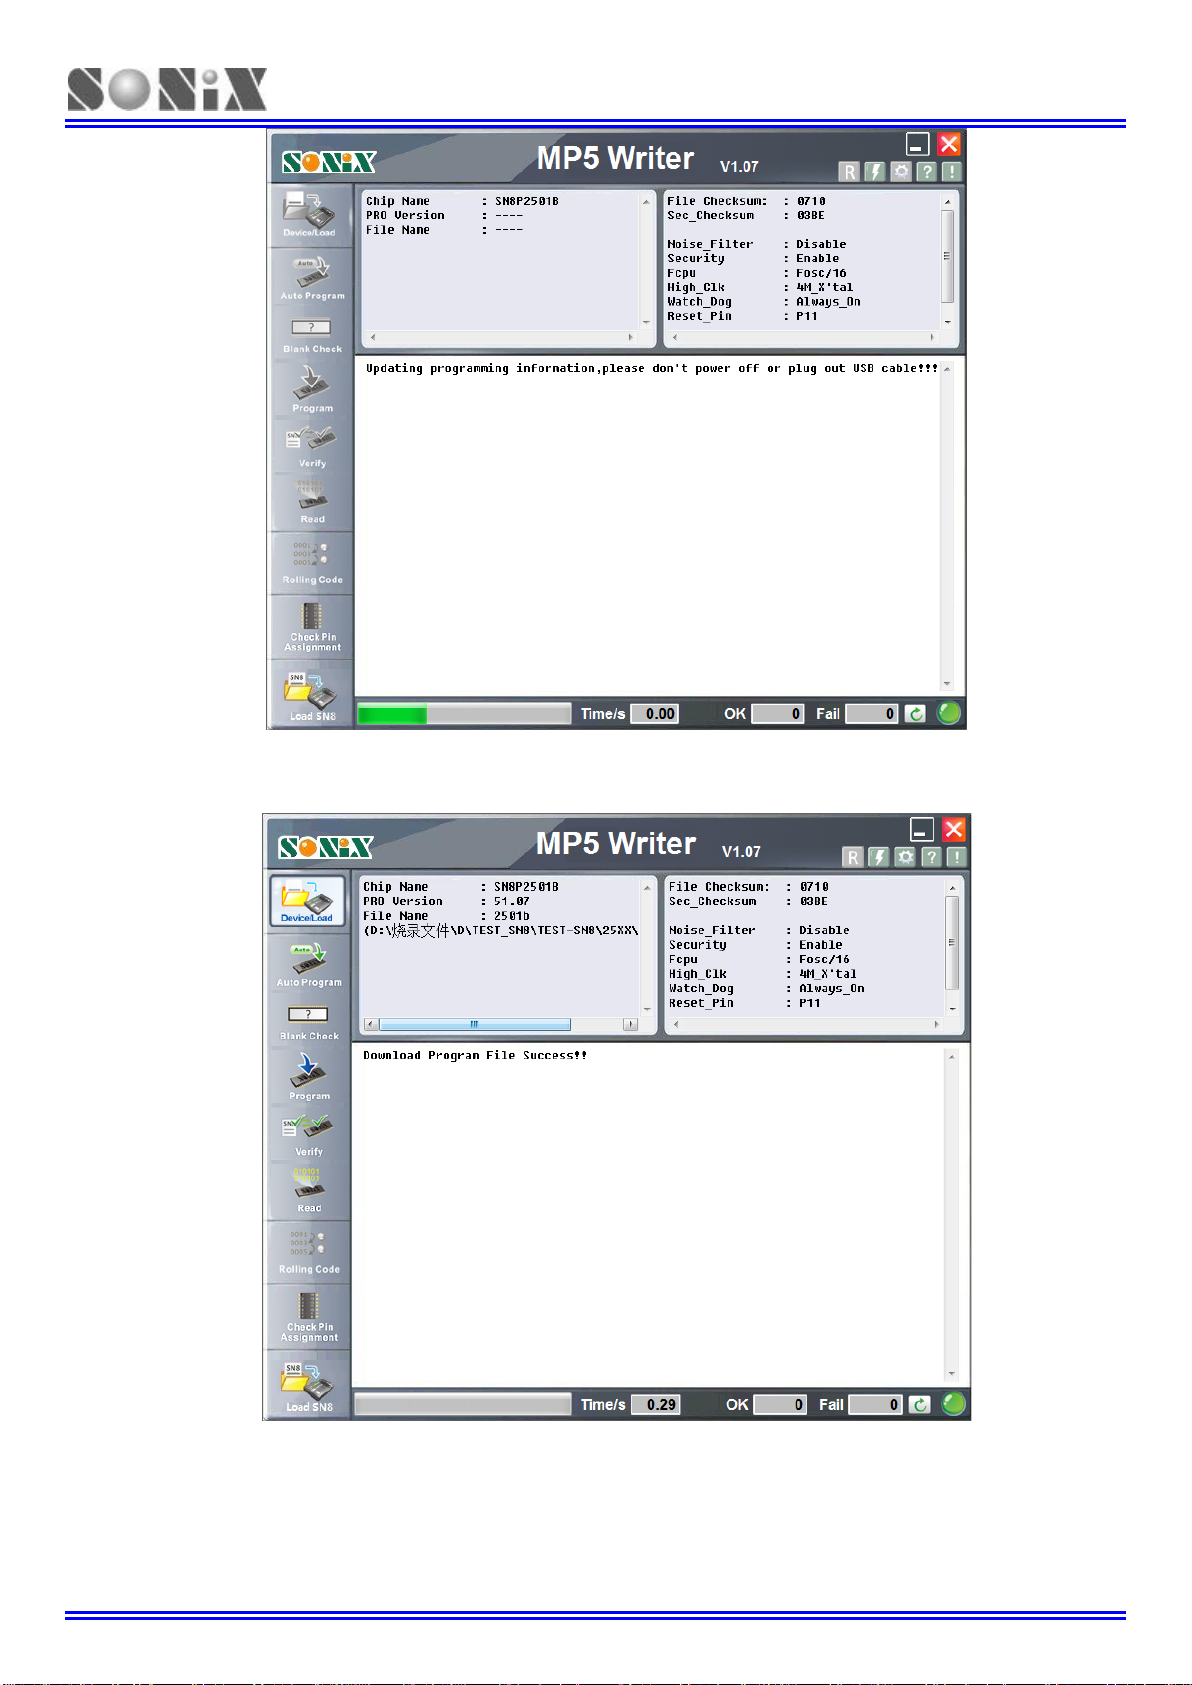
After selecting the programming file, MP5 Plus Writer will update the Firmware and download the
programming file automatically; as shown in Fig3-4,3-5:
MP5 Plus Writer Easy Guide
SONIX TECHNOLOGY CO., LTD. Page 14 Version 1.0
Fig3-4 Update the Firmware and download the programming file
Note: Don’t remove the USB cable, until “Download Program File Success!!” is prompted;
Fig3-5 Programming file is downloaded successfully
After the programming file is downloaded successfully, the function buttons become clickable;
If only need “Blank check” or “Read”, not “program”, user can set ”Unload SN8/Hex” in the above window;
As shown in Fig3-6:
MP5 Plus Writer Easy Guide
SONIX TECHNOLOGY CO., LTD. Page 15 Version 1.0
Fig3-6 Unload SN8/Hex interface
In this function, the window for unload SN8/hex successfully as shown in Fig3-7:
Fig3-7 Firmware updated successfully
Attention:
In this function, not support “Auto Program”, “Program” or “Verify”!Only support “Blank Check” and “Read”!
Based on the above operation, after the MCU to be operated is placed on the Text tool, it can be operated in
On-line mode;
MP5 Plus Writer Easy Guide
SONIX TECHNOLOGY CO., LTD. Page 16 Version 1.0
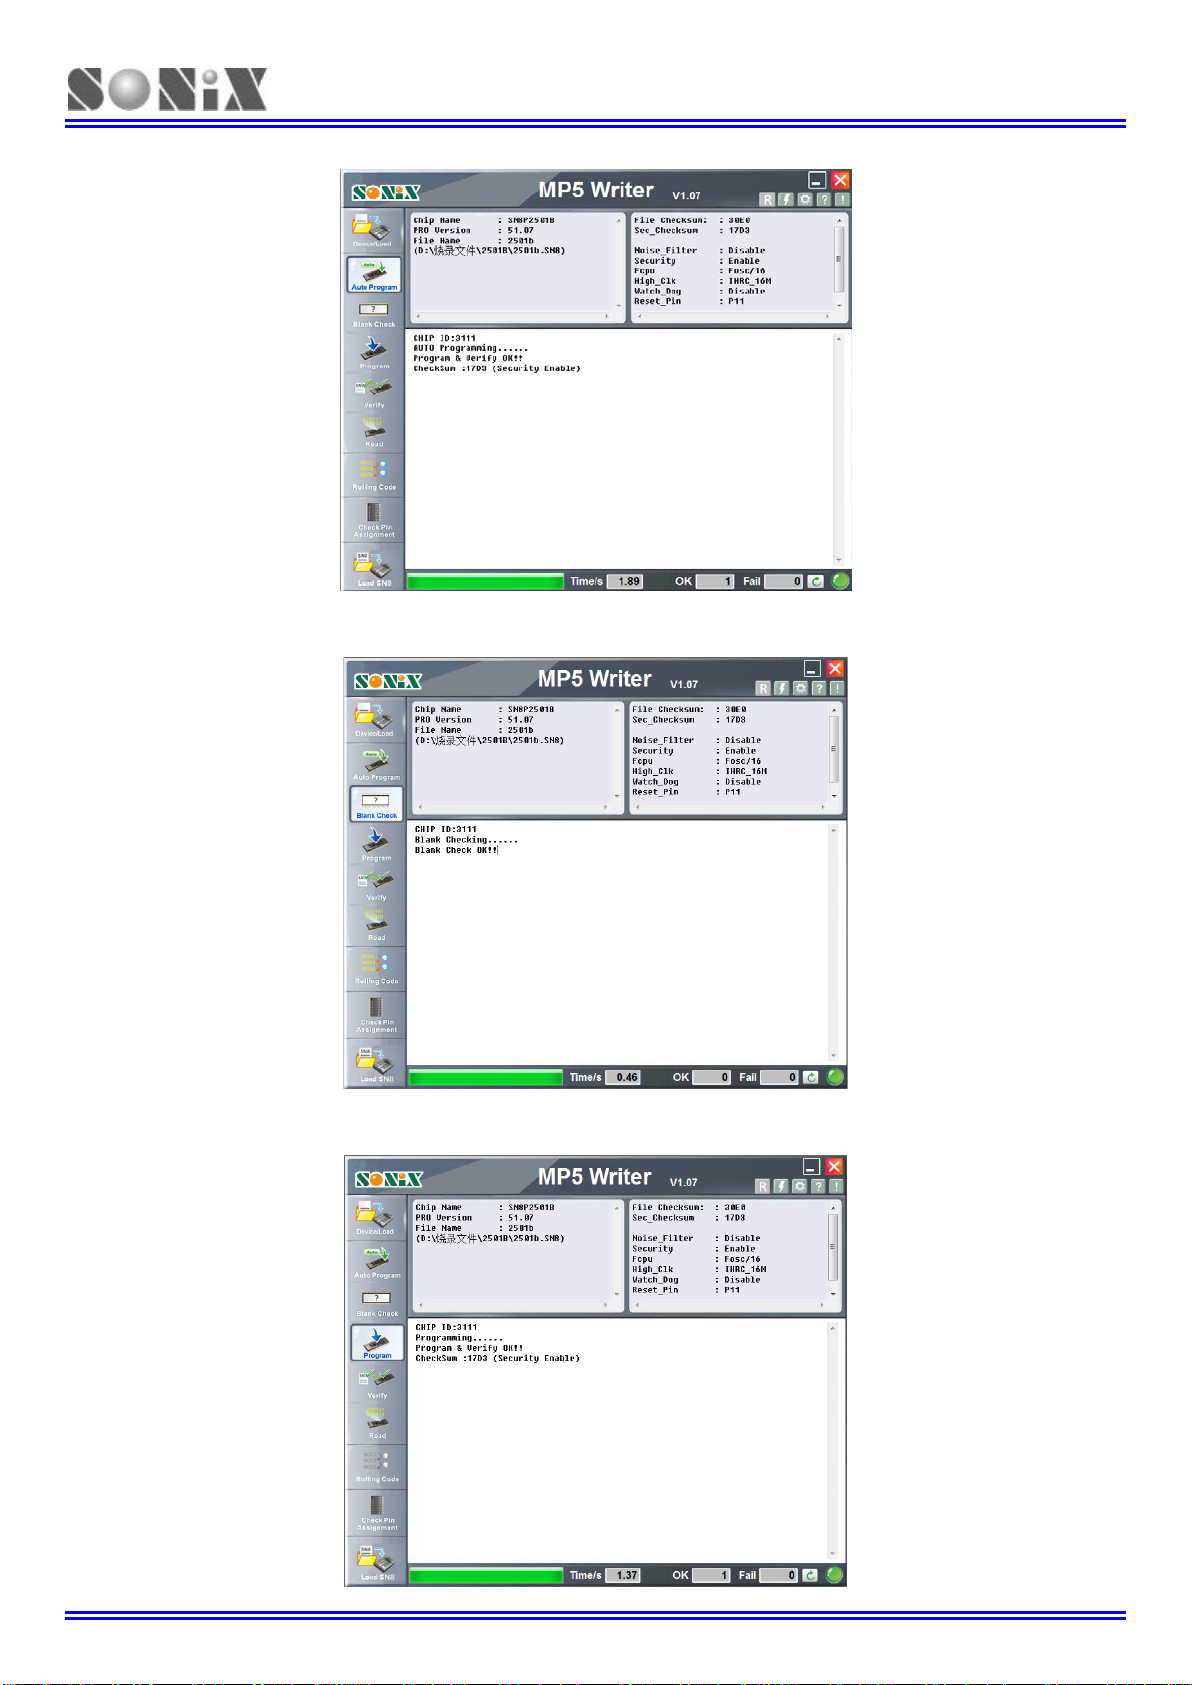
Click “Auto Program”,MP5 Plus Writer will execute “Blank check”, “Program”, “Verify”, as shown in Fig3-8:
Fig3-8 “Auto Program” is executed successfully interface
Click “Blank Check”, MP5 Plus Writer will check the blank of MCU, as shown in Fig3-9:
Fig3-9 “Blank Check” is executed successfully interface
Click “Program”, will execute “Program”, “ Verify ” , as shown in Fig3-10:
Fig3-10 “Program” is executed successfully interface
MP5 Plus Writer Easy Guide
SONIX TECHNOLOGY CO., LTD. Page 17 Version 1.0
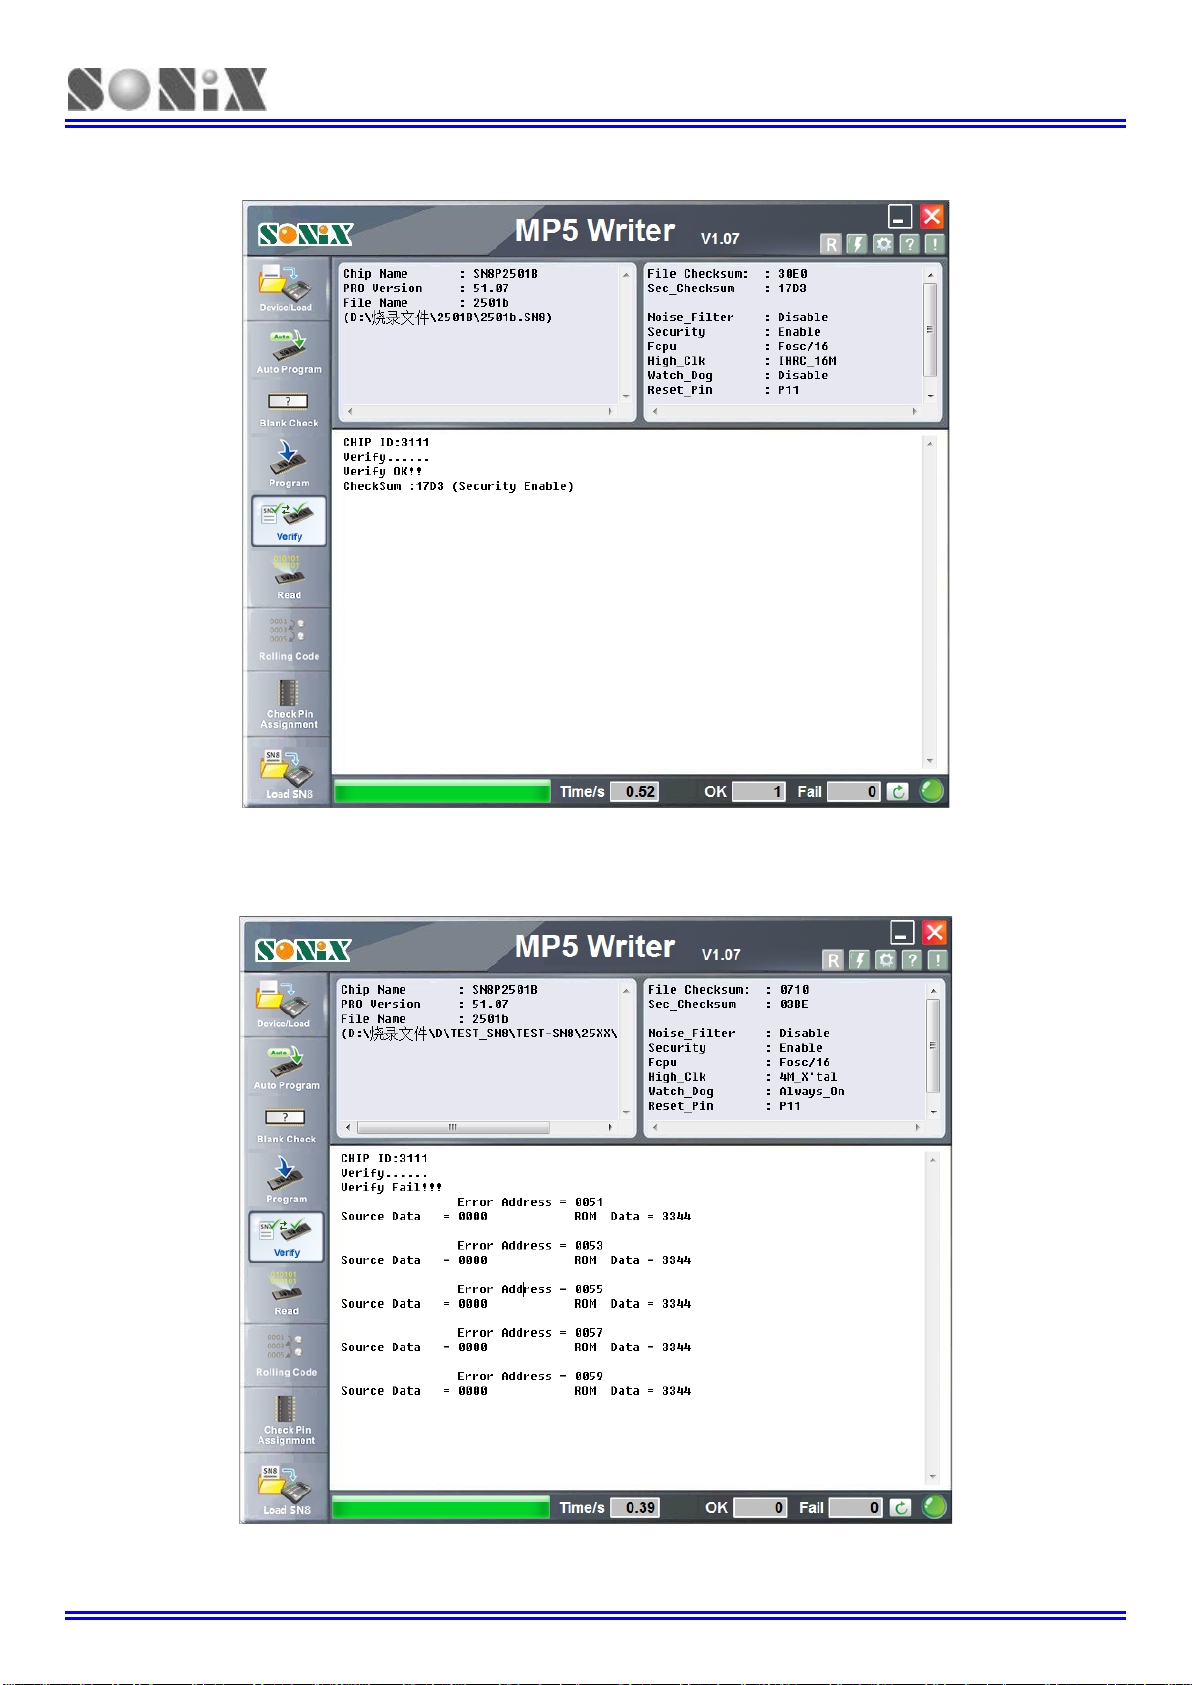
Click “Verify”, will verify the data in MCU with the programming file;
If they are the same, the information is as shown in Fig3-11;
Fig3-11 “Verify” is executed successfully
If they are different, the error address and data are displayed (five items at most), the information as shown in
Fig3-12:
Fig 3-12 “Verify” unsuccessfully
MP5 Plus Writer Easy Guide
SONIX TECHNOLOGY CO., LTD. Page 18 Version 1.0
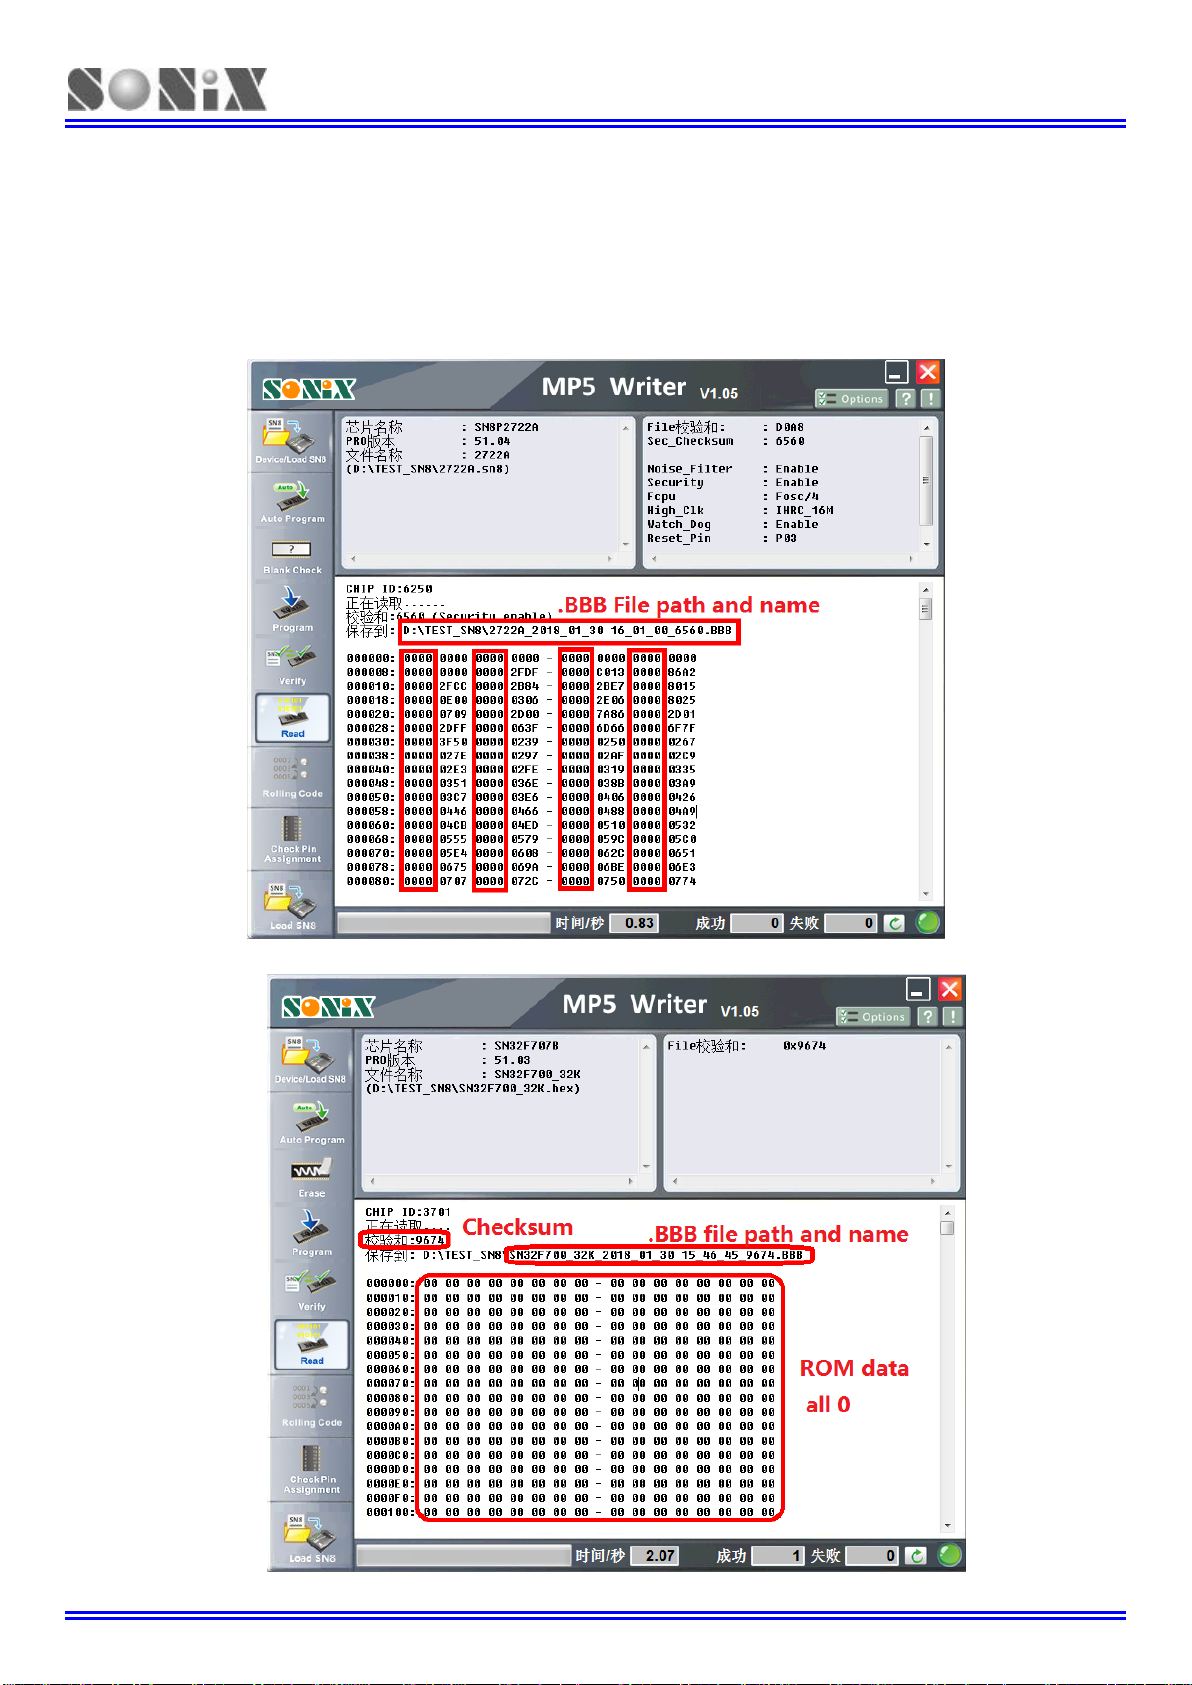
Click “Read”, Read MCU ROM and display the data in the information window, as shown in Fig3-13,3-14:
At the same time, a .BBB file is saved in the same path; The.BBB file is named: Programming file name_
year_ month_ day hour_ minute_ second_ Checksum;
Note:
1、If the .SN8 file’s security is enable, Can only read half of the data, encryption area of 0;
2、If the .Hex file’s security is enable, the whole ROM area is 0, and the checksum can be referred to;
Fig3-13 “Read” result, when the .SN8 file’s security is enable
Fig3-14 “Read” result, when the .Hex file’s security is enable

MP5 Plus Writer Easy Guide
SONIX TECHNOLOGY CO., LTD. Page 19 Version 1.0
3.2 Programming quantity statistics
In online mode, "Auto Program" and "Program" will count the number of successful and failed operations.
Fig3-15 shows the number of successes and failures after programming.
Execute " ", the number of successes and failures can be cleared to zero.
Fig3-15 The counter in online mode
3.3 Rolling Code Setting
The window of setting parameters pops-up after loading the programming file with Rolling Code.
This window allows you to reset the Rolling Code initial value, the step value, and whether Rolling Code is
validated in Verify mode. As shown in Fig3-16:
Fig3-16 Set Rolling Code parameters
The description of checkbox is as follows:
If checked, Rolling Code is not checked in verify mode.
If not checked, Rolling Code is checked in verify mode.
When the Rolling Code parameter is set successfully, the "Rolling Code" button will be clickable.
This button allows you to reset the parameters of Rolling Code. As is shown in Fig3-17:
Table of contents


