Sonnet TEMPO SATA X4i User manual

Serial ATA Host Adapter for PCI-X
TEMPO™
SATA X4i
Quick Start Guide for Tempo SATA X4i
You Should Have
The following item should be included in your product package:
• One Tempo SATA X4i card
• One Serial ATA data cable
The following items may be required (sold separately):
• Medium Phillips screwdriver
• One or more Serial ATA data cables
• Internal drive mounting hardware
• One or more legacy (4-pin) power cable Y-adapters
• One or more legacy to Serial ATA (4-pin to 15-pin) power
cable adapters
• One or more Ultra ATA to Serial ATA adapters (only used to
support parallel ATA drives)
System Requirements
The Tempo SATA X4i requires the following in order to operate in
your system:
• One available PCI-X or PCI slot
• Mac OS®X Version 10.2.x or later, or Windows®XP
Remember to register your product online at http://registration.sonnettech.com to be informed of future upgrades and product releases.
Software updates and links are available from the Sonnet web site at www.sonnettech.com. • Online support form available at http://supportform.sonnettech.com.
Sonnet Technologies Customer Service hours are Mon.-Fri., 7 a.m.–5 p.m. Pacific Time • Customer Service Phone: 1-949-472-2772 • E-mail: support@sonnettech.com
Sonnet Technologies, Inc., Irvine, California USA • Tel: 1-949-587-3500 Fax: 1-949-457-6350
©2006 Sonnet Technologies, Inc. All rights reserved. Sonnet, the Sonnet logotype, Simply Fast, the Simply Fast logotype, and Tempo are trademarks of Sonnet Technologies, Inc. Macintosh and Mac are trademarks of
Apple Computer, Inc., registered in the United States and other countries. Other product names are trademarks of their respective owners. Product specifications subject to change without notice. Printed in the USA.
QS-TSATAII-X4i-E-A-061206
Support Notes: We recommend that you make a backup of important
information on your system’s current hard drive prior to installing new
hardware or software.
When handling computer products, you must take care to prevent components
from being damaged by static electricity. Before opening your computer or
removing parts from their packages, always ground yourself first by touching
a metal part of the computer, such as a port access cover, and work in an area
free of static electricity; avoid carpeted areas. Handle all electronic components
only by their edges, and avoid touching connector traces and component pins.
Also, avoid touching the logic board and any of its components.

2
Quick Start Guide for Tempo SATA X4i
Installation Preparation
Prior to installing the Tempo SATA X4i into your system and connecting any
hard drives, you should familiarize yourself with the parts to be installed. We
also strongly recommend that you read the sections in your computer’s user
manual that address hard drive and PCI card installation.
1. The Tempo SATA X4i card uses internal Serial ATA (SATA) data cable con-
nectors. The internal connectors have an L-shaped “key” in the center
(Figure 1).
2. Figure 2 illustrates the internal Serial ATA data cable included with the
Tempo card; plug the straight connector into the Tempo card.
3. Locate the connector block on your drive. Many Serial ATA drives are
equipped with both a legacy 4-pin power connector and a Serial ATA 15-
pin power connector (Figure 3). Depending on your computer, you may
need to use 4-pin to 15-pin power adapter cables.
Hardware Installation Steps
This section covers the installation of the Tempo SATA X4i into your system
and connection of one or more hard drives.
1. Shut down the computer.
2. Open your computer to access its expansion card area (PCI-X or PCI slots);
refer to your computer’s user manual for specific information.
3. Install your hard drives now. (Depending on your computer model, drive
mounting hardware may be required to secure your hard drives. Refer to
your computer’s user manual.)
4. Plug the SATA data cables’ right angle connectors into your drives; verify
the connectors are plugged in securely. (If you are connecting more
than one drive, you will need additional SATA data cables.)
Figure 1
Support Note: Technical knowledge may be required to gain access to
the computer’s expansion bays in certain computers. We recommend
you first consult your computer’s user manual. If you feel you are unable to
install the computer hardware, contact a qualified technician.
Figure 2
Serial ATA data cable
right angle
connector
straight connector
Figure 3
Serial ATA power
connector
Serial ATA data
connector
legacy power
connector
SATA connector

3
Quick Start Guide for Tempo SATA X4i
5. Locate the power connector plugged into your computer’s
existing hard drive. You should find at least one extra power
connector near the existing drive; if you have installed
only one new drive, plug the extra power connector into it.
Connect only one power connector to the drive. If you
have installed more than one new drive, or there are no
additional power connectors, you may need to use power
cable Y-adapters or other adapters which will provide power
to the connected hard drives. Verify the connectors are
plugged in securely.
6. Locate an available PCI-X or PCI slot inside your computer
and remove its access cover, if present, from the rear of the
computer.
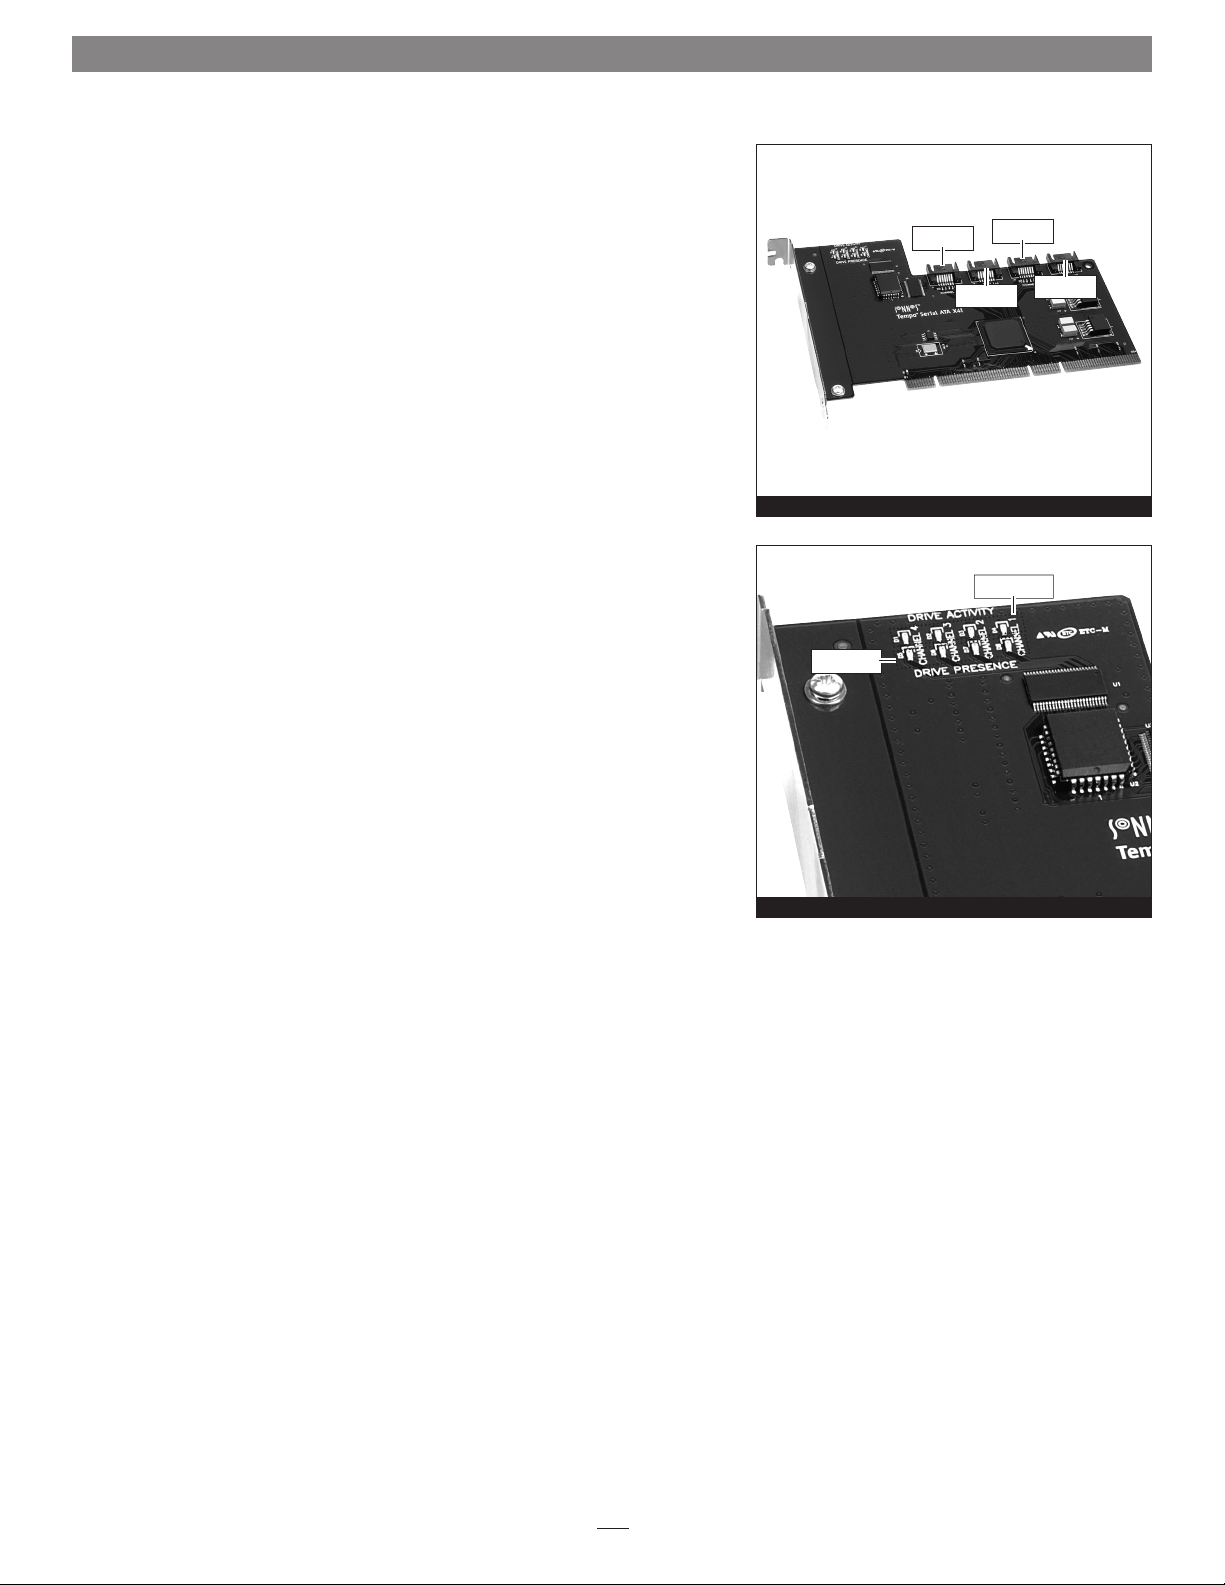
7. Remove the Tempo card from its packaging, and install it
into the slot; make sure the card is firmly seated.
8. Route the Serial ATA data cable(s) to the Tempo card; avoid
heat sinks and make sure the cables will not get crushed or
pinched by any part of the case when the computer is reas-
sembled.
9. Plug in the Serial ATA data cable(s) to the Tempo card.
10. Check the cable connections; make sure all cables are con-
nected securely to the Tempo card and the hard drives.
11. Secure the Tempo card firmly in place with the previously
removed mounting screw if necessary, and then close the
computer; be very careful not to pinch the cables.
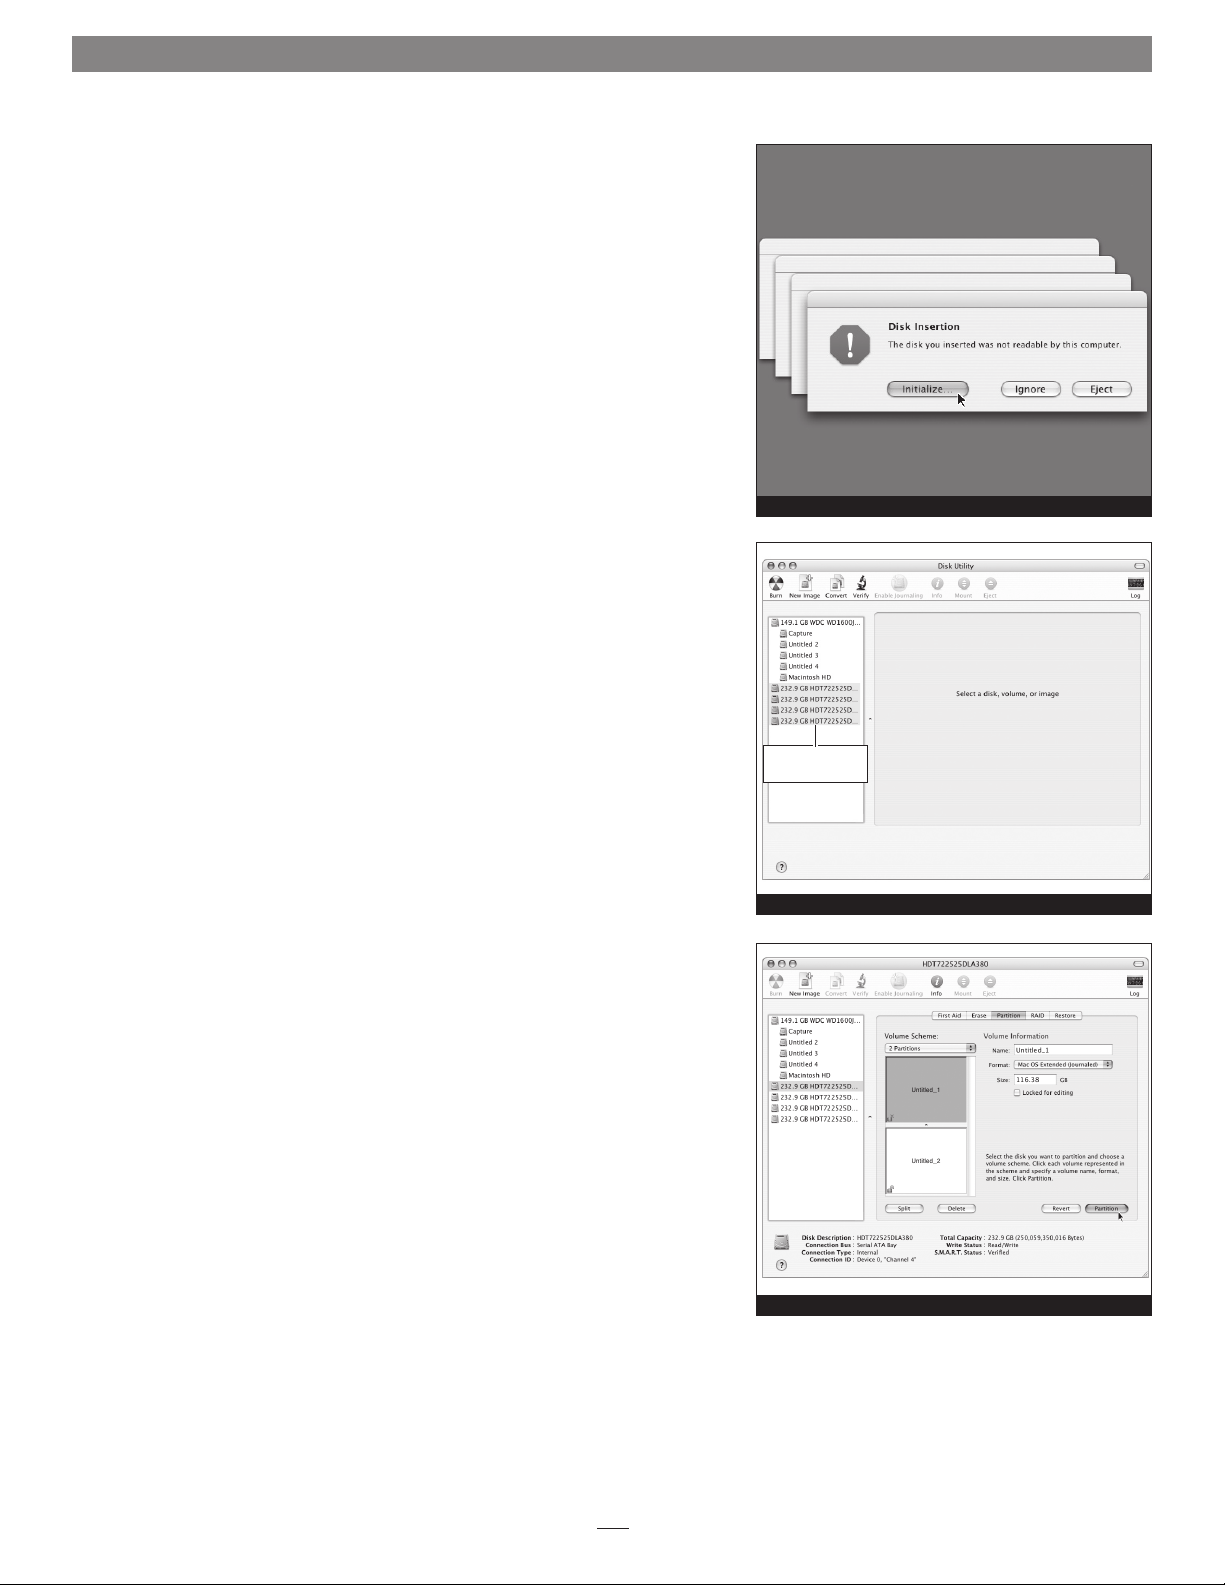
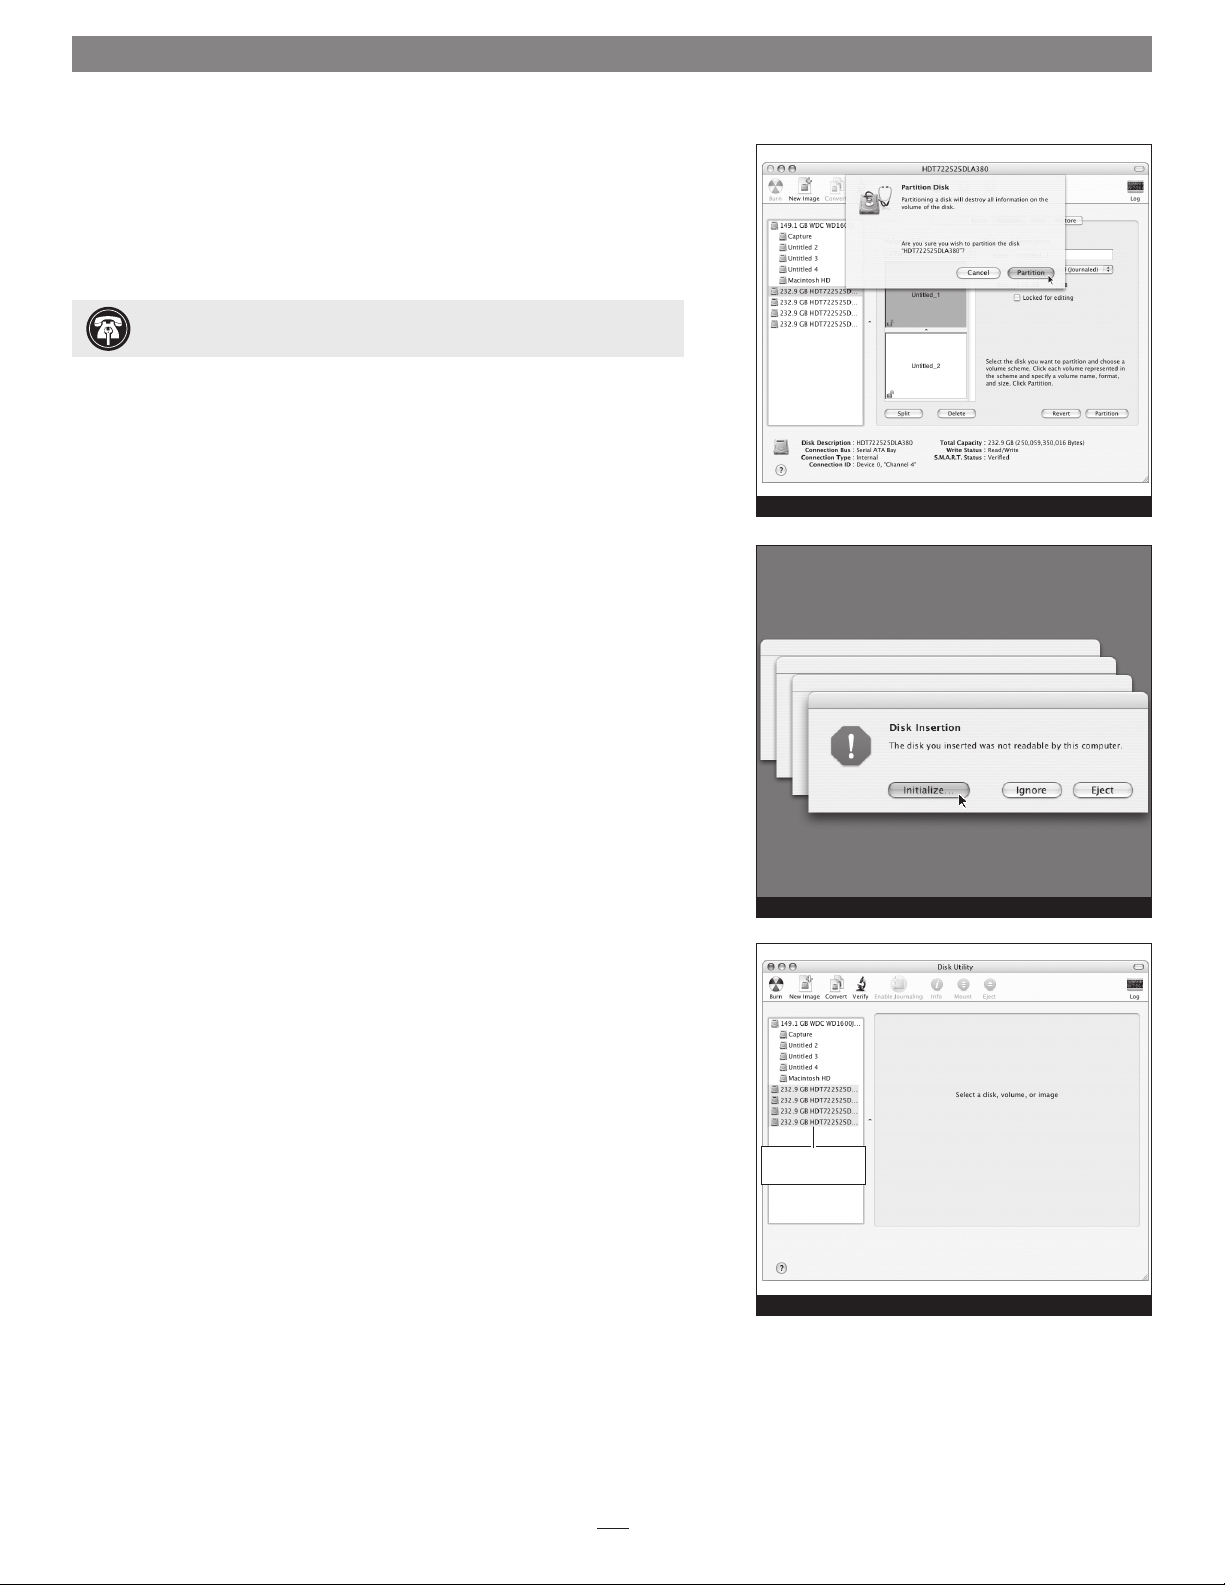
12. If you are a Mac user, skip to page 4. If you are a
Windows user, continue below.
Windows XP Driver Installation
This section describes the installation of drivers to support the
Tempo SATA X4i in systems running Windows XP.
1. Turn on your computer; during Windows startup, two
New Hardware Found pop-ups may briefly appear, with IDE
Controller and Standard Dual Channel PCI IDE Controller
listed as the new hardware types.
2. Log on to the Internet and point your web browser to:
www.sonnettech.com/downloads/adapter_sw.html#tsata-
xwin
3. Find the file that matches the version of Windows XP you
are using, click the Download button next to it, and save the
file to your desktop.
4. Locate the tempo-x file on the desktop. Right-click it and
select Extract All…
5. Click Start > Control Panel. When the Control Panel window
appears, double-click the System icon. (If the System icon is
not visible, click the Switch to Classic View link to make it
appear.)
6. When the System Properties window appears, click the
Hardware tab, and then click Device Manager.
7. When the Device Manager window appears, click on the +
next to IDE ATA/ATAPI controllers to expand the list. Right-
click on Standard Dual Channel PCI IDE Controller and
select Update Driver.
8. When the Hardware Update Wizard window appears, select
“No, not this time”, and then click Next.
9. When the next window appears, select “Install from a list or
specific location (Advanced)” and then click Next.
10. When the next window appears, select “Don’t search. I will
choose the driver to install” and then click Next.
11. When the next window appears requesting you to select
the device driver, select Standard Dual Channel PCI IDE
Controller from the list, and then click Have Disk…
12. When the Install From Disk window appears, click Browse.
13. Navigate to and open the tempo-x folder, and then open
the TempoXP folder, select “mvsata”, and then click Open.
14. When the Hardware Update Wizard window appears again,
click Next.
15. When the Hardware Installation window appears, the Tempo
card will be identified as “Marvell Serial ATA Gen 2 PCI-X
Adapter”; click next. When the Hardware Installation window
appears, Continue Anyway and the driver will be installed.
15. When the next window appears, click Finish.
16. Click Start > Turn Off Computer, and then click Restart;
you may now format drives attached to the Tempo card.
Windows Drive Formatting
If you intend to format drives connected to the Tempo SATA X4i
using Windows drive formatting tools, you may locate the infor-
mation by using “format volume” as the search item in Windows
Help.
Support Note for Power Mac G5 Users: If your
computer has PCI-X slots, you should be aware that when
certain standard 33 MHz PCI adapter cards are installed along
with the Tempo card in slots 2 and 3, the Tempo card’s perfor-
mance may be adversely affected.

4
Mac OS X Drive Formatting—Individual Drives (Not in a RAID Set)
This section describes the process of formatting (initializing) individual hard
drives connected to the Tempo SATA X4i using Disk Utility under Mac OS X
Version 10.4. If you intend to create a RAID set with the drives attached to the
Tempo card, skip to “Mac OS X Drive Formatting—RAID Sets” on the next page.
1. Turn on your computer. During startup, your computer will display one or
more messages referring to an unreadable disk; click Initialize… to launch
Disk Utility (Figure 4). After Disk Utility launches, click the Initialize but-
ton in each remaining message window.
2. If it is not already open, launch Disk Utility (Figure 5). Note that all
attached drives appear in the information window, regardless of being for-
matted or not.
3. Select a drive you want to format by clicking the drive symbol or the
“name” of the drive (Figure 6). At the bottom of the window, drive capac-
ity, connection type, and connection ID information are listed.
4. Click on the Partition button (Figure 6). Click on the drop down menu
beneath “Volume Scheme:” and select a number of partitions for the vol-
ume; you may optionally choose to partition each drive to create two or
more smaller “virtual” drives.
5. Click to highlight a partition, and then type a name in the Name field;
repeat for each partition (Figure 6). After formatting, each partition will
appear in the Finder window as a drive*.
6. Click Partition (Figure 6).
* If you changed the Finder preferences setting to not show hard drives on the desktop,
newly-formatted drives won’t appear on the desktop after you’ve formatted them.
Figure 4
Figure 5
Quick Start Guide for Tempo SATA X4i
Figure 6
drives connected
to Tempo card

5
Quick Start Guide for Tempo SATA X4i
Mac OS X Drive Formatting—Individual Drives (continued)
7. When the Partition Disk window appears, click the Partition button
(Figure 7). If necessary, repeat steps 3–6 to partition any other drives con-
nected to the Tempo card. When partitioning and formatting are com-
plete, close the Disk Utility application; you can now use your drive(s).
Mac OS X Drive Formatting—RAID Sets
This section describes the process of formatting (initializing) multiple hard
drives connected to the Tempo SATA X4i using Disk Utility under Mac
OS X Version 10.4. If you choose to do so, you may format your drives using
SoftRAID 3.1 or later; refer to that product’s documentation for instructions.
1. Turn on your computer. During startup, your computer will display one or
more messages referring to an unreadable disk; click Initialize… to launch
Disk Utility (Figure 8). After Disk Utility launches, click the Initialize but-
ton in each remaining message window.
2. If it is not already open, launch Disk Utility (Figure 9). Note that all
attached drives appear in the information window, regardless of being for-
matted or not.
Figure 7
Figure 8
Figure 9
Support Note: See page 7 for port and channel identification, and
information on Tempo SATA X4i’s status LEDs.
drives connected
to Tempo card

6
Quick Start Guide for Tempo SATA X4i
Drive Formatting—RAID Sets (continued)
3. Select one of the drives you want to format in a RAID set by clicking the
drive symbol or the “name” of the drive. At the bottom of the window,
drive capacity, connection type, and connection ID information are listed.
4. Click the RAID tab in the Disk Utility window, select all the drives you
will use to create your striped RAID set, and drag them into the disk field
(Figure 10). Be careful NOT to accidentally drag in a drive you don’t
want included in the RAID.
5. From the drop-down menus, select the volume format and the RAID
scheme (Striped RAID Set), and then type in the name for your RAID set
(Figure 10). Click the Create button.
6. When the Creating RAID window appears, click the Create button; all of
the selected drives will be formatted and the RAID set created (Figure 11).
Close Disk Utility; your drives are now ready for use and your installation
is complete.
Figure 10
Figure 11
Support Notes: The remaining steps in this section describe the creation
of a RAID 0 (striped) set. If you intend to create a RAID 1 (mirrored) or
RAID 10 (striped/mirrored) set, the procedure is similar to the remaining steps.
Please refer to Disk Utility help for further information.
All hard drives connected to the Tempo card will be described by Disk Utility as
having an internal connection.
Support Note: See page 7 for port identification and information on
Tempo SATA X4i’s status LEDs.

7
Quick Start Guide for Tempo SATA X4i
About Tempo SATA X4i’s Ports and LEDs
1. Each SATA connector on the Tempo card is assigned a channel number
that may be helpful if you need to diagnose any issues (Figure 12).
2. When drives connected to the Tempo card are powered and active, the
status LEDs on the card will light (Figure 13):
• Green LED ON: Drive(s) present and ready.
• Amber LED ON/Flashing: Drive(s) reading/writing data.
Figure 12
Figure 13
channel 4
channel 3
channel 2
channel 1
green LEDs
amber LEDs
Table of contents
Other Sonnet Host Adapter manuals

Sonnet
Sonnet TEMPO ATA100 User manual

Sonnet
Sonnet Tempo SATA Pro 6Gb ExpressCard/34 User manual

Sonnet
Sonnet TEMPO HD User manual

Sonnet
Sonnet Tempo Ultra ATA66 User manual

Sonnet
Sonnet Tempo SATA Pro 6Gb PCIe 2.0 User manual

Sonnet
Sonnet Tempo SATA EDGE ExpressCard/34 User manual

Sonnet
Sonnet Tempo Ultra ATA66 User manual
Popular Host Adapter manuals by other brands

Sun Microsystems
Sun Microsystems Sun StorageTek SG-XPCIE2FCGBE-E-Z installation guide

Apricorn
Apricorn Mac Array quick start guide

HighPoint
HighPoint RocketRAID 2220 user guide

Emulex
Emulex LPe15004 installation manual

ATTO Technology
ATTO Technology ATTO ExpressPCI FC 3322 Technical specification

IOGear
IOGear GPS702e3W6 installation guide