Sony Ericsson Cyber-Shot K770 User manual

Trouble Shooting Guide, Mechanical
4/000 21-1/FEA 209 544/142 A
Company Internal
©
Sony Ericsson Mobile Communications AB
1(32)
Trouble Shooting Guide, Mechanical
Applicable for K770
Contents
1
General ...............................................................................................................2
1.1
Service functions in the software...........................................................2
1.2
Misuse and other no warranty issues ....................................................3
2
Appearance Problems.......................................................................................7
3
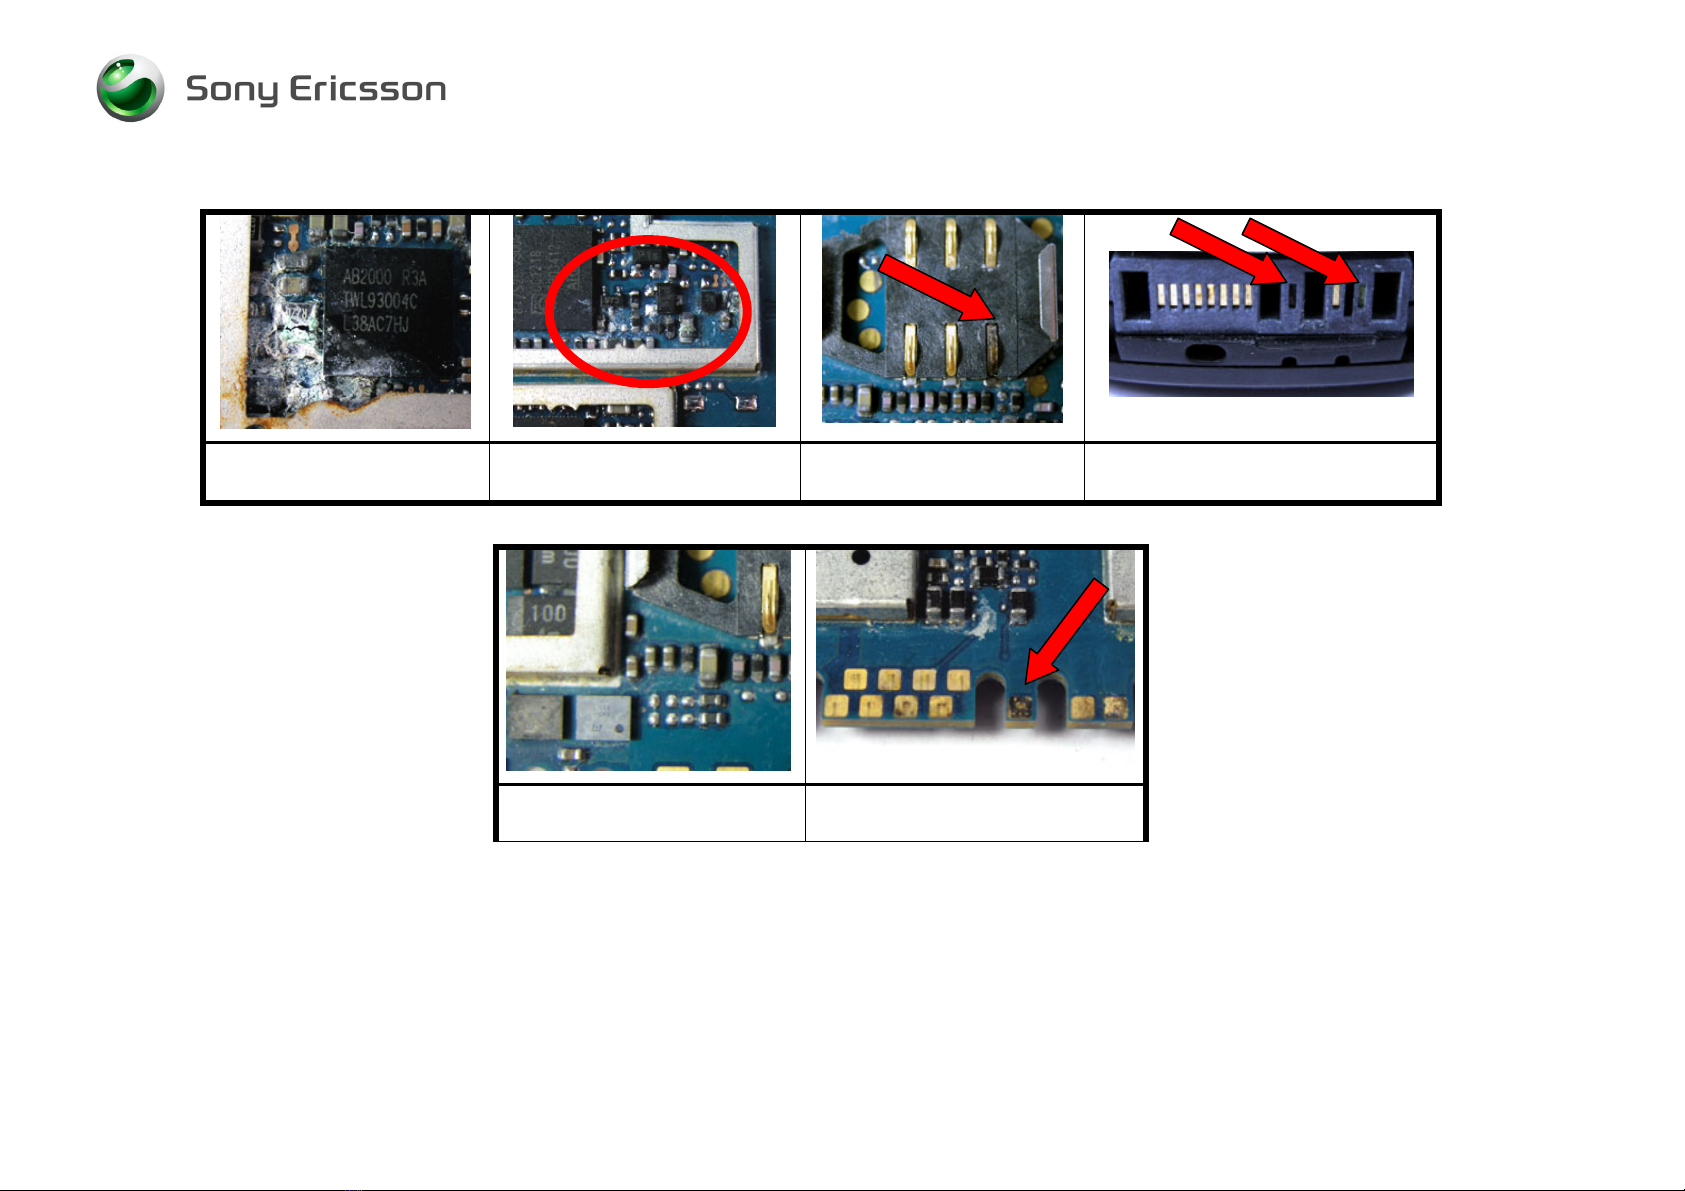
Network/Signal Problems .................................................................................9
4
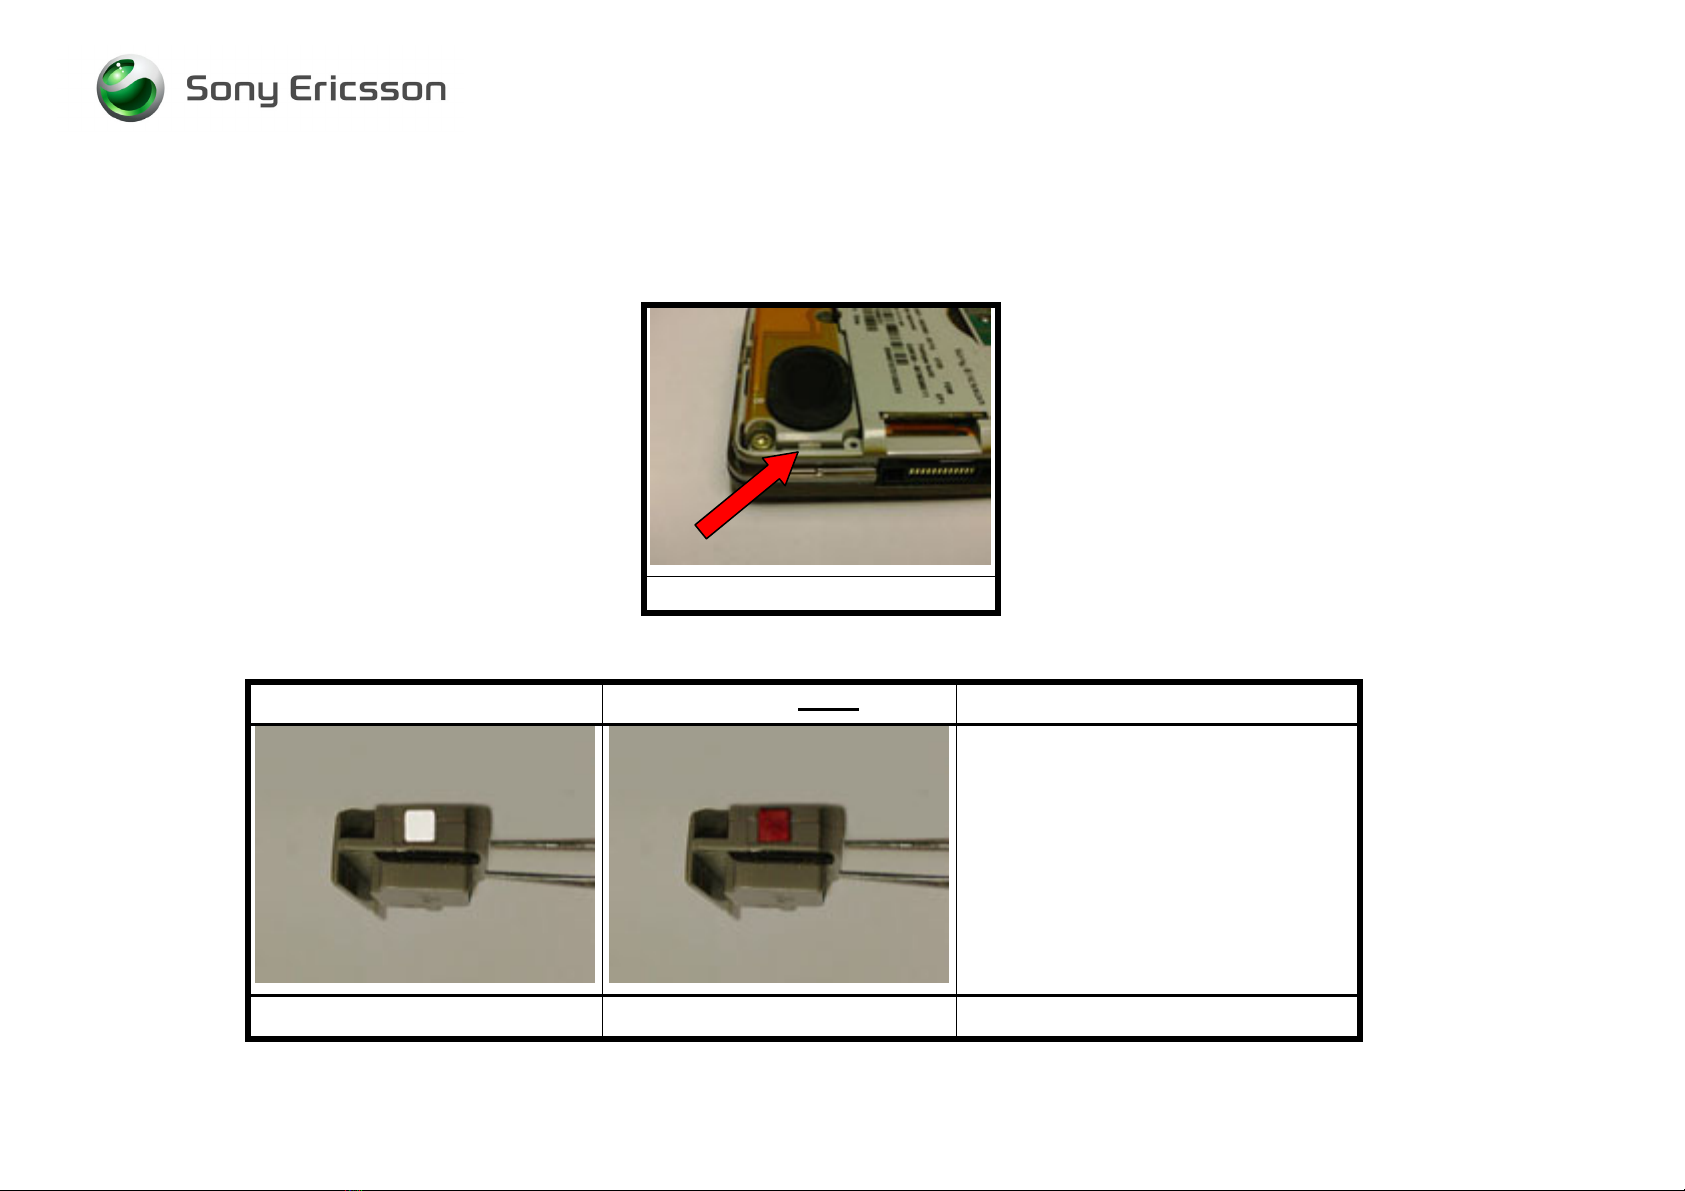
On/Off Problems ..............................................................................................12
5
Audio Problems ...............................................................................................14
6
Key Problems...................................................................................................18
7
Display Problems ............................................................................................21
8
Illumination Problems .....................................................................................22
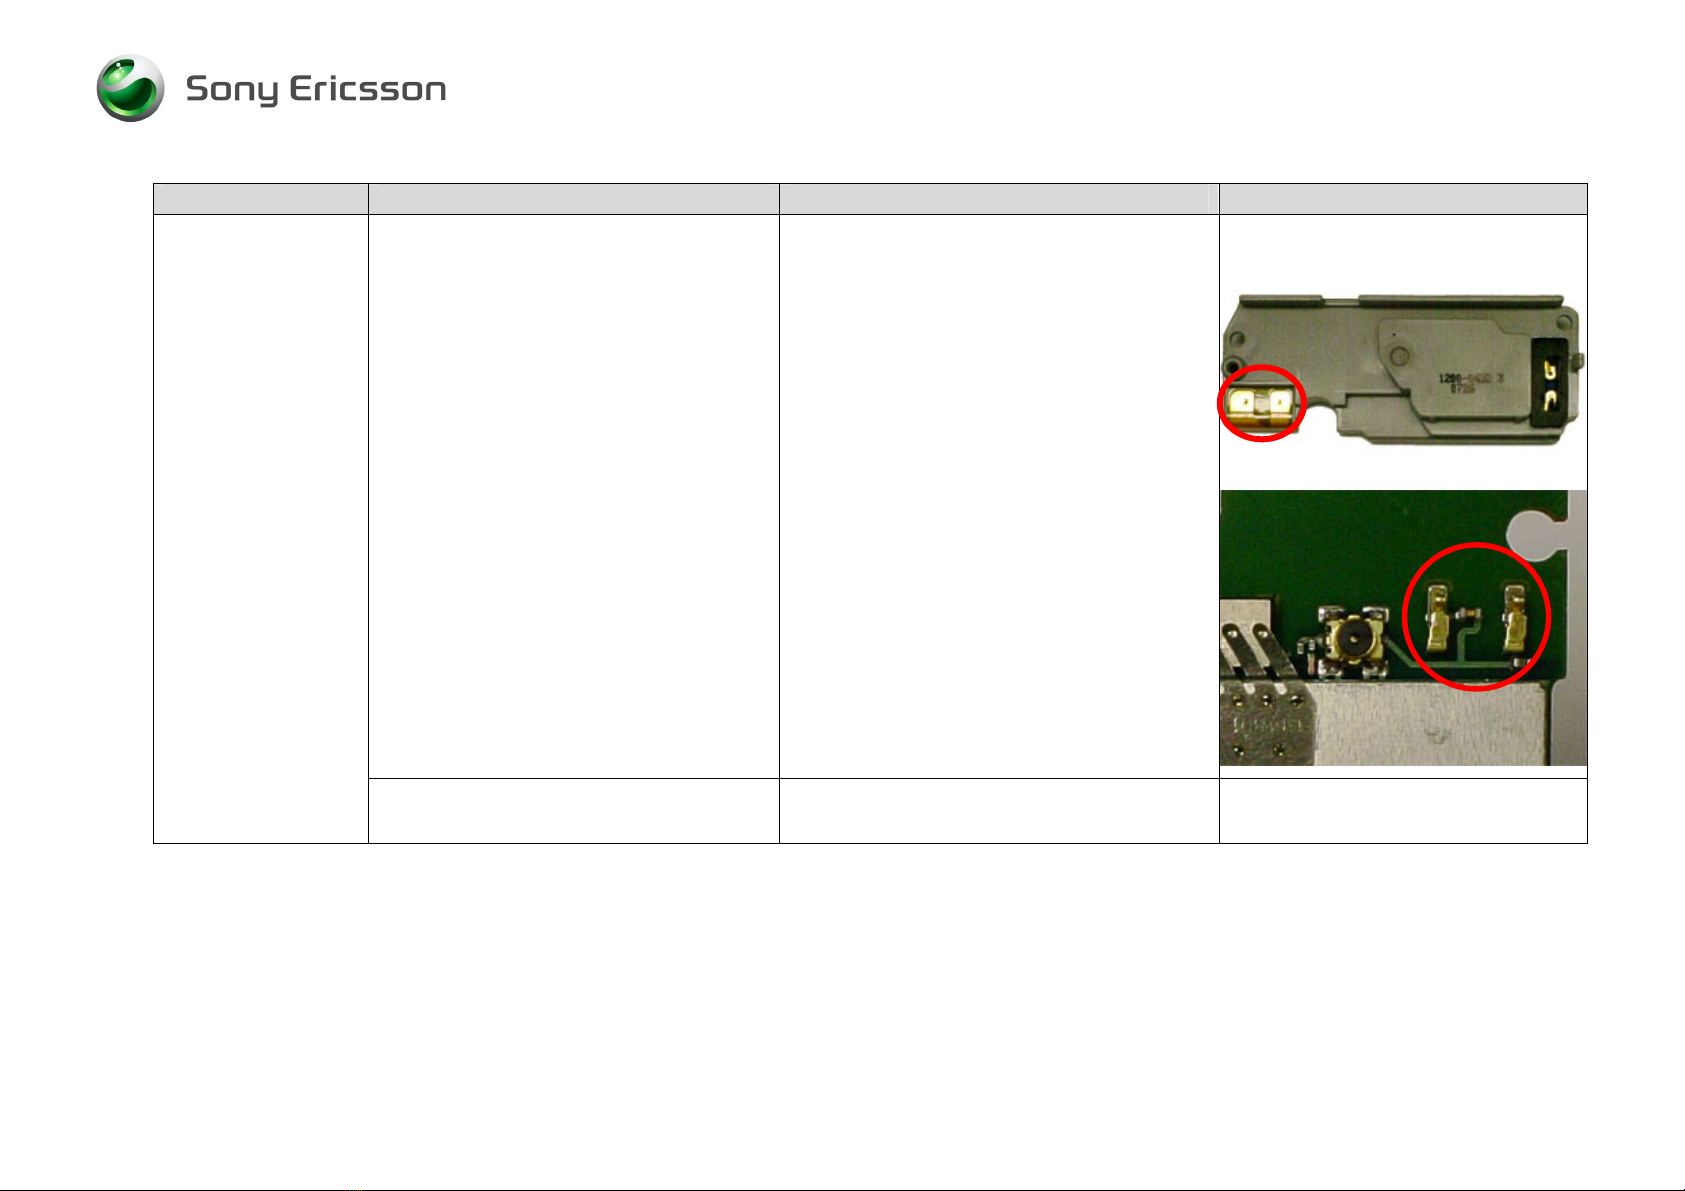
9
Alert Problems .................................................................................................24
10
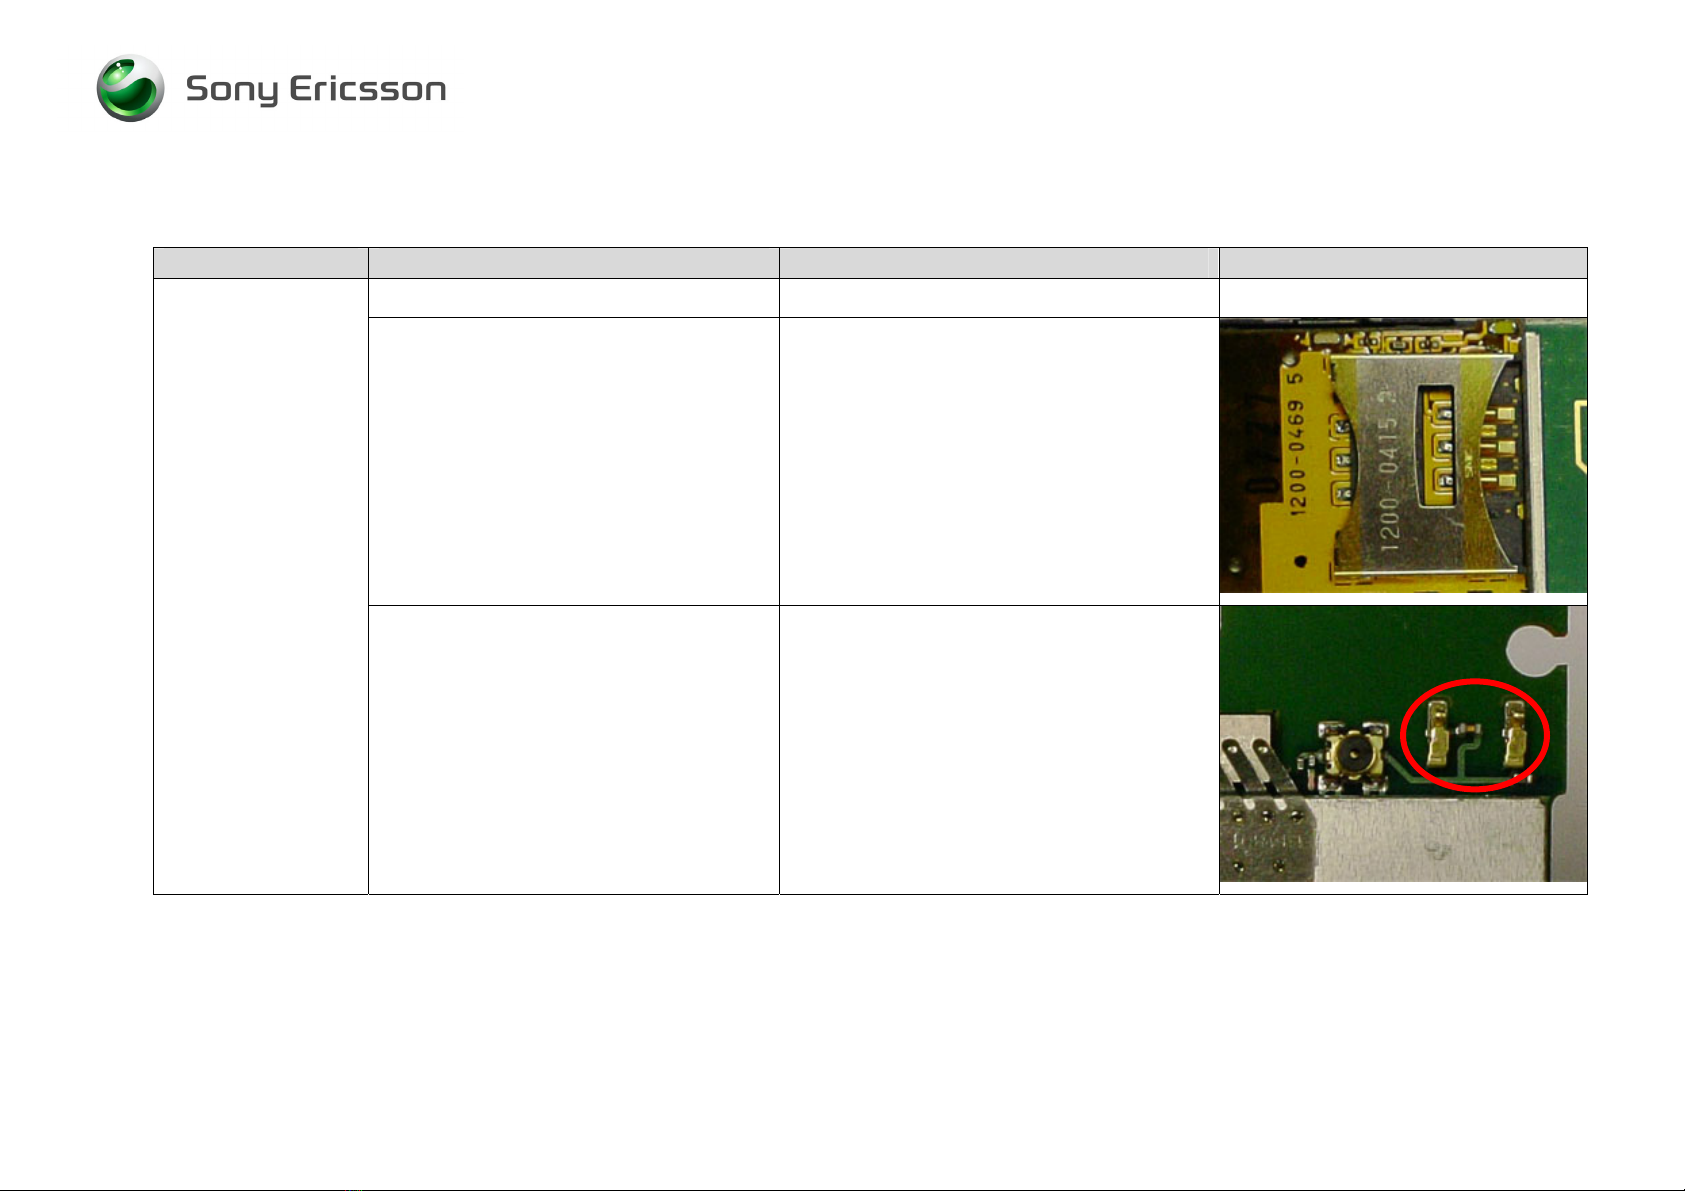
SIM Problems...................................................................................................26
11
Charging/Capacity Problems .........................................................................27
12
Camera Problems ............................................................................................29
13
Media Memory Problems ................................................................................30
14
Software Problems ..........................................................................................31
15
Revision History ..............................................................................................32

Trouble Shooting Guide, Mechanical
4/000 21-1/FEA 209 544/142 A
Company Internal
©
Sony Ericsson Mobile Communications AB
2(32)
1General
This document outlines the mechanical repairs that should be made in an attempt to fix the common failures that are seen in the
field. To gain a complete understanding of how to test and repair a specific failure, this document should be used in conjunction
with the Test Instructions, Mechanical and the Working Instructions, Mechanical.
1.1Service functions in the software
The service menu will be accessed with the following key combination.
⇒*⇐⇐*⇐*
They are as follows:
Service info
Service tests
Text labels
The phones software has a built in service functionality that allows you to test some of the phones functions. (See point 2 above) It
looks like this:
Main display
LED/illumination
Keyboard
Speaker
Earphone
Microphone
Vibrator
Camera
Real time clock
Total call time
NOTE: Different names may occur depending on language setting and customization.

Trouble Shooting Guide, Mechanical
4/000 21-1/FEA 209 544/142 A
Company Internal
©
Sony Ericsson Mobile Communications AB
3(32)
1.2Misuse and other no warranty issues
Misuse is not covered by warranty. This chapter will explain what’s not covered by warranty. Phones that have been exposed to
misuse will not be covered by warranty.
This means: if it is possible to repair the phone, the customer will have to pay for the repair. SEMC will not allow any of these
phones to be claimed into WCMS. Some local perspectives may interfere with this. Please reference to local directives.
1.2.1 Action
Make a general visual inspection for misuse.
Below are some examples of what is not covered by warranty.
Front window broken
due to misuse.
LCD cracked due to
drop.
Clear scratches Mark after drop Corrosion components
on the PCB.

Trouble Shooting Guide, Mechanical
4/000 21-1/FEA 209 544/142 A
Company Internal
©
Sony Ericsson Mobile Communications AB
4(32)
Corrosion components on
the PCB.
Corrosion components on the
PCB.
SIM reader damaged by
liquid.
System connector damaged by
liquid
Components around system
connector damaged by liquid
System connector pad(s)
damaged by liquid

Trouble Shooting Guide, Mechanical
4/000 21-1/FEA 209 544/142 A
Company Internal
©
Sony Ericsson Mobile Communications AB
5(32)
1.2.2 Liquid damage sticker
In the phone there is placed a sticker that can give you a hint to see if the phone is damage by liquid or not. This sticker is located
near the Antenna box (Fig. 1.2.1) and it is possible to see it without disassemble the phone.
Fig. 1.2.1
On the pictures below you will see the different between a sticker that has been in contact with liquid (Fig. 1.2.3) and with one that
hasn’t (Fig. 1.2.2).
This sticker is ok This sticker is not ok
The white sticker that has been in
contact with liquid turns into a red or
pink sticker. In this case you should
check the phone for liquid damage
(See point 1.1.1)
.
Note: There must be clear marks after
liquid on the PCB before rejecting the
phone for repair.
Fig. 1.2.2 Fig. 1.2.3

Trouble Shooting Guide, Mechanical
4/000 21-1/FEA 209 544/142 A
Company Internal
©
Sony Ericsson Mobile Communications AB
6(32)
1.2.3 Action
Make a general visual inspection for misuse, corrosion or oxidation from liquid damage. No further action should be taken for a liquid
damaged phone. Handle the unit according to local directives.

Trouble Shooting Guide, Mechanical
4/000 21-1/FEA 209 544/142 A
Company Internal
©
Sony Ericsson Mobile Communications AB
7(32)
2Appearance Problems
Problem Area Items to Check Repair Action Reference Image
Visually inspect the cosmetic quality of
all user viewable surfaces
•If dirty – Clean parts as necessary.
•If unacceptably scratched or damaged
– Replace damage parts as necessary.
Appearance
Visually inspect all keys •If dirty – Clean parts as necessary.
•If unacceptably scratched or damaged
– Replace damaged parts as
necessary.

Trouble Shooting Guide, Mechanical
4/000 21-1/FEA 209 544/142 A
Company Internal
©
Sony Ericsson Mobile Communications AB
8(32)
Problem Area Items to Check Repair Action Reference Image
Visually inspect for improper gap
between seams
•Reassemble or replace damaged parts
as necessary.

Trouble Shooting Guide, Mechanical
4/000 21-1/FEA 209 544/142 A
Company Internal
©
Sony Ericsson Mobile Communications AB
9(32)
3Network/Signal Problems
Problem Area Items to Check Repair Action Reference Image
Before proceeding !Perform a flash upgrade.
Visually inspect SIM holder •If dirty or oxidized – Clean it.
•If damaged – Replace the M2 SIM
assembly.
No Signal or Poor
Signal
Visually inspect antenna contact pads •If dirty or oxidized – Clean the pads
and replace the Antenna box.

Trouble Shooting Guide, Mechanical
4/000 21-1/FEA 209 544/142 A
Company Internal
©
Sony Ericsson Mobile Communications AB
10(32)
Problem Area Items to Check Repair Action Reference Image
Visually inspect antenna •If dirty or oxidized – Clean the pads.
•If damaged – Replace the Antenna
box.
•If antenna pin damaged - Send to an
electrical repair location.
If the issue has not been resolved !•Handle the unit according to local
directives.

Trouble Shooting Guide, Mechanical
4/000 21-1/FEA 209 544/142 A
Company Internal
©
Sony Ericsson Mobile Communications AB
11(32)
Problem Area Items to Check Repair Action Reference Image
Connect the phone to a handsfree car
kit connected with external antenna.
Visually inspect the antenna bar on the
phone.
•If no or only very less signal – Push
the middle pin of the ext. antenna
connector a few times.
Note: Be gently it might damage the
connector.
No signal when
using external
antenna (ex. Hands
free in car).
If the issue has not been resolved !•Handle the unit according to local
directives.

Trouble Shooting Guide, Mechanical
4/000 21-1/FEA 209 544/142 A
Company Internal
©
Sony Ericsson Mobile Communications AB
12(32)
4On/Off Problems
Problem Area Items to Check Repair Action Reference Image
Check whether the phone vibrates 10 to
15 seconds after pressing the power
key and whether the keypad illuminates
•If activation of the vibrator or keypad
are detected, refer to the “Display
Problems” chapter 7
Before proceeding !•Perform a flash upgrade.
Visually inspect contact pads on battery •If dirty or oxidized – Clean pads.
•If damaged – Replace the battery.
Power On
problems
Visually inspect battery connector •If dirty or oxidized – Clean it.
Note: Be gentle do not bend or damage
the gold surface on connector pin’s
•If damaged – Send to an electrical
repair location.

Trouble Shooting Guide, Mechanical
4/000 21-1/FEA 209 544/142 A
Company Internal
©
Sony Ericsson Mobile Communications AB
13(32)
Problem Area Items to Check Repair Action Reference Image
Visually inspect the power key •If damaged – Replace it.
If the issue has not been resolved !•Handle the unit according to local
directives.

Trouble Shooting Guide, Mechanical
4/000 21-1/FEA 209 544/142 A
Company Internal
©
Sony Ericsson Mobile Communications AB
14(32)
5Audio Problems
Problem Area Items to Check Repair Action Reference Image
Before proceeding !•Perform a flash upgrade and a setting
reset.
Visually inspect the microphone’s
external port
•If clogged - Clean or replace Front
cover.
If the issue has not been resolved !•If damaged – Send to an electrical
repair location.(Replace the
microphone)
Microphone:
If the issue has not been resolved !•Handle the unit according to local
directives.
Receiver:
No sound or poor
Before proceeding !•Perform a flash upgrade and a setting
reset.

Trouble Shooting Guide, Mechanical
4/000 21-1/FEA 209 544/142 A
Company Internal
©
Sony Ericsson Mobile Communications AB
15(32)
Problem Area Items to Check Repair Action Reference Image
Visually inspect receiver’s external port •If clogged – Clean or replace Front
cover.
Visually inspect receiver’s dust cloth •If dirty or damaged – Replace front
cover.
Visually inspect the receiver •If dirty or damaged – Clean or replace
it.
Visually inspect the pads •If dirty or oxidized – Clean pads.
quality sound
If the issue has not been resolved !•Replace receiver.

Trouble Shooting Guide, Mechanical
4/000 21-1/FEA 209 544/142 A
Company Internal
©
Sony Ericsson Mobile Communications AB
16(32)
Problem Area Items to Check Repair Action Reference Image
If the issue has not been resolved !•Handle the unit according to local
directives.
Before proceeding !•Perform a flash upgrade and a setting
reset.
Visually inspect speaker’s external port •If clogged – Clean it.
Speaker:
No sound or poor
quality sound
Visually inspect the speaker’s dust
cloth
•If dirty or damaged – Clean or replace
Speaker gasket.

Trouble Shooting Guide, Mechanical
4/000 21-1/FEA 209 544/142 A
Company Internal
©
Sony Ericsson Mobile Communications AB
17(32)
Problem Area Items to Check Repair Action Reference Image
Visually inspect the pads •If dirty or oxidized – Clean pads.
Visually inspect the Speaker pins •If dirty or oxidized – Clean or replace
Speaker & Antenna box.
If the issue has not been resolved !•Replace loudspeaker. (Speaker &
Antenna box)
If the issue has not been resolved !•Handle the unit according to local
directives.

Trouble Shooting Guide, Mechanical
4/000 21-1/FEA 209 544/142 A
Company Internal
©
Sony Ericsson Mobile Communications AB
18(32)
6Key Problems
Problem Area Items to Check Repair Action Reference Image
Keyboard:
A key on the
keyboard is not
functioning or is
intermittent
Visually inspect for debris between
keypad and dome sheet and for
damage to the keypad and the dome
sheet.
•If dirty – Clean both parts.
•If damaged - Replace keypad and/or
keypad support plate assembly as
necessary.

Trouble Shooting Guide, Mechanical
4/000 21-1/FEA 209 544/142 A
Company Internal
©
Sony Ericsson Mobile Communications AB
19(32)
Problem Area Items to Check Repair Action Reference Image
If the issue has not been resolved !•Replace the dome sheet, if it has not
already been replaced.
If the issue has not been resolved !•Handle the unit according to local
directives.

Trouble Shooting Guide, Mechanical
4/000 21-1/FEA 209 544/142 A
Company Internal
©
Sony Ericsson Mobile Communications AB
20(32)
Problem Area Items to Check Repair Action Reference Image
Visually inspect for damage to the side
keys
•If damaged - Replace keys as
necessary.
Side keys
If the issue has not been resolved !•Handle the unit according to local
directives.
Other manuals for Cyber-Shot K770
4
Table of contents
Other Sony Ericsson Mobile Phone manuals