manuals.online logo
Brands
  1. Home
  2. •
  3. Brands
  4. •
  5. Sony
  6. •
  7. CD Player
  8. •
  9. Sony CD Walkman D-FJ787 User manual

Sony CD Walkman D-FJ787 User manual

12Jog lever (u
(play/pause)•ENT
(enter) • ./>
(AMS/search))
微调杆(u(播放/
暂停)• ENT(输入)
• ./>(AMS/
搜索))
C
FM/AM
Portable CD Player
©2003 Sony Corporation
Operating Instructions
使用说明书
3-246-672-21 (1)
D-FJ787
English
WARNING
To prevent fire or shock hazard, do not expose the unit to
rain or moisture.
Do not install the appliance in a confined space, such as
a bookcase or built-in cabinet.
To prevent fire, do not cover the ventilation of the
apparatus with newspapers, tablecloths, curtains, etc. And
don’t place lighted candles on the apparatus.
To prevent fire or shock hazard, do not place objects filled
with liquids, such as vases, on the apparatus.
Certain countries may regulate disposal of the battery used
to power this product. Please consult with your local
authority.
CAUTION
• INVISIBLE LASER RADIATION WHEN OPEN
•DO NOT STARE INTO BEAM OR VIEW DIRECTLY
WITH OPTICAL INSTRUMENT
The validity of the CE marking is restricted to only those
countries where it is legally enforced, mainly in the
countries EEA (European Economic Area).
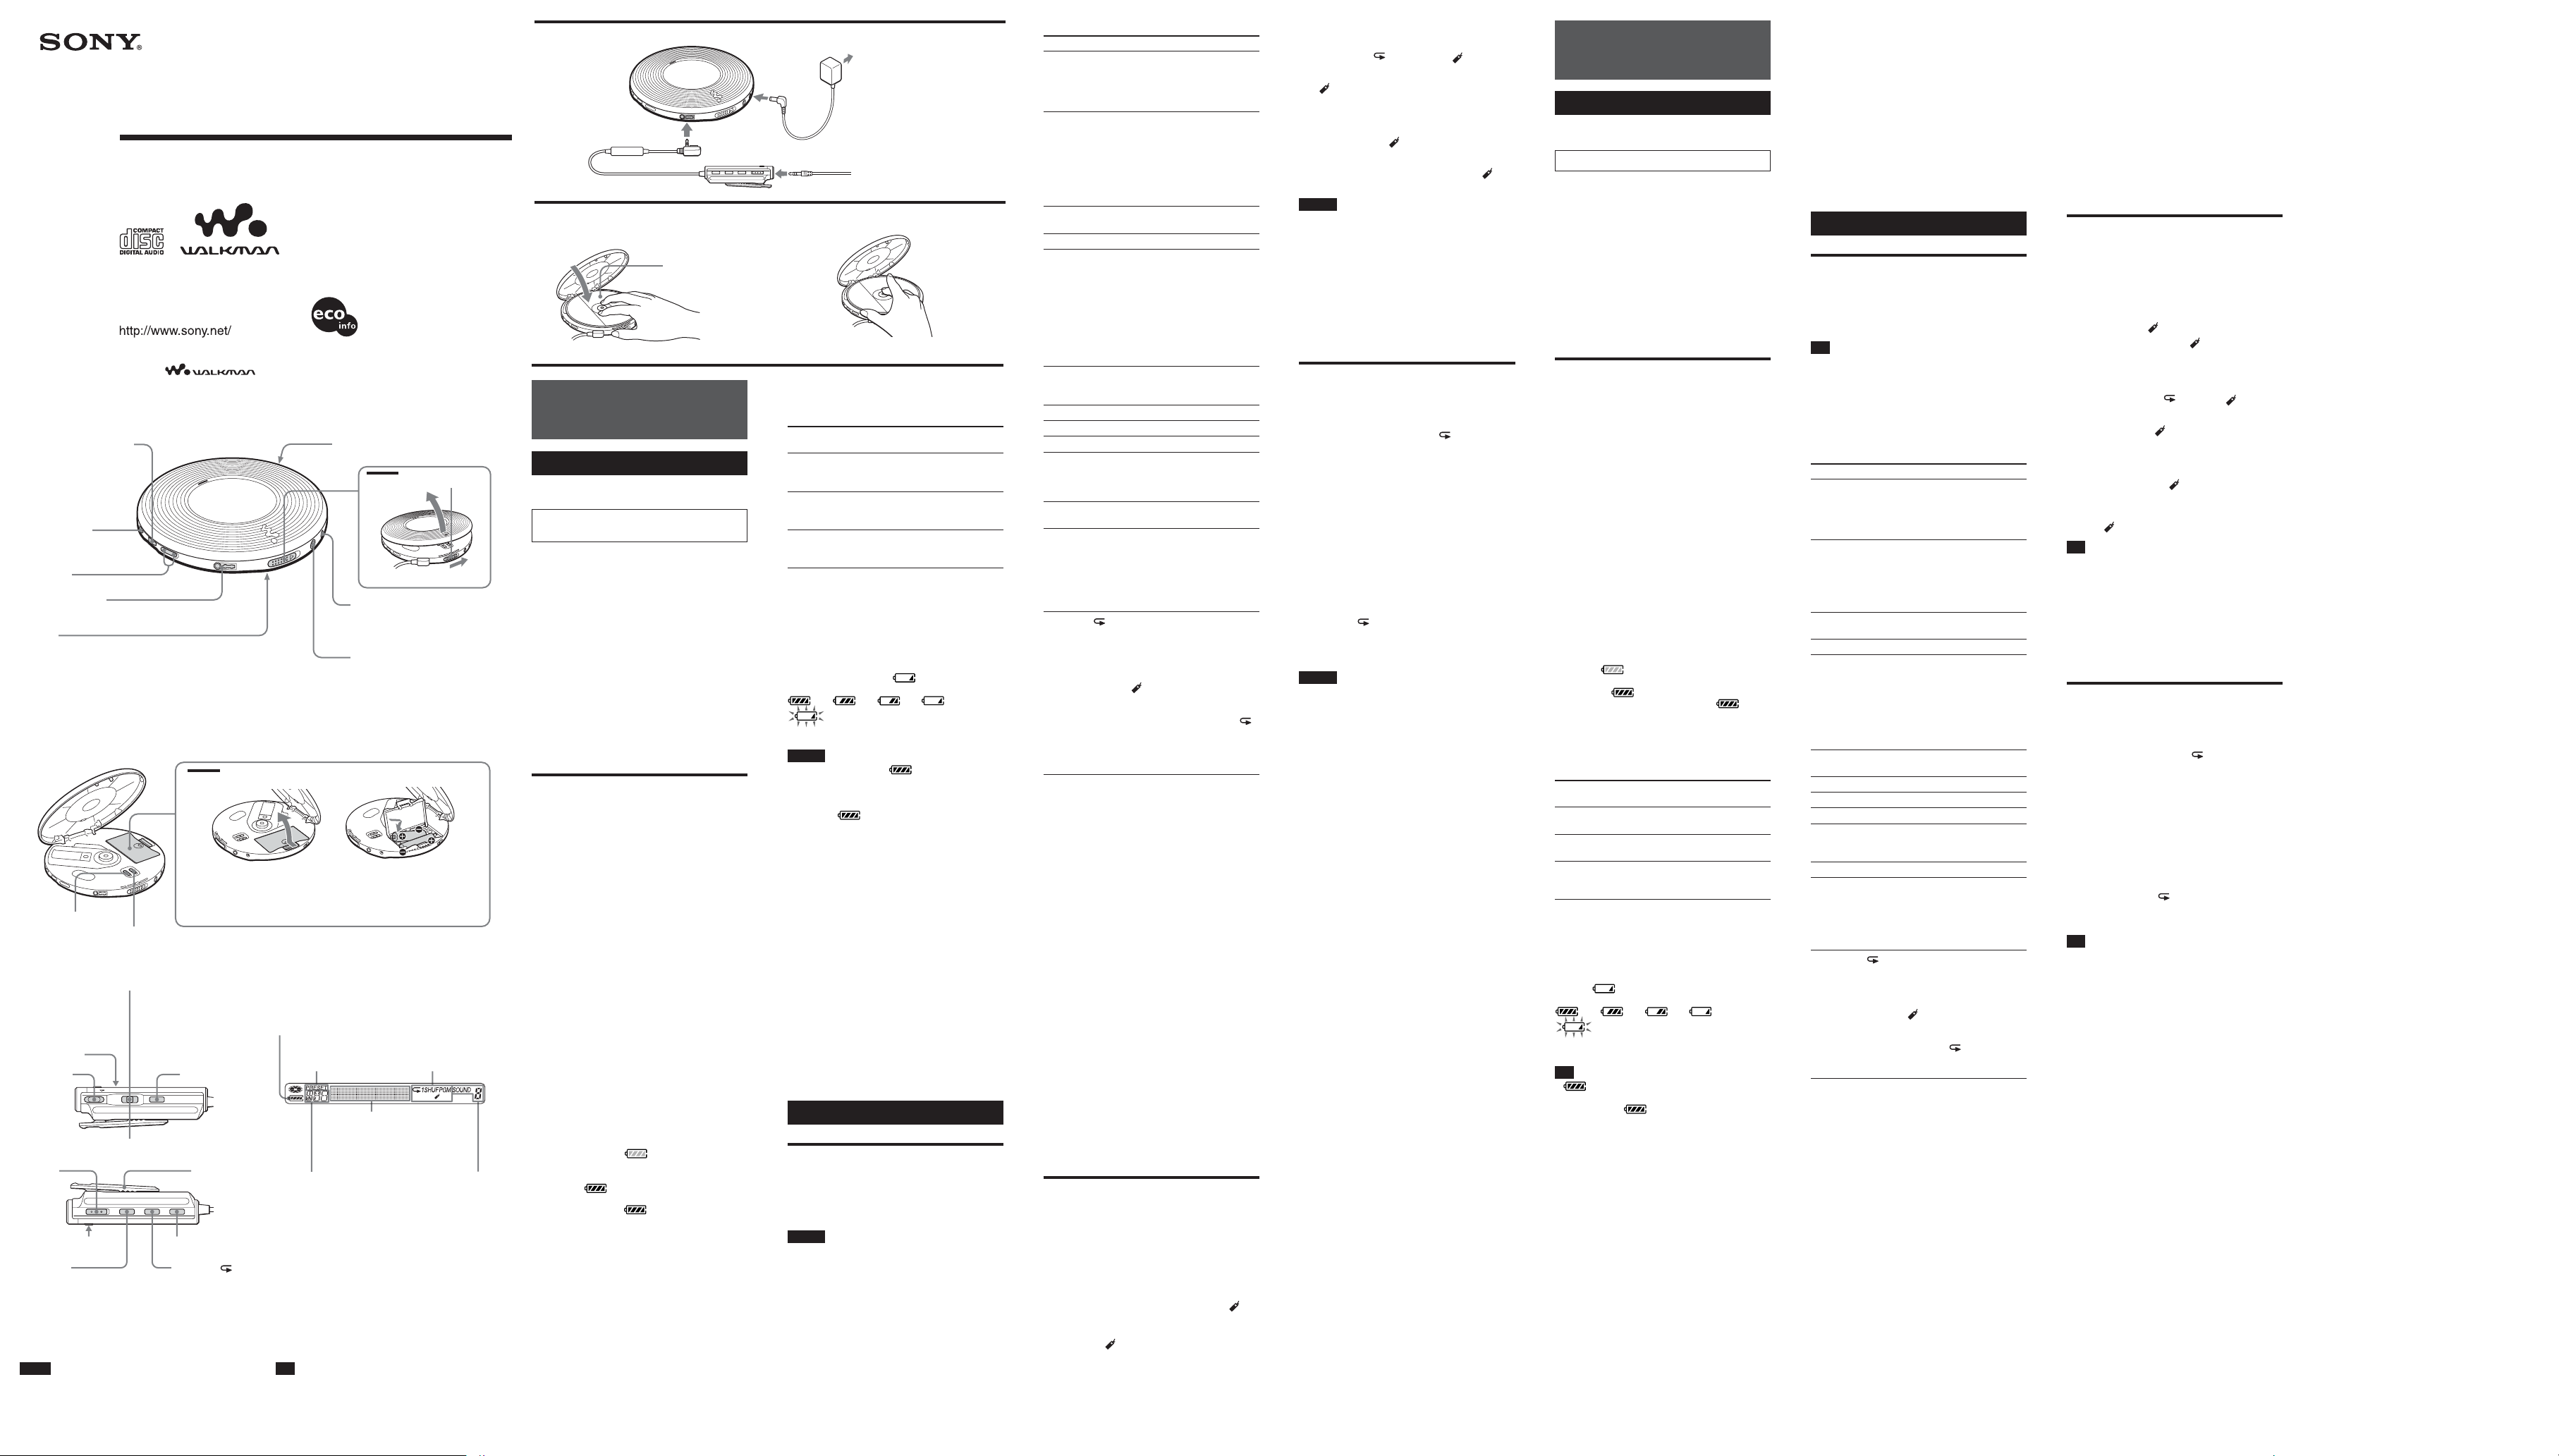
Power Sources
To use the AC power adaptor (C)
1Connect the AC power adaptor to an AC outlet.
To use the batteries (B)
Use only the following batteries for your CD player:
Rechargeable batteries
Charge the rechargeable batteries before using them for
the first time.
•NH-7WMAA (supplied)
•NH-WM2AA (NH-WMAA ×2) (not supplied)
Dry batteries
•LR6 (size AA) alkaline batteries
To insert the batteries
1Open the battery compartment lid inside your CD
player.
2Insert the #end of two batteries, then matching the
3to the diagram in the battery compartment insert
the other end. Then, close the lid until it clicks into
place.
3When using the rechargeable batteries, connect the
AC power adaptor to the DC IN 4.5 V jack of your
CD player and an AC outlet, then press CHARGE/x
to start charging.
The CD player charges the batteries. In the display on
the remote control, “Charging” flashes and the
indicator sections of light up in succession.
The CHARGE lamp on the CD player turns on. When
the batteries are completely charged, the CHARGE
lamp and indicator get turned off.
If you press CHARGE/xafter the charge has already
been completed, the indicator flashes and
“FULL” appears in the display.
4Disconnect the AC power adaptor.
CD player (front)/CD 播放机(正面)
to an AC outlet
至AC电源插座
i
i(headphones) jack
i(头戴耳机)插孔
5HOLD
A
DC IN 4.5 V (external power
input) jack
DC IN 4.5 V(外部电源输
入)插孔
4VOL +*/–
CD player (inside)/CD 播放机(里面)
Insert the #end first (for both
batteries).
首先插入#端(两电池都
是)。
Remote control/遥控器
Note
Use only the supplied remote control. You cannot operate
this CD player with the remote control supplied with other
CD players.
4VOL +*/–
Battery life* (approx. hours)
(When the CD player is used on a flat and stable place)
Playing time varies depending on how the CD player is
used.
G-PROTECTION RADIO
on off ON
Two NH-7WMAA 15 10 8
(charged for
about 2 hours**)
NH-WM2AA 32 24 16
(charged for
about 4 hours**)
Two Sony alkaline 50 35 20
batteries LR6 (SG)
(produced in Japan)
*Measured value by the standard of JEITA (Japan
Electronics and Information Technology Industries
Association).
** Charging time varies depending on how the
rechargeable battery is used.
To check the remaining power of the
batteries (only when playing a CD)
You can check it in the display.
Replace the batteries when “ ” flashes.
t t tt
tLobatt*
* Beep sounds.
Notes
•The indicator sections of roughly shows the
remaining battery power. One section does not always
indicate one-fourth of the battery power.
•Depending on operating conditions, the indicator
sections of may increase or decrease.
•When listening to the radio, the remaining power of the
batteries is not displayed.
When to replace the rechargeable
batteries
If the battery life becomes shorter by about half, replace
the batteries with new rechargeable batteries.
Notes on the rechargeable batteries
•To keep the original battery capacity for a long time,
charge the batteries only when they are completely
depleted.
• If the battery is new or has not been used for a long
time, it may not be charged completely until you charge
and discharge it several times.
• When carrying the rechargeable batteries, use the
supplied battery carrying case to prevent unexpected
heat. If the rechargeable batteries and the metallic
objects get contacted, heat or fire may occur due to a
short circuit.
Notes on using the dry batteries
•Be sure to remove the AC power adaptor.
• When the batteries are depleted, replace both batteries
with new ones.
CD Player
Playing a CD
To insert a CD
1Slide OPEN to open the lid (A).
2Fit the CD to the pivot, then close the lid (D).
Notes
•This CD player can play CD-Rs/RWs recorded in the
Compact Disc Digital Audio (Audio CD) format, but
playback capability may vary depending on the quality
of the disc and the condition of the recording device.
•This product is designed to playback discs that conform
to the Compact Disc (CD) standard. Recently, various
music discs encoded with copyright protection
technologies are marketed by some record companies.
Please be aware that among those discs, there are some
that do not conform to the CD standard and may not be
playable by this product.
AC power adaptor
AC电源转接器
Display on the remote control
遥控器上的显示
Play mode
播放模式
Remaining battery power
剩余电池电力
Sound mode
声音模式
B
D E
12Jog lever (u(play/
pause)•./>(AMS/
search))
微调杆(u(播放/暂
停)• ./>
(AMS/搜索))
3CHARGE/x(stop)•
CHARGE lamp
CHARGE(充电)/
x(停止)按钮•
CHARGE(充电)灯
Headphones or earphones
头戴耳机或耳机
Label side up
贴标签面朝上
Open the battery
compartment lid.
打开电池室盖。
*There is a tactile dot beside the button.
*按钮旁边有一个触感圆点。
LINE OUT jack
LINE OUT(线路输出)插孔
注限使用附带的遥控器。不能用其他CD播放机所
附带的遥控器去控制操作本CD 播放机。
Strap holes
吊带孔
“WALKMAN” is a registered trademark of Sony Corporation to represent Headphone Stereo
products. is a trademark of Sony Corporation.
6AVLS
7G-PROTECTION
Display/显示器
3x
qs SOUND
qd P MODE/
Clip
夹子
qa DISPLAY
5HOLD Track number, preset number of
radio station and radio band
曲号、收音机电台的预设号和
收音机波段
Playing time, radio
information
播放时间收音机信息
DC IN 4.5V
OPEN
Printed on 100 % recycled paper
using VOC (Volatile Organic
Compound)-free vegetable oil
based ink.
To operate the CD player
Button/Switch Function/Operation
1Jog lever Press to start play. Press again to
u(play/pause) pause play.
To play from the first track, press
for 2 seconds or more while the CD
player is stopped.
2Jog lever Flick toward .or >once to
./>find the beginning of the current/
(AMS*1/search) next track. Flick toward .or
>repeatedly to find the
beginning of the previous/
succeeding tracks. Hold toward
.or >to go backward/
forward quickly.
3CHARGE/x (x)Press to stop playing.
(stop)
4VOL+/– Press to adjust the volume.
5HOLD Use to lock the controls on your
CD player or remote control to
prevent accidental button presses.
HOLD on the CD player works
only for the player, while HOLD
on the remote control works only
for the remote control.
The CHARGE lamp flashes if you
press any button when the HOLD
function is activated.
6AVLS*2Set to “LIMIT” when you want to
keep down the maximum volume
to protect your hearing.
7G-PROTECTION Protect against sound skipping.*3
8RADIO ON/OFF Press to turn on/off the radio.
9Jog lever BAND Press to change the band.
0Jog lever When listening to the radio, press
TUNE –/+ to tune in to the station you want.
Also press to select the preset
station you want.
qa DISPLAY Press to display the remaining time/
tracks.
qs SOUND Use to emphasize bass-boosted
sound. Press repeatedly to select
SOUND 1 or SOUND 2. SOUND 2
enhances bass more than SOUND
1.*
4
For radio: Press to switch between
“Stereo” and “Mono”.
qd P MODE/ Press repeatedly until the play
(play mode/repeat) mode you want appears in the
display.
No indication: Normal play
“1”: Single play
“SHUF”: Shuffle play
“”: Bookmarked track play
“PGM”: PGM (program) play
To repeat the play mode you
selected, press and hold until “ ”
appears.
For radio: Press to switch between
the tuning mode and the preset
mode.
*1AMS = Automatic Music Sensor
*2AVLS = Automatic Volume Limiter System
The AVLS function does not work when listening to the
radio.
*3Sound may skip:
–if the CD player receives stronger continuous shock than
expected,
–if a dirty or scratched CD is played or
–when using poor-quality CD-Rs/RWs or if there is a
problem with the recording device or application software.
*4If the sound is distorted when using the SOUND function,
turn down the volume.
The SOUND function does not work when listening to the
radio.
To remove the CD
Remove the CD while pressing the pivot (E).
To turn off the operation beep
sound
You can turn off the beep sound that is heard from your
headphones/earphones when you operate your CD player.
When listening to the radio, you cannot turn off the beep
sound for the radio.
1Remove the power source (AC power adaptor,
rechargeable batteries or dry batteries) from the CD
player.
2Connect the power source while pressing
CHARGE/xon the CD player or xon the remote
control.
To turn on the beep sound
Remove the power source and then connect the power
source without pressing CHARGE/xor x.
Playing your favorite tracks
by adding Bookmarks
(Bookmarked track play)
You can add Bookmarks to up to 99 tracks for each CD.
You can use this function for up to 10 CDs.
To add Bookmarks
1During playback of the track where you want to add a
Bookmark, press and hold the jog lever until “
(Bookmark)” flashes in the display.
When the Bookmark has been added successfully,
flashing of “ ” becomes slow.
2Repeat step 1 to add Bookmarks to the tracks you
want.
To listen to the tracks with
Bookmarks
1Press P MODE/ repeatedly until “ ” flashes.
2Press the jog lever.
“” lights up in the display and the playback of the
tracks with Bookmarks starts.
To remove the Bookmarks
During playback of the track with a Bookmark, press and
hold the jog lever until “ ” disappears from the display.
To check the tracks with Bookmarks
During playback of the tracks with Bookmarks, “ ”
keeps flashing slowly in the display.
Notes
•During playback of the tracks with Bookmarks, tracks
are played in order of track number, and not in the order
you added the Bookmarks.
•If you try to add Bookmarks to the tracks on the 11th
CD, the Bookmarks of the CD you played back first will
be erased.
•If you remove all power sources, all Bookmarks stored
in memory will be erased.
• If you continue playing the CD player on the
rechargeable batteries without charging the batteries
even though “Lobatt” is displayed, all Bookmarks
stored in memory will be erased.
Playing tracks in your
favorite order (PGM play)
You can program the CD player to play up to 64 tracks in
your favorite order.
1During playback, press P MODE/ repeatedly until
“PGM” appears.
2Flick the jog lever toward .or >to select a
track.
3Press the jog lever to enter the selected track.
“000” appears and the playing order increases
by one.
4Repeat steps 2 and 3 to select the tracks in your
favorite order.
5Press and hold the jog lever until the PGM play starts.
To check the program
During programming:
Press the jog lever repeatedly before step 5.
During the PGM play:
Press P MODE/ repeatedly until “PGM” flashes, then
press the jog lever repeatedly.
Each time you press the jog lever, the track number
appears.
Notes
• When you finish entering the 64th track in step 3, the
first selected track appears in the display.
•If you select more than 64 tracks, the first selected
tracks are erased.
8RADIO ON/OFF
90 TUNE –/BAND/TUNE +
*There is a tactile dot beside the button.
*按钮旁边有一个触感圆点。
中文
警告
为防火灾或触电危险,切勿让机器暴露于雨中或
潮湿处。
别把机器安装在诸如书橱或壁橱等密闭处。
为防火灾,请勿让装置的通风孔盖住报纸,桌布,
窗帘等。也不可在装置上点放蜡烛。
为防火灾或触电危险,不可在装置上摆饰花瓶等
装满液体的物体。
一部分国家对于本产品的电源用电池可能规定有
处置的标准。请洽询当地有关当局。
注意
•开着时,将有看不见的激光辐射
•别凝视激光束或直接用光学仪器观看
CE标志的有效性,仅限于那些有法律限制的国
家,主要在EEA(欧洲经济区)国家。
连接电源
使用AC电源转接器 (C)
1将AC电源转接器连接到 AC 电源插座。
使用电池 (B)
本CD播放机限使用下列电池:
充电式电池
初次使用充电式电池时,必须进行充电。
•NH-7WMAA(附带)
•NH-WM2AA (NH-WMAA × 2)(无附带)
干电池
•LR6(AA,5 号)碱性电池
插入电池
1打开CD 播放机里面的电池室盖。
2让3对准电池室中的图示,先装入两节电池的#
端,然后关上盖子至其“卡嗒”一声到位。
3将AC电源转接器连接到您的 CD播放机上的DC
IN 4.5 V插孔和AC电源插座,然后按CHARGE/
x以开始充电。
遥控器的显示器中,“Charging”闪烁并且指示灯
的段节 将接续点亮。CD 播放机上将点亮
CHARGE指示灯。当电池完成充电时,CHARGE
指示灯和 也将熄灭。
如果在充电完成后按CHARGE/x, 指示灯
闪烁,显示器上出现“FULL”。
4断开AC 电源转接器。
电池使用时间*(大约时数)
(在平稳表面使用 CD 播放机时)
播放时间因 CD 播放机的使用状况而异。
G-PROTECTION设定 RADIO
开关ON
两NH-7WMAA 15 10 8
(充电大约2 小时 **)
NH-WM2AA 32 24 16
(充电大约4 小时 **)
两Sony碱性电池 50 35 20
LR6 (SG)
(日本制)
*JEITA (Japan Electronics and Information
Technology Industries Association)(日本电
子和信息技术产业协会)的标准测值。
** 充电时间,随充电式电池的使用状况而异。
检查电池剩余电力(仅当播放 CD 时)
可以在显示器上检查。
当“ ”闪烁时请更换电池。
t t tt
tLobatt*
*哔声。
注
• 的指示段节粗示剩余电池电力。其一个段节不
一定正确代表电池电力的四分之一。
•根据操作条件, 的指示段节的使用时间可能增
加或减少。
•当听收音机时,不显示电池剩余电量。
何时更换充电式电池
当电池使用时间缩短到大约一半时,即请更换新
的充电式电池。
充电式电池须知
•为保持充电式电池原有容量维持长时间的电池使用时
间,请在完全耗尽电力时才给电池充电。
•新充电式电池或搁置长时间没用的充电式电池,可能
不能完全充满电,须等充电使用过数次之后才能达到
完全充满电。
•请利用附带的电池携带盒以防意外生热。让充电式电
池和金属小件物品混合放置,可能因发生短路而生
热,甚至有起火危险。
使用干电池的注意事项
•务必卸下AC 电源转接器。
•当电池用完时,同时更换两节新电池。
CD 播放机
播放CD
插入CD
1滑动OPEN 打开顶盖(A)。
2把CD按入中心轴,然后盖上顶盖(D)。
注
•本CD播放机可以播放以激光光盘数码音频(音频
CD)格式录制的CD-R/RW。但播放能力取决于光盘
质量和录音设备的状况。
•本产品设计用于播放符合Compact Disc(CD)标准的
光盘。近来,许多录制公司都出售各种用版权保护技
术编码的音乐光盘。请注意,这些光盘中可能会有不
符合CD 标准的光盘,且可能无法用本产品播放。
操作CD播放机
按钮/开关 功能/操作
1 微调杆u按下此杆开始播放。再按一次
(播放/暂停) 暂停播放。
要从第一个曲子开始播放,当
CD播放机停止时,按住此钮
2秒以上。
2 微调杆 朝.或>按此钮一次查
./>找当前/下一曲子的开头。反
(AMS*1/搜索) 复朝.或>按此钮查找
前面/后面曲子的开头。朝
.或>方向按住此钮快
退/快进。
3 CHARGE/x(x)按下停止播放。
(停止)
4 VOL+/– 按下以调节音量。
5 HOLD 用于锁定CD播放机或遥控器
上的控制钮以防止意外按动。
CD播放机上的 HOLD 仅作用
于CD播放机,遥控器上的
HOLD仅作用于遥控器。
当HOLD功能激活时,如果
按任何按钮,CHARGE灯闪
烁。
6 AVLS*2当您要控制最大音量以保护听
力时,将它设为“LIMIT”。
7 G-PROTECTION 防止声音跳动。*3
8 RADIO ON/OFF 按下打开和关闭收音机。
9 微调杆BAND 按下改变波段。
0 微调杆TUNE-/+ 听收音机时,按下以调入您想
要的电台。也可以按它预设您
想要收听的电台。
qa DISPLAY 按下显示剩余时间/曲子。
qs SOUND 用于加强低音。反复按以选择
SOUND 1或 SOUND 2。
SOUND 2比 SOUND 1 的加
强效果更好。*4
对于收音机:按下可以在
“Stereo”和“Mono”之间切换。
qd P MODE/ 反复按直到所要的播放模式出
(播放模式/重复) 现在显示器上。
无显示:正常播放
“1”:单首曲子播放
“SHUF”:随机播放
“”:播放加记书签的曲子
“PGM”:PGM(程序)播放
要重复选定的播放模式,按住
此钮直到“ ”出现。
对于收音机:按下可以在调谐
模式和预设模式之间切换。
*1AMS=自动音乐传感器
*2AVLS=自动音量控制系统
听收音机时AVLS功能不起作用。
*3声音可能跳动:
–如果CD播放机受到比预计更强的连续震动,
–如果播放脏的或划伤的CD或
–当使用低劣的CD-R/RW时或录制设备或应用软件有
问题。
*4当使用SOUND功能时,如果声音失真,请降低音量。
听收音机时SOUND功能不起作用。
要取出CD
按住中心轴(E),取下CD。
关掉操作哔声
可以关掉当操作CD 播放机时在头戴耳机/耳机
上可听到的哔声。听收音机时不能关闭收音机的
“哔”声。
1从CD播放机上卸下电源(AC电源转接器,充电
式电池或干电池)。
2按着CD 播放机上的CHARGE/x或遥控器上的x
同时连接上电源。
要打开哔声时
卸下电源,然后不必按CHARGE/x或x而再
连接上电源。
给喜欢的曲子加记Bookmark以便
选播(播放加记书签曲子)
每张CD最多能给99首曲子加记书签。最多能为
10张 CD使用此功能。
要加记Bookmark时
1播放曲子当中,在所要加记书签处按住微调杆至显
示器中闪烁着“ (Bookmark)”。
当成功地加记完书签时,“”闪烁即变慢。
2反复步骤1 给所有喜欢的曲子加记书签。
要利用Bookmark听曲子时
1请反复按P MODE/ 至闪烁着“ ”。
2按微调杆。
显示器中即点亮“”而 开始播放带有Bookmark
(书签)的曲子。
要去除Bookmark时
请在播放带有Bookmark(书签)的曲子当中,按
住微调杆至显示器中的“ ”消失了显示。
要检查带有Bookmark的曲子时
在播放带有Bookmark(书签)的曲子当中,显示
器中的“ ”将闪烁得较慢。
注
•在播放带有Bookmark(书签)的曲子时,是以曲号
顺序播放曲子的,而不是以您加记书签的顺序播放
的。
•您如果试图给第11张CD加记书签,则第1张播放的
CD其所加记的书签,即被擦去。
•您如果拆开了所有的电源,则储存在存储器中的所有
Bookmark都将被擦去。
•如果连续用充电式电池操作 CD 播放机而在显示了
“Lobatt”(电池电力弱)也不进行充电时,储存在存
储器中的所有Bookmark 也都将被擦去。
按照喜欢顺序播放曲子
(PGM(程序)播放)
可按照所喜欢顺序给CD播放机编程序去播放最多
64 首曲子。
1播放中,反复按P MODE/ 至显示“PGM”。
2向 . 或 > 轻按微调杆以选择曲子。
3按微调杆以输入所选曲子。
即显示“000”而播放序列将增加一。
4反复步骤 2 和3 以所喜欢顺序选择曲子。
5按住微调杆至开始PGM(程序)播放。
要检查程序时
编程序中:
在步骤5 之前,反复按微调杆。
PGM(程序)播放中:
反复按P MODE/ 至闪烁着“PGM”,然后反
复按微调杆。
每次按了微调杆,都将出现曲号。
注
•在步骤3当您输出完第64曲时,显示器即出现所选
第一首曲子。
•选择64 首以上曲子时,第一首选曲将被擦去。
“PRESET” indication
“PRESET”指示
F
Stereo system,
cassette recorder,
radio cassette
recorder, etc.
Connecting cord
连接导线
Left (white)
左(白色)
Right (red)
右(红色)
LINE OUT
Precautions
On safety
• Should any solid objects or liquid fall into the CD
player, unplug it and have it checked by qualified
personnel before operating it any further.
•Do not put any foreign objects in the DC IN 4.5 V
(external power input) jack.
On power sources
•When you are not using the CD player for a long time,
disconnect all power sources from the CD player.
On AC power adaptor
• Use only the AC power adaptor supplied. If your CD
player is not supplied with the one, use the AC-E45HG
AC power adaptor. Do not use any other AC power
adaptor. It may cause a malfunction.
Polarity of the plug
•Do not touch the AC power adaptor with wet hands.
• Connect the AC power adaptor to an easily accessible
AC outlet. Should you notice an abnormality in the AC
power adaptor, disconnect it from the AC outlet
immediately.
On rechargeable batteries and dry
batteries
•Do not charge the dry batteries.
•Do not throw the batteries into fire.
• Do not carry the batteries with coins or other metallic
objects. It can generate heat if the positive and negative
terminals of the battery are accidentally contacted by a
metallic object.
• Do not mix rechargeable batteries with dry batteries.
•Do not mix new batteries with old ones.
•Do not use different types of batteries together.
•When the batteries are not to be used for a long time,
remove them.
•If battery leakage occurs, wipe off any deposit in the
battery compartment, and install new batteries. In case
the deposit adheres to you, wash it off thoroughly.
On the CD player
• Keep the lens on the CD player clean and do not touch
it. If you do so, the lens may be damaged and the CD
player will not operate properly.
•Do not put any heavy object on top of the CD player.
The CD player and the CD may be damaged.
• Do not leave the CD player in a location near heat
sources, or in a place subject to direct sunlight,
excessive dust or sand, moisture, rain, mechanical
shock, unleveled surface, or in a car with its windows
closed.
• If the CD player causes interference to the radio or
television reception, turn off the CD player or move it
away from the radio or television.
•Discs with non-standard shapes (e.g., heart, square, star)
cannot be played on this CD player. Attempting to do so
may damage the CD player. Do not use such discs.
On headphones/earphones
Road safety
Do not use headphones/earphones while driving, cycling,
or operating any motorized vehicle. It may create a traffic
hazard and is illegal in some areas. It can also be
potentially dangerous to play your headsets at high
volume while walking, especially at pedestrian crossings.
You should exercise extreme caution or discontinue use in
potentially hazardous situations.
Preventing hearing damage
Avoid using headphones/earphones at high volume.
Hearing experts advise against continuous, loud and
extended play. If you experience a ringing in your ears,
reduce volume or discontinue use.
Consideration for others
Keep the volume at a moderate level. This will allow you
to hear outside sounds and to be considerate to the people
around you.
Maintenance
To clean the casing
Use a soft cloth slightly moistened in water or a mild
detergent solution. Do not use alcohol, benzine or thinner.
To clean the plugs
If the plugs become dirty, there is no audio or noise is
heard. Clean them with a dry soft cloth periodically.
Troubleshooting
Should any problem persist after you have made these
checks, consult your nearest Sony dealer.
CHARGE lamp flashes on the CD player
when you press a button, and the CD
does not play.
cThe buttons are locked. Slide HOLD back.
The CD player does not start charging.
cDuring stop, press CHARGE/x.
cYou press xon the remote control. Press CHARGE/x
on the CD player.
cThe radio is turned on.
The volume does not increase even if
you press VOL + repeatedly.
cSet AVLS to “NORM.”
The battery compartment lid is
dettached by an accidental drop,
excessive force, etc.
cAttach it as illustrated below.
Specifications
CD player
System
Compact disc digital audio system
Laser diode properties
Material: GaAlAs
Wavelength: λ= 780 nm
Emission duration: Continuous
Laser output: Less than 44.6 µW (This output is the value
measured at a distance of 200 mm from the objective lens
surface on the optical pick-up block with 7 mm aperture.)
Radio
Frequency range
FM: 87.5 - 108.0 MHz
AM: 531 - 1 602 kHz
Antenna
FM: Headphones/earphones cord
antenna
AM: Ferrite bar antenna built in the remote control
General
Power requirements
For the area code of the model you purchased, check the
upper left side of the bar code on the package.
• Two Sony NH-7WMAA rechargeable batteries: 1.2 V
DC ×2
•Sony NH-WM2AA rechargeable batteries: 1.2 V DC ×
2
•Two LR6 (size AA) batteries: 1.5 V DC × 2
•AC power adaptor (DC IN 4.5 V jack):
U, U2, CA, CA2, E92, MX2, TW2 and CA2/C models:
120 V, 60 Hz
CED, CED/4, CE7, CE7/C, EE, EE1, E, E13 and E13/2
models: 220 - 230 V, 50/60 Hz
CEK model: 230 V, 50 Hz
AU2 model: 240 V, 50 Hz
EU8, EU8/C, JE.W, E18, KR4 and EE8 models:
100 - 240 V, 50/60 Hz
HK4 model: 230 V, 50 Hz
CNA model: 220 V, 50 Hz
Dimensions (w/h/d) (without projecting
parts and controls)
Approx. 136.0 ×19.6 ×136.0 mm (5 3⁄8×25⁄32 ×5 3⁄8in.)
Mass (excluding accessories)
Approx. 158 g (5.6 oz)
Operating temperature
5°C - 35°C (41°F - 95°F)
Design and specifications are subject to change without
notice.
Supplied Accessories
AC power adaptor (1)
Headphones/earphones (1)
Remote control with built-in tuner (1)
Rechargeable batteries (2)
Battery carrying case (1)
Carrying pouch (1)
English
Using the radio
Using the remote control, you can enjoy FM and AM
programs by presetting the stations or by tuning in to the
stations manually.
You can preset your favorite stations manually.
Listening to the radio
1Press RADIO ON/OFF to turn on the radio.
If “PRESET” is displayed, press P MODE/ to
make it disappear from the display.
2Press the jog lever of the remote control until the
radio band you want appears.
Each time you press the button, the display on the
remote control changes as follows:
tFM tAM
3Flick the jog lever of the remote control toward
TUNE + or TUNE – to tune in the station you want
and adjust the volume.
To turn off the radio
Press RADIO ON/OFF again.
To tune in to a station quickly
Flick and hold the jog lever toward TUNE + or TUNE –
in step 3 until the frequency digits begin to change in the
display. The CD player automatically scans the radio
frequencies and stops when it finds a clear station.
To improve broadcast reception
For FM, extend the headphones or earphones cord.
Headphones or earphones
For AM, reorient the remote control itself.
Note
There is a DC-DC converter attached to the headphones/
earphones cord.
When listening to an AM program, keep the remote
control away from the DC-DC converter, otherwise, noise may
be heard.
If it is hard to hear an FM broadcast
Press SOUND repeatedly until “Mono” appears in the
display.
The noise will be reduced but the radio will play in
monaural mode.
Presetting radio stations
You can preset up to 40 stations: 30 for FM and 10 for
AM.
1Press RADIO ON/OFF to turn on the radio.
2Press the jog lever to select a radio band.
3Flick the jog lever toward TUNE + or TUNE – to tune
in to the station you want.
4Hold down the jog lever for 2 seconds or more until
“PRESET” appears in the display.
The preset number and “M” flash in the display.
From this step on, start the next operation within 15
seconds after you finished the previous operation. If
15 seconds pass with nothing done, “PRESET” and
the preset number disappear which shows that the CD
player has exited the presetting mode. If this happens,
start again from step 4.
5Flick the jog lever toward TUNE + or TUNE –
repeatedly to select the preset number you want to use
to store the station.
6Press the jog lever.
When the station is preset successfully, a beep sounds
and “PRESET” and the preset number disappear from
the display. If there is a station already stored using
that number, the new station replaces the old one.
Playing preset radio
stations
1Press RADIO ON/OFF to turn on the radio.
2Press the jog lever of the remote control to select a
radio band.
3Press P MODE/ to switch your CD player to the
presetting mode.
4Flick the jog lever toward TUNE + or TUNE – to tune
in to the stored station you want to listen to.
If you press P MODE/ again, “PRESET”
disappears from the display and you can tune in to a
station manually.
Connecting a stereo
system (F)
You can listen to CDs through a stereo system and record
CDs on a cassette tape. For details, see the instruction
manual that comes with the connected device.
Be sure to turn off all connected devices before making
connections.
Notes
•Before you play a CD, turn down the volume of the
connected device to avoid damaging the connected
speakers.
•Use the AC power adaptor for recording. If you use the
rechargeable batteries or dry batteries as a power source,
batteries may become completely depleted during
recording.
•Adjust the volume properly on the connected device so
that the sound will not be distorted.
•When the CD player is connected to a stereo system,
you cannot listen to the radio.
When using the connecting cord
If the sound is distorted, connect the device to the ijack.
About the G-PROTECTION and SOUND
functions when using the connecting
cord
•To record high quality CD sound, set the
G-PROTECTION switch to “OFF.”
•The SOUND function works only on the output sound
from the ijack and not work on the output sound from
the LINE OUT jack.
立体声系统,
磁带录音机,
磁带收/录音机
等。
保养
清洁机壳
用清水或温和的洗涤剂溶液蘸湿软布擦拭清洁,
不可使用酒精、汽油或稀释剂。
清洁端子
如果端子脏了,可能听不到声音或听到噪音。定期
用干的软布清洁它们。
故障检修
虽经检查过这些征候而问题仍未获解决时,即请
洽询附近的 Sony 销售店。
当您按了按钮时,CD播放机上闪烁着
CHARGE(充电)灯,而并不播放 CD。
c按钮被锁定。请推回 HOLD。
CD播放机不能充电。
c停止期间按了CHARGE/x。
c按了遥控器上的x。请按 CD 播放机上的
CHARGE/x。
c打开收音机。
即使反复按VOL +,音量也不提高。
c把AVLS设为“NORM”。
电池室盖由于意外掉落、过大的力等而脱落。
c如下图所示把它装上。
规格
CD唱机
系统
CD数码声频系统
激光二极管性质
材料:GaAlAs
波长:λ=780 nm
发射持久性:连续
激光输出:小于44.6 µW(本输出值是在距离7 mm光
圈的光学拾音元件的物镜镜面200 mm 处测得。)
收音机
频率范围
FM: 87.5-108.0 MHz
AM: 531-1 602 kHz
天线
FM:头戴耳机/耳机导线天线
AM:遥控器内置的铁氧体棒型天线
一般
电源
您购入型号的区域码,请查看包装上的条型码的
左上角。
•两节Sony NH-7WMAA 可充电电池:1.2V DC × 2
•用Sony NH-WM2AA充电式电池:1.2 V DC × 2
•两LR6(AA,5号)电池:1.5 V DC × 2
•AC电源转接器(DC IN 4.5 V 插孔):
U,U2,CA,CA2,E92,MX2,TW2和CA2/C
型号:120 V,60 Hz
CED,CED/4,CE7,CE7/C,EE,EE1,E,E13
和E13/2型号:220~230 V,50/60 Hz
CEK型号:230 V,50 Hz
AU2型号:240 V,50 Hz
EU8,EU8/C,JE.W,E18,KR4 和 EE8 型号:
100~240 V,50/60 Hz
HK4型号:230 V,50 Hz
CNA型号:220 V,50 Hz
尺寸(宽/高/纵深)(不含突起部分和控
制器)
大约136.0 × 19.6 × 136.0 mm
重量(不含附件)
大约 158 g
操作温度
5℃~35℃
设计和规格有所变更时,恕不另行奉告。
附带的附件
AC电源转接器 (1)
头戴耳机/耳机 (1)
带内置调谐器的遥控器 (1)
充电式电池 (2)
电池携带盒 (1)
携带软袋 (1)
中文
使用收音机
使用遥控器,通过预设电台和手动调入电台您可
以收听FM 和 AM节目。
您可以手动预设喜欢的电台。
听收音机
1按RADIO ON/OFF打开收音机。
如果显示“PRESET”,按 P MODE/ 使其从
显示器上消失。
2按遥控器上的微调杆直到您想要的波段出现。
每次按该按钮,遥控器上的显示改变如下:
tFM tAM
3朝TUNE +或TUNE –方向轻移微调杆以调入您
想要的电台并调节音量。
要关闭收音机
再次按RADIO ON/OFF。
要快速调入电台
在步骤 3 中朝 TUNE + 或 TUNE – 方向轻移微调
杆直到显示器上的频率数字开始改变。CD 唱机自动扫
描收音机频率,当找到清晰的电台时停止。
要改善广播接收水平
对于FM,加长头戴耳机或耳机线。
头戴耳机或耳机
对于AM,重新调整遥控器的方向。
注
头戴耳机或耳机线上安装有一个 DC-DC 转换器。
当收听 AM 节目时,请让遥控器远离 DC-DC 转换器。否
则,可能会听到噪音。
如果无法收听 FM 广播
反复按 SOUND 直到显示屏上出现“Mono”。
在单声道噪音会减少并能播放广播。
预设无线电台
您可以预设多达 40 个电台:30 个 FM 台,10 个
AM台。
1按RADIO ON/OFF打开收音机。
2按微调杆选择波段。
3朝TUNE +或TUNE –方向轻移微调杆以调入您
想要的电台。
4按住微调杆 2 秒以上,直到显示屏上出现
“PRESET”。
预设号和“M”在显示器上闪烁。
从这步开始,请在完成上一步操作后的15 秒内开
始下一步操作。如果15 秒内不开始操作,则
“PRESET”和预设号将消失,这表示CD唱机已
经退出预设模式。发生这种情况时,请从第4步重
新开始操作。
5反复朝TUNE +或TUNE –方向轻移微调杆选择
您想要存储的电台的预设号。
6按微调杆。
电台预设成功时,会响起一声“哔”声并且
“PRESET”和预设号从显示器上消失。如果电
台已经存储,新电台将取代原有的电台。
播放预设电台
1按RADIO ON/OFF打开收音机。
2按遥控器的微调杆选择波段。
3按P MODE/ 将CD唱机切换到预设模式。
4朝TUNE +或TUNE –方向轻移微调杆以调入您
想要收听的已存储电台。
如果再按一次P MODE/ ,“PRESET”从显示
器上消失,您可以手动调入电台。
连接立体声系统 (F)
可以通过立体声系统听CD放音或把CD录到盒带
上。详细参看所连接装置附带的使用说明书。
连接装置以前,一定请先关掉各装置的电源开关。
注
•要播放CD以前,请降低所连接装置的音量以防损坏
连接着使用的扬声器。
•请用AC电源转接器接电录音。如果用充电式电池或
干电池电源录音,可能会在录音中途耗光电池造成不
完全的录音。
•适当调整好所连接装置的音量以免声音发生失真。
•当CD唱机与立体声系统相连时,不能听收音机。
使用连接导线时
如果声音失真了,则请把装置连接到i 插孔。
使用连接导线时的有关G-PROTECTION
和SOUND(声)功能
•要录取高音质的CD音响时,请把G-PROTECTION
开关设定于“OFF”。
•SOUND(声)功能只可在来自 i 插孔的输出声上
发生作用,并不能在来自LINE OUT插孔的输出声
上发生作用的。
使用前须注意
安全须知
•万一有任何异物或液体掉进CD播放机内时,即请立
刻卸下电源并找有资格的人检查过以后才可再操作使
用。
•别试图用任何物体塞入DC IN 4.5 V(外部电源输
入)插孔。
电源须知
•当长期不使用CD 播放机时,请卸下所有的电源。
AC电源转接器须知
•限使用附带的AC电源转接器。如果CD播放机没有
附带AC电源转接器,使用AC-E45HG AC电源转
接器。请别使用任何其他的AC电源转接器。因为可
能造成故障。
插头极性
•潮湿着手不要去碰AC 电源转接器。
•将AC电源转接器接插到方便的AC电源插座。万一
发现AC电源转接器有异常时,请立即从AC电源插
座上拔下AC 电源转接器。
充电式电池和干电池须知
•别试图给干电池充电。
•别把电池投入火中。
•电池不要和硬币等别的金属小件混在一起携带。因
为电池的 +、– 极若与金属件接触,将会生热造成
危险。
•别混用充电式电池和干电池。
•别混用新、旧电池。
•别混用不同类型的电池。
•长时间不用电池时,请把它卸下保存。
•电池发生漏液时,须即擦拭干净电池室里沾染的电解
液,然后装用新电池。万一皮肤上沾染了漏液时,必
须赶快洗净。
CD播放机须知
•须保持 CD 播放机上的透镜干净清洁,不要用手触
摸。否则,透镜可能受损而CD播放机将不能操作正
常。
•别在CD播放机上堆置重物以免压坏CD播放机或CD
光盘。
•别把CD 播放机放置靠近热源或可直接照射到阳光,
或多沙尘、潮湿、淋到雨、有机械冲击、不平坦的地
方,或紧闭着窗门的汽车里面。
•如果 CD 播放机给附近的收音机或电视接收造成干
扰,即请关掉CD播放机或把它移离开收音机或电视
机远些使用。
•本CD播放机不能用于播放不规则形(例如心形,方
形,星形)的光盘。若试图那样做,将可能损坏您的
CD播放机。切勿使用该类光盘。
头戴耳机/耳机须知
路上安全
开车、骑车、或在操作任何机动车辆时,请勿使用
头戴耳机/耳机。因为可能有造成交通事故的危险。有
些地区是禁止使用的。步行中如果用太大声听耳机也
会有潜在危险的,尤其是在横越马路时。在有潜在危险
的地方,必须特别注意或暂停使用。
防止损伤听觉
避免用大音量听头戴耳机/耳机。最好也不要长
时间连续使用。如有耳鸣经历,更应降低音量和避免连
续用耳机听。
顾虑他人
请用适当的音量听。如此则仍可听到周围的声音
并且不至于骚扰到旁边的人。

Other Sony CD Player manuals

Sony CDP-CX250 User manual

Sony

Sony CDP-CX250 User manual

Sony CDX-F5700 - Fm/am Compact Disc Player User manual

Sony

Sony CDX-F5700 - Fm/am Compact Disc Player User manual

Sony XP-EV600 User manual

Sony

Sony XP-EV600 User manual

Sony CDX-L380X User manual

Sony

Sony CDX-L380X User manual

Sony 454RF - CDX CD Changer User manual

Sony

Sony 454RF - CDX CD Changer User manual

Sony MD Walkman MZ-R91 User manual

Sony

Sony MD Walkman MZ-R91 User manual

Sony CDP-M42 User manual

Sony

Sony CDP-M42 User manual

Sony CDX-52RF User manual

Sony

Sony CDX-52RF User manual

Sony CDX-GT360MP User manual

Sony

Sony CDX-GT360MP User manual

Sony CDP-CX57 - 50 Disc Cd Changer User manual

Sony

Sony CDP-CX57 - 50 Disc Cd Changer User manual

Sony CDX-60X - Compact Disc Changer User manual

Sony

Sony CDX-60X - Compact Disc Changer User manual

Sony CDP-CA8ES - 5 Disc Cd Changer User manual

Sony

Sony CDP-CA8ES - 5 Disc Cd Changer User manual

Sony CD-PC50 User manual

Sony

Sony CD-PC50 User manual

Sony Walkman D-NE711 User manual

Sony

Sony Walkman D-NE711 User manual

Sony CDX-G1152U User manual

Sony

Sony CDX-G1152U User manual

Sony CDX-M730 User manual

Sony

Sony CDX-M730 User manual

Sony CFD-F10 - Cd Radio Cassette-corder User manual

Sony

Sony CFD-F10 - Cd Radio Cassette-corder User manual

Sony D-EJ360 - PSYC CD Walkman User manual

Sony

Sony D-EJ360 - PSYC CD Walkman User manual

Sony CDP-CA8ES - 5 Disc Cd Changer User manual

Sony

Sony CDP-CA8ES - 5 Disc Cd Changer User manual

Sony HCD-V5500 User manual

Sony

Sony HCD-V5500 User manual

Sony cCFD-S20CP User manual

Sony

Sony cCFD-S20CP User manual

Sony CDP-XB630 User manual

Sony

Sony CDP-XB630 User manual

Sony CDX-CA600X Product guide

Sony

Sony CDX-CA600X Product guide

Sony CDX-L600X - Fm/am Compact Disc Player Product guide

Sony

Sony CDX-L600X - Fm/am Compact Disc Player Product guide

Popular CD Player manuals by other brands

RCA RP2910 user manual

RCA

RCA RP2910 user manual

Sanyo CDP-4100CR instruction manual

Sanyo

Sanyo CDP-4100CR instruction manual

Philips AZ1300 Specifications

Philips

Philips AZ1300 Specifications

Sylvania SRCD824 instruction manual

Sylvania

Sylvania SRCD824 instruction manual

Denon DCD-1700NE quick start guide

Denon

Denon DCD-1700NE quick start guide

VDO CHA 602 S datasheet

VDO

VDO CHA 602 S datasheet

Monoprice 614410 user manual

Monoprice

Monoprice 614410 user manual

RCA LAD899U user manual

RCA

RCA LAD899U user manual

Krell Industries SACD Standard Developer's reference guide

Krell Industries

Krell Industries SACD Standard Developer's reference guide

Kenwood DP-4020 instruction manual

Kenwood

Kenwood DP-4020 instruction manual

Insignia NS-P3113 user guide

Insignia

Insignia NS-P3113 user guide

Horizon Fitness Trio owner's manual

Horizon Fitness

Horizon Fitness Trio owner's manual

Technics SL-P1200 Service manual

Technics

Technics SL-P1200 Service manual

NAD C541i Service manual

NAD

NAD C541i Service manual

Hyundai PCD 345I3 PLL user manual

Hyundai

Hyundai PCD 345I3 PLL user manual

Kenwood KDC-CMP59FM instruction manual

Kenwood

Kenwood KDC-CMP59FM instruction manual

RCA RCS13101E user manual

RCA

RCA RCS13101E user manual

Pioneer CDJ-500II operating instructions

Pioneer

Pioneer CDJ-500II operating instructions

manuals.online logo
manuals.online logoBrands
  • About & Mission
  • Contact us
  • Privacy Policy
  • Terms and Conditions

Copyright 2025 Manuals.Online. All Rights Reserved.