manuals.online logo
Brands
  1. Home
  2. •
  3. Brands
  4. •
  5. Sony
  6. •
  7. Desktop
  8. •
  9. Sony VGC-LS30 User manual

Sony VGC-LS30 User manual

2
1
To meet your
VGC-LS30 Series
personal computer
Conozca su computadora personal
Serie VGC-LS30
Main unit and supplied items
Unidad principal y artículos suministrados
Unfold Prop-up Stand
1Grasp the side ends with both hands and raise the bottom
end, as shown below, to place your computer upright.
Be sure to place your computer on a soft cloth to avoid
damage to your computer screen.
Remove Back Panel Cover
1You need to remove the back panel cover 1before
accessing the DC IN port. Simply pull the cover off the
computer.
ABC
AMain unit
Unidad principal
3-211-047-11 (1) © 2007 Sony Corporation Printed in China
The illustrations in this document may appear different from your model, depending on the country or area of your residency.
Es posible que las ilustraciones de este documento difieran de su modelo, según su país o región de residencia.
¡IMPORTANTE!
Por favor lea detalladamente este manual de instrucciones antes de conectar y operar este equipo. Recuerde que un mal uso de su aparato podria anular la
garantia.
To turn on your computer
Para encender la computadora
Before starting your computer for the first time, do not connect any other hardware that did not originally come with your computer. Make sure to start up
your computer with only the supplied accessories connected and set up your system. Upon completion, connect one device (for example, a printer, an
external hard disk drive, a scanner, and so on) at a time, following the manufacturers’ instructions.
Antes de iniciar por primera vez su computadora, no conecte ningún otro hardware que no venga incluido originalmente con ella. Asegúrese de iniciar
su computadora sólo con los accesorios suministrados que están conectados y de configurar su sistema. Una vez finalizado lo anterior, conecte un
dispositivo (por ejemplo, una impresora, una unidad de disco duro externa, un escáner, etc.) a la vez, de acuerdo con las instrucciones del fabricante.
EF
G
BAC adapter
Adaptador de CA
CPower cord
Cable de alimentación
HI
1
EWireless mouse
Mouse inalámbrico
HRemote sensor control *
Control del sensor remoto *
IAA batteries (6) or (8 *)
Baterías AA (6) u (8 *)
JTV coaxial cable *
Cable coaxial de TV *
K8cm disc adapter
Adaptador de discos
de 8 cm
Connect AC Adapter
1Plug one end of the power cord 1into the AC
adapter 3and the other end into an AC outlet 2.
2Plug the cable attached to the AC adapter 3into
the DC IN port 4on the computer.
3Replace the back panel cover.
DWireless keyboard
Teclado inalámbrico
FRemote commander *
Control remoto *
GRemote sensor *
Sensor remoto *
JK
D
3
4Power On
1Press the power button until the power indicator turns on.
2
4
3
1
Despliegue el soporte de la
computadora
1Sostenga los extremos laterales del soporte con ambas manos y
levante el extremo inferior, como se indica en la ilustración, para
poner su computadora en posición vertical.
Asegúrese de colocar la computadora sobre un paño suave para
evitar dañar la pantalla.
Retire la tapa del panel
posterior
1Antes de acceder al puerto DC IN, debe retirar la tapa del panel
posterior 1. Simplemente saque la tapa de la computadora.
Conecte el adaptador de CA
1Conecte un extremo del cable de alimentación 1al adaptador
de CA 3y el otro extremo, a una toma de CA 2.
2Inserte el cable conectado al adaptador de CA 3en el puerto
DC IN 4de la computadora.
3Vuelva a colocar la tapa del panel posterior.
Encienda la computadora
1Pulse el botón de encendido hasta que el indicador de
encendido se ilumine.
L
LDigital TV tuner **
Sintonizador de TV digital **
*On selected models only.
Sólo en modelos seleccionados.
** A digital TV tuner, which comes in a box with other cables, is supplied for selected models only.
Un sintonizador de TV digital, que viene en una caja junto con otros cables, se incluye sólo para modelos seleccionados.
What should I do if my computer does
not start?
The power indicator on your computer is off when the computer is
not securely attached to a source of power. Make sure the computer
is securely plugged into a power source and turned on. Make sure
the VAIO power indicator shows the power is on.
Additional suggestions included:
■If the orange MONITOR OFF indicator at the top right corner of
the display is on, press the MONITOR OFF button.
■If your computer is starting from a floppy disk, eject the disk from
the floppy disk drive (if applicable).
■If you notice condensation on your computer, do not use the
computer for at least one hour. Condensation may cause the
computer to malfunction.
¿Qué debo hacer si la computadora no se
inicia?
El indicador de encendido de la computadora está apagado cuando la
computadora no está conectada a una fuente de alimentación en forma
segura. Asegúrese de que la computadora esté conectada correctamente
a una fuente de alimentación y que esté encendida. Asegúrese de que el
indicador de encendido de VAIO muestre que la computadora está
encendida.
Sugerencias adicionales:
■Si el indicador MONITOR OFF anaranjado en la esquina superior
derecha de la pantalla está encendido, pulse el botón MONITOR OFF.
■Si la computadora se está iniciando desde un disquete, retire el disco
de la unidad (si corresponde).
■Si observa condensación en la computadora, no la use durante una
hora por lo menos. La condensación puede causar una falla de
funcionamiento en la computadora.
Your computer is equipped with VAIO®Recovery Center, a utility program
that recovers your computer’s operating system and preinstalled software
to their original factory-installed settings.
System and/or application recovery media are not delivered with your
computer.
For on-screen information about hard disk
recovery:
1Click Start > Help and Support.
2Click Manuals & Specifications.
3Click VAIO Recovery Center User Guide.
To access the VAIO Recovery Center utility
from the Windows Vista™ operating system:
1Click Start > Help and Support.
2Click Backup & Recovery.
3Click VAIO Recovery Center.
Su computadora tiene instalado VAIO®Recovery Center, programa utilitario
que restablece el sistema operativo de la computadora y el software
preinstalado a los valores originales instalados de fábrica.
El sistema y/o medio de recuperación de aplicaciones no vienen con la
computadora.
Para obtener información en pantalla acerca
de la recuperación del disco duro:
1Haga clic en Inicio > Ayuda y soporte técnico.
2Haga clic en Manuales y especificaciones.
3Haga clic en VAIO Recovery Center Guia del usuario.
Para acceder al programa utilitario VAIO
Recovery Center desde el sistema operativo
Windows Vista™:
1Haga clic en Inicio > Ayuda y soporte técnico.
2Haga clic en Copia de seguridad y recuperación.
3Haga clic en VAIO Recovery Center.
Troubleshooting
Solución de problemas
HDD recovery
Recuperación de la unidad de disco duro
1Haga clic en Inicio > Ayuda y soporte técnico.
2Haga clic en Manuales y especificaciones.
3Haga clic en Guía de Usuario de VAIO.
To locate the User Guide
Para ubicar la Guía del usuario
Se le solicita que registre la computadora la primera vez que encienda la
unidad. Siga las instrucciones que aparecen en pantalla para completar el
proceso de registro. Si no puede registrar la computadora durante la primera
sesión, posteriormente se le brindarán otras oportunidades para hacerlo.
Además puede registrar en línea su computadora en:
http://www.sony.com/vaioregistration para clientes en Estados Unidos,
http://www.sonystyle.ca/registration para clientes en Canadá,
http://vaio.sony-latin.com/ para clientes en países o regiones de América
Latina donde se habla español, o en
http://www.sony.com.br/ para clientes en Brasil.
El registro de los productos Sony es voluntario. No hacerlo no afecta los
derechos que le concede la garantía limitada.
You are prompted to register your computer the first time you turn on the
unit. Follow the on-screen instructions to complete the registration
process. If you are not able to register your computer during the first
session, you are provided with additional registration opportunities later.
You can also register your computer online at:
http://www.sony.com/vaioregistration for customers in USA,
http://www.sonystyle.ca/registration for customers in Canada,
http://vaio.sony-latin.com/ for customers in Spanish speaking Latin
American countries or areas, or
http://www.sony.com.br/ for customers in Brazil.
Sony product registration is voluntary. Failure to register will not dimin-
ish your limited warranty rights.
To register your computer
Para registrar la computadora
2
1
5
1
3
2
4
2
1
3
4
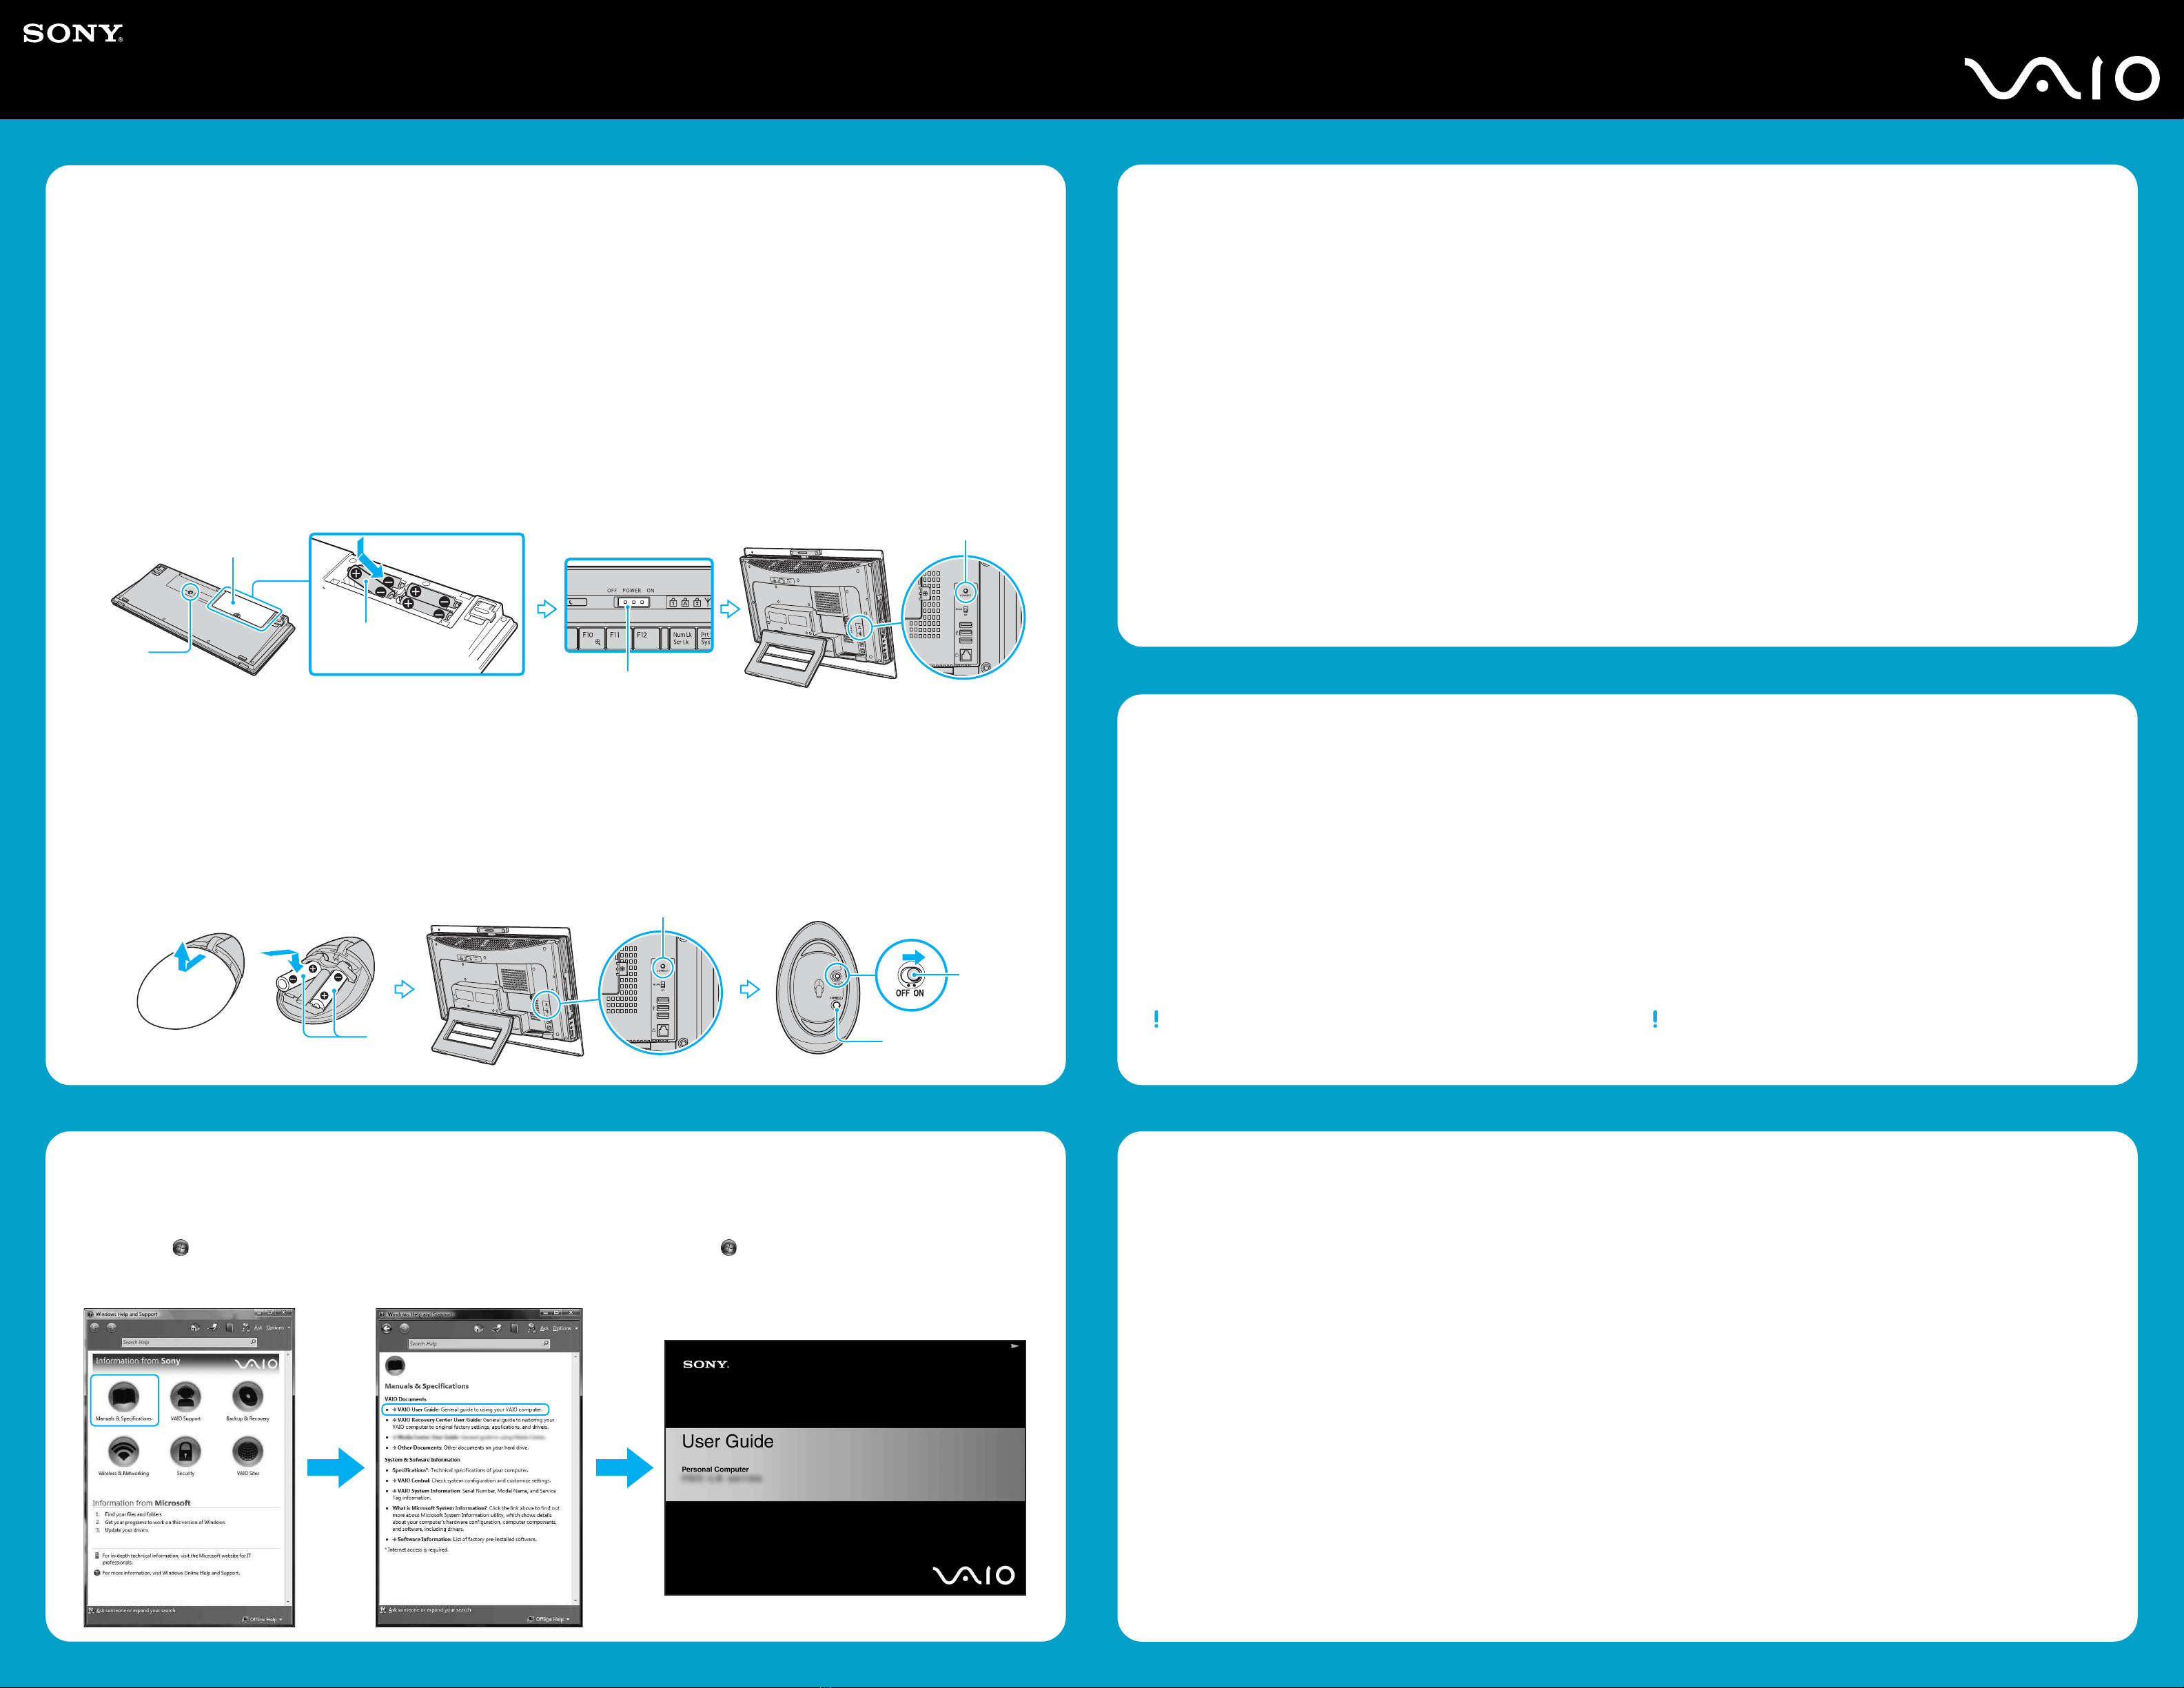
To get the wireless keyboard and mouse ready
Para instalar el teclado y el mouse inalámbricos
Wireless keyboard
1Insert the supplied four AA batteries 1into the battery
compartment 2on the bottom of the wireless keyboard,
and then turn on your computer.
2Slide the POWER switch 3at the top of the keyboard to
the ON position.
3Press the CONNECT button 4on the back of the
computer.
4Press the CONNECT button 5on the bottom of the
keyboard within 10 seconds from step 3.
Wireless mouse
1Insert the supplied two AA batteries 1into the wireless
mouse, and then turn on your computer.
2Press the CONNECT button 2on the back of the
computer.
3Slide the power switch 3on the bottom of the mouse
to the ON position and press the CONNECT button 4
within 10 seconds from step 2.
Teclado inalámbrico
1Inserte las cuatro baterías AA suministradas 1en el
compartimiento de la batería 2en la parte inferior del teclado
inalámbrico y luego encienda la computadora.
2Deslice el interruptor POWER 3, ubicado en la parte superior del
teclado, a la posición ON.
3Pulse el botón CONNECT 4, ubicado en la parte posterior de la
computadora.
4Pulse el botón CONNECT 5, ubicado en la parte inferior del
teclado, en un lapso de 10 segundos entre este paso y el paso 3.
Mouse inalámbrico
1Inserte las dos baterías AA suministradas 1en el mouse
inalámbrico y luego encienda la computadora.
2Pulse el botón CONNECT 2, ubicado en la parte posterior de la
computadora.
3Deslice el interruptor de encendido 3ubicado en la parte inferior
del mouse a la posición ON y pulse el botón CONNECT 4en un
lapso de 10 segundos entre este paso y el paso 2.
1Click Start > Help and Support.
2Click Manuals & Specifications.
3Click VAIO User Guide.

Other manuals for VGC-LS30

3

This manual suits for next models

6

Other Sony Desktop manuals

Sony VPCJ115FX User manual

Sony

Sony VPCJ115FX User manual

Sony VPCCW2C5E User manual

Sony

Sony VPCCW2C5E User manual

Sony VGC-RA840G VAIO User manual

Sony

Sony VGC-RA840G VAIO User manual

Sony VGC-RB64GY Vaio User manual

Sony

Sony VGC-RB64GY Vaio User manual

Sony PCV-J100 - Vaio Desktop Computer User manual

Sony

Sony PCV-J100 - Vaio Desktop Computer User manual

Sony VGN-FZ31ER User manual

Sony

Sony VGN-FZ31ER User manual

Sony VGC-RA710G User manual

Sony

Sony VGC-RA710G User manual

Sony Vaio PCV-RZ40CP User manual

Sony

Sony Vaio PCV-RZ40CP User manual

Sony VGC-JS290J User manual

Sony

Sony VGC-JS290J User manual

Sony VAIO VGN-UX380N User manual

Sony

Sony VAIO VGN-UX380N User manual

Sony PCV-RZ22G - Vaio Desktop Computer User manual

Sony

Sony PCV-RZ22G - Vaio Desktop Computer User manual

Sony VPCCA Series Original instructions

Sony

Sony VPCCA Series Original instructions

Sony Vaio PCV-V210P User manual

Sony

Sony Vaio PCV-V210P User manual

Sony PCV-L630 Installation guide

Sony

Sony PCV-L630 Installation guide

Sony VAIO VPCCA22FX User manual

Sony

Sony VAIO VPCCA22FX User manual

Sony VPCJ113FX User manual

Sony

Sony VPCJ113FX User manual

Sony VGC-RC202 User manual

Sony

Sony VGC-RC202 User manual

Sony VAIO VPCB11 Series Original instructions

Sony

Sony VAIO VPCB11 Series Original instructions

Sony VPCS12A7E User manual

Sony

Sony VPCS12A7E User manual

Sony VPCF21Z1R/BI User manual

Sony

Sony VPCF21Z1R/BI User manual

Sony PCV-70 - Vaio Desktop Computer User manual

Sony

Sony PCV-70 - Vaio Desktop Computer User manual

Sony PCV-J120 - Vaio Desktop Computer User manual

Sony

Sony PCV-J120 - Vaio Desktop Computer User manual

Sony VGN-FW4 User manual

Sony

Sony VGN-FW4 User manual

Sony PCV-E201 - Vaio Desktop Computer User manual

Sony

Sony PCV-E201 - Vaio Desktop Computer User manual

Popular Desktop manuals by other brands

AIME T500 user guide

AIME

AIME T500 user guide

Digitus DA-90380-1 manual

Digitus

Digitus DA-90380-1 manual

HP Xw8200 - Workstation - 1 GB RAM specification

HP

HP Xw8200 - Workstation - 1 GB RAM specification

HP TouchSmart Series Disassembly instructions

HP

HP TouchSmart Series Disassembly instructions

Inval ET 3115 manual

Inval

Inval ET 3115 manual

IBM PC 300GL Types 6275 using manual

IBM

IBM PC 300GL Types 6275 using manual

HP Business e-pc Technical data

HP

HP Business e-pc Technical data

Dell Optiplex 5070 Small Form Factor Service manual

Dell

Dell Optiplex 5070 Small Form Factor Service manual

Compaq Presario SR1700 - Desktop PC brochure

Compaq

Compaq Presario SR1700 - Desktop PC brochure

Roland Fantom-G none Supplementary manual

Roland

Roland Fantom-G none Supplementary manual

Lenovo S400Z Hardware Maintenance Manual

Lenovo

Lenovo S400Z Hardware Maintenance Manual

Everex Impact GD3300 user manual

Everex

Everex Impact GD3300 user manual

Honeywell Thor CV31 installation instructions

Honeywell

Honeywell Thor CV31 installation instructions

HP Desktop PC 390 Disassembly instructions

HP

HP Desktop PC 390 Disassembly instructions

Lenovo ThinkStation C20 Podręcznik użytkownika

Lenovo

Lenovo ThinkStation C20 Podręcznik użytkownika

Clarke CWB450WS Assembly instructions

Clarke

Clarke CWB450WS Assembly instructions

HP TouchSmart dx9000 quick start guide

HP

HP TouchSmart dx9000 quick start guide

Lenovo THINKCENTRE M710q User guide and hardware maintenance manual

Lenovo

Lenovo THINKCENTRE M710q User guide and hardware maintenance manual

manuals.online logo
manuals.online logoBrands
  • About & Mission
  • Contact us
  • Privacy Policy
  • Terms and Conditions

Copyright 2025 Manuals.Online. All Rights Reserved.