Sony NYSNO-10 Reference guide

Help Guide
Helmet Mounted Wireless Headset
NYSNO-10
Use this manual if you encounter any problems, or have any questions.
Getting Started
Notes on water resistant and dust proof features
Parts and controls
Location and function of parts
About the lamp on the main unit
Charging
Charging the main unit
Checking the remaining battery charge
System requirements for battery charge using USB
Attaching to a helmet
Attaching the main unit to a helmet
Attaching the microphone
Turning on the main unit
1

Preparing the remote control
Using the remote control
Attaching the remote control to your wrist
Changing the length of the remote control belt
Replacing the remote control battery
Talking within multiple members (Group Talk)
What is Group Talk?
Registering multiple devices as a group
Talking within multiple members (Group Talk)
Changing the sound quality mode of Group Talk (Priority on sound quality / Priority on stable connection)
When the voice conversation is interrupted during Group Talk (optimization of the connection status)
Connecting to a smartphone with BLUETOOTH
What you can do with the BLUETOOTH function
How to make a wireless connection to BLUETOOTH devices
One-touch connection (NFC) compatible Android devices
One-touch connection (NFC) with a smartphone (Android 4.1 or later)
Disconnecting the smartphone by one-touch (NFC)
Switching the device by one-touch (NFC)
Android devices not compatible with one-touch connection (NFC)
Paring and connecting with an Android smartphone
Connecting to a paired Android smartphone
iPhone (iOS devices)
Pairing and connecting with iPhone
Connecting to a paired iPhone
Other BLUETOOTH devices
Pairing and connecting with other BLUETOOTH devices
Connecting to a paired BLUETOOTH device
Listening to music in a smartphone
Listening to music from a device via BLUETOOTH connection
Setting the sound quality for music playback (Equalizer)
2

Functions with the remote control while playing music
Disconnecting BLUETOOTH connection (after use)
Making phone calls
Receiving a call
Making a call
Functions for a phone call
Disconnecting BLUETOOTH connection (after use)
Important information
Precautions
Trademarks
Customer support websites
Troubleshooting
What can I do to solve a problem?
Power
The main unit is not turned on.
The main unit is turned off.
Charging
Charging cannot be done.
Charging time is too long.
Usage hours (battery duration) are too short.
Sound
No sound, low sound level
Sound interrupted, sound distorted
Group Talk
Unable to register NYSNO-10s as a group
Unable to talk on Group Talk
The voice conversation is interrupted while talking on Group Talk.
Remote control
The remote control does not operate properly.
BLUETOOTH connection
3

4-596-222-11(1) Copyright 2017 Sony Corporation
Unable to connect the main unit to a BLUETOOTH device with one-touch connection (NFC)
Unable to make the device registration (pairing)
Unable to make a BLUETOOTH connection.
A passkey input is required on the display for the BLUETOOTH connection.
Calling
No voice from callers
Others
The main unit does not operate properly.
The main unit gets hot.
Resetting / initializing the main unit
4

Help Guide
Helmet Mounted Wireless Headset
NYSNO-10
Notes on water resistant and dust proof features
The main unit and remote control have a water resistant specification of IPX5*1 as specified in “Degree of protection
against water immersion” of the IEC60529 “Ingress Protection Rating (IP Code)”, and a dust proof specification of IP6X*2
as specified in “Degree of protection against solid foreign objects.”
Liquids that the water resistant performance specifications apply to
Applicable: fresh water, tap water, perspiration
Not applicable: liquids other than the above (soapy water, water with detergent or bath agents, shampoo, hot spring
water, pool water, sea water, etc.)
The water resistant and dust proof performance of NYSNO-10 is based on our measurements under the
conditions herein described. Note that malfunctions as a result of water immersion or dust intrusion caused by
misuse by the customer are not covered by the warranty.
To avoid deterioration of water resistant and dust proof performance
Check the following and use NYSNO-10 correctly.
Do not use or leave NYSNO-10 in a location with where the temperature is very high (approx. 41 ºC (105.8 ºF) or
above) and low (approx. -11 ºC (12.2 ºF) or below). Using or leaving it in a location where the temperature is out of
the range above, may stop the operation automatically to protect internal circuit.
NYSNO-10 passed the drop test from 1.2 m (3 ft. 11 1/4 in.) on plywood of 5 cm (2 in.) thickness conforming to MIL-
STD 810 F Method 516.5-Shock. However, this does not guarantee no damage, no breakdown, or water resistant
and dust proof performance in all conditions. Deformation or damage from dropping NYSNO-10 or subjecting it to
mechanical shock may cause deterioration of the water resistant and dust proof performance.
Do not use NYSNO-10 in a location where water or hot water may splash on it heavily. NYSNO-10 does not have a
design that is resistant to water pressure. Use it in a location where high water pressure is applied, such as under
running water or in the shower, may cause a malfunction.
Do not pour high temperature water or blow hot air from a hair dryer or any other appliance on NYSNO-10 directly.
Also, never use it in high temperature locations such as in saunas or near a stove.
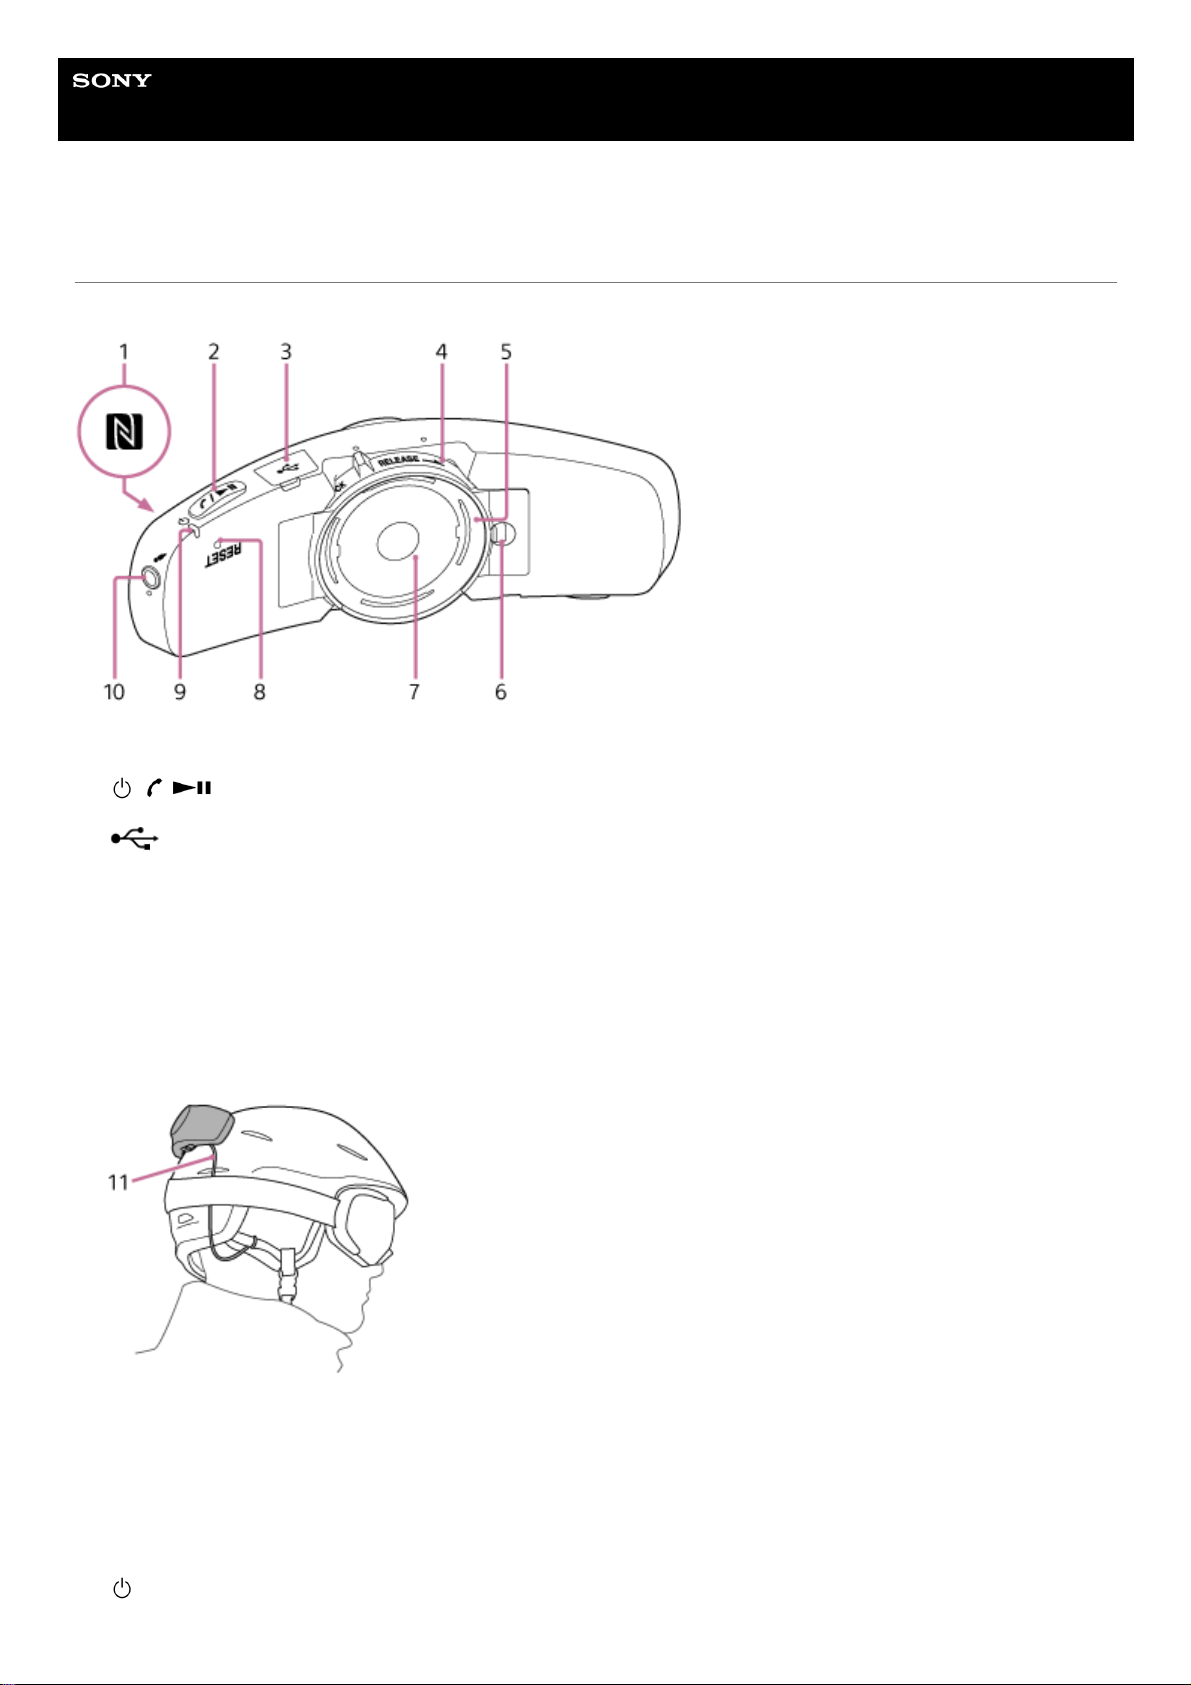
To prevent foreign objects from attaching to the port area, make sure that the micro-USB port cover of the main unit
is closed completely when not used.
IPX5 equivalency: The main unit, with the micro-USB port cover closed, has been tested and maintains its operability under the following test
conditions: When exposed to direct streams of water from any direction where approximately 12.5 L/min. of water is supplied for more than 3
minutes from a distance of approximately 3 m (9 ft. 10 5/8 in.) using a nozzle with an inner diameter of 6.3 mm (1/4 in.).
*1
IP6X equivalency: The main unit, with the micro-USB port cover closed, has been tested to and continues to block dust after stirring for 8 hours
in a testing device which contains dust particles that are up to 75 μm in diameter.
*2
5

How to care
If you leave the main unit wet, it may develop scales, molds, etc. We recommend that you wipe off water droplets
after use and dry it in a well-ventilated place until moisture disappears.
Especially in cold regions, be sure to wipe off the moisture after use. Leaving moisture on its surface may cause the
main unit to freeze and malfunction.
If sand grains, etc. enter the adhesive mount attaching part, remove them carefully.
4-596-222-11(1) Copyright 2017 Sony Corporation
Micro-USB port cover1.
6

Help Guide
Helmet Mounted Wireless Headset
NYSNO-10
Location and function of parts
Main unit
N-Mark
Use to connect to the one-touch connection (NFC) supported device via BLUETOOTH.
1.
/ / (Power, Answer, Play/Pause) button
Press to turn on/off the main unit, receive a call, register BLUETOOTH devices (pairing), and play/pause music.
2.
(Micro-USB) port
Use to charge the main unit. Be sure to close the port cover tightly when not used.
3.
Lock lever
Turn to the [LOCK] side when attaching the main unit to a helmet with the adhesive mount and turn to the
[RELEASE] side when releasing the main unit.
4.
Adhesive mount attaching part5.
Leash cord attaching slot
To avoid falling or losing the main unit, using the supplied leash cord is recommended. Lace the leash cord through
this slot and tie it to the strap on the helmet, etc. as shown below. If the leash cord is too long, cut it to adjust the
length.
11. Leash cord
6.
Actuator
Transmits vibrations to the helmet.
7.
RESET button
Press with a pen, etc. to reset if the main unit does not operate properly. Do not use sharp pointed objects such as a
safety pin.
8.
(Power) lamp
Lights up in blue and red to indicate the power status and communication status.
9.
7

Remote control
Related Topic
About the lamp on the main unit
Checking the remaining battery charge
4-596-222-11(1) Copyright 2017 Sony Corporation
(Microphone) jack
Connect a microphone (supplied) for Group Talk or hands free call.
10.
Operation lamp
Lights up in blue and red to indicate the power status and communication status.
1.
+/- (volume) button2.
/ (Answer, Play/Pause) button
Press to receive a call and play/pause music.
3.
ATT/EQ (Attenuate/Equalizer) button
Press to turn down the volume temporarily (Attenuate) and set the sound quality (Equalizer).
4.
/ (Previous/Next) button
Press to skip to the previous/next song while music is being played/paused.
Press and hold to fast rewind/fast forward. Release the button to return to normal play.
5.
TALK button
Press to register multiple devices as a group, and start/finish Group Talk.
6.
RESET button
Press with a pen, etc. to reset if the remote control does not operate properly. Do not use sharp pointed objects such
as a safety pin.
7.
Belt loop8.
8

Help Guide
Helmet Mounted Wireless Headset
NYSNO-10
About the lamp on the main unit
You can check the status of the main unit by the (Power) lamp.
Turning on/off
Turning on
When turning on NYSNO-10 by pressing and holding the / / (Power, Answer, Play/Pause) button on the
main unit for more than 2 seconds
- (flashes 2 times)
Turning off
When turning off NYSNO-10 by pressing and holding the / / (Power, Answer, Play/Pause) button on the
main unit for more than 2 seconds
(lights for about 2 seconds)
Bluetooth connection
Pairing mode
When entering pairing mode by pressing and holding the / / (Power, Answer, Play/Pause) button on the
main unit for more than 7 seconds
(flashes in blue and red alternately)
Not connected
- - - - - - (flashes in about 1 second intervals)
Connection completed
(flashes quickly for about 5 seconds)
Connected
- - -(flashes in about 5 seconds intervals)- - -
Incoming call
(flashes quickly)
Remaining battery charge indication of the main unit
High
- - (flashes 3 times)
Medium
- (flashes 2 times)
Low (needs to charge)
(flashes 1 time)
For details, refer to “Checking the remaining battery charge”.
Initializing the main unit
Initialization completed
(flashes 4 times)
For details, refer to “Resetting / initializing the main unit”.
Hint
When the remaining battery charge becomes low, the (Power) lamp turns from blue to red, except for pairing mode.
9

Help Guide
Helmet Mounted Wireless Headset
NYSNO-10
Charging the main unit
The main unit contains a rechargeable battery. Charge the main unit using the micro-USB cable (supplied).
Available operation time of the main unit
The available operating times of the main unit on a fully-charged battery are as follows:
Music playback time, Group Talk time: Maximum approx. 8 hours*2
Communication (hands-free call) time: Maximum approx. 20 hours*2
Hint
When charging starts, the main unit is automatically turned off.
Note
While charging, the main unit cannot be turned on and the BLUETOOTH function cannot be used.
If the main unit detects a problem while charging due to following causes, the (Power) lamp (red) may turn off, although
charging is not complete. In this case, charge again within the charging temperature range. If the problem persists, visit the
Company support site:
https://www.sony.net/Products/NYSNO/support/
Ambient temperature exceeds the charging temperature range of 5 °C – 35 °C (41 °F - 95 °F).
There is a problem with the battery.
If the main unit is not used for a long time, charge the battery to its full capacity once every 6 months to avoid over discharge.
If the main unit is not used for a long time, the main unit may be under the following condition.
Connect the micro-USB cable (supplied) to the main unit, and then connect the other end to a booted
computer.
1. Micro-USB cable (supplied)
The (Power) lamp (red) on the main unit lights up.
Charging is completed in about 4 hours*1 and the (Power) lamp (red) goes off automatically.
1
Time required for charging the empty battery to its full capacity. The time may be different depending on the conditions of use.
*1
It is in -10ºC (14ºF) environment.
*2
11

The battery may be quickly depleted.
After a few recharges, the battery life will improve.
It may take longer to charge the battery.
The (Power) lamp (red) may not light up immediately.
Wait for a while until the (Power) lamp (red) lights up.
If the life of the built-in rechargeable battery drops significantly, the battery should be replaced. Visit the Company support site:
https://www.sony.net/Products/NYSNO/support/
Avoid exposure to temperature extremes, direct sunlight, moisture, sand, dust or mechanical shock. Never leave the main unit in
a car parked in the sun.
If connecting to the computer for charging, remember to follow the precautions below.
If the computer enters into hibernation mode, charging will not be completed properly. Check the setting of the computer before
charging.
The (Power) lamp (red) will go off automatically if the computer enters into hibernation mode. Charge the main unit again in
this case.
Use the supplied micro-USB cable only, and connect directly to a computer. Charging will not be completed properly by an
indirect connection, such as via a USB hub.
4-596-222-11(1) Copyright 2017 Sony Corporation
12

Help Guide
Helmet Mounted Wireless Headset
NYSNO-10
Checking the remaining battery charge
You can check the remaining battery charge of the rechargeable battery.
When pressing the / / (Power, Answer, Play/Pause) button to turn on the main unit, the (Power) lamp on
the main unit flashes twice in blue, then flashes in red. The remaining battery charge can be indicated by the lamp (red)
flashing.
3 times - - : Remaining battery charge is high.
2 times - : Remaining battery charge is medium.
1 times : Remaining battery charge is low (needs to charge).
When the battery is almost empty
When turning on the main unit, you hear voice guidance indicating the low battery, and the (Power) lamp turns to
red. When the battery becomes empty, the main unit sounds a warning beep, you hear voice guidance indicating to
charge the battery, and the main unit is turned off automatically.
When using iPad/iPhone/iPod touch
When the main unit is connected to an iPad, iPhone or iPod touch that supports HFP (Hands-free Profile), it will show an
icon that indicates the remaining battery charge of the main unit on the screen.
Compatible devices
iPad, iPhone and iPod touch (iOS 5.0 or later) supporting Hands-free-Profile (HFP)
iOS 10.2 or later
iOS 7.x / 8.x / 9.x
iOS 5.x / 6.x
A: Remaining battery charge of the main unit
13

B: Remaining battery charge is high.
C: Remaining battery charge is medium.
D: Remaining battery charge is low (needs to charge).
4-596-222-11(1) Copyright 2017 Sony Corporation
14

Help Guide
Helmet Mounted Wireless Headset
NYSNO-10
System requirements for battery charge using USB
The main unit has a built-in lithium-ion rechargeable battery. Use the main unit after the battery is charged. The
recommended environment for charging the battery with a computer using a USB cable is as follows.
Personal Computer pre-installed with any of the following operating systems and USB port:
Windows®
Windows® 10 Home/Windows® 10 Pro
Windows® 8.1/Windows® 8.1 Pro
Windows® 8/Windows® 8 Pro
Windows® 7 Home Basic/Home Premium/Professional/Ultimate
Mac
Mac OS X (version 10.9 or later)
Note
Update to the latest version through Windows Update in case of Windows 8.1.
4-596-222-11(1) Copyright 2017 Sony Corporation
15

Help Guide
Helmet Mounted Wireless Headset
NYSNO-10
Attaching the main unit to a helmet
Helmets suitable for NYSNO-10
The main unit can be attached to helmets for winter sports. Check if the following conditions are met in the central area
on the rear side of the helmet, other than the area where the goggle belt and fixed parts are located.
There is no irregularity in the area where the adhesive mount will be stuck (46 mm (1.81 in.) in diameter).
There is no protrusion in the area where the main unit will be attached (length 52 mm × width 143 mm (2.05 in. ×
5.63 in.)).
Determine the attaching position.
1
Put the main unit on the helmet with the adhesive mount attached to the main unit and determine the area
where the sticking surface has no gap.
1.
Remove the release paper and press the whole main unit securely against the area you determined in step 1.
To ensure that the adhesion strength is sufficient, check that the sticking surface has no gap.
2.
Detach the main unit and fix the adhesive mount.
2
Turn the lock lever in the direction of the arrow as illustrated and detach the main unit leaving the adhesive
mount.
1.
16

To use the spare adhesive mount
Attach the spare adhesive mount to the main unit as followings.
Turn the lock lever of the main unit to the [RELEASE] side, and then place the adhesive mount with its groove cross-
shaped. Turn the lock lever to the [LOCK] side to fix the adhesive mount.
After attaching the adhesive mount to the main unit, do steps and .
Hint
Allow 24 hours for the adhesive mount to stick securely, with the main unit attached securely.
4-596-222-11(1) Copyright 2017 Sony Corporation
Tightly stick the adhesive mount with your fingertip.
Press the adhesive mount tightly using a pen cap, etc. to remove air bubbles.
2.
Put the main unit back on the adhesive mount, turn the lock lever in the opposite direction of step 1. until it
clicks, and then attach the main unit on the helmet.
3.
17

Help Guide
Helmet Mounted Wireless Headset
NYSNO-10
Attaching the microphone
Attach a microphone (supplied) for Group Talk or hands free call.
Hint
Keep the microphone cable tidy using a helmet hole or goggle belt to avoid it getting caught.
4-596-222-11(1) Copyright 2017 Sony Corporation
Loop the hook-and-loop fastener for the microphone (supplied) around the belt near the ear pad of the
helmet and attach the microphone.
1
Insert the microphone plug to the (Microphone) jack of the main unit.
2
18

Help Guide
Helmet Mounted Wireless Headset
NYSNO-10
Turning on the main unit
To turn off the main unit
Press and hold the / / (Power, Answer, Play/Pause) button for about 2 seconds again. You hear voice
guidance "Power off" and the main unit is turned off.
4-596-222-11(1) Copyright 2017 Sony Corporation
Press and hold the / / (Power, Answer, Play/Pause) button for about 2 seconds.
The main unit is turned on and you hear voice guidance "Power on."
1
19

Help Guide
Helmet Mounted Wireless Headset
NYSNO-10
Using the remote control
The main unit can be operated using the remote control (supplied). The remote control and main unit are already paired
at the time of purchase.
Hint
The remote control is turned off automatically when the main unit is turned off.
The remote control is turned off automatically when no operation is performed for about 2 hours.
The operation lamp on the remote control turns to red when the remaining battery level of the remote control becomes low.
Note
The main unit cannot be turned on/off by operating the remote control.
Related Topic
Attaching the remote control to your wrist
Changing the length of the remote control belt
Turning on the main unit
Replacing the remote control battery
4-596-222-11(1) Copyright 2017 Sony Corporation
Attach the remote control to your wrist.
1
Turn on the main unit.
2
Press a button on the remote control to turn on it.
The operation lamp on the remote control flashes in blue. Flashing stops when the connection to the main unit is
completed.
3
Press a button on the remote control to operate the main unit.
4
20
Table of contents
Other Sony Headset manuals

Sony
Sony DR-EX300iP User manual

Sony
Sony WF-1000X User manual

Sony
Sony DR-GA500 - Digital Surround Headset System User manual

Sony
Sony DR-ZX301IP User manual

Sony
Sony SBH20 User manual

Sony
Sony DR-GA100 User manual

Sony
Sony WI-C300 Reference guide

Sony
Sony WH-H900N User manual

Sony
Sony WF-1000X User manual

Sony
Sony WH-1000XM4 User manual

Sony
Sony MDR-AS600BT User manual

Sony
Sony DR-EX39PP User manual

Sony
Sony MDR-100ABN User manual

Sony
Sony DR-EX230DP User manual

Sony
Sony MDR-AS35W User manual

Sony
Sony DR-EX14VP/PNK User manual

Sony
Sony MDR-ZX770BN User manual

Sony
Sony MDR-XB50BS User manual

Sony
Sony WI-C600N Reference guide

Sony
Sony WH-1000XM4 User manual