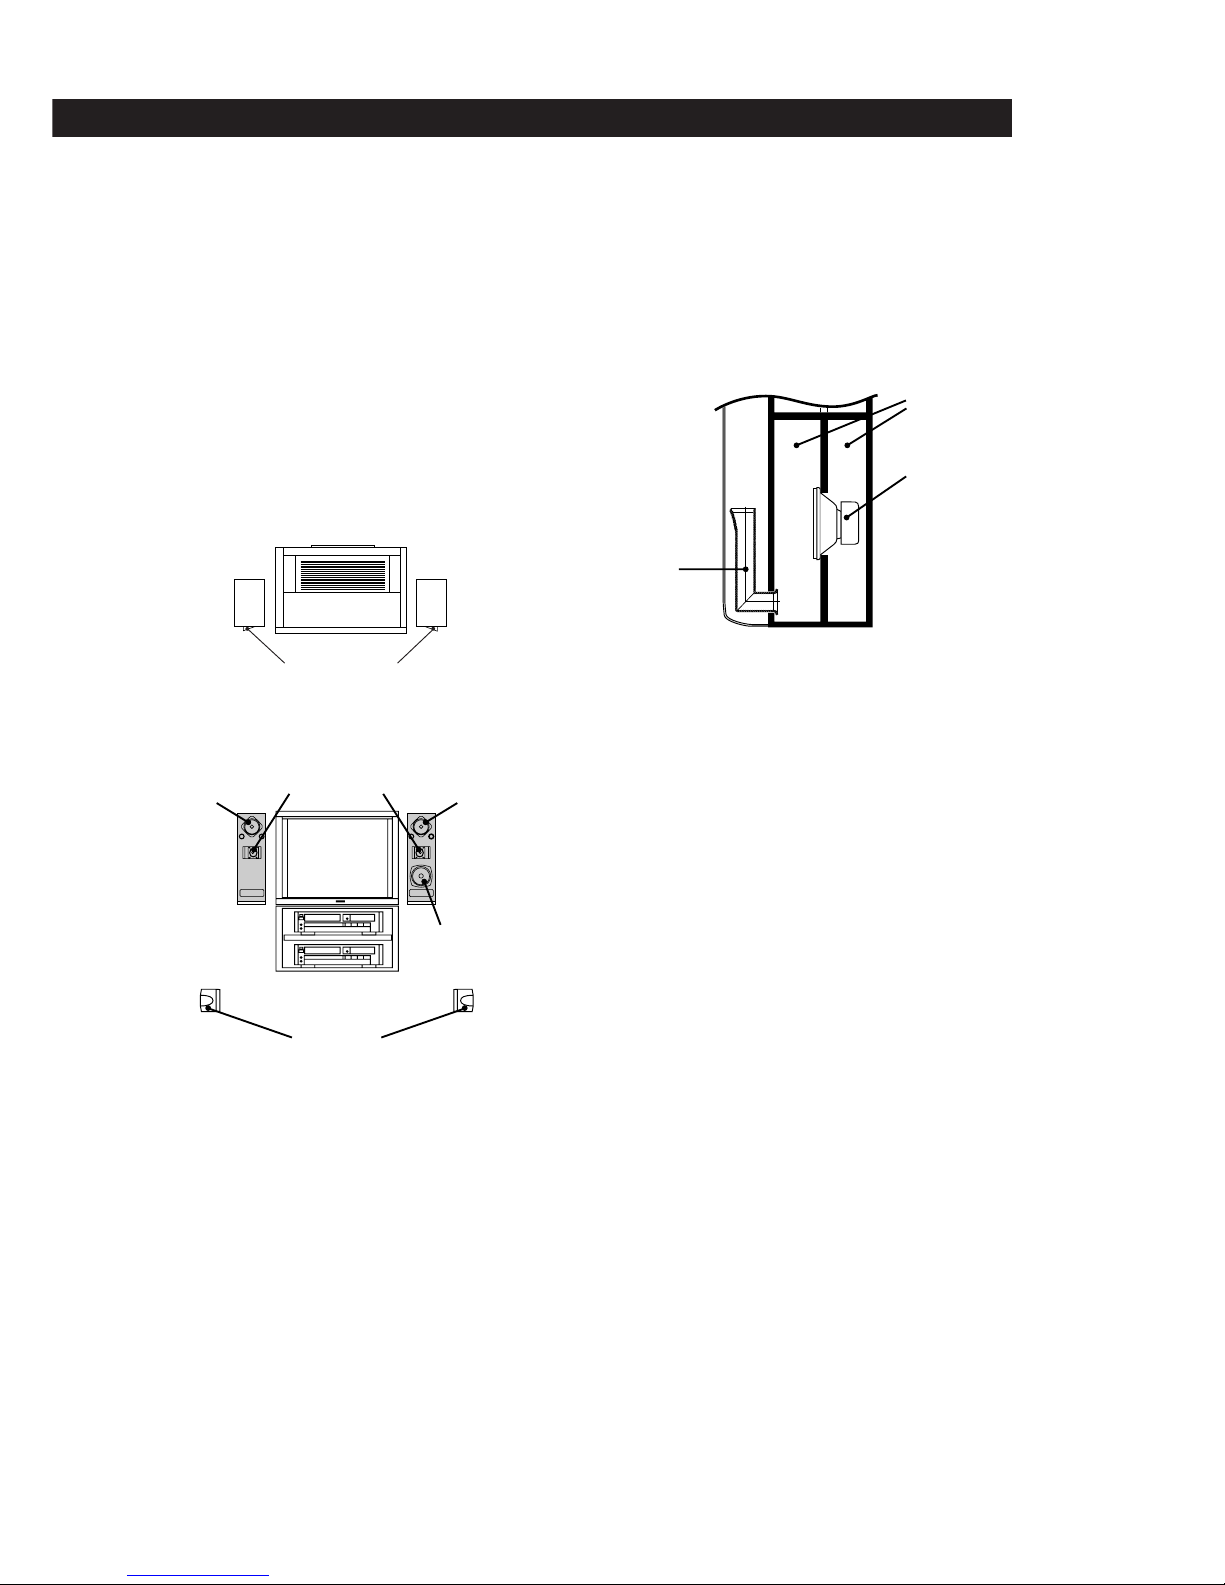
Sony SA-VA10 User manual

Bedienungsanleitung
Gebruiksaanwijzing
Bruksanvisning
Istruzioni per l'uso
© 1996 by Sony Corporation
SA-VA10
Home Theater
Active Speaker System
3-856-457-32(1)
Operating Instructions
Mode d’emploi
Manual de Instrucciones
Manual de Instruçõnes
D
NL
S
I
GB
F
E
P

2GB
WARNING
To prevent fire or shock
hazard, do not expose
the unit to rain or
moisture.
Welcome!
Thank you for purchasing a Sony
speaker system.
Before operating the unit, please read
this manual thoroughly and retain it for
future reference.
About This Manual
The instructions in this manual describe
the controls on the left speaker. You can
also use the controls on the remote if
they have the same or similar names as
those on the left speaker.
• The following icons are used in this
manual:
Indicates that you can use only
the remote to do the task.
Indicates hints and tips for
making the task easier.
This speaker system incorporates the
Dolby Pro Logic Surround System.*
* Manufactured under license from
Dolby Laboratories Licensing
Corporation. DOLBY, the double-D
symbol aand “PRO LOGIC” are
trademarks of Dolby Laboratories
Licensing Corporation.

3GB
TABLE OF CONTENTS
Overview 4
Getting Started
Precautions 6
Unpacking 6
Installing the Anti-vibration pads 7
Choosing the Best Location 7
Speaker System Hookups 8
Audio Component Hookups 9
Home Theatre Operations
Enjoying Surround Sound 10
Adjusting the Surround Sound 11
Adjusting the Sound 12
Using an External Centre Speaker 13
Additional Information
Troubleshooting 14
Specifications 14
Glossary 15
Index 15
GB

4GB
Overview
The SA-VA10 is an active home-theatre speaker system
incorporating a Dolby Pro Logic decoder and super
woofer speakers. Its design features allow easy
connection to your current TV/VCR setup. You can
connect this system without having to reconnect the
cords of your TV and VCR. Also, you don't have to
connect a centre speaker to optimize the surround
effects. Easy operation via the supplied remote ensures
maximum enjoyment of the home-theatre sound this
system provides.
Three different types of surround sound
accommodate a variety of program sources
Dolby Surround (Pro Logic) mode
Lets you enjoy superb theatre-like presence and
surround effects in your home when playing back
video software encoded with the Dolby Surround
system.
HALL surround mode
Reproduce the acoustics of a rectangular concert hall.
Ideal for soft, acoustic sounds, or giving an extra punch
to debates and press conferences.
GAME surround mode
Obtain maximum audio impact from video game
software.

5GB
Dynamic Bass Roar (DBR) super woofer
system provides theatre-like bass sound
To provide a theatre-like experience complete with
dynamic bass sounds, this speaker system incorporates
the Super Acoustically-loaded Woofer (SAW) design
(see below) in the right front speaker to form a DBR
super woofer system.
What is the SAW design?
The SAW design features a centrally-positioned woofer
drive unit, two chamber construction, and a long duct.
Through precision control of the acoustics of the two
chambers, the unit can reproduce powerful ultra low
frequencies without muddiness.
In addition, we also included two super woofer modes
designed to bring the dynamic bass sounds found in
movie theatres (mode 1) and concert halls (mode 2) to
your living room.
Power turns on and off automatically
The speakers will turn on automatically when a sound
signal is input and turn off when you've finished
watching a program and the sound signal goes out. So
you don't have to bother using the power switch every
time you use the system.
Dolby Pro Logic Surround sound
The use of a centre speaker is a key factor in obtaining
a full surround effect when playing sources encoded
with the Dolby Pro Logic Surround sound system.
Centre speakers in a movie theatre make central
sounds, such as dialogue, clearer and create a unified
sound image.
Normally, you have to install a centre speaker
separately, but this speaker system makes it easy to set
up a high-performance home theatre system by
incorporating a high-quality centre speaker system into
the front speakers.
Top view
Front view
How the centre speaker works
The front left and right speakers are equipped with centre
channel tweeters (see above) angled inwards at 30° to
reproduce high-frequency centre channel sounds. Low-
frequency centre channel sounds are mixed with the front
channel signals and reproduced through the front left and
right full range units. This design produces a high-quality
centralized sound image for the centre channel which
exactly matches the quality of the front channel sound to
provide superior sound quality and a unified sound image
without a cumbersome external centre speaker.
Overview
Left speaker Right speaker
Centre channel
speakers
Super woofer
Rear
speakers
Centre channel
speakers
Chamber
Drive unit
Duct

6GB
Getting Started
Unpacking
Check that you received the following items with your
speaker system:
• Front L/R speaker connecting cord, 3.5 m (1)
• Rear speaker SS–SR151 (2)
• Rear speaker connecting cord, 10 m (2)
• Audio connecting cord, 1.5 m (1)
• Remote commander (remote) RM–J10 (1)
• Sony SUM–3 (NS) batteries (2)
• Anti-vibration pads (8)
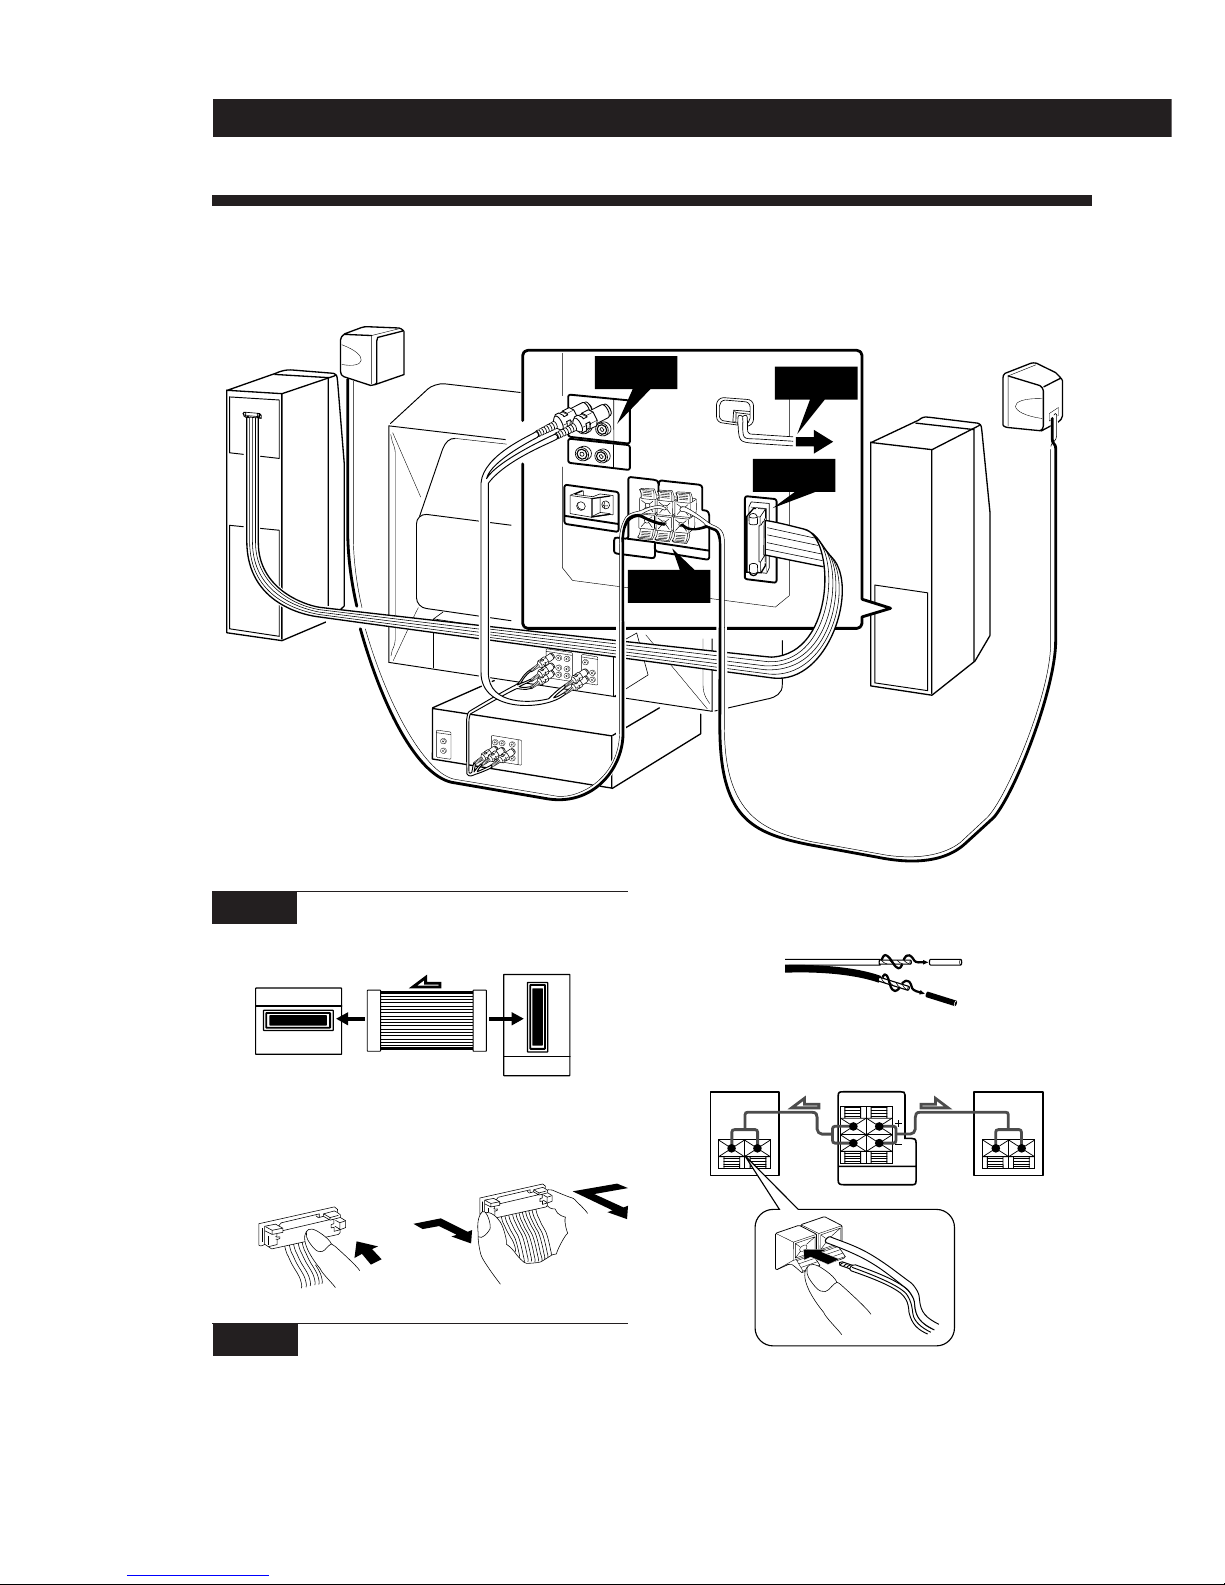
Inserting batteries into the remote
Insert two size AA (R6) batteries with the + and – on
the battery compartment. When using the remote,
point it at the remote sensor gon the left front
speaker.
When to replace batteries
Under normal use, the batteries should last for about 6
months. When the remote no longer operates the
speakers, replace both batteries with new ones.
Notes
• Do not leave the remote in an extremely hot or humid
place.
• Do not use a new battery with an old one.
• Do not expose the remote sensor to direct sunlight or
lighting apparatuses. Doing so may cause a malfunction.
• If you don’t use the remote for an extended period of time,
remove the batteries to avoid possible damage from
battery leakage and corrosion.
Precautions
On safety
• Should any solid object or liquid fall into the cabinet,
unplug the speaker system and have it checked by
qualified personnel before operating it any further.
On power sources
• Before operating the speakers, check that the operating
voltage is identical with your local power supply. The
operating voltage is indicated on the nameplate on the
rear of the speakers.
• The speakers are not disconnected from the AC power
source as long as they are connected to the wall outlet,
even if the speakers themselves have been turned off.
• If you are not going to use the speakers for a long time, be
sure to disconnect the speakers from the wall outlet. To
disconnect the Mains lead, grasp the plug itself; never
pull the cord.
• One blade of the plug is wider than the other for the
purpose of safety and will fit into the wall outlet only one
way. If you are unable to insert the plug fully into the
outlet, contact your dealer.
• AC power cord must be changed only at the qualified
service shop.
On placement
• Do not place the speakers near heat sources, or in a place
subject to direct sunlight, excessive dust or mechanical
shock.
• Good ventilation is essential to prevent internal heat
buildup. Place the speakers in a location with adequate air
circulation, and in a way that does not block the rear
ventilation holes.
On cleaning
• Clean the cabinet, panel and controls with a soft cloth
slightly moistened with a mild detergent solution. Do not
use any type of abrasive pad, scouring powder or solvent
such as alcohol or benzine.
If you have any question or problem concerning your
receiver, please consult your nearest Sony dealer.
]
]
}}

7GB
Getting Started
Using the remote
You can use the shaded buttons shown below to
operate Sony TVs.
To Press
turn on a Sony TV TV POWER
operate a Sony TV the button(s) for the operation
you desire.
turn off a Sony TV TV POWER
Choosing the Best Location
To obtain high sound quality and a proper sound
image from the front speakers, place the speaker with
the built–in operation panel to the left of your TV and
the other to the right of your TV so that the centre
channel tweeters angle towards the centre of the room.
For the best central sound image, place the left and
right speakers within 1.5 m of each other and
equidistant from the TV.
The left and right speakers must be placed standing
upright, laying them on their sides will defeat the
centre channel surround effect.
Place the rear speakers so that they fire directly across
at each other about 60 – 90 cm (2 – 3 feet) above your
listening position.
1.5 m (5 feet) max
+
–
60 – 90 cm
(2 – 3 feet)
Installing the Anti-vibration
pads
1Spread a towel, or other soft cloth, over a table
and lay the speakers down.
2Peel off the covering sheet from the anti-vibration
pad and attach it on the bottom of the speakers (4
for each speaker).
3Make sure the anti-vibration pads are securely
attached and stand the speaker upright.

8GB
1Twist the speaker cord coating and strip it from
the end of the cords.
2Insert the stripped wire into speaker terminals.
Be sure to connect matching speaker terminals
(e.g. use the striped wire to connect + to +, and
use the solid wire to connect – to –). If the
connections are reversed (+ to –), the sound will
be distorted and lack bass.
+
–
REAR SPEAKER
RL
Speaker System Hookups
This section describes how to connect the speaker system and how to connect your TV or VCR to the speakers.
The arrow çindicates signal flow.
Getting Started
STEP 1 Connecting the front speakers
STEP 2 Connecting the rear speakers
Use the supplied speaker cord to connect the left and
right rear speakers.
R-ch SPEAKER
INPUT
R-ch SPEAKER
OUTPUT
right speaker left speaker
To connect, depress the
middle of the male
connector until it clicks
into the female connector.
To disconnect, pull the
connector out. Never pull
the cord itself.
VCR
TV
STEP 3
leftright
STEP 1
STEP 4
Rear speaker
SS-SR151 Rear speaker
SS-SR151
STEP 2
Left front
speaker
Right front
speaker

9GB
R
L
L
R
1
IN
TO TV
VIDEO
AUDIO
OUTPUT
Getting Started
TV front left speaker
STEP 3 Connecting your TV
If the audio and video output terminals on your TV
and VCR are already connected, and your TV has
stereo AUDIO OUT jacks, you can start enjoying
surround sound simply by connecting the speaker
system to your TV as shown below.
Important
• Set the volume on your TV to MIN (minimum).
• If your TV has an ON/OFF switch for its internal speaker,
set it to OFF and enjoy the sound from this speaker
system.
If you use AUDIO OUT jacks marked VARIABLE
After making the connection as shown above, turn up the
volume on the TV. Use this speaker system‘s volume control
for regular volume adjustment. Turning down the volume
on the TV reduces the AUDIO OUT signal level and may
cause a loss in sound quality and/or the auto-power off
function (see page 11) to function.
For the best possible sound (or if your TV only has a
monaural AUDIO OUT jack, or no AUDIO OUT jacks)
Connect the speaker system directly to your VCR or cable
box.
The following connections suppress noise from the TV and
let you enjoy high quality sound.
1Connect your VCR or cable box to the 1 IN jacks on the left
front speaker.
2Connect your TV to the TO TV jacks on the left front
speaker.
R
L
L
R
1
IN
TO TV
VIDEO
AUDIO
INPUT
OUTPUT
LR VIDEOAUDIO
TV front left speaker
VCR/cable
box
STEP 4 Connecting the mains lead
Connect the mains lead to a wall outlet.
Audio Component Hookups
Since this speaker system incorporates its own internal
amplifier and preamplifier, you can also connect an
audio component, such as a CD player.
Note
Do not connect an amplified audio source. The combined
amplification from the component and the speaker's internal
amplifier may damage the speakers.
R
L
L
R
1
IN
TO TV
OUT
CD front left speaker

10GB
+
–
+
–
+
–
+
–
+
–
+
–
Enjoying Surround Sound
You can take advantage of the speaker's surround
sound simply by choosing a surround mode according
to the type of program you are watching. This system
is provided with three different surround modes:
DOLBY SUR. (Dolby Pro Logic Surround)
Reproduces superb theatre-like presence and surround
effects from video software encoded with Dolby
Surround.
HALL surround mode
Reproduce the acoustics of a rectangular concert hall.
Ideal for soft, acoustic sounds, or for giving an extra
punch to debates and press conferences.
GAME surround mode
Obtain maximum audio impact from video game
software.
Remote
Left speaker
Home Theatre Operations
POWER
GAME
SUPER WOOFER
MODE (1,2,OFF)
MASTER VOL
INPUT 1
INPUT 2
DOLBY SUR
HALL
MUTING
SUR OFF
STANDBY
indicator
(red)
+
–
MASTER VOL
S.WOOFER
SURROUND
INPUT
POWER
POWER
indicator
(red/green)
1Press POWER.
The POWER indicator lights (green) and the
speakers turn on. Once you've turned the
speakers on, they turn themselves off and on
automatically with the auto power on/off
function.
2Press INPUT 1 or 2 on the remote or INPUT on
the operation panel to select the program source.
For example, if you connected your VCR to the 1
IN jacks, select INPUT 1.
The respective INPUT indicator lights up.
3Start playback from the program source.
4Press either DOLBY SUR, HALL or GAME on the
remote, or SURROUND on the operation panel a
few times, according to the program you want to
enjoy.
To listen without surround effects
Press SUR OFF on the remote, or press SURROUND on
the operation panel a few times until SUR OFF is
displayed.
Note
Some videos and laser discs may use Dolby Surround
sound even if it's not indicated on the package.
program
recent
movies
concerts
music
sports
video game
education,
news
SUR
OFF
r
GAME
r
DOLBY
SUR
r
r
HALL
r
r
r
DIMMER

11GB
Adjusting the Surround Sound
Although this speaker system is factory preset to
provide balanced surround sound without adjustment,
you can adjust the volume of each speaker and the
delay time to accommodate the conditions in your
living room or your individual preference.
Adjusting the speaker volumes
The test tone feature lets you adjust the volume of the
sound coming from each speaker to the same level, so
that the surround sound will be even and natural.
Make the following adjustments from your listening
position.
1Choose the DOLBY SUR mode.
2Press TEST TONE on the remote.
The test tone comes from each speaker in
sequence:
3Adjust the volume levels so that you hear the test
tone from each speaker at the same volume level
when you are in your listening position:
4Press TEST TONE on the remote to turn off the
test tone.
To restore the centre, rear, or balance levels to the
factory setting
Press CENTER +/–, REAR +/–, or BALANCE L/R, then
press RESET.
5Press MASTER VOL. (VOLUME) to adjust the
volume.
To select a suitable SUPER WOOFER mode
Press SUPER WOOFER MODE 1 or 2.
SUPER WOOFER MODE 1 provides powerful bass sound
ideal for movies. SUPER WOOFER MODE 2 is a more subtle
effect designed for music.
To mute the sound
Press MUTING.
To restore the sound, press MUTING again.
For other sound adjustments, see page 12.
The speakers turn on and off automatically
(Auto power on/off function)
Three minutes after the sound signal goes out (when
you turn off the TV, or the currently playing video/
laserdisc ends), the speakers turn off automatically and
the POWER indicator turns red.
The speakers turn themselves back on the next time you
turn on the TV or start playback from the VCR and the
POWER indicator turns green.
If you press POWER on the remote when the
speakers are on
The speakers enter standby mode (the red standby
indicator lights up) and the auto power on/off function
will not operate. You have to press POWER on the
remote again to turn on the speakers.
Changing the display
You can dim the display, or turn it off, according to
your preference.
Press DIMMER, on the remote, a few times until the
display mode you desire appears.
The display returns to full brightness temporarily
when you press one of the buttons on the control panel
or the remote.
To adjust the level
between the right and left
front speakers
of the centre speaker
of the rear speaker
press
BALANCE L or R
CENTER + or –
REAR + or –
/Left Front (L) /Centre /Right Front (R)
Rear ?
+
–
+
–
+
–
+
–
+
–
REAR +/–
CENTER +/–
RESET
DELAY
TEST TONE
BALANCE L/R
Home Theatre Operations
(continued)

12GB
Note
Pressing buttons other than MASTER VOL., RESET,
CENTER +/–, REAR +/–, or BALANCE L/R cancels the test
tone.
Adjusting the delay time
By adjusting the delay time you can enhance the spatial
characteristics of the sound to obtain a theatre-like
presence regardless of the size of your room. If the rear
speakers are close to your listening position, choose a
longer delay time.
You can adjust the settings individually for DOLBY
SUR, HALL and GAME.
Note
The delay time cannot be adjusted in PRO LOGIC 3CH
mode.
1Choose any surround mode.
2Playback a program.
3Press DELAY on the remote once to display the
current delay time.
4Press DELAY a few times to choose the delay time
you prefer, either 15, 20, or 30 ms.
The factory setting is 20 ms.
To restore the delay time to the factory setting
Press DELAY and then RESET.
Resetting an entire surround mode
Press the button for the surround mode you want to
reset (i.e., HALL) and then press RESET while the
name of the surround mode is being displayed.
All of the adjustments in that mode, including the bass
and treble, are reset to the factory settings.
Adjusting the Sound
Although this speaker system's sound quality is
already adjusted. You can change the settings, as you
like, for each surround mode individually. The
following settings remain stored in their respective
surround mode until you change them.
1Playback a program and choose a surround mode.
2Make the following sound adjustments according
to your preference and/or the type of program
you are watching.
* Since BALANCE L and R control sound from the front
speakers, they have little effect on DOLBY SUR when the
source software has a high proportion of centre-channel
sound.
To restore the factory settings
Press RESET after pressing either S.WOOFER +/–,
BASS +/–, TREBLE +/–, or BALANCE L/R.
To
adjust the super
woofer level
adjust the bass level
adjust the treble level
adjust the balance
press
S.WOOFER + or –
BASS + or –
TREBLE + or –
BALANCE L or R*
+
–
+
–
+
–
+
–
+
–
SUPER WOOFER
MODE (1, 2, OFF)
S.WOOFER +/–
TREBLE +/–
BASS +/–
BALANCE L/R
Home Theatre Operations

13GB
+
–
CENTER SPAKER
INT
o
O
EXT
left front speaker centre speaker
CENTER MODE
Using an External Centre
Speaker
Since this system incorporates a centre speaker (see
page 5), you don't have to connect a centre speaker.
However, it is possible to connect a centre speaker, if
you already have one, to the CENTER SPEAKER
terminals. Be sure to use a speaker with a 8 to 16 ohm
impedance for the centre speaker.
Use a screwdriver and remove the screw holding the
CENTER SPEAKER button cover in place. Then
depress the CENTER SPEAKER button. This turns off
the internal centre speaker and directs the centre
channel signal to the CENTER SPEAKER terminals.
Connecting an external centre speaker lets you choose
from 4 different Dolby Pro Logic Surround centre
modes: NORMAL, WIDE, 3 CH (3 Channel logic), or
PHANTOM. Use the NORMAL or WIDE mode. For
details on Dolby Pro Logic Surround sound, see page
15.
1Press SURROUND on the front left speaker to
choose PRO LOGIC. (“PRO LOGIC” appears in
the display instead of “DOLBY SUR” when you
connect an external centre speaker.)
2Press CENTER MODE on the front left speaker a
few times until the centre mode you want appears
in the display.
3Adjust the speaker volumes and delay time, if
necessary, by referring to pages 11 and 12.
SURROUND
EXTERNAL
CENTER SPEAKER
IMPEDANCE 8 - 16 Ω
Home Theatre Operations

14GB
Additional Information
Troubleshooting
If you experience any of the
following difficulties while using
the speakers, use this
troubleshooting guide to help you
remedy the problem. Should any
problem persist, consult your
nearest Sony dealer.
There’s no sound from any of the
speakers.
/Check that components are
connected securely to the
speakers.
/Make sure you selected the
correct input (1 or 2).
/Press MUTING to cancel
the muting function.
/Press MASTER VOLUME +
to turn up the volume.
/Turn up the volume on the
TV to increase the output
level when using the TV's
VARIABLE AUDIO
OUTPUT terminals.
No sound or only a very low sound
level is heard from the rear speakers.
/Surround sound is turned
off.
/Adjust the volume of the
rear speakers (see page 11).
/Check the sound image
balance with TEST TONE
(see page 11).
There’s no sound from the centre
speaker.
/Make sure you selected the
DOLBY SUR (or PRO
LOGIC) surround mode.
/No centre speaker is
connected, but the
CENTER SPEAKER button
on the rear panel is set to
EXTERNAL.
/You connected an external
centre speaker, but the
Dolby Pro Logic Surround
centre mode is set to
PHANTOM.
Bass: ±10 dB at 100 Hz
Treble: ±10 dB at
10 kHz
Bass reflex type
SAW type
Bass reflex type
Centre tweeter: 5 cm
cone type (2)
Front full range /
Centre woofer: 10 cm
cone type (2)
Super woofer:
13 cm cone type (1)
8 cm cone type (2)
220-230 V AC,
50/60 Hz
75 W
Front left:
Approx. 190 x 565 x 280
mm (w/h/d)
(7 1/2 x 22 1/4x 11
inches)
Front right:
Approx. 190 x 565 x 265
mm (w/h/d)
(7 1/2 x 22 1/4x 10 7/16
inches)
Rear:
Approx. 110 x 160 x 140
mm (w/h/d)
(4 5/16 x 6 5/16 x 5 1/2
inches)
Front (L): 9.0 kg
(19 lb 13 oz)
Front (R): 8.0 kg
(17 lb 10 oz)
Rear: 700 g/pc
(1 lb 9 oz)
/You connected an external
centre speaker, but the
CENTER SPEAKER button
on the rear panel is set to
INTERNAL.
Severe hum or noise is heard.
/Move the connecting cord
away from any
transformers or motors and
least 3 meters (10 feet) from
any fluorescent lights.
/Connect the speakers to
your VCR or cable box
instead of to your TV
(see page 9).
Remote operations cannot be
performed.
/Point the remote towards
the remote sensor on the
left front speaker.
/Remove any obstructions
between the remote and
this system's left front
speaker.
/Replace the batteries in the
remote.
Picture on TV screen vibrates or
distorts.
/Move the speakers farther
away from the TV.
Tone control
Front/Centre
Speaker section
Type
Front speaker
DBR super woofer
Rear speaker
Speaker unit
Front speaker
system
Rear speaker
General
Power requirement
Front speakers
Power consumption
Front speakers
Dimensions
Mass
Specifications
Amplifier section
Continuous RMS
power output
Centre tweeter
Front full range/
Centre woofer
Super woofer
Rear
Input sensitivity/
Impedance
Output sensitivity/
Impedance
total 100 W
20 W (8 ohms at
10 kHz, 9 % THD)
20 W + 20 W (8 ohms at
1 kHz, 9 % THD)
20 W (8 ohms at 40 Hz,
9 % THD)
20 W (8 ohms at 1 kHz,
9 % THD)
450 mV, 50 kilohms
TO TV:
450 mV, 1 kilohm
External Centre: 20 W
(at 8 ohms, 1 kHz, 9 %
THD), 8–16 ohms
Rear: Accepts only
supplied rear speakers
SS-SR151
R-ch: Accepts only
SA-VA10 R-ch speaker
Rear speaker
SS-SR151 (2)
Front L/R speaker
connecting cord,
3.5 m (1)
Rear speaker
connecting cord, 10 m
(2)
Audio connecting cord,
1.5 m (1)
Remote Commander
RM-J10 (1)
Sony batteries SUM-3
(NS) (2)
Anti-vibration pads (8)
Supplied
accessories
Design and specifications are subject
to change without notice.

15GB
Index
A, B
Adjusting
bass 12
delay time 12
speaker volume 11
super woofer level 11, 12
treble 12
volume 11
Audio component hookups 9
C
Centre mode 13, 15
NORMAL mode 13, 15
PHANTOM mode 13, 15
3 CH LOGIC mode 13, 15
WIDE mode 13, 15
Connecting. See Hookups
D
Delay time 12, 13, 15
Dolby Pro Logic Surround 13,
15
centre mode 13, 15
Dolby Surround sound 15
E, F, G
External centre speaker 13
H, I, J, K, L, M
Hookups
audio components 9
mains lead 9
speakers 8
TV/VCRs 9
N, O
NORMAL mode 13, 15
P, Q
PHANTOM mode 13, 15
R
Remote 6, 7, 10, 11, 12
S
Speakers
connection 8
placement 7
Speaker volume 11
Surround sound 10, 11, 12
T
Test tone 11
3 CH LOGIC mode 13, 15
Troubleshooting 14
TV/VCR hookups 9
U, V
Unpacking 6
W, X, Y, Z
WIDE mode 13, 15
• PHANTOM mode
Select PHANTOM mode if you do not
want to use the centre speaker to output
sound. The sound of the centre channel is
output from the front speakers.
The test tone is output:
Delay time
Time lag between the surround sound output
from front speakers and rear speakers. By
adjusting the delay time of the rear speakers,
you can obtain the feeling of presence. Make
the delay time longer when you have placed
the rear speakers in a small room or close to
your listening position, and make it shorter
when you have placed them in a large room
or apart from your listening position.
Dolby Pro Logic Surround
Decoding system of Dolby Surround sound
standardized in TV programs and movies.
Compared with the former Dolby Surround
system, Dolby Pro Logic Surround improves
sound image by using four separate channels:
off-screen audio effects, on-screen dialog,
left-to-right panning, and music. These
channels manipulate the sound to be heard
and enhance the action as it happens on the
screen. To take advantage of Dolby Pro Logic,
you should have at least one pair of rear
speakers and/or one centre speaker. You also
need to select the appropriate centre mode to
enjoy a full effect.
Dolby Surround
Encoding and decoding system of Dolby
Surround sound for consumer use. Dolby
Surround decodes the extra channels on the
Dolby Surround-encoded sound tracks of
movie videos and TV programs and produces
sound effects and echoes that make the action
seem to envelop you.
Glossary
Centre mode
Speaker setting to enhance the Dolby Pro
Logic Surround mode. Select one of the
following four centre modes according to
your speaker system.
• NORMAL mode
Select NORMAL mode if you connect a
small sized active centre speaker to this
speaker system. Since a small speaker
cannot produce enough bass, the bass
sound of the centre channel is output from
the front speakers.
The test tone is output as shown on page 11.
• WIDE mode
Select WIDE mode if you connect an active
centre speaker equivalent to the two front
speakers. With the WIDE mode, you can
take full advantage of Dolby Surround
sound.
The test tone is output as shown on page 11.
• 3 CH LOGIC mode
Select 3 CH LOGIC mode if you don't want
to use the rear speakers to output sound.
The sound of the rear channel is output
from the front speakers to let you
experience some of the surround sound
without using rear speakers.
The test tone is output:
Rear
speaker (L)
Rear
speaker (R)
Front
speaker (R)
Front
speaker (L)
Small
centre speaker
Rear
speaker (L)
Rear
speaker (R)
Front
speaker (R)
Front
speaker (L)
/Front (L) + (R) /Rear
Rear
speaker (L)
Rear
speaker (R)
Front
speaker (R)
Front
speaker (L)
Centre
speaker
/Front (L) /Centre /Front (R)
Centre
speaker Front
speaker (R)
Front
speaker (L)
Additional Information

2F
Bienvenue !
Nous vous remercions d’avoir acheté ce
système d’enceintes Sony.
Avant la mise en service de ce système,
veuillez lire attentivement ce mode
d’emploi et le conserver pour toute
référence future.
AVERTISSEMENT
Afin d’éviter tout risque
d’incendie ou
d’électrocution, éviter
d’exposer l’appareil à la
pluie ou à l’humidité.
Au sujet de ce
manuel
Les commandes indiquées dans les
instructions de ce manuel sont celles de
l’enceinte gauche. Vous pouvez aussi
utiliser les touches de la télécommande
qui ont le même nom ou un nom
similaire à celles sur l’enceinte.
• Les symboles suivants sont utilisés
dans ce manuel:
Indique que vous pouvez utiliser
la télécommande pour effectuer
cette opération.
Donne des conseils
supplémentaires qui facilitent une
opération.
Ce système d’enceintes intègre le
système Dolby Pro Logic Surround.
* Fabriqué sous licence de Dolby
Laboratories Licensing Corporation.
DOLBY, le symbole double-D aet
PRO LOGIC sont des marques de
Dolby Laboratories Licensing
Corporation.

3F
F
TABLE DES MATIÈRES
Présentation 4
Préparatifs
Précautions 6
Déballage 6
Fixation des tampons anti-vibrations 7
Choix de l’emplacement 7
Raccordement des enceintes 8
Raccordement d’appareils audio 10
Fonctionnement du cinéma domestique
Ecoute du son d’ambiance 11
Réglage du son d’ambiance 12
Réglage du son 13
Utilisation d’une enceinte centrale externe 14
Informations supplémentaires
Guide de dépannage 15
Spécifications 15
Glossaire 16
Index 17

4F
Présentation
Le SA-VA10 est un système d’enceintes pour cinéma
domestique intégrant un décodeur Dolby Pro Logic et
des caissons d’extrême grave. Grâce à sa conception, il
peut être facilement raccordé à un téléviseur et à un
magnétoscope. Vous pouvez relier ce système à votre
téléviseur et magnétoscope sans avoir à refaire tous les
raccordements. Vous n’avez pas besoin non plus de
raccorder une enceinte centrale pour optimiser les
effets d’ambiance. La télécommande fournie facilite les
manipulations ce qui augmentera encore votre plaisir
d’écoute.
Trois types de son d’ambiance pouvant
s’accommoder à une grande diversité de
programmes:
Mode Dolby Surround Pro Logic
Vous bénéficiez d’un son comme au cinéma et d’effets
d’ambiance lors de la lecture de matériel vidéo codé
avec le système Dolby Surround.
Mode d’ambiance HALL
Reproduit l’acoustique d’une salle de concert
rectangulaire. Idéal pour les sons doux ou pour donner
un peu de nerf aux débats et conférences de presse.
Mode d’ambiance GAME
Pour renforcer de manière optimale le son des jeux
vidéo.

5F
Présentation
Son Dolby Pro Logic Surround
L’utilisation d’un haut-parleur pour le canal central est
primordial si l’on veut obtenir un effet surround
parfait lors de la lecture de sources enregistrées avec le
système Dolby Pro Logic Surround. Les haut-parleurs
du canal central au cinéma rendent les sons, en
particulier les dialogues, plus clairs et unifient l’image
sonore.
Normalement, il est nécessaire d’installer une enceinte
centrale pour obtenir un système de cinéma
domestique performant, mais avec ce système vous
n’avez pas ce problème, et l’installation s’en trouve
facilitée, car les enceintes avant intègrent des haut-
parleurs de grande qualité pour le canal central.
Vue du haut
Vue de devant
Comment fonctionnent les haut-parleurs du canal central
Les enceintes avant gauche et droite sont équipées de haut-
parleurs d’aigu pour le canal central (voir ci-dessus) dirigés
vers l’intérieur à 30˚ pour reproduire les sons haute
fréquence du canal central. Les sons basse fréquence du
canal central sont mélangés aux signaux du canal avant et
reproduits par les haut-parleurs pleine gamme avant gauche
et droit. Cette conception permet d’obtenir pour le canal
central une image sonore harmonisée de grande qualité, qui
correspond exactement à la qualité du son du canal avant. Le
résultat est un son d’une exceptionnelle qualité et un image
sonore unifiée sans enceinte centrale encombrante.
Le système de caissons d’extrême grave
DBR (Dynamic Bass Roar) procure un son de
grave comme au cinéma
Pour vous offrir la même expérience qu’au cinéma et
reproduire les mêmes sons graves dynamiques,
l’enceinte avant droite intègre des caissons d’extrême
grave à charge acoustique (SAW) (voir ci-dessous) qui
constituent un véritable système d’extrême grave de
conception DBR.
Qu’est-ce que le SAW?
Le SAW (Super Acoustically-loaded Woofer) est une
conception d’enceinte avec l’excitateur de grave positionné
au centre, une division en deux chambres et un long event.
Grâce au contrôle précis de l’acoustique des deux chambres,
l’enceinte peut reproduire les fréquences ultra-basses sans
flou.
En outre, deux modes d’extrême grave ont été prévus
pour mieux faire ressortir les sons graves dynamiques
typiques d’un cinéma (mode 1) et ceux typiques d’une
salle de concert (mode 2) dans votre salon.
Mise en et hors service automatique
Les enceintes s’allument automatiquement quand un
signal sonore entre et s’éteignent quand vous avez fini
de regarder un programme et que le son est coupé.
Ainsi vous n’avez plus besoin d’actionner
l’interrupteur chaque fois que vous utilisez le système.
Haut-parleurs du
canal central
Haut-parleurs du
canal central
Caisson
d’extrême grave
Enceintes
arrière
Enceinte gauche Enceinte droite
Event
Chambre
Excitateur

6F
Préparatifs
Précautions
Sécurité
• Si un liquide ou un solide tombait dans le coffret,
débranchez le système d’enceintes et faites-le contrôler par
un technicien qualifié avant de le remettre en service.
Sources d’alimentation
• Avant d’utiliser les enceintes, vérifiez que leur tension de
fonctionnement est identique à celle du secteur local. La
tension de fonctionnement est indiquée sur la plaque
signalétique à l’arrière des enceintes.
• Les enceintes ne sont pas déconnectées de la source
d’alimentation secteur tant qu’elles sont branchées sur la
prise murale, même si elles ont été mises hors tension.
• Si vous prévoyez de ne pas utiliser les enceintes pendant
longtemps, débranchez-les de la prise murale. Pour
débrancher le cordon d’alimentation secteur, tirez sur la
fiche. Ne jamais tirer sur le cordon proprement dit.
• Pour des raisons de sécurité, une lame de la fiche est plus
large que l’autre et ne peut donc être insérée que d’une
seule manière dans une prise murale. Si vous ne parvenez
pas à insérer la fiche dans la prise, contactez votre
revendeur.
• Le cordon d’alimentation secteur ne doit être changé que
dans un magasin qualifié.
Installation
• Ne pas installer les enceintes près d’une source de chaleur
ou dans un endroit exposé au soleil, à de la poussière
excessive ou à des chocs mécaniques.
• Une bonne ventilation est essentielle pour éviter une
surchauffe interne. Installez les enceintes dans un endroit
où la circulation d’air est suffisante pour ne pas boucher
les orifices de ventilation à l’arrière.
Nettoyage du coffret
• Nettoyez le coffret, le panneau et les commandes avec un
chiffon doux légèrement imprégné d’une solution
détergente neutre. Ne pas utiliser de tampons abrasifs,
poudre à récurer ou diluant, comme l’alcool ou la benzine.
Pour toute question ou problème au sujet des
enceintes, veuillez contacter votre revendeur Sony.
Déballage
Vérifiez si vous avez bien reçu tous les éléments joints
au système d’enceintes.
• Cordon de liaison de 3,5 m pour les enceintes avant
gauche et droite (1)
• Enceintes arrière SS-SR151 (2)
• Cordons de liaison de 10 m pour les enceintes arrière
(2)
• Cordon de liaison audio de 1,5 m (1)
• Télécommande infrarouge RM-J10 (1)
• Piles Sony SUM-3 (NS) (2)
• Tampons anti-vibrations (8)
Mise en place des piles dans la
télécommande
Mettez deux piles AA (R6) en place en faisant
correspondre les indications + et – sur les piles avec
celles à l’intérieur du logement des piles. Quand vous
utilisez la télécommande, dirigez-la vers le détecteur g
sur l’enceinte avant gauche.
Quand faut-il remplacer les piles
Normalement, les piles durent environ 6 mois. Quand la
télécommande ne parvient plus à contrôler les
enceintes, remplacez toutes les piles par des neuves.
Remarques
• Ne pas laisser la télécommande dans un endroit
extrêmement chaud ou humide.
• Ne pas utiliser ensemble une pile usée et une pile neuve.
• Ne pas exposer le détecteur à la lumière directe du soleil
ou à un éclairage puissant. La télécommande risquerait de
ne pas fonctionner comme il faut.
• Si vous prévoyez de ne pas utiliser la télécommande
pendant longtemps, enlevez les piles pour éviter toute
corrosion due à une fuite de l’électrolyte.
]
]
}}
Other manuals for SA-VA10
3
Table of contents
Languages:
Other Sony Home Cinema Speakers manuals

Sony
Sony SA-VA100 User manual

Sony
Sony SA-VA1 User manual

Sony
Sony SA-VS500H User manual

Sony
Sony HT-ST7 User manual

Sony
Sony SA-VA500 User manual

Sony
Sony SA-VA500 User manual

Sony
Sony SAVA-27 User manual

Sony
Sony SA-VA10 User manual

Sony
Sony SAVA-D900 User manual

Sony
Sony FT1H - SA 5.1-CH Home Theater Speaker Sys User manual