manuals.online logo
Brands
  1. Home
  2. •
  3. Brands
  4. •
  5. Sony
  6. •
  7. Home Theater System
  8. •
  9. Sony BDV-E800W User manual

Sony BDV-E800W User manual

Other manuals for BDV-E800W

4

Other Sony Home Theater System manuals

Sony BDV-EF220 User manual

Sony

Sony BDV-EF220 User manual

Sony DAV-IS10 User manual

Sony

Sony DAV-IS10 User manual

Sony DAV-TZ630 User manual

Sony

Sony DAV-TZ630 User manual

Sony SA-VE322 User manual

Sony

Sony SA-VE322 User manual

Sony BDVT11 - Blu-ray Disc/DVD Home Theater... User manual

Sony

Sony BDVT11 - Blu-ray Disc/DVD Home Theater... User manual

Sony HT-DDW760 User manual

Sony

Sony HT-DDW760 User manual

Sony DAV-BC150 - Dvd Home Theater System User manual

Sony

Sony DAV-BC150 - Dvd Home Theater System User manual

Sony BDV-HZ970W  (UWA-BR100) User manual

Sony

Sony BDV-HZ970W (UWA-BR100) User manual

Sony DAV-SA30 User manual

Sony

Sony DAV-SA30 User manual

Sony SA-VE335 User manual

Sony

Sony SA-VE335 User manual

Sony BDV-N9200W User manual

Sony

Sony BDV-N9200W User manual

Sony HT-5500D Instruction manual

Sony

Sony HT-5500D Instruction manual

Sony HTP-1200 User manual

Sony

Sony HTP-1200 User manual

Sony HT-DDW700 User manual

Sony

Sony HT-DDW700 User manual

Sony RHT-G2000 - Home Theater Built-in Sound Rack... User manual

Sony

Sony RHT-G2000 - Home Theater Built-in Sound Rack... User manual

Sony DAV-DX375 - Integrated Home Theater System Quick start guide

Sony

Sony DAV-DX375 - Integrated Home Theater System Quick start guide

Sony DAV-DZ280 User manual

Sony

Sony DAV-DZ280 User manual

Sony HT-RT5 User manual

Sony

Sony HT-RT5 User manual

Sony HT-1700D Instruction manual

Sony

Sony HT-1700D Instruction manual

Sony HT-CT260H User manual

Sony

Sony HT-CT260H User manual

Sony DAV-TZ210 User manual

Sony

Sony DAV-TZ210 User manual

Sony HT-DDW685 User manual

Sony

Sony HT-DDW685 User manual

Sony HT-1750DP User manual

Sony

Sony HT-1750DP User manual

Sony HT-CT60BT User manual

Sony

Sony HT-CT60BT User manual

Popular Home Theater System manuals by other brands

Samsung HT-DL200 instruction manual

Samsung

Samsung HT-DL200 instruction manual

Samsung HT-ES6600 user manual

Samsung

Samsung HT-ES6600 user manual

Curtis DVD6010 instruction manual

Curtis

Curtis DVD6010 instruction manual

Philips MCD716/12 user manual

Philips

Philips MCD716/12 user manual

Sherwood ST-4108 operating instructions

Sherwood

Sherwood ST-4108 operating instructions

Philips HTS5520/12 quick start

Philips

Philips HTS5520/12 quick start

LG HT503PHW owner's manual

LG

LG HT503PHW owner's manual

Samsung HT-ES4200K user manual

Samsung

Samsung HT-ES4200K user manual

Samsung HT-P10 instruction manual

Samsung

Samsung HT-P10 instruction manual

Philips HTS5131 User manaul

Philips

Philips HTS5131 User manaul

Goodmans GDVD19SWS user manual

Goodmans

Goodmans GDVD19SWS user manual

Moxi media center user guide

Moxi

Moxi media center user guide

Samsung HT-EM35 user manual

Samsung

Samsung HT-EM35 user manual

Manta GK-500 user manual

Manta

Manta GK-500 user manual

Sharp SBW800 user manual

Sharp

Sharp SBW800 user manual

Philips HTS3541 user manual

Philips

Philips HTS3541 user manual

LG LHT799 specification

LG

LG LHT799 specification

Samsung HT-TWZ415 user manual

Samsung

Samsung HT-TWZ415 user manual

manuals.online logo
manuals.online logoBrands
  • About & Mission
  • Contact us
  • Privacy Policy
  • Terms and Conditions

Copyright 2025 Manuals.Online. All Rights Reserved.

SUBWOOFER
FRONT R
CENTER
Main unit/
Unidad principal
Surround amplifier/
Amplificador de sonido envolvente
FRONT L
SUR L
SUR R
4-147-265-11(1)
©2009 Sony Corporation Printed in Malaysia
(1)
Quick Setup Guide/Guía de ajuste rápido
BDV-E800W
1
Connect the speakers/Conexión de los altavoces
Connect the speaker cords to match the color of the SPEAKER jacks of the unit.
Conecte los cables de altavoz de modo que coincidan con el color de las tomas SPEAKER de la unidad.
Rear panel of the main unit/
Panel posterior de la unidad principal
SPEAKER
FRONT R
FRONT L
CENTER SUBWOOFER
DC5V
700mA MAX
SPEAKER
LAN(100)
Red
Rojo
White
Blanco
Green
Verde
Purple
Púrpura
Rear panel of the surround amplifier/
Panel posterior del amplificador de
sonido envolvente
R
SURROUND SELECTOR
S-AIR ID
SPEAKER
SURROUND
PAIRING
C
B
A
SURROUND
BACK
L
Blue
Azul
Gray
Gris
To connect speaker cords to the speaker/Para conectar los cables de altavoz al altavoz
Rear of the speaker/Parte posterior del altavoz
2
Connect your TV/Conexión del televisor
Depending on the jacks on your TV, select the video and audio connection method.
En función de las tomas del televisor, seleccione el método de conexión de audio y vídeo.
Video connection method/Método de conexión de vídeo
Method 1/Método 1 Method 2/Método 2 Method 3/Método 3
AUDIO
DIGITALIN
DMPORT
HDMI OUT
COMPONENT VIDEO OUT
VIDEO OUT
S-AIR ID
AUDIO IN AUDIO IN
A. CAL MIC
ECM-AC2
SPEAKER
Y
P
B
/ C
B
P
R
/ C
R
COAXIAL
OPTICAL
R
L
R
L
FRONT R
FRONT L
EXT
DC5V
700mA MAX
EZW-RT10
TV
TV
DIGITALIN
SAT/CABLE
ABC
DC5V
500mA MAX
LAN(100)
ANTENNA
FM
COAXIAL 75
P
B
/C
B
P
R
/C
R
Y
COMPONENT VIDEO IN
HDMI IN
AUDIO OUT L
R
TV/VIDEO
DIGITALOUT
COAXIAL
OPTICAL
TV
VIDEO IN
VIDEO IN
Video cord
Cable de vídeo
HDMI cable**
Cable HDMI**
AUDIO
DIGITALIN
DMPORT
HDMI OUT
COMPONENT VIDEO OUT
VIDEO OUT
S-AIR ID
AUDIO IN AUDIO IN
A. CAL MIC
ECM-AC2
SPEAKER
Y
P
B
/ C
B
P
R
/ C
R
COAXIAL
OPTICAL
R
L
R
L
FRONT R
FRONT L
EXT
DC5V
700mA MAX
EZW-RT10
TV
TV
DIGITALIN
SAT/CABLE
ABC
DC5V
500mA MAX
LAN(100)
ANTENNA
FM
COAXIAL 75
P
B
/C
B
P
R
/C
R
Y
COMPONENT VIDEO IN
AUDIO OUT L
R
TV/VIDEO
DIGITALOUT
COAXIAL
OPTICAL
TV
VIDEO IN
HDMI IN
VIDEO IN
HDMI IN
Video cord
Cable de vídeo
AUDIO
DIGITALIN
DMPORT
HDMI OUT
COMPONENT VIDEO OUT
VIDEO OUT
S-AIR ID
AUDIO IN AUDIO IN
A. CAL MIC
ECM-AC2
SPEAKER
Y
P
B
/ C
B
P
R
/ C
R
COAXIAL
OPTICAL
R
L
R
L
FRONT R
FRONT L
EXT
DC5V
700mA MAX
EZW-RT10
TV
TV
DIGITALIN
SAT/CABLE
ABC
DC5V
500mA MAX
LAN(100)
ANTENNA
FM
COAXIAL 75
HDMI IN
AUDIO OUT L
R
TV/VIDEO
DIGITALOUT
COAXIAL
OPTICAL
TV
VIDEO IN
P
B
/C
B
P
R
/C
R
Y
COMPONENT VIDEO IN
VIDEO IN
PB/CBPR/CRY
COMPONENT VIDEO IN
Video cord
Cable de vídeo
Component video cable*
Cable de vídeo componente*
*Not supplied/No suministrado
**Supplied with Singapore, Indonesian, Malaysian, Hong Kong, Filipino, and Taiwan models only.
**Suministrado únicamente con los modelos de Singapur, Indonesia, Malasia, Hong Kong, Filipinas y Taiwán.
Audio connection method/Método de conexión de audio
Method 1/Método 1 Method 2/Método 2
AUDIO
DIGITALIN
DMPORT
HDMI OUT
COMPONENT VIDEO OUT
VIDEO OUT
S-AIR ID
AUDIO IN AUDIO IN
A. CAL MIC
ECM-AC2
SPEAKER
Y
P
B
/ C
B
P
R
/ C
R
COAXIAL
OPTICAL
R
L
R
L
FRONT R
FRONT L
EXT
DC5V
700mA MAX
EZW-RT10
TV
TV
DIGITALIN
SAT/CABLE
ABC
DC5V
500mA MAX
LAN(100)
ANTENNA
FM
COAXIAL 75
COAXIAL
DIGITALOUT
AUDIO OUT L
R
TV/VIDEO
HDMI IN
P
B
/C
B
P
R
/C
R
Y
COMPONENT VIDEO IN
VIDEO IN
OPTICAL
DIGITALOUT
OPTICAL
DIGITAL OUT
Digital optical cord*
Cable digital óptico*
AUDIO
DIGITALIN
DMPORT
HDMI OUT
COMPONENT VIDEO OUT
VIDEO OUT
S-AIR ID
AUDIO IN AUDIO IN
A. CAL MIC
ECM-AC2
SPEAKER
Y
P
B
/ C
B
P
R
/ C
R
COAXIAL
OPTICAL
R
L
R
L
FRONT R
FRONT L
EXT
DC5V
700mA MAX
EZW-RT10
TV
TV
DIGITALIN
SAT/CABLE
ABC
DC5V
500mA MAX
LAN(100)
ANTENNA
FM
COAXIAL 75
OPTICAL
DIGITALOUT
COAXIAL
DIGITALOUT
HDMI IN
P
B
/C
B
P
R
/C
R
Y
COMPONENT VIDEO IN
VIDEO IN
L
R
AUDIO OUTPUT
LR
AUDIO OUTPUT
Audio cord*
Cable de audio*
*Not supplied/No suministrado
For details, refer to the Operating Instructions.
Si desea obtener más información, consulte el manual de
instrucciones.
3
Enable wireless transmission/
Activación de la transmisión inalámbrica
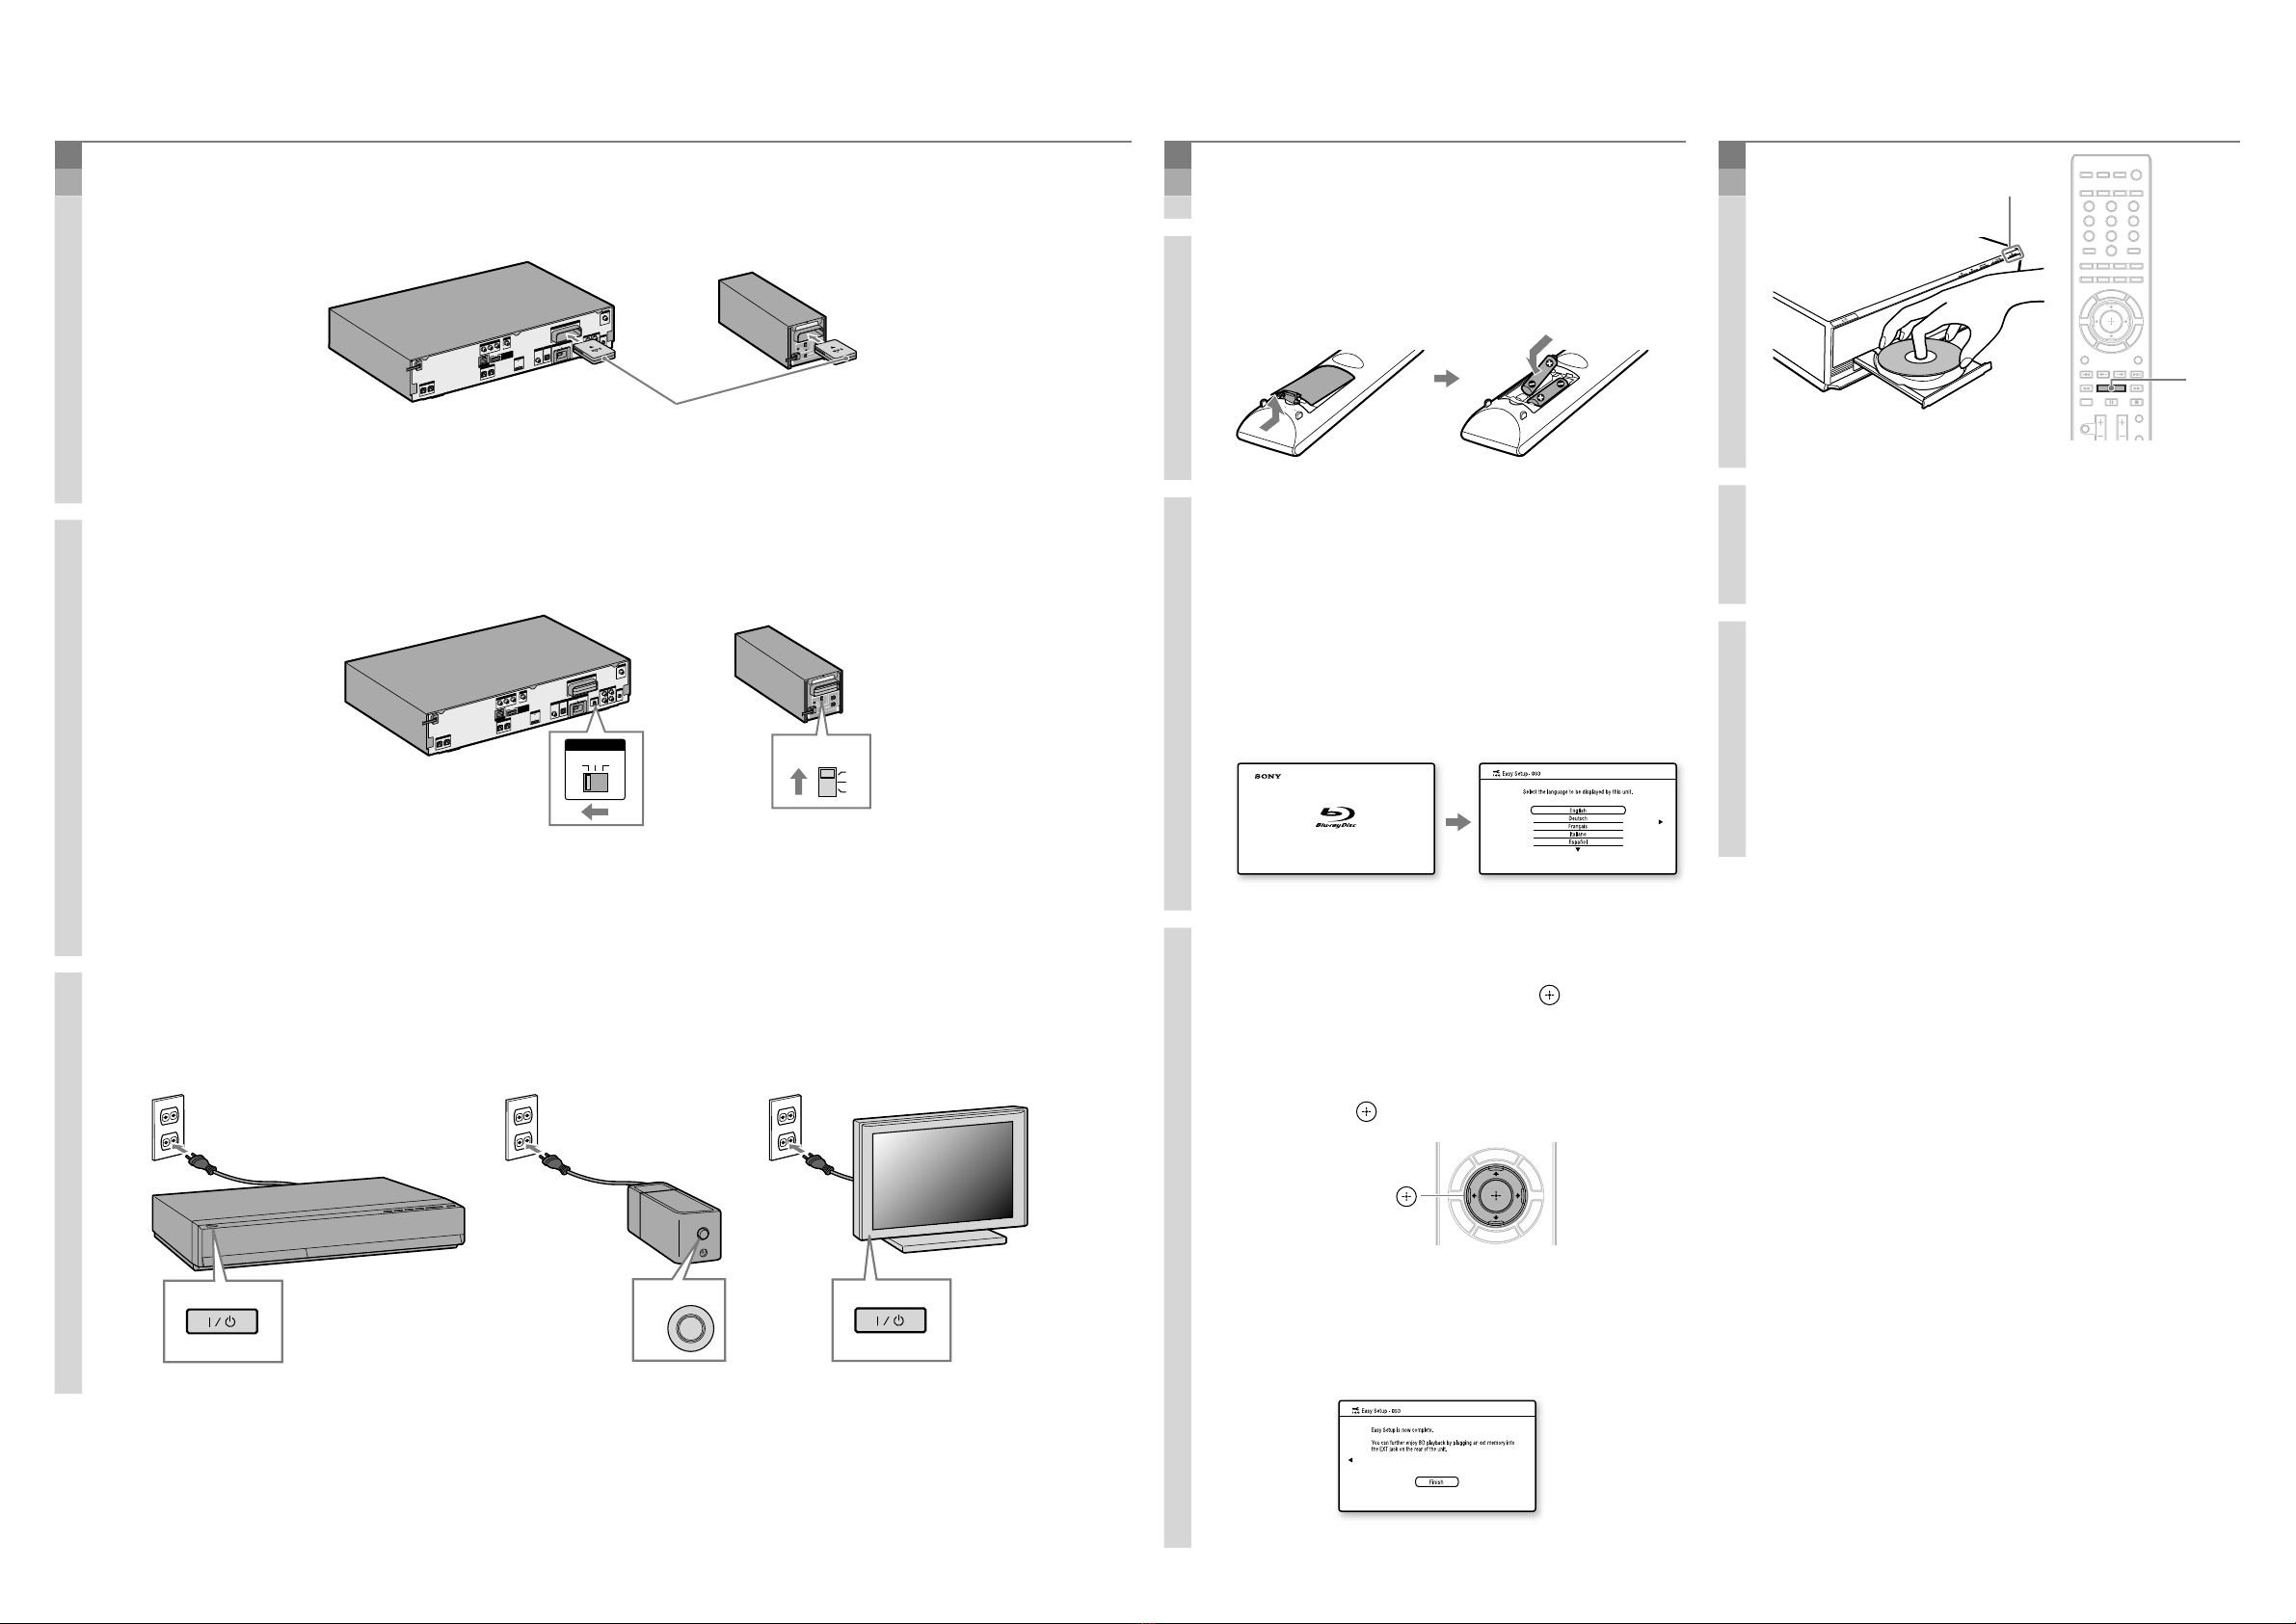
1. Insert the wireless transceivers into both the main unit and surround amplifier.
Inserte los transceptores inalámbricos en la unidad principal y en el amplificador de
sonido envolvente.
ANTENNA
AUDIO
DIGITALIN
DMPORT
HDMIOUT
COMPONENTVIDEO OUT
VIDEOOUT
S-AIRID
AUDIOIN AUDIOIN
A.CAL MIC
ECM-AC2
SPEAKER
Y
P
B
/C
B
P
R
/C
R
FM
COAXIAL75
COAXIAL
OPTICAL
R
L
R
L
FRONTR
FRONTL
CENTER SUBWOOFER
EXT
DC5V
700mA MAX
EZW-RT10
TV
TV
DIGITALIN
SAT/CABLE
ABC
DC5V
500mA MAX
SPEAKER
LAN(100)
R
SURROUNDSELECTOR
S-AIR ID
SPEAKER
SURROUND
PAIRING
C
B
A
SURROUND
BACK
L
EZW-RT
10
Insert securely until they click.
Insértelos firmemente hasta que encajen con un clic.
2. Set the S-AIR ID switches to“A.”
Ajuste los interruptores S-AIR ID en “A”.
R
SURROUNDSELECTOR
S-AIR ID
SPEAKER
SURROUND
PAIRING
C
B
A
SURROUND
BACK
L
EZW-RT
10
ANTENNA
AUDIO
DIGITALIN
DMPORT
HDMIOUT
COMPONENTVIDEO OUT
VIDEOOUT
S-AIRID
AUDIOIN AUDIOIN
A.CAL MIC
ECM-AC2
SPEAKER
Y
P
B
/C
B
P
R
/C
R
FM
COAXIAL75
COAXIAL
OPTICAL
R
L
R
L
FRONTR
FRONTL
CENTER SUBWOOFER
EXT
DC5V
700mA MAX
EZW-RT10
TV
TV
DIGITALIN
SAT/CABLE
ABC
DC5V
500mA MAX
SPEAKER
LAN(100)
S-AIR ID
A B C
S-AIR ID
C
B
A
The S-AIR IDs on the main unit and surround amplifier are set to “A” at the factory.
Los S-AIR ID de la unidad principal y del amplificador de sonido envolvente están ajustados en“A” de manera
predeterminada de fábrica.
3. Connect the AC power cords (), and turn on the power ().
Conecte los cables de alimentación de ca () y, a continuación, encienda la
alimentación ().


POWER

 

4
Perform “Easy Setup”/
Realización de la“Configuración fácil”
Do not insert a disc before performing the “Easy Setup”.
No inserte ningún disco antes de llevar a cabo la “Configuración fácil”.
1. Insert batteries into the remote.
Inserte las pilas en el mando a distancia.
2. Switch the input selector on your TV
so that system screens like the ones
below appear on the TV screen.
Cambie el selector de entrada del
televisor de manera que aparezcan
pantallas similares a las que aparecen
en la pantalla del televisor.
“Easy Setup” screen/
Pantalla“Configuración fácil”
Starting up/
Inicio
3. Perform basic settings by following
the on-screen instructions in “Easy
Setup” using ///and .
Siga las instrucciones en pantalla para
realizar los ajustes básicos en
“Configuración fácil” mediante
///y .
///,
[Easy Setup is now complete.] appears when “Easy
Setup” is complete.
Aparece el mensaje [El Ajuste fácil se ha
completado.] cuando finaliza la“Configuración fácil”.
5
Play a disc/
Reproducción de discos
321
654
987
0


1. Press , and place a disc on the tray.
Pulse y coloque un disco en la
bandeja.
2. Press to close the disc tray.
Playback starts. When playback does not start,
press .
Pulse para cerrar la bandeja de
discos.
Comienza la reproducción. Si la reproducción no
comienza, pulse .
Enjoying more BD functions
Refer to“Enjoying BonusView/BD-Live” in the
Operating Instructions.
Más funciones de BD
Consulte“Utilización de BonusView/BD-Live” en el
manual de instrucciones.