manuals.online logo
Brands
  1. Home
  2. •
  3. Brands
  4. •
  5. Sony
  6. •
  7. Home Theater System
  8. •
  9. Sony HT-RT5 User guide

Sony HT-RT5 User guide

4-570-119-11(1)
HT-RT5
© 2015 Sony Corporation Printed in Malaysia
•There are the labels on the rear of the each speaker. Make sure to identify“SUR L” (left) and “SUR R” (right) and
place the speakers in the correct places.
•Des étiquettes sont apposées à l’arrière de chaque enceinte. Assurez-vous d’identifier les étiquettes «SURL»
(gauche) et «SUR R» (droite) et de placer les enceintes aux endroits appropriés.
Home Theatre System
Startup Guide
Manuel de démarrage
US
FR
ES
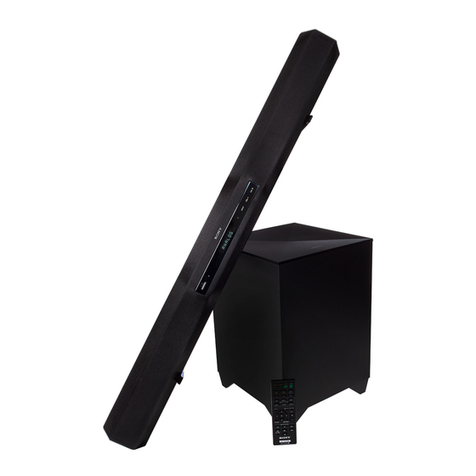
Bar Speaker
Barre de haut-parleurs
Subwoofer
Caisson infragrave
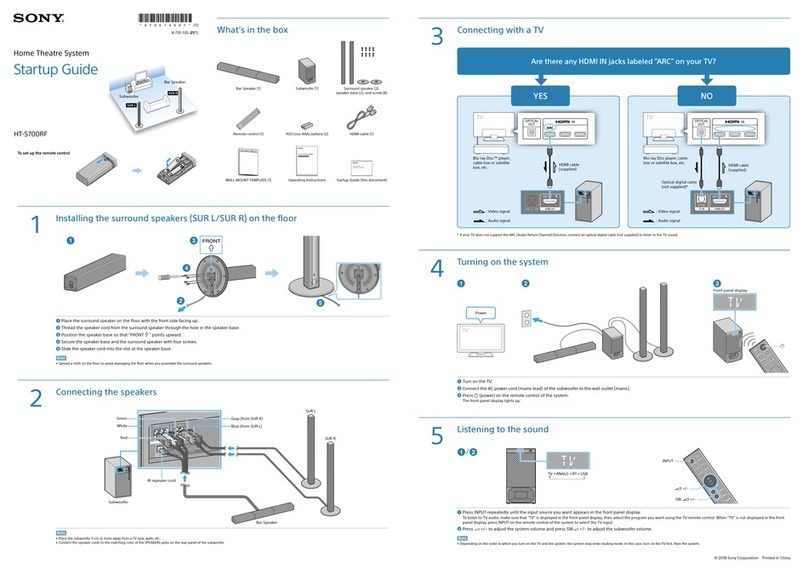
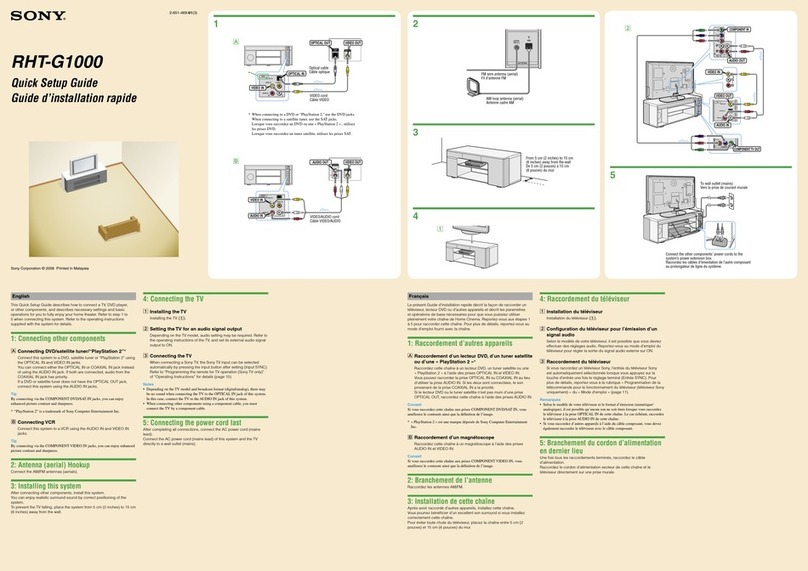
1Connecting with a TV
Raccordement à un téléviseur
Optical digital cable (not supplied)
Câble numérique optique (non fourni)
High Speed HDMI
cable (supplied)*
Câble HDMI haute
vitesse (fourni)*
Is the HDMI input jack on your TV labeled “ARC” ?
La prise d’entrée HDMI de votre téléviseur porte-t-elle une étiquette «ARC»?
High Speed HDMI cable (supplied)*
Câble HDMI haute vitesse (fourni)*
YES/OUI NO/NON
2Connecting with other devices
Raccordement à d’autres appareils
High Speed HDMI cable (supplied)*
Câble HDMI haute vitesse (fourni)*
Blu-ray Disc™ player, cable
box or satellite box, etc.
Lecteur Blu-ray Disc™,
décodeur de
câblodistribution ou
récepteur satellite, etc.
* One High Speed HDMI cable is supplied with this system.
* Un câble HDMI haute vitesse est fourni avec ce système.
Tip
•If another device is connected to the TV, disconnect its High Speed HDMI cable (supplied)* from the TV's HDMI IN jack and reconnect it to the HDMI IN jack of the Bar Speaker.
•To enjoy copy right-protected 4K content, connect the HDCP 2.2-compatible HDMI jack. For details, refer to “Viewing Copyright-protected 4K Content” in the supplied operating instructions.
Conseil
•Si un autre appareil est raccordé au téléviseur,déconnectez le câble HDMI haute vitesse (fourni)* de la prise HDMIIN du téléviseur, puis reconnectez-le à la prise HDMIIN de la barre de haut-parleurs.
•Pour apprécier un contenu 4K protégé par droit d’auteur, effectuez le raccordement à la prise HDMI compatible HDCP2.2. Pour plus de détails, consultez la section «Visionnement d’un contenu 4K protégé par droit d’auteur» du manuel
d’instructions fourni.
3Turning on the TV
Mise en marche du téléviseur
Allumé
Power
4Turning on the system
Mise en marche du système

Connect the AC power cords (mains leads) of the Bar Speaker, the subwoofer
and the surround speakers (SUR L/SUR R).

Press /(on/standby) of the remote control.
The front panel display lights up.

Confirm that the on/standby indicator of the subwoofer and surround speakers
(SUR L/SUR R) are lit in green.
When the on/standby indicator of the subwoofer and surround speakers (SUR L/SUR R)
turns green, wireless connection of Bar Speaker, subwoofer and surround speakers (SUR
L/SUR R) is completed. If the wireless connection is not completed, the on/standby
indicator lights up in red. In this case, the wireless transmission is not activated. Refer to
“Wireless sound (Subwoofer/Surround speakers)” of “Troubleshooting” in the supplied
operating instructions.

Branchez les cordons d’alimentationCA de la barre de haut-parleurs, du caisson
infragrave et des enceintes ambiophoniques (SURL/SURR).

Appuyez sur la touche /(marche/veille) de la télécommande.
L’affichage du panneau avant s’allume.

Vérifiez que le témoin de marche/veille du caisson infragrave et des enceintes
ambiophoniques (SURL/SURR) s’allume en vert.
Lorsque le témoin de marche/veille du caisson infragrave et des enceintes
ambiophoniques (SURL/SURR) s’allume en vert, la connexion sans fil de la barre de
haut-parleurs, du caisson infragrave et des enceintes ambiophoniques (SURL/SURR) est
terminée. Si la connexion sans fil n’est pas terminée, le témoin de marche/veille s’allume
en rouge. En pareil cas, la transmission sans fil n’est pas activée. Consultez «Son sans fil
(Caisson infragrave/Enceintes ambiophoniques)» dans la section «Dépannage» du
manuel d’instructions fourni.
5Performing the Easy Setup
Exécution de Régl. facile
, , , ,
HOME

Connect the calibration mic to the A.CAL MIC (ECM-AC3) jack on the rear of the
Bar Speaker.
Follow the illustration and place the calibration mic where you would normally sit.

Press HOME on the remote control of this system.
The [Easy Setup] screen appears.
If the [Easy Setup] screen does not appear
Using the remote control of the TV, switch the input setting of the TV to that for the HDMI
input jack the system is connected to.

Press ///to select an item, and then press to perform Easy Setup.

Once [Easy Initial Settings are complete.] appears, select [Finish].
The home menu appears.

Connectez le micro d’étalonnage à la prise A.CAL MIC (ECM-AC3) à l’arrière de la
barre de haut-parleurs.
Reportez-vous à l’illustration et placez le micro d’étalonnage à l’endroit où vous seriez
normalement assis.

Appuyez sur la touche HOME de la télécommande de ce système.
L’écran [Régl. facile] s’affiche.
Si l’écran [Régl. facile] ne s’affiche pas
En utilisant la télécommande du téléviseur, commutez le réglage d’entrée du téléviseur à
la prise d’entrée HDMI servant à raccorder le système.

Appuyez sur ///pour sélectionner un élément, puis appuyez sur pour
exécuter Régl. facile.

Lorsque [Le Réglage initial facile est alors terminé.] s’affiche, sélectionnez
[Terminer].
Le menu d’accueil s’affiche.
Tip
•On-screen instructions are displayed in the language you selected in this step.
•You can also select [Easy Setup] from [Setup] on the home menu.
Conseil
•Les instructions à l’écran sont affichées dans la langue que vous avez sélectionnée à cette étape.
•Vous pouvez également sélectionner [Régl. facile] à partir de [Config.] dans le menu d’accueil.
6Listening to the sound
Écoute du son
INPUT
+/–
Press INPUT repeatedly until the device you want appears in the front panel
display. Then, press +/– repeatedly to adjust the volume.
Listening to the audio of the TV

Select the desired program using the remote control of the TV.
The screen switches to the television broadcast screen and the TV audio is output from
the system.
Adjust the volume pressing +/− on the remote control of the system.
Appuyez plusieurs fois sur INPUT jusqu’à ce que l’appareil souhaité apparaisse
dans l’affichage du panneau avant. Ensuite, appuyez plusieurs fois sur +/– pour
régler le volume.
Écoute de l’audio du téléviseur

Sélectionnez le programme souhaité en utilisant la télécommande du téléviseur.
L’écran passe à l’écran d’émission de télévision et l’audio du téléviseur est reproduit par le
système.
Réglez le volume en appuyant sur la touche +/− de la télécommande du système.
Setup completed! Enjoy! Please see the supplied Operating Instructions regarding details about
the network connection, NFC function, other functions. Operating Instructions
Manuel d’instructions
Configuration terminée!
Appréciez!
Veuillez consulter le manuel d’instructions fourni pour en savoir plus sur
la connexion réseau, la fonction NFC et les autres fonctions.
SongPal
A dedicated App for this model is available on both Google Play™ and
App Store.
Search for “SongPal” and download the free App to find out more about the convenient features.
Une application dédiée pour ce modèle est disponible dans Google
Play™ et l’App Store.
Recherchez «SongPal» et téléchargez l’application gratuite pour en savoir plus sur les fonctions
pratiques.
Supplied accessories
Accessoires fournis
Remote control (1)
Télécommande (1)
R03 (size AAA) batteries (2)
Piles R03 (taille AAA) (2)
High Speed HDMI cable (1)
Câble HDMI haute vitesse (1)
Calibration mic (1)
Micro d’étalonnage (1)
IR blaster (1)
IR Blaster (1)
Wall mounting brackets (2)
and screws (2)
Supports de fixation murale (2)
et vis (2)
Setting up the remote control
Configuration de la télécommande
To mount the Bar Speaker and the surround speakers (SUR L/SUR R) on
a wall
Refer to the supplied operating instructions.
Pour fixer la barre de haut-parleurs et les enceintes ambiophoniques
(SUR L/SUR R) sur un mur
Consultez le manuel d’instructions fourni.
Home Theatre System
Guía de inicio
•Hay etiquetas en la parte posterior de cada parlante. Asegúrese de identificar “SUR L” (izquierda) y “SUR R”
(derecha) y coloque los parlantes en los lugares correctos.
US
FR
ES
1Conectar con un televisor
Cable óptico digital
(no incluido)
Cable HDMI de alta
velocidad
(incluido)*
¿Tiene la toma de entrada HDMI en su televisor la etiqueta “ARC”?
Cable HDMI de alta
velocidad (incluido)*
SÍ NO
2Conectar con otros dispositivos
Cable HDMI de alta velocidad
(incluido)*
Reproductor Blu-ray Disc™,
caja de cable o caja de
satélite, etc.
* Este sistema incluye un cable HDMI de alta velocidad.
Sugerencia
•Si hay otro dispositivo conectado con el televisor, desconecte el cable HDMI de alta velocidad (incluido)* de la toma HDMI IN de la barra parlante y vuelva a conectarlo a la toma HDMI IN de la barra parlante.
•Para disfrutar de contenido 4K protegido con derechos de copyright, conecte la toma HDMI compatible con HDCP 2.2. Para obtener más detalles, consulte“Visualización de contenido 4K protegido por derechos de autor” en el Manual de
instrucciones suministrado.
3Encendido del televisor
Alimentación
4Encendido del sistema

Conecte los cables de alimentación de ca de la barra parlante, el subwoofer y los altavoces envolventes (SUR L/SUR R).

Presione /(encendido/en espera) en el control remoto.
El visor del panel frontal se ilumina.

Confirme que el indicador de encendido/en espera del subwoofer y de los altavoces envolventes (SUR L/SUR R) estén iluminados de color verde.
Cuando el indicador de encendido/en espera del subwoofer y los altavoces envolventes (SUR L/SUR R) se ilumine de verde, la conexión inalámbrica de la barra parlante, del subwoofer y de
los altavoces envolventes (SUR L/SUR R) se completa. Si la conexión inalámbrica no se completa, el indicador de encendido/en espera se ilumina de rojo. En este caso, no se activa la
transmisión inalámbrica. Consulte “Sonido inalámbrico (altavoces de subwoofer/envolventes)” en “Localización y corrección de fallas” en el Manual de instrucciones suministrado.
5Realizar la configuración fácil
, , , ,
HOME

Conecte el micrófono de calibración a la toma A.CAL MIC (ECM-AC3) en
la parte posterior de la barra parlante.
Siga la ilustración y coloque el micrófono de calibración en donde acostumbra a
sentarse.

Presione HOME en el control remoto de este sistema.
Aparece la pantalla [Configuración fácil].
Si no aparece la pantalla [Configuración fácil]
Utilizando el control remoto del televisor, cambie el ajuste de entrada del televisor a la toma de
entrada HDMI a la que está conectada el sistema.

Presione ///para seleccionar un elemento y luego presione para realizar la
Configuración fácil.

Una vez que aparece [La configuración de inicio fácil se ha completado.], seleccione
[Finalizar].
Aparece el menú de inicio.
Sugerencia
•Las instrucciones en pantalla se muestran en el idioma que seleccionó en este paso.
•También puede seleccionar [Configuración fácil] en [Configurar] en el menú de inicio.
6Escuchar el sonido
INPUT
+/–
Presione INPUT repetidamente hasta que el dispositivo que desea aparezca en el visor del panel frontal. Luego presione +/– repetidamente para ajustar el volumen.
Escuchar el audio del televisor

Seleccione el programa deseado con el control remoto del televisor.
La pantalla cambia a la pantalla de la transmisión de televisión y el audio del televisor se emite desde el sistema.
Ajuste el volumen con los botones +/− en el control remoto del sistema.
¡Configuración
completada! ¡Disfrútelo!
Consulte el Manual de instrucciones suministrado para obtener más
detalles sobre la conexión a la red, la función NFC y otras funciones. Manual de instrucciones
SongPal
Una aplicación dedicada para este modelo está disponible tanto en Google Play™ como en App Store.
Busque “SongPal” y descargue la aplicación en forma gratuita para saber más sobre las características convenientes.
Accesorios suministrados
Control remoto (1) Pilas R03 (tamaño AAA) (2) Cable HDMI de alta velocidad (1)
Micrófono de calibración (1) Extensor IR (1) Soportes de montaje de pared (2)
y tornillos (2)
Configuración del control remoto
Para montar la barra parlante y los altavoces envolventes (SUR L/SUR R) en
la pared
Consulte el Manual de instrucciones suministrado.
© 2015 Sony Corporation Printed in Malaysia
Barra parlante
Subwoofer
HT-RT5

Other manuals for HT-RT5

4

Other Sony Home Theater System manuals

Sony HT-5800DP Instruction manual

Sony

Sony HT-5800DP Instruction manual

Sony HT-DDW795 User manual

Sony

Sony HT-DDW795 User manual

Sony BDV-N790W User manual

Sony

Sony BDV-N790W User manual

Sony DAV-FX500 - Dvd Dream System User manual

Sony

Sony DAV-FX500 - Dvd Dream System User manual

Sony HT-S500RF User manual

Sony

Sony HT-S500RF User manual

Sony HT-1700D Instruction manual

Sony

Sony HT-1700D Instruction manual

Sony HT-4800DP - Home Theater In A Box Instruction manual

Sony

Sony HT-4800DP - Home Theater In A Box Instruction manual

Sony DAV-DZ870KW User manual

Sony

Sony DAV-DZ870KW User manual

Sony BDV-N9200W User manual

Sony

Sony BDV-N9200W User manual

Sony HT-SF1000 Instruction manual

Sony

Sony HT-SF1000 Instruction manual

Sony DAV-DZ330 User manual

Sony

Sony DAV-DZ330 User manual

Sony HT-SS370HP User manual

Sony

Sony HT-SS370HP User manual

Sony BDV-IT1000 User manual

Sony

Sony BDV-IT1000 User manual

Sony BDV-T10 - Blu-ray Disc™ / Dvd Home Theater... Quick start guide

Sony

Sony BDV-T10 - Blu-ray Disc™ / Dvd Home Theater... Quick start guide

Sony DAV-TZ130 User manual

Sony

Sony DAV-TZ130 User manual

Sony DAV IS50 - Bravia Theater Home System User manual

Sony

Sony DAV IS50 - Bravia Theater Home System User manual

Sony HT-7000DH User manual

Sony

Sony HT-7000DH User manual

Sony BDV-E6100 User manual

Sony

Sony BDV-E6100 User manual

Sony BDV-E300 - Blu-ray Disc™ Player Home Theater... Instruction manual

Sony

Sony BDV-E300 - Blu-ray Disc™ Player Home Theater... Instruction manual

Sony BDV-NF720 User manual

Sony

Sony BDV-NF720 User manual

Sony HT-K215 User manual

Sony

Sony HT-K215 User manual

Sony DAV-TZ215 User manual

Sony

Sony DAV-TZ215 User manual

Sony HT-DDW755 Instruction manual

Sony

Sony HT-DDW755 Instruction manual

Sony DAV-FX80 - Dvd Dream System Quick start guide

Sony

Sony DAV-FX80 - Dvd Dream System Quick start guide

Popular Home Theater System manuals by other brands

Panasonic SCHT743 - HOME THEATER operating instructions

Panasonic

Panasonic SCHT743 - HOME THEATER operating instructions

Epson EH-LS10000 manual

Epson

Epson EH-LS10000 manual

Philips HTS3506/F7 user manual

Philips

Philips HTS3506/F7 user manual

Open Air Cinema CINEBOX HOME SYSTEM user guide

Open Air Cinema

Open Air Cinema CINEBOX HOME SYSTEM user guide

Panasonic SC-PT860 operating instructions

Panasonic

Panasonic SC-PT860 operating instructions

Philips HTS3500K/51 quick start guide

Philips

Philips HTS3500K/51 quick start guide

LG DH7531TW owner's manual

LG

LG DH7531TW owner's manual

Magnavox Magnavox MRD410B/F7 owner's manual

Magnavox

Magnavox Magnavox MRD410B/F7 owner's manual

Philips MCD755 Service manual

Philips

Philips MCD755 Service manual

Philips HTS3510 Service manual

Philips

Philips HTS3510 Service manual

Samsung AH68-01959S instruction manual

Samsung

Samsung AH68-01959S instruction manual

Sharp HT-SB38 Operation manual

Sharp

Sharp HT-SB38 Operation manual

Onkyo HT-S780 instruction manual

Onkyo

Onkyo HT-S780 instruction manual

Goodmans MICRO1980DVD Operating instructions manual

Goodmans

Goodmans MICRO1980DVD Operating instructions manual

Samsung HT-BD7200 user manual

Samsung

Samsung HT-BD7200 user manual

THOMSON DPL906VD_EN owner's manual

THOMSON

THOMSON DPL906VD_EN owner's manual

Philips HTS3500S/05 user manual

Philips

Philips HTS3500S/05 user manual

Philips DVD580HC Technical specifications

Philips

Philips DVD580HC Technical specifications

manuals.online logo
manuals.online logoBrands
  • About & Mission
  • Contact us
  • Privacy Policy
  • Terms and Conditions

Copyright 2025 Manuals.Online. All Rights Reserved.