Welcome
!
Congratulations
on
your
purchase
of
the
Sony
EV-S3000
Video
Cassette
Recorder.
This
video
cassette
recorder
is
the
result
our
commitment
to
bring
Sony
customers
high
quality
and
state-of-the-art
technology.
Thank
you
for
choosing
Sony.
Table
of
Contents
Warning
Precautions
Chapter
1
Introduction
How
to
Use
this
Manual
Unpacking
Overview
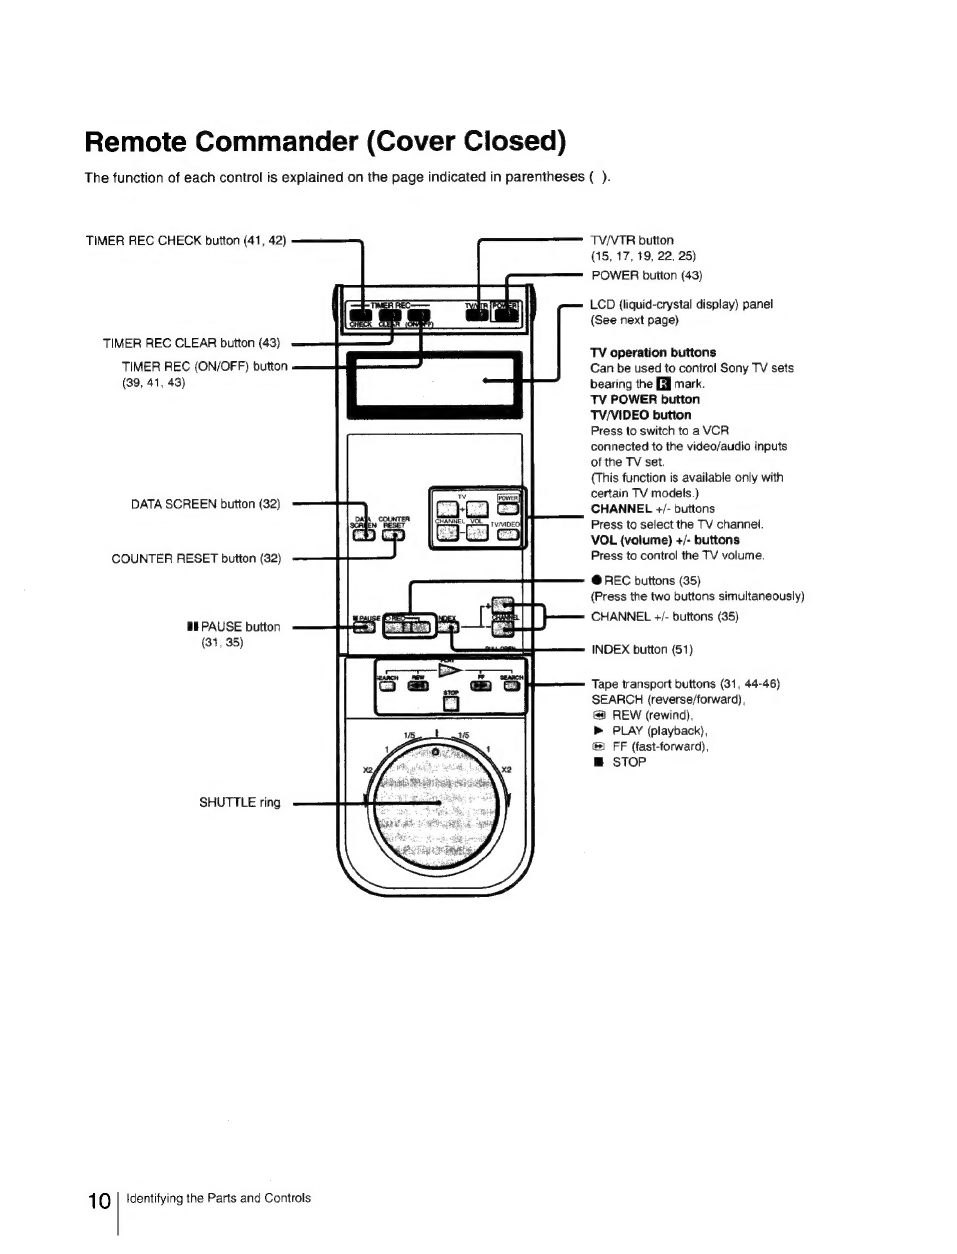
Identifying
the
Parts
and
Controls
Chapter
2.
Hookups
and
Getting
Started
..12
Hookup
1
Audio/Video
(A/V)
Hookup
Hookup
2
Antenna
Hookup
.................
Hookup
3
Simple
Cable
Hookup
.........
Hookup
4
Alternate
Cable
Hookup
..
i
Hookup
5
Advanced
Cable
Hookup
...........
eee
Chapter
3
Preparation
Preparing
the
Remote
Commander
23
Inserting
Batteries
...........0.0.
Setting
the
Command
Mode
..
Setting
the
Time
and
Date...........
Presetting
the
Active
Channels
.............::0cc0
wa
Presetting
All
Receivable
Channels
Automatically
.......
25
Presetting
Desired
Channels
or
Disabling
Unwanted
GHANMEIS
25-5
is3sis
sc
teasvutiesnionsavenainonas
elestorkessertbantaducesteigert
26
FIM
G2
TUNING
6
sense
cosenssbivancta
sarees
vase
dgecsansbongs
sapbotyesees
pinceess
26
Cable
TV
Channel
Assignment
.
2
Using
the
SET
UP
MENU
Chapter
4
Basic
Operations
Playback
Inserting
a
Video
Cassette
.
Ejecting
the
Cassette
...
ry
Cassette:
Care
iii
iisccccctestssacvengsseriesesiesteseersessee
nedenvigass
30
Playing
Back
a
cassette
0...
icccceceeeetseesteeeeetrenes
31
The
Data
Screen
..........
Indexing
Tape
Contents
....0....
Playing
Back
Externally
Recorded
Tapes...
.
Selecting
the
Monitor
Sound
0.0.0.0...
ccc
cece
33
Recording
Recording
TV
Programs..
PauSing
oo...
eee
Recording
with
the
TV
Off
Watching
One
TV
Program
While
Recording
AMOLM
ON
Sos
sescktiacelsofisievcdatasndsateaniatayesbugetorneiacthates
Recording
Multi-channel
TV
Sound
Broadcasts
..
3
Timer-Activated
Recording
.............sscsressesesecseeenseese
37
Setting
the
Timer
..........
ec
ccccceceeceeseeeetetteeseseseeteeseees
37
DailyWeekly
Recording
.....
Timer
Recording
Standby
Mode
Overlapping
Timer
Recordings
.
Checking
the
Timer
Settings
Changing
or
Cancelling
the
Timer
Settings
..................
42
Using
the
VCR
Before
Timer
Recording
Starts
............
43
Chapter5
Advanced
Operations
Variable
Speed
Playback
........
Still
Picture
oe
SHUTTLE
Ring
Operation.........
Picture
Search
(During
Playback)
m
Locked
Picture
Search
..........
45
Auto
Play
........
Frame-by-Frame
Picture
.
Slow
Motion
Playback
Assigning
a
Desired
Operation
—
AUTO
MENU.
AUTO
MENU
Setting
Index
Function
............
Marking
Index
Signals
Playing
Back
from
the
Index
Point
—
Index
Scan
Locating
an
Index
—
Index
Search
0...
Erasing
Index
Signals
Adjusting
the
Picture
Quality
—
Sharpness/
TBC/DNR
23.
sceciececeo
ecto
tcacceccectestitphentecciose
ccctecaetefoenstoredeetees
PCM
Audio
Recording
Quick
-Timer
Recording
....
Cutting
out
the
Unwanted
Scenes
—
SHUTTLE
EDIT
Chapter6
Editing
Overview
of
the
Editing
Functions
Tape
Dubbing...
Editing
from
Another
is
Editing
onto
Another
VCR......
Assemble
Editing/Insert
Editing
Synchronized
Editing
.............sscceseeseecessseeeecseeeeseeseeere
Connecting
Video
Equipment
with
the
LANC
CONC
CIGE
circ
eaante
tantizniaiag
axes
eau
bie
yeine
hae
eI
abe
68
Connecting
Video
Equipment
with
the
CONTROL
§S
connector
LANC
MODE
and
SHUTTLE
MODE
Sett
..70
Synchronized
Assemble
Editing.................
7
Synchronized
Insert
Editing
............
74
Adding
Audio
or
Narration
(Audio
Dubbing)................
77
Chapter
7
Additional
information
Technical
Information
General
Setup
Information
Setting
the
RF
UNIT
..............
Attaching
an
F-type
Connector
«0.0.0.0...
Attaching
the
External
Antenna
Connector
......
“
Attaching
the
EAC66
U/V
Band
Separator/Mixer
.........
82
Troubleshooting
On-Screen
Help
Messages...
Taking
Care
of
Your
EV-S3000
...
Specifications
......
Index
.«.
Back
cover