TABLE
OF
CONTENTS
1.
INSTALLATION
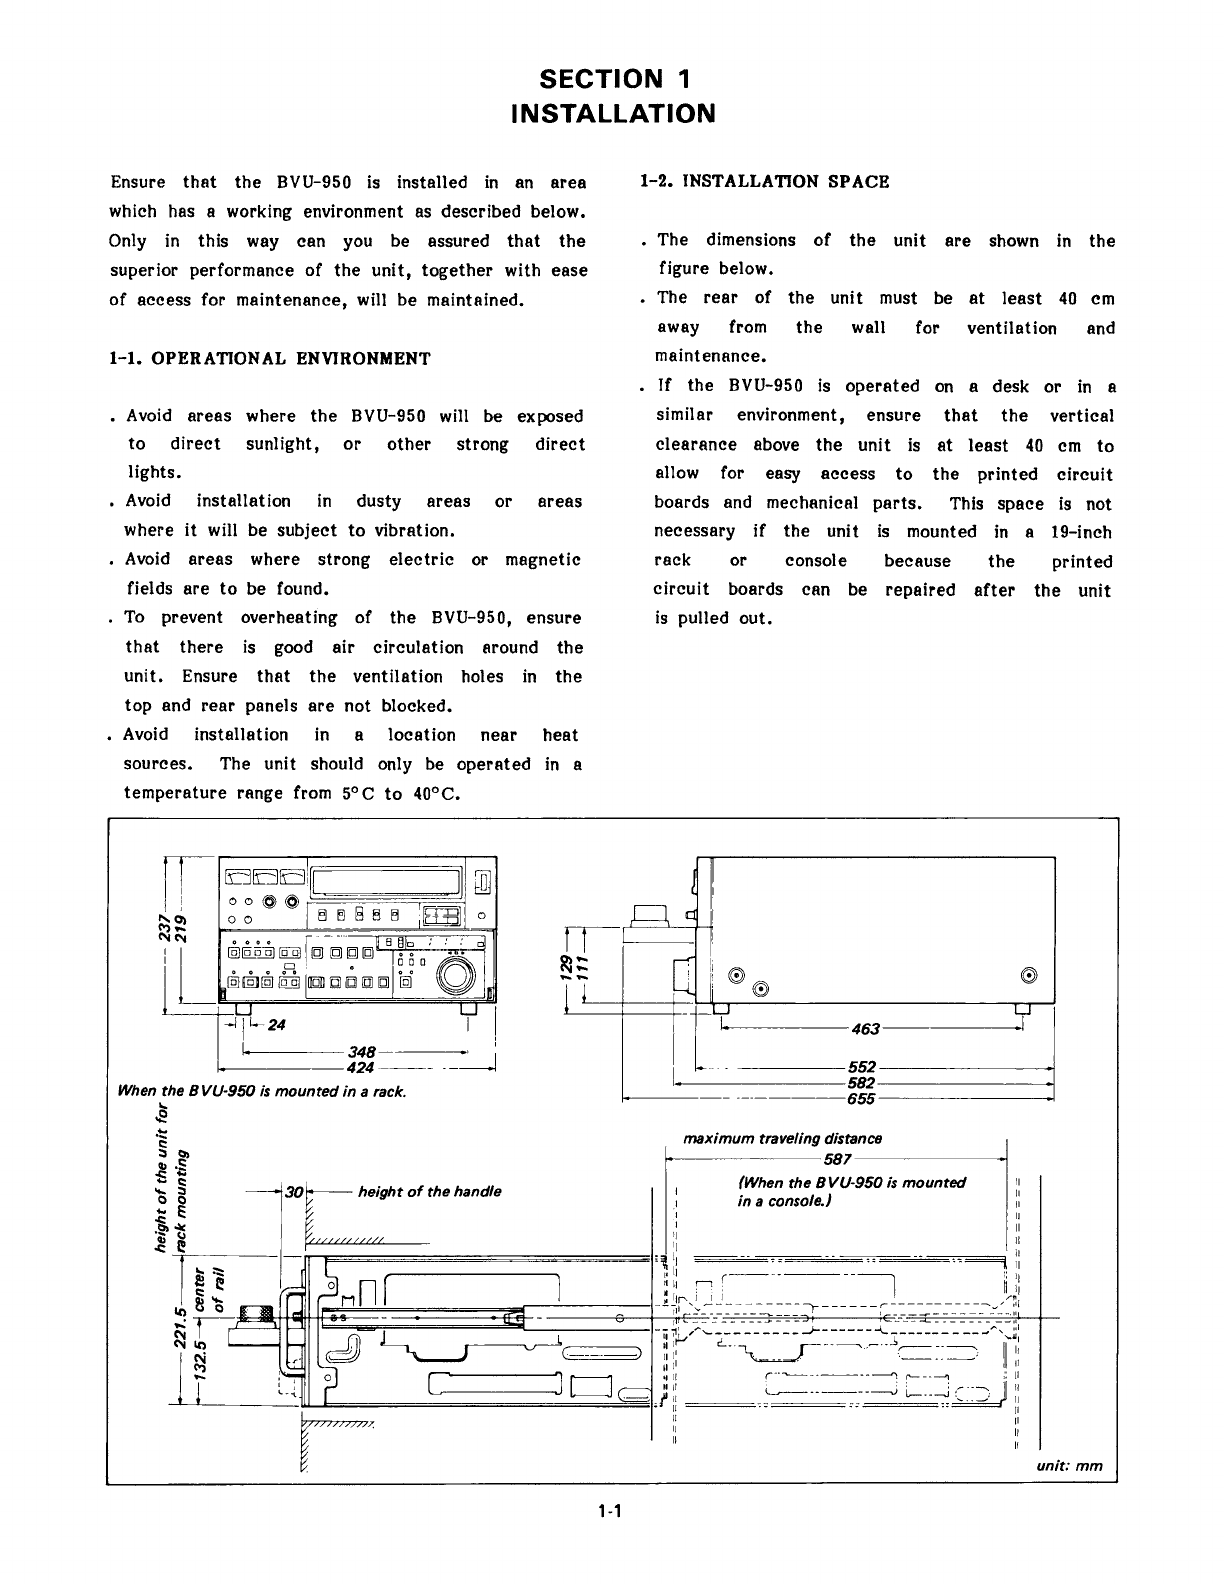
1-1.
Operational
Environment
....................
1-1
1-2.
Installation
Space
.................
ee
ee
eee.
1-1
1-3.
Input/Output
Signal
of
the
Connector
......
1-2
1-4.
Connection
Connector................0000
eee
1-4
1-5.
Select
Switch
Setting
....................0..
1-4
1-6.
Dial
Menu
Operation........................
1-6
1-6-1.
Button
and
Dial
Settings
..............
1-6
1-6-2.
Operation..............
0.
ce
eee
ee
eee
1-6
1-6-3.
ITEM/DATA............
00.0
ccc
cee
eee
1-9
1-6-4.
System
Error................
eee
eee
eee
1-19
1-7.
Recording
of
Time
Code
Character
and
Title
.......
0...
cc
ccc
cee
ee
1-21
1-7-1.
Setting
the
Time
Code
Character
and
the
Title...........0
0...
ccc
eee
1-21
1-7-2.
Insert
the
Characters
on
the
Playback
Picture
....
0...
ccc
cece
cee
eee
es
1-26
1-7-3.
Recording
the
Characters
on
the
Tape
1-26
1-8.
Rack
Mounting....................e
cece
eee
1-27
1-9.
Function
Control
Panel
Positioning
........
1-30
1-10.
Use
of
the
Function
Control
Panel
as
a
Remote
Control
Unit.....................45.
1-30
1-11.
REMOTE
2
(24P)
Connector................
1-31
1-12.
Supplied
Accessories
.................0
eee
ee
1-31
1-13.
Optional
Accessories
................0
eee
aee
1-32
2.
TECHNICAL
INFORMATION
2-1.
Specifications
...............
eee
eee
eee
eee
2-1
2-2.
Location
of
Main
Parts
....................
2-3
2-2-1.
Location
of
the
Mechanical
Main
Parts/Components................00ee0eee
2-3
2-2-2.
Location
of
the
Printed
Circuit
Boards
2-7
2-3.
Printed
Circuit
Boards......................
2-11
2-4.
Cassette
Removal
Procedure
when
Normal
Ejection
is
not
Possible
....................
2-13
2-5.
The
Tape
Speed
and
Time
in
FF
and
REW
Mode...............0c0
cece
eens
2-14
2-6.
Timing
Chart
.................
ee
eee
eee
eee
ee
2-16
3.
PERIODIC
CHECK
AND
MAINTENANCE
3-1.
System
Control
Operation
Check............
3-1
3-1-1.
Play
Back,
F.FWD,
REW,
SHUTTLE,
JOG
and
Preroll
Function
Check
......
3-1
3-1-2.
Record
Function
Check
................
3-4
3-1-3.
Editing
Function
Check
................
3-6
3-2.
Hours
Meter...............
ccc
cece
eee
3-8
3-3.
Cleaning
Procedure...............-..0eee
sees
3-8
3-3-1.
Video
Heads
and
Rotary
Erase
Heads
.......
cc
cece
cece
eee
eee
teens
3-8
3-3-2.
Stationay
Heads
...........-....
eee
eee,
3-8
3-3-3.
Tape
Movement
Areas..............+---
3-8
3-3-4.
Slip-rings
and
Brushes
..................
3-8
3-4.
Head
Degaussing..................
cece
eee.
3-9
3-5.
Maintenance
After
Repairs..................
3-9
3-6.
Periodic
Chech
and
Maintenance
Schedule...
3-10
4.
SERVICE
INFORMATION
4-1.
Removal
and
Installation
of
the
Cabinet
..
4-1
4-2.
Removal
and
Installation
of
the
Function
Control
Panel
...........
0.0.00.
c
cece
eee
eee
4-3
4-3.
Removal
of
the
Cassette-up
Compartment
..
4-3
4-4.
Service
of
the
Special
Printed
Circuit
Boards
.......
0...
cece
cee
cece
ee
eee
ee
ene
4-4
4-4-1.
Service
of
the
RP-30
Printed
Circuit
Board
......
0...
ccc
ce
ee
eee
eee
eee
4-4
4-4-2.
Replacement
of
Parts
on
the
HN-80
Printed
Circuit
Board
..................
4-4
4-4-3.
Removal
of
the
PD-37
Printed
Circuit
Board
........
0.0.
ccc
cece
eee
ene
ee
eees
4-4
4-4-4.
Replacement
of
the
MB-139
Printed
Circuit
Board
.............
00.
cece
ee
eee
4-4
4-4-5.
Removal
of
the
DR-53
and
DR-59
Printed
Circuit
Boards..................
4-6
4-5.
Removal
and
Installation
of
the
Power
Block
2...
ccc
eee
eee
teen
e
eee
4-6
4-6.
Extension Board
.....................-
eee
ee
4-7
4-7.
Operation
of
the
Unit
Without
Installing
the
Cassette-up
Compartment
and
the
Cassette
Tape
................
ee
ee
eee
ee
4-7
4-8.
Spare
PartS
...........
cece
eee
eee
eee
es
4-7
4-9,
Fixture......
0.0...
cece
eee
nes
4-8
4-10.
Safety
Check-out
.............
0.0.
cece
eee
eee
4-9
5.
REPLACEMENT
OF
MAJOR
PARTS
5-1.
Replacement
of
the
Upper
Drum
Assembly
5-1
5-2.
Replacement
of
the
Drum
Assembly........
5-3
5-3.
Replacement
of
the
Capstan
Motor
........
5-3
5-4.
Replacement
of
the
Reel
Motor............
5-4
5-5.
Replacement
of
the
Head
..................
5-5
5-5-1.
Replacement
of
the
Audio/CTL
Head
..
5-5
5-5-2.
Replacement
of
the
Time
Code
Head..
5-6
5-5-3.
Replacement
of
the
Full
Erase
Head
..
5-7
5-6.
Replacement
of
the
Tension
Detector
Block
2.0...
ccc
eee
eee
ee
nee
5-7
5-6-1.
Replacement
of
the
S
Tension
Detector
......
0c
cc
cee
cece
eee
eens
5-7
5-6-2.
Replacement
of
the
T
Tension
Detector
......
ccc
cece
eee
eee
eee
5-8
5-6-3.
Replacement
of
the
CDS
of
the
$
Tension
Detector
.............000e
cee
eeee
5-9
5-6-4.
Replacement
of
the
CDS
of
the
T
Tension
Detector..............000
ce
eens
5-9
5-7.
Replacement
of
the
S
Drawer
Roller
......
5-10
—1-—