Sortimo GA 00005 User manual

2 GA 00005 | 2017-09-04 © Sortimo International GmbH
de
1. Über dieses Dokument
Zum sicheren Gebrauch des Produkts müssen Sie
folgende Aspekte beachten.
• Lesen Sie dieses Dokument sorgfältig vor dem
Gebrauch.
• Bewahren Sie dieses Dokument für späteres
Nachschlagen auf.
• Geben Sie dieses Dokument an den
Endverbraucher weiter.
Dieses Dokument ist Teil des Produkts und ein
wichtiger Baustein im Sicherheitskonzept.
Nichtbeachtung kann zu schweren Verletzungen
oder zum Tod führen.
1.1. Konventionen
In diesem Dokument werden Symbole und
Texthervorhebungen verwendet. Im Folgenden
werden die Bedeutungen erklärt.
▶ Dieses Symbol kennzeichnet eine
Handlungsaufforderung.
2. Bestimmungsgemäße
Verwendung
Der Dachlüfter ist für die Befestigung auf dem
Dach eines Nutzfahrzeugs bestimmt. Der
Dachlüfter darf nur in Kombination mit einem
zugelassenen Seitenlüfter oder Bodenlüfter
betrieben werden.
3. Funktionsbeschreibung
Der Dachlüfter belüftet oder entlüftet das
Fahrzeug.
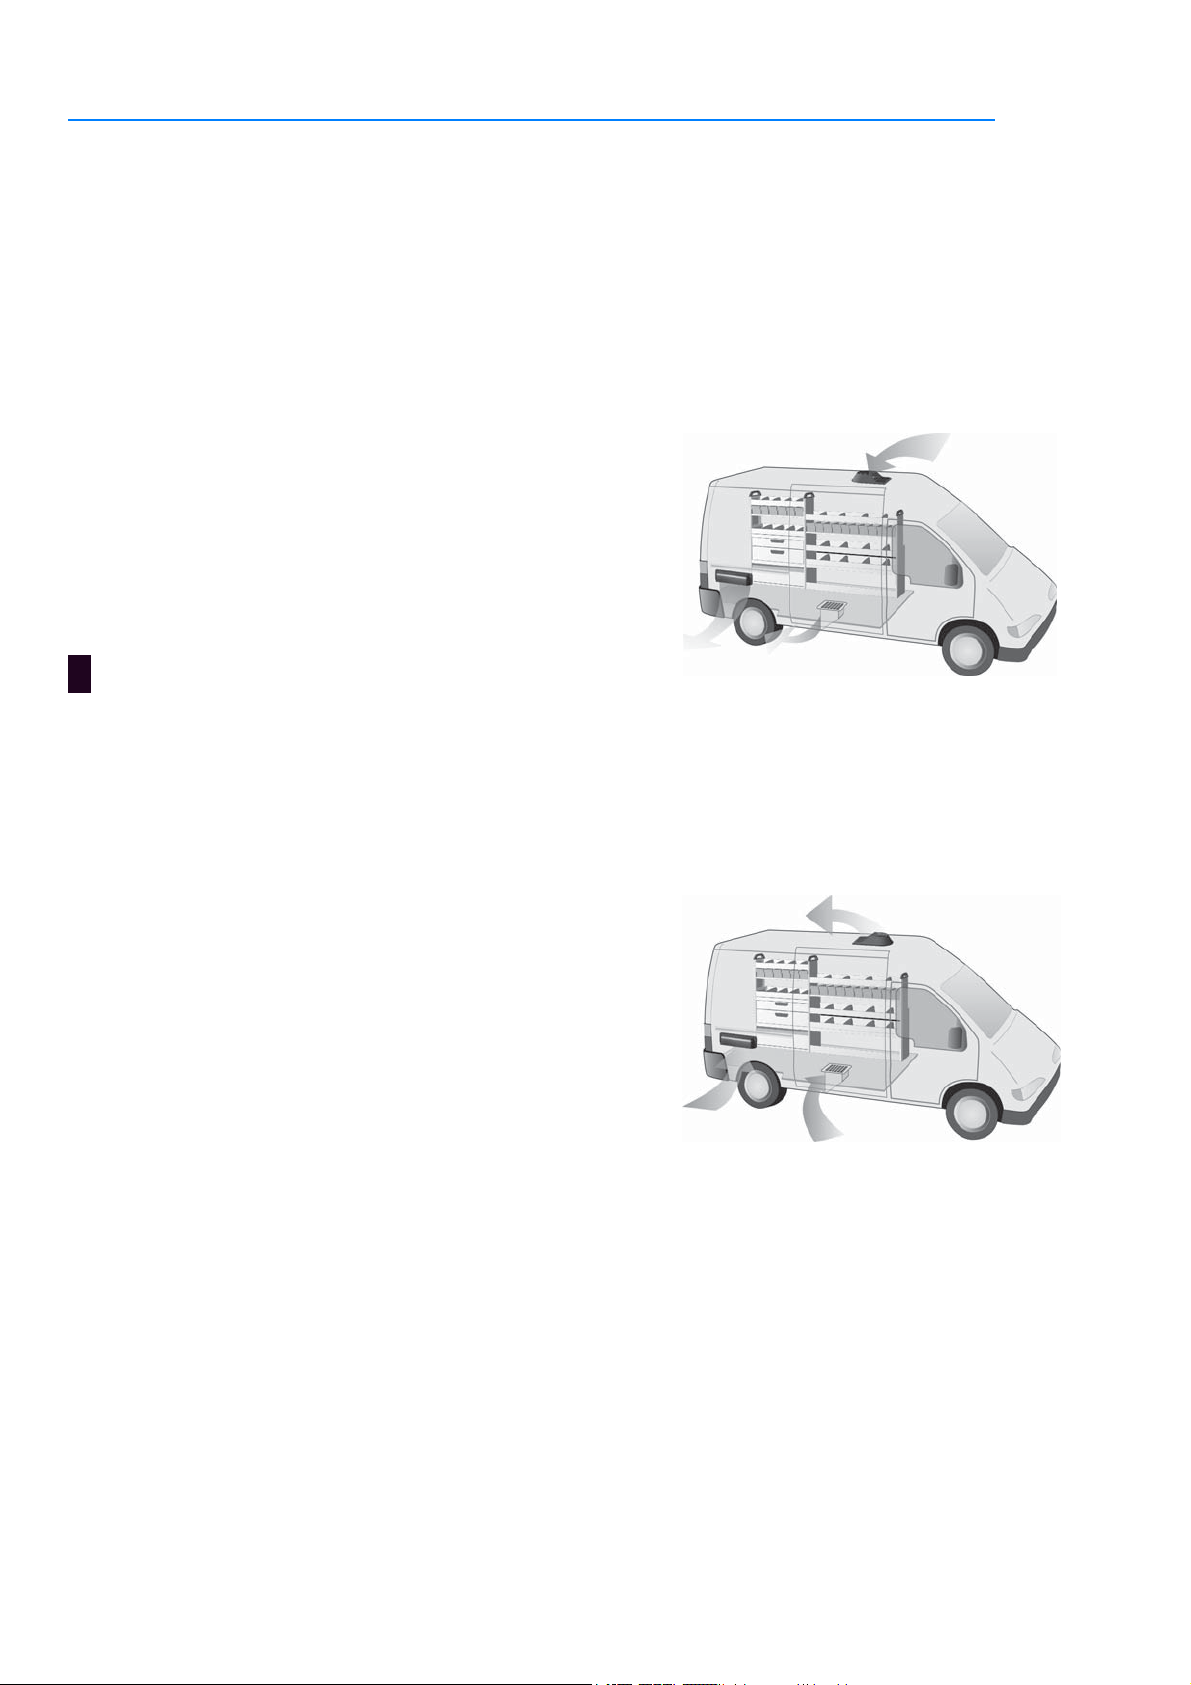
3.1. Belüftung
Der Pfeil des Sterngriffs zeigt in Fahrtrichtung.
Der Dachlüfter erzeugt einen Überdruck im
Fahrzeug. Schwere Gasarten werden durch den
Boden- bzw. Seitenlüfter nach außen gedrückt.
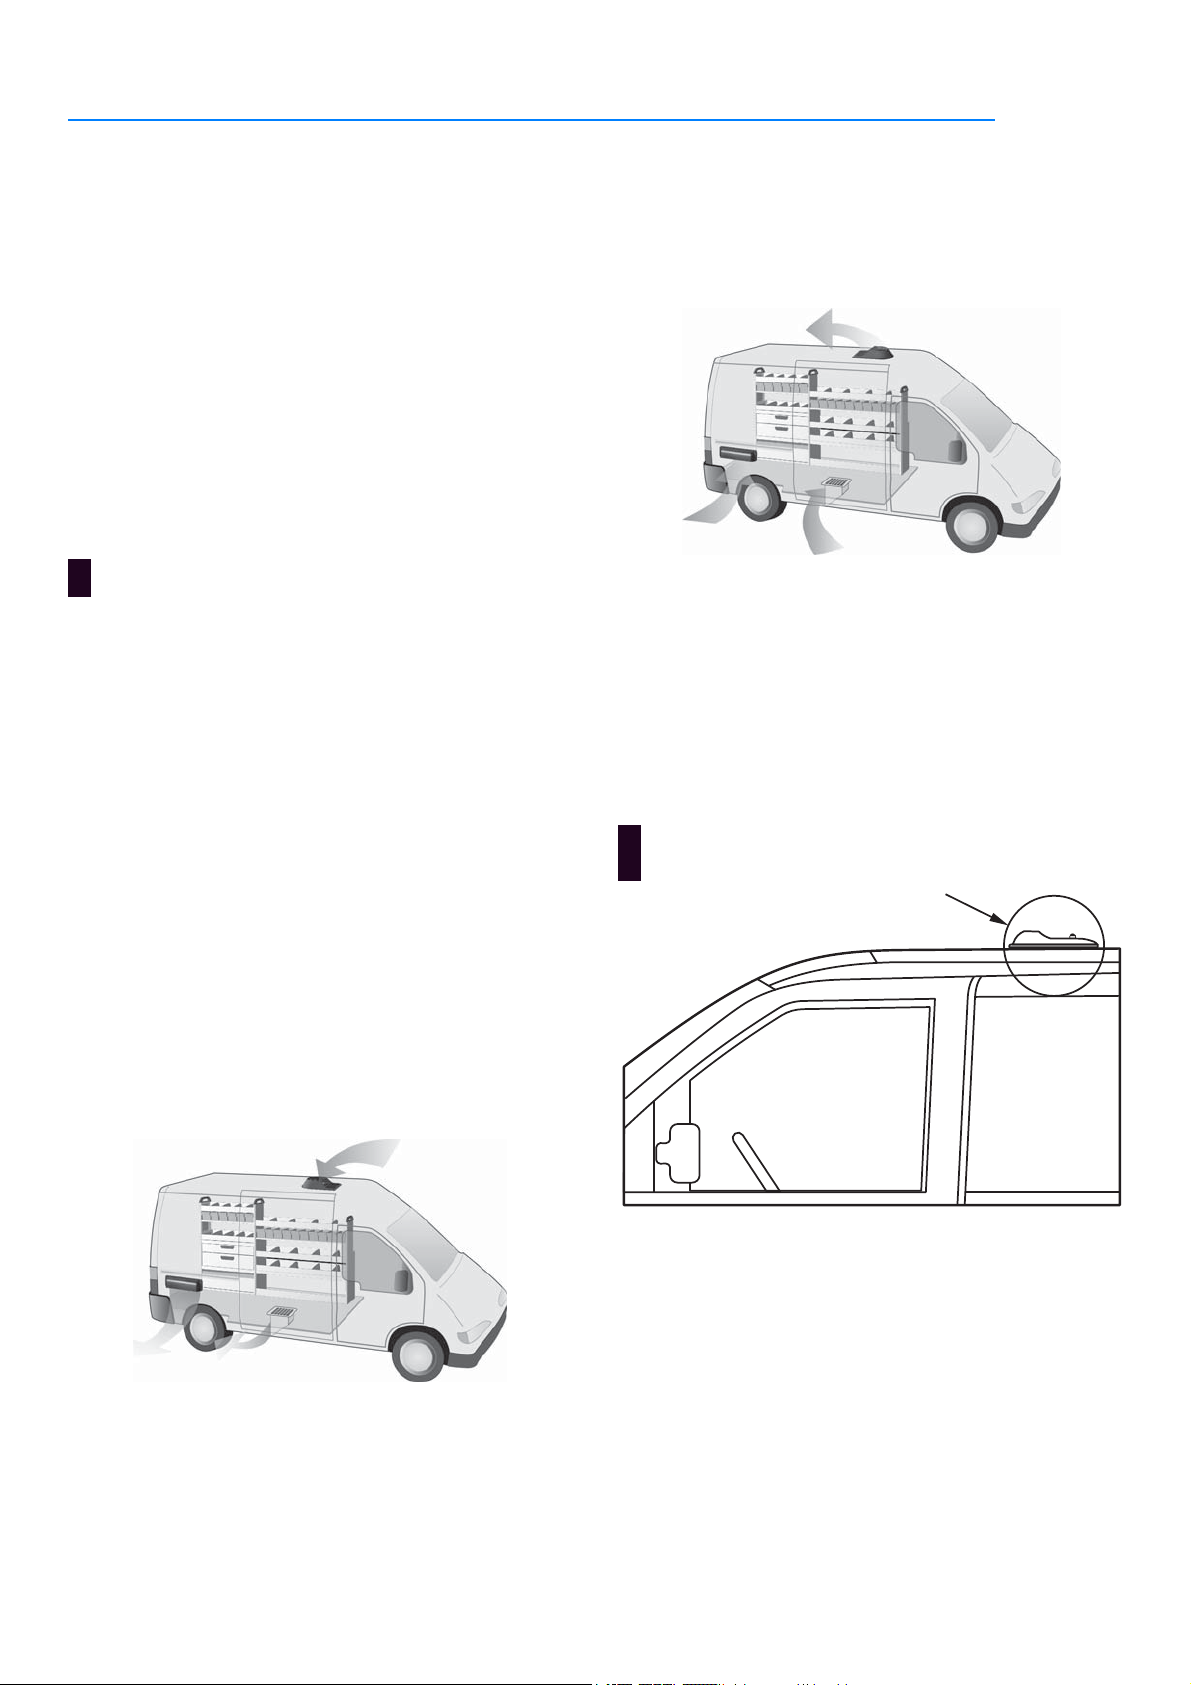
3.2. Entlüftung
Der Pfeil des Sterngriffs zeigt entgegen der
Fahrtrichtung. Der Dachlüfter erzeugt einen
Unterdruck im Fahrzeug. Leichte Gasarten
werden durch den Dachlüfter nach außen
gedrückt.
iDieses Symbol kennzeichnet einen Hinweis.

© Sortimo International GmbH GA 00005 | 2017-09-04 3
4. Montieren
4.1. Position wählen
▶ Lüftungsöffnungen diagonal zueinander
anordnen.
▶ Dachlüfter im vorderen Dachbereich
positionieren.
▶ Sicherstellen, das keine Dachelemente wie
Dachträgerteile oder ähnliches im
Verstellbereich des Dachlüfters liegen.
▶ Tragende Teile wie z.B. Spriegel dürfen nicht
angeschnitten oder durchtrennt werden.
▶ Der Dachlüfter muss zwischen 2m und 4m
über der Fahrbahnhöhe befestigt werden.
▶ Die Lüfterauflagefläche muss die erhabenste
Fläche im Lüfterverstellbereich sein.
▶ Eine einwandfreie Abdichtung sicherstellen.
▹ Dachlüfter mit Handdruck auf die gewünschte
Anschlussfläche andrücken.
▹ Mit Sichtkontrolle vergewissern, dass die
Lüfterdichtung im Bereich der
Mindestauflagefläche für beide
Lüfterstellungen lückenfrei aufliegt.
4.2. Dach ausschneiden
▶ Bohrschablone abtrennen (Siehe Seite 9).
▶ Bohrschablone auf Dach kleben und
Fahrtrichtung beachten.
▶ Bohrbild mit Bohrer Ø 2,5 mm bohren.
▶ Ausschnitt mit Stichsäge erstellen.
iDachlüfter nicht oberhalb der Fahrzelle
positionieren.
Fahrzelle Laderaum
Verstellbereich
360°
R178
Auflagefläche
Mindestauflagefläche
iWenn an der gewählten Position keine
lückenfreie Befestigung möglich ist, dann
muss eine andere Position gefunden werden.
iEs ist hilfreich, wenn der Ausschnittbereich auf
der Dachaußenseite mit Gewebeband
befestigt wird.
Fahrtrichtung

4 GA 00005 | 2017-09-04 © Sortimo International GmbH
4.3. Dachlüfter anpassen
▶ Einsatz in Dachausschnitt stecken.
▶ Überstand des Einsatzes mit Stift an
gewünschter Abtrennkerbe markieren.
▶ Einsatz wieder entnehmen.
▶ Überstand an markierter Abtrennkerbe
absägen.
▶ Dichtung auf der Flanschunterseite des
Einsatzes auftragen.
▶ Rändelmutter bis zum Anschlag an den
Sterngriff nach unten drehen.
4.4. Dachlüfter montieren
▶ Einsatz auf der Dachaußenseite befestigen.
▶ Dachlüfter mit Einsatz verbinden.
▶ Abdeckring bis zum Anschlag an der
Dachinnenseite über den Einsatz schieben.
▶ Rändelmutter für Fahrbetrieb bis auf Anschlag
an Einsatz hochdrehen.
▶ Beiliegenden Produktaufkleber gut sichtbar in
der Nähe des Dachlüfters anbringen.
Zahnscheibe

© Sortimo International GmbH GA 00005 | 2017-09-04 5
5. Bedienen
5.1. Belüften
▶ Sterngriff drehen, bis der Pfeil in Fahrtrichtung
zeigt.
5.2. Entlüften
▶ Sterngriff drehen, bis der Pfeil entgegen der
Fahrtrichtung zeigt.
6. Reinigen und Pflegen
▶ Dachlüfter von witterungsbedingten
Verschmutzungen freihalten.
iBei folgenden Gasen muss belüftet werden:
•Argon Ar
•Propan C
3H8
• Kohlenstoffdioxid CO2
•n-Butan C
4H10
• Kohlenstoffmonoxid CO
•Krypton Kr
•Stickstoffdioxid NO
2
• Stickstoffmonoxid NO
•Xenon Xe
iBei folgenden Gasen muss entlüftet werden:
•Acetylen C
2H2
•Helium H
2
•Stickstoff N
2
• Wasserstoff H2
iVerschmutzungen können z.B. Laub oder
Schnee sein.
6 GA 00005 | 2017-09-04 © Sortimo International GmbH
en
1. About this document
Comply with the following aspects for safe use of
the product.
• Read this document carefully before use.
• Keep this document for subsequent reference.
• Pass this document to the end user.
This document forms an integral part of the
product and is an important component of the
safety concept. Non-compliance may lead to
severe injury or death.
1.1. Conventions
This document includes symbols and text
highlighting. The meanings are explained below.
▶ This symbol marks a call for action.
2. Intended use
The roof vent is intended for fastening on the roof
of a commercial vehicle. The roof vent should
only be operated in conjunction with an approved
side vent or floor vent.
3. Functional description
The roof vent ventilates or extracts air from the
vehicle.
3.1. Ventilation
The arrow of the star grip points in the direction
of travel. The roof vent generates excess
pressure in the vehicle. Heavy gases are pushed
outwards through the floor or side vent.
3.2. Air extraction
The arrow of the star grip points away from the
direction of travel. The roof vent generates
negative pressure in the vehicle. Lightweight
gases are pushed outwards through the roof vent.
4. Installation
4.1. Selecting the position
▶ Arrange ventilation openings diagonally to each
other.
▶ Position roof vents in the front section of the
roof surface.
iThis symbol marks an instruction.
iDo not position roof vents above the driver’s
cab.
Driver’s cab Cargo space

© Sortimo International GmbH GA 00005 | 2017-09-04 7
▶ Make sure that no roof elements, such as parts
of the roof racking or similar, are positioned
within the moving area of the roof vent.
▶ Do not cut into or through load-bearing parts,
such as the hoops.
▶ Position the roof vent between 2 m and 4 m
above ground level.
▶ Make sure that the contact surface of the vent
is the highest section of the vent moving area.
▶ Make sure that there is a proper seal.
▹ Press the roof vent manually onto the
preferred surface.
▹ Visually ensure that there are no gaps in the
vent seal around the minimum contact
surface.
4.2. Cutting through the roof
▶ Cut off the drilling template (See Page 10).
▶ Adhere the drilling template to the roof and
note the direction of travel.
▶ Use a Ø 2.5 mm drill to make the holes.
▶ Use a jigsaw to cut the opening.
4.3. Adjusting the roof vent
▶ Place the insert in the roof opening.
▶ Use a pen to mark the excess length of the
insert on the corresponding cutting notch.
▶ Remove the insert again.
▶ Saw off the excess length at the marked cutting
notch.
▶ Attach the rubber sealing to the flanged
underside of the insert.
iFind another position if it is impossible to fit
the vent at the selected position without there
being gaps.
360° moving area
R178
Contact surface
Minimum contact
surface
iIt is helpful if fabric tape is stuck to the outside
roof edge of the cutting area.
Direction of travel

8 GA 00005 | 2017-09-04 © Sortimo International GmbH
▶ Turn the knurled nut downwards onto the
contact surface of the star grip as far as it will
go.
4.4. Fitting the roof vent
▶ Fasten the insert onto the outside of the roof.
▶ Connect the roof vent to the insert.
▶ Slide the cover ring over the insert as far as it
will go on the inside of the roof.
▶ Screw up the knurled nut onto the contact
surface on the insert.
▶ Visibly attach the product labels supplied close
to the roof vent.
5. Operation
5.1. Ventilation
▶ Turn the star grip until the arrow points to the
direction of travel.
5.2. Extraction
▶ Turn the star grip until the arrow points away
from the direction of travel.
6. Cleaning and care
▶ Keep the roof vent clear of dirt caused by
weathering,
Serrated washer
iVentilation is required with the following
gases:
•Argon Ar
•Propane C
3H8
• Carbon dioxide CO2
•n-butane C
4H10
• Carbon monoxide CO
•Krypton Kr
•Nitrogen dioxide NO
2
• Nitrogen monoxide NO
•Xenon Xe
iExtraction is required with the following gases:
•Acetylene C
2H2
•Helium H
2
•Nitrogen N
2
•Hydrogen H
2
isuch as snow or leaves.

© Sortimo International GmbH GA 00005 | 2017-09-04 9
Bohrschablone Dachlüftereinsatz
Vor dem Gebrauch die Gebrauchsanleitung durchlesen.
Mindestauflagefläche
Dachlüfter
Ausschnittfläche
Alle Bohrungen Ø 2,5 mm
109mm
R84
144mm
38°
(M 1:1)

10 GA 00005 | 2017-09-04 © Sortimo International GmbH
Drilling template for roof vent insert
Read the instructions for use before using.
Minimum contact surface
of roof vent
Cutting surface
All drill holes Ø 2.5 mm
109 mm
R84
144 mm
38°
(M 1:1)
Table of contents
Languages:
Popular Fan manuals by other brands

Fantech
Fantech 2SHE Series Operational instruction and parts manual

SNOWJOE
SNOWJOE SUNJOE 24V-MSTFAN-LTE-RM Operator's manual

Mesko
Mesko MS 7308 user manual

smaco
smaco F36AR Instructions for use

Bigassfans
Bigassfans Basic^ installation guide

Minka Group
Minka Group minkaAire Contractor WATT F551 instruction manual


