Sound Devices Kashmir MixPre II Series User manual

User Guide
Multichannel Recorders | Mixers | USB Audio Interfaces
MixPre II Series
****Insert MixPre II stack photo*****
Legal Notices
Product specications and features are subject to change without
prior notication.
Copyright© 2019 Sound Devices, LLC. All rights reserved.
This product is subject to the terms and conditions of a
software license agreement provided with the product, and
may be used in accordance with the license agreement.
This document is protected under copyright law. An authorized
licensee of this product may reproduce this publication for the
licensee’s own personal use. This document may not be reproduced
or distributed, in whole or in part, for commercial purposes, such
as selling copies or providing educational services or support.
This document is supplied as a technical guide. Special care
has been taken in preparing the information for publication;
however, since product specications are subject to change,
this document might contain omissions and technical or
typographical inaccuracies. Sound Devices, LLC does not accept
responsibility for any losses due to the user of this guide.
Trademarks
The “wave” logo is a registered trademark and
Kashmir is a trademark of Sound Devices, LLC. iPad, iPhone,
Mac and OS X are trademarks of Apple Inc., registered in the
U.S. and other countries. Windows is a registered trademark of
Microsoft Corporation in the U.S. and other countries. Bluetooth
Smart is a registered trademark of Bluetooth SIG, Inc. ASIO is a
registered trademark of Steinberg Media Technologies. All other
trademarks herein are the property of their respective owners.
WEEE Statement
If you wish to discard a Sound Devices product in Europe,
contact Sound Devices (Germany) for further information.
Warning! This device can drive headphones to potentially
dangerous levels. Do not listen at high volume levels for
long periods.
Read and fully understand this manual before operation.
Manual Conventions
SYMBOL DESCRIPTION
>
This symbol is used to show the order in which you select menu
commands and sub-options, such as: Main Menu > Outputs
indicates you press the Menu button for the Main Menu, then
scroll to and select Outputs by pushing the Encoder.
[ ] This symbol is used to convey selectable menu items.
*This symbol is used to convey factory default settings.
+
A plus sign is used to show button or keystroke combinations. For
instance, Ctrl+V means to hold the Control key down and press
the V key simultaneously. This also applies to other controls, such
as switches and encoders. For instance, MIC+HP turn means
to slide and hold the MIC/TONE switch left while turning the
Headphone (HP) encoder. METERS+SELECT means to hold the
METERS button down as you press the SELECT encoder.
Note
A
note
provides recommendations and important related
information. The text for notes appears italicized.
*
A cautionary warning about a specic action that could cause
harm to you, the device, or cause you to lose data. Follow the
guidelines in this document or on the unit itself when handling
electrical equipment. The text for cautionary notes also appears
italicized and bold in a different color.
MixPre II User Guide | Rev 1-A | 08/29/19
This document is distributed by Sound Devices, LLC in online electronic (PDF)
format only. Published in the USA.
This table provides the revision history and cross-reference
links to “what’s new” in this guide.
REV # DATE VERSION DESCRIPTION
1-A 08/19 Av4.00 Initial release
Post Ofce Box 576
E7556 State Rd. 23 and 33
Reedsburg, Wisconsin 53959 USA
www.sounddevices.com
+1 608.524.0625 main
+1 608.524.0655 fax
800.505.0625 toll free

MixPre II User Guide 1
Welcome to MixPre II
Versatile. Durable. High-Performance.
If you record eld audio, sound eects, audio for lm,
podcasts, voice-overs, music, or are just starting your
audio journey, the MixPre II Series is for you! Light-
weight, durable, and small, this powerhouse audio
recorder and USB interface will help you capture audio
for any application.
With Sound Devices’ hand-craed, crystal-clear, ultra
low-noise Kashmir preamps, you’ll record audio in
superior quality - all the way up to a 32-bit oat bit
depth and a 192 kHz sample rate. is newest genera-
tion of Sound Devices’ award-winning MixPre Series
has been redesigned for increased performance and an
astounding 142 dB of dynamic range.
e MixPre II is highly customizable to your needs.
Record internally to a compatible SD card on set or
stream your podcast over USB to your computer at
home. Power with your computer, wall power, or
record in the middle of nowhere with AA or Sony
L-mount batteries. Adjust limiters, bit depth, sample
rates, gain, pan, low-cut, phase inversion and phantom
power to your liking. Use the MixPre’s high-precision
internal timecode generator to trigger the camera, or
feed timecode in. e choice is yours!
Professionals love the exibility of the MixPre Series.
Don’t need all those options? Basic mode has you
covered.
All models are rugged, lightweight, and small, so you
can throw it in a bag or mount it to a tripod or cam-
era - or get situated on set with our Wingman App and
one of our four supported USB control surfaces. With
the superior sound and build quality that you can
expect from the industry leader in production audio
recording, your MixPre II can capture audio for any
application. Our friendly and knowledgeable support
team, based in the USA and Germany, is here for all
your questions and comments. Our job is to make
your job easier.
Customize With Plugins
Are you a songwriter or musician? Buy the Musician
Plugin to easily create a song using your MixPre II as
a standalone recorder or USB interface. Use onboard
features like overdub, bounce, reverb, and tracking
to a metronome. Create Music Projects to lay down
backing tracks and use them live or at home for
writing or practicing. Capturing your song ideas has
never been easier!
Download the free Ambisonics Plugin to record in
360° audio and monitor binaurally with an ambisonic
microphone like the Sennheiser AMBEO and a Mix-
Pre-6 II or MixPre-10 II.
We are honored to be part of your kit.
Sincerely,
Sound Devices

MixPre II User Guide 2
Table of Contents
PANEL VIEWS 3
MIXPRE-10 II 3
MIXPRE-6 II 4
MIXPRE-3 II 5
POWERING 6
TOUCHSCREEN 7
NAVIGATING MENUS 8
BASIC VS ADVANCE MODE 9
CUSTOM MODE 12
FILE LIST 13
INPUTS 15
INPUT LINKING 17
LIMITERS 18
METERING 19
OUTPUTS 19
HEADPHONE 20
PRESETS 20
PROJECTS 20
TRANSPORT CONTROL 21
STAR SHORTCUTS 22
SYSTEM MENU 22
MEDIA AND FORMATTING 23
RECORD AND PLAY 23
REMIX AND RERECORD 23
CUE MARKS 24
TIMECODE 25
USB AUDIO INTERFACE 27
WINGMAN 28
USB KEYBOARD CONTROL 30
USB CONTROL SURFACES 31
SPECIFICATIONS 36
MIXPRE-3 II 36
MIXPRE-6 II 37
MIXPRE-10 II 38
MixPre II User Guide 3
Panel Views
MIXPRE-3 II
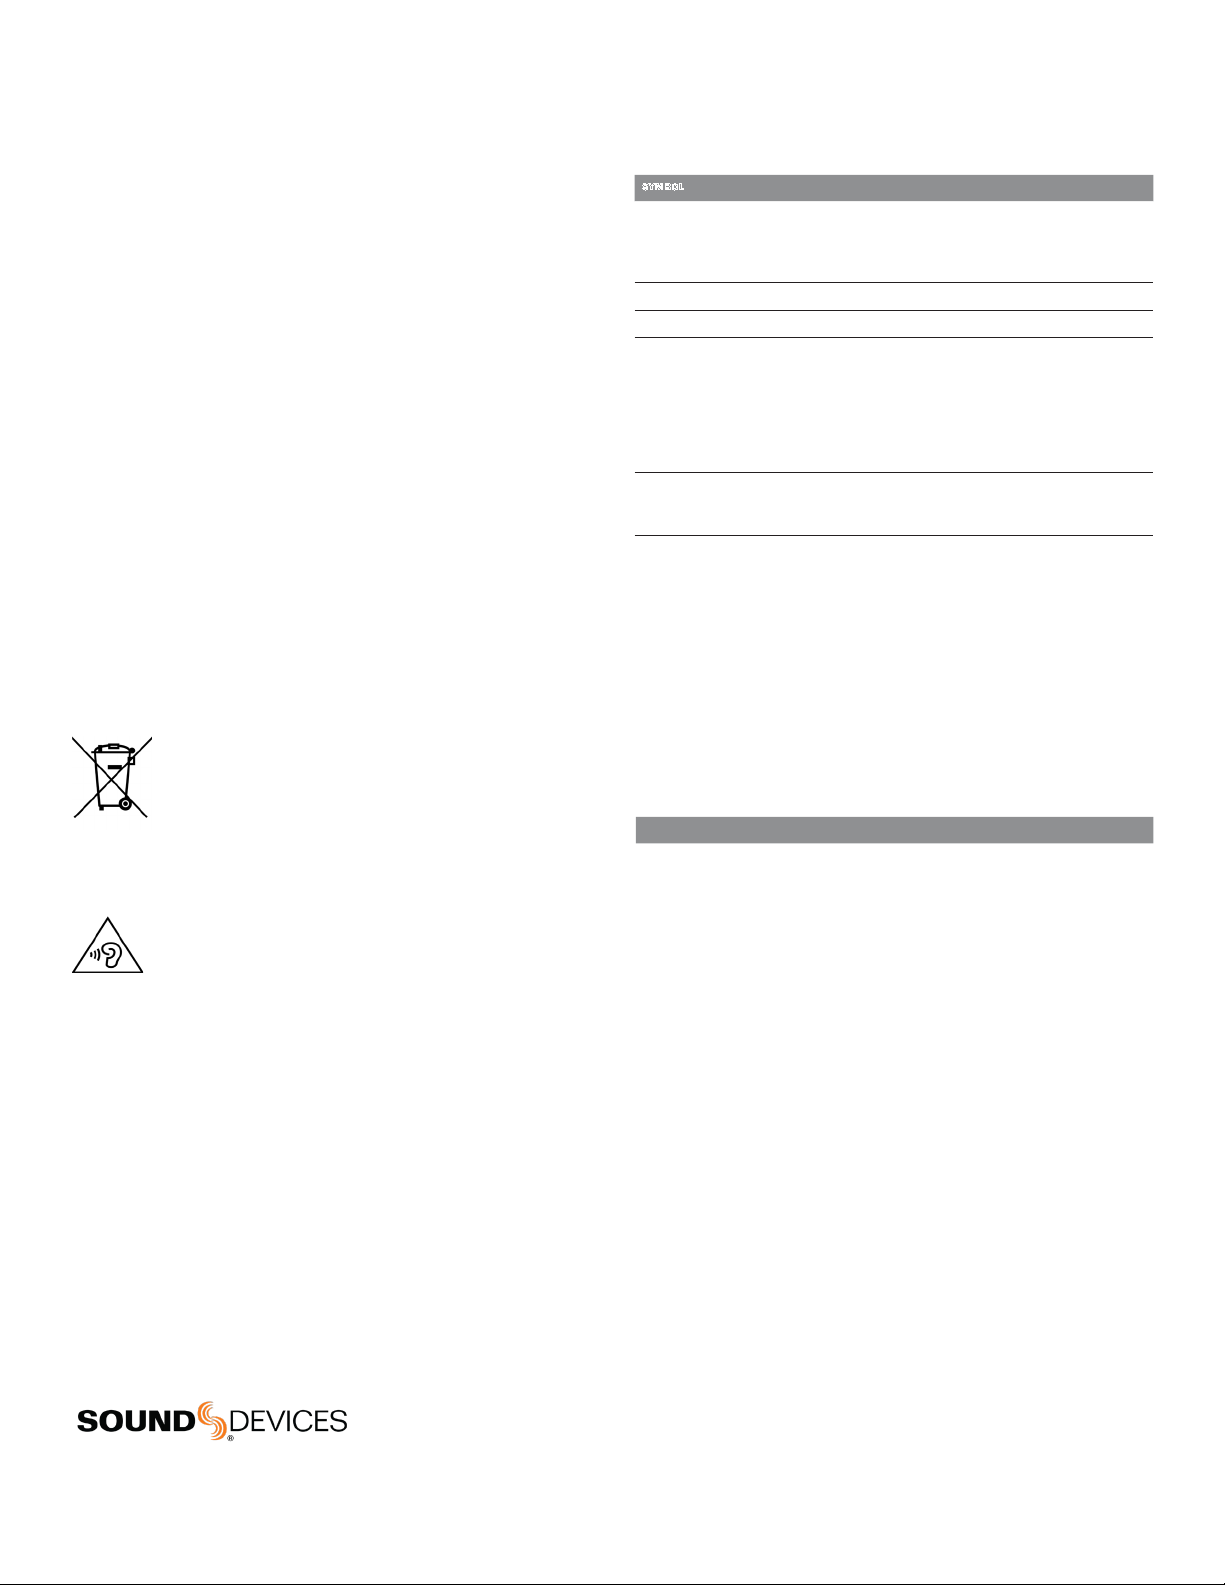
FRONT
Power Light
Channel Knobs
Channel Ring LED
Touchscreen
Play Button
Stop Button
Record Button
REAR
Battery Mounts
SD Card Slot
Allen Wrench and
Anti-Rotational Pin
RIGHT
XLR / 1/4-inch TRS Input
Headphone Knob HDMI TC Input
Headphone Output
Aux/Mic/Timecode Input
LEFT
XLR / 1/4-inch TRS Inputs
USB-A Port
USB-C Port
Power Switch
3.5 mm Stereo
Output
POWER LIGHT Glows when the MixPre II is powered on.
CHANNEL KNOBS Sets the input sensitivity for the channel. Press
in on knob to access channel screen.
CHANNEL LED RING Provides visual indication of channel signal
condition, solo and mute.
PLAY BUTTON Press to begin playback. While in playback the button
glows green. See Transport.
STOP BUTTON Press to stop recording or playback. While stopped
the button glows orange. See Transport.
RECORD BUTTON Press to begin a recording. While recording the
button glows red. See Transport.
TOUCH SCREEN The sunlight-viewable, high-resolution, touch-
screen is used to navigate the MixPre II user interface.
BATTERY MOUNTS Accepts power sled accessories designed for
MixPre. Allows powering the MixPre II from AA or Sony L-Mount batter-
is, such as the included MX-4AA.
SD CARD SLOT Insert SD card for recording.
ALLEN WRENCH & ANTI-ROTATIONAL PIN Magnetically at-
taches to the MixPre II for safe keeping. Used to attach MixPre II to
cameras and tripods via ¼-inch-20-thread captive screw on MixPre II
top panel.
INPUTS 1-3 FEMALE XLR / 1/4” TRS COMBO JACKS Active-bal-
anced analog microphone or line-level inputs. Inputs 1-2 on left
panel, input 3 on the right. [pin-1 = ground, pin-2 = hot (+), and pin-3
= cold (-)]
USB-A PORT
1. USB keyboard
2. Auto-copy to USB drives
3. USB to approved 3rd party fader controllers
USB-C PORT
1. Provides power to the unit.
2. Connects to computer as a USB Audio Interface.
3. Connects to computer for transfering les from the SD card.
STEREO OR TIMECODE OUTPUT Unbalanced stereo 3.5 mm
female connector. Routing determined in the Outputs menu. [Sleeve =
ground, tip = X1, ring = X2].
POWER SWITCH Turns the power on and off.
HEADPHONE OUTPUT 3.5 mm TRS headphone output. Warning!
This output can drive headphones to potentially dangerous levels.
[Sleeve = ground, tip = left, ring = right]
HEADPHONE KNOB
1. Rotate to control headphone volume.
2. Rotate to navigate some menus and the virtual keyboard. Press in
to select items.
AUX/MIC/TIMECODE INPUT Menu-selectable input. Accepts
unbalanced stereo audio signal, Plug in Power microphones, or LTC
timecode.
HDMI TC INPUT Connect to select cameras to receive HDMI time-
code and record start/stop ags.

MixPre II User Guide 4
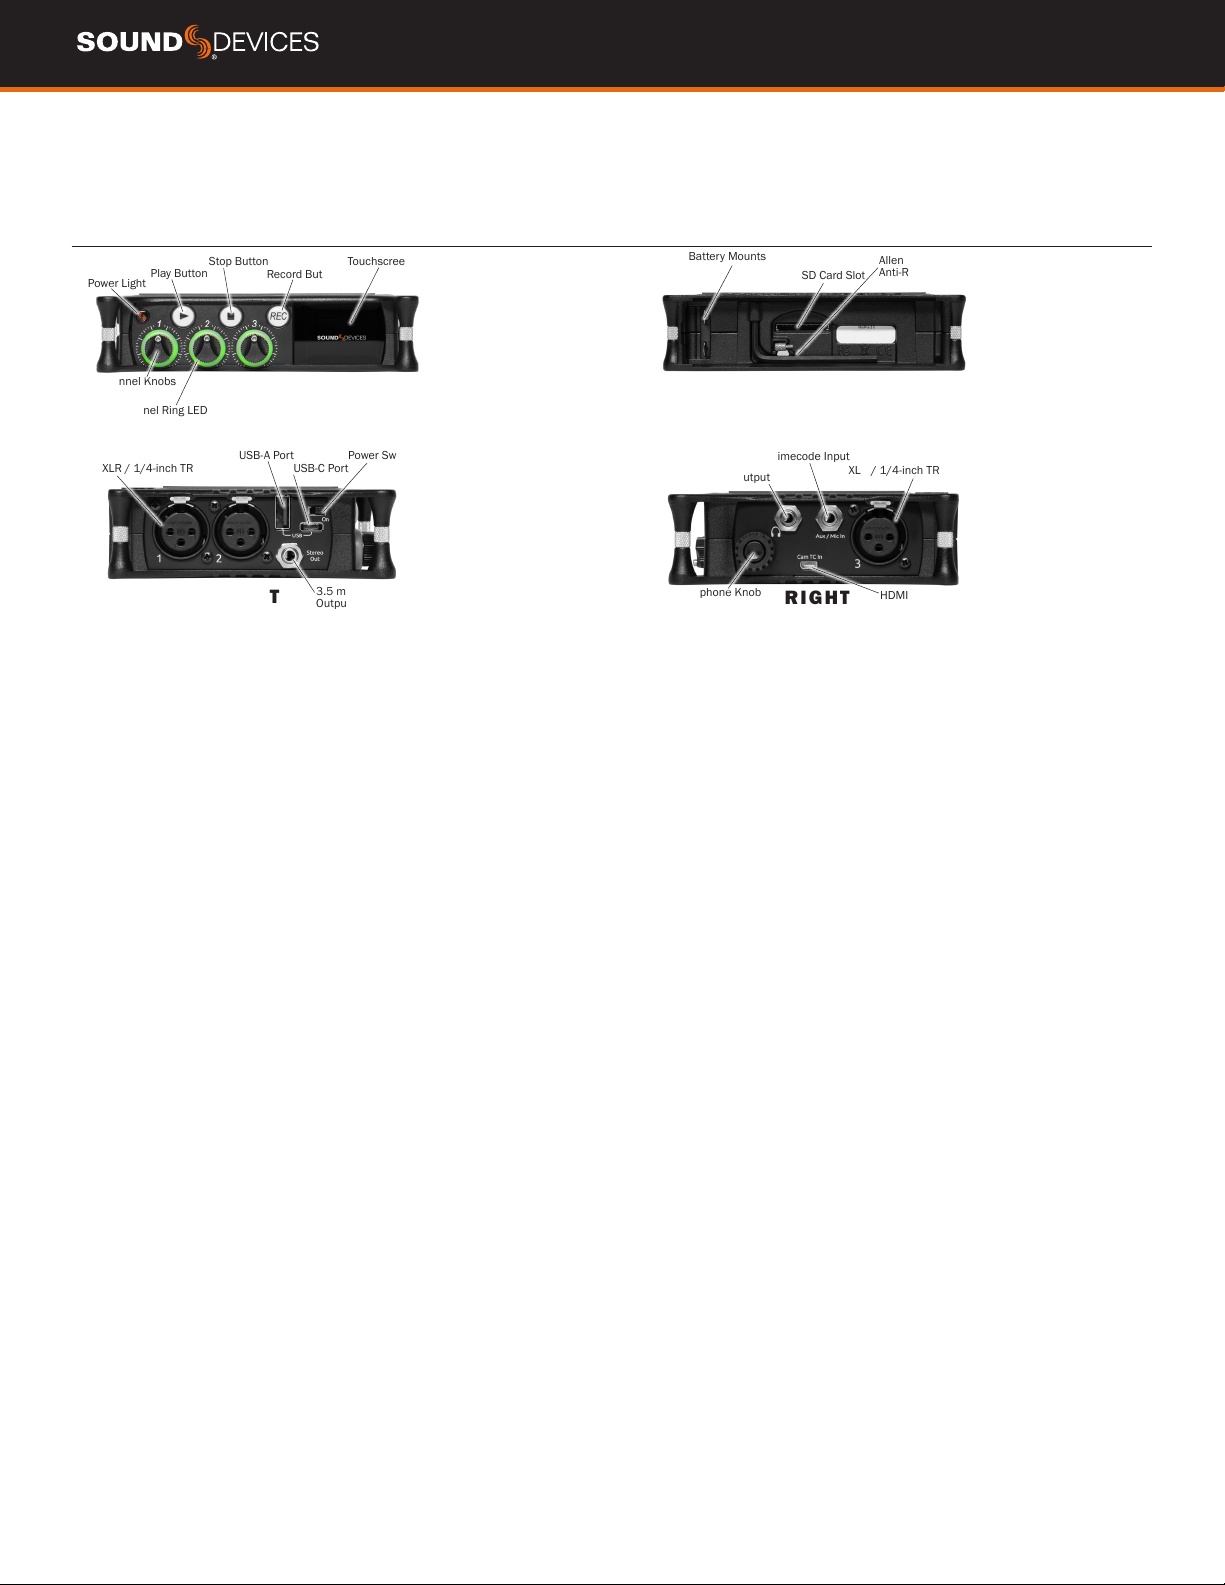
MIXPRE-6 II
REAR
RIGHT
FRONT
LEFT
Power Light
Channel Knobs
Channel Ring LED
Touchscreen
Play Button
XLR / 1/4-inch TRS Inputs
USB-A Port
USB-C Port
Power Switch
Stereo or Timecode
Output
XLR / 1/4-inch TRS Inputs
Battery Mounts
SD Card Slot
Allen Wrench and
Anti-Rotational Pin
Headphone Knob
HDMI TC Input
Headphone Output
Aux/Mic/Timecode Input
Star Button Stop Button Record Button
POWER LIGHT Glows when the MixPre II is powered on.
CHANNEL KNOBS Sets the input sensitivity for the channel. Press
in on knob to access channel screen.
CHANNEL LED RING Provides visual indication of channel signal
condition, solo and mute.
STAR (* & **) BUTTON Provides a user-assignable hardware but-
ton to frequently used functions. See Shortcuts
PLAY BUTTON Press to begin playback. While in playback the button
glows green. See Transport.
STOP BUTTON Press to stop recording or playback. While stopped
the button glows orange. See Transport.
RECORD BUTTON Press to begin a recording. While recording the
button glows red. See Transport.
TOUCH SCREEN The sunlight-viewable, high-resolution, touch-
screen is used to navigate the MixPre II user interface.
BATTERY MOUNTS Accepts power sled accessories designed for
MixPre. Allows powering the MixPre II from AA or Sony L-Mount batter-
is, such as the included MX-4AA.
SD CARD SLOT Insert SD card for recording.
ALLEN WRENCH & ANTI-ROTATIONAL PIN Magnetically at-
taches to the MixPre II for safe keeping. Used to attach MixPre II to
cameras and tripods via ¼-inch-20-thread captive screw on MixPre II
top panel.
INPUTS 1-4 FEMALE XLR / 1/4” TRS COMBO JACKS Active-bal-
anced analog microphone or line-level inputs. Inputs 1-2 on left
panel, inputs 3-4 on the right. [pin-1 = ground, pin-2 = hot (+), and
pin-3 = cold (-)]
USB-A PORT
1. USB keyboard
2. Auto-copy to USB drives
3. USB to approved 3rd party fader controllers
USB-C PORT
1. Provides power to the unit.
2. Connects to computer as a USB Audio Interface.
3. Connects to computer for transfering les from the SD card.
STEREO OR TIMECODE OUTPUT Unbalanced stereo 3.5 mm
female connector. Routing determined in the Outputs menu. [Sleeve =
ground, tip = X1, ring = X2].
POWER SWITCH Turns the power on and off.
HEADPHONE OUTPUT 3.5 mm TRS headphone output. Warning!
This output can drive headphones to potentially dangerous levels.
[Sleeve = ground, tip = left, ring = right]
HEADPHONE KNOB
1. Rotate to control headphone volume.
2. Rotate to navigate some menus and the virtual keyboard. Press in
to select items.
AUX/MIC/TIMECODE INPUT Menu-selectable input. Accepts
unbalanced stereo audio signal, Plug in Power microphones, or LTC
timecode.
HDMI TC INPUT Connect to select cameras to receive HDMI time-
code and record start/stop ags.
MixPre II User Guide 5
MIXPRE-10 II
REAR
RIGHT
FRONT
LEFT
Power Light Channel Knobs Channel LED Ring
Star Switch
Touchscreen
Transport Controls
XLR / 1/4-inch TRS Inputs BNC Timecode/
Word Clock Output
BNC Timecode/
Word Clock Input
USB-A Port
USB-C Port
Power Switch
X1 and X2 Output
XLR / 1/4-inch TRS Inputs
Battery Mounts
4-Pin Hirose DC Input SD Card Slot
Allen Wrench and
Anti-Rotational Pin
Headphone Knob
HDMI TC Input
Headphone Output
Aux/Mic/Timecode Input Left and Right TA3 Outputs
POWER LIGHT Glows when the MixPre II is powered on.
CHANNEL KNOBS Sets the input sensitivity for the channel. Press
in on knob to access channel screen.
CHANNEL LED RING Provides visual indication of channel signal
condition, solo and mute.
TRANSPORT CONTROLS A joystick (with its illuminated LED ring)
on the front panel is used to perform various transport control func-
tions. (see Transport).
STAR (* & **) SWITCH Provides a user-assignable hardware switch
to frequently used functions. See Shortcuts
TOUCH SCREEN The sunlight-viewable, high-resolution, touch-
screen is used to navigate the MixPre II user interface.
4-PIN HIROSE DC INPUT Accepts DC voltages from 10–17 V for
powering. [pin-4=+, pin-1=-] Mates with included XL-WPH3
BATTERY MOUNTS Accepts power sled accessories designed for
MixPre. Allows powering the MixPre II from AA or Sony L-Mount batter-
is, such as the included MX-8AA.
ALLEN WRENCH & ANTI-ROTATIONAL PIN Magnetically at-
taches to the MixPre II for safe keeping. Used to attach MixPre II to
cameras and tripods via ¼-inch-20-thread captive screw on MixPre II
top panel.
SD CARD SLOT Insert SD card for recording.
INPUTS 1-8 FEMALE XLR / 1/4” TRS COMBO JACKS Active-bal-
anced analog microphone or line-level inputs. Inputs 1-4 on left
panel, inputs 5-8 on the right. [pin-1 = ground, pin-2 = hot (+), and
pin-3 = cold (-).
BNC TIMECODE OR WORD CLOCK OUTPUT Menu-selectable
between timecode or word clock functionality. Set to timecode to
send LTC timecode to cameras, digi-slates or other timecode-enabled
equipment. Set to word clock to use the MixPre-10 II as a master
precision clock source for external equipment.
BNC TIMECODE OR WORD CLOCK INPUT Menu-selectable be-
tween timecode or word clock functionality. Set to timecode to receive
LTC timecode from a camera or timecode generator. Set to word clock
to slave to an external clock source.
USB-A PORT
1. USB keyboard
2. Auto-copy to USB drives
3. USB to approved 3rd party fader controllers
USB-C PORT Used to connect to a computer for USB audio or trans-
fering les from the SD card.
X1/X2 OUTPUT Unbalanced stereo 3.5 mm female connector.
Routing determined in the Outputs menu. [Sleeve = ground, tip = X1,
ring = X2].
POWER SWITCH Turns the power on and off.
HEADPHONE OUTPUT 3.5 mm TRS headphone output. Warning!
This output can drive headphones to potentially dangerous levels.
[Sleeve = ground, tip = left, ring = right]
AUX/MIC/TIMECODE INPUT Menu-selectable input. Accepts
unbalanced stereo audio signal, Plug in Power microphones, or LTC
timecode.
HEADPHONE KNOB
1. Rotate to control headphone volume.
2. Rotate to navigate some menus and the virtual keyboard. Press in
to select items.
HDMI TC INPUT Connect to select cameras to receive HDMI time-
code and record start/stop ags.
LEFT & RIGHT TA3 OUTPUTS +18 dBu line level outputs. Routing
determined in the Outputs menu. [pin-1 = Ground, pin-2 = hot (+), pin-
3 = cold (-). Float pin-3 to unbalance]

MixPre II User Guide 6
Flexible Powering Options
In designing the MixPre II, we felt that it was important to be able to
operate in a wide array of applications and environments. To support
that goal, power can be supplied from several possible sources. Some
possible powering scenarios are listed below for your MixPre II.
MIXPRE-3 II AND MIXPRE-6 II
fIncluded MX-PSU AC wall adapter
to USB-C power supply.
fFour NiMH rechargeable batteries installed
in the included MX-4AA Battery Sled.
fEight NiMH rechargeable batteries installed in
the optional MX-8AA Battery Sled accessory.
fOne or two Sony-type L-mount batteries installed
in the optional MX-LMount battery sled accessory.
fUSB-C to USB-C cable (included) connected to
a USB-C host computer or AC wall adapter.
fUSB-A to USB-C cable connected to a USB-A
host computer or AC wall adapter. The unit will
enter a low power state and some functionality
will be limited with this power option.
fMX-USBY Dual USB-A to USB-C optional accessory
cable connected to a USB-A host computer. Use
this cable option if your computer is unable to
provide adequate power with only one USB-A port.
MIXPRE-10 II POWER OPTIONS
fIncluded XL-WPH3 AC to DC 12 V
Power supply with 4-pin Hirose.
fEight NiMH rechargeable batteries installed
in the included MX-8AA Battery Sled.
fOne or two Sony-type L-mount batteries installed
in the optional MX-LMount battery sled accessory.
Powering the MixPre II
Apply your choice of power source. Turn the master power switch
located in the upper right corner of the left side panel to the On
position. To ensure the battery/power status indicator displayed on
the touchscreen shows accurate level and status, select your battery/
power type in the Power menu.
When using batteries to power the MixPre II, NiMH rechargeable or
Lithium primary AA’s are recommended, not alkaline batteries. The
high internal resistance of alkaline batteries makes them only suited
to devices requiring low current (less than 25 mA), not higher power
electronic devices such as the MixPre.
Incorrect use of batteries poses a danger of explosion. Replace only
with the same or equivalent type. Properly recycle batteries. Do not
crush, disassemble, incinerate, dispose in a re or expose batteries to
high temperatures.
Power Switchover and Priority
MIXPRE-3 II AND MIXPRE-6 II
To preserve battery power, USB-C power sources take priority over
batteries if both are connected with one exception - if the USB-C pow-
er source does not meet the full power requirements of the MixPre
II, you can choose to power from battery or continue to power from
USB-C. The MixPre II will still be able to use two of the three channels
with 48 V phantom mics even with an underpowered USB-C source.
Other channels can still be used with dynamic mics and line level,
aux, or USB sources. In low power state, the MixPre II automatically:
fDims LCD and LED Brightness
fDisables USB-A port
fDisables HDMI TC port
For protection against accidental loss of power, the MixPre II incorpo-
rates circuitry to automatically switch over from USB-C to batteries.
MIXPRE-10 II
For preservation of battery power, 4-pin Hirose power sources take
priority over batteries if both are connected. For protection against
accidental loss of power, the MixPre II incorporates circuitry to auto-
matically switch power sources.
MixPre II User Guide 7
Touchscreen
The MixPre II has a sunlight-viewable, high-resolution, touch-screen-based user interface, which consists of the Home screen, Main Menu screen,
and Channel screen views. There are several touch zones on the touch screen for controls. As you become familiar with the user interface, chang-
ing settings for inputs, outputs, recording and metering will become fast and intuitive.
HOME SCREEN
The Home screen view appears on the touchscreen when the device is powered up.
Power Status
Icon
File List Icon
Time counter
Status Bar
Meter View
Current File
Name Menu Icon
Cue Marker
Icon
FILE LIST ICON Touch to enter the File List.
CURRENT FILE NAME Displays the current le name.
TIME COUNTER Displays current timecode value. If timecode is Off,
displays time counter of recording le.
CUE MARKER ICON Touch to lay a cue marker during record or play-
back. Displays current cue mark point.
POWER STATUS ICON Displays the status of the active power
source. See tables oposite for further details.
MENU ICON Touch to enter the setup menu.
METER VIEW Displays audio activity. Touch to toggle through avail-
able meter views.
1. Left and Right mix tracks
2. Left and Right mix tracks with isolated tracks
3. Left and Right mix tracks, USB inputs 1 and 2, and 2 camera
returns (when aux inputs are set to camera)
STATUS BAR Touch to toggle information displayed.
1. SD card status: card/drive activity, available recording time, le
duration, elapsed time, and headphone preset
2. USB drive status: remaining space on drive and when it is actively
copying, sample rate, bit depth
3. Sync Source (if external), Sample rate, and bit depth
4. Date and time
MIXPRE-3 II AND MIXPRE-6 II
Power Status Icon Description
(Green USB)
USB power source is ideal.
(Orange USB)
USB power source low. Brightness
dimmed, HDMI & USB-A ports disabled,
48 V phantom on 2 channels only.
(Green Battery)
Healthy battery. Plan to change batteries
when green level drops to about ¼ full.
(Flashing Red Battery)
Battery power is critically low. Change
batteries.
MIXPRE-10 II
Power Status Icon Description
(Green Battery)
Healthy battery. Plan to change batteries
when green level drops to about ¼ full.
(Flashing Red Battery)
Battery power is critically low. Change
batteries.

MixPre II User Guide 8
Navigating Menus
Most features and functions are selected and set up in the Menu.
Touch the Menu icon from the Home Screen to enter the Menu.
Touch the Page (dots) icon to view the next page of options.
Touch the Back icon to return to the main Menu from any submenu.
Touch the Home icon to immediately return the the Home Screen.
Touch the Headphone icon to enter the Headphone menu.
MAIN MENU SCREEN
Touch any menu item to enter the submenu. The menus available
depend on model and Mode. See Choosing Your Mode for more
information.
CHANNEL SCREEN
Access Channel Screens by pressing the associated channel knob.
Additional software controlled channels on the MixPre-6 II (channel
5,6) and MixPre-10 II (channels 9, 10) are found in the Inputs menu.
The Channel screen is where you will nd channel-specic settings,
such as Channel name, Input selection, Pan, 48 V phantom power
and Low Cut ltering. Options available in the Channel screen depend
on model and Mode. See Choosing Your Mode for more information.
The top left corner of the Channel screen displays an editable Chan-
nel name. Touch this region to give the channel an easy to identify
name, like Vocals or Bob. Below the Channel name is a Channel
meter to aid in setting audio levels.
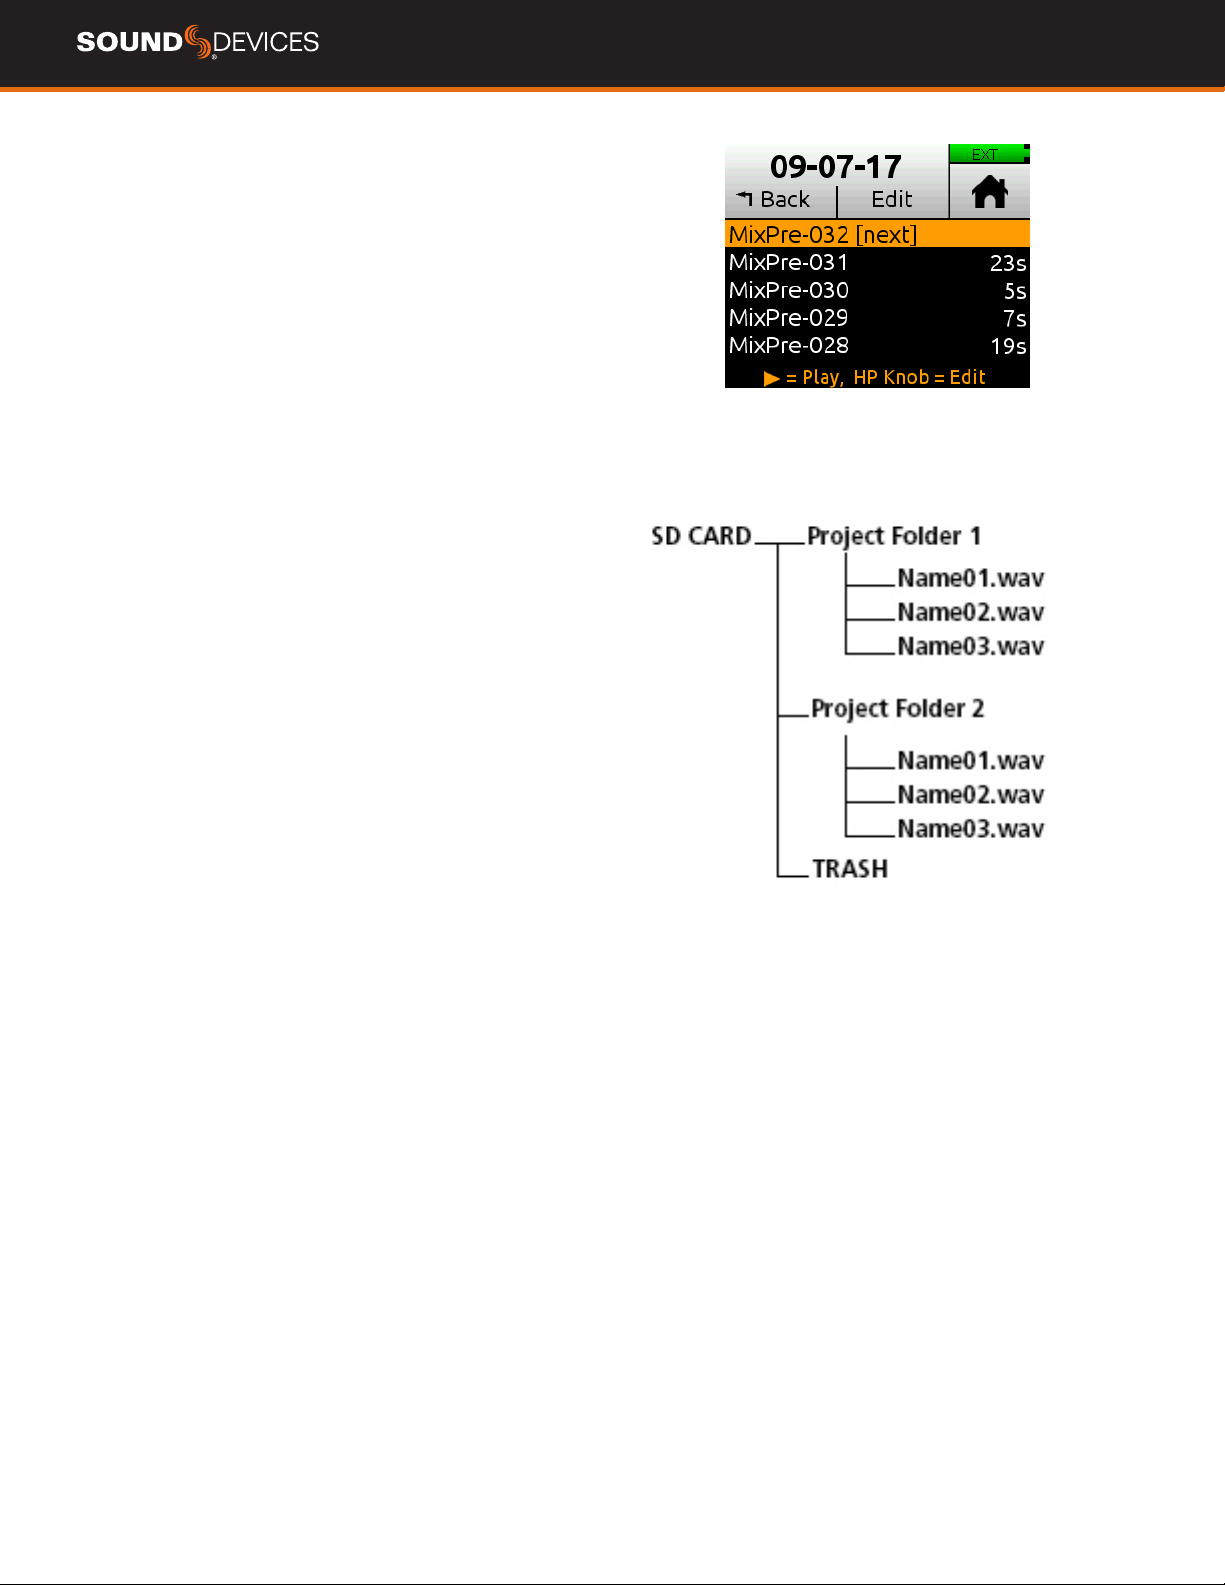
FILE LIST
Access the File Screen by touching the File List icon on the Home
Screen. The File List displays all les of the current project. Turn the
headphone encoder to scroll through the available les. A hightlight-
ed le can be played back or edited. Press the Headphone Encoder
or touch Edit to enter the le options menu. File options depend on
Mode setup. The top le displayed in the list is for the upcoming
recording indicated by (next).

MixPre II User Guide 9
Choosing your Mode
The MixPre II has three differend modes of operation to suit you and your application, Basic, Advanced, and Custom.
Basic mode is intended for hassle-free, plug-and-play use. This mode is ideal for the new user and amateur or any job where you want to keep
things simple.
Advanced mode is intended for use by professionals and users who want to have every available setting and option at their disposal.
Custom mode is intended for users who want to customize the features and functionality with a mix of basic and advanced operation.
The MixPre-3 II and MixPre-6 II default to Basic mode. The MixPre-10 II defaults to Advanced mode. To change your mode, navigate to Menu>Sys-
tem>Mode.
MIXPRE-3 II BASIC VS ADVANCED
FEATURE BASIC ADVANCED
Gain Channel knob controls all gain for a
channel.
Dual gain stage. Input gain is set in the Channel Screen. Channel
knob controls post-fade levels to mix bus.
Channel Screen Options Pan (Left, Center, Right)
Input
Phantom
Low Cut (On or Off)
Solo
Mute
Track Arm (Iso Tracks)
Gain
Pan (variable)
Input
Phantom
Low Cut (On or Off)
Phase
Delay
Stereo and MS Linking
Headphone Options LR Stereo
USB 1,2
LR Stereo
LR Mono
USB 1,2
Presets 1-4
Edit Presets
Camera Stereo
Camera Mono
HP Solo mode (Multiple or Individual)
Outputs Fixed routing of LR mix Stereo Output exible routing
Stereo Output gain
Stereo Out Mode (LTC or Audio)
Stereo Out Mute
File List Options Name
Number
Trash File
Cue Move
Cue Name
Cue Delete
Undo Recording
Name
Number
Notes
Track Names
Trash File
Cue Move
Cue Name
Cue Delete
Aux In Options Mic
Line
Timecode
Off
Mic
Line
Timecode
Camera Return
Off
Record Options Sample Rate xed at 48 kHZ
Bit Depth xed at 24 bit
Records only the Left/Right mix
Pre-roll
Record Triggers
Record Bells
Sample Rate Options 44.1 - 192 kHz
Bit Depth options 16, 24, 32 (oat)
Record Isolated channels and mix tracks
Individual control of Left and Right gain
Individual control of Left and Right record arming
Pre-roll
Record Triggers
Record Bells
ReMix & ReRecord
Tone Menu On or Off On or Off
L Ident Tone
Tone Level
Limiters Always On Limiters (Off, Factory, Custom)
Custom Limiter options (Ratio, Threshold, Release)
MixPre II User Guide 10
MIXPRE-6 II BASIC VS ADVANCED
FEATURE BASIC ADVANCED
Gain Channel knob controls all gain for a
channel.
Dual gain stage. Input gain is set in the Channel Screen. Channel
knob controls post-fade levels to mix bus.
Channel Screen Options Pan (Left, Center, Right)
Input
Phantom
Low Cut (On or Off)
Solo
Mute
Track Arm (Iso Tracks)
Gain
Pan (variable)
Input
Phantom
Low Cut (On or Off)
Phase
Delay
Stereo and MS Linking
Headphone Options LR Stereo
USB 1,2
USB 3,4
LR Stereo
LR Mono
USB 1,2
USB 3,4
Presets 1-4
Edit Presets
Camera Stereo
Camera Mono
HP Solo mode (Multiple or Individual)
Outputs Fixed routing of LR mix Stereo Output exible routing
Stereo Output gain
Stereo Out Mode (LTC or Audio)
Stereo Out Mute
File List Options Name
Number
Trash File
Cue Move
Cue Name
Cue Delete
Undo Recording
Name
Number
Notes
Track Names
Trash File
Cue Move
Cue Name
Cue Delete
Aux In Options Mic
Line
Timecode
Off
Mic
Line
Timecode
Camera Return
Off
Ambisonics not available Requires Plugin
Record Options Sample Rate xed at 48 kHZ
Bit Depth xed at 24 bit
Records only the Left/Right mix
Pre-roll
Record Triggers
Record Bells
Sample Rate Options 44.1 - 192 kHz
Bit Depth options 16, 24, 32 (oat)
Record Isolated channels and mix tracks
Individual control of Left and Right gain
Individual control of Left and Right record arming
Pre-roll
Record Triggers
Record Bells
ReMix & ReRecord
Tone Menu On or Off On or Off
L Ident Tone
Tone Level
Limiters Always On Limiters (Off, Factory, Custom)
Custom Limiter options (Ratio, Threshold, Release)

MixPre II User Guide 11
MIXPRE-10 II BASIC VS ADVANCED
FEATURE BASIC ADVANCED
Gain Channel knob controls all gain for a
channel.
Dual gain stage. Input gain is set in the Channel Screen. Channel
knob controls post-fade levels to mix bus.
Channel Screen Options Pan (Left, Center, Right)
Input
Phantom
Low Cut (On or Off)
Solo
Mute
Track Arm (Iso Tracks)
Gain
Pan (variable)
Input
Phantom
Low Cut (On or Off)
Phase
Delay
Stereo and MS Linking
Headphone Options LR Stereo
X1X2 Stereo
USB 1,2
USB 3,4
LR Stereo
LR Mono
X1X2 Stereo
USB 1,2
USB 3,4
Presets 1-4
Edit Presets
Camera Stereo
Camera Mono
HP Solo mode (Multiple or Individual)
Outputs Fixed routing of LR mix L,R and X1,X2 exible routing
L,R and X1,X2 gain
L,R and X1,X2 Out Mute
L,R and X1,X2 Delay
File List Options Name
Number
Trash File
Cue Move
Cue Name
Cue Delete
Undo Recording
Name
Number
Notes
Track Names
Trash File
Cue Move
Cue Name
Cue Delete
Aux In Options Mic
Line
Timecode
Off
Mic
Line
Timecode
Camera Return
Off
Ambisonics not available Requires Plugin
Record Options Sample Rate xed at 48 kHZ
Bit Depth xed at 24 bit
Records only the Left/Right mix
Pre-roll
Record Triggers
Record Bells
Sample Rate options 44.1 - 192 kHz
Bit Depth options 16, 24, 32 (oat)
Record Isolated channels and mix tracks
Individual control of Left and Right gain
Individual control of Left and Right record arming
Pre-roll
Record Triggers
Record Bells
ReMix & ReRecord
Tone On or Off Flexible Tone Routing
Tone Level
L Ident Tone
Tone Level
Limiters Always On Limiters (Off, Factory, Custom)
Custom Limiter options (Ratio, Threshold, Release)
MixPre II User Guide 12
Custom Mode
Custom mode is intended for users who want to customize the fea-
tures and functionality and operate somewhere between basic and
advanced modes. This mode grants access to select categories of
Advanced Mode. features,
To congure Custom Setup:
Set System > Mode to Custom.
In System > Custom Setup set each category to basic or advanced.
Custom Setup options are:
CATEGORY DESCRIPTION
Channel Allows advanced operation of the following
items: Channel Solo, Mute, Track Arm, Pan,
Low Cut, Phase, Delay, Channel Linking,
and isolated track recording.
Gain Allows advanced operation of channel gain,
including dual gain stage (gain and fader)
and ReMix.
Headphone Allows access to advanced headphone
presets and channel solo.
Record Allows advanced operation of isolated track
arming and recording, LR track linking and
gain, sample rate, and bit depth.
Metadata Allows advanced operation in the Files List.
This includes metadata entry and editing
of name, number, notes, track names, and
access to the undo recording feature.
Outputs Allows advanced operation of Output menu
items such as mute, gain, mode, and
routing.

MixPre II User Guide 13
File List - Basic Mode
Scroll through the chronological list of all les in an active project
with the headphone encoder. The top item in the list is the next le
to be recorded. Directly below that is the last recorded le or le
currently being recorded, followed by all previously recorded les.
Press Edit or push the headphone encoder in to access submenus
for each le.
TO ACCESS THE FILE LIST
Tap the lename at the top of the Home screen.
TO PLAYBACK A FILE FROM THE LIST
Select a le and press Play to play it back.
NAME Edit the le’s name.
NUMBER Edit the le’s number.
MixPre II User Guide 14
File List - Advanced Mode
Scroll through the chronological list of all les in an active project
with the headphone encoder. The top item in the list is the next le
to be recorded. Directly below that is the last recorded le or le
currently being recorded, followed by all previously recorded les.
Press Edit or push the headphone encoder in to access submenus
for each le.
TO ACCESS THE FILE LIST
Tap the lename at the top of the Home screen.
TO PLAYBACK A FILE FROM THE LIST
Select a le and press Play to play it back.
UNDO Undo moves the last recorded le to the SD card’s UNDO
folder and resets the number of the next le. Files in this folder are
accessible using a computer.
NAME,NUM,NOTES Edit the le’s name, number, and, in advanced
mode, make notes.
TRACK NAMES Edit track names within a le.
RENAME Rename the le’s name and number.
TRASH FILE Deletes the le.
CUE LIST Brings up list of all cue marks added during record or
playback. Name, move, and delete cue marks on this list.

MixPre II User Guide 15
Channel Inputs - Basic Mode
The MixPre II’s exibility is enhanced by its ability to select various
input types to its mixer channels. Each of the MixPre II’s channels
can be sourced from an XLR or TRS mic/line input, 3.5 mm Aux line
or mic input (with or without plug-in-power) or from USB channels
from a computer.
There are three channel inputs on the MixPre-3 II, 6 channel inputs
on the MixPre-6 II, and 10 channel inputs on the MixPre-10 II.
For quick and easy applications, access the channel’s input settings
by pushing in the channel’s knob. You will see the Channel screen
displayed. Channels 5 and 6 on MixPre-6 II and 9 and 10 on the
MixPre-10 II are controlled in the Inputs menu.
There, you’ll be able to select the channel input source, whether
you’d like to send the audio to the Left, Center, or Right of the mix
bus, select Phantom power (for condenser microphones and active
DIs), and select a Low Cut Filter.
Channel use a single gain stage adjusted by its Channel knob.
The MixPre II’s Kashmir mic preampliers have great dynamic range
and noise specs as well as limiters so it’s not necessary for you to
set any levels other than that of the Channel knob (which sends the
audio to the LR mix record channels and the LR outputs. The limit-
ers are present on each channel and the LR mix bus. This means
that peaks that would normally clip other mic preampliers and ruin
a mix, will be handled in just the right way to make sure that your
audio is safe from accidental clipping.
PAN Pan the channel’s signal Left, Center or Right in the stereo LR
mix and Stereo Out.
LOW CUT Turn Low Cut lter on or off. Useful for reducing unwant-
ed low frequency in the audio of the select channel.
INPUT Select one of the available Mic, Line, Aux (available when
Aux In Mode is Mic or Line) or USB inputs as the channel source.
PHANTOM Turn on 48 V phantom power when using a condenser
microphone in the selected channel (available when Input is Mic).

MixPre II User Guide 16
Channel Inputs - Advanced Mode
The MixPre II’s exibility is enhanced by its ability to select various
input types to its mixer channels. Each of the MixPre II’s channels can
be sourced from an XLR or TRS mic/line input, 3.5 mm Aux line or
mic input (with or without plug-in-power) or from USB channels from a
computer.
There are three channel inputs on the MixPre-3 II, 6 channel inputs on
the MixPre-6 II, and 10 channel inputs on the MixPre-10 II.
For quick and easy applications, access the channel’s input settings
by pushing in the channel’s knob. You will see the Channel screen
displayed. Channels 5 and 6 on MixPre-6 II and 9 and 10 on the
MixPre-10 II are controlled in the Inputs menu.
There, you’ll be able to select the channel input source, whether you’d
like to send the audio to the Left, Center, or Right of the mix bus,
select Phantom power (for condenser microphones and active DIs),
and select a Low Cut Filter.
Channel use a dual gain stage adjusted by the gain control in the
Channel Screen and the Channel knob controls fader level.
The MixPre II’s Kashmir mic preampliers have great dynamic range
and noise specs as well as limiters. The limiters are present on each
channel and the LR mix bus. This means that peaks that would
normally clip other mic preampliers and ruin a mix, will be handled in
just the right way to make sure that your audio is safe from accidental
clipping.
SOLO Lets you “solo” the selected channel in the headphone output.
Solo mode can be set to “Individual” or “Multiple” in the HP menu.
When a channel is soloed, its light ring will ash orange.MUTE
ARM Allows pre-fade recording of the channel to an individual track
on the SD card.
GAIN Sets the sensitivity of the input. Generally, the Gain should be
set so that the loudest parts of the audio signal just touch the red
segments of the meters. The control knobs on the front panel act as
faders.
PAN Lets you position the audio of the channel anywhere between
Left and Right in the stereo image of the LR mix and Stereo Out.
LOW CUT Turn Low Cut lter on or off. Useful for reducing unwanted
low frequency in the audio of the select channel. Frequency is adjust-
able from 40, 80, 120, or 160 Hz.
INPUT Select one of the available Mic, Line, Aux (available when Aux
In Mode is Mic or Line) or USB inputs as the channel source.
PHANTOM Turn on 48 V phantom power when using a condenser
microphone in the selected channel (available when Input is Mic)
PHASE Phase inversion (or polarity reversal) is used to compensate
for incorrectly wired, balanced cables, to prevent signal cancellation
when a source is dual-mic’d from opposite directions, or to reverse
left/right with microphones in a mid-side (MS) conguration.
DELAY Input delay may be used to compensate for ‘phasey’ sounding
audio because of time-of-arrival differences between sound sources,
such as a boom mic and wireless radio mic picking up the same
sound source.
LINKING Lets you link channels 1 and 2 either as a stereo pair, mid
side pair, or turn linking off.
MIXPRE-3 II BASIC MODE FEATURES AND MENUS
Screen Sub-menu Available Options and Functions
File List File Options The File List is where you manage upcoming and previously recorded les’ metadata and cue
markers. Available options:
Name - Names the le and scene metadata.
Number - Three digit number that follows the Name entry for the le name. Number resets to 001
when the Name is changed. Number is also stored in the take metadata eld.
Trash File - Sends the select le to the Trash folder.
Cue List - Enters the Cue List where
Menu Presets Save and load user presets to and from SD card and internal memory or reset unit to factory default
settings.
Menu Project Create New Projects
Open Projects
Copy Project from SD card to USB drive.
Trash existing projects.
Menu Inputs Aux In Mode sets the source for the 3.5 mm Aux/Mic In. Select from Mic, Line, Timecode, or Off.
Menu Timecode Timecode Mode (Free Run, Time of Day, Record Run, Aux In 1, Aux In 2, HDMI TC In, Off)
Frame Rate (23.98, 24, 25, 29.97 ND, 29.97 DF, 30, 30 DF
Jam - Jams the timecode generator from sources Aux 1 or Aux 2
Set TC -Sets the Timecode value for Free Run or Rec Run modes set Hour, Minutes, Seconds,
Frames
Set UBits - Sets the User Bit format and value (Custom User, Month/Day/User, Day/Month/User,
External)
Menu Tone Turn the test tone on or off. Test tone is a 1kHz sine wave at -20dBFS.
Menu Record Pre-roll (1-10 seconds)
Record Trigger (Off, HDMI ag, or Timecode)
Record Bells (On or Off)
Menu SD Card Displays SD card info, allows formatting the SD card, and emptying their trash folder.
Menu USB Drive Displays USB drive info and allows formatting of the USB drive.
Menu Date/Time Sets current date/time and format.
Menu System Mode - Select your mode of operation from Basic, Advanced, or Custom
Custom Mode - Available when in Custom Mode. Select functions to be Basic or Advanced (Channel,
Gain, Headphone, Record, Metadata, Outputs)
USB-C - Sets the functionality of the USB-C connector from Audio (and power) or Power Only
USB Audio - sets the content of the USB audio inputs and outputs (Normal = advertises all USB
channels to computer or Stereo Out = Left and Right mix only advertised to computer)
File Transfer - Enters le transfer mode so that you can transfer les from the SD card to a computer.
Bluetooth® - turn the Bluetooth circuitry on or off.
Wingman App password -Setup a password to prevent other mobile devices from connecting to
MixPre II over Bluetooth.
LCD/LED brightness setup
System date and time setup
Updating Firmware
Version
Regulatory information
Plugins - Displays installed Plugins and applies Plugins, such as the Musicians plugin.
Menu Power Select the type of batteries being used (Alkaline, NiMH, L-Mount) to ensure that the Power Status
icon on the Home screen accurately displays remaining battery level.
Menu HP Preset Select either LR Stereo or USB 1,2 as the headphone sources.
Channel Pan
Channel Input
Channel Phantom
Channel Low Cut
MIXPRE-3 II ADVANCED MODE FEATURES AND MENUS
Screen Sub-menu DeScription
Home File List The File List is where you manage upcoming and previously recorded les’ metadata and cue
markers. Available options:
Undo - Sends the last recorded le to the Undo folder and rolls back the Number to the previous
value.
Name - Names the le and scene metadata.
Number - Three digit number that follows the Name entry for the le name. Number resets to 001
when the Name is changed. Number is also stored in the take metadata eld.
Notes - Enter or edit notes that are stored in the le’s metadata.
Track Names - Enter or edit names for all record tracks.
Rename - Renames the le.
Trash File - Sends the select le to the Trash folder.
Cue List - Enters the Cue List where
Re-Record LR - This function requires Iso track recording and Remix to be on. Allows you to rerecord
the LR mix track.
Menu Presets Save and load user presets to and from SD card and internal memory or reset unit to factory default
settings.

MixPre II User Guide 17
Input Types Description
Mic Use for microphones. For condenser mics
requiring 48 V phantom power, set Phantom
to On.
Line Use this type for balanced analog line level
sources.
Aux In 1-2 Use for unbalanced stereo input.
USB 1,2
USB 3,4
Use for external audio from a computer.
USB-3,4 is available on the MixPre-6 II and
MixPre-10 II.
Off Turn the input off.
Linking Channels
Are you working with a stereo source—a keyboard or stereo mic per-
haps? To make it easy to adjust these types of sources, the MixPre II
offers linking of channel pairs either as a stereo pair or mid-side (MS)
pair.
STEREO PAIR LINKING - Control the level of both channels 1 and 2
with the Channel 1 knob. The Channel 2 knob will now function as a
balanced control if stereo linked.
MS PAIR LINKING - Control the level of both channels 1 and 2 with
the Channel 1 knob. The Channel 2 knob will now function as a width
control. You can choose to have the MS decoder apply to the mix only
and not isolated tracks in th menu Inputs > MS Decode.
MULTICHANNEL LINKING - When multiple channels are linked,
gain, fader, limiters, track arming, low cut lters, and input delay are
all linked and controlled from the single Channel. Additionally, the Link
Type menu provides the options for which paramaters are linked.
fAll links input type, trim gains, faders,
limiters, low cuts, record arms, and delays
fFaders Only links only fader level.
Gain Staging with Linking
You can use linking with single gain stage or two-gain stage (trim/
fader) operation.
For instance, users wanting to link inputs 1-2 or 1-4, but control all
levels from the front-panel Channel 1 knob should set System > Mode
to Custom and then in Custom Setup, set Gain to Basic and Channel
to Advanced.
Users wanting to link those same inputs but use two gain stages
should use Advanced Mode or Custom mode with both Gain and
Channel set to Advanced. Then, you can adjust trim gain levels for
linked channels from the Channel 1 screen and adjust fader levels for
linked channels with the Channel 1 knob.
Inputs Menu
The Inputs menu allows you to access software-controlled channels
(5/6 on MixPre-6 II and 9/10 on MixPre-10 II) and Aux In Mode
settings.
SOFTWARE-CONTROLLED CHANNEL SCREENS Selects Input
source from Off, USB 1 or 2, and Aux In. From these screens, you may
also solo, mute, arm tracks, adjust gain, pan, low cut, and set linking.
AUX IN MODE Congures how the Aux/Mic In 3.5 mm connector is
used.
1. Mic: Select this option when the Aux/Mic In is to be used with a
mic. The MixPre-10 II provides bias voltage for PiP (plug-in-power)
mics. Aux 1 and 2 are available as input sources to any channel.
2. Line: Select this option when the Aux/Mic In is to be used with an
unbalanced 2ch line source, such as smartphone headphone output,
stereo line source, etc. Aux 1 and 2 are available as input sources to
any channel.
3. Camera: Select this option when the Aux/Mic In is to be used for
monitoring a video camera’s audio output via the MixPre II’s head-
phones and camera return (C1/C2) meters located on meter view.
This is particularly useful when you want to use the MixPre II to
drastically improve the sound quality recorded on the camera. It is
common knowledge that camera mic inputs are not of high quality so
by connecting your mics to the MixPre II instead, then connecting the
MixPre II’s L/R outputs to your camera audio input, you will achieve
far superior sound quality. Then by connecting the camera’s audio
output to the MixPre II’s Aux/Mic In, it allows you to check that the
camera audio is noise and distortion-free.
When this option is selected an additional setting appears in the
Input Menu called Camera Gain. This lets you adjust the gain of the
incoming camera audio level. You also get additional camera monitor-
ing options in the HP Presets menu.
When Aux In Mode is set to Camera, you cannot route Aux In to a
channel and thus you cannot record it.
4. Timecode: Select this option is for using an external timecode
source connected to the Aux/Mic In port. The 3.5 mm TRS connector
is wired to receive timecode on its tip.
Also ensure Menu > Timecode > TC Mode is set to Aux TC In.
Off: Select this option to turn off the Aux/Mic Input.

MixPre II User Guide 18
Limiters
The MixPre II has fully adjustable limiter parameters giving control over
Ratio, Release and Threshold. The limiters can be ne tuned for dialog,
foley, nature recording, and even live instruments.
Access the Limiters menu by navigating to Menu > System > Limiters.
The following options are available in the Limiters menu:
ON/OFF Toggles the Limiters On or Off. While set to On the limiter is a
global setting and applies to every channel.
LIMITER SETUP Toggle limiter preset between Factory or Custom.
CUSTOM Enters Custom Limiter set up menu giving the following pa-
rameter adjustments:
RATIO Sets the Limiting ratio. Options are Inf:1, 10:1, and 20:1. 20:1 is
the default setting.
RELEASE Adjustable from 50-1000 ms in 10 ms increments. 100 ms is
the default setting.
THRESHOLD adjustable from -2 to -12 dBFS in 1 dB steps. -6 dBFS is
the default setting.
Any changes made in Custom Limiter mode are retained after leaving
the menu, allowing you to compare the Factory setting and your own
Custom Limiter setting.
Metering
There are ve basic methods for observing input and output levels on
the MixPre II.
CHANNEL KNOB RING LEDS The brightness of the light ring indi-
cates the level of the input. Green = signal present, red = signal peak-
ing, orange = signal limiting. A channel’s ring LED will ash orange
when in solo and glow red when the channel is muted.
CHANNEL SCREEN METER The Channel screen displays the isolat-
ed channel meter in the top left-hand corner.
HOME SCREEN METERS To switch meter views, touch the meters
to cycle through the three different views. The meters will show signal
levels, current arm status of each track for the recorder and limiting
activity for L,R and each channel.
MAIN LR STEREO METER VIEW
LR, ISO MULTI-TRACK METER VIEW (MIXPRE-10 II SHOWN)
LR, CAMERA RETURNS, AND USB 1,2 METER VIEW
This manual suits for next models
3
Table of contents
Other Sound Devices Measuring Instrument manuals


