Sound Sation Realkit-home User manual

USER’S MANUAL - MANUALE D’USO
Please read this manual carefully and proper take care of this manual.
Leggete per intero questo manuale e conservatelo per future consultazioni!
REALKIT-HOME DIGITAL DRUM

2
ENGLISH
Dear customer,
First of all thanks far purchasing a SOUNDSATION® product. Our mission
is to satisfy all possible needs of musical instrument and professional audio
users offering a wide range of products using the latest technologies.
We hope you will be satised with this item and, if you want to collaborate, we
are looking for a feedback from you about the operation of the product and
possible improvements to introduce in the next future. Go to our website www.
soundsationmusic.com and send an e-mail with your opinion, this will help
us to build instruments ever closer to customer’s real requirements.
One last thing: read this manual before using the instrument, an incorrect
operation can cause damages to you and to the unit. Take care!
The SOUNDSATION Team

3
ENGLISH
TABLE OF CONTENTS
IMPORTANT SAFETY SYMBOLS ..................................................................5
IMPORTANT SAFETY INSTRUCTIONS.........................................................5
Water / Moisture .............................................................................................................5
Heat................................................................................................................................5
Ventilation.......................................................................................................................6
Object and Liquid Entry ..................................................................................................6
Power Cord and Plug .....................................................................................................6
Power Supply .................................................................................................................6
Fuse................................................................................................................................6
Electrical Connection......................................................................................................6
Cleaning .........................................................................................................................6
Servicing.........................................................................................................................6
Warning ..........................................................................................................................6
1. INSTALLATION ...........................................................................................7
RACK SYSTEM................................................................................................................................8
RACK INSTALLATION.....................................................................................................................9
COMPONENTS INSTALLATION....................................................................................................10
2. SOUND MODULE .....................................................................................12
2.1 CONTROL PANEL .................................................................................................12
2.2 BOTTOM PANEL ...................................................................................................13
3. PLAY PAD .................................................................................................14
TURN ON THE POWER.................................................................................................................14
PLAYING PADS.............................................................................................................................14
MASTER VOLUME.........................................................................................................................15
4. DRUM KIT..................................................................................................16
KIT SELECT...................................................................................................................................16
KIT EDIT ........................................................................................................................................17
5. PATTERN...................................................................................................19
PLAY THE PATTERN .....................................................................................................................19
EXERCISE WITH THE PATTERN ...................................................................................................20
6. METRONOME............................................................................................21
7. RECORD....................................................................................................22
RECORD STANDBY ......................................................................................................................22
RECORDING .................................................................................................................................23
STOP AND SAVE...........................................................................................................................24
PLAYBACK....................................................................................................................................24

4
ENGLISH
8. USB & MIDI................................................................................................25
USB ...............................................................................................................................................25
MIDI APPLICATION CHART..........................................................................................................25
9. VOICE LIST................................................................................................26
10. SPECIFICATIONS ...................................................................................28
11. WARRANTY AND SERVICE...................................................................29
12. WARNING ...............................................................................................30

5
ENGLISH
IMPORTANT SAFETY SYMBOLS
The symbol is used to indicate that some hazardous live termi-
nals are involved within this apparatus, even under the normal
operating conditions, which may be sufcient to constitute the
risk of electric shock or death.
The symbol is used in the service documentation to indicate
that specic component shall be replaced only by the compo-
nent specied in that documentation for safety reasons.
Protective grounding terminal
Alternating current/voltage
Hazardous live terminal
Denotes the apparatus is turned on
Denotes the apparatus is turned off
WARNING: Describes precautions that should be observed to prevent the
danger of injury or death to the operator.
CAUTION: Describes precautions that should be observed to prevent dan-
ger of the apparatus.
IMPORTANT SAFETY INSTRUCTIONS
fRead these instructions
fKeep these instructions
fHeed all warning
fFollow all instructions
Water / Moisture
The apparatus should be protected from moisture and rain and can not be used
near water; for example near a bathtub, a kitchen sink, a swimming pool, etc.
Heat
The apparatus should be located away from heat sources such as radiators,
stoves or other appliances that produce heat.

6
ENGLISH
REALKIT-HOME User’s manual
Ventilation
Do not block areas of ventilation opening. Failure to do could result in re.
Always install according to the manufacturer's instructions.
Object and Liquid Entry
Objects do not fall into and liquids are not spilled into the inside of the appara-
tus for safety.
Power Cord and Plug
Protect the power cord from being walked on or pinched particularly at plugs,
convenience receptacles, and the point where they exit from the apparatus.
Do not defeat the safety purpose of the polarized or grounding-type plug. A
polarized plug has two poles; a grounding-type plug has two poles and a third
grounding terminal. The third prong is provided for your safety. If the provided
plug does not t into your outlet, refer to an electrician for replacement.
Power Supply
In case of external power supply, the apparatus should be connected to the
power supply only of the type as marked on the apparatus or described in the
manual. Failure to do could result in damage to the product and possibly the
user. Unplug this apparatus during lightning storms or when unused for long
periods of time.
Fuse
To prevent the risk of re and damaging the unit, please use only of the rec-
ommended fuse type as described in the manual. Before replacing the fuse,
make sure the unit turned off and disconnected from the AC outlet.
Electrical Connection
Improper electrical wiring may invalidate the product warranty.
Cleaning
Clean only with a dry cloth. Do not use any solvents such as benzol or alcohol.
Servicing
Do not implement any servicing other than those means described in the man-
ual. Refer all servicing to qualied service personnel only. Only use accesso-
ries/attachments or parts recommended by the manufacturer.
Warning
Please remember the high sound pressure do not only temporarily damage
your sense of hearing, but can also cause permanent damage. Be careful to
select a suitable volume.

7
ENGLISH
REALKIT-HOME User’s manual
1. INSTALLATION
CRASH
RACK
HI - HAT PEDAL
SNARE SOUND
MODULE
TOM 1
TOM 2
TOM 3
RIDE
HI-HAT
KICK PEDAL
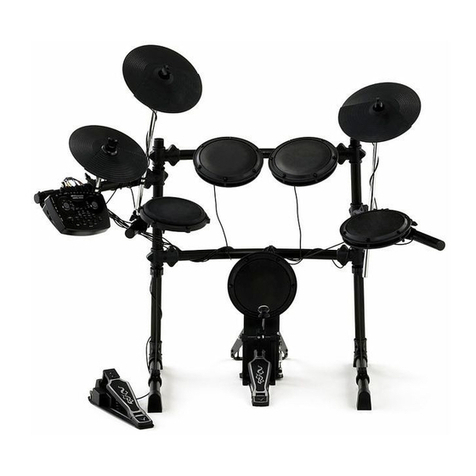
Fig. 1: The drawing shows a complete drum kit after installation.
Each drum pad, cymbal pad and Hi-Hat control pedal has its part number underneath the
component name for your reference in installation. The part number is also printed on the
part packing box. Power adaptor and connection cables are not shown in the drawing.

8
ENGLISH
REALKIT-HOME User’s manual
RACK SYSTEM
Fig.2: Folded rack in package
Fig. 3: Cymbal Holders are contained separately in the package.

9
ENGLISH
REALKIT-HOME User’s manual
RACK INSTALLATION

10
ENGLISH
REALKIT-HOME User’s manual
COMPONENTS INSTALLATION
2
1
2
1
3
Hi-Hat Installation
1. Remove the wing nut, washer and felt pad
2. Put the Hi-Hat into the rod along with parts
removed in step 1. Fasten the wing nut.
Crash and Ride Installation
1. Remove the wing nut, washer and felt
pad.
2. Put the cymbal pad into the rod along with
parts removed in step 1. Tighten the wing
nut modertly to give the pad a little bit
wobbling like the real acoustic cymbal.
Note: Crash and Ride have different part na-
mes. Please refer to indication on page 7.
3. Adjust the angle of the rod then tighten
the wing nut.
Tom Installation
1. Insert the tom into support arm, then
adjust its position and angle. Tighten
the screw with the screw driver inclu-
ded.
Note: All the toms use the same pad.
Adjust the angle of the rod then tighten
the wing nut.

11
ENGLISH
REALKIT-HOME User’s manual
Finalizing the Installation
Adjust arms, clamps and rods to the best position you like to nalize the installa-
tion.
Electronic Connection
Please refer to the SOUND MODULE Chapter for electronic connection.
Snare Installation
1. Insert the snare into the L-Rod, then
tighten the wing nut.
2. Adjust the angle of the L-Rod then
tighten the wing nut in the clamp.
Sound module Installation
1. Align holes in supporting board with
these in sound module then fasten
them with screws.
2. Insert rod of the supporting board into
the clamp, then tighten the wing nut.

12
ENGLISH
REALKIT-HOME User’s manual
2. SOUND MODULE
2.1 CONTROL PANEL
1. Display: The display is a 3-digital 7-Segment LED type showing Informa-
tion such as Kit number, Voice number etc.
2. CLICK Button: Metronome On/Off switch
3. TEMPO Button: Change the tempo of the metronome, it is also used for
recording and Pattern playing.
4. MASTER VOLUME Knob: Rotate the knob clockwise to increase the ma-
ster volume and counter-clockwise to decrease the master volume.
5. KIT Button: Enter the Drum kit selection mode.
6. PATTERN Button: Enter the Pattern play mode.
7. VOICE Buttons: Enter the voice assignment mode.
8. VOLUME Button: Enter the volume adjustment mode.
9. DRUM OFF Button: Mute drum sound in the pattern.
10. STOP Buttons: Stop the pattern playing or recording.
11. PLAY Button: Play the Pattern.
12. RECORD Buttons: Enter the record mode.

13
ENGLISH
REALKIT-HOME User’s manual
13. SAVE Button: Save the record and setting.
14. +/- Buttons: It is universal in the kit, pattern selection and volume setting etc.
15. Pad Select Buttons: Select a pad in kit edit and display pad performance
in pattern playing.
RESET
2.2 BOTTOM PANEL
1. Power Switch: Turn On/Off the sound module
Note: After you turn the power off, do not turn it on immediately. Wait at least ve
seconds so that the electronic circuits can be properly reset.
2. Power In Jack: Plug in the DC cable of the attached adaptor.
3. USB Jack: The USB connector allows you to connect the drum directly to your
computer’s USB port. The USB interface is compatible with Windows XP/Vista,
Windows 7 and MAC. The computer will recognize the drum as Audio Device.
4. Pad Trigger Connector: Each pad and Hi-Hat control pedal have labeled cables.
All cables are merged into a single connector. Plug the cable into the jack of the
corresponding component, and then plug in the connector here.
5. Headphone Jack: The drum has a stereo headphone jack. You can play in total
silence without disturbing others in the room by plugging a set of headphones into
the socket.
6. Line Out Jack: There is no built-in speaker in the drum. Line Out of stereo audio
output delivers the drum output signal to external amplication, such as home ste-
reo, PA system or other stand alone ampliers. If you connect to an external mono
system, stereo/mono adapter is recommended.
7. Line In Jack: Line In of stereo audio input jacks will mix the supplied signal with
the internal drum sound. It can be used to connect to items such as CD players,
MP3
player etc.
Press and hold down both + and - button when turn
on the power until rES appears on the display. The
factory setting will be restored and recorded conten-
ts erased.

14
ENGLISH
REALKIT-HOME User’s manual
3. PLAY PAD
TURN ON THE POWER
1. Turn down the external audio device connected with the drum.
2. Press the POWER button while don’t strike pad or press the Hi-Hat control
pedal.
3. Turn on external devices connected.
4. Strike the pad and adjust the volume to a proper level.
PLAYING PADS
All pads have striking force sensitivity feature. Strike the pad harder to make a
higher volume and strike the pad softer to make a lower volume.
Playing Tom Drum
Strike the central position to create a sound.
Playing Cymbal
Strike rubber area of the crash and ride pad to create a cymbal sound.
The crash has choke feature. Strike the crash pad, its sound will sustain.
Squeeze the edge portion, the sound will be mute.

15
ENGLISH
REALKIT-HOME User’s manual
Playing Snare Drum
Strike the central position (head) of the pad to make head sound, strike the rim
of the pad to make a rim sound.
Playing Hi-Hat
1. Strike the Hi-Hat pad without pressing the Hi-Hat control pedal to make an
open Hi-Hat sound.
2. Strike the Hi-Hat pad while fully pressing the Hi- Hat control pedal to make
a close Hi-Hat sound.
3. Strike the Hi-Hat pad while pressing the Hi-Hat control pedal gradually, the
consecutive open sound changes to close sound.
4. Press the Hi-Hat pedal down quickly to make Hi-Hat pedal sound.
Playing Kick Drum
Press the Kick drum pedal to make a kick drum sound.
MASTER VOLUME
Rotate the MASTER VOLUME knob to turn the master volume
up/down. Rotate the knob clockwise to increase the volume;
rotate the knob counter-clockwise to decrease the volume.

16
ENGLISH
REALKIT-HOME User’s manual
4. DRUM KIT
This drum has 20 preset drum kits
for your choice. The kit is a combi-
nation of different instrument voices
assigned to each pad which has
unitary style for performance. Any kit
could be edited and saved. After the
power is turned on, the kit mode is
engaged automatically the KIT but-
ton is lit and the kit number is shown
on the display.
In other operation modes, you could
press the KIT button to enter the kit
mode directly.
KIT SELECT
Press the + or - button to select the
kit you desire from the kit list below
ranging 01 - 20. The default kit num-
ber is 01. When you re-enter the kit
mode, the kit number will be one you
selected last time.

17
ENGLISH
REALKIT-HOME User’s manual
KIT EDIT
After selecting a kit, you can change
the voice and its volume of each pad
and save them.
CHANGE THE VOICE AND
VOLUME OF THE PAD
Press the VOICE button to assign a
voice to the pad and press the VO-
LUME button to change its volume.
The pressed button will light up and
blink. Before editing, you should se-
lect a pad by pressing the pad select
button. The selected pad button will
light up and blink, and then you can
hear its voice.
Please note that the snare has head
and rim parts; Hi-Hat has open and
close voices. Press the correspon-
ding button twice to select an alter-
native part of this pad and the light
color of the button becomes blue.
The default pad is Tom 1. Or, it is the
pad you edited last time.

18
ENGLISH
REALKIT-HOME User’s manual
The following procedure is for voice
assignment. The way of changing its
volume is the same.
While the VOICE button and the
selected pad button blink, its current
voice number will appear on the di-
splay. Use the +, - button to change
the voice number ranging 1 - 184.
Press both + and - button simultane-
ously, its original voice will be resto-
red. All assignable voices are listed
in the Appendix VOICE LIST.
You can test the voice by striking the
pad or pressing the pad button.
fTip: Press and hold down the +
or - button, the data will change
consecutively. It is helpful for you
to change the number in large
range.
You can change the voice of another
pad by pressing another button. Or,
you can adjust the volume of this
pad by pressing the VOLUME button
and the VOLUME button will light up
and blink. The display shows current
volume. Then, use the +/- button to
change the volume ranging 0 - 127.
fTip: An easy way to select a part is
to hit the pad or press the Hi-Hat
pedal directly. The corresponding
button will light up and blink. Ple-
ase note that a too slight striking
cannot trigger a proper selection.

19
ENGLISH
REALKIT-HOME User’s manual
EXIT FROM THE EDIT MODE
Press the blinking VOICE or VOLU-
ME button again to exit and turn to
the kit select mode. Its indicator will
be off. Please note that your setting
will be lost when you turn off the
power. You can also exit by pressing
the SAVE button. In this way, your
setting is nonvolatile even when you
turn off the power.
fTip: You can restore the factory
setting. Please refer to descrip-
tion about the Reset on page 13.
5. PATTERN
There are 50 built-in patterns for your
enjoyment and exercise.
PLAY THE PATTERN
Press the PATTERN button to enga-
ge the pattern mode and its indicator
will light up. The pattern number with
“P” in front will appear and blink on
the display. Use the + or – button to
select a pattern. Press the PLAY but-
ton to start playing and the display
will show measure number. Pad
select buttons will ash to indicate
which pad is performed.
When the pattern playing is nished,
it’ll restart from the very beginning.
Press the STOP button to stop the
playing.
During the playing, you can also
select a pattern by pressing the + or
- button, the next/last pattern number
will appear on the display. After se-
lecting, the new pattern will start play
from the rst measure.

20
ENGLISH
REALKIT-HOME User’s manual
During the playing, you can change
its tempo. Press the TEMPO button,
its indicator will light up and blink.
The current tempo will appear on the
display and blink. Use the + or - but-
ton to change the tempo ranging 40
- 240. Press both + and - button si-
multaneously, the tempo will recover
the original value. Wait 3 seconds or
press the TEMPO button again, the
display will recover the measure.
EXERCISE WITH THE PAT-
TERN
During the pattern playing, you can
also play pads. All patterns consist of
drum pattern and orchestral back-
ground music. You can mute the
drum sound and play by yourself ac-
companied with background music.
Press the DRUM OFF button to mute
the drum sound and the button will
light up. The volume of the pattern
is adjustable. Press the VOLUME
button, the button will light up and
blink while the current volume will be
displayed. Use the + or - button to
adjust the volume. Wait 3 seconds or
press the VOLUME button again, the
display will recover the measure.
Press the KIT button or press the
PATTERN button again to exit and
turn to the Kit mode.
Table of contents
Languages:
Other Sound Sation Drum manuals

