ATV aD5 User manual

Quick Start Guide
DA
NL
PT
ES
IT
FR
DE
JA
EN

2
Welcome.
Before using the aD5, be sure to read “4 Important Notices” (p. 14).
Contents
Packing list . . . . . . . . . . . . . . . . . . . . . . . . . . . . . . . . . . . . . . . . . . . . . . . . . . . . . . . . . . . . . . . 3
Attaching the stand adapter . . . . . . . . . . . . . . . . . . . . . . . . . . . . . . . . . . . . . . . . . . . . . . . . . . 3
Top panel . . . . . . . . . . . . . . . . . . . . . . . . . . . . . . . . . . . . . . . . . . . . . . . . . . . . . . . . . . . . . . . . 4
Rear panel . . . . . . . . . . . . . . . . . . . . . . . . . . . . . . . . . . . . . . . . . . . . . . . . . . . . . . . . . . . . . . . 5
1 Getting Ready . . . . . . . . . . . . . . . . . . . . . . . . . . . . . . . . . . . . . . . . . . . . . . . . . . . . . . . . . . 6
Audio . . . . . . . . . . . . . . . . . . . . . . . . . . . . . . . . . . . . . . . . . . . . . . . . . . . . . . . . . . . . . . . . . . . 6
Pads. . . . . . . . . . . . . . . . . . . . . . . . . . . . . . . . . . . . . . . . . . . . . . . . . . . . . . . . . . . . . . . . . . . . 6
Zones supported by the aD5’s trigger inputs. . . . . . . . . . . . . . . . . . . . . . . . . . . . . . . . . . . . . . 7
Compatible pads and hi-hat control pedals. . . . . . . . . . . . . . . . . . . . . . . . . . . . . . . . . . . . . . . 7
Turning the power on . . . . . . . . . . . . . . . . . . . . . . . . . . . . . . . . . . . . . . . . . . . . . . . . . . . . . . . 8
Turning the power o . . . . . . . . . . . . . . . . . . . . . . . . . . . . . . . . . . . . . . . . . . . . . . . . . . . . . . . 8
Turning the power o automatically (auto power-o) . . . . . . . . . . . . . . . . . . . . . . . . . . . . . . . . 8
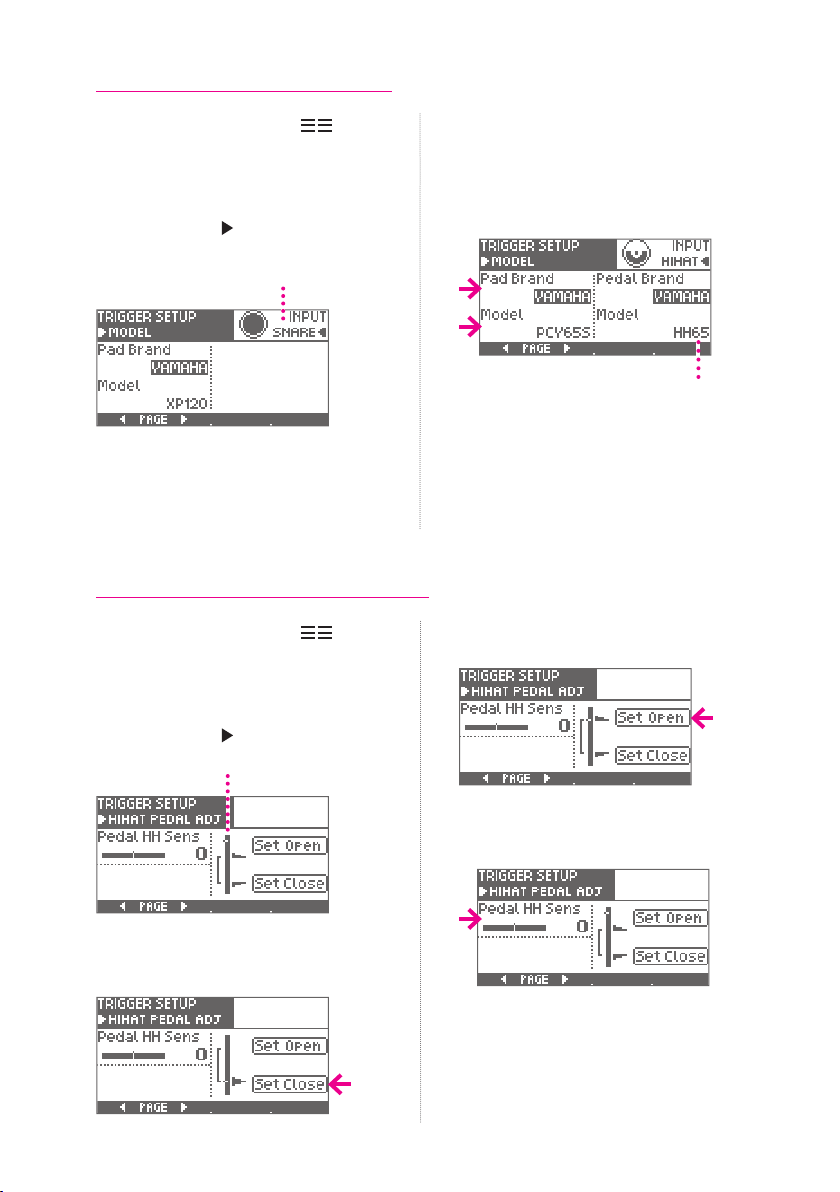
Trigger settings . . . . . . . . . . . . . . . . . . . . . . . . . . . . . . . . . . . . . . . . . . . . . . . . . . . . . . . . . . . . 9
2 Performing . . . . . . . . . . . . . . . . . . . . . . . . . . . . . . . . . . . . . . . . . . . . . . . . . . . . . . . . . . . . 11
Home screen . . . . . . . . . . . . . . . . . . . . . . . . . . . . . . . . . . . . . . . . . . . . . . . . . . . . . . . . . . . . 11
Performing . . . . . . . . . . . . . . . . . . . . . . . . . . . . . . . . . . . . . . . . . . . . . . . . . . . . . . . . . . . . . . 11
Changing instruments. . . . . . . . . . . . . . . . . . . . . . . . . . . . . . . . . . . . . . . . . . . . . . . . . . . . . . 12
Switching drum kits . . . . . . . . . . . . . . . . . . . . . . . . . . . . . . . . . . . . . . . . . . . . . . . . . . . . . . . 12
3 Detailed Information . . . . . . . . . . . . . . . . . . . . . . . . . . . . . . . . . . . . . . . . . . . . . . . . . . . . 13
Details of functions . . . . . . . . . . . . . . . . . . . . . . . . . . . . . . . . . . . . . . . . . . . . . . . . . . . . . . . . 13
Specications . . . . . . . . . . . . . . . . . . . . . . . . . . . . . . . . . . . . . . . . . . . . . . . . . . . . . . . . . . . . 13
Support . . . . . . . . . . . . . . . . . . . . . . . . . . . . . . . . . . . . . . . . . . . . . . . . . . . . . . . . . . . . . . . . 13
4 Important Notices . . . . . . . . . . . . . . . . . . . . . . . . . . . . . . . . . . . . . . . . . . . . . . . . . . . . . . 14
Important safety information . . . . . . . . . . . . . . . . . . . . . . . . . . . . . . . . . . . . . . . . . . . . . . . . . 14
Important information about use . . . . . . . . . . . . . . . . . . . . . . . . . . . . . . . . . . . . . . . . . . . . . . 15

3
Packing list
The following items are included with this product.
Attaching the stand adapter
If mounting the aD5 on a stand, use the
attachment screws to fasten the included
stand adapter to the bottom surface of the
aD5.
The aD5 can be mounted on a microphone
stand. Use the W3/8 screw hole on the
bottom of the aD5.
aD5 Module
Multi-trigger cable
Quick Start Guide (this book)
Stand adapter
AC adapter

4
Power button
Long-press this
button to turn the
power on/o.
Top panel
Value knob
Used to change
various settings.
PHONES
Connect your
headphones here.
About the function buttons
Use the function buttons to select the corresponding items or functions in the screen.
Function button
The function of each button is shown in
the screen. These buttons are also used
to select items in the screen. Available
buttons are lit.
[OK] button
Conrms a change made to a
setting. This button is also used in
a conrmation screen.
[CANCEL] button
Cancels a change made to
a setting, returning to the
previous screen. This button
is also used in a conrmation
screen.
[HOME] button
Returns to the initial
screen (home screen).
Volume
Adjusts the volume of
the headphones and the
OUTPUT.
Buttons for
which there is no
corresponding item
are unlit.

5
Rear panel
AUX 1, 2
Additional pads
can be connected
here to expand your
drum kit.
QR code
Use this to access the
manual, the latest rmware,
or sound data on the ATV
website.
ATV LINK
This has no function at the
present time. We plan to
provide a rmware update
that allows this to be
connected to other devices.
USB
The aD5 can be connected to a Mac or
Windows PC, allowing MIDI messages
to be transmitted and received. Use a
USB 2.0 cable.
About the AC adapter
The AC adapter can be used worldwide.
Attach the included plug that is suitable for the type of outlet in your
country.
*You must use only the included AC adapter and plug.
OUTPUT
These jacks output the
audio signal. Connect
them to powered speakers
or a mixer.
SD CARD
You can use a card to back
up the aD5’s data or to
load sound data. SD/SDHC
cards with a capacity of up
to 32 GB are supported.
DC IN
Connect the included
AC adapter here.
AUDIO IN
You can connect your music
player here and listen to its sound
mixed with the audio produced
by the aD5.
MULTI TRIGGER
Connect the included multi-trigger
cable here to input trigger signals
from the pads.
1
2

6
1 Getting Ready
In order to use the aD5 you’ll need the following (commercially available) items.
Audio
• Headphones or powered speakers
• If you connect the headphone port of your PC or tablet to the AUDIO IN jack, you’ll be able to
play along with songs.
Pads
• Drum pads, cymbal pads, kick triggers, etc.
• Stands, drum sticks, kick pedal, drum throne, etc.
Connect the aD5’s multi-trigger cable to your pads.
Note the connection destination written on each plug of the multi-trigger cable, and connect them
as shown in the illustration.
L R
Stereo phone
Mono phone
Stereo mini
AUDIO IN
USB
SD CARD
DC IN
21
AUX
ATV LINK
MULTI TRIGGER
TRIGGER INPUT
R OUTPUT L
T3
SN
T1 T2
RD
CR
HH
CTL
K
BEL

7
1 Getting Ready
Zones supported by the aD5’s trigger inputs
aD5 trigger
input Supported zone Choke
method Notes
KICK (K) Head
SNARE (SN) Head, Rim YES
• Switch between rimshot and side stick for Yamaha 3-zone
pads
• Choke technique is supported if a cymbal pad is connected
TOM 1 (T1) Head
TOM 2 (T2) Head
TOM 3 (T3) Head
HI-HAT (HH) Bow, Edge YES • Rim is not supported for Roland mesh pads
CRASH (CR) Bow, Edge YES • Cup is not supported for Yamaha three-zone cymbals
• Rim is not supported for Roland mesh pads
RIDE
(RD/BEL) Bow, Edge, Cup YES
• Three-way triggering is supported for Roland ride cymbal pads
(use the BEL plug)
• Select either Edge or Cup for Yamaha three-zone cymbals
• Rim is not supported for Roland mesh pads
AUX 1 Head, Rim
(Bow, Edge) YES
AUX 2 Head, Rim
(Bow, Edge) YES
*The controller knob of Yamaha pads is not supported.
*For details on connecting and playing pads made by the respective manufacturers, refer to the owner’s manual
of each pad.
*To connect pads to the AUX 1 or AUX 2 trigger inputs, use the cable included with each pad.
*Connect the CTL plug to the hi-hat control pedal or to the hi-hat open/close sensor.
*Roland multi-trigger cable does not work right with the aD5.
*Touching an unused plug of the multi-trigger cable to metallic things can cause unintended triggering. Protect
unused plugs with adhesive tape to avoid this.
Compatible pads and hi-hat control pedals
For compatible pads and hi-hat control pedals, refer to the “Pad Compatibility List” PDF.
The “Pad Compatibility List” can be downloaded from the following URL.
http://products.atvcorporation.com/drums/ad5/

8
1 Getting Ready
Turning the power on
1 Lower the volume of the connected amp or speakers.
2 Long-press the power button of the aD5.
The power turns on.
Turning the power o
1 Lower the volume of the connected amp or speakers.
2 Long-press the power button of the aD5.
The power turns o.
All settings are saved.
*Disconnecting the AC adapter without turning o the power will cause malfunctions. You must turn o the
power by pressing the power button.
Turning the power o automatically (auto power-o)
If the aD5 has not been played or operated for 30 minutes, it automatically turns o the power
in order to conserve electricity. You can disable this function. For details, refer to the “Reference
Guide” PDF (p. 13).

9
1 Getting Ready
Trigger settings
You’ll need to make trigger settings when using the aD5 for the rst time or after you’ve changed
the types of pads. This allows the data from the pad sensors to be processed correctly so that the
aD5’s performance capabilities can be fully utilized.
You must set the following three items.
<1> Crosstalk cancel
setting (p. 9)
This prevents the “crosstalk” that can occur when the impact of striking a pad
reaches another pad, unintentionally triggering it.
Complete this setting simply by striking each pad as instructed by the crosstalk
cancel wizard.
<2> Trigger setting for
each pad (p. 10)
These settings specify the response of each of your pads to ensure that the sound
accurately reects the output of the pad sensor.
Simply select the model name of each pad, and the typical response is specied.
<3> Hi-hat control pedal
adjustment (p. 10)Make adjustments so that the hi-hat control pedal operates correctly.
1 Press the [HOME] button, and then press
[ ].
2 Select the [SYSTEM] tab, and then press
[TRIGGER].
3 Press [Crosstalk Cancel Wizard].
4 As directed in the screen, strongly hit the
specied pad three times.
Specied pad
OK
indication
*If you press [RETRY], the previous strikes are
discarded.
5 When the screen indicates “OK” press
[NEXT] to proceed.
6 Repeat steps 4—5 in the same way.
The aD5 calculates the state of crosstalk for
all of the connected pads.
*We recommend that you play a rimshot when
striking the snare pad.
*If the specied pad is not connected, press [SKIP].
7 When the following screen appears,
play the pads to verify that there is no
crosstalk, and then press [EXIT].
*If there is crosstalk, press [YES] and repeat the
wizard once again.
<1> Crosstalk cancel setting

10
1 Getting Ready
<2> Trigger setting for each pad
<3> Hi-hat control pedal adjustment
1 In the home screen, press [ ].
2 Select the [SYSTEM] tab, and then press
[TRIGGER].
3 Press the [PAGE ] to access the MODEL
page.
Pad being congured
4 Strike the pad that you want to congure.
5 Press [Pad Brand] to select the
manufacturer, and press [Model] to select
the model name of the pad.
*When making settings for the hi-hat pad, you’ll
also specify the model name of the hi-hat pedal.
Model name of the hi-hat pedal
6 Repeat steps 4—5 in the same way to
congure for all pads.
7 Press the [OK] button to conrm the
setting.
If you decide not to change the setting,
press the [CANCEL] button.
1 In the home screen, press [ ].
2 Select the [SYSTEM] tab, and then press
[TRIGGER].
3 Press the [PAGE ] several times to
access the HIHAT PEDAL ADJ page.
Meter
4 Advance the hi-hat pedal to the closed
position, and press [Set Close].
5 Remove your foot from the hi-hat pedal,
and press [Set Open].
6 Press [Pedal HH Sens] and adjust the
foot-close and foot-splash volume.
7 Press the [OK] button to conrm the
setting.
If you decide not to change the setting,
press the [CANCEL] button.

11
2 Performing
Home screen
The home screen is the screen that appears when you turn on the power.
From any screen, you can return to the home screen by pressing the [HOME] button.
When playing drums, make sure that the home screen is displayed.
Instrument
“Instrument” (INST) refers to the sound you hear when you play each pad, such as a snare drum
or ride cymbal. You can change the instrument for each pad.
Instrument group
The aD5 contains numerous instruments. They are organized in to groups according to their type.
Drum kit
A “drum kit” consists of the instruments assigned to each pad. When you change the drum kit to
jazz or to rock, all the instruments are changed with this single action.
Performing
Strike a pad, and you’ll hear a sound. The sound changes in a natural way in response to the
strength of your strike. The screen shows the instrument of the pad that you struck.
Side stick (cross stick)
To play side sticks on the snare pad, turn [SIDE STK] on. You can switch between rimshots and
side sticks.
Pad you struck
Drum kit
Instrument group
Instrument

12
2 Performing
Changing instruments
Here’s an example of you can assign a dierent snare drum instrument to the snare pad.
Switching drum kits
By switching drum kits you can change the instruments of all pads in a single action.
The aD5 comes with various drum kits in its memory.
1 Strike the snare pad.
The instrument assigned to the snare pad
appears in the screen.
2 Press [INST].
The INST ASSIGN screen appears.
3 Use the value knob or [ ][ ] to change
the instrument.
Strike the snare pad to hear the sound.
4 Press the [OK] button to conrm the
setting.
If you decide not to change the setting, press
the [CANCEL] button.
You can change the instruments of other
pads in the same way.
1 Press [KIT].
The KIT SELECT screen appears.
2 Use the function buttons to select a kit.
Next page
Select the kit group
• Use [PAGE ] to see the next page.
• Use [GROUP] to change the kit group. If
you select ALL, all drum kits are displayed.
The home screen appears, and the drum kit
is loaded.
*It takes about 5 seconds for a drum kit to be
loaded.

13
3 Detailed Information
Details of functions
The aD5 has many other functions.
For detailed information and a detailed explanation of the functions, refer to the “Reference Guide”
PDF.
You can download the “Reference Guide” PDF from the following URL.
http://products.atvcorporation.com/drums/ad5/
Specications
Electronic Drum Sound Module
Model: aD5
Item Specications
Connection jacks /
Interfaces
OUTPUT L/R: mono phone x 2
PHONES: stereo phone
AUDIO IN: stereo mini-phone
MULTI TRIGGER INPUT: dedicated multi-connector
AUX TRIGGER INPUT 1/2: TRS phone
USB: 2.0 type B connector (High Speed)
ATV LINK: RJ45 LAN connector
SD CARD: SD/SDHC card
DC IN: only for the included AC adapter
Power supply DC 12 V
Current
consumption 600 mA
Dimensions 197 (W) x 144 (D) x 73 (H) mm
7.8 (W) x 5.7 (D) x 2.9 (H) inches
Weight 1.1 kg
*Specications and appearance of this product are subject to change without notice for improvement.
Support
• Refer to the following URL for frequently asked questions, rmware updates, and other
information.
http://products.atvcorporation.com/drums/ad5/

14
4 Important Notices
Important safety information
Failure to observe the following safety directives may result in re, electric shock, injury, or damage
to the aD5 or to other items or property.
You must read all of the following safety information before you use the aD5.
About the symbols
"Caution": Calls your attention to a point
of caution
"Do not ...": Indicates a prohibited action
"You must ...": Indicates a required action
About warnings and cautions
WARNING
Indicates a hazard that could
result in death or serious injury
CAUTION
Indicates a hazard that could
result in injury or property
damage
WARNING
Do not disassemble or modify
Do not disassemble or modify this product.
Do not use or store in the following locations
• Locations of high temperature (in direct
sunlight, near heating equipment)
• Moist or humid locations (near a bath or
shower, or on a wet oor)
• Locations subject to salt damage
• Locations subject to water or rain
• Excessively dusty locations
Do not damage the power cord
Do not excessively bend the power cord or
damage it. Do not place heavy objects on top
of the power cord. Doing so may damage the
power cord, causing re or electric shock.
Use the included AC adapter
Use only the included AC adapter. Use the
adapter with the voltage that it species.
Turn o the power if an abnormality or
accident occurs
In the following situations, immediately turn o
the power, disconnect the AC adapter from the
AC outlet, and contact your dealer or ATV for
servicing.
• If the AC adapter, power cord, or plug is
damaged
• If smoke is emitted or an abnormal odor is
noticed
• If liquid or a foreign object enters the unit
• If an abnormality or malfunction occurs in
the unit
Do not drop or subject to strong impact
Do not drop this product or subject it to strong
impact.
Do not plug or unplug the AC adapter with
wet hands
You risk electric shock by doing so.
CAUTION
Grasp the power plug when connecting or
disconnecting
When connecting or disconnecting the AC
adapter from the unit, you must grasp the plug
rather than pulling the power cord.
Don’t use AC outlet multipliers
Doing so will cause the outlet to become hot,
causing a re hazard.
If the power plug is dusty, wipe it o
Dust on the power plug can cause electric shock
or short circuits.
Disconnect the power plug from the AC
outlet if not using the unit for an extended
time, or if lightning is expected
Failure to do so may cause electric shock, re,
or malfunction.
Disconnect all connections before moving
the unit
Failure to do so may cause damage to the
power cord or cables, or may cause people to
trip over the cables.
Don’t place the unit in an unstable location
Doing so may cause the unit to overturn,
causing personal injury.
Don’t sit or stand on the unit, or place heavy
objects on it
Doing so may damage the unit.
You should also avoid applying excessive force
to the buttons, knobs, and input/output jacks.
Doing so will cause malfunctions.
Don’t use the unit at high volume for an
extended time
Using speakers or headphones at high volume
for an extended time will damage your hearing.
Handle the unit with care
Take care that your hands or ngers are not
injured by corners or openings in the unit.
Place small parts out of reach of children
Place small parts out of reach of children who
might accidentally swallow them.

15
4 Important Notices
Important information about use
Placement
• Do not use this unit near other electrical products such
as televisions, radios, stereos, or mobile phones. This
unit may cause noise in televisions or radios.
• Do not use this unit in locations where extremely high
temperatures might occur, such as in direct sunlight,
in a car in sunlight, or near a stove. Doing so may
cause the unit to be deformed or discolored, or internal
components to malfunction.
Power supply
• A small amount of current ows even when the power
is turned o. If you will not be using this unit for an
extended period of time, you must unplug the AC
adapter from the AC outlet.
Cleaning
• Use a soft dry cloth to clean the unit. Do not use
benzene, thinner, detergent, or chemically treated cloth,
since these can cause deformation or discoloration.
Data
• Please be aware that the manufacturer bears no
responsibility for any consequences that may arise from
damage to or loss of data.
• In some cases, equipment malfunction or incorrect
operation can cause the contents of the memory to be
lost. Please make a backup of any important data that is
in the memory.
Copyright
• Duplication or reuse of the music and sound data
provided by ATV Corporation and third parties without
permission from the copyright holder is forbidden (with
the exception of copying for personal use as permitted
by copyright law).
• Copyright for the content (sound data, phrase data,
audio data, image data, computer programs, etc.)
contained in or included with this product is the property
of ATV Corporation. Copyright law forbids you to use the
above content without permission of ATV Corporation for
any purpose other than personal use.
• The above content that is contained in or included with
this product may not be resold, distributed, or published,
neither in its existing form nor in any way that resembles
it. However, this prohibition does not apply to sound
data exported from this product and distributed free of
charge.
This document
• All illustrations and screens appearing in this document
are for the purpose of explaining operation, and may
dier from the actual specications.
• Company names and product names appearing in this
document are the registered trademarks or trademarks
of their respective corporate owners.

2016 Rev.02
© 2015 ATV Corporation All rights reserved.
www.atvcorporation.com
Other manuals for aD5
3
Table of contents
Other ATV Drum manuals