Sound Sation K2U User manual
ELECTRONIC KEYBOARD with 61 piano keys
touch response and mp3 Player
Please read this manual carefully and properly take care of it
USER MANUAL
Leggete questo manuale e conservatelo per future consultazioni
MANUALE UTENTE

Dear customer,
First of all thanks far purchasing a SOUNDSATION® product. Our mission is to satisfy
all possible needs of musical instrument and professional audio users oering a wide
range of products using the latest technologies.
We hope you will be satised with this item and, if you want to collaborate, we are
looking for a feedback from you about the operation of the product and possible
improvements to introduce in the next future. Go to our website www.soundsation-
music.com and send an e-mail with your opinion, this will help us to build instruments
ever closer to customer’s real requirements.
One last thing: read this manual before using the instrument, an incorrect operation
can cause damages to you and to the unit. Take care!
The SOUNDSATION Team
Gentile Cliente,
Grazie per aver scelto un prodotto SOUNDSATION®. La nostra missione è quella di
orire ai nostri utenti una vasta gamma di strumenti musicali ed apparecchiature audio
e lighting con tecnologie di ultima generazione.
Speriamo di aver soddisfatto le vostre aspettative e, se voleste collaborare, sarem-
mo lieti di ricevere un vostro feedback sulla qualità del prodotto al ne di migliorare
costantemente la nostra produzione. Visitate il nostro sito www.soundsationmusic.
com ed inviateci una mail con la vostra opinione, questo ci aiuterà a sviluppare nuovi
prodotti quanto più vicini alle vostre esigenze.
Un’ultima cosa, leggete il presente manuale al ne di evitare danni alla persona ed al
prodotto, derivanti da un utilizzo non corretto.
Il Team SOUNDSATION

3
ENGLISH
K2U User manual
TABLE OF CONTENTS
1. INTRODUCTION..........................................................................................................................7
1.1. Unpacking.................................................................................................................................................................7
1.2. Accessories...............................................................................................................................................................7
2. OVERVIEW ...................................................................................................................................8
3. MAIN FEATURES .........................................................................................................................8
4. CONTROL PANEL ........................................................................................................................9
4.1. LCD display screen diagram ............................................................................................................................10
5. REAR PANEL and CONNECTIONS .......................................................................................... 11
5.1. Use power adaptor..............................................................................................................................................11
5.2. Use Batteries..........................................................................................................................................................12
5.3. Use Headphones..................................................................................................................................................12
5.4. Sustain Pedal..........................................................................................................................................................12
5.5. Audio Stereo Input..............................................................................................................................................12
5.6. Microphone Input................................................................................................................................................13
5.7. Audio Stereo Output ..........................................................................................................................................13
5.8. USB/MIDI Function Socket...............................................................................................................................13
5.9. USB Socket (MP3)................................................................................................................................................14
6. BASIC OPERATION................................................................................................................... 14
6.1. Turn on Power.......................................................................................................................................................14
6.2. Master Volume adjustment..............................................................................................................................14
7. TONES ....................................................................................................................................... 14
7.1. Tones selection......................................................................................................................................................14
7.2. Dual Function ........................................................................................................................................................15
7.3. Lower Function .....................................................................................................................................................15
8. EFFECTS AND CONTROLS ....................................................................................................... 16
8.1. Sustain......................................................................................................................................................................16
8.2. Vibrato......................................................................................................................................................................16
8.3. Touch ........................................................................................................................................................................16
8.4. Tempo.......................................................................................................................................................................17
8.5. Transpose................................................................................................................................................................17
8.6. Tune ..........................................................................................................................................................................17
8.7. Pitch Bend...............................................................................................................................................................17
8.8. Metronome ............................................................................................................................................................18
8.9. Split Point................................................................................................................................................................18
9. STYLE SELECTION .................................................................................................................... 19
10. STYLE CONTROLS .................................................................................................................... 19
10.1. Auto Chord.............................................................................................................................................................19
10.2. Chords recognition mode ................................................................................................................................20
10.3. Start/Stop................................................................................................................................................................21
10.4. Sync...........................................................................................................................................................................22
10.5. Fill In..........................................................................................................................................................................22
10.6. Intro/Ending...........................................................................................................................................................22
10.7. Accompaniment Volume adjustment ..........................................................................................................23
10.8. Chords Volume adjustment .............................................................................................................................23
11. MANUAL DRUM....................................................................................................................... 23
12. REGISTRATION MEMORIES .................................................................................................... 24
13. RECORD FUNCTION................................................................................................................. 24
13.1. Recording Notes...................................................................................................................................................24
13.2. Recording Drum Pattern ...................................................................................................................................25
14. SONG......................................................................................................................................... 25
15. SONG LEARNING MODE ......................................................................................................... 26
16. MP3 PLAYBACK........................................................................................................................ 27
16.1. Play / Pause ............................................................................................................................................................27
16.2. Volume Adjustment ............................................................................................................................................27

4
ENGLISH
K2u User manual
16.3. Play Mode...............................................................................................................................................................27
16.4. Equalization Mode...............................................................................................................................................28
16.5. Loop..........................................................................................................................................................................28
16.6. Previous Song / Next Song..............................................................................................................................28
17. TONE LIST ................................................................................................................................. 29
18. STYLE LIST ................................................................................................................................ 34
19. DEMO SONG LIST .................................................................................................................... 40
20. SPECIFICATIONS ...................................................................................................................... 41
21. WARRANTY AND SERVICE ..................................................................................................... 42
22. WARNING................................................................................................................................. 42

5
ENGLISH
K2U User manual
IMPORTANT SAFETY SYMBOLS
The symbol is used to indicate that some hazardous live terminals are
involved within this apparatus, even under the normal operating con-
ditions, which may be sucient to constitute the risk of electric shock
or death.
The symbol is used in the service documentation to indicate that spe-
cic component shall be replaced only by the component specied in
that documentation for safety reasons.
Protective grounding terminal
Alternating current/voltage
Hazardous live terminal
Denotes the apparatus is turned on
Denotes the apparatus is turned o
WARNING: Describes precautions that should be observed to prevent the danger
of injury or death to the operator.
CAUTION: Describes precautions that should be observed to prevent danger of
the apparatus.
To protect the environment, please try to recycle the packing material
as much as possible
Don’t throw this product away just as general trash, please deal with
the product follow the abandon electronic product regulation in your
country.
TAKING CARE OF YOUR PRODUCT
fRead these instructions
fKeep these instructions
fHeed all warning
fFollow all instructions

6
ENGLISH
K2u User manual
1) Water / Moisture
The keyboard should be protected from moisture and rain and can not be used near
water; for example near a bathtub, a kitchen sink, a swimming pool, etc.
2) Heat
The keyboard should be located away from heat sources such as radiators, stoves or
other appliances that produce heat. Don not use it when maximum ambient tempera-
ture is higher than 40°C.
3) Object and Liquid Entry
Objects do not fall into and liquids are not spilled into the inside of the keyboard for
safety.
4) Power ADAPTER
Please use specied Adapter, otherwise fault adaptermay cause damage of your elec-
tronic keyboard. Do not place adapter or power cord near heating source such as cen-
tral heating or heat radiator. Regularly check power plug and clean surface dirt. Do not
pull out power plug with wet hands. Do not overbend wire and place heavy matters on
wire with other matters to avoid damaging wire. Unplug the keyboard from the mains
during lightning storms or when unused for long periods of time.
5) CleaninG and MAINTENANCE
To clean the body of the electronic keyboard, please use dry soft cloth. Do not use
paint, organic solvent, alcohol or chemically impregnated cloth.
6) Servicing
Do not open the case of electronic keyboard and try to disassemble any part of it or
make any change to it. Should any abnormal function occur in use, please stop operat-
ing it immediately and send the keyboard for repair by qualied service personnel only.
Only use accessories/attachments or parts recommended by the manufacturer.
NOTICE:
fSpecications are subject to change without notice
fShould any description of product function be not specied in detail or some typing
error occurs, please forgive us.
fWhat is displayed in LCD in this instructions is only for the purpose of explanation
and may be dierent with actual display in your electronic keyboard.

7
ENGLISH
K2U User manual
1. INTRODUCTION
Thank you for purchasing our K2U keyboard. Enjoy your new equipment and make sure
to read this manual carefully before operation.
This user manual is made to provide both an overview of controls, as well as informa-
tion on how to use them.
1.1. Unpacking
Your K2U keyboard was carefully packed to ensure safe transport. Despite this, we
recommend you to carefully examine the package and its contents for any signs of
physical damage, which can occur during transport. Each unit has the following parts:
f1 x K2U Electronic Keyboard
f1 x Power Adapter 12V
f1 x Music Stand.
f1 x User Manual
ATTENTION: Packaging cartons are not a toys! Keep out of reach of chil-
dren!!! Keep in a safe place the original packaging material for future use.
If anything damaged during transport, notify the shipper immediately and keep the
packing material for inspection. Again, please save the carton and all packing materials.
If the keyboard must be returned to the manufacturer, it is important that it is returned
in the original manufacturer box and packing. Please do not take any action without
rst contacting us.
1.2. Accessories
SOUNDSATION can supply a wide range of quality accessories that you can use with
your K2U keyboard, like Audio cables, Headphones, Keyboard stands, external speakers
and a wide range of other dedicated items.
All products in our catalogue has been long tested with this device, so we recommend
you to use Genuine SOUNDSATION Accessories and Parts.
Ask your SOUNDSATION dealer or check out our website www.soundsationmusic.com
for any accessories you could need to ensure best performance of the product.

8
ENGLISH
K2u User manual
2. OVERVIEW
Soundsation K2U keyboard is perfect for beginners who want to start playing, but
given the many features it has, even the most experienced musicians can have fun with
this instrument. K2U keyboard has 61 touch-sensitive keys piano type, 500 dierent
sounds, 500 accompaniment styles and 80 demo songs to practice playing. You can
also add a sustain pedal (not included) for more authentic piano performances. Thanks
to the USB MIDI connector, you can be connected to a computer. It can play mp3
songs thanks to the USB Host connection to which a USB Flash Drive can be inserted.
Audio playback is via two integrated 5 Watt speakers. The result of all the features is
that of a good keyboard with an excellent value in its market range.
3. MAIN FEATURES
f61 Piano Keys with touch response
fCustomized and backlit multifunction LCD Display
fPower Supply DC 12V (Bundled Adaptor)
f500 Sounds
f500 Automatic accompaniments (Styles) with relative controls
f80 Demo Songs
fIntelligent teaching system for beginners
fDUAL Function to play two sounds simultaneously across the entire keyboard
fLOWER Function to have simultaneously a sound for right hand and another for left
hand.
fRecord and Playback functions available for real time parts only (SOLO, DUAL and
LOWER)
fProgramming a Drum Pattern
fUSB/MIDI Function available
fMp3 Playback available
fPitch Bend Wheel
fBattery operation
fMusic Stand included

9
ENGLISH
K2U User manual
4. CONTROL PANEL
1) Switch ON/FF 15) Play 29) Keyboard drum
activation
2) Master Volume Setting 16) Drum Pattern
Recording
30) Demo Songs Start
3) Accompaniment Volume
Setting
17) Touch sensitivity
(On / O)
31) Teach Step1
4) Chords Volume Regulation 18) Sustain 32) Teach Step2
5) Tempo Setting 19) Vibrato 33) Teach Step3
6) Transpose Setting 20) Numeric Buttons
Section, [+], [-]
34) LOWER On/O
7) Tune Setting 21) Start/Stop 35) DUAL On/O
8) Memory buttons 22) Function
“Single Finger Chord”
36) Mp3 Volume Setting
9) Funzione Split Point 23) Sync Start 37) Mp3 Play Mode
10) Metronome 24) Function
“Multi Finger Chord”
38) Mp3 Equalization
Mode
11) Songs Selection 25) Fill In 39) Mp3 Play/Pausa
12) Tones Selection 26) Auto Chords 40 AB Repeat on Mp3
13) Style Selection 27) Intro / Ending 41) Next/Previous Song
14) Record 28) Chord O 42) USB Input
10
ENGLISH
K2u User manual
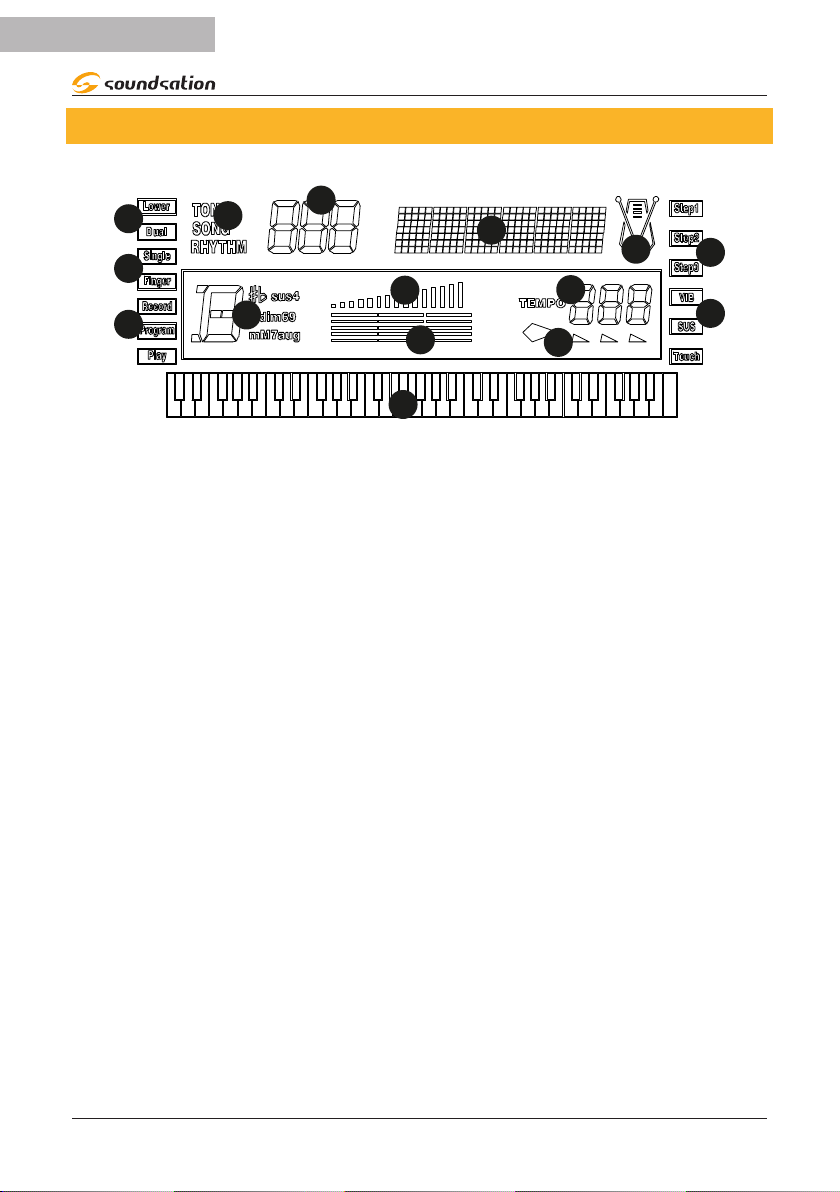
4.1. LCD display screen diagram
2
1
3
4
5
67
8
9
10
11
12
13 14
15
1) Numeric display area
2) Character display area
3) Selection Modes (Tones, Styles, Songs)
4) Keyboard Mode
5) Automatic Chord recognition mode
6) Record and Play
7) Chords display area
8) Master Volume
9) Accompaniment Levels (Drums, Bass, Chords)
10) Keys played display area
11) Display Beats
12) TEMPO Value Display (Bpm)
13) Metronome
14) Learning mode
15) Eects and sensitivity to the Key Touch
11
ENGLISH
K2U User manual
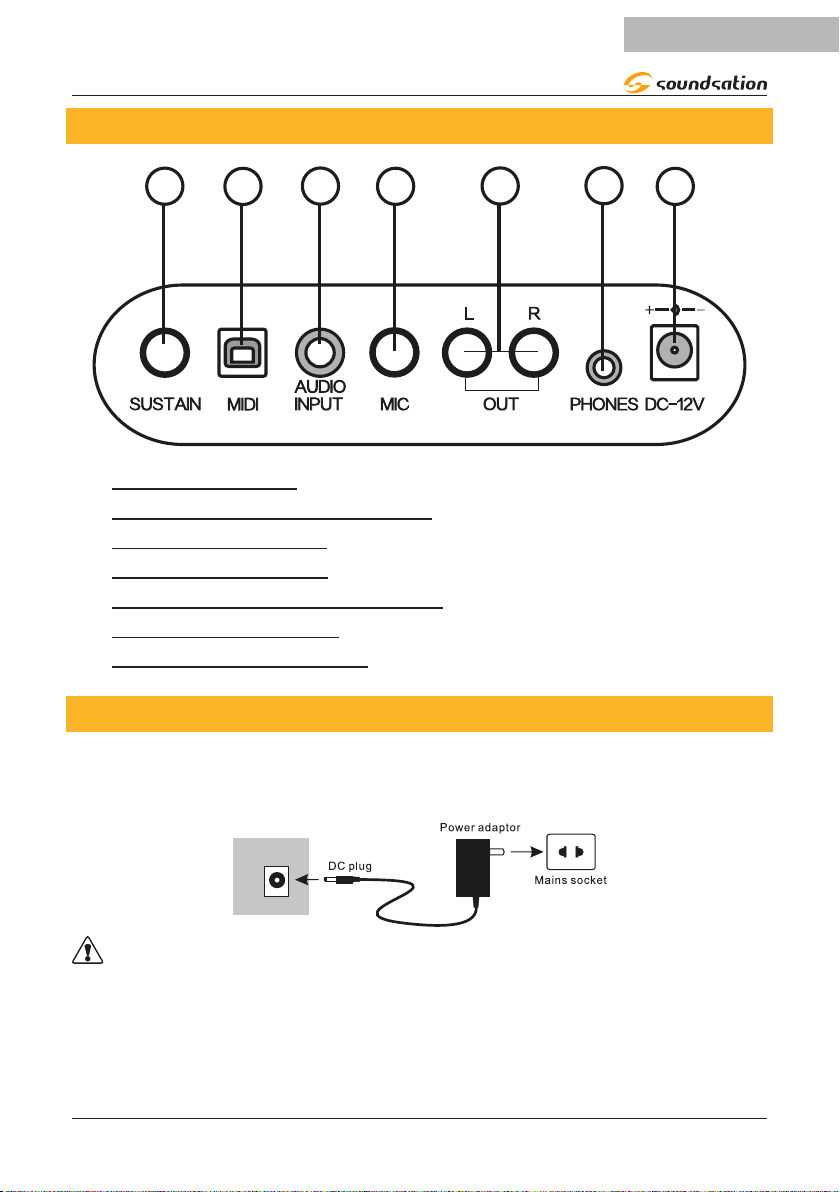
5. REAR PANEL and CONNECTIONS
12 3 4 5 6 7
1) SUSTAIN PEDAL
2) USB/MIDI function SOCKET
3) AUDIO INPUT JACK
4) MICROPHONE JACK
5) AUDIO OUTPUT JACKS (L R)
6) HEADPHONES JACK
7) DC-12V INPUT Socket
5.1. Use power adaptor
Please use the special power adaptor that was equipped with this electronic keyboard,
Insert the DC plug of power adaptor into the DC jack of electronic keyboard, then,
insert the other end into Mains socket, nally turn on power switch.
DC-12V
CAUTION: When you don’ t use this electronic keyboard, you should pull out the
plug of power adaptor from power socket safely to avoid the parts trouble or other
accidents.
12
ENGLISH
K2u User manual
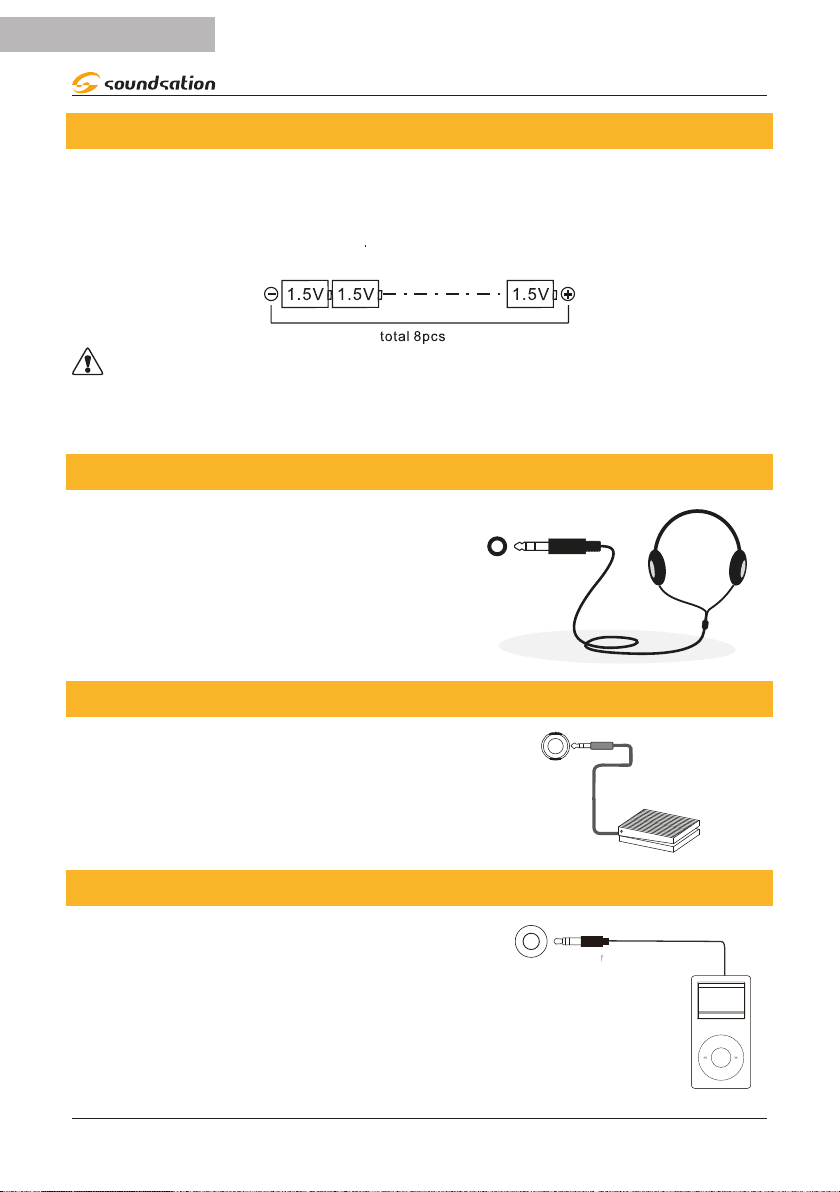
5.2.Use Batteries
Open the battery lid at the bottom of electronic keyboard and load 8pcs l.5V size 1
batteries,ensure the polarity of the batteries should conform to the anode and cath-
ode direction of batteries marked in battery internal slot.Cover the battery lid after the
installation.
CAUTION: Please replace all batteries at one time when them need the replace-
ment. Don’ t use dierent kinds of batteries and not mix new and old batteries at the
same time. Please take out the batteries as to avoid possible damage caused by the
batteries leakage if you don’t use the keyboard for long time.
5.3.Use Headphones
Insert headphone plug into [PHONES] jack in
back of keyboard. The internal speaker system of
electronic keyboard cuts o automatically now.
PHONES
5.4.Sustain Pedal
An optional footswitch can be plugged into the
sustain jack and be used to switch sustain on or
o. Simply by pressing a sustain footswitch, you
will have a natural sustain as you play..
SUSTAIN
5.5.Audio Stereo Input
By connecting the audio output of an MP3 / CD
player or other audio source to the AUDIO INPUT
connector on the rear panel, the audio input signal
is mixed with the instrument signal and therefore, it
is possible to play the keyboard at the same time.
AUDIO
INPUT
13
ENGLISH
K2U User manual
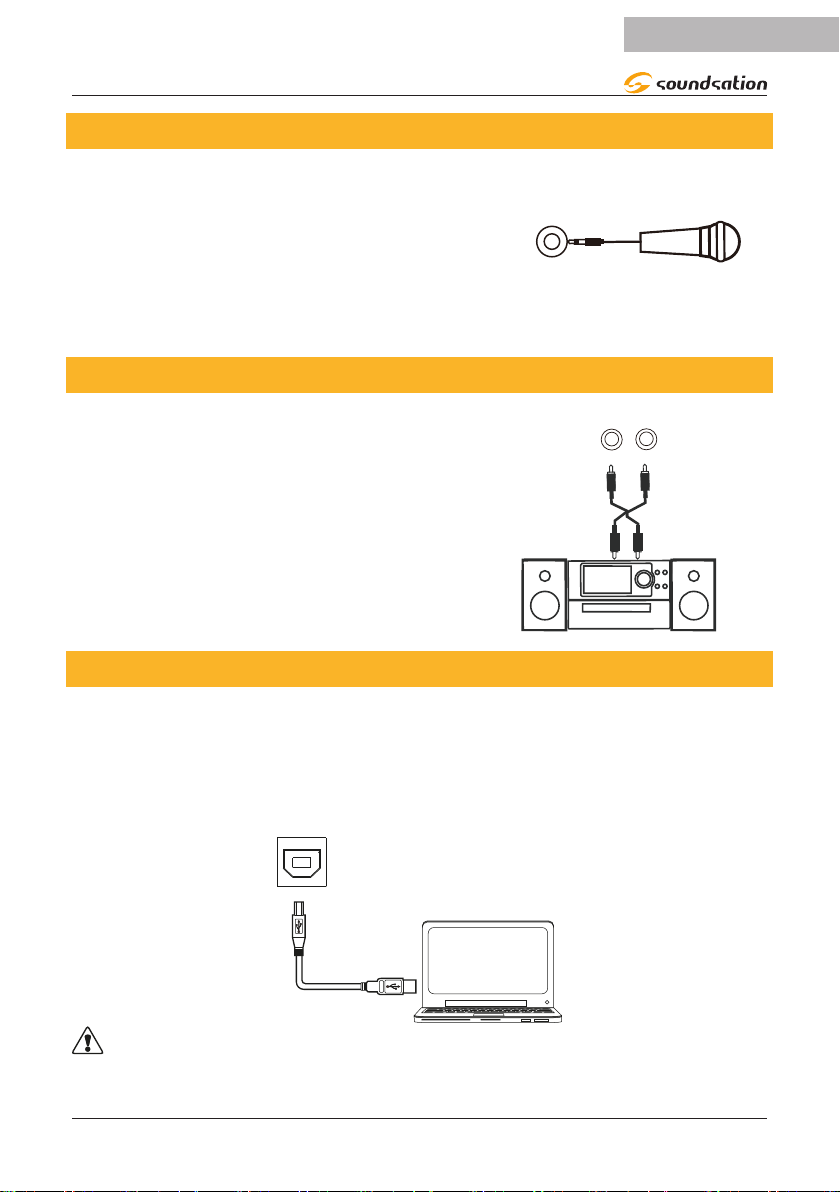
5.6.Microphone Input
By connecting a microphone to the dedicated
connector, you can sing while playing or during
song playback via the MP3 player. Before turning on
the instrument, set the master volume to minimum.
Then connect a microphone to the MIC jack and
after turning on the instrument, adjust the master
volume while singing using the microphone.
MIC
5.7. Audio Stereo Output
The two JACK (1/4”) type “L / R OUT” connectors
on the rear panel provide stereo audio output
from the instrument to external audio equip-
ment such as a keyboard amplier, stereo audio
system, mixer, etc. Use JACK (1/4”) type audio
cables to connect the instrument’s “L / R OUT”
connections to the respective input connections
on the external audio equipment.
L
OUT
R
5.8.USB/MIDI Function Socket
This keyboard supplies one USB socket to be connected to personal computer direct-
ly. You only need one USB cable, one end must be inserted into USB socket of this
keyboard and the other must be inserted into USB port of computer. This connection
allows to transfer information with computer in both direction Such as you can store
the music that you had played on the keyboard to the computer. You can also play
MIDI sequences of your computer by this keyboard as well.
MIDI
CAUTION: The USB audio equipment cannot be set for input and output at the
same time when you do the setting of the computer software, or else the sound will be
overlapping when you play the keys.

14
ENGLISH
K2u User manual
5.9.USB Socket (MP3)
This keyboard supports to connect USB equip-
ments up to 32G , such as USB ash Drive etc. It
can play MP3 les directly from USB ash Drive.
The USB port is located on the front panel of
the instrument at the bottom right.
USB
CAUTION: Please don’t pull out USB equipments in play process,or else,it will
cause mistakes or USB equipments damage
6. BASIC OPERATION
6.1. Turn on Power
Press the [POWER] button to turn on the keyboard after
power adaptor was well connected or batteries were
installed correctly. Press the [POWER] button again to turn
o the keyboard.
ON OFF
POWER
6.2.Master Volume adjustment
This keyboard has 16 volume levels, from 0 to 15. The
default value of master volume is 7. The master volume
increases correspondingly or decreases correspondingly by
pressing [MASTER VOLUME+/-]buttons. The volume will
recover the default value automatically if [MASTER VOLUME
+/-]buttons are pressed at the same time.
VOLUME
The Master Volume levels will be shown on the display
graphically as shown in the gure to the right.
7. TONES
7.1. Tones selection
This keyboard has 500 (from 000 to 499) kinds of voices. The default status of the key-
board is [TONE] when power is turned on. You need to press [TONE] red button if the
current status isn’t [TONE]. The icon will appear on the top left of the display
The tone can be choosed by number 0-9 buttons or [+/-]buttons(As shown in the next
picture)
15
ENGLISH
K2U User manual
SONG
TONE STYLE
1 2 3 +
4 5 6
7 8 9
0
-
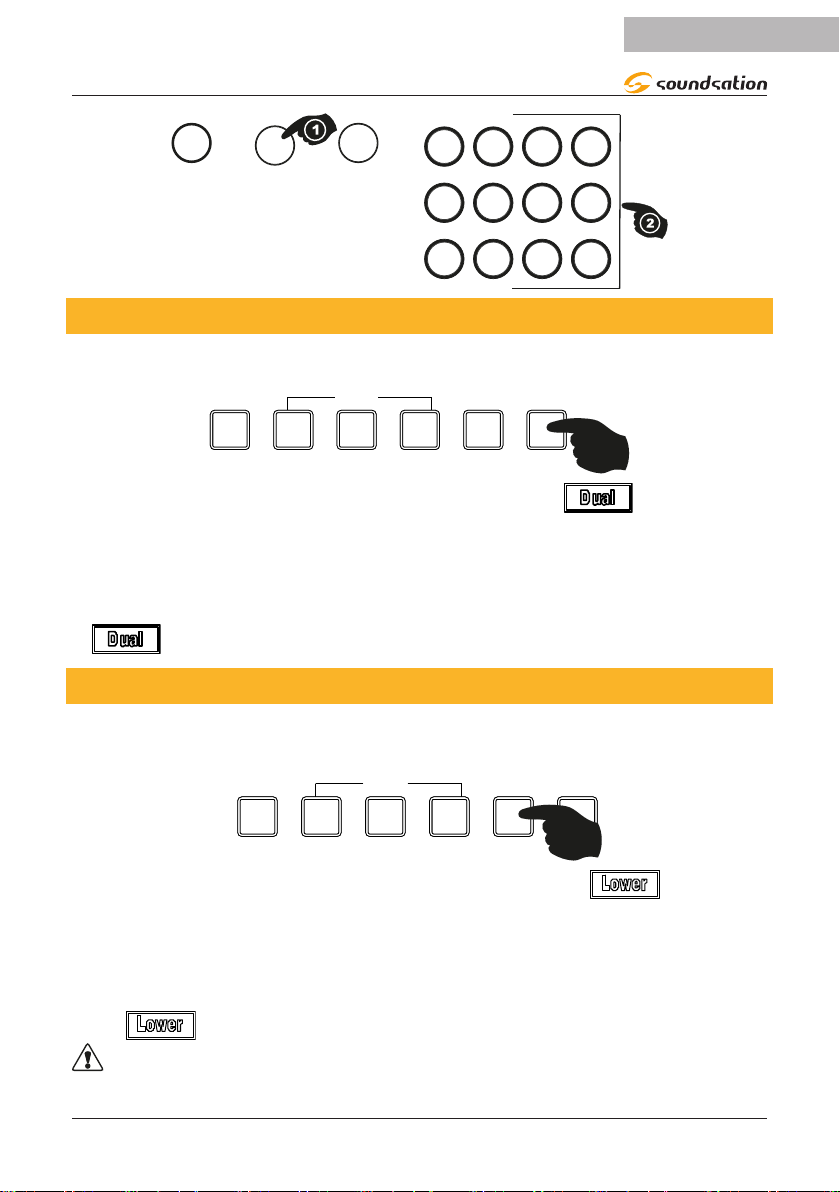
7.2. Dual Function
This keyboard is equipped with the DUAL function. This means that two sounds can be
layered and played at the same time for a richer sound eect during your performance.
DEMO STEP 1 STEP 2 STEP 3 LOWER DUAL
TEACH
1) Press the [DUAL] button to activate the DUAL function. The icon lights up
on the top left display and at the same time the name of the sound assigned to the
DUAL function and its number are displayed.
2) Use the numeric buttons and / or the [+] / [-] buttons to choose a dierent DUAL
sound
3) By pressing the [DUAL] button again, the DUAL function will be turned o. The
icon will be turned o and the keyboard will play only the main sound.
7.3. Lower Function
This keyboard is equipped with the LOWER function. This means that you can have two
sounds on the keyboard at the same time; one for the right hand and one for the left
hand. The keyboard is split at note C4 (Key 25).
DEMO STEP 1 STEP 2 STEP 3 LOWER DUAL
TEACH
1) Press the [LOWER] button to activate the LOWER function. The icon lights
up on the top left display and at the same time the name of the sound assigned to
the LOWER function and its number are displayed.
2) Use the number buttons and / or the [+] / [-] buttons to choose a dierent LOWER
sound
3) By pressing the [LOWER] button again, the LOWER function will be turned o.
The icon will be turned o and the keyboard will play only the main sound.
NOTICE: The DUAL and LOWER functions are self-excluding and therefore can’t
be activated at the same time. When the Lower function is activated, the AutoChord
function is turned OFF.

16
ENGLISH
K2u User manual
8. EFFECTS AND CONTROLS
8.1. Sustain
By pressing the [SUSTAIN] button, the icon lights up on the display. Sustain can
add a slow, natural decay to the sound and on some sounds, this eect can be more
intense. By pressing the [SUSTAIN] button again, this function will be disabled. You can
also use the sustain pedal (optional) to realize the SUSTAIN function.
TOUCH SUSTAIN VIBRATO
8.2. Vibrato
By pressing the [VIBRATO] button, the icon lights up on the display and the
VIBRATO eect is activated. When a note is played on the keyboard, you will be able to
hear a periodic variation of the note pitch. Press the [VIBRATO] button again to turn o
this function.
TOUCH SUSTAIN VIBRATO
8.3.Touch
The keyboard is equipped with a touch response feature (TOUCH) that lets you dynam-
ically and expressively controls the level of the voice with your playing strength just as
on an acoustic instrument. Press the [TOUCH] button to turn on/o this function. The
TOUCH function is active when the keyboard is turned on. When the TOUCH function is
activated, the display shows the icon.
TOUCH SUSTAIN VIBRATO
17
ENGLISH
K2U User manual
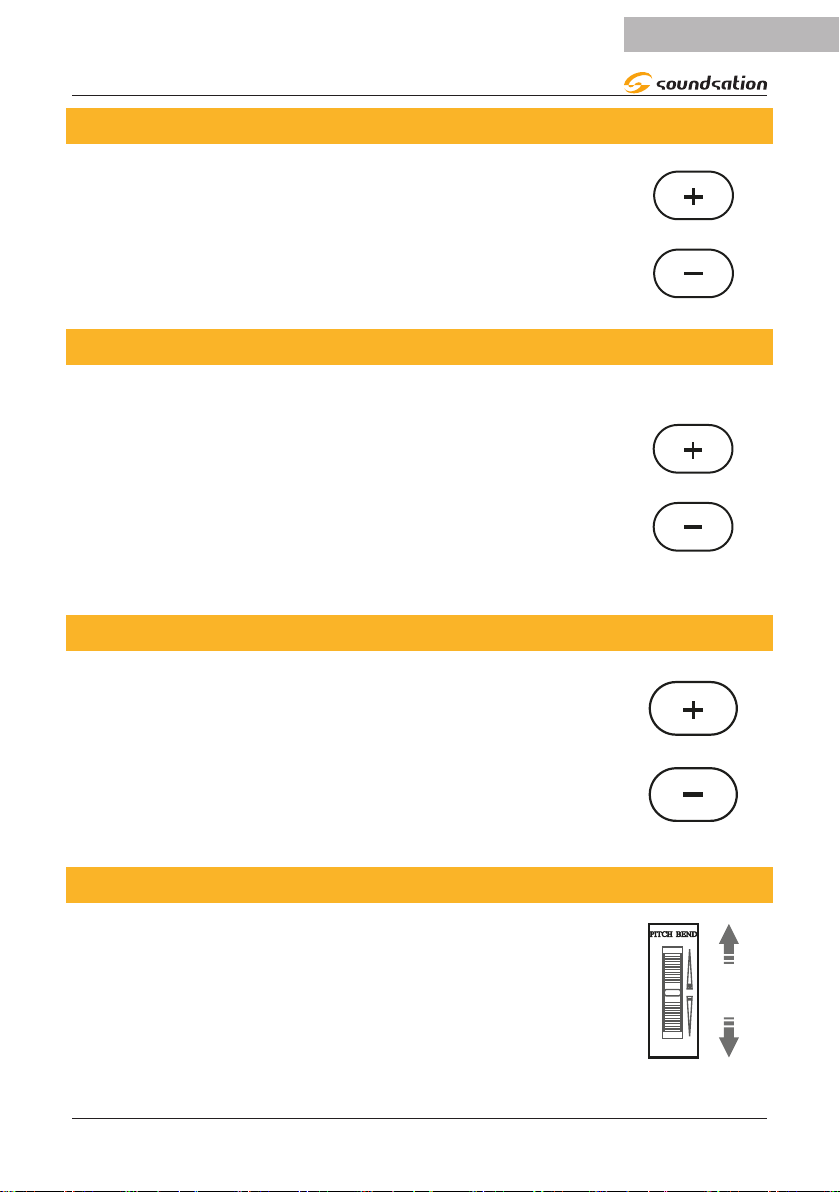
8.4.Tempo
When the keyboard is turned on the preset tempo value is 120 and
each instrument style has been programmed with a predened tem-
po. The tempo value can however be changed by using the [+] or
[-] buttons. Press and hold the [+] or [-] buttons to quickly change
the Tempo. If the [+] / [-] buttons are pressed simultaneously, the
Tempo setting relative to the current style or to the default value is
restored. The range for Tempo is 30 ÷ 280.
TEMPO
8.5.Transpose
Transpose function allows the overall pitch of the instrument to
be transposed up or down from -5 to +6). When the instrument is
turned on, the value of the TRANSPOSE function is 0. To adjust the
value of the TRANSPOSE function, use the [+] / [-] buttons. If the [+]
/ [-] buttons are pressed simultaneously the value of the TRANS-
POSE function is reset to 0. During the modication of the transpo-
sition value, the display temporarily shows the writing “Transp” at
the top and the relative value on the left. Once the [+] or [-] buttons
have been released, the main screen will be displayed after about 3
seconds.
TRANSPOSE
8.6.Tune
The TUNE function adjusts the ne pitch of the entire keyboard in
1 cent steps. When the instrument is turned on, the value of the
TUNE function is 0. To adjust the value of the TUNE function in
the range from -99 to +99, use the [+] / [-] buttons. If the [+] / [-]
buttons are pressed simultaneously the value of the TUNE function
is reset to 0. While changing the tune value, the display temporarily
shows “Tune” at the top and its value on the left. Once the [+] or [-]
buttons have been released, the main screen will be displayed after
about 3 seconds.
TUNE
8.7. Pitch Bend
Use the pitch bend wheel to bend notes up (roll the wheel away
from you) or down (roll the wheel toward you) while playing the
keyboard. The pitch bend wheel is self-centering and will automati-
cally return to normal pitch when released.

18
ENGLISH
K2u User manual
8.8. Metronome
Pressing the [METRONOME], button as shown in the pic-
ture to the right, turns ON the metronome .
POINT METRONOME
SPLIT
After activating the metronome, you will be able to hear
the sound eect of the selected option. The Down Beat is
shown in the beats display area. The ashing of the sym-
bols in the beats area will remain active until the metro-
nome is deactivated.
By repeatedly pressing the [METRONOME] button, you can select the desired time si-
gnature or turn o the Metronome. The selectable time signature values are as follows:
1/4, 2/4, 3/4, 4/4, OFF
The message “Beat” appears in the character area of the display and a value from 1 to
4 in the numeric display area. Once the [METRONOME] button is released, the main
screen will be displayed after about 3 seconds.
NOTICE: If a style is started with the [START / STOP] button, the metronome will
automatically be turned OFF.
8.9. Split Point
As already explained in paragraph 7.3 Lower function, the keyboard is divided into two
parts in order to have one sound for the right hand and another for the left hand at the
same time. The split point is at note C4 (key 25).
The split point relating to the Lower function can be changed in the range from C3 to
C6 (Keys 13 to 49).
To set the split point, press and hold the [SPLIT POINT]
button as shown in the gure to the right. The writing
“SpltPt” appears in the character area of the display and
a value from 13 to 49 in the numerical display area.
POINT METRONOME
SPLIT
Then press a key on the keyboard in the range from C3 to C6 (Keys 13 to 49).
The new split point value will be shown in the numeric display area of the display. Once
the key has been released, the main screen will be displayed after about 3 seconds.
NOTES:
1) During the Split Point setting the keyboard doesn’t emit any sound.
2) The Split Point setting has eect only for the Lower function.
3) The Split Point for the automatic accompaniments is set to note C4 (Key 25) and
can’t be changed.

19
ENGLISH
K2U User manual
9. STYLE SELECTION
The K2U keyboard has 500 Styles that cover dierent music genres. For detailed infor-
mation please refer to Styles List. Pressing the [STYLE] button accesses the selection
of styles. The icon lights up on the display. The desired style selection can be
made using the numeric buttons [0 ... 9] or the [+] / [-] buttons. The preset style when
the keyboard is switched on is 000 - 8Beat.
SONG
TONE STYLE
1 2 3 +
4 5 6
7 8 9
0
-
10. STYLE CONTROLS
When playing with a style, you can use dierent controls available on this keyboard.
Below is an explanation for each of these.
10.1. Auto Chord
When the “Auto Chord” function is activated, chords played in the chord area of the
keyboard will be detected automatically and will be used to control playback of the
selected style. Pressing the [AUTO CHORD] button activates the relative function. You
will have the possibility to select the two chords recognition modes available (single
nger, ngered).
FINGER
FINGERED AUTO CHORD
CHORD OFF
SINGLE
The icons and light up on the display to indicate that chord recognition
is done in both “Single Finger” and “Fingered” modes. The keyboard is split at note C4
(Key 25).
The “AUTO CHORD” function can be turned o by pressing the [AUTO CHORD] button
again or by pressing the [CHORD OFF] button.
NOTICE: The “AUTO CHORD” function is also turned OFF when the LOWER func-
tion is activated.
20
ENGLISH
K2u User manual
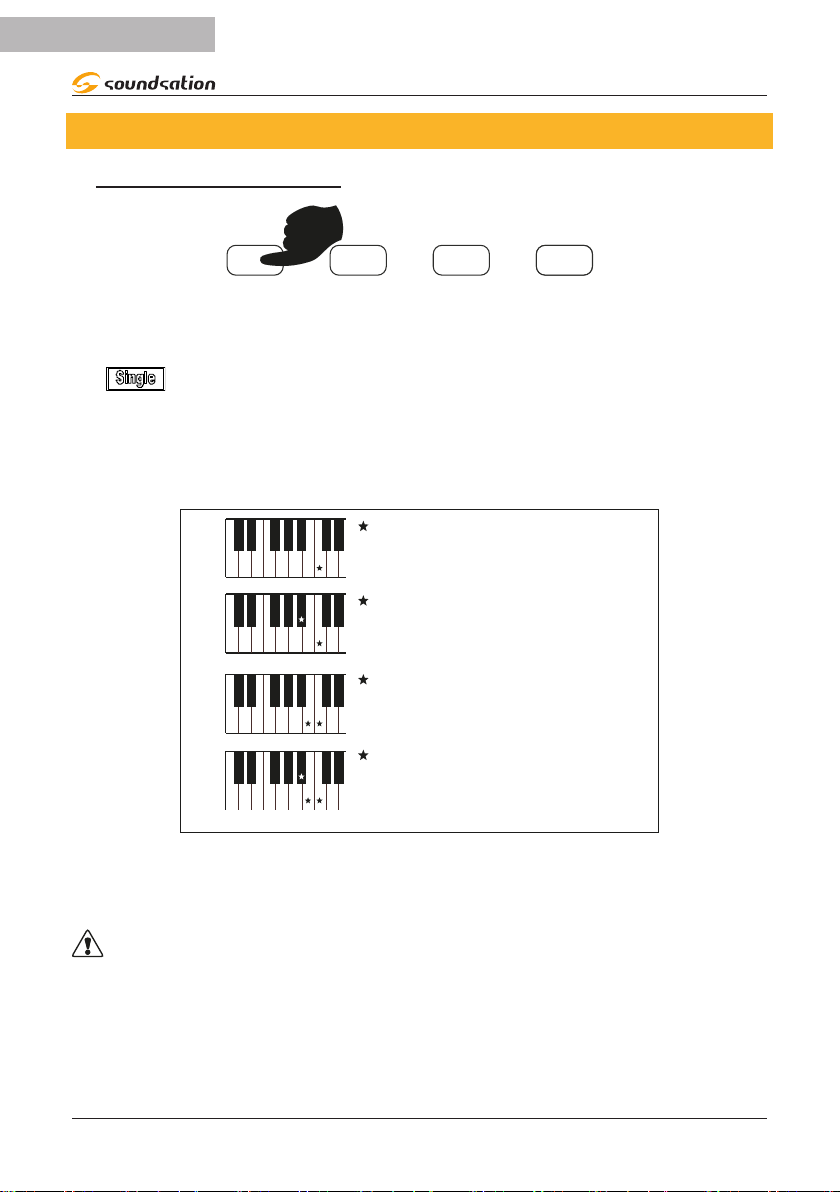
10.2. Chords recognition mode
1)^SINGLE FINGER MODE
FINGER
FINGERED AUTO CHORD
CHORD OFF
SINGLE
To activate the “One Finger” mode press the [ONE FINGER]
The icon lights up on the display to indicate that the “Single Finger” mode has
been activated.
The “Single Finger” mode is not only capable of detecting a single nger, but it can also
detect multiple ngers. This mode makes it easy to play major, minor, seventh, and mi-
nor seventh chords with just one, two, or three keys. Refer to the next image for details.
Major Chord
Only press the root note on the
keyboard.
Minor Chord
Press the root note and the nearest
left black key simultaneously.
Seventh Chord
Press the root note and the nearest
left white key simultaneously.
Minor Sventh Chord
Press the root note and the nearest
left white and black keys
simultaneously.
C7
Cm7
Cm
C
To turn o the “One Finger” mode, press the [ONE FINGER] button again or the
[CHORD OFF] button. The keyboard will be reset with the last sound previously selected
over the entire range
NOTICE: The “Single Finger” mode is also turned OFF when the LOWER function is
activated.
Table of contents
Languages:
Other Sound Sation Musical Instrument manuals


