manuals.online logo
Brands
  1. Home
  2. •
  3. Brands
  4. •
  5. SOUNDMASTER
  6. •
  7. CD Player
  8. •
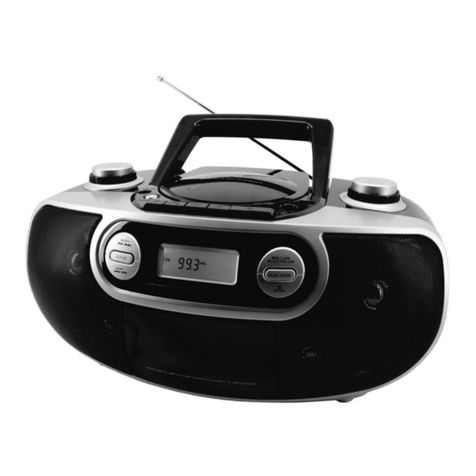
  9. SOUNDMASTER RCD5000 User manual

SOUNDMASTER RCD5000 User manual

This symbol indicates the presence of dangerous
voltage inside the enclosure, sufficient enough to
cause electric shock.
This symbol indicates the presence of important
operating and maintenance instructions for the
device.
Safety, Environmental and Setup Instructions
•Use the device in dry indoor environments only.
•Protect the device from humidity.
•Do not open the device. RISK OF ELECTRIC SHOCK! Refer opening and servicing to qualified personnel.
•Connect this device to a properly installed and earthed wall outlet only. Make sure the mains voltage corresponds with the
specifications on the rating plate.
•Make sure the mains cable stays dry during operation. Do not pinch or damage the mains cable in any way.
•Disconnect device warning: Main plug is used as the connection, so it should always remain ready operate.
•The mains plug is used as the disconnect device, the disconnect device shall remain readily operable.
•A damaged mains cable or plug must immediately be replaced by an authorized service center.
•In case of lightning, immediately disconnect the device from the mains supply.
•Children should be supervised by parents when using the device.
•Clean the device with a dry cloth only.
Do NOT use CLEANING AGENTS or ABRASIVE CLOTHS!
•Do not expose the device to direct sunlight or other heat sources.
•Install the device at a location with sufficient ventilation in order to prevent heat accumulation.
•Do not cover the ventilation openings!
•The ventilation should not be impeded by covering the ventilation openings with items, such as newspaper, table-cloths, curtains, etc.
•It shall be not be exposed to dripping or splashing and that no objects filled with liquids, such as vases, shall be placed on the
apparatus.
•The unit should not be exposed to direct sunlight, very high or low temperature, moisture, vibrations or placed in dusty environment.
•Never attempt to insert wires, pins or other such objects into the vents or opening of the unit.
•Install the device at a safe and vibration-free location.
•No naked flame sources, such as lighted candles, should be placed on the apparatus.
•Install the device as far away as possible from computers and microwave units; otherwise radio reception may be disturbed.
•Do not open or repair the enclosure. It is not safe to do so and will void your warranty. Repairs only by authorized service/ customer
center.
•The device is equipped with a “Class 1 Laser”. Avoid exposure to the laser beam as this could cause eye injuries.
•Only use mercury and cadmium-free batteries.
•Batteries shall not be exposed to excessive heat such as sunshine, fire or the like.
•Used batteries are hazardous waste and NOT to be disposed of with the household waste!!! Return the batteries to your dealer or to
collection points in your community.
•Keep batteries away from children. Children might swallow batteries. Contact a physician immediately if a battery was swallowed.
•Check your batteries regularly to avoid battery leakage.
CAUTION
-
INVISIBLE LASER RADIATION
WHEN OPENING
THE COVER
OR
PRESSING THE SAFETY INTERLOCK. AVOID EXPOSURE TO THE LASER BEAM.
ENVIRONMENTAL PROTEC
TION
Do not dispose of this product with the normal household waste at the end
of its life cycle. Return it to a collection point for the recycling of electrical
and electronic devices. This is indicated by the symbol on the product,
user manual or packaging.
The materials are reusable according to their markings. By reusing, recycling or
other forms of utilization of old devices you make an important contribution to
the protection of our environment.
Please contact your local authorities for details about collection points.
WARNING
Risk of electric shock
Do not open
!
Caution: To reduce the risk of electric shock, do not remove the cover (or back). There
are no user serviceable parts inside. Refer servicing to qualified service personnel.
Used batteries are hazardous waste and NOT to be disposed
of with the household waste! As a consumer you are legally
obligated to return all batteries for environmentally responsible
recycling – no matter whether or not the batteries contain harmful
substances*).
Return batteries
free of charge
to public collection points in your
community or to shops selling batteries of the respective kind.
Only return fully discharged batteries.
*) marked Cd = cadmium, Hg = mercury, Pb = lead
RCD5000 English Instruction Manual
1
LOCATION OF CONTROLS
1 Speaker 13 BAND Switch
2 Antenna 14 BASS Button
3 FOLDER DOWN Button 15 CD Compartment
4 FOLDER UP Button 16 LCD Button
5 MODE Button 17 CD Door Open Button
6 SKIP DOWN Button 18 AUX-IN Jack
7 SKIP UP Button 19 Battery Compartment
8 STOP/USB Button 20 AC Socket
9 PLAY/PAUSE Button 21 Handle
10 VOLUME Control 22 USB Slot (1A Charging)
11 TUNING Control 23 USB Slot (Decoding)
12 FUNCTION Switch 24 NFC Sensor
AC OPERATION
Before operation, please make sure that the VOLTAGE mentioned on the unit is same as the voltage of your local
area. Unravel the AC power cord, insert one end into the AC socket on the set, and the other end into a standard
AC outlet.
ATTENTION
1. Do not plug or unplug the power cable while you have wet hands.
2. When planning not to use this unit for a long time, disconnect the power cable from the wall outlet.
3. When disconnecting the power cord from the wall outlet, do not pull on the cord in order to avoid shock risks
caused by damaged cable.
BATTERY OPERATION
Disconnect the AC cord set completely. Open the battery compartment door and insert 8 pieces UM-2 "C" size
batteries into the battery compartment with battery polarity as shown inside the battery compartment.
USB CHARGING (1 A)
This product can provide 1A charging when it is under AC operation. You can charge most of the smartphones and
tablets. Please be reminded to connect your device to the correct USB slot.
BASS EFFECT
Press BASS button for bass effect.
RADIO OPERATION
1. Set the FUNCTION switch to RADIO position.
2. Rotate the TUNING control to tune to your desired radio station.
3. Adjust the sound level by rotating the VOLUME control.
4. To turn off the radio, set the FUNCTION switch to OFF position.
FM Stereo/Mono Broadcast
For FM Mono Broadcast, set the BAND switch to FM.
For FM stereo broadcast, set the BAND switch to FM ST. "ST." will be shown on the display.
RCD5000 English Instruction Manual
2
ANTENNA
For best reception, fully extend the FM Antenna to receive FM stations.
MP3/AUX IN CONNECTION
1. Set the FUNCTION switch to BT/AUX position.
2. Insert one side of the audio cable (requires 3.5mm stereo plug, not supplied) into the line-out jack or phones
jack on your MP3 player and the other side to the aux-in jack on the unit.
3. Turn on your MP3 player and follow the playback instruction.
4. Adjust the sound level by rotating the VOLUME control.
5. To stop this function, simply turned off your MP3 player.
CD/MP3/USB OPERATION
Playing Audio CDs
1. Set the FUNCTION switch to CD/USB position.
2. Insert a CD disc in the CD compartment and close the CD door, the unit will start reading the disc and will play
automatically.
3. During playing, press the PLAY/PAUSE button to temporarily pause playing. To resume, press the
PLAY/PAUSE button again.
4. Adjust the sound level by rotating the VOLUME control.
5. To stop playing the CD, press the STOP button.
Playing MP3 Discs
1. Set the FUNCTION switch to CD/USB position.
2. Insert a MP3 disc into the CD Compartment and close the door, the unit will start reading the disc and will play
automatically.
3. If your MP3 disc has folders, you can use the FOLDER DOWN/FOLDER UP button to select the desired folder.
4. During playing, press the PLAY/PAUSE button to temporarily pause playing. To resume, press the
PLAY/PAUSE button again.
5. Adjust the sound level by rotating the VOLUME control.
6. To stop playing the CD, press the STOP button.
Playing MP3 files with USB device
1. Set the FUNCTION switch to CD/USB position.
2. Press and hold the STOP/USB button to select the USB mode, USB will appear on the LCD display.
3. Plug your USB device into the USB port on the unit, the unit will start reading the files in the USB device and
play automatically.
4. If your USB device has folders, you can use the FOLDER DOWN/FOLDER UP button to select the desiredfolder.
5. During playing, press the PLAY/PAUSE button to temporarily pause playing. To resume, press the
PLAY/PAUSE button again.
6. Adjust the sound level by rotating the VOLUME control.
7. To stop playing the files in the USB, press the STOP button.
Note:
Because of non-standardized format definition/production of MP3 format, playback quality & performance are not
guaranteed.
Manufacturer is not responsible for the playability of MP3 in any case due to recording conditions such as PC
performance, writing software, media ability and etc.
Different Play Mode
Press the MODE button to select different kinds of play mode with the following sequence.
For Audio CDs : Repeat 1 Repeat All Normal
For MP3 Files : Repeat 1 Repeat Folder Repeat All Normal

Repeat 1 – repeat the track being played.

Repeat All – repeat all the tracks in the storage media.

Repeat Folder – repeat the tracks in the entire folder.

Normal – play the tracks in sequence.
RCD5000 English Instruction Manual
3
Skip Mode
1. During play or pause mode, press the SKIP UP button to go to the next track.
2. During play or pause mode, press the SKIP DOWN button to go back to the previous track.
Programming
In case of Playing Audio CD/MP3 disc
The programming should be done during STOP mode
1. Press the MODE button, the LCD display will show P01.
2. Use the SKIP UP or SKIP DOWN button to select the desired track.
3. Press the MODE button again to store the selected track in the memory, the LCD display will show P02 and
flash continuously.
4. Repeat step 2 to 3 to store more tracks in the memory. You can store up to 20 tracks in the memory for CD disc
and 99 tracks in the memory for MP3 disc.
5. Press the PLAY/PAUSE button to start playing the disc in the programmed order.
6. To stop playing, press the STOP/USB button.
7. To cancel the programming list, press the STOP/USB button and set the FUNCTION switch to OFF position.
BLUETOOTH STREAMING
1. Set the FUNCTION switch to BT/AUX position. The LCD display will show “bt” and the bluetooth icon will flash.
2. Turn on your Bluetooth of your Bluetooth device and search the boombox for connection. Your Bluetooth device
should find “RCD5000”.
3. If the connection is successful, the bluetooth icon on the LCD display will stop flashing.
4. Select and play the audio files though your Bluetooth device.
5. To stop this function, switch to other mode or shut down your Bluetooth of your Bluetooth device
BLUETOOTH STREAMING THROUGH NFC PAIRING
1. Set the FUNCTION switch to BT/AUX position. The LCD display will show “bt” and the bluetooth icon will flash.
2. Enable your NFC function of your Bluetooth device and place the device near the NFC sensor on the CD door
for 5 to 10 seconds.
3. If the connection is successful, your Bluetooth device will show that it is connected and the bluetooth icon on
the LCD display will stop flashing.
4. Select and play the audio files though your Bluetooth device.
5. To stop this function, switch to other mode or shut down your Bluetooth of your Bluetooth device
AUTO PAIRING
Once the unit paired with the Bluetooth device, it will automatically pair with that device next time when you turn on
the unit and that Bluetooth device.
SPECIFICATIONS
Frequency Range: FM 87.5 - 108 MHz
Power Supply: AC 100-240V ~ 50/60Hz
DC 12V (UM-2 x 8)
Specifications are subject to change without further notice.
IMPORTANT NOTICE
Automatic standby mode
To comply with the ErP2 directive, the unit automatically switches to standby after approx. 11 minutes without a signal.
(For instance in CD-Stop mode). To switch the unit on again, please follow the instructions mentioned in instruction
manual.

Other SOUNDMASTER CD Player manuals

SOUNDMASTER SCD 6600 User manual

SOUNDMASTER

SOUNDMASTER SCD 6600 User manual

SOUNDMASTER SCD 5400 User manual

SOUNDMASTER

SOUNDMASTER SCD 5400 User manual

SOUNDMASTER DISC 4011 User manual

SOUNDMASTER

SOUNDMASTER DISC 4011 User manual

SOUNDMASTER CD9170 User manual

SOUNDMASTER

SOUNDMASTER CD9170 User manual

SOUNDMASTER SCD-5600 User manual

SOUNDMASTER

SOUNDMASTER SCD-5600 User manual

SOUNDMASTER SCD 5850MP3 User manual

SOUNDMASTER

SOUNDMASTER SCD 5850MP3 User manual

SOUNDMASTER RCD1750SI User manual

SOUNDMASTER

SOUNDMASTER RCD1750SI User manual

SOUNDMASTER SCD5750 User manual

SOUNDMASTER

SOUNDMASTER SCD5750 User manual

SOUNDMASTER SCD7200WE User manual

SOUNDMASTER

SOUNDMASTER SCD7200WE User manual

SOUNDMASTER SCD5701 User manual

SOUNDMASTER

SOUNDMASTER SCD5701 User manual

SOUNDMASTER CD9180 User manual

SOUNDMASTER

SOUNDMASTER CD9180 User manual

SOUNDMASTER RCD1180 User manual

SOUNDMASTER

SOUNDMASTER RCD1180 User manual

SOUNDMASTER SCD 2600 User manual

SOUNDMASTER

SOUNDMASTER SCD 2600 User manual

SOUNDMASTER SCD6500USB User manual

SOUNDMASTER

SOUNDMASTER SCD6500USB User manual

SOUNDMASTER NR-980CD User manual

SOUNDMASTER

SOUNDMASTER NR-980CD User manual

SOUNDMASTER CD9110 User manual

SOUNDMASTER

SOUNDMASTER CD9110 User manual

SOUNDMASTER RCD1200 User manual

SOUNDMASTER

SOUNDMASTER RCD1200 User manual

SOUNDMASTER SCD1500 User manual

SOUNDMASTER

SOUNDMASTER SCD1500 User manual

SOUNDMASTER SCD7505 User manual

SOUNDMASTER

SOUNDMASTER SCD7505 User manual

SOUNDMASTER SCD-5500 User manual

SOUNDMASTER

SOUNDMASTER SCD-5500 User manual

SOUNDMASTER KCD1600 User manual

SOUNDMASTER

SOUNDMASTER KCD1600 User manual

SOUNDMASTER CD9180 User manual

SOUNDMASTER

SOUNDMASTER CD9180 User manual

SOUNDMASTER MCD7950 User manual

SOUNDMASTER

SOUNDMASTER MCD7950 User manual

SOUNDMASTER CD9220 User manual

SOUNDMASTER

SOUNDMASTER CD9220 User manual

Popular CD Player manuals by other brands

Currys Essentials CCDSTR10 instruction manual

Currys Essentials

Currys Essentials CCDSTR10 instruction manual

Philips AZ 1004 user manual

Philips

Philips AZ 1004 user manual

Yamaha R CD-S700 owner's manual

Yamaha

Yamaha R CD-S700 owner's manual

Sony CFD-G70 - Cd Radio Cassette-corder operating instructions

Sony

Sony CFD-G70 - Cd Radio Cassette-corder operating instructions

Sony MZ-M200 Hi-MD Music Transfer Version 1 for Mac  (User... operating instructions

Sony

Sony MZ-M200 Hi-MD Music Transfer Version 1 for Mac (User... operating instructions

Sony Walkman D-NE730 Service manual

Sony

Sony Walkman D-NE730 Service manual

Sony CFD-E55 Operating Instructions  (primary... operating instructions

Sony

Sony CFD-E55 Operating Instructions (primary... operating instructions

Pioneer PD-217 operating instructions

Pioneer

Pioneer PD-217 operating instructions

Aiwa CSD-FD88 operating instructions

Aiwa

Aiwa CSD-FD88 operating instructions

Marantz CD6004 owner's manual

Marantz

Marantz CD6004 owner's manual

NAD C521i Service manual

NAD

NAD C521i Service manual

TerraTec M3PO GO Information sheet

TerraTec

TerraTec M3PO GO Information sheet

JVC 0910TMMMDWMTS instruction manual

JVC

JVC 0910TMMMDWMTS instruction manual

Yamaha CDX-730 owner's manual

Yamaha

Yamaha CDX-730 owner's manual

Sony CDP-CX255 operating instructions

Sony

Sony CDP-CX255 operating instructions

Philips AZ6836 - Cd Portable user manual

Philips

Philips AZ6836 - Cd Portable user manual

Magnavox AZ6820 - Portable Radio Cass Rec owner's manual

Magnavox

Magnavox AZ6820 - Portable Radio Cass Rec owner's manual

Sony CDP-C322M operating instructions

Sony

Sony CDP-C322M operating instructions

manuals.online logo
manuals.online logoBrands
  • About & Mission
  • Contact us
  • Privacy Policy
  • Terms and Conditions

Copyright 2025 Manuals.Online. All Rights Reserved.