SOUNDMASTER ur2160 User manual

UR2160
DEUTSCH NEDERLANDS
ENGLISH ESPAÑOL
FRANÇAIS PORTUGUÊS

Dieses Symbol zeigt an, dass im Inneren des
Gerätes gefährliche Spannungen vorhanden sind,
und einen Stromschlag verursachen können.
Dieses Symbol weist auf wichtige Bedienungs-
und Wartungsanweisungen bezüglich des Geräts
hin.
Sicherheits- / Umwelt- / Aufstellhinweise
xDas Gerät ausnahmslos nur in trockenen Innenräumen betreiben.
xNiemals mit Feuchtigkeit in Verbindung bringen
xSchützen Sie das Gerät vor tropfenden oder spritzenden Flüssigkeiten, und stellen Sie keine mit
Flüssigkeit gefüllten Gefäße (z. B. Vasen) auf das Gerät.
xNiemals das Gerät öffnen. STROMSCHLAGGEFAHR ! Dies ist nur Fachpersonal gestattet.
xSchließen Sie das Gerät nur an eine vorschriftsmäßig installierte und geerdete Netzsteckdose an.
Die Netzspannung muss mit den Angaben auf dem Typenschild des Gerätes übereinstimmen.
xAchten Sie darauf, dass im Betrieb das Netzkabel niemals nass oder feucht wird. Das Netzkabel
darf nicht eingeklemmt oder anderweitig beschädigt werden.
xDer Netzstecker muss immer leicht erreichbar sein, um das Gerät vom Stromnetz zu nehmen.
xLassen Sie beschädigte Netzstecker oder Netzkabel sofort von dem Kundenservice austauschen.
xBei Gewitter, Netzstecker sofort aus der Steckdose entfernen.
xKinder sollten das Gerät nur unter Aufsicht Erwachsener betreiben.
xDas Gerät ausnahmslos nur mit einem trockenen Abstaubtuch reinigen.
KEINE REINIGUNGSMITTEL oder TÜCHER mit GROBEN Material verwenden!!!
xDas Gerät keiner Sonnenbestrahlung oder anderen Hitzequellen aussetzen.
xStellen Sie das Gerät so auf, dass kein Hitzestau entstehen kann, also frei und gut belüftet.
xDecken Sie niemals die Belüftungsöffnungen zu!!!
xOffene Brandquellen, wie z.B. brennende Kerzen, dürfen nicht auf das Gerät gestellt werden.
xEs dürfen keine mit Flüssigkeit befüllten Behälter (z.B. Vasen) auf oder in die Nähe des Gerätes
gestellt werden.
xDas Gerät an einem sicheren, erschütterungsfreien Platz aufstellen.
xGerät NICHT in der Nähe vom Spülbecken oder Herd montieren.
xGerät sicher gegen herunterfallen montieren.
xGerät möglichst weit entfernt von Computern und Mikrowellengeräten platzieren, da es sonst evtl.
zu Empfangsstörungen im Radiobetrieb kommen kann.
xSie dürfen das Gehäuse nicht öffnen oder reparieren. In diesem Falle ist die Sicherheit nicht
gegeben und die Garantie erlischt. Reparaturen sind ausschließlich durch einen Service-
Center/Kundencenter auszuführen.
VORSICHT – UNSICHTBARE LASERSTRAHLUNG TRITT AUS,
WENN DER DECKEL GEÖFFNET, UND DIE
SICHERHEITSVERRIEGELUNG NIEDERGEDRÜCKT WIRD.
SETZEN SIE SICH NICHT DEM STRAHL AUS.

Batteriehinweise
xVerwenden Sie nur Batterien, die frei von Quecksilber & Cadmium sind.
xVerbrauchte Batterien sind Sonderabfall und gehören NICHT in den Hausmüll!!! Geben Sie diese
Ihrem Händler zurück oder entsorgen Sie diese an geeigneten Sammelstellen Ihrer Stadt oder
Gemeinde.
xBatterien dürfen nicht in die Hände von Kindern gelangen. Kinder können Batterien verschlucken.
Wurde eine Batterie verschluckt, muss sofort medizinische Hilfe in Anspruch genommen werden.
xÜberprüfen Sie regelmäßig die Batterien um ein Auslaufen der Batterie zu vermeiden.
xBatterien dürfen keiner Hitze (z. B. Sonnenbestrahlung), Feuer ausgesetzt werden.
xACHTUNG: Explosionsgefahr bei falscher Batteriehandhabung. Nur durch denselben oder
baugleichen Batterietyp ersetzen.

hZϮϭϲϬĞƵƚƐĐŚĞĞĚŝĞŶƵŶŐƐĂŶůĞŝƚƵŶŐ
ϭ
BATTERIE EINLEGEN
Öffnen Sie das Batteriefach und legen 1x CR2032 3V Knopfzellenbatterie unter Beachtung der Polarität in das Batteriefach ein
und schließen es wieder.
•Verwenden Sie nur Batterien, die frei von Quecksilber & Cadmium sind.
•Verbrauchte Batterien sind Sonderabfall und gehören NICHT in den Hausmüll!!! Geben Sie diese Ihrem
Händler zurück oder entsorgen Sie diese an geeigneten Sammelstellen Ihrer Stadt oder Gemeinde.
•Batterien dürfen nicht in die Hände von Kindern gelangen. Kinder können Batterien verschlucken. Wurde eine
Batterie verschluckt, muss sofort medizinische Hilfe in Anspruch genommen werden.
•Überprüfen Sie regelmäßig die Batterien um ein Auslaufen der Batterie zu vermeiden.
•Batterien dürfen keiner Hitze (z. B. Sonnenbestrahlung), Feuer ausgesetzt werden.
•ACHTUNG: Explosionsgefahr bei falscher Batteriehandhabung. Nur durch den selben oder baugleichen
Batterietyp ersetzen.

hZϮϭϲϬĞƵƚƐĐŚĞĞĚŝĞŶƵŶŐƐĂŶůĞŝƚƵŶŐ
Ϯ
BEDIENELEMENTE
1) Standby (Bereitschafts) LED Indikator
2) CD Fach
3) AUX-IN Anschluss
4) Magnet für Fernbedienung
5) USB Anschluss
6) CD Fach öffnen / schließen
7) Wiedergabe/Pause Taste
8) Stop
/
St-Mono Taste
9) Titelsprung/Such Auf / Ab Taste
10) Album/Festsenderspeicher Auf/Ab Taste
11) Speicher. / Uhrzeiteinstell- Taste
12) IR Sensor für Fernbedienung
13) LCD Anzeige
14) Lautstärke Tasten
15) Ein/Aus Taste
16) Funktionstaste
17) EQ Equalizer Taste
18) Display/ID3/RDS Modus Taste
19) Timer Taste
20) Sleep (Einschlaffunktion) Taste
21) Wiedergabe Modus/RDS Suchtaste
22) Lautsprecher
23) Gangreserve Batteriefach
24) 75ohm Antennenanschluss
25) Netzkabel
Maßnahmen für die Benutzung
Installation
•Alle Komponenten auspacken und das Schutzmaterial entfernen.
•Stellen Sie sicher, dass Ihr Hausstromnetz AC230V~50Hz hat.
•Schließen Sie ggf. die UKW-Wurfantenne an den 75ohm Antennenanschluss (24) an.
•Die Belüftungsöffnungen nicht zukleben oder blockieren.
Gangreserve (Batterie Installation)
•Mit dieser Funktion läuft die Uhr intern weiter bzw. Ihre eingestellten
Festsenderspeicher bleiben bei einem Stromausfall erhalten. Die Anzeige leuchtet
erst wieder, sobald das Stromnetz wieder verfügbar ist. Öffnen Sie das Batteriefach
(23) und legen 2x UM-3/AA 1.5V Batterien (nicht inklusive) unter Beachtung der
Polarität ein und schließen das Fach wieder..
•Wir empfehlen Ihnen Alkaline Batterien zu verwenden.
•Falsch eingesetzte Batterien können explodieren und das Gerät beschädigen.

hZϮϭϲϬĞƵƚƐĐŚĞĞĚŝĞŶƵŶŐƐĂŶůĞŝƚƵŶŐ
ϯ
Montageanleitung
Stellen Sie sicher, dass während der Montage das Gerät nicht am Strom angeschlossen ist.
1) Suchen Sie eine geeignete und sichere (möglichst weit entfernt von Spüle, Herd &
Mikrowelle) Anbaustelle. Stellen Sie sicher, dass um das Gerät genügend Freiraum
herrscht, um einen Hitzestau auszuschliessen.
2) Beiliegende Bohrschablone an der gewünschten Montagestelle mit Klebeband
befestigen. Achten Sie darauf, dass die Schablone komplett flach auf dem Schrank
liegt.
3) Verwenden Sie einen 5mm Bohrer.
4) Achten Sie beim Bohren auf folgende Punkte:
•Geeigneten Bohrer für das Gehäusematerial Ihres Hängeschrankes
verwenden (z.B. Holzbohrer)
•Auf evtl. Kabel am Hängeschrank achten (z.B. indirekte Beleuchtung)
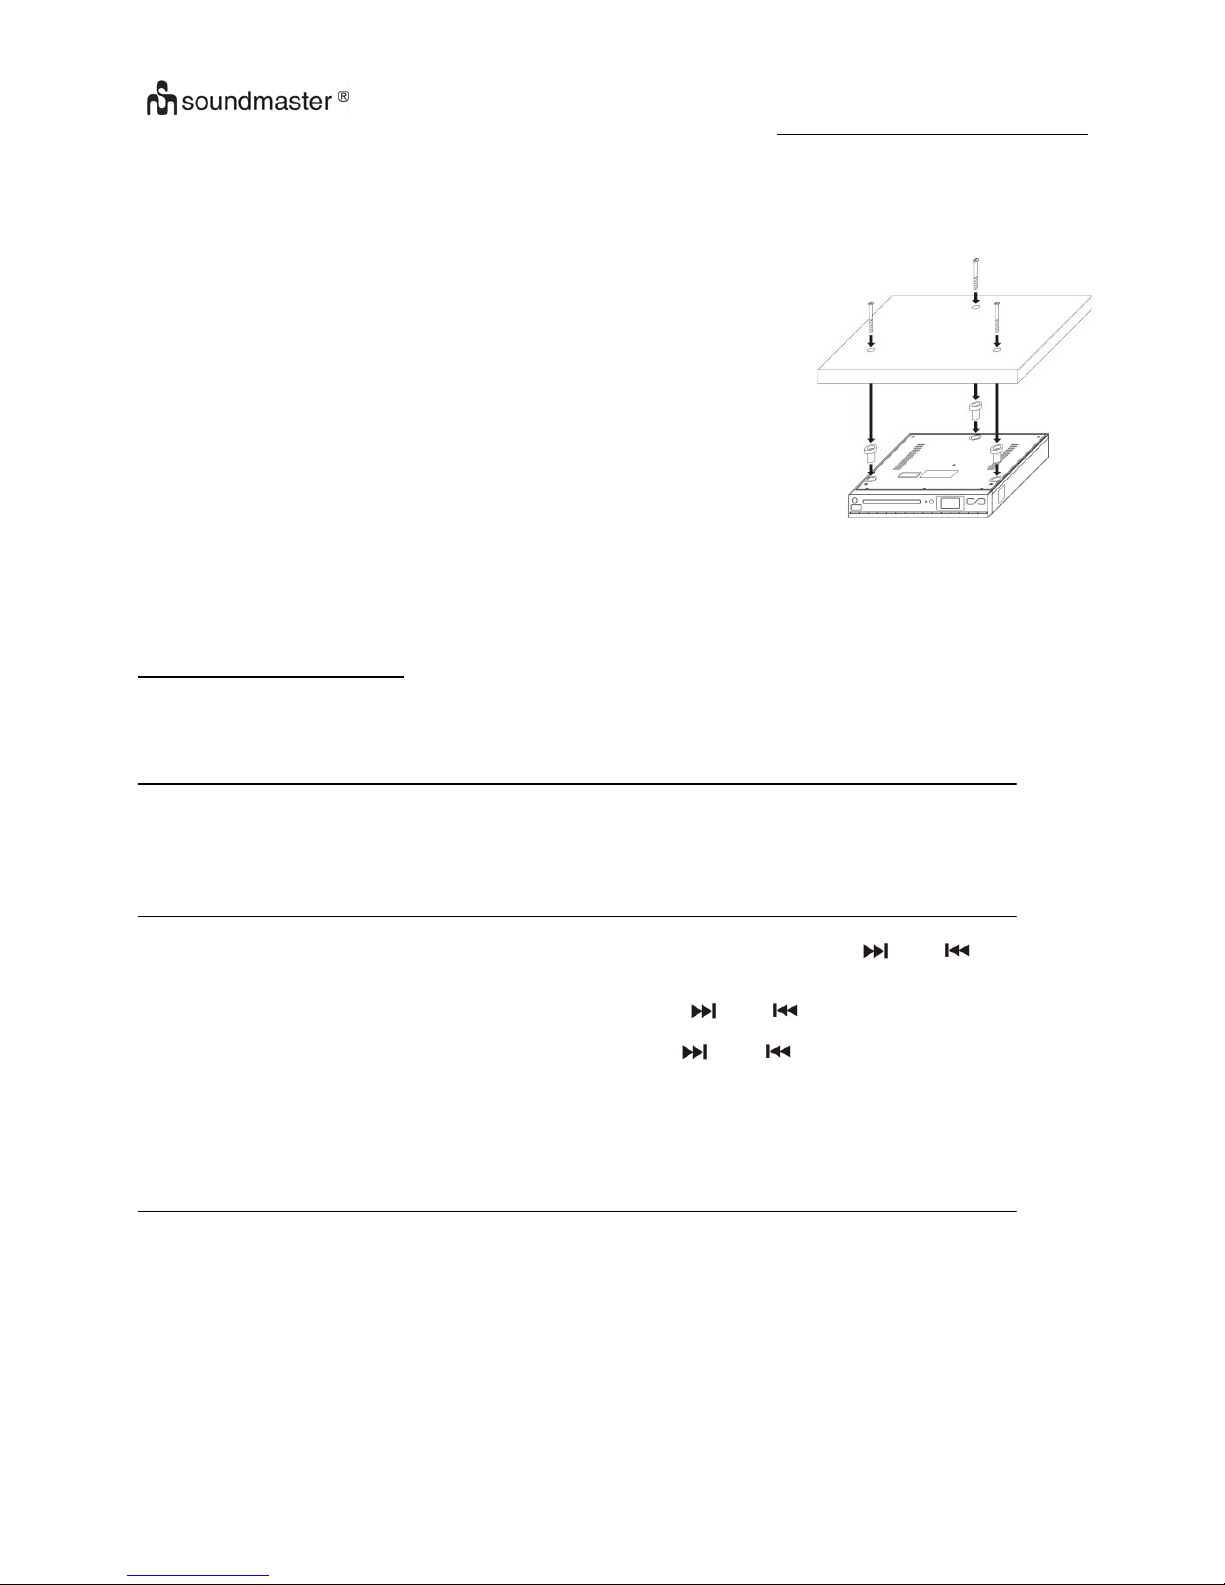
5) Bohren Sie vorsichtig 3 Löcher an der markierten Stellen (Fadenkreuz der
Bohrschablone).
6) Falls Sie eine Blende am Unterbauschrank haben, können Sie die beiliegenden
Distanzhalter verwenden.
7) Befestigen Sie nun das Gerät (mit oder ohne Distanzhalter) mit den beiliegenden Schrauben von oben durch den
Hängeschrank. Verwenden Sie ausschliesslich einen Schraubendreher (KEINEN Akkuschrauber) und ziehen Sie die
Schrauben nur leicht fest, um eine Beschädigung im Geräteinneren zu vermeiden. Achten Sie darauf, dass das Netzkabel
und das Antennenkabel (75ohm Kabel oder beiliegende Wurfantenne) nicht eingeklemmt werden. Bei Benutzung der
Wurfantenne muss diese vollständig ausgezogen werden, um einen bestmöglichen Empfang zu gewähren.
Haftungsausschluss für Montage
Wir weisen ausdrücklich darauf hin, dass die beiliegenden Schrauben nicht für alle auf dem Markt befindlichen
Unterbauschrankmaterialien/-stärken geeignet sind und schließen somit jegliche Haftungsansprüche uns gegenüber bei
Beschädigung des Unterbauschrankes aus. Sollten Sie längere Schrauben für die Montage benötigen, sind diese im
einschlägigen Fachhandel erhältlich.
Anschluss
1. Schließen Sie das Netzkabel (25) an Ihre Steckdose an. Das Gerät schaltet sich automatisch in den Standby Modus
(Betriebsmodus). Der LED Standby Indikator leuchet auf.
2. Schalten Sie das Gerät durch Tastendruck (15) ein. Sobald sich die Hintergrundbeleuchtung im LCD Display aktiviert, ist Ihr
Gerät bereit zum Musikspielen.
Uhrzeit einstellen
1. Das Gerät muss sich im Standby Modus befinden.
2. Drücken Sie die Taste “ Mem/Clk-Adj ” (11) bis “24HR” in der LCD Anzeige blinkt. Mit Tasten oder (9) kann auf 12
oder 24 Std. umgestellt werden. Nach gewünschter Einstellung, die Taste “ Mem/Clk-Adj ” (11) nochmals drücken, um
Format zu bestätigen.
3. Die ersten Zahlen “ 00: ” blinken in der LCD-Anzeige (13). Mit Tasten oder (9) die Stunde einstellen und mit Taste
“ Mem/Clk-Adj ” (11) die Einstellung bestätigen.
4. Die 3.&4. Zahlen “ :00 ” blinken in der LCD-Anzeige (13). Mit Tasten oder (9) die Minuten einstellen und mit Taste
“ Mem/Clk-Adj ” (11) die Einstellung bestätigen.
¾Wenn binnen ca. 5 Sekunden nach Drücken der Taste “ Mem/Clk-Adj ” keine Einstellung vorgenommen wird, geht
das Gerät aus dem Einstellmodus automatisch heraus.
¾Wenn das Gerät vom Stromnetz genommen wird und keine Stützbatterie in das Batteriefach der
Gangreserve eingelegt wurde, erlischt die Zeit und muss neu eingestellt werden.
Radiobetrieb
Manuelle Sendereinstellung
1. Schalten Sie das Gerät mit der Taste On/Standby (15) ein und drücken anschließend die Function Taste (16) so oft, bis
„Tuner“ in der Anzeige erscheint.
2. Durch wiederholtes kurzes Drücken der Taste Tuning Up oder Down (9) die gewünschte Senderfrequenz einstellen.
3. Lautstärke mit Volume Tasten (14) einstellen.
Automatische Sendersuche
1. Drücken Sie die Function Taste (16) so oft, bis „Tuner“ in der Anzeige erscheint.
2. Drücken und halten Sie die Tuning Up oder Down Taste (9), bis automatischer Suchlauf startet. Das Gerät stoppt
automatisch beim nächst empfangenen Sender.
3. Diesen Vorgang wiederholen bis gewünschte Senderfrequenz erreicht ist.
4. Die Gewünschte Lautstärke mit Taste (14) +/- einstellen.

hZϮϭϲϬĞƵƚƐĐŚĞĞĚŝĞŶƵŶŐƐĂŶůĞŝƚƵŶŐ
ϰ
Festsenderspeicher
Es können bis zu 20 Sender gespeichert werden.
1. Wie unter manueller oder automatischer Sendersuche beschrieben, die gewünschte Senderfrequenz einstellen.
2. Taste „Mem/Clk-Adj ” (11) drücken bis der “ MEM ” Indikator in der LCD Anzeige blinkt.
3. Mit der Taste “ Folder / Pre-up /down “ (10) den gewünschten Speicherplatz auswählen.
4. Eingabe durch Tastendruck “ Mem/Clk-Adj ” (11) bestätigen.
5. Wiederholen Sie die Schritte 1 – 4, bis gewünschte Senderspeicher gesetzt sind.
6. Nun können Sie durch Drücken der Taste Folder/Pre–up /down “ (10), die Festsender in nummerischer Reihenfolge
abrufen.
¾Wenn binnen ca. 5 Sekunden keine Einstellung im Festsenderspeichermenü vorgenommen wird, geht das Gerät aus dem
Speichermodus automatisch heraus..
¾Falls das Gerät vom Stromnetz genommen wird und keine Stützbatterie in das Batteriefach der Gangreserve eingelegt
wurde, werden alle gespeicherten Sender gelöscht und müssen neu programmiert/gespeichert werden.
Radio Data System (RDS)
Wenn das UKW Radiosignal stark genug ist, empfängt das Radio RDS ( Radio Data System) Informationen. (wenn vom
Radiosender unterstützt).
RDS Mode : Drücken Sie die RDS Mode Taste (18), um die RDS Funktion zu aktivieren.
RDS Suche: Drücken Sie die RDS search Taste (21), um gewünschten u.g. Programmtyp auszuwählen. Anschließend drücken
Sie die Tuning +/- Taste (9), um die RDS Suche zu starten. Das Gerät sucht nun automatisch einen passenden Sender, welcher
im Moment das angewählte Senderprogramm ausstrahlt. Falls die Suche fehlgeschlagen ist, erscheint NO MATCH in der
Anzeige.
Hinweis : „PS“ oder „PTY“ erscheint nicht, wenn kein passendes Signal gesendet wird.
Die Programme sind wie folgt aufgelistet:
NEWS (Nachrichten), AFFAIRS, INFO, SPORT, EDUCATE (Bildung), DRAMA, CULTURE (Kultur), SCIENCE
(Wissenschaft), POP M (Pop Musik), ROCK M (Rock Musik), EASY M, LIGHT M
CLASSICS (Klassiche Musik), OTHER M (Andere Musik), WEATHER (Wetter), FINANCE (Finanzen), CHILDREN
(Kinder), SOCIAL (Soziales), RELIGION (Religion), PHONE IN, TRAVEL (Reisen), LEISURE (Freizeit), JAZZ,
COUNTRY, NATION M, OLDIES, FOLK M, DOCUMENT.
UKW-Stereo
zMit der Taste „St/Mono“ (8) kann auf MONO (Bei schlechtem UKW-Empfang) umgeschaltet bzw. von Mono auf Stereo
zurückgeschaltet werden.
zBei Stereoempfang leuchtet der Stereoindikator “ ” in der LCD Anzeige auf.
- UKW : Schließen Sie ein im Fachhandel erhältliches 75ohm Antennenkabel an die Buchse (24) an und anschließend das
Gegenstück an Ihre 75ohm Hausantennenbuchse. Falls Sie keinen Hausantennenanschluss haben, können Sie die
mitgelieferte UKW-Wurfantenne an die 75ohm Buchse am Gerät anschließen. WICHTIG: Um einen optimalen Empfang von
UKW-Sendern zu empfangen, rollen Sie die UKW-Wurfantenne vollständig aus.
CD Betrieb
zWiedergabe einer CD
1. Drücken Sie die Function Taste (16) bis “CD” in der LCD Anzeige erscheint.
2. Taste CD OPEN Taste (6) drücken um das CD-Fach zu öffnen.
3. Legen Sie eine CD mit der Beschriftung zu Ihnen zeigend in das CD Fach ein und schließen es durch Tastendruck (6)
wieder.
4. Die CD wird eingelesen was je nach Format einige Sekunden dauern kann. Die Titelanzahl & Spielzeit wird in der LCD
Anzeige dargestellt.
zPlay / Pause Modus
1. Drücken Sie die “ Play/Pause ” Taste (7), um die Wiedergabe zu starten. Um die Wiedergabe kurz zu unterbrechen,
drücken Sie die Taste “ Play/Pause ” (7). Die Titelzeit blinkt in der LCD Anzeige. Zum Fortsetzten der Wiedergabe,
drücken Sie die Play/Pause Taste erneut.

hZϮϭϲϬĞƵƚƐĐŚĞĞĚŝĞŶƵŶŐƐĂŶůĞŝƚƵŶŐ
ϱ
zStop
1. Um die Wiedergabe zu beenden, drücken Sie die “ Stop ” Taste (8).
zTitelsprung (skip vor / skip rückwärts )
1. Titelsprung vorwärts: Taste (9) kurz drücken und nächster Titel wird angewählt.
2. Titelsprung rückwärts: Taste (9) kurz drücken und vorheriger Titel wird angewählt.
zMP3 CD´s / Format
1. Nach Einlegen einer MP3-CD in das CD-Fach, zeigt die LCD Anzeige nach ein paar Sekunden die Titelanzahl &
Albumanzahl an.
2. Mit Tasten “ Folder/ Pre-up /down ” (10) können Sie das gewünschte Album anwählen.
3. Mit Tasten “ Skip Up oder Skip Down ” (9) die Titel anwählen.
ID3 Anzeige (Fernbedienung)
Sie können in der LCD Anzeige den Dateinamen (falls MP3 unterstützt) anzeigen lassen. Im CD/MP3 Wiedergabemodus,
drücken Sie wiederholt die Taste “ ID3 “ (18) an der Fernbedienung
MP3 track format
- Bit rate : 32 kbps~320kbps, sampling rate : 32khz, 44.1khz and 48 kHz decodable
zWiederhol-/Zufallswiedergabe
Taste “ Play Mode ” (21) während dem Abspielen einmal oder mehrmals drücken. Jeweilige Funktion finden Sie wie folgt:
FürCD
(1) Titelwiederholung 1 (2) Wiederholung aller Titel (3) Zufallswiedergabe (4) Normal Modus
Indikator
Play mode im LCD Display
Titelwiederholung & blinkt
Wiederholung alle
Zufallswiedergabe RAN
Normalmodus --------------
Für MP3
(1) Titelwiederholung 1 (2) Wiederholung aller Titel (3) Wiederholung Album
(5) Normalmodus (4) Zufallswiedergabe
Indikator
Play mode im LCD Display
Titelwiederholung & blinkt
Wiederholung alle
Wiederholung Album
Zufallswiedergabe RAN
Normalmodus

hZϮϭϲϬĞƵƚƐĐŚĞĞĚŝĞŶƵŶŐƐĂŶůĞŝƚƵŶŐ
ϲ
CD Titelprogrammierung
Sie können mit dieser Funktion bis zu 20 Titel in einer beliebigen Reihenfolge programmieren. Das Gerät muss sich im Stopp
Modus befinden.
1. CD einlegen wie bei CD Betrieb beschrieben und Wiedergabe stoppen.
2. Drücken Sie die“ Mem/Clk-Adj ” Taste (11) Æ“ MEM ” blinkt in der Anzeige ÆSie sind nun im Programmmodus.
3. Wählen Sie Ihren gewünschten Titel mit Tasten oder (9).
4. Eingabe mit der Taste “ Mem/Clk-Adj ” (17) bestätigen ÆTitel wurde somit gespeichert.
5. Wiederholen Sie die Schritte 3-4, bis alle gewünschten Titel gespeichert sind.
6. Mit der “ Play/Pause ” Taste (7) das programmierte Abspielen starten.
7. Drücken Sie die “ Stop ” Taste (8), um die Wiedergabe zu stoppen.
¾Programmierung löschen : Taste “ Stop ” (8) 2x drücken.
USB Wiedergabe
1. Vergewissern Sie sich, dass sich das Gerät im Standby (Bereitschaftsmodus) oder in einer Funktion
außer USB befindet.
2. Schließen Sie den USB-Stick vorsichtig & korrekt an die USB Buchse (5) an.
zACHTUNG: Falsches Anschließen des USB-Sticks, kann das Speichermedium und/oder die den
Anschluss am Gerät beschädigen, daher stellen Sie sicher, dass der USB-Stick korrekt
anschlossen wird.
3. Die Taste Function (16) drücken, bis das USB Symbol “ ” aufleuchtet.
4. Das Gerät liest nun die Daten ein und zeigt die Titel & Alben in der LCD Anzeige an.
5. Weitere Funktionen wie Wiedergabe, Stop, etc. sind identisch wie im CD bzw. CD/MP3 Betrieb.
Hinweis
- USB funktioniert nur bei Direktanschluss eines USB Sticks. Kein Adapterkabel- oder Computerbetrieb möglich..
- Durch unterschiedliche MP3 Codierformate, kann es möglich sein, dass ein USB Stick nicht funktioniert, was
KEINE Fehlfunktion des Geräts darstellt.
Entfernen des USB-Sticks
1) Das Hauptgerät immer in den Standby (Bereitschaftsmodus) versetzen.
2) USB Stick gerade aus dem Gerät ziehen
Weitere Funktionen
A. Einschlaftimer (mit Fernbedienung)
1. Taste“ Sleep ” drücken. “SLP-90 “ erscheint in der LCD Anzeige (1).
2. Taste “Sleep” drücken, bis gewünschte Einschlaftzeit angezeigt wird. 90 > 80 > 70 >….10 Minuten. “ ” erscheint nun in
der LCD Anzeige und Einschlaftimer ist somit aktiv.
3. Das Gerät schaltet automatisch nach Ablauf der eingestellten Zeit ab..
4. Um die Funktion vorab zu deaktivieren, drücken Sie die Taste „Sleep“ bis “ “ in der LCD Anzeige erlischt.

hZϮϭϲϬĞƵƚƐĐŚĞĞĚŝĞŶƵŶŐƐĂŶůĞŝƚƵŶŐ
ϳ
B. Kochtimer (Countdown)
Der UR2160 besitzt einen Kochtimer von 1 – 120 Minuten, welcher nach Ablauf der eingestellen Zeit, Sie mit einem Beep Ton
erinnert.
1) Drücken und halten Sie die Taste „ Timer „ (19), um in den Einstellmodus zu gelangen. Die ersten Ziffern der Zeit und
das Symbol beginnen zu blinken.
2) Mit der Lautstärke (Volume) Taste (14) können Sie die gewünschten Minuten von 1 – 120 Minuten anwählen.
3) Drücken Sie im Anschluss die „ Timer „ Taste (19).
4) Nun stellen Sie die gewünschte Lautstärke des Beep Tons (Signaltons) ein, indem Sie die Taste Volume (14) drücken.
5) Um die Eingabe zu bestätigen, die Taste „ Timer „ (19) erneut drücken und der Timer (Countdown) aktiviert sich.
6) Sobald der Countdown abgelaufen ist, aktiviert sich automatisch der Beep Ton. (Signalton)
Hinweis:
¾Wenn Sie im Einstellmenü innerhalb 6 Sekunden keine Taste drücken, wechselt das Gerät automatisch zur Normalansicht
und das Einstellmenü wird abgebrochen.
¾Sie können Ihre Musik (Radio / CD / USB) während des Küchentimers (Countdown) weiter hören. Sobald der Countdown
abgelaufen ist, aktiviert sich der Signalton und Ihre Musik wird kurz unterbrochen. Drücken Sie die „ Timer „ Taste (19), um
den Signalton bzw. Küchentimer zu beenden.
¾Sie haben auch zur jeder Zeit die Möglichkeit, den Küchentimer zu beenden. Drücken Sie so oft die “ Timer “ Taste (19) bis
das Symbol erlischt.
C. Equalizer
Mit der Taste „ Preset EQ ” (14) können Sie den Klang nach Ihren Wünschen einstellen:
FLAT CLASSIC ROCK POP JAZZ
D. ID3/Display Funktion
Da der Artikel als Küchengerät mit Kochtimer entwickelt wurde, wechselt das LCD-Display bei Wiedergabe von CD, USB oder
Radio automatisch zur Uhrzeit nach ein paar Sekunden. Um den Wiedergabemodus (ID3 = Album, Titel, Interpret, RDC =
Radiostation etc.) kurz zu überprüfen, drücken Sie die “ Display/ID3 “ Taste (18).
AUX-IN
Schließen Sie ein im Fachhandel erhältliches AUX-Kabel mit 3.5mm Klinkenstecker an Ihr externes Gerät (z.B. MP3 Player) und
das Gegenstück in die AUX IN Buchse (3) an. Drücken Sie die Taste Function (16) bis AUX in der Anzeige erscheint.


hZϮϭϲϬŶŐůŝƐŚŝŶƐƚƌƵĐƚŝŽŶŵĂŶƵĂů
E'ϭ
IMPORTANT SAFETY INSTRUCTIONS:
1. Read the instructions. All uses guidelines must be read before start device.
2. Keep the instructions for future use.
3. Attention, use and security guidelines must be respected.
4. The device must not be used near water or be put in contact with moisture.
5. Make sure has no liquid is spilled on device and device openings.
6. Move device carefully, avoid shocks.
7. Do not block the breakdown of the device outputs.
8. Do not place the device near from a heat source (e.g. radiator). Do not expose it to the Sun.
9. Plug the device as indicate on this information form.
10. This device has a connection with overload protection (security device) decision-making. If the
replacement of decision-making is required, please you send has an experienced or the device
manufacturer technician.
11. For cleaning the device, please follow the recommendations of the notice.
12. The sector cord should be unplugged a long period of use.
ENVIRONMENTAL PROTECTION
Do not dispose of this product with the normal household waste at the end
of its life cycle. Return it to a collection point for the recycling of electrical
and electronic devices. This is indicated by the symbol on the product, user
The materials are reusable according to their markings. By reusing, recycling or
other forms of utilization of old devices you make an important contribution to the
protection of our environment.

hZϮϭϲϬŶŐůŝƐŚŝŶƐƚƌƵĐƚŝŽŶŵĂŶƵĂů
E'Ϯ
13. Device shall be repaired by a qualified person when:
a. the taken or the power cord is damaged,
b. objects have fallen a I ' interior camera or a liquid was reverses a I ' internal device,
c. device was exposes to the rain,
d. device does not work correctly without notable exterior change,
e. device fell and the subwoofer is broken.
14. The user shall not try to maintain device beyond that which is described in this information form. The
guarantee would negate.
15. MAINS plug is used as the disconnect device and shall remain readily operable and easily accessible.
16. Usage of other than specified head- or earphones can result in hearing loss due to excessive sound
pressures.
17. To prevent injury, this apparatus must be securely attached to the floor/wall in accordance with the
installation instructions.

hZϮϭϲϬŶŐůŝƐŚŝŶƐƚƌƵĐƚŝŽŶŵĂŶƵĂů
E'ϯ
BATTERY REPLACEMENT
The battery compartment is located on the back of the remote control.
1. Remove the battery compartment door by pressing in on the tab and lifting it off.
2. Insert one (1) CR2032 size batteries into the battery compartment following the polarity markings inside the battery
compartment.
3. Replace the battery compartment door.
Battery Precautions
zReplacement of batteries must be done by an adult.
zDo not mix old and new batteries.
zDo not mix alkaline, standard (carbon-zinc) or rechargeable
(nickel-cadmium) batteries.
zThe supply terminals are not to be short-circuited.
zNon-rechargeable batteries are not to be recharged.
zExhausted batteries are to be removed.
zOnly batteries of the equivalent type are to be used.
zBatteries are to be inserted with the correct polarity.
zDispose of batteries properly. Do not dispose of batteries in fire. The
batteries may explode or leak.

hZϮϭϲϬŶŐůŝƐŚŝŶƐƚƌƵĐƚŝŽŶŵĂŶƵĂů
E'ϰ
LOCATION OF CONTROLS
MAIN UNIT
1) Standby LED indicator
2) CD tray
3) Aux-in jack
4) Remote handset stick place
5) USB Socket
6) CD tray open/close button
7) Play/Pause button
8) Stop
/
St-Mono button
9) Skip/Tuning Up /Down button
10) Folder/Pre-Up/Down button
11) Memory/Clock-Adjust button
12) Remote sensor
13) LCD display
14) Volume button
15) On/Standby button
16) Function button
17) Preset EQ button
18) Display/ID3/RDS mode button
19) Timer button
20) Sleep button
21) Play Mode/RDS search button
22) Speaker
23) Backup battery compartment
24) FM wire antenna
25) AC cord
Caution:
Usage of controls or adjustments or performance of procedures other than those specified herein may result in hazardous
radiation exposure.
This unit should not be adjusted or repaired by anyone except qualified service personnel.
Important:
Since movement of the CD mechanism and the sensitive circuitry may cause interference to the radio tuner nearby, switch this
unit off while operating other
radio devices
Precautions for use
Installation
•Unpack all parts and remove protective material.
•Do not connect the unit to the mains before checking the main voltage and before all other connections have been made.
•Do not cover any vents and make sure that there is a space of several centimeters around the unit for ventilation.
Backup battery installation
•This device provide a battery backup system to memory your clock time, preset
memory of tuner and timer once the AC source was interrupted. Follow the engraved
marking in the compartment to install 2pcs “AA ” size battery(not included) with the
correct direction to the battery compartment. Then cover the battery door.
•Alkaline type battery recommended for long life performance.
•Wrong direction battery installation will cause explosion and damage the unit.

hZϮϭϲϬŶŐůŝƐŚŝŶƐƚƌƵĐƚŝŽŶŵĂŶƵĂů
E'ϱ
Install to your kitchen cabinet
1) Use the mounting template supplied with the unit to make anchor hole marks on the kitchen
cabinet.
2) Drill 1/4” holes on the marks.
3) Fix the plastic pole(provided) to top of the unit with the proper high level which can match
your kitchen cabinet.
4) Drive the provided screw from the kitchen cabinet to the main unit(refer to the picture).
Connection
1. Plug in the AC cord (25) to the AC outlet. The unit will go to standby mode and the Standby LED indicator (1) will light up.
2. Turn on the unit (15), if the LCD display (13) is on with backlighting, it means the power supply is normal. Now your system
is ready to play the music.
Setting the clock
1. Set unit in standby mode.
2. Press the “ Mem/Clk-Adj ” button (11) until display will flash “24HR” press the Skip Up or Skip Down button (9) to
select the clock format between 12 or 24Hour. Then press the “ Mem/Clk-Adj ” button (11).
3. The first digit of “ 0:00 ” is flashing on the LCD display (13). Press Skip Up or Skip Down button (9) to set the
correct hour. Press “ Mem/Clk-Adj ” button (11) to store the correct hour.
4. The third & fourth digit of “ 00 ” is flashing, press the Skip Up or Skip Down button (9) to set the correct minutes.
Then press “ Mem/Clk-Adj ” button (11) to store the correct minute.
¾The clock setting mode will automatically quit if no button is being pressed in a period of about 5 seconds after
pressing the “ Mem/Clk-Adj ” button.
¾The pre-set time will be re-set completely if dis-connecting the main power supply except backup
battery installed. You are recommended to switch the system into standby mode for convenience
usage.
Listening to radio
Manual tuning
1. Switch on the unit by On/Standby button (15), then press Function button (16) to select “ Tuner ” mode.
2. Tune to the required station by pressing the Tuning Up or Down button (9).
3. Press the Volume knob (14) to the desired volume level.
Auto tuning
1. Press Function button (16) to select “ Tuner ” mode.
2. Press and hold the Tuning Up or Down button (9) for 1-2 seconds and then release.
3. The unit will start seeking automatically and stop until a radio station is reached.
4. Repeat step 2 & 3 until the desired radio station is being reached.
5. Press Volume knob (14) to the desired volume level.
Preset stations
You can store up to 20 radio stations in the memory
Set to tuner mode.
1. Turn to the desired radio station by “ Manual” or “ Auto ” tuning method.
2. Press the Mem/Clk-Adj ” button (11) until the “ MEM ” indicator and preset station number are flash on LCD display (13)
3. Press “ Folder / Pre-up /down “button (10) to select the desired station memory for storage.
4. Press “ Mem/Clk-Adj ” button (11) again to confirm the setting.
5. Repeat step 1 to 4 to store other stations.
6. Now you can select the presets stations in order by pressing the “Folder/Pre–up /down “button (10)
¾The pre-set memories will be cancelled completely if dis-connecting the main power supply except backup battery
installed. You are recommended to switch the system into standby mode for convenience usage.
¾There are 5 seconds for program state, after 5 sec. This state would resume to normal tuner mode automatically.
¾You can overwrite a present station by storing another frequency in its place.
Radio data system (RDS)
This is the features to display the information which released from the radio broadcast:-
RDS mode : Press RDS mode button( 18) to active the RDS function and the program service station name (PS) is being
displayed.

hZϮϭϲϬŶŐůŝƐŚŝŶƐƚƌƵĐƚŝŽŶŵĂŶƵĂů
E'ϲ
RDS search : Press RDS search button(21)to select the program type you want to listen, then press the tuning +/- button to start
RDS searching and the unit will automatically search a suitable station, which is currently broadcasting with program type
identification (PTY) signal. If there was no any broadcasting station match your selection, display will show NO MATCH and then
stay back in previous frequency.
Remark : no “ PS “ nor “ PTY “ appears if no signal is sent.
Program are classified as follows:
NEWS, AFFAIRS (current affairs), INFO (information), SPORT, EDUCATE (education), DRAMA, CULTURE, SCIENCE,
VARIED, POP M (pop music), ROCK M (rock music), EASY M, LIGHT M (light classical),
CLASSICS (serious classical), OTHER M (other music), WEATHER, FINANCE, CHILDREN, SOCIAL, RELIGION,
PHONE IN, TRAVEL, LEISURE, JAZZ, COUNTRY, NATION M, OLDIES, FOLK M, DOCUMENT.
Notes
Program service station name (PS)
This is a name consisting of less than 8 alphanumeric characters, which is displayed in order to inform listeners about the
program service being broadcast by the radio station. Example: BBC 1
Programmed type identification (PTY)
PTY allows selection by one of the program types rather than by a station.
Radio text (text)
Information such as the cast list of a play or the title of a song is shown on the display.
FM-Stereo reception
zPress the “ St/Mono ” button (8) repeatedly, the FM programs are receiving in mono and stereo mode repeatedly. In
particular when stereo signals are weak, it is preferable to receive the program in Mono.
zIf stereo signal is being received, the stereo indicator “ ” will appear on LCD display (13) to show FM Stereo program
is now receiving.
Hints for best reception:-
- FM : the receiver has a build-in FM wire antenna (24) hanging at the rear cabinet, this wire should be totally unraveled and
extended for the best reception.
Playing Compact Disc
zGetting start
1. Press Function button (16) to select “ CD ” mode.
2. Push the CD tray open (6) to open the CD tray.
3. Place a CD with the printed side facing up and then close the CD tray.
4. Focus search will performing and the LCD display (13) will show the total number of tracks & total playing time. Then, the
unit will start to automatically.
5. Press Volume knob (14) to the desired volume level.
zPlay / Pause mode
1. To interrupt, press the “ Play/Pause ” button (7) once, and the playing time will be freeze on the LCD display (13). Press
again to resume normal playback.
zStop mode
1. If “ Stop ” button (8) is pressed during play or pause mode, system will go to stop mode.
zSkip mode (skip up / skip down )
1. During play or pause mode, if “ skip up ” button (9) is pressed. It will go to next track and display the track no. and then
remain the play or pause mode.
2. During play or pause mode, if “ skip down ” button (9) is pressed. It will go to the previous track, original track no. is
display and remain the play or pause mode.
zFor MP3 Disc
1. After focus search is performing, the total number of track and album will be shown on the LCD display (13). The unit will
start to plat directly.
2. Press “ Folder/ Pre-up /down ” button(10) to select the folder number.
3. Press “ Skip Up or Skip Down ” button (9) to select the track number.

hZϮϭϲϬŶŐůŝƐŚŝŶƐƚƌƵĐƚŝŽŶŵĂŶƵĂů
E'ϳ
ID3/Display function (On remote control)
Press the “ ID3 “ button(18)repeatedly, the LCD display (13) show “ fileġȿduring playback of MP3 file, the song
file/album/song/artist name/clock time is being displayed few seconds in sequence . Then will change back to current clock time.
Remark:-
- In that case of no name or not supportive languages had been assigned for the track, LCD display will blank (13) when press
the ID3 button.
- No Title/Album name can be recognized if the input format on the Disc is not supporting by the system.
- The system support only English and Arabic number for ID3 function.
MP3 track format requirement:-
-
Bit rate : 32 kbps~320kbps, sampling rate : 32khz, 44.1khz and 48 kHz decodable
- The performance of playing MP3 Disc is various from the quality of recording disc and the method of recording. Furthermore,
the searching lead-time for MP3-CD is longer than normal CD due to difference format.
zRepeat/Random mode
Press the “ Play Mode ” button (21) during playback to select repeat and random function, a single track, all the tracks repeat or
folder repeat(MP3 only) and random can be played in difference mode as follow:-
ForCD
(1) repeat 1 (2) repeat all track (3) random (4) off mode
Indicator
Play mode on LCD display
Repeat track & flashing
Repeat all
Random RAN
Off mode --------------
For MP3 Disc
(1) repeat 1 (2) repeat all tracks (3) repeat 1 folder
(5)offmode (4)random
Indicator
Play mode on LCD display
Repeat single track & flashing
repeat all tracks
Repeat single folder
Random mode RAN
Off mode
zRepeat play
You can listen the desired track, folder(for MP3 only) or whole disc repeat by this function.
zRandom play
You can listen all the tracks in a random order by this function.

hZϮϭϲϬŶŐůŝƐŚŝŶƐƚƌƵĐƚŝŽŶŵĂŶƵĂů
E'ϴ
CD programming
Up to 20 tracks can be programmed for disc play in any order. Before use, be sure to press the “ stop ” button (8).
1. Set in CD mode & stop the CD playback.
2. Press the “ Mem/Clk-Adj ” button (11) and “ MEM ” will appear on LCD display (13).
3. Select a desired track by pressing skip up or down button (9).
4. Press the “ Mem/Clk-Adj ” button (17) to store the track into memory.
5. Repeat steps 3 and 4 to enter additional tracks into the memory if necessary.
6. When all the desired tracks have been programmed, press “ Play/Pause ” button (7) to play the disc in assigned order.
7. Press “ Stop ” button (8) to stop playback, press Stop button again to clear all stored memory.
¾The programming mode will automatically stop if no button is being pressed in a period of about 10 seconds after pressing
the “Mem/Clk-Adj ” button.
Playback of MP3 song via USB storage media
Connecting
The system is able to decode and playback all MP3 file which stored in the memory media with USB connecting port.
1. Set the system at standby mode first or other function except USB mode.
2. Open the USB socket cover and plug-in the USB pen-drive with the face up & make sure it going into
completely.
zConnecting the USB upside down or backwards could damage the audio system. Check to be
sure the direction is correct before connection.
3. Set Function button (16) to “ ” USB mode.
4. The system will start reading the storage media automatically after connecting, and LCD display (13)
will show the total number of folder and MP3 files being detected.
5. Repeat the same playback procedure as playing CD/MP3 disc as above.
Remark
- The system can detect and read the file under MP3 format only at USB mode but not other music file format.
- If connect the system to MP3 player via the USB socket, due to variances in MP3 encoding format, some MP3
player may not be able to play via the USB socket. This is not a malfunction of the system.
- USB port does not support connection with USB extension cable and is not designed for communication with
computer directly
Removing of USB
To remove the USB storage media, change the function mode to either CD, Aux, or Tuner first. Then un plug it by pulling out the
USB socket directly.
More features
A. Sleep function
1. Press “ Sleep ” button (on Remote) “SLP-90 “ will shown on the LCD display (1).
2. Keep pressing the button to adjust the sleep timer in the order of 90 > 80 > 70 >….10 minutes respectively and sleep icon
“” will indicate on LCD.
3. System will stop and go to standby mode automatically after running the selected time.
4. To cancel the sleep mode, press “ Sleep ” button until “SLP-off’ displayed and the “ “ indicator disappear on LCD
display.
B. Cooking timer
This system had cooking timer function from 1 to 120 minutes to remind your cooking state by bee tone sound.
Press and hold the “ Timer ” button(19) to enter the timer setting mode, the first digits of display and timer icon will flashing .
Press Volume button (14) to adjust the countdown minute, the display will run up from 1 minute to 120 minutes maximum. Then
press “ Timer “ button (19) to confirm the countdown time, then press Volume button (14) to adjust the bee tone volume level.
Press the “ Timer “ button to complete the timer setting. System will start to countdown automatically and display will change to
countdown state. Once countdown was arrived, bee tone sound will coming.
Remark:-
¾There are about 6 seconds for timer setting mode, this system will return to normal mode automatically if no keys being
pressed in this time frame.
¾You still can enjoy your music during timer countdown. Once countdown was arrived, the system will generate a bee tome
sound instead of your playing music, just press “ Timer “ button(19) to switch off the timer bee tone sound then your music
will resume playing.
¾You also can disable the timer function anytime by press “ Timer “ button(19) until the timer icon disappear.

hZϮϭϲϬŶŐůŝƐŚŝŶƐƚƌƵĐƚŝŽŶŵĂŶƵĂů
E'ϵ
C. Pre-set EQ function
This unit provides 4 differences sound mode to enhance your listening experience. You can select the desired effect by pressing
the “ Preset EQ ” button (14) repeatedly at following sequence:-
FLAT CLASSIC ROCK POP JAZZ
D. ID3/Display function
Since this system designed with clock/timer feature, thus, the LCD display will change to clock automatically after operation.
To check your playing mode state(such as CD track nr./ radio frequency) press “ Display/ID3 “ button(18) to change the
information for displaying few second.
Aux-in connection
Connect another audio device, e.g. (portable) CD player, MP3 player, (portable) Cassette player, etc. to this system via a audio
cord with RCA plugs (not supplied).
Connect one end of this cord to the external device and the other end to the Aux-in jack (3) on the back of the unit.
When connected in this way and select to Aux mode by Function button (16). It is possible to play back the music already on the
connected device.
Remote handset placement
Remote handset can stick on both side of the unit by a magnet plate to avoid losing and convenience using.
Table of contents
Languages:
Other SOUNDMASTER Media Player manuals