SOUNDMASTER KTD 51002 User manual

DEUTSCH
ENGLISH
FRANÇAIS
KTD 51002

1
TableofContents
Important Safety Instructions ............................................................................................... 2
Characteristic Features .......................................................................................................... 4
Disc Information..................................................................................................................... 6
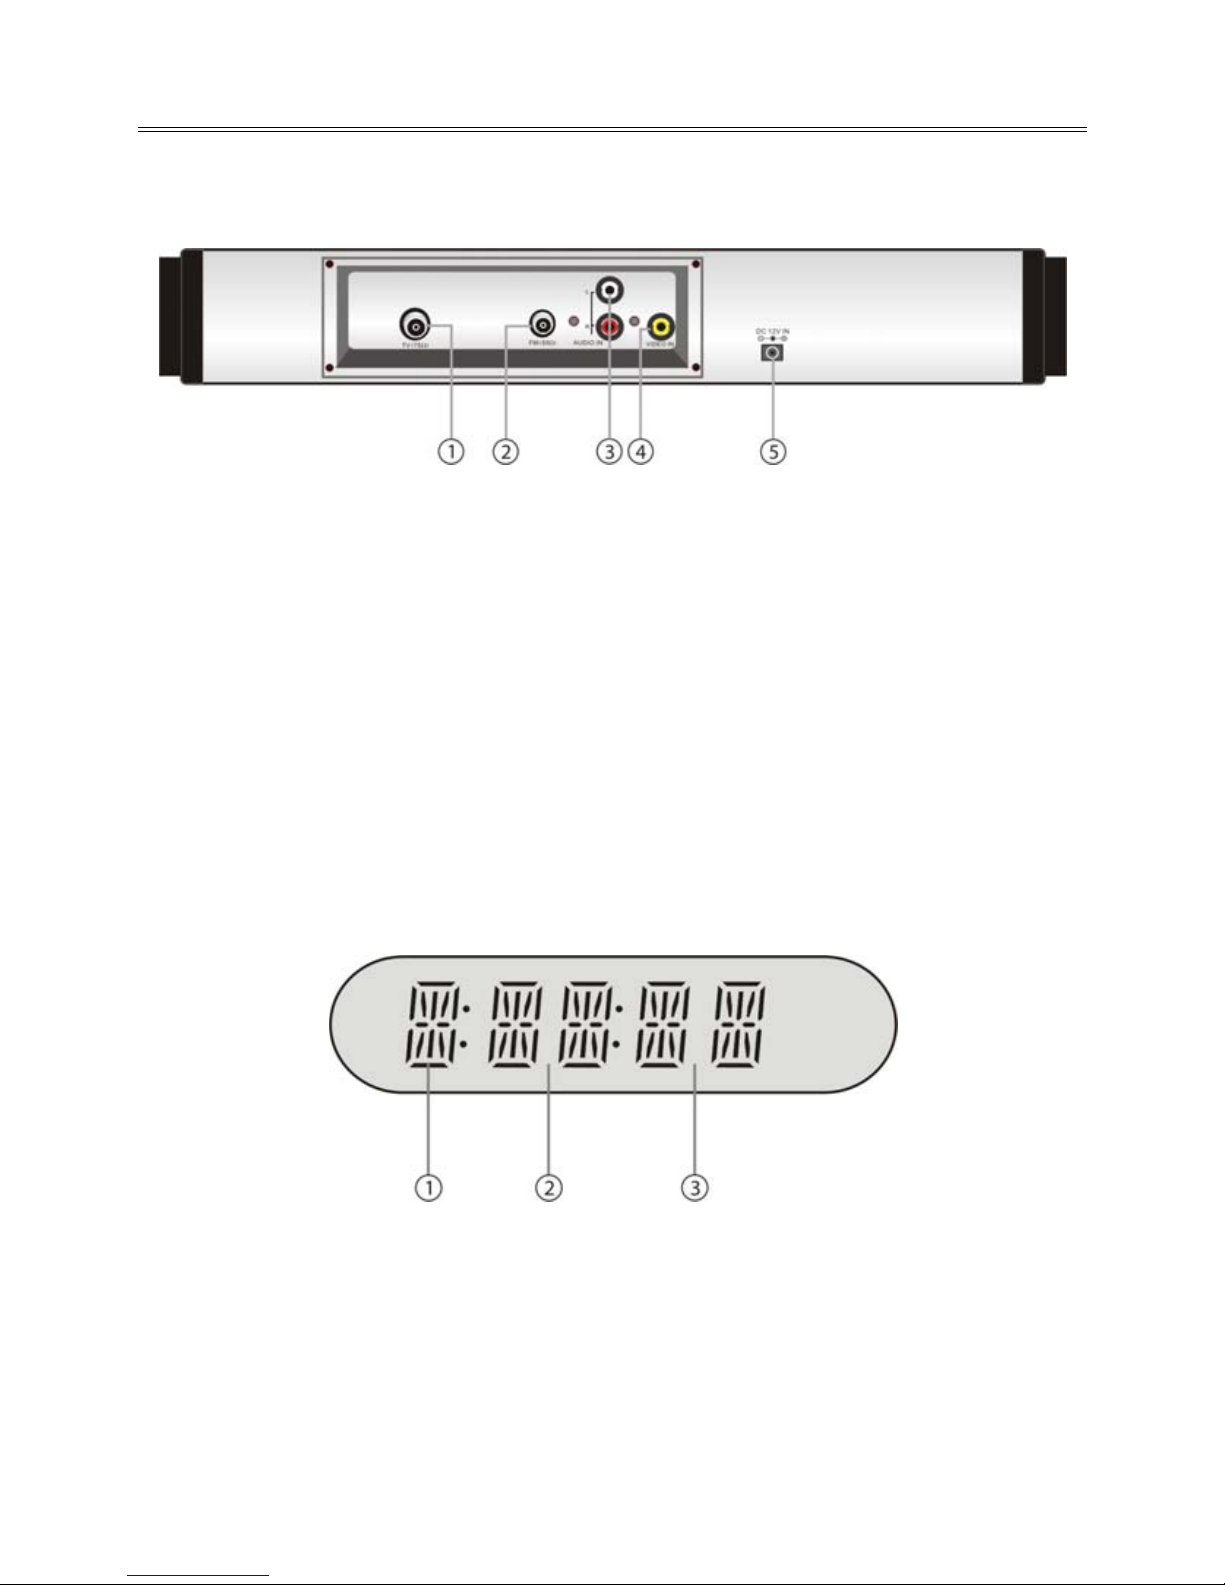
View of Unit ............................................................................................................................ 7
Front Panel........................................................................................................................................................ 7
Rear Panel.......................................................................................................................................................... 9
Display Panel.................................................................................................................................................... 9
Remote Control .................................................................................................................... 10
Preparation .....................................................................................................................................................10
Using Of Remote Control...........................................................................................................................10
Remote Control Drawing ...........................................................................................................................11
System Connections............................................................................................................. 14
Connecting to External AV Signal Source.............................................................................................14
Connecting to TV Signal Input Source ..................................................................................................14
Connecting to Antenna..............................................................................................................................15
Connecting To the Power Adapter.........................................................................................................15
First Time Installation .......................................................................................................... 16
On Screen Menus and Displays ........................................................................................... 16
SETUP Setting ................................................................................................................................................17
Picture Setting ...............................................................................................................................................19
Sound Setting ................................................................................................................................................20
Time Setting ...................................................................................................................................................21
Option Setting ...............................................................................................................................................21
Lock Setting....................................................................................................................................................22
EPG Function ........................................................................................................................ 23
DVD Playback Operation ..................................................................................................... 24
DVD disc Playback........................................................................................................................................24
CD disc Playback ...........................................................................................................................................26
JPEG disc Playback .......................................................................................................................................26
Using the Memory cards ............................................................................................................................27
DVD System Setup ............................................................................................................... 27
Radio Function ..................................................................................................................... 31
Installing the Unit In Kitchen............................................................................................... 32
Troubleshooting................................................................................................................... 34
Specifications ....................................................................................................................... 35

2
ImportantSafetyInstructions
CAUTION: USE OF ANY CONTROLS, ADJUSTMENTS, OR PROCEDURES OTHER THAN THOSE
SPECIFIED HEREIN MAY RESULT IN HAZARDOUS RADIATION EXPOSURE.
CAUTION
1. The product contains a low-power laser device. In order to ensure the safety of the laser
device, do not remove any cover and attempt to repair the unit. If any service is needed,
please contact the distributor or its authorized service center.
2. To reduce the risk of electric shock, do not remove the cover (or back). No user-
serviceable parts inside. Refer servicing to qualified service personnel. Unplug the
product from the wall outlet before servicing or when it is unused for a long period of
time.
3. The manufacturer should not hold responsibility for the damage caused by any
substitutions and modifications of the product without authorization from the
manufacturer or authorized unit.
WARNING
The apparatus shall not be exposed to dripping or splashing and that no objects filled with
liquids, such as vases, shall be placed on the apparatus.
The lightning flash with arrowhead symbol, within an equilateral triangle, is
intended to alert the user to the presence of un-insulated “dangerous voltage”
within the product’s enclosure that may be of sufficient magnitude to
constitute a risk of electric to persons.
The exclamation point within an equilateral triangle is intended to alert the
user to the presence of important operating and maintenance (servicing)
instructions in the literature accompanying the appliance.
CAUTION: Laser radiation when open. Do not stare into beam.

3
ImportantSafetyInstructions
NOTES
1. Read these instructions.
2. Keep these instructions.
3. Heed all warnings.
4. Follow all instructions.
5. Do not use this apparatus
near water.
6. Clean only with dry cloth.
7. Do not block any ventilation openings. Maintain well ventilated conditions around the
product. Do not put product on bed, sofa or anything that blocks ventilation. Install
according to the manufacturer’s instructions.
8. Do not install near any heat sources such as radiators, heat registers, stoves or other
apparatus (including amplifiers) that produce heat.
9. Read, heed and follow all instructions to ensure correct and safe installation and
interconnection of the apparatus;
10. The apparatus shall not be exposed to dripping or splashing and that no objects filled
with liquids, such as vases, shall be placed on the apparatus;
11. The mains socket-outlet shall be installed near the apparatus and the mains plug shall
remain readily operable;
12. Protect the power cord from being walked on or pinched particularly at plugs,
convenience receptacles, and the point where they exit from the apparatus.
13. Only use attachments/accessories specified by the manufacturer.
14. Use only with the cart, stand, tripod, bracket, or table specified by the manufacturer, or
sold with the apparatus. When a cart is used, use caution when moving the
cart/apparatus combination to avoid injury from tip-over.
15. Unplug the apparatus during lightning storms or when unused for long periods of time.
16. Refer all servicing to qualified service personnel. Servicing is required when the
apparatus has been damaged in any way, such as power-supply cord or plug is
damaged, liquid has been spilled or objects have fallen into the apparatus, the
apparatus has been exposed to rain or moisture, does not operate normally, or has been
dropped.
Note: Do not touch the color TFT LCD screen by hand directly.
Copyright Protection
This product incorporates copyright protection technology that is protected by U.S. patents
and other intellectual property rights. Use of this copyright protection technology must be
authorized by Rovi Corporation, and is intended for home and other limited viewing uses
only unless otherwise authorized by Rovi Corporation. Reverse engineering or disassembly is
prohibited.
IMPORTANT FOR LASER PRODUCTS
1. CLASS 1 LASER PRODUCT
2. DANGER: Visible laser radiation when open and
interlock failed or defeated. Avoid direct exposure to
beam.
3. CAUTION: Do not open the top cover. There are
no user serviceable parts inside the unit. Leave all
servicing to qualified service personnel.

4
CharacteristicFeatures
This product incorporates a DVD player, LCD display, TV receiver, Radio function and DVB-T
function in one system. It is designed for convenient use in the kitchen. Please refer to page
31 for the installation instructions.
Multiple Mode
DVD
ATV
DTV
Radio
AV Mode
High Quality Property
Video Screen
Supports normal screen (4:3) and wide
screen (16:9) aspect ratios.
AV Input
External Audio, Video input can be
connected to most external AV sources.
LCD (Liquid Crystal Display) Screen
Color video screen designed with LCD
technology clearly shows video.
Amplifier Function
Built-in 2x5w stereo amplifier with left and
right speakers.
Switching Power Adapter
Automatically adapts to the voltage
required.
Special Functions
Supports Multi-language.
Advanced Playing Function
Compatibility
Plays: DVD, CD and JPEG discs.
On-Screen Display
Displays your choices of English, French,
Spanish, German, etc.
Fast Search Function
Multi-speed, fast forward, fast reverse, slow
play and repeat playback.
Zoom Function
Allows the viewer to enlarge in the picture.
Search By Time
Search for a certain time on a disc.
TV Functions
Clear TV signal reception.
Search for TV channels automatically.
Automatically memorize the channels.
Radio Functions
Clear FM signal reception.
Search for radio stations automatically.
Store radio stations easily.
Search for radio stations in high or low
frequency range.

5

6
DiscInformation
Disc Formats Supported By This Player
DISC LOGO DIAMETER
PLAYBACK TIME/
PLAYABLE SIDES
133 min (SS-SL)
242 min (SS-DL)
266 min (DS-SL)
12cm
484 min (DS-DL)
41 min (SS-SL)
75 min (SS-DL)
82 min (DS-SL)
DVD
8cm
150 min (DS-DL)
12cm 74 min
CD
8cm 20 min
The disc maker specifies the operation of some DVD discs. Please refer to the instruction
manual with the disc.
Care of Discs
Do not touch the playing surface of the disc.
Do not stick paper or labels on the disc.
Storage of Discs
Do not expose discs to direct sunlight or
excessive temperatures.
Cleaning of Discs
If a disc has fingerprints or dust on it, lightly
wipe the disc with soft cloth from the
center of the disc outward.
Never use record cleaning sprays, or any
other solvents to clean your discs.

7
ViewofUnit
1. POWER Button
Press to enter or exit the STANDBY
mode.
2. Disc Tray
Used to load disc.
3. EJECT Button
Press to open or close the disc tray.
4. (PLAY/PAUSE) Button
Press to start or pause playback in DVD
mode.
5. (STOP) Button
Press to stop playback in DVD mode.
6. Button
In DVD mode, press once to go to
beginning of the current track/chapter.
Press twice to go to the previous
track/chapter.
7. Button
Press to go to the next track in DVD
mode.
8. REV SCAN Button
In FM mode, press once to fine tune
frequency backward.
Press for about 1.5 seconds to search
radio stations backward automatically.
In DVD mode, press to activate fast
backward playback.

8
ViewofUnit
9. FWD SCAN Button
In FM mode, press once to fine tune
frequency forward.
Press for about 1.5 seconds to search
radio stations forward automatically.
In DVD mode, press to activate fast
forward playback.
10. Remote Sensor
Receives remote control signal for
operation.
11. SOURCE Button
Press to shift among DVD, ATV, DTV, AV
and FM mode.
12. MUTE Button
Press to turn the speaker output on or
off.
13. SET Button
Press to memorize the selected radio
stations under FM status.
In DVD menu, press to enter the DVD
system setup menu.
14. Display Panel
Displays the time, status, radio
frequency and radio station number.
15. ▼/CH- Button
Press to select items in the system
setup menu.
Press to select the channels or radio
stations backward in ATV/DTV or FM
mode.
16. ▲/CH+ Button
Press to select items in the system
setup menu.
Press to select channels or radio
stations forward in ATV/DTV or FM
mode.
17. ◄/VOL- Button
Press to select items in the system
setup menu.
Press for about 1.5 seconds to decrease
the volume.
Press to decrease the value in the
system setup menu.
18. ►/VOL+ Button
Press to select items in the setup menu.
Press to for about 1.5 seconds increase
the volume.
Press to increase the value in the
system setup menu.
19. TIME /ENT Button
Press it once to confirm selections in
the setup menu.
Press for about 1.5 seconds to set the
time on the display panel.
Use the ◄► buttons to select the
editing position of hour or minute, and
then use the ▲▼ buttons to adjust
the value of the hour or minute
upward and downward.
In standby status, the time is still
displayed on the panel.
20. USB port
Connect USB device for files playback.
21. TV/LCD SETUP Button
Press once to enter the system setup
menu.
22. LCD Screen
Presents high resolution picture.

9
ViewofUnit
Rear Panel
1. TV Antennal Jack
Connected to external antenna to receive the ATV/DTV/Radio program in ATV/DTV mode.
2. FM Coaxial Antenna Jack
3. Left/Right AUDIO Input Jacks
Connection for audio input.
4. VIDEO Input Jack
Connection for video input.
5. DC 12V Input Jack
Display Panel
1. Character indicators
2. Hour or character indicators
3. Minute or character indicators

10
RemoteControl
Preparation
Refer to the drawing and remove the
empty battery receptacle.
Insert the battery into the receptacle. Make
sure the polarity matches the marks inside
the component.
Insert the receptacle into the remote
control.
Using Of Remote Control
Point the remote control towards the main
unit when operating. The remote control
works best at a distance less than 7m and
at an angle of up to 60°to the front of the
unit. No obstacles may stand in the way
between remote control and infrared
sensor.
The battery normally lasts for about six
months. This depends on how often
and for what operations the remote
control is used.
If the remote control unit fails to work
even when it is operated near the
player, replace the battery.
If the remote control is not used for a
long period of time, please remove the
battery from the compartment, to
prevent damage by leakage.

11
RemoteControl
Remote Control Drawing
1. POWER Button
Press to access to or exit the STANDBY
mode.
2. SUBTITLE Button
Press to select a subtitle language or to
turn subtitles off when a DVD disc with
multi-subtitles is playing.
In DTV mode, press to enter the
subtitle language menu.

12
RemoteControl
3. DVD Button
Press to enter DVD mode.
4. DTV Button
Press to enter DTV mode.
5. ATV Button
Press to enter ATV mode.
6. AV Button
Press to shift to AV mode.
7. FM Button
Press to shift to FM mode.
8. OK Button
Press to confirm selections.
9. WX, S/CH+,T/CH- Buttons
Press to select menu items or settings.
Press WXbuttons to adjust value in
the system setup menu.
Press ST buttons to select channels
or radio stations forward and backward
in DTV/ATV and FM mode.
Press to adjust the value of time when
setting time on the display panel.
10. DVD SETUP/SET Button
Press to enter the DVD system setup
menu in DVD mode.
Press to memorize the selected radio
stations in FM mode.
11. /SEEK – , /SEEK + Buttons
In FM mode, press once to fine tune
frequency backward/forward.
Press for about 1.5 seconds to search
radio stations backward/forward
automatically.
In DVD mode, press to activate fast
backward/forward playback.
In program edit menu, use the red
button to delete a program and the
green button to rename a program.
12. /TTX Button
Press to stop playback in DVD mode.
Press to display the teletext
information in ATV/DTV mode.
13. X/TVR Button
Press to start playback in DVD mode.
In DTV mode, press to select DTV or
Radio program.
14. MENU/FAV Button
Press to access the disc menu under
DVD mode.
In ATV/DTV mode, press to enter the
favorite list.
15. TITLE/EPG Button
Press to display titles if present on the
disc in DVD mode.
Press to enter the program guide
menu in DTV mode.
16. REPEAT/EXIT Button
Press to repeat a title, chapter or the
entire disc in DVD mode.
Press to exit the system setup menu.
17. SLOW/STEREO Button
Press to activate slow playback in DVD
mode.
Press to enter the audio language
menu in DTV mode.
Press to select sound track in ATV or AV
mode.
18. EJECT Button
Press to open or close the disc tray.

13
RemoteControl
19. AUDIO Button
Press to access various audio
languages when the DVD disc contains
multiple audio languages.
In DTV mode, press to enter the audio
language menu.
20. 0-9 number Buttons
Select numbers.
21. GOTO Button
Press to select the desired disc starting
Time, Track or Title in DVD mode.
22. +10 Button
Select numbers greater than 9 in DVD
mode.
23. TIME Button
Press it once to display the time on the
display panel. In standby status, the
time is still displayed on the display
panel.
Press it twice to set the time on the
display panel. Use the WXbuttons to
select the editing position of hour or
minute, use the ST buttons to adjust
the value of the hour or minute
upward and downward.
24. SETUP Button
Press to enter the system setup menu.
25. INFO Button
Press to display the reference
information about the current mode.
26. LCD ON/OFF Button
Press to turn the LCD screen display On
or Off.
27. USB Button
In DVD mode, press the shift between
disc playback and USB playback.
28. /Buttons
Press to go to the previous/next track
in DVD mode.
In program edit menu, use the yellow
button to move a program and the
blue button to skip a program.
29. (PAUSE) Button
Press to pause playback in DVD mode.
30. MUTE Button
Press to turn on/off the speaker output.
31. ZOOM Button
Press to enter and cycle through zoom
functions, use the direction buttons to
pan around the screen in DVD mode.
Press to shift the aspect ratio of the
screen in ATV/DTV/AV mode.
32. VOL+/- Buttons
Press to increase or decrease the
speaker volume level.
33. INDEX Button
Used to play a section of the DVD from
point “A” to point “B”. Press once to
select the starting point (A), press
again to select the end point (B). Press
the third time to stop the A-B repeat.
In teletext mode, press to display P.100.

14
SystemConnections
Do not connect the power cord until all other connections have been made.
Each time you restart the unit, it remembers the last function used.
Please make all the connections before installing the unit in the kitchen.
Connecting to External AV Signal Source
Connections should be made as follows:
Connect the L/R audio cables according to the marks on the rear panel of the unit.
Connecting to TV Signal Input Source

15
SystemConnections
Connecting to Antenna
Connect the supplied FM antennas to listen to the radio.
Extend FM antenna fully.
Keep the FM antenna as horizontal as possible after connection.
If the FM reception is poor, use a 50Ω coaxial cable (not supplied) to connect system to
an outdoor FM antenna as above.
If you connect the system with outdoor FM antenna, you should earth the system in
order to avoid lightning strike.
Do not connect the earth wire to gas pipe to prevent gas explosion.
Connecting To the Power Adapter
This unit is powered via the switching power adapter (supplied). See the below figure for
details:
1. Connect the AC adapter to jack marked with “DC 12V IN” on the rear panel of the unit.
2. Plug the two-prong end of the power cord to the grounded electrical socket.
3. When not using the unit, turn off the power of the unit first, and then unplug the power
supply to prevent malfunctions.

16
FirstTimeInstallation
After you reset all the settings to their original status,
the Installation Guide page appears automatically.
With this guide you can search analogue and digital
TV channels. The search routine includes the
frequencies of the analogue and digital broadcaster.
1. Please select the OSD language. You can choose
the pre-installed languages by pressing the
◄► buttons.
2. Press the ▼button and navigate to the option “Auto Tuning”. Press the OK or ►button
and a new popup window appears on the screen. Please select the suitable region by
pressing the ◄► button.
3. If you had chosen the region, please press the ▼button, so that the “Start” will be
selected. Press the OK button and the search starts immediately.
4. A new window opens on the screen, where the status of the searching is documented.
The values of the found TV broadcast programs of analogue, digital and Radio are listed.
5. After finishing of the searching, all found TV programs will be saved into the channel list.
NOTE:
The complete searching needs a couple of minutes.
OnScreenMenusandDisplays
Press the MENU button and you can gets access to the different
settings. The beside picture shows the different categories “SETUP”,
“PICTURE”, “SOUND”, “TIME”, “OPTION” and “LOCK” which
characterizes with symbols.
Basic operations:
1. You can change the category by using the ◄► buttons. You can enter in each category
by pressing the ▼or OK button and this category is active.
2. You can select each option or setting by using the ▲▼ button.
3. Each option or setting can be changed by ◄► buttons.
4. To exit the active category please press repeatedly the SETUP button.
5. To leave the system menu, press the REPEAT/EXIT button.

17
OnScreenMenusandDisplays
SETUP Setting
The channel settings includes the options
for Auto Tuning, DTV manual Tuning, ATV
manual Tuning and Program Edit.
Auto Tuning
1. Press the ▼button and navigate to the
option “Auto Tuning”. Press the OK or
►button and a new popup window
appears on the screen. Please select the
suitable region by pressing the ◄►
button.
2. If you had chosen the region, please
press the ▼button, so that the “Start”
will be selected. Press the OK button
and the search starts immediately.
3. A new window opens on the screen, where the status of
the searching is documented. The values of the found TV
broadcast programs of analogue, digital and Radio are
listed.
4. After finishing of the searching, all found TV programs
will be saved into the channel list.
5. During searching, press the SETUP button to skip the
current range of available programs.
6. Press the REPEAT/EXIT button to exit.
NOTES:
Channel Tuning scans the ATV, DTV and Radio programs.
Please allow a few minutes for this feature to scan the entire range of available programs.

18
OnScreenMenusandDisplays
DTV Manual Tuning
1. Press the ▲▼ button to select DTV Manual Tuning and
press the OK or ►button, the screen will display as
shown on the right:
2. Use the ◄► button to change the channel number. So
you can define, on which channel shall be runs the
search.
3. Starts the searching by the OK button.
4. To leave the DTV Manual tuning, press the REPEAT/EXIT
or SETUP button.
ATV Manual Tuning
1. Press the ▲▼ button to select ATV Manual Tuning and
press the OK or ►button, the screen will display as
shown on the right:
2. Press the ▲▼ button to select desired item and press the
◄► button to set.
3. Press the red button to save the settings.
4. To leave the ATV Manual tuning, press the REPEAT/EXIT or
SETUP button.
Program Edit
The option “Program Edit” includes settings for Moving and
sorting, skip and set favorites.
Set a favorite program:
Within the menu, press the ▲▼ button to select a
program and press the MENU/FAV button to set it as
your favorite program, press the MENU/FAV button
again to cancel.
Delete a program:
Within the menu, press the ▲▼ button to select a
program you want to delete and press the red button to set a symbol “DELETE” on the
program. Press the red button again to delete the selected program.

19
OnScreenMenusandDisplays
Rename a program: (only for ATV programs)
Within the menu, press the ▲▼ button to select a program you want to rename and
press the green button to set a symbol “RENAME” on the program.
Press the ◄► button to highlight the character position of program name and press the
▲▼ button to select desired character, press the SETUP button to confirm and return.
Move a program: (only for ATV programs)
Within the menu, press the ▲▼ button to select a program you want to move and press
the yellow button to set a symbol “MOVE” on the program.
Press the ▲▼ button to select the desired position and press the SETUP button to move
the selected program to position you select.
Skip a program:
Within the menu, press the ▲▼ button to select a program you want to skip and press
the blue button to set the program skipped. A symbol “SKIP” appears on the skipped
program. Press the blue button again to cancel.
NOTE:
A skipped program is skipped when using the CH +/- button to browse the programs but can
be watched by
us
ing the number buttons.
Picture Setting
The picture settings includes the options
for Picture Mode, Contrast, Brightness,
Colour, Sharpness, Tint, Colour Temp, Red,
Green, Blue, Aspect Ratio and Noise
Reduction.
Picture Mode
With the ◄► button you can Standard,
Mild, User and Dynamic.
Contrast
With the ◄► button you can adjust the
level of contrast.
Brightness
With the ◄► button you can adjust the
level of brightness.
Colour
With the ◄► button you can adjust the
level of colour.
Sharpness
With the ◄► button you can adjust the
level of sharpness.
Table of contents