Soundmatters foxlo User manual

user guide
Soundmatters International, Inc.
Reno, Nevada USA
support@soundmatters.com • www.soundmatters.com
tel: 775.981.1460 • in the US (800) 698.7662
Optional for
VERTICAL ORIENTATION:
remove the two “upper” feet
and add four button covers.
SERIAL NUMBER infomation
is located under bottom foot
Important:
To avoid a spark,
read instructions
below before
plugging into AC
Use wired or wireless
connection to foxL,
ADJUST SYSTEM
VOLUME from
phone/tablet/PC
or foxL, or use both.
Forfurthertipson how tobest utilize your foxLO,visitwww.soundmatters.com/faq
A
C
D
E
F
G
B
Use attenuation
insert cable if you are
connecting to a foxL v2.2.
Connection fromfoxL
SubwooferOutput
1. Connect audio cable from the foxL Subwoofer
Output to the foxLO AUDIO IN (B).
NOTE: The included audio cable has a short
“attenuation” insert attached.
Keep this connected if you are
using a foxL v2.2. It is optional
when connecting the foxLO
with other foxL models.
2. To avoid a spark, connect the foxLO to power
in this order:
A. First, push the POWER button (E) in to the
ON position.
B. Next, connect the AC charger’s right-angle
barrel connector to the foxLO DC IN 24V DC
(F).
C. Then, connect the AC charger to the wall
outlet. A blue LED indictor will light.
3. See Performance Tips section to adjust foxLO
LEVEL and LIMITER positions
atten uation in se rt cable
A. AUDIO OUT (full-range signal
pass-through). For use when no subwoofer
output is available on speakers.
(See“Direct Connection” instructions below or
www.soundmatters.com/foxLO+Jambox)
B. AUDIO IN Connect from foxL Sub Output
C. LEVEL Make small adjustments from
center position to avoid overload.
D. LIMITER
• ON – Allows the foxLO to play louder
with dynamic music & soundtracks
• OFF – Deepest bass output, but reduced
maximum output level capabilities to
prevent/reduce overload
E. POWER ON/OFF
F. 24V DC POWER INPUT Insert right-
angle charger connector here before
connecting to AC power (to avoid a spark)
G. POWER LED
PERFORMANCETIPS
SettingtheLevel
1. If connecting to a foxLv2.2:
To ensure adequate range using the slider control,
make sure the auxiliary cable insert connected to
standard audio cable (between foxL sub out and
foxLO Input). Removing the auxiliary cable is optional
for all other foxL models, doing so will increase the
input signal to the foxLO.
2. Given its tiny size and the variety of music and
sources used, it IS easy to overload the foxLO...
make small adjustments from the center position
to nd your optimum bass level.
3. Experiment with a range of music when setting
your foxLO level.
(Forunits without subwoofer out –
such asaJawbone Jambox–
see“Direct Connection”
instructionsbelow.)
Direct Connection of foxLO to
Speakerswithout a SubwooferOutput
(i.e.,JawboneJambox)
1. Remove the short “attenuation” insert cable attached
to the included audio cable.
2. Connect the audio cable from phone/tablet/PC etc.
headphone jack to the foxLO AUDIO IN (B)
3. To avoid a spark, connect the foxLO to power
in this order:
A. First, push the POWER button (E) in to the
ON position.
B. Next, connect the AC charger’s right-angle barrel
connector to the foxLO DC IN 24V DC (F).
C. Connect Audio Out (A) to Speaker (Jambox)
Aux/Audio in (see Fig. 1 above)
D. Then, connect the AC charger to the wall outlet.
A blue LED indictor will light.
4. Set the speaker (i.e., Jambox) to its max level
setting whenever in use and control volume
from the audio source (laptop, tablet, phone)
5. See next section to adjust foxLO LEVEL and
LIMITER positions.
Limiter, On or O?
In the OFF position, try your favorite music at your loudest
normal listening level... if there is overload, use ON.
Placement can make a huge
dierence insound,so experiment!
1. Try foxLO next to or near your foxL. Or put the foxLO
on the oor up against a wall. Try both.
2. Middle of a room/desk = Least Bass.
Hard surfaces (i.e., walls, oors) = More Bass.
Placed in a corner = Most Bass.
3. Closer is louder...usually.
4. Very minor location adjustment (even a few inches)
sometimes makes a big dierence.
5. It usually makes very little dierence in sound whether
the orientation of your foxLO is vertical or horizontal.
Figure 1 – Direct Connection
LimitedWarranty
soundmatters international, inc. (soundmatters) warrants foxLO to the original
consumer purchaser to be free from defects in materials and workmanship for a period
of one (1) year after the date of purchase.
FOR COMPLETE DETAILS OF THIS WARRANTY VISIT soundmatters.com or contact
soundmatters at support@soundmatters.com, or by telephone at 775.981.1460 or
800.698.SOMA (in US).
IMPORTANT – Keep your original sales receipt. Be sure the retail dealer has written
on it the date, model number, and serial number of the Product. This information is
required for warranty service. Be sure to obtain and retain proof of shipment.
This warranty does not cover:
• Damage that is the result of misuse, abuse, accident (including but not limited to
damage by water), faulty hookup, defective or maladjusted associated equipment, or
the use of the Product with equipment for which it was not intended.
• Cosmetic defects that appear more than thirty (30) days after the date of purchase.
Cosmetic damage caused by improper handling is also excluded.
• Damage that occurs while the Product is being shipped to whoever will service it.
This warranty is void if:
• The Product identication or serial number label is removed or defaced in any way.
• The Product is serviced or repaired by any one other than soundmatters or an
authorized soundmatters dealer or service agency.
ImportantSafetyInstructions
CAUTION – Risk of electric shock – Do not open
1. Read all safety and user instructions before the product is operated, retain for
future reference.
2. To reduce the risk of re or electric shock, do not expose this apparatus to rain
or moisture – The product should not be used near water – for example, near
a bathtub, washbowl, kitchen sink, laundry tub, in a wet basement, or near a
swimming pool and the like. The apparatus shall not be exposed to dripping or
splashing and that no objects lled with liquids, such as vases, shall be placed
on the apparatus.
3. Clean only with a dry cloth.
4. Power cords and power adapters – Use only the power cords and power adapters
supplied by the product Manufacturer.
5. Do not attempt to service this product yourself. Refer all servicing to qualied
service personnel
All manuals and user guides at all-guides.com
all-guides.com

guide d’utilisation
Soundmatters International, Inc.
Reno, Nevada USA
support@soundmatters.com • www.soundmatters.com
tel: 775.981.1460 • in the US (800) 698.7662
Pour une UTILISATION VERTICALE,
retirer les 2 pieds “supérieurs” et
ajouter les 4 caches de boutons
NUMERO DE SERIE situé
en dessous du pied inférieur
IMPORTANT:
An d’éviter toute
étincelle, lire les
instructions suivantes
avant de brancher le
périphérique au secteur.
Utiliser une connexion
laire ou sans l vers
le foxL AJUSTER LE
VOLUME à partir d’un
téléphone/tablette/PC
ou du foxL, ou
utiliser les deux.
Pourplusde conseils surl’utilisation de votre foxLO,visitezwww.soundmatters.com/faq
A
C
D
E
F
G
B
Dans le cas de la connexion
avec un foxL v2.2, utiliser le câble
muni d’un “insert d’atténuation”.
Connexion à partir de la sortie
Sub du foxL
1. Connecter le câble audio de la sortie Sub du foxL
à l’entrée AUDIO IN du foxLO (B).
REMARQUE : Le câble audio inclus dispose d’un
“insert d’atténuation” intégré.
Conserver ce dernier connecté
dans le cas d’une utilisation avec
un foxL v2.2 (optionnel si le foxLO
est utilisé avec d’autres modèles de foxL).
2. An d’éviter toute étincelle, connecter le foxLO
au secteur dans l’ordre suivant :
A. Premièrement, mettre le bouton POWER (E)
sur la position ON.
B. Ensuite, connecter la prise à angle droit
du chargeur secteur à l’entrée DV 24 V du
foxLO (F).
C. Puis connecter le chargeur secteur à la prise
de courant. Une LED bleue va s’allumer.
3. Voir la section suivante pour les réglages du
NIVEAU et du LIMITEUR
in sert d’atté nuati on
A. SORTIE AUDIO (full range signal pass-
through) à utiliser lorsque les haut-parleurs ne
disposent pas d’une sortie Sub. (Voir “Connexions
directes” : instructions ci-dessous ou www.
soundmatters.com/foxLO+Jambox)
B. ENTREE AUDIO connexion à la sortie Sub.
du foxL
C. NIVEAU Réglages légers à partir de la
position de base pour éviter une saturation.
D. LIMITEUR
• ON (Position par défaut) Fournit une
compression et une limitation pour réduire
la saturation.
•
OFF : basses plus profondes, mais niveau de
sortie max. plus bas an de prévoir/réduire
toute saturation
E. Power ON/OFF
F. ENTREE DC 24 V Insérer le connecteur
à angle droit du chargeur avant de le brancher
au secteur (pour éviter toute surtensi
G. LED D’ACTIVITÉ
CONSEILSDE RÉGLAGE
Réglage du Niveau
1. Si connecté à un foxL v2.2 : Pour garantir un
niveau adéquat en utilisant le bouton de contrôle,
assurez-vous que le câble auxiliaire soit connecté
au câble audio standard (entre la sortie Sub out du
foxL et l’entrée du foxLO). Le fait de retirer ce câble
auxiliaire est optionnel si le foxLO est utilisé avec
les autres modèles foxL, cette action aura pour
cause d’augmenter le niveau d’entrée vers le foxLO.
2. En considérant son petit format et la large variété
de musiques et de périphériques utilisés, il EST
facile de faire saturer le foxLO… faites de petits
ajustements à partir de la position de passer pour
déterminer votre niveau de basses optimal.
3. Pour un meilleur réglage du niveau du foxLO,
utilisez de nombreux styles de musique.
(Pourles unités dépourvues
d’une sortie subwoofer – comme
la Jawbone Jambox –Voir
“Connexionsdirectes”:instructions
ci-dessous).
Connexionà d’autreshaut-parleurs
dépourvusd’une sortie Sub
(commela JawboneJambox)
1. Retirer l’insert d’atténuation attaché au câble audio inclus.
2. Connecter le câble audio de la prise jack du téléphone/
tablette/PC à l’entrée AUDIO du foxLO (B)
3. An d’éviter toute étincelle, connecter l’alimentation
du foxLO dans l’ordre suivant :
A. Premièrement, mettre le bouton POWER (E) sur la
position ON.
B. Ensuite, connecter la prise à angle droit du chargeur
secteur à l’entrée DV 24 V du foxLO (F).
C. Connecter la sortie audio (A) vers l’entrée Audio/Aux
du haut-parleur (voir gure sur la droite)
D. Puis connecter le chargeur secteur à la prise de courant.
Une LED bleue va s’allumer.
4. Régler le haut-parleur (ex : Jambox) à son niveau de
volume maximal lorsque le réglage principal se fait à
partir de la source audio (téléphone/tablette/PC)
5. Voir la section suivante pour les réglages du NIVEAU
et du LIMITEUR
Limiteur, On ou O ?
Dans la position OFF, essayez votre musique favorite au niveau
le plus fort d’écoute habituelle…s’il y a une saturation, placer
le bouton sur ON.
Le Placement fait une grande diérence
au niveau du son, expérimentez !
1. foxLO près/loin du foxL ou foxLO par terre contre le mur ?
Essayez les deux.
2. Surfaces dures (murs, sols, etc.) = Plus de basses .
Milieu d’une pièce ou d’un bureau = Moins.
Dans un angle = Niveau optimal.
3. Plus près = plus fort … habituellement.
4. Parfois, des ajustements mineurs au niveau de la distance
(même quelques centimètres) font une grande diérence.
5. La façon dont le foxLO est orienté, verticalement ou
horizontalement, impacte habituellement peu le son.
Figure 1 – Connexion à d’autres haut-
parleursdépourvusd’unesortieSub
GarantieLimitée
soundmatters international, inc. (soundmatters) garantie le foxLO à l’acheteur original que
celui-ci n’a aucun défaut matériel ou de fabrication et cela pour une période d’un (1) an à
partir de la date d’achat.
POUR OBTENIR TOUS LES DETAILS CONCERNANT CETTE GARANTIE VISITEZ NOTRE SITE
www.soundmatters.com ou contactez soundmatters au 775.981.1460, 800.698.SOMA
(aux Etats-Unis)
IMPORTANT – Conservez l’original du ticket de caisse. Assurez vous que le nom du vendeur
y apparaît ainsi que la date, le numéro du modèle et le numéro de série du produit. Cette
information est nécessaire pour le service de la garantie. Assurez vous de bien obtenir et de
conserver une preuve d’envoi.
Cette garantie ne couvre pas:
• Les dommages causés par une mauvaise utilisation, un abus, un accident (y compris mais non
limités aux dommages causés par l’eau), un mauvais branchement, un équipement associé
défectueux ou mal ajusté; ou une utilisation du Produit avec un équipement pour lequel il n’est
pas prévu.
• Les défauts esthétiques apparaissant après plus de trente (30) jours après la date d’achat. Les
dommages esthétiques causés par une manipulation inappropriée sont également exclus.
• Dommages survenus lors de l’envoi du Produit, à toute personne le réparant.
Cette garantie est nulle si:
• L’étiquette d’identication ou du numéro de série du produit est retirée ou dégurée.
• Le Produit est réparé par une autre organisation que soundmatters ou autre qu’un vendeur
habilité par soundmatters ou une agence de réparation.
Instructions de Sécurité Importantes
ATTENTION – Risque d’électrocution – Ne pas ouvrir
1. Lire toutes les instructions de sécurité et d’utilisation avant d’utiliser ce produit,
les conserver pour référence future.
2. Pour réduire les risques liés au feu ou à l’électrocution, ne pas exposer cet appareil
à la pluie ou à l’humidité – Le produit ne doit pas être utilisé près de l’eau – par
exemple près d’une baignoire, un lavabo, un évier, dans une cave mouillée ou près
d’une piscine ou autres. L’appareil ne doit pas être exposé au suintement ou aux
éclaboussures et s’assurer qu’aucun objet rempli d’eau, tel qu’un vase, ne soit placé
sur l’appareil.
3. Ne nettoyer qu’avec un chion sec.
4. Les câbles de branchement et les prises d’alimentation – Seulement utiliser les
câbles et les prises de branchement fournis par le fabricant du produit.
5. N’essayer pas de réparer ce produit vous-même. Demander toujours à ce que la
réparation soit eectuée par un personnel de réparation qualié.
All manuals and user guides at all-guides.com
Bedienungsanleitung
Optional für
VERTIKALE AUFSTELLUNG:
Entfernen Sie die beiden „oberen“
Gerätefüße und verwenden
Sie die vier kleinen Kunststo-
Abdeckungen.
Die SERIENNUMMER bendet
sich hinter dem unteren Gerätefuß
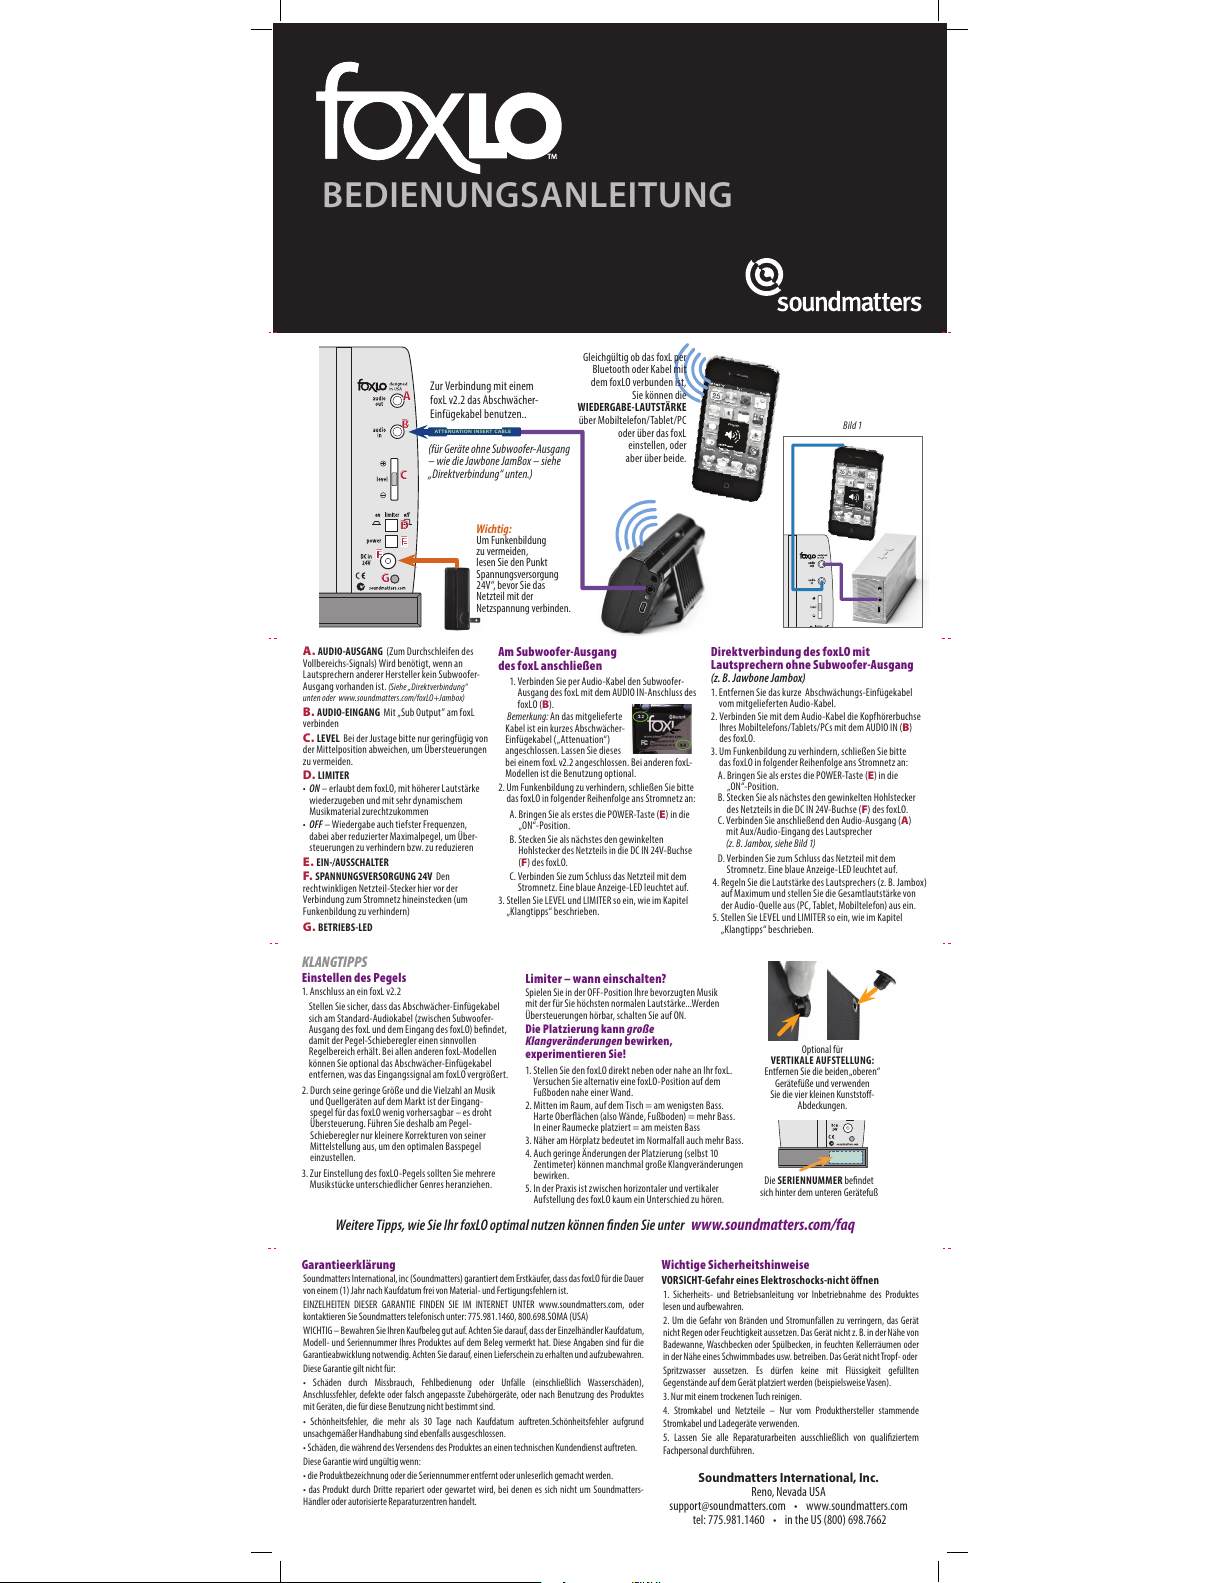
Wichtig:
Um Funkenbildung
zu vermeiden,
lesen Sie den Punkt
Spannungsversorgung
24V“, bevor Sie das
Netzteil mit der
Netzspannung verbinden.
Gleichgültig ob das foxL per
Bluetooth oder Kabel mit
dem foxLO verbunden ist,
Sie können die
WIEDERGABE-LAUTSTÄRKE
über Mobiltelefon/Tablet/PC
oder über das foxL
einstellen, oder
aber über beide.
WeitereTipps,wie Sie Ihr foxLOoptimal nutzen können ndenSie unter www.soundmatters.com/faq
A
C
D
E
F
G
B
Zur Verbindung mit einem
foxL v2.2 das Abschwächer-
Einfügekabel benutzen..
AmSubwoofer-Ausgang
desfoxLanschließen
1. Verbinden Sie per Audio-Kabel den Subwoofer-
Ausgang des foxL mit dem AUDIO IN-Anschluss des
foxLO (B).
Bemerkung: An das mitgelieferte
Kabel ist ein kurzes Abschwächer-
Einfügekabel („Attenuation“)
angeschlossen. Lassen Sie dieses
bei einem foxL v2.2 angeschlossen. Bei anderen foxL-
Modellen ist die Benutzung optional.
2. Um Funkenbildung zu verhindern, schließen Sie bitte
das foxLO in folgender Reihenfolge ans Stromnetz an:
A. Bringen Sie als erstes die POWER-Taste (E) in die
„ON“-Position.
B. Stecken Sie als nächstes den gewinkelten
Hohlstecker des Netzteils in die DC IN 24V-Buchse
(F) des foxLO.
C. Verbinden Sie zum Schluss das Netzteil mit dem
Stromnetz. Eine blaue Anzeige-LED leuchtet auf.
3. Stellen Sie LEVEL und LIMITER so ein, wie im Kapitel
„Klangtipps“ beschrieben.
atten uation in se rt cable
A. AUDIO-AUSGANG (Zum Durchschleifen des
Vollbereichs-Signals) Wird benötigt, wenn an
Lautsprechern anderer Hersteller kein Subwoofer-
Ausgang vorhanden ist. (Siehe„Direktverbindung“
untenoder www.soundmatters.com/foxLO+Jambox)
B. AUDIO-EINGANG Mit „Sub Output” am foxL
verbinden
C. LEVEL Bei der Justage bitte nur geringfügig von
der Mittelposition abweichen, um Übersteuerungen
zu vermeiden.
D. LIMITER
• ON – erlaubt dem foxLO, mit höherer Lautstärke
wiederzugeben und mit sehr dynamischem
Musikmaterial zurechtzukommen
• OFF – Wiedergabe auch tiefster Frequenzen,
dabei aber reduzierter Maximalpegel, um Über-
steuerungen zu verhindern bzw. zu reduzieren
E. EIN-/AUSSCHALTER
F. SPANNUNGSVERSORGUNG 24V Den
rechtwinkligen Netzteil-Stecker hier vor der
Verbindung zum Stromnetz hineinstecken (um
Funkenbildung zu verhindern)
G. BETRIEBS-LED
KLANGTIPPS
EinstellendesPegels
1. Anschluss an ein foxL v2.2
Stellen Sie sicher, dass das Abschwächer-Einfügekabel
sich am Standard-Audiokabel (zwischen Subwoofer-
Ausgang des foxL und dem Eingang des foxLO) bendet,
damit der Pegel-Schieberegler einen sinnvollen
Regelbereich erhält. Bei allen anderen foxL-Modellen
können Sie optional das Abschwächer-Einfügekabel
entfernen, was das Eingangssignal am foxLO vergrößert.
2. Durch seine geringe Größe und die Vielzahl an Musik
und Quellgeräten auf dem Markt ist der Eingang-
spegel für das foxLO wenig vorhersagbar – es droht
Übersteuerung. Führen Sie deshalb am Pegel-
Schieberegler nur kleinere Korrekturen von seiner
Mittelstellung aus, um den optimalen Basspegel
einzustellen.
3. Zur Einstellung des foxLO-Pegels sollten Sie mehrere
Musikstücke unterschiedlicher Genres heranziehen.
(fürGeräte ohne Subwoofer-Ausgang
–wie die JawboneJamBox– siehe
„Direktverbindung“unten.)
Direktverbindungdes foxLOmit
Lautsprechernohne Subwoofer-Ausgang
(z.B.JawboneJambox)
1. Entfernen Sie das kurze Abschwächungs-Einfügekabel
vom mitgelieferten Audio-Kabel.
2. Verbinden Sie mit dem Audio-Kabel die Kopfhörerbuchse
Ihres Mobiltelefons/Tablets/PCs mit dem AUDIO IN (B)
des foxLO.
3. Um Funkenbildung zu verhindern, schließen Sie bitte
das foxLO in folgender Reihenfolge ans Stromnetz an:
A. Bringen Sie als erstes die POWER-Taste (E) in die
„ON“-Position.
B. Stecken Sie als nächstes den gewinkelten Hohlstecker
des Netzteils in die DC IN 24V-Buchse (F) des foxLO.
C. Verbinden Sie anschließend den Audio-Ausgang (A)
mit Aux/Audio-Eingang des Lautsprecher
(z.B. Jambox, siehe Bild1)
D. Verbinden Sie zum Schluss das Netzteil mit dem
Stromnetz. Eine blaue Anzeige-LED leuchtet auf.
4. Regeln Sie die Lautstärke des Lautsprechers (z. B. Jambox)
auf Maximum und stellen Sie die Gesamtlautstärke von
der Audio-Quelle aus (PC, Tablet, Mobiltelefon) aus ein.
5. Stellen Sie LEVEL und LIMITER so ein, wie im Kapitel
„Klangtipps“ beschrieben.
Limiter– wanneinschalten?
Spielen Sie in der OFF-Position Ihre bevorzugten Musik
mit der für Sie höchsten normalen Lautstärke...Werden
Übersteuerungen hörbar, schalten Sie auf ON.
DiePlatzierungkanngroße
Klangveränderungen bewirken,
experimentierenSie!
1. Stellen Sie den foxLO direkt neben oder nahe an Ihr foxL.
Versuchen Sie alternativ eine foxLO-Position auf dem
Fußboden nahe einer Wand.
2. Mitten im Raum, auf dem Tisch = am wenigsten Bass.
Harte Oberächen (also Wände, Fußboden) = mehr Bass.
In einer Raumecke platziert = am meisten Bass
3. Näher am Hörplatz bedeutet im Normalfall auch mehr Bass.
4. Auch geringe Änderungen der Platzierung (selbst 10
Zentimeter) können manchmal große Klangveränderungen
bewirken.
5. In der Praxis ist zwischen horizontaler und vertikaler
Aufstellung des foxLO kaum ein Unterschied zu hören.
Bild1
Garantieerklärung
Soundmatters International, inc (Soundmatters) garantiert dem Erstkäufer, dass das foxLO für die Dauer
von einem (1) Jahr nach Kaufdatum frei von Material- und Fertigungsfehlern ist.
EINZELHEITEN DIESER GARANTIE FINDEN SIE IM INTERNET UNTER www.soundmatters.com, oder
kontaktieren Sie Soundmatters telefonisch unter: 775.981.1460, 800.698.SOMA (USA)
WICHTIG – Bewahren Sie Ihren Kaufbeleg gut auf. Achten Sie darauf, dass der Einzelhändler Kaufdatum,
Modell- und Seriennummer Ihres Produktes auf dem Beleg vermerkt hat. Diese Angaben sind für die
Garantieabwicklung notwendig. Achten Sie darauf, einen Lieferschein zu erhalten und aufzubewahren.
Diese Garantie gilt nicht für:
• Schäden durch Missbrauch, Fehlbedienung oder Unfälle (einschließlich Wasserschäden),
Anschlussfehler, defekte oder falsch angepasste Zubehörgeräte, oder nach Benutzung des Produktes
mit Geräten, die für diese Benutzung nicht bestimmt sind.
• Schönheitsfehler, die mehr als 30 Tage nach Kaufdatum auftreten.Schönheitsfehler aufgrund
unsachgemäßer Handhabung sind ebenfalls ausgeschlossen.
• Schäden, die während des Versendens des Produktes an einen technischen Kundendienst auftreten.
Diese Garantie wird ungültig wenn:
• die Produktbezeichnung oder die Seriennummer entfernt oder unleserlich gemacht werden.
• das Produkt durch Dritte repariert oder gewartet wird, bei denen es sich nicht um Soundmatters-
Händler oder autorisierte Reparaturzentren handelt.
Wichtige Sicherheitshinweise
VORSICHT-Gefahr eines Elektroschocks-nichtönen
1. Sicherheits- und Betriebsanleitung vor Inbetriebnahme des Produktes
lesen und aufbewahren.
2. Um die Gefahr von Bränden und Stromunfällen zu verringern, das Gerät
nicht Regen oder Feuchtigkeit aussetzen. Das Gerät nicht z. B. in der Nähe von
Badewanne, Waschbecken oder Spülbecken, in feuchten Kellerräumen oder
in der Nähe eines Schwimmbades usw. betreiben. Das Gerät nicht Tropf- oder
Spritzwasser aussetzen. Es dürfen keine mit Flüssigkeit gefüllten
Gegenstände auf dem Gerät platziert werden (beispielsweise Vasen).
3. Nur mit einem trockenen Tuch reinigen.
4. Stromkabel und Netzteile – Nur vom Produkthersteller stammende
Stromkabel und Ladegeräte verwenden.
5. Lassen Sie alle Reparaturarbeiten ausschließlich von qualiziertem
Fachpersonal durchführen.
Soundmatters International, Inc.
Reno, Nevada USA
support@soundmatters.com • www.soundmatters.com
tel: 775.981.1460 • in the US (800) 698.7662
All manuals and user guides at all-guides.com
Table of contents
Languages:
Other Soundmatters Subwoofer manuals


