Soundmatters SLIMstage 30 User manual

1
繁體中文简体中文
English
soundmatters international, inc.
reno, nevada, USA
worldwide tel 775.981.1460
toll-free (usa) 800.698.SOMA (7662)
fax 775.981.1465
email [email protected]
web www.soundmatters.com
in europe contact:
Dahl Audio Electronic GmbH
10707 Berlin, Germany
tel 0049 (0) 30 – 88628017
email [email protected]
©2008 soundmatters international, inc. – 07.08-p1
operation manual
操作手册
操作手冊
Use the SLIMstage
Set-Up Guide/Connection Poster
to connect your new soundmatters system
使用
SLIMstage
設置指南/連接海報
連接您的新
soundmatters
系统
使用
SLIMstage
设置指南/连接海报
连接您的新
soundmatters
系統
p2 p20 p38

2
3
English
Important Safety Precautions
CAUTION – Risk of electric shock – Do not open
1. Read instructions – All the safety and operating instructions should be read before the product is operated.
2. Keep these instructions – The safety and operating instructions should be retained for future reference.
3. Heed all warnings – All warnings on the product and the Users Guide should be adhered to.
4. Follow all instructions – All operating and use instructions should be followed.
5. To reduce the risk of fire or electric shock, do not expose this apparatus to rain or moisture – The product
should not be used near water – for example, near a bathtub, washbowl, kitchen sink, laundry tub, in a wet basement, or
near a swimming pool and the like. The apparatus shall not be exposed to dripping or splashing and that no objects filled
with liquids, such as vases, shall be placed on the apparatus.
6. Clean only with a dry cloth.
7. Do not block any ventilation openings. Install in accordance with the manufacturer’s instructions. Slots or openings
in the cabinet are provided for ventilation and to ensure reliable operation of the product and to protect it from overheating,
and these openings must not be blocked or covered. Placing the product on a bed, sofa, rug or similar surface should never
block the openings. The product should not be placed in a built-in installation such as a bookcase or rack unless proper
ventilation is provided or the manufacturer’s instructions have been adhered to.
8. Do not install near any heat sources such as radiators, heat registers, stoves, or other apparatus (including
amplifiers) that produce heat.
9. Do not defeat the safety purpose of the polarized or grounding-type plug. A polarized plug has two blades with
one wider than the other. A grounding type plug has two blades and a third grounding prong. The wide blade or the third
prong are provided for your safety. If the provided plug does not fit into your outlet, consult an electrician for replacement
of the obsolete outlet.
10. Power cords and power adapters – Use only the power cords and power adapters supplied by the product
manufacturer.
Never wrap a power cord around the power adapter or other object. Doing so can stress the cord in ways that can cause the
cord to fray or crack. This can present a safety hazard.
Always route power cords so that they will not be walked on, tripped over, or pinched by objects.
Protect the cord and power adapters from liquids. For instance, do not leave the cord or power adapter near sinks, tubs,
toilets, or on floors that are cleaned with liquid cleaners. Liquids can cause a short circuit, particularly if the cord or power
adapter has been stressed by misuse. Liquids can also cause gradual corrosion of the power cord terminals and/or the
connector terminals on the adapter which can eventually result in overheating.
Always ensure that all power cords connectors are securely and completely plugged into receptacles.
Do not use any power adapter that shows corrosion at the ac input pins and/or shows signs of overheating (such as
deformed plastic) at the ac input or anywhere on the power adapter.
Do not use any power cords where the electrical contacts on either end show signs of corrosion or overheating or where the
power cord appears to have been damaged in any way.
11. Only use attachments/accessories specified by the manufacturer.
12. Use only with the cart, stand, tripod, bracket, or table specified by the manufacturer,
or sold with the apparatus. When a cart is used, use caution when moving the cart/apparatus
combination to avoid injury from tip-over. Placing the product in an unstable location such as an
unstable cart, bracket or table, may cause the product to fall, causing serious injury to a child or an
adult, and serious damage to the product.
13. Unplug this apparatus during lightning storms or when unused for long periods of time. A surge-filter can
also prevent damage and is recommended.
14. Refer all servicing to qualified service personnel. Servicing is required when the apparatus has been damaged in
any way, such as power-supply cord or plug is damaged, liquid has been spilled or objects have fallen into the apparatus,
the apparatus has been exposed to rain or moisture, does not operate normally, or has been dropped.
15. This product should be operated only from the type of power source indicated on the marketing label. If
you are not sure of the type of power supply in your home, consult your product dealer or local power company. For products
intended to operate from battery power or other sources, refer to the operating instructions.
16. Overloading – Do not overload wall outlets, extension cords, or integral convenience receptacles, as this can result
in risk of fire or electric shock.
17. Object and liquid entry – Never push objects of any kind into this product through openings, as they may touch
dangerous voltage points or short-out parts that could result in a fire or electric shock. Never spill liquid of any kind on
the product. Adjust only those controls that are covered by the operating instructions, as an improper adjustment of other
controls may result in damage and will often require extensive work by a qualified technician to restore this product to its
normal operation.
18. Replacement parts – When replacement parts are required, be sure the service technician has used replacement
parts specified by the manufacturer or have the same characteristics as the original part. Unauthorized substitutions may
result in fire, electric shock or other hazards.
19. Upon completion of any service or repairs to this product, ask the service technician to perform safety checks to
determine that the product is in proper operating condition.
20. Do not attempt to service this product yourself, opening or removing covers may expose you to dangerous
voltage or other hazards. Refer all servicing to qualified service personnel.
21. Wall Bracket Mounting – Refer to the mounting bracket manufacturer for instructions; confirm that bracket securely
mounted to the SLIMstage and into the wall studs in a manner which will not shake loose during product operation.
WARNING To reduce the risk of fire or electric shock, do not expose this apparatus to rain or moisture.

4
5
English
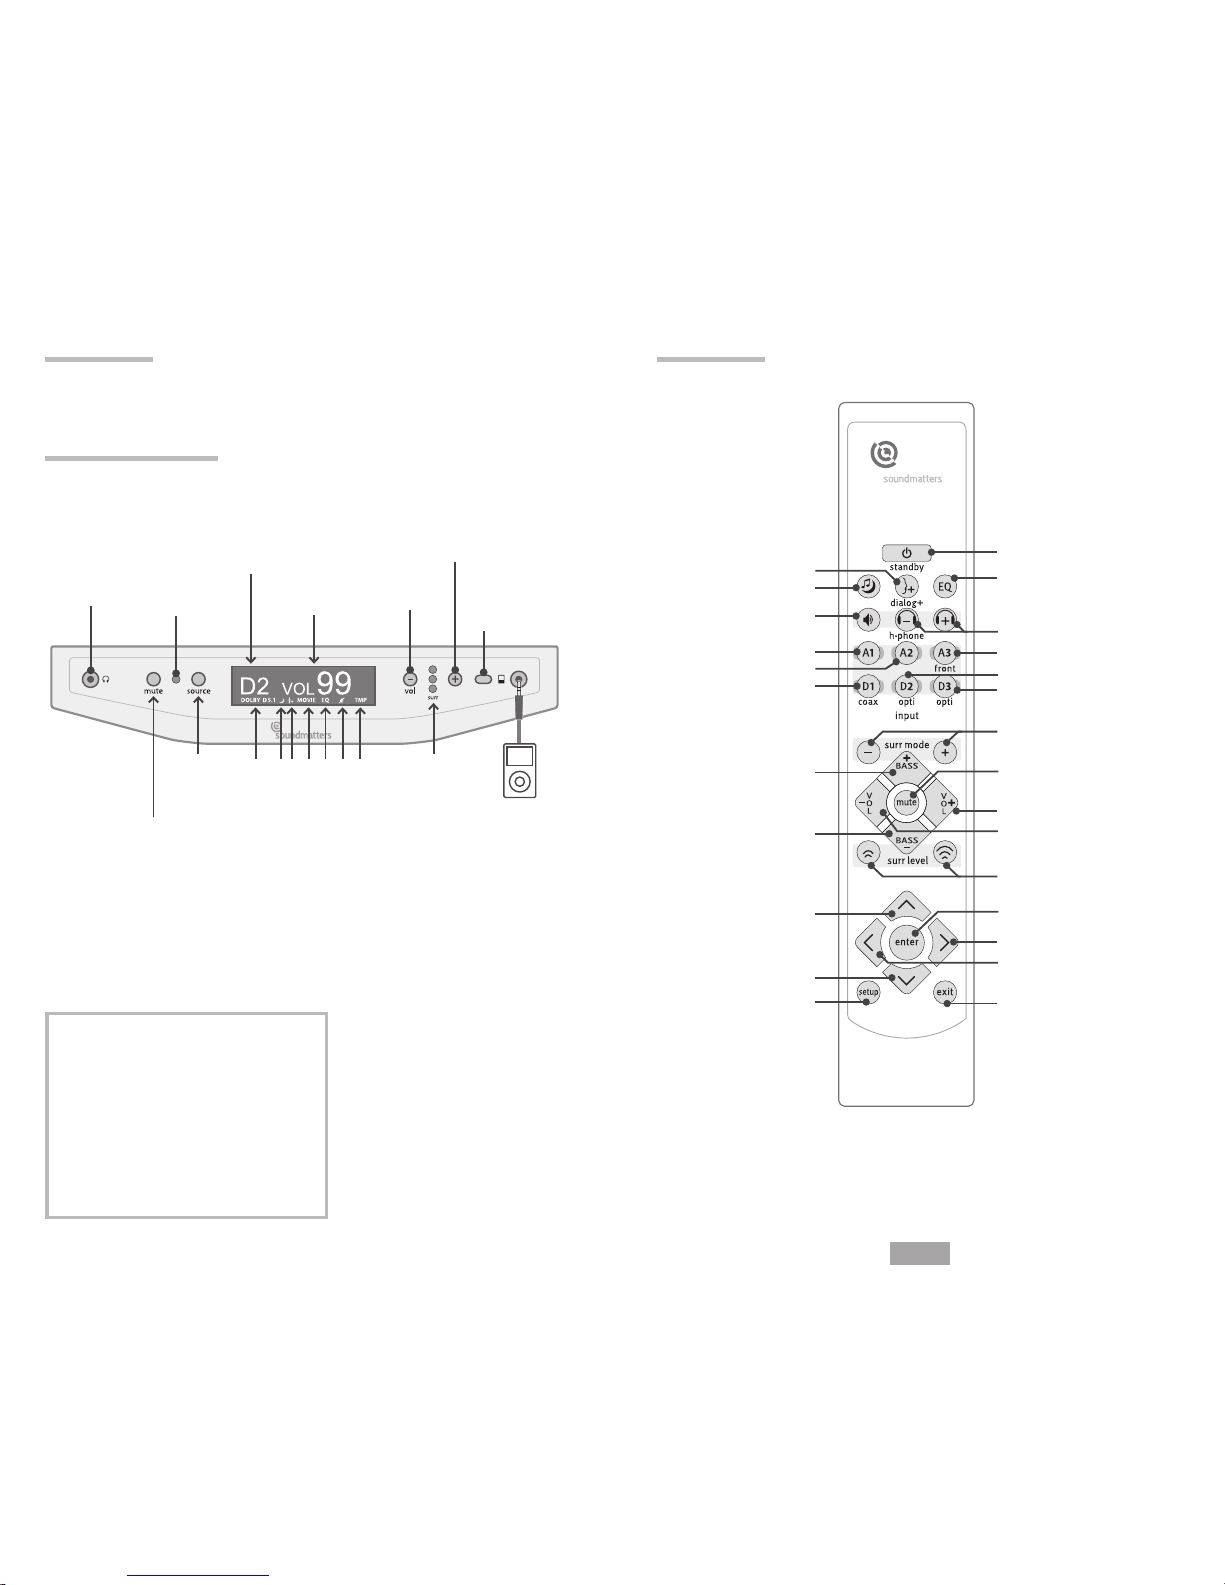
14. Bass Level Up
(including external sub)
17. Master Volume Up
5. Preset EQ On & O
6. Headphone Volume Down & Up
16. Mute
(unmute via any remote or
front panel command)
18. Master Volume Down
15. Bass Level Down
(including external sub)
19. Surround Level Down & Up
(or rear level if set for external rears)
23. Menu Next/Right
24. Menu Previous/Left
22. Set/Enter
20. Menu Next/Up
21. Menu Previous/Down
25. Enter Setup Mode 26. Exit to Previous Menu
13. Surround Down & Up
(through 4 positions)
1. Vocals EQ (on & o)
2. Night / Dynamic
Compression (on & o)
3. Speakers on & o
(with headphones connected)
7. Select input: Analog 1
8. Select input: Analog 2
9. Select input: Analog 3 (front)
10. Select input: Digital 1 12. Select input: Digital 3
11. Select input: Digital 2
4. On / O / Standby Mode
H.
Mute/Unmute
(also unmute via any
remote or front panel
button)
Q.
Surround
Mode
Indicator
3 LED = Movie
2 LED = Live/TV
1 LED = Music
0 LED = Stereo/
Bypass
R.
“iPod”/Analog
Input
(auto-switching
via 1/8” 3.5mm
connector –
overrides all
rear inputs)
B.
Power
Indicator
F.
Master
Volume
Up
(controls
headphone
volume
when
speakers
are o)
E.
Master
Volume
Down
(controls
headphone
volume
when
speakers
are o)
G.
IR Remote
Sensor
I.
Source
Select
(sequence
through
inputs)
C.
Input/Source
D.
Volume
Status
J. Dolby D2.0, Dolby D5.1,
DTS, PCM, Analog
detected
K. Night / Dynamic
Compression On
L. Dialog+ On
M. STEREO, MUSIC, LIVE,
MOVIE mode
N. EQ Preset
O. Speakers O (when
using headphones)
P. Thermal Overload
Protection Warning
J K L M N O
Connections & Placement
IMPORTANT NOTE: Prior to using this Operation Manual, please follow the instructions in the
Setup Guide for making all connections and proper positioning of your SLIMstage.
P
Front Control Panel Layout
Remote Control Layout
A.
Headphone
EuphonyHD
Surround
Technology
(via 1/8” 3.5mm
connector)
Contents page
•Safety . . . . . . . . . . . . . . . . . . . . . . . 2
•Connections & Placement . . . . . . . . . . 4
•Front Panel & Remote Control . . . . . . . . 4-5
1. Operation. . . . . . . . . . . . . . . . . . . . . 6
2. Adjustments . . . . . . . . . . . . . . . . . . . 6
3. Headphones . . . . . . . . . . . . . . . . . . . 7
4. Advanced . . . . . . . . . . . . . . . . . . . . . 7
5. Setup . . . . . . . . . . . . . . . . . . . . . . . 8
6. FAQ. . . . . . . . . . . . . . . . . . . . . . . . . 14
7. Troubleshooting . . . . . . . . . . . . . . . . 15
8. Specifications . . . . . . . . . . . . . . . . . . 16
9. Warranty/Service . . . . . . . . . . . . . . . . 17

6
7
English
Bass level
Use the remote control to adjust the bass + or –. The relative Bass level will be shown in the
front panel display. Adjusting the bass from the remote will also adjust the level of an external
subwoofer, such as a soundmatters SUBstage, if one is connected.
Surround Level
Use the remote control surr level buttons to increase or decrease the level of the surround. The
Surround Level will be shown in front panel display.
EQ
Utilize the remote’s EQ button to add a preset equalization curve (see SETUP > REMOTE EQ)
providing an alterative tonal balance. EQ curve in display.
Input Sensitivity
It is possible to have a mis-match between the output of an analog source unit and the input
of an AV component (like SLIMstage). This causes either low level /excess hiss, or premature
overloading/distortion. See Advanced Settings: INPUT PARAMETERS > SENSITIVITY.
3. Headphones
Using Headphones
SLIMstage EuphonyHD Headphone technology delivers a personal theater experience from
conventional headphones. Connect headphones via the left side front panel 1/8” (3.5mm)
receptacle. This will turn-off the speakers. Pressing the remote’s button allows simultan-
eous playing of speakers with the headphones (stereo playback). Utilize the H-phone vol –/+
buttons on the remote to adjust headphone level separately from the speaker output.
Adding An External Subwoofer
Refer to the SLIMstage Setup Guide, Menu Section C, and your subwoofers instruction Manual
to optimize subwoofer integration and performance.
Adding External Rear Speakers
Rear external speakers may be added to supplement the SLIMstage’s surround sound. (see
ADVANCED SETUP> REAR SURROUND). For additional information contact your local dealer or
soundmatters technical support department.
4. Advanced
RS-232 Control Port
SLIMstage provides an RJ-11 receptacle to allow RS-232 control via a computer or external
automation device. Two of the pins are available to connect a rear IR sensor.
For more information visit www.soundmatters.com/support/downloads, contact your dealer
or soundmatters customer service.
Overheat Shutdown Protection
The SLIMstage uses state-of-the-art digital amplifiers which allow significantly higher music
peaks to be heard cleanly. If the system is played at levels that are overheating the system
the display will indicate TMP. If temperatures are reached that may damage the SLIMstage,
the amplifiers will shut down to protect the system and speakers from damage – PT will be
displayed. When the protection system is activated, you will hear the system repeatedly mute
and unmute. To deactivate the protection system, simply turn down the volume.
DB-15 Service Port
SLIMstage provides a 15-pin receptacle to allow for servicing. For more information contact
soundmatters customer service.
1. Operation
Turn-on/turn-off
Turn on the SLIMstage by pressing any button on the front panel or remote control. Turn off by
pressing the remote Off/standby button.
OFF/standby – Powers down all components except the IR sensor. Power consumption is less
than 2.0W
Input/Source selection
To select the source, press the desired input button on the remote control (A1, A2, A3, D1, D2,
D3), or sequence inputs via front panel button The display will indicate the source selected.
Repeated front button presses will toggle the unit through the source inputs sequentially.
Auto Signal Detection and Conversion
SLIMstage surround processing technology Euphony HD can handle virtually all types of signals
including analog, Dolby Digital 2.0, 5.1, DTS Digital Surround, DTS 96/24 or PCM.
The display will indicate whether the signal being received by the SLIMstage is Dolby Digital 2.0,
5.1, DTS, PCM, or Analog.
In MUSIC, LIVE, and MOVIE modes, SLIMstage’s EuphonyHD technology automatically converts
all 2-channel sources (such as Stereo, Dolby 2.0, or stereo PCM) into surround.
Surround Mode
SLIMstage’s EuphonyHD provides stereo and three different surround modes which can be
selected via the remote control’s “surr” mode – and + buttons. The selected mode will be
momentarily highlighted in the LCD display and continue to be displayed on the vertical blue
LED bar.
No LED..... SURR OFF ......Stereo / Bypass
1 LED .....MUSIC Mode.....Mild surround effect, ideal for music
2 LED ......... LIVE .........Ideal surround for most TV shows
3 LED ........MOVIE ........Maximum surround – great for Action Movies
Unless changed in the Set-up Menu (see Advanced Settings – INPUT PARAMETERS>SURR MODE),
SLIMstage will turn-on and retain your last selected surr mode setting until you select another
mode or source.
Mute
To mute the sound, press the mute button on the remote. MUTE will be indicated in the display.
Select any button to un-mute.
Night / Dynamic Compression
Utilize the remote’s night music button to engage/disengage the night / dynamic compression
circuit which reduces the dynamic range (difference between the loudest and quietest sounds)
to make it easier to avoid disturbing the neighbors or sleeping loved ones. Shows NIGHT in
display.
Dialog+ voice clarity circuit
Using the remote Dialog + button to engage/disengage circuit which provides additional
output and clarity at typical vocal frequencies. Shows in display when active.
2. Adjustments
Volume
To adjust the volume level, use the remote volume + and –, or use the front panel buttons
( + and –).
Note: If headphones are connected with speakers off, front panel controls headphone level.

8
English
A. LANGUAGES
}Action: Select LANGUAGE, then select desired Language and
push ENTER
Result: SETUP is now shown in selected language.
B. DISPLAY OPTIONS
The SLIMstage display will auto-dim after about 10 seconds as the
factory default, auto-off and always-on are also options.
}Action: Select DISPLAY, then select Auto DIM, Auto OFF or
Always ON, then press Enter
Result: Display setting are saved.
C. ROOM SETUP
Adjusts basic parameters for ROOM setup
for best performance
}Action: Select ROOM and push ENTER
Result: Shows selected Setup Menu Options
Adjust for LISTENING DISTANCE
}}Action: Select listening DISTANCE and press ENTER
}}}Action: Select desired distance and press ENTER
Result: Listening distance is saved and display revert
to ROOM Setup Menu
Set Left/Right SURROUND BALANCE
}}Action: Navigate to SURR BALANCE and press ENTER.
Result: SURR BALANCE displayed
}}Action: Select desired setting and press ENTER
Result: Revised balance will be set.
Tip: If one side of the listening area (L or R) is acoustically more “live” (say,
glass or hard reflective surfaces), you may want to set the balance slightly
to the more “dead” (i.e., curtains, open to another room) side of the area.
Set Default SLIMstage ROOM EQ Parameters
Changes frequency balance of SLIMstage for placement, room
acoustics, and listening taste
}}Action: Navigate to room EQ, press ENTER.
Result: 10 frequency equalizer will be displayed
}}}Action: Move each slider to desired level and press ENTER
Result: Frequency settings will be the default EQ response.
Tips: The Room EQ adjusts the EQ for all inputs. In Advanced Settings the
EQ for each input can be created. To reset the input EQ back to the Room EQ
settings. Reset the input to factory default.
Set CENTER CHANNEL Level
Adjust the Center Channel level to optimize vocals
}Action: 1. Push ENTER
Result: 1. Center LEVEL range shows
2. DEFAULT OUTPUT LEVEL will be displayed
}}Action: Select desired CENTER level and press ENTER
Result: Level will be saved.
D. EXTERNAL SUBWOOFER
Set SUBWOOFER Output Parameters
Replaces the controls normally found on your external subwoofer.
}Action: Set volume to max and crossover to the maximum
frequency and the phase to zero on your External Subwoofer.
Tip: Sonically integrating an external sub with any main system
typically requires some back and forth tweaking between the
crossover and level.
SUBWOOFER YES / NO
}}Action: Select YES and press ENTER for best sound when an
external subwoofer is used.
Subwoofer Output Level
Adjust the Subwoofer output level to match the Subwoofer output
of the internal woofers for a smooth transition.
}}Action: 1. Push ENTER
Result: 1. Subwoofer LEVEL range shows
2. Default output LEVEL will be displayed
}}}Action: Select desired SUBWOOFER level and press
ENTER
Result: Level will be saved.
Tip: The BASS +/– on the Remote Control adjusts both the Woofer and
Subwoofer level.
Subwoofer Crossover
The crossover has been preset to provide a smooth transition to the
woofer.
}}Action: Select desired crossover frequency setting and press
ENTER
Result: Selected crossover will be saved.
Tip: Set the Crossover point as low as possible without creating a hole in
the musical range.
Select Subwoofer PHASE
Adjusts subwoofers phasing to match location.
}}Action: Select desired degree of phase and press ENTER
Result: Subwoofer phase will be saved.
Tip: If your subwoofer has a phase adjustment, switch it to 0° so as
not to interfere with the SLIMstage phase setting.
SETUP
LANGUAGE
DI SPL AY
ROOM
SUBWOOFER
EQ REMOTE
ADVANCED
ROOM
DISTANCE
SURR BALANCE
EQ
CENTER CHANNEL
SETUP
LANGUAGE
DISP L AY
ROOM
SUBWOOFER
EQ REMOTE
ADVANCED
SETUP
LANGUAGE
DI SPL AY
ROOM
SUBWOOFER
EQ REMOTE
ADVANCED
SETUP
LANGUAGE
DI SPL AY
R OOM
SUBWOOFER
EQ REMOTE
ADVANCED
LEVEL
–10 ……... 0 ……… 10+
PH ASE
0 ........ 90 ........ 180o
LANGUAGE
DEUTSCH
ESPANOL
ENGLISH
FRANCAIS
ITALIANO
LEVEL
–10 ……... 0 ……… 10+
DI SPL AY
DIM
OFF
ON
SUBWOOFER
YES / NO
LEVEL
XOVER
PHASE
SUBWOOFER
YES / NO
LEVEL
XOVER
PHASE
SUBWOOFER
YES
N O
SUBWOOFER
YES / NO
LEVEL
XOVER
PHASE
SUBWOOFER
SUBWOOFER
LEVEL
XOVER
PHASE
ROOM
D ISTANCE
SURR BALANCE
EQ
CENTER CHANNEL
XOVER
250HZ 190HZ 143HZ
110HZ 82HZ 62HZ
43HZ
DISTANCE
< 2 M
> 2 M
SURR BALANCE
L R
10 ……... ! ……… 10
ROOM
DISTANCE
SURR BALANCE
EQ
CENTER CHANNEL
ROOM
DISTANCE
SURR BALANCE
E Q
CENTER CHANNEL
EQ RESET
5. Setup Menus
While SLIMstage is plug and play ready, setup menus allows you to both
sonically and functionally “fine-tune” SLIMstage for your specific application.
1. Push SETUP button to access SETUP MENUS (or get out of SETUP MODE).
2. Use remote navigation cluster to navigate through and select Menu items.
3. Push EXIT button at any time to revert to the previous menu.

10
English
E. EQ REMOTE for Remote Control
Set Equalizer for EQ Button on REMOTE Control
Design an EQ especially for a favorite activity, perhaps action movies,
news or classical music. Then with the press of the EQ button on the
Remote Control you can activate this special EQ.
}}Action: Navigate to EQ REMOTE and press ENTER.
Result: 10 frequency equalizer will be displayed
Tip: EQ adjustment is real-time so make sure you play
the favorite activity while making the adjustment.
}}}Action: Move each slider to desired level, press ENTER
Result: Sets the EQ button response and display will
revert to main SETUP menu.
}}Action: Press EXIT
Result: Exits SETUP menu
– OR –
}}Action: Navigate to ADVANCED setup and press ENTER.
Result: Displays ADVANCED setup setup options
F. ADVANCED SETUP
Set DEFAULT INPUT
SLIMstage always returns to DEFAULT INPUT from standby/off
}}Action: Navigate to DEFAULT INPUT and push ENTER
Result: Shows all available inputs and last selected.
Tip: LAST SELECTED is the normal factory setting.
}}}Action: Navigate to desired DEFAULT INPUT and push
ENTER
Result: Shows new Default Input and reverts to
ADVANCED setup menu
Set PARAMETERS for Each Input
Individually fine-tune the characteristics of each of your inputs.
}}Action: Navigate to INPUT PARAMETERS, press ENTER
Result: Display shows available inputs for INPUT PARAMETERS
selection
Select INPUT to be Updated
}}Action: Navigate to desired input and push ENTER
Result: Displays input setup options
Note: Modifying the active input and playing music or movies allows
for real-time adjustment of the Sensitivity and Input EQ.
Input SENSITIVITY Adjustment
The input sensitivity level of Analog Input A1, A2, A3 can be adjusted.
In addition, Analog A2 has a –20dB attenuator that can be switched
for use with speaker level output.
}}Action: Select SENSITIVITY
Result: SENSITIVITY options display
Select SURROUND MODE (Stereo, Music, Live, or
Movie) as the default surround playback processing
}}Action: Navigate to SURR DEFAULT and press ENTER
Result: Surround options displayed
}}}Action: Select desired default surround mode and press
ENTER
Result: SLIMstage will always select your input default mode
at turn-on.
Tips:
1. Of the surround modes, Music is the most subtle, and Movie,
the most enveloping.
2. Regardless of the default, you can select any mode via the remote.
Set INPUT EQ
While not recommended for most applications, individual default
input EQ can be set for each source. If you select to use Input EQ,
the Room EQ function will be disabled and EQ will need to be set
for each input individually.
}}Action: Navigate to input EQ and press ENTER
Result: 10 frequency equalizer will be displayed
}}}Action: Move each slider to desired level, press ENTER
Result: Sets the EQ for the selected Input, this EQ will be
active when ever the modified Input is selected.
Note: To disable the Input EQ’s and restore the Room EQ, select Reset
Input or RESET ALL TO FACTORY is required
HIDE INPUT
Hiding an Input means that if you sequence through the sources on the
Source front panel source button, the “hidden” input will be skipped.
Similarly, there will be no response if that source is selected on the
remote.
}}Action: Navigate to HIDE input and press ENTER
Result: HIDE input options will be display
}}}Action: Select HIDE or SHOW and press ENTER
Result: If HIDE is selected, the Input will be disabled and can
not be selected by the Remote Control.
CAUTION: Careful with this one… if you hide an input, its ability
to be seen virtually disappears unless you “un-hide” it in the Setup
Input Preferences or reset all setup functions to Factory Default
RESET INPUT to Factory Default Settings
Resetting to Factory Default will un-do any set-up adjustments you’ve
made for that input.
}}Action: Select RESET INPUT (to factory default) and press ENTER
Result: RESET INPUT options will display
}}}Select YES or NO
Result: If YES, factory default settings for this input will be
reinstated.
SETUP
LANGUAGE
DI SPL AY
ROOM
SUBWOOFER
EQ REMOTE
ADVANCED
A2
SENSITIVITY
SURR DEFAULT
EQ
HIDE
RESET INPUT
A2
SENSITIVITY
SURR DEFAULT
E Q
HIDE
RESET INPUT
A2
SENSITIVITY
SURR DEFAULT
EQ
H I DE
RESET INPUT
A2
SENSITIVITY
SURR DEFAULT
EQ
HIDE
RESET INPUT
A2
LIVE
MOVIE
LAST SELECTED
STEREO
MUSIC
A2
HIDE SHOW
A2
YES N O
SETUP
LANGUAGE
DI SPL AY
ROOM
SUBWOOFER
EQ REMOTE
ADVANCED
ADVANCED
DEFAULT INPUT
INPUT PARAMETERS
REAR
IR
LOCK
VERSION
RESET
ADVANCED
DEFAULT INPUT
INPUT PARAMETERS
REAR
IR
LOCK
VERSION
RESET
A2
SENSITIVITY
SURR DEFAULT
EQ
HIDE
RESET INPUT
DEFAULT
LAST SELECTED
A1
A2
A3
D1
D2
D3
INPUT
A1
A 2
A3
D1
D2
D3
A2
–5……… 0 ………5+
ATTEN: –20DB
ON OFF
EQ RESET
A2 RESET
Create Speaker Level Input
A2 Input only, can accept a speaker level signal if connecting
speaker level ON is selected for A2 SENSITIVITY.
Note: You will need to adapt connection from speaker wires to
a stereo mini-jack. Contact Customer Support for questions

12
13
English
External Rear Channel Output
SLIMstage makes it possible to add external Rear Speakers to enhance
the surround effect. The Rear Output is disabled while headphones
are connected.
Tip: To add a MAINstageHD as external rear channel, connect a 3.5mm
stereo audio cable from the Rear Output to the Analog 1 input of the
rear MAINstageHD.
Select REAR SPEAKER TYPE
}}Action: Navigate to REAR channel menu and select
desired item and press ENTER.
Result: Rear Channel Output will be optimized to support the
connected Rear Speaker Type.
External Surround LEVEL
Adjusts output level to external rear surround speakers.
}}Action: Navigate to LEVEL and press ENTER. Utilizing
familiar surround source adjust rear level and press ENTER
Result: Selected rear level becomes default
Select IR SENSOR
SLIMstage can be controlled via the normal FRONT IR Sensor, an
optional REAR IR sensor, and the RS-232 port.
Normal is FRONT. Select REAR if controlling via the RS-232 port
(including if connecting an RF remote control adapter) or, if using
another SLIMstage as an external rear channel (to prevent your
IR remote from inadvertently adjusting both SLIMstages).
}}Action: Navigate to IR SENSOR and press ENTER.
Result: IR SENSOR options will be displayed
}}}Action: Select FRONT or REAR and press ENTER
Result: If REAR is selected, confirming menu will display.
IMPORTANT: To re-activate the FRONT IR SENSOR, press MUTE and
SOURCE buttons at the same time for 2 seconds.
}}Action: Select CONFIRM or CANCEL.
Result: The IR sensor will be switched to REAR. Front sensor
will stop working immediately.
Tip: For connectivity information and programming instruction
check the Soundmatters website.
SETUP LOCK
Prevents accidental setup changes
}}Action: 1. Navigate to LOCK setup
}}Action: 2. Select LOCK setup and press ENTER.
Result: LOCK setup menu is displayed
}}Action: Select CANCEL or LOCK and press ENTER
Result: Setting will highlight
Result: The Setup will be locked from accidental changes
To unlock SETUP, sequentially press SETUP, , EXIT buttons
on remote
VERSION
VERSION displays important information about your SLIMstage
including model, serial number, electronic version and software
version.
}}Action: Navigate to VERSION and press ENTER.
RESET all settings to Factory Default
This resets all setup options back to their original factory default
position.
}}Action: Navigate to RESET all to factory and press ENTER.
Result: RESET options will be displayed
}}}Action: Select YES or NO and press ENTER
Result: If YES, all Settings will be reset to the factory default
condition.
Press EXIT to revert to previous menu
Press EXIT again to exit SETUP MENU.
ADVANCED
DEFAULT INPUT
INPUT PARAMETERS
R E AR
IR
LOCK
VERSION
RESET
ADVANCED
DEFAULT INPUT
INPUT PARAMETERS
REAR
IR
LOCK
VERSION
RESET
ADVANCED
DEFAULT INPUT
INPUT PARAMETERS
REAR
IR
LOCK
VERSION
R E SET
ADVANCED
DEFAULT INPUT
INPUT PARAMETERS
REAR
IR
LOCK
VERSION
RESET
ADVANCED
DEFAULT INPUT
INPUT PARAMETERS
REAR
I R
LOCK
VERSION
RESET
IR SENSOR
RECOVERY PRESS MUTE AND
SOURCE BUTTON AT THE SAME TIME
FOR 2 SECONDS
CONFIRM CAN CEL
REAR
T YPE
LEVEL
LOCK
TO UNLOCK PRESS SETUP,
SPEAKER, EXIT BUTTON
CANCEL LOCK
RESET
MASTER RESET TO FACTORY DEFAULT?
YES N O
VERSION
MODEL: 40
ELECTRO: 1.00
SW: 1.0.0/1.0.0
SERIAL #: S1035000025
IR
FRONT REAR
TYPE
SLI MSTAGE
MAINSTAGE HD
L & R SPEAKER
REAR
TYPE
LEVEL
LEVEL
–10 ……... 0 ……… 10+

14
English
6. Frequently Asked Questions
For the latest FAQs visit our website at www.soundmattters.com
Q1. Any tips on how to locate/position SLIMstage in the room for the best performance?
While SLIMstage performs well in virtually any application, like all loudspeakers, best
performance will be achieved if one takes a bit of care in its placement.
Best Hi-Fidelity: The system should always be centered in front of the listener(s) using the
tilt-able feet or wall bracket to point the SLIMstage’s front grille directly at the listener(s). If in a
cabinet, move as far forward as possible to allow widest dispersion.
Best Surround: All surround systems have a“sweet spot”the place where the surround effect is
maximized , this is an areas size varies depending on your distance from the SLIMstage…if your
main listening is closer than 9 feet, be sure and re-set the DISTANCE position in the setup menu.
Best Bass: Placing any speaker against a heavy hard surface will reinforce (increase) its bass.
The more surfaces SLIMstage sits against, the more bass. Least bass would be floating in the
middle of the room. Most bass would be in a corner at the floor or ceiling. Also, since the built-
in woofers fire down, there must be adequate space left below the unit (about 3/4 inch) for the
bass to vent into the room.
Q2. The bass is surprisingly good for such a small all-in-one box… but I want more!
Can I add an external subwoofer?
Yes, SLIMstage has a subwoofer output jack for connecting to the acoustically-matched
soundmatters SUBstage™, or virtually any good-quality hi-fi powered subwoofer. SLIMstage’s
sub out is a space-saving 1/8” mini-jack, so if you’re not using our SUBstage; you’ll need an
1/8”stereo mini to RCA adapter for most subwoofers (included with the SUBstage).
Q3. I love the SLIMstage, but want more volume?
Here are some options –add an external subwoofer such as a SUBstage (or two) and/or add an
additional SLIMstage in the back for the rear channels and/or upgrade to a larger SLIMstage. If
the problem occurs only when using a specific source you may be able to increase sensitivity
of the connected input (see ADVANCED> INPUT PARAMETERS> SENSITIVITY).
Q4. How do I control the SLIMstage and my TV from a single remote control?
The SLIMstage’s remote control functions are easily captured by most “third party” learning
remote controls. The SLIMstage’s volume can also be controlled by many TV and cable/satellite
remotes by inputting a Denon® audio code. Refer to the instructions provided with the TV
remote.
Q5. In order to properly integrate the SLIMstage into my advanced learning remote or home
automation system I need to have “discrete codes”, how do I find them?
The SLIMstage’s discrete IR codes are available in the Download section at www.soundmatters.
com.
Q6. Can I use SLIMstage when I travel overseas?
SLIMstages utilizes a very high power version of a notebook computer power supply, designed
to operate reliably on most any worldwide household voltage: 95–240Vac, 50/60Hz. Just
replace the cord connecting the external power module to the wall with one that meets local
outlet requirements.
Q7. Do you recommend plugging SLIMstage into a surge protector?
SLIMstage, like all electronic appliances, may benefit from surge protectors.
Q8. Does SLIMstage go into energy-saving mode by itself or do I need to switch it?
Slimstage should be turned off by pressing the OFF/standby button on the remote control.
System enters Energy-Saving mode after 2 minutes of no signal on active input automatically.
Q9. When switching between normal and Dialog+ modes, sometimes I hear a big difference
and sometimes none at all. Why?
There are a number of possible reasons. When you have the bass level set to maximum, it may
overshadow the dialog boost. Obviously, some program material has no vocals in it, so when
that’s the case, you will hear little or no difference.
7. Troubleshooting
1. Problem: No sound from anything
Solutions:
a. Check that source unit is on and playing (i.e., DVD or TV)
b. If the headphones are connected, confirm speakers aren’t off.
c. Is AC cord connected to live AC and securely inserted into the SLIMstage power supply
module… and is the module also connect to the back of SLIMstage?
d. Is volume up on SLIMstage?
e. Push source button on SLIMstage or remote to select an active input
2. Problem: I select an input on the remote but it doesn’t show-up in the Display
Solution:
a. The input is “hidden”… See Input Parameters> Hide Input? In the Setup Menu.
3. Problem: Not enough bass
Solutions:
a. Raise bass level via remote
b. Raise the bass level in the setup menu
c. See FAQ, Q1 on how placement affects bass
d. Add a SUBstage subwoofer!
4. Problem: I don’t hear any or enough surround
Solutions:
a. Make sure you are in Music, Live or Movie (not Stereo) mode. Movie mode has the most
surround.
b. Confirm you are listening within 45 degrees from the center of the SLIMstage, called the
“sweet spot”
c. Confirm that all EQ & surround modes built into the DVD player or other source
component are turned-off!
d. See faq/tips #1 on placement
e. Add powered speakers to the rear of the room.
5. Problem: Erratic or no remote operation
Solutions:
a. Confirm that the batteries are fresh
b. To re-activate the FRONT IR SENSOR, press MUTE and SOURCE buttons at the same time
for 2 seconds.
6. Problem: Fuzzy sound
Solution:
a. Confirm that all DSP/surround/sound enhancement modes are off on all sources
connected to the SLIMstage
b. Confirm sensitivity setting isn’t to high, overloading the input, in the SENSITIVITY
ADJUSTMENT section.
7. Problem: System seems to have locked up
Solution:
a. SLIMstages circuitry includes a powerful microprocessor. Should the unit appear to
operate erratically, simply unplug it from the wall outlet for 15 seconds and plug it back
in to reset the internal computer to normal operation.

16
17
English
8. Problem: TMP or PT indicates in display and units cuts in/out.
Solution:
a. Overheat Protection Circuitry is working...turn down the volume.
9. Problem: Not enough volume
Solutions:
a. If available, increase the output on the source you are using.
b. Increase the sensitivity of the input, see Sensitivity Adjustment in Advanced Setup section.
10. Problem: Connected from Cable box but there is no sound
Solutions:
a. Unfortunately some cable boxes have digital out or even analog audio (red/white RCA)
audio connections that are dummies (not internally connected in the box). Check with your
cable provider to confirm the output capabilities of your box.
b. If using the digital output of your cable box, you may find that it only works when you are
on an HDTV channel, to access the audio for other channels you will also need to connect
to the analog audio output and switch to the correct input on the SLIMstage.
11. Problem: Optical cable won’t fit
Solutions:
a. Makes sure clear protective covers are removed from cable ends
b. Some aftermarket cables have overly large connector “jackets” and may not be able to be
accommodated.
12. Problem: I can’t access the SETUP menu
Solution:
a. SETUP access is locked. Sequentially press SETUP, , EXIT on the remote.
8. Specifications
SLIMstage 5.1 Surround Sound Console
• Surround Algorithms: Euphony™HD decodes Analog, PCM, Dolby Digital 2.0/5.1,
DTS Digital Surround, DTS 96/24
• Decoding 5.1 channel: Dolby Digital, DTS Digital Surround, DTS 96/24
• Decoding 2.0 channel: Dolby Digital, PCM
• 2-channel to 5-channel conversion: Euphony™HD
• Power: Class-D Amplifiers (RMS at < 0.8%THD)
SLIMstage 30 – Satellites 80W, Woofers 60W
SLIMstage 40 – Satellites 80W, Woofers 90W
SLIMstage 50 – Satellites 80W, Woofers 130W
• Maximum SPL@1m:
SLIMstage 30 – 103dB
SLIMstage 40 – 106dB
SLIMstage 50 – 109dB
• Main Speakers:
SLIMstage 30 – 4 each 50x50mm with patented LMD Neo-sandwich magnets
SLIMstage 40 – 4 each 50x50mm with patented LMD Neo-sandwich magnets
SLIMstage 50 – 4 each 50x50mm with patented LMD Neo-sandwich magnets
• Woofer Arrays:
SLIMstage 30 – 2 woofer arrays*
SLIMstage 40 – 3 woofer arrays*
SLIMstage 50 – 4 woofer arrays*
*Each array includes one Active High-Energy 3˝ patented LMD Neo-sandwich magnet woofer
plus two 3” bass radiators
• Power Supply: Digital, 95–265Vac, 50/60Hz, 36V
• Inputs (6)
Analog 1 –stereo 1/8” (3.5mm)
Analog 2 – stereo 1/8” (3.5mm) Available 20dB attenuation for speaker level in
Analog 3 – stereo 1/8” (3.5mm) Front Panel, with priority selection
Digital 1 – SP/DIF coax
Digital 2 – Optical / TosLink
Digital 3 – Optical / TosLink
• Outputs (3)
Analog: Subwoofer out – stereo 1/8” (3.5mm)
Analog: Headphone (Euphony Virtual Surround) –stereo 1/8” (3.5mm)
Rear Channel Outputs
• Accessories
IR remote control
Power supply with cables
EZ-tilt™ leveling feet with height insert
Wall-Mount Bracket with mounting hardware
1 each – 3m optical cable
1 each – 3m 1/8˝ mini phone jack cable
1 each – 3m 1/8˝ mini phone jack to male stereo RCA cable
1 each – 3m digital coax RCA cable
• Controls
Master, Headphone Volume (IR and front panel)
Subwoofer level (IR only)
Source select, mute (IR and front panel)
Surround/stereo (IR only)
• Modes: On, Mute, Off/Standby
• Off/Standby Power: 2W or less
• Weight:
SLIMstage 30 – 16.5 lbs (7.5 kg)
SLIMstage 40 – 19 lbs (8.5 kg)
SLIMstage 50 – 21 lbs (9.5 kg)
• Dimensions:
SLIMstage 30 (WxHxD) – 31.1” x 3.5” x 3.7” (790 x 88 x 93mm)
SLIMstage 40 (WxHxD) – 39” x 3.5” x 3.7” (990 x 88 x 93mm)
SLIMstage 50 (WxHxD) – 47.5” x 3.5” x 3.7” (1206 x 88 x 93mm)
Height with EZ-tilt leveling feet, any model (H) – 4.4” (112mm)
Height with feet+height insert, any model (H) – 5.2” (132mm)
Depth with wall-mount bracket, any model (D) – 5”(127mm)
soundmatters® believes in a policy of continuous product improvement,
therefore specifications are subject to change without prior notice.
9. Warranty/Service
There are two things you must do to ensure trouble free service in the event you need warranty
repairs.
1. Keep your original sales receipt in a safe place. A copy of the receipt will be required to obtain
warranty service.
2. Be sure your retail dealer has written the date, the model number, and the serial number (if
applicable) of the Product on the receipt. To give yourself an extra measure of protection,
make a separate record of the purchase information and keep it in a safe place. In the event
you misplace the sales receipt, your dealer may be able to provide a copy.
Take a moment now to read the terms of your warranty.
When shipping a product in for service:
• Email or call soundmatters for the proper ship-to address for servicing and an RMA (return
merchandise copy of your original sales receipt that has the date, the Product model number
and serial number (if applicable) written on it. You must place your RMA number on the
shipping label of any unit returned to soundmatters for service.
(Warranty/Service continues next page)

18
19
English
• Always ship Products in the complete original packing material.
• Avoid shipping Products via the Postal service. If you must use the Postal service, be sure to
register and insure the package.
soundmatters Limited Warranty
• soundmatters international, inc. (soundmatters) warrants to the original consumer purchaser
of the soundmatters Products described in this manual, that the Product will be free from
defects in materials and workmanship for a period of two (2) years after the date of purchase.
• soundmatters’ sole obligation under this warranty shall be to provide, without charge, parts
and labor necessary to remedy the defects, if any, that appear during the warranty period. This
warranty is the sole and exclusive express warranty given with respect to the Product. All other
warranties are hereby excluded.
• Neither soundmatters nor the authorized dealer who sells the Product is responsible for
indirect, incidental, or consequential damages. Some states do not allow the exclusion or
limitation of incidental or consequential damages, so the above limitation or exclusion may not
apply to you. This warranty gives you specific legal rights and you may also have other rights,
which vary from state to state.
This warranty is limited to:
• Products purchased from authorized soundmatters retail dealers. soundmatters will supply a
list of authorized dealers on request.
In order to obtain service you must:
• Return the Product, freight prepaid, to the soundmatters dealer from which it was purchased,
an authorized soundmatters independent service agency, an authorized soundmatters
international distributor, or to soundmatters. If necessary you may call soundmatters Customer
Service Department for the names and addresses of authorized independent service agencies
in your area.
• Provide proof of purchase in the form of a copy of your original sales receipt, the date, model
number, and serial number (if applicable) of the Product must be written on the sales receipt.
This warranty does not cover:
• Damage that is the result of misuse, abuse, accident (including but not limited to damage
by water), faulty hookup, defective or maladjusted associated equipment, or the use of the
Product with equipment for which it was not intended.
• Cosmetic defects that appear more than thirty (30) days after the date of purchase. Cosmetic
damage caused by improper handling is also excluded.
• Products that are used for commercial purposes.
• The cost of removing or reinstalling the Product.
• Damage that occurs while the Product is being shipped to whoever will service it. See the
information above regarding shipping procedures.
This warranty is void if:
• The Product identification or serial number label is removed or defaced in any way.
• The Product is serviced or repaired by anyone other than soundmatters or an authorized
soundmatters dealer or service agency.
For warranty information contact:
soundmatters international, inc
reno, nv 89501
phone: 775 981 1460
in the usa 800-698 SOMA (7662)
email: [email protected]
web: www.soundmatters.com
Dolby and the double-D symbol are trademarks
of Dolby Laboratories.
Manufactured under license under U.S. Patent #’s:
5,451,942; 5,956,674; 5,974,380; 5,978,762; 6,487,535
& other U.S. and worldwide patents issued & pending.
DTS and DTS Digital Surround are registered trademarks
and the DTS logos and Symbol are trademarks of DTS, Inc.
© 1996-2007 DTS, Inc. All Rights Reserved.
EUPHONY HD is a trademark of DiMAGIC Co. Ltd
Soundmatters is a registered trademark of Soundmatters
International Inc.

20
21
简体中文
安全注意事项
谨慎-触电的危险-不要开启
1.阅读说明书--在操作产品之前应该阅读所有安全与操作说明。
2.妥善保存这些说明书--安全与操作说明书,应予以保留,以供日后参考。
3.注意所有警告标志--注意所有产品上及用户指南内的警告标志。
4.遵循所有使用说明--所有操作与使用都应该遵循说明书。
5.为减少起火或触电的风险,请不要暴露这台机器在雨中或者潮湿的地方--该产品不
能在靠近水的地方使用--例如,靠近浴缸,洗脸盆,厨房水槽,洗衣房,浴缸,在一
个潮湿的地下室,或附近的游泳池等等。该机器不能暴露在有水滴或有水贱出的地
方,不能在上面放置盛有液体的器具,如瓶子。
6.要求用干布清洁。
7.不要堵塞任何通风口。根据厂商要求安装--为保证产品可靠操作,防止过热,应把
产品置于适当通风的地方。如不要把产品放在床上,沙发上或类似通风不良的地方。
不要把产品放在与通风不畅的书架或柜子等类似的地方。
8.不要放置在任何热源旁,如散热器,热记录器,电炉或产生热量的其他电器(包括功
放)。
9.不要破坏极性或接地插头安全性。极性插头具有两个金属片,一个略微宽一些。接
地插头有两叶片和一插脚。它们能保证您的安全。如果提供的插头不能插入插座,请
让电工换插座。
10.电源线和电源适配器--只使用产品制造商所提供的电源线和电源适配器。
不要把电源线缠绕在电源适配器上或者别的物体上。如果那样做可能会导致电源线磨
损或者裂开。这样子会对安全性造成威胁。
请小心使用与处理电源线,这样就不会踩到或者被绊倒,或者被物体紧压着。
从液体中对电源适配器和电源线的保护。例如,不要把电线或电源适配器放到水槽,
浴缸,厕所的附近,也不要放到用清洁液清洁的地板上。液体可造成短路,尤其是如
果电线或电源适配器一直被误用。液体也可以渐渐的腐蚀电源线的插口或者电源适配
器的插口,那样会最终导致过热。
始终确保所有电源线连接器的安全和完全插入到插座。
如果电源适配器或者插口上有显示腐蚀现象或者显示过热的迹象(如变形,塑料),
请不要使用。
如果电源线的两端显示腐蚀或过热迹象,或者电线出现被破坏现象,请不要使用。
11.仅使用厂商规定的附件。
12.仅与厂商指定或与电器一同售出的推车,架子,三脚架,支架或桌
子一起使用。推动小车/电器时谨防翻倒。把产品放置在不稳定的位
置,如不稳定的购物车,支架或桌子,可能会导致产品跌下,对儿童
或成人造成了严重的伤害,并严重损害产品。
13.雷电或长时间不使用时请拔掉电源以防止损坏产品。
14.需要维修请向专业服务人员求助。当电器损坏,如电源线或插头损坏,液体溢出
或物体掉入电器中,电器暴露于潮气或雨中,不能正常操作或摔落时。
15.产品的电源需要使用指定商标的类型。如果您不清楚您家中的电源适配器的类
型,参考您的产品经销商或者当地的电源适配器公司。如想用电池或者其它来源给产
品供电,请参考操作说明书。
16.过载--为降低火灾或触电危险,应防止墙上插座、延长绳线及整体电源插座过
载。
17.物体或液体落入产品内--不要让物体或液体通过空隙落入产品内,它们可能接触
危险电压或短路部分从而导致火灾或触电。只调整使用说明书所涵盖的遥控操作,如
果不正确的使用别的遥控器来调整,可能会导致损坏,这样将需要合格的技术员花大
量工作来恢复本产品,使其正常运作。
18.更换零件--当需要更换零件,请务必让服务技术员使用指定的制造商或具有相同
的特征的零件代替原零件。擅自改换可能会导致火灾,触电或其他危险。
19.本产品的任何服务或维修完成后,要求服务技术员执行安全检查,以确定该产品
具有适当的操作条件。
20.不要尝试自己维修本产品,打开或者移动盖子可能让您受到电压危险或者其它危
险。所有维修工作请交给合格的服务人员。
21.墙上支架的安装--查阅安装支架制造商的说明书;确认支架将SLIMstage固定安稳
和墙壁上的钉拧紧使得本产品工作时不会动摇松散。
警告: 为减少起火或触电的风险,不暴露这台机器在雨水或潮湿处。
22
23
简体中文
14. 低音级别+
(包括外接低音炮)
17. 主音量加
5. 预置均衡器开&关
6. 耳机音量+&-
16. 静音
(通过遥控器上的任意键或者前
方面板的命令可以解除静音)
18. 主音量减
15. 低音级别-
(包括外接低音炮)
19. 环绕级别+&-
23. 菜单前一项
24. 菜单后一项
22. 确认/输入
20. 菜单上一项
21. 菜单下一项
25. 进入设置模式 26. 退出到上一级菜单
13. 环绕声+&-
(4种模式)
1. 人声均衡器(开&关)
2. 夜间/动态压缩(开&关)
3. 扬声器开&关
(连接上耳机时)
7. 选择输入: Analog 1
8. 选择输入: Analog 2
9. 选择输入: Analog 3(前方)
10. 选择输入: Digital 1 12. 选择输入: Digital 3
11. 选择输入: Digital 2
4. 关闭/待机模式
H.
静音/非静音
Q.
环绕模式的指标
3 LED = 电影
2 LED = 现场/电视
1 LED = 音乐
0 LED =
立体声/旁
路R.
“iPod”/Analog
输入
(通过3.5mm连接
器,自动切换——
不管之后选择什么
输入模式都不变)
B.
开启指示器
F.
主音量+(当扬
声器中断时控
制耳机音量)
E.
主音量-(当扬
声器中断时控
制耳机音量) G.
红外线遥
控传感器
I.
来源选择
(经由输
入顺序)
C.
输入/来源
D.
音量显示
J.
检测Dolby D2.0, Dolby D5.1,
DTS, PCM, Analog
K.
开启动态压缩
(夜间模式)
L. 开启会话+
M. 立体声,音乐,现场,电
影模式
N. 均衡器预置
O. 关闭扬声器
(当使用耳机
时)
P. 热过载保护警告
J K L M N O
连接和安置
重要注意事项:
使用本操作手册之前,请根据安装指南给您的SLIMstage做所有连接和适
当的定位。
P
前方控制面板布局
遥控器布局
A.
耳机EuphonyHD环绕技术
(通过3.5毫米连接器)
目录 页码
•安全 . . . . . . . . . . . . . . . . . . . . . . . . 20
•连接和安置 . . . . . . . . . . . . . . . . . . . 22
•前面板和遥控器 . . . . . . . . . . . . . . . 22-23
1. 操作 . . . . . . . . . . . . . . . . . . . . . . . . 24
2. 调整 . . . . . . . . . . . . . . . . . . . . . . . . 24
3. 耳机 . . . . . . . . . . . . . . . . . . . . . . . . 25
4. 高级 . . . . . . . . . . . . . . . . . . . . . . . . 25
5. 设置 . . . . . . . . . . . . . . . . . . . . . . . . 26
6. 常见问题解答 . . . . . . . . . . . . . . . . . . 32
7. 发现并维修故障 . . . . . . . . . . . . . . . . 33
8. 规格 . . . . . . . . . . . . . . . . . . . . . . . . 34
9. 保修/服务 . . . . . . . . . . . . . . . . . . . . 35

24
25
简体中文
低音级别
使用遥控器来调整低音+或-。相对低音级别将在前面板上显示。用遥控器调整低音也将调
整外置低音炮的级别,例如soundmatters的SUBstage,如果它与SLIMstage连接的话。
环绕级别
使用遥控器的环绕级别按钮来增加或减少环绕音效的级别。该环绕级别将显示在前面板上
显示。
均衡器
利用遥控器上的均衡器键添加预设的均衡曲线(请看SETUP > REMOTE EQ)提供一个改变
的音调平衡。均衡器曲线在显示屏上。
输入灵敏度
模拟输出源与音频输入(比如SLIMstage)有可能搭配失谐这将导致低水平/过多噪音,
或者是过早超载/失真。参看高级设置:INPUT PARAMETERS > SENSITIVITY。
3. 耳机
使用耳机
SLIMstage EuphonyHD耳机技术提供传统耳机的个人剧院体验。通过左边面板1/8”
(3.5mm)插口连接耳机。这将关闭扬声器。按遥控器上的 键可以同时使用耳机(立体
声放音)和扬声器。运用遥控器上的H-phone vol –/+按钮调整耳机音量,而不影响扬声器
的输入。
添加一个外置低音炮
参见SLIMstage设定指南、菜单C部分和您的低音炮说明书,以优化低音炮的集成度和性
能。
添加外置后方扬声器
后方的外置扬声器可以对SLIMstage补充额外的环绕声。(参见设置菜单的ADVANCED>
REAR SURROUND)。如需更多信息,请您与当地经销商或soundmatters技术支持部门联
系。
4. 高级
RS-232控制端口
SLIMstage有一个RJ -11连接口,允许计算机或者其它外部自动控制设备通过RS - 232来控
制SLIMstage。
更多信息,请访www.soundmatters.com/support/downloads,与您的经销商或
soundmatters顾客服务联系。
过热关机保护
SLIMstage使用最先进的数字式扬声器,它能播放音乐更高音量而听起来清晰悦耳。如果
音量达到一定水平而导致过热,系统会在显示屏上显示TMP。如果温度达到损害SLIMstage
的程度,扬声器会自动关闭以保护系统和扬声器-此时PT会在显示屏上显示。当保护系统启
动,您会听到系统重复的静音和非静音。要解除保护系统,只需要降低音量。
DB-15服务端口
SLIMstage提供一个DB-15连接口。如需更多信息请联络soundmatters顾客服务。
1. 操作
开/关
开启SLIMstage只需要按下前方面板或者遥控器的任何按钮。关闭请按下遥控器的Off/
standby按钮。
OFF/standby–关闭除了红外传感器的所有组件。功率消耗小于2.0瓦特。
输入/来源选择
需要选择什么来源,只需在遥控器上按下那个键(A1,A2,A3,D1,D2,D3),或者通过
前面板的键按顺序输入。显示屏上会显示选择的来源类型。重复按前方的按键将顺序的切
换输入来源。
自动信号检测与转换
SLIMstage环绕处理技术Euphony HD可以处理几乎所有类型的信号,包括analog, Dolby
Digital 2.0, 5.1, DTS Digital Surround, DTS 96/24 或者 PCM.
SLIMstage的显示屏会显示信号是否正在接受Dolby Digital 2.0, 5.1, DTS, PCM, 或者
Analog。
在MUSIC, LIVE和MOVIE模式,SLIMstage的Euphony HD技术会自动转换所有2通道来源(比
如Stereo,Dolby 2.0,或 stereo PCM)为环绕。
环绕模式
SLIMstage的EuphonyHD提供立体声和3种不同的环绕模式,可以通过遥控器上的“surr”
模式-和+键来选择。选定的模式将在LCD显示器瞬间突出,相继在蓝色LED垂直栏显示。
No LED.... 环绕不工作..... 立体声/旁路
1 LED .......音乐模式 ...... 温和的环绕效果,理想的音乐
2 LED .......现场模式 ...... 大部分电视节目的理想环绕
3 LED .......电影模式 ...... 最高环绕–最适合动作片
除非在设置菜单中改变(看Advanced Settings – INPUT PARAMETERS>SURR MODE)
SLIMstage将开通和保留你的最后一次选定的surr模式设置,直到您选择另一种模式或来
源。
静音
要静音,请在遥控器上按下静音键。MUTE将会在显示屏上显示出来。要接触静音只需按任
意键。
夜间/动态压缩
利用遥控器上的夜间音乐键来开/关夜间动态压缩电路,从而降低动态范围(最高音和最低
音的差)以更易于避免打扰邻居或者睡觉的亲人。NIGHT在显示屏上显示。
对话+语音更清晰
使用遥控器上的Dialog+键来开启/关闭,提供额外的输出和典型的声音清晰度。当打开时
会在显示屏显示。
2. 调整
音量
调整音量,使用遥控器音量+和-,或使用前面板按钮(+和-)。
注意:如果耳机连接上,扬声器关闭了,前面板控制耳机的级别。

26
27
简体中文
A. 语言
}
操作:
选择LANGUAGE(语言),然后选择您想要的语言和按下
ENTER键
结果:
设置菜单上显示的是您选择的语言种类了。
B. 显示选择
SLIMstage在默认设置下是自动昏暗模式,大约十秒钟后会自动昏
暗。自动关闭和一直亮灯也是选择项。
}
操作:
选择DISPLAY,然后选择Auto DIM,Auto OFF或者Always
ON,然后按下Enter。
结果:
显示的设置就保存了。
C. 房间设置
调整房间设置的基本参数以达到最佳性能
}
操作:
选择ROOM然后按下ENTER键
结果:
显示待选择的设置菜单选项
调整收听距离
}}
操作:
选择收听距离DISTANCE然后按下ENTER键
}}}
操作:
选择你想要的距离然后按下ENTER键
结果:
收听距离保存了,菜单自动回到ROOM设置菜单。
设置左/右环绕平衡
}}
操作:
选择环绕平衡SURRBALANCE然后按下ENTER键。
结果:
环绕平衡SURRBALANCE显示。
}}
操作:
选择您所需的设置,并按ENTER键。
结果:
经修改的平衡将被设置。
提示:如果有一边的收听区域(左边或者右边)在听觉上更加“生动”
(比方说,玻璃或者坚硬反射性表面),您可能会想把那边区域的平衡
设置成“呆板”一些(例如,窗帘,打开门窗等)。
调整SLIMstage默认房间均衡器参数
改变SLIMstage频率平衡安置、室内声学和收听体验。
}}
操作:
选择房间均衡器EQ,按下ENTER。
结果:
10个频率均衡器将显示。
}}}
操作:
移动每个滑块至期望水平并且按下ENTER。
结果:
频率设置将会以默认均衡器响应。
提示: 房间均衡器调整均衡器的所有输入。在高级设置每个输入的均衡
器都可以生成。重置输入均衡器至房间均衡器设置,重置输入至原厂默
认设置。
设置中声道级别
调整中声道级别以最优化声音
}
操作:
按下ENTER
结果:
1.显示中声道级别LEVEL的范围。
2.默认输出水平会显示。
}}
操作:
选择需要的中声道级别按下ENTER
结果:
级别将被保存.
D. 外置低音炮
设置低音炮输出参数
在SLIMstage中控制外置低音炮。
}
操作:
设置外接低音炮的音量至最大和分频频率至最大值,相位
调到零。
提示: 外置部件与主系统音速集成,需要在分频与级别上进行调整。
低音炮 是 / 否
}}
操作:
当低音炮连接上时,选择YES按下ENTER以获取更好的
声音效果。
低音炮输出级别
调整外置低音炮的输出级别,以配内部低音炮输出平稳结合。
}}
操作:
1.按ENTER键
结果:
1.显示低音炮级别范围
2.输出默认级别将显示
}}}
操作:
选择您想要的低音级别然后按ENTER
结果:
级别将保存.
提示: 遥控器上的低音
+/–
同时调整内置低音和外置低音的级别。
超低频分频
分频已经预先设定与内置低音炮磨合转换。
}}
操作:
选择您需要的分频频率设置,按下ENTER
结果:
选择的分频将保存
提示:尽可能的将分频值设置低。
选择低音炮的相位
调整低音炮的相位与场所相匹配.
}}
操作:
选择您需要的相位度数,按ENTER
结果:
低音炮相位将保存。
提示:如果您的外置低音炮有相位调整器,将它调整到
0°
,这样就
不影响SLIMstage的相位设置。
SETUP
LANGUAGE
DI SPL AY
ROOM
SUBWOOFER
EQ REMOTE
ADVANCED
ROOM
DISTANCE
SURR BALANCE
EQ
CENTER CHANNEL
SETUP
LANGUAGE
DISP L AY
ROOM
SUBWOOFER
EQ REMOTE
ADVANCED
SETUP
LANGUAGE
DI SPL AY
ROOM
SUBWOOFER
EQ REMOTE
ADVANCED
SETUP
LANGUAGE
DI SPL AY
R OOM
SUBWOOFER
EQ REMOTE
ADVANCED LEVEL
–10 ……... 0 ……… 10+
PH ASE
0 ........ 90 ........ 180o
LANGUAGE
DEUTSCH
ESPANOL
ENGLISH
FRANCAIS
ITALIANO
LEVEL
–10 ……... 0 ……… 10+
DI SPL AY
DIM
OFF
ON
SUBWOOFER
YES / NO
LEVEL
XOVER
PHASE
SUBWOOFER
YES / NO
LEVEL
XOVER
PHASE
SUBWOOFER
YES
N O
SUBWOOFER
YES / NO
LEVEL
XOVER
PHASE
SUBWOOFER
SUBWOOFER
LEVEL
XOVER
PHASE
ROOM
D ISTANCE
SURR BALANCE
EQ
CENTER CHANNEL
XOVER
250HZ 190HZ 143HZ
110HZ 82HZ 62HZ
43HZ
DISTANCE
< 2 M
> 2 M
SURR BALANCE
L R
10 ……... ! ……… 10
ROOM
DISTANCE
SURR BALANCE
EQ
CENTER CHANNEL
ROOM
DISTANCE
SURR BALANCE
E Q
CENTER CHANNEL
EQ RESET
5. 设置菜单
当SLIMstage即插即用准备好时,设定菜单允许您对SLIMstage声波和功能上
进行微调以达到您需要的效果。
1.按SETUP按钮访问设置菜单(或离开设置模式)。
2.使用远程遥控来浏览并选择菜单项。
3.在任何时候按EXIT按钮回到上一级菜单。

28
29
简体中文
E. 遥控器上的遥控均衡器
遥控器上有均衡器按键,设置这个均衡器
设计一个均衡器用于自己喜爱的节目,比如动作片,新闻或者古
典音乐。只需要按遥控器上的均衡器EQ键,即可激活自己设定的
均衡器。
}}
操作:
选择EQREMOTE然后按ENTER。
结果:
10个频率均衡器将显示出来。
提示: 均衡器的调整是实时进行的,所以在您播放您喜爱的
节目的时候做调整。
}}}
操作:
滑动每一个滑块到您想要的级别,按ENTER
结果:
设置好了均衡器设置菜单将回到主菜单。
}}
操作:
按EXIT键。
结果:
退出设置菜单
–或者–
}}
操作:
选择ADVANCED高级设置,按ENTER。
结果:
显示高级设置选项。
F. 高级设置
设置默认输入
SLIMstage总是在关机/开机之后回到默认的输入设置。
}}
操作:
选择DEFAULTINPUT按ENTER
结果:
显示所有可用的输入和最后选定。
提示: LAST SELECTED是标准的工厂设置。
}}}
操作:
选择你需要的默认输入DEFAULTINPUT按ENTER。
结果:
显示新的默认输入和回到高级设置菜单。
设置每一个输入的参数
微调您的每一个输入的特征。
}}
操作:
选择INPUTPARAMETERS,按ENTER
结果:
显示屏显示的可使用输入为输入参数的选择。
选择输入更新
}}
操作:
选择您需要的输入按ENTER
结果:
显示输入设置选项
注释: 灵敏度和输入均衡器是适时调整的,所以在您播放音乐或者电
影时对正在使用的输入进行调整。
输入灵敏度调整
可以调整模拟输入A1,A2,A3的输入灵敏度水平。此外,模拟A2
有一个–20dB的衰减器,它可以用于转换扬声器的电平输出。
}}
操作:
选择SENSITIVITY
结果:
显示灵敏度选项
选择环绕模式 (立体声, 音乐, 现场, 或者电影)
作为播放处理的默认环绕
}}
操作:
选择SURRDEFAULT,按ENTER
结果:
显示环绕选项。
}}}
操作:
选择您想要的默认环绕模式,按ENTER
结果:
SLIMstage在开启时总会使用您选择的默认输入模
式。
提示:
1. 环绕模式中,音乐模式是最精细的,电影模式是最有立体感的。
2. 您可以通过遥控器选择任何模式。
设置输入均衡器
可以独立设置每个来源的默认输入均衡器,而不推荐多个应用。如
果您选择使用输入均衡器,房间均衡器的功能将丧失,而均衡器的
每个输入需要单独设置。
}}
操作:
选择EQ,按ENTER
结果:
10个频率均衡器将显示出来
}}}
操作:
滑动每一个滑块到您想要的级别,按ENTER
结果:
设置选择的输入的均衡器,均衡器设置被保存,当
重新选择这个修改的输入模式,均衡器设置不变
注释: 不使用输入均衡器而且要恢复房间均衡器,选择重置输入或者重
置全部到原厂默认设置即可。
隐藏输入
隐藏输入是指,如果您在前方面板上的来源键选取输入选项,将跳
过这个隐藏的输入。同样地,如果在遥控器上选取来源,将不会有
任何回应。
}}
操作:
选择隐藏输入HIDE,按ENTER
结果:
显示隐藏输入选项
}}}
操作:
选择HIDE或者SHOW,按ENTER
结果:
如果选择了隐藏,这个输入将丧失功能并写不能用
遥控器来选择它。
警告: 小心这个操作…如果您隐藏了这个输入, 它将消失,除
非您在输入参数选项中设置“取消隐藏”或者恢复所有设置到
原厂默认设置。
恢复输入设置到原厂默认设置
恢复原厂默认设置将解除这个输入模式之前做的任何调整。
}}
操作:
选择RESETINPUT(原厂默认)按ENTER
结果:
恢复输入选项将显示。
}}}
操作:
选择YES或者NO。
结果:
如果选择YES,这个输入的原厂默认设置将恢复。
外置后方通道输出
连接外置后方扬声器到SLIMstage可以增强环绕效果。当连接耳机之
后,后方输出将不工作。
提示:添加
MAINstageHD
作为外置后方通道, 用3.5mm立体音频线将
MAINstageHD
连接到
SLIMstage
的A1.
SETUP
LANGUAGE
DI SPL AY
ROOM
SUBWOOFER
EQ REMOTE
ADVANCED
A2
SENSITIVITY
SURR DEFAULT
EQ
HIDE
RESET INPUT
A2
SENSITIVITY
SURR DEFAULT
E Q
HIDE
RESET INPUT
A2
SENSITIVITY
SURR DEFAULT
EQ
H I DE
RESET INPUT
A2
SENSITIVITY
SURR DEFAULT
EQ
HIDE
RESET INPUT
A2
LIVE
MOVIE
LAST SELECTED
STEREO
MUSIC
A2
HIDE SHOW
A2
YES N O
SETUP
LANGUAGE
DI SPL AY
ROOM
SUBWOOFER
EQ REMOTE
ADVANCED
ADVANCED
DEFAULT INPUT
INPUT PARAMETERS
REAR
IR
LOCK
VERSION
RESET
ADVANCED
DEFAULT INPUT
INPUT PARAMETERS
REAR
IR
LOCK
VERSION
RESET
A2
SENSITIVITY
SURR DEFAULT
EQ
HIDE
RESET INPUT
DEFAULT
LAST SELECTED
A1
A2
A3
D1
D2
D3
INPUT
A1
A 2
A3
D1
D2
D3
A2
–5……… 0 ………5+
ATTEN: –20DB
ON OFF
EQ RESET
A2 RESET
创建扬声器电平输入
只有A2输入能接受扬声器电平信号,而且开启A2灵敏度的电
平连接。
注释:您将需要将扬声器电线换成立体声mini-jack电缆。如
有问题请联系客户支持。
ADVANCED
DEFAULT INPUT
INPUT PARAMETERS
R E AR
IR
LOCK
VERSION
RESET
REAR
T YPE
LEVEL

30
31
简体中文
选择后方扬声器类型
}}
操作:
选择REAR通道菜单选取您想要的项,按ENTER.
结果:
后方通道输出将最优化以支持后方扬声器类型的连接。
外置环绕级别
调整外置后方环绕扬声器的输出级别。
}}
操作:
选择LEVEL按ENTER.利用熟悉的环绕来源,调整后方级
别,按ENTER
结果:
选取的后方级别变成默认值。
选择红外传感器
SLIMstage可以通过前方红外传感器,或者可选择的用后方红外传
感器,或者用RS-232端口来控制。
红外传感器通常是前方的。如果通过RS-232端口(包括如果连接RF
遥控适配器)来控制,或者连接另一台SLIMstage作为外置后方通
道(为了防止您的红外遥控同时控制两台SLIMstage),则选择后
方红外传感器。
}}
操作:
选择IRSENSOR,按ENTER.
结果:
红外传感器选项将显示。
}}}
操作:
选择FRONT或者REAR,按ENTER
结果:
如果选择后方,待确认菜单将显示。
重要事项: 要恢复到前方红外传感器,同时按MUTE键和SOURCE键2
秒钟。
}}
操作:
选择CONFIRM或者CANCEL.
结果:
红外传感器将切换到后方。前方传感器将立即停止工
作。
提示: 如需连通性信息和程序指令,请登陆Soundmatters网站。
锁定设置
防止设置被意外改变。
}}
操作:
选择LOCK设置,按ENTER。
结果:
显示锁定菜单。
}}
操作:
选择CANCEL或者LOCK,按ENTER
结果:
设置将加亮。
结果:
设置将被锁定。
要解除锁定设置,在遥控器上连续的按SETUP
, ,
EXIT键。
版本
版本显示您的SLIMstage的型号,序列号,电子版本和软件版本这些
重要信息。
}}
操作:
选择VERSION,按ENTER.
恢复所有设置到原厂默认设置
恢复所有设置选项到原厂默认位置。
}}
操作:
选择RESET,按ENTER.
结果:
复位选项将显示
}}}
操作:
选择YES或者NO,按ENTER
结果:
如果选择是,所有设置将恢复到原厂默认状态。
按EXIT键,回到上一级菜单
再按EXIT键,退出设置菜单
ADVANCED
DEFAULT INPUT
INPUT PARAMETERS
REAR
IR
LOCK
VERSION
RESET
ADVANCED
DEFAULT INPUT
INPUT PARAMETERS
REAR
IR
LOCK
VERSION
R E SET
ADVANCED
DEFAULT INPUT
INPUT PARAMETERS
REAR
IR
LOCK
VERSION
RESET
ADVANCED
DEFAULT INPUT
INPUT PARAMETERS
REAR
I R
LOCK
VERSION
RESET
IR SENSOR
RECOVERY PRESS MUTE AND
SOURCE BUTTON AT THE SAME TIME
FOR 2 SECONDS
CONFIRM CAN CEL
LOCK
TO UNLOCK PRESS SETUP,
SPEAKER, EXIT BUTTON
CANCEL LOCK
RESET
MASTER RESET TO FACTORY DEFAULT?
YES N O
VERSION
MODEL: 40
ELECTRO: 1.00
SW: 1.0.0/1.0.0
SERIAL #: S1035000025
IR
FRONT REAR
TYPE
SLI MSTAGE
MAINSTAGE HD
L & R SPEAKER
REAR
TYPE
LEVEL
LEVEL
–10 ……... 0 ……… 10+

32
33
简体中文
6. 常见问题解答
有关最新的常见问题解答访问我们的网站www.soundmattters.com
Q1. 如何在房间定位/安置SLIMstage,以获得最佳声音效果?
如果能够注重SLIMstage的摆放位置使得它的功能都发挥出来,比如所有的扬声器,那将达
到最佳效果。
最佳高保真:使用可倾斜的脚座或者墙上支架将SLIMstage固定在听众的正前方。如果放在
柜子里,尽量的摆放在靠边上使其有广阔的空间。
最佳环绕:所有的环绕系统都有一个“最佳视听位置”,它的环绕效果最好,这个区域的
大小取决于您与SLIMstage的距离…如果您的收听距离小于9英尺(274cm),请在设置菜单
中重设距离位置。
最佳低音:任何扬声器放置在越坚固的墙面,它的低音就越强。SLIMstage倚放在越坚固的
表面,低音也越强。很少的低音会浮动在房间的中央。多数的低音会在房间的角落或者天
花板。此外,由于内置低音炮朝下,就必须留有适当的空间(大约至少3/4英寸)来让低音
释放到房间。
Q2. 一个如此小的音响却有如此好的低音…但是我希望有更高的低音!我可以加一个外置
低音炮吗?
可以的,SLIMstage有一个外置低音炮输出连接口可以连接SUBstage™,或者其它高质量hi-fi
低音炮。SLIMstage的输出连接口是1/8” mini-jack,所以如果您不是用我们的SUBstage,您
需要一根1/8” stereo mini toRCA音频线来连接外置低音炮(包括连接到SUBstage)。
Q3. 我喜欢SLIMstage,但是我想要更大的音量?
以下方法供您选择–添加一个外置扬声器,比如SUBstage(或者两个),或者添加另
外一个SLIMstage在后面作为后通道,或者升级为更大尺寸的SLIMstage。如果您的音量
问题只是效果来源问题,那您可以增大连接输入的灵敏度(参看设置菜单的ADVANCED>
INPUT PARAMETERS> SENSITIVITY)。
Q4. 我只有一个遥控器如何控制SLIMstage和电视?
SLIMstage的遥控功能很容易匹配于大多数智能遥控器。SLIMstage的音量也可以由电视遥
控器来控制,还可以在有线/卫星遥控器上输入Denon®音频编码后控制音量。如果使用电
视遥控器请参看说明书。
Q5.为了能把SLIMstage与我的高级智能遥控器或者家庭自动系统结合起来使用,我需
要“离散编码”,我应该如何找到?
SLIMstage的离散红外编码可以在www.soundmatters.com的下载区域查看。
Q6.当我去国外旅游时我可以使用SLIMstage吗?
SLIMstage利用高功率版本的笔记本电脑的电源适配器,设计成适合于全世界大部分家庭的
电压:95–240Vac,50/60Hz。请使用符合出口地要求的电源线插座连接到电源适配器上。
Q7. 您是否推荐SLIMstage使用电涌保护器?
SLIMstage跟其它电子产品一样,最好得到电涌保护器的保护。
Q8.SLIMstage是否会自动进入节能模式或者需要手动进入?
SLIMstage需要通过按遥控器上的OFF/standby键来关闭。系统会在输入来源没有信号的情
况下,2分钟后进入节能模式。
Q9.将正常模式下切换成Dialog+模式,有时候能听到很大的区别,有时候却感觉不到区
别,为什么?
有许多可能的原因。当您把低音的级别调到最高,这可能掩盖对话的增强。当然,有些节
目是没有对话的,所以在这种情况下,您会听到很小区别或根本没有差别。
7. 发现并维修故障
1. 问题: 没有声音。
解答:
a.检查播放来源是否开着或者正在播放(例如,DVD或TV)。
b.如果连接了耳机,确认扬声器没有关。
c.交流电线连接到了交流电源和SLIMstage的电源适配器上…而电源适配器的接口连接
到SLIMstage后面的电源接口上了?
d.SLIMstage的音量有开吗?
e.在SLIMstage上按source键或者通过遥控器来选择运行中的输入来源。
2. 问题: 我选择了输入来源,但是显示屏上没有显示出来
解答:
a.这个输入被“隐藏”了…参见设置菜单中的Input Parameters> Hide Input。
3. 问题: 低音不够
解答:
a.通过遥控器提高低音级别
b.在设置菜单中提高低音级别
c.参见常见问题中的Q1,如何放置SLIMstage会影响低音效果。
d.增加一个SUBstage低音炮!
4. 问题: 听不到环绕效果或者环绕效果不够
解答:
a.确认您在用音乐、现场或者电影模式(非立体声模式)。电影模式下有最大的环
绕。
b.确认您聆听的位置与SLIMstage的垂直面成45度,称之为“最佳视听位置”
c.确认设置了播放来源的EQ和环绕模式或者关闭了其它来源。
d.参见常见问题中的Q1。
e.在房间添加动力扬声器。
5. 问题: 无法用遥控器操作
解答:
a.确认遥控器的电池有电
b.恢复到前方红外传感器,同时按住MUTE和SOURCE键2秒钟。
6. 问题: 失真的声音
解答:
a.确认所有连接到SLIMstage的来源的DSP/环绕/声音增强模式都关闭了。
b.确认灵敏度的设置不会太高导致输入过载。
7. 问题: 系统好像锁定了
解答:
a.SLIMstages电路包含一个强大的微处理器。如果单位不正常反应,只需简单的拔掉
壁装电源插座15秒然后插回去重启内置计算机就会正常运行。

34
35
简体中文
8. 问题: 显示屏显示TMP或者PT系统会静音或关机
解答:
a.电路的过热保护启动...调低音量。
9. 问题: 音量不够
解答:
a.如果可以,提高您使用的输出来源的音量
b.提高输入灵敏度,参见菜单高级设置部分的Sensitivity Adjustment。
10.问题: 连接有线电视机顶盒但是没有声音
解答:
a.由于一些电缆盒的数字输出,甚至模拟音频(红/白RCA)音频连接都是虚拟的。请与
您的电缆供应商确认电缆盒的真实输出。
b.如果用数字输出有线电视机顶盒,您会发现它只在高清晰度电视(HDTV)频道工作,
访问其它音频,您将需要连接模拟音频输出,然后在SLIMstage选择正确的输入。
11.问题: 光缆不合适
解答:
a.确认移除了光缆接口上的保护盖。
b.一些配件市场的光缆连接口可能过大导致无法匹配。
12.问题: 无法访问设置菜单
解答:
a.设置被锁定了,请在遥控器上连续按SETUP, ,EXIT键解锁。
8. 规格
SLIMstage 5.1环绕音效控制台
•环绕算法:Euphony™HD解码Analog, PCM, Dolby Digital 2.0/5.1, DTS Digital Surround, DTS
96/24
•解码5.1声道:Dolby Digital, DTS Digital Surround, DTS 96/24
•解码2.0声道:Dolby Digital, PCM
•2-声道到5-声道的转换:Euphony™HD
•电力:D类扬声器(总谐波失真有效值小于0.8%)
SLIMstage30–附属设备80W,低音炮60W
SLIMstage40–附属设备80W,低音炮90W
SLIMstage50–附属设备80W,低音炮130W
•SPL@1m的最大值:
SLIMstage30–103dB
SLIMstage40–106dB
SLIMstage50–109dB
•主扬声器:
SLIMstage30–4个50x50mm取得专利的LMDNeo-sandwich磁体
SLIMstage40–4个50x50mm取得专利的LMDNeo-sandwich磁体
SLIMstage50–4个50x50mm取得专利的LMDNeo-sandwich磁体
•低音炮排列:
SLIMstage30–2个低音炮排列*
SLIMstage40–3个低音炮排列*
SLIMstage50–4个低音炮排列*
*每个排列包括一个取得专利的LMD Neo-sandwich 3˝主磁体低音喇叭加上两个3”副低音喇叭
•电源:Digital,95–265Vac,50/60Hz,36V
•输入(6)
Analog 1 –stereo 1/8” (3.5mm)
Analog 2 – stereo 1/8” (3.5mm) 可以用到扬声器级别的20dB衰减
Analog 3 – stereo 1/8” (3.5mm) 在前方面板,具有优先选择
Digital 1 – SP/DIF coax
Digital 2 – Optical / TosLink
Digital 3 – Optical / TosLink
•输出(3)
Analog:外置低音炮输出–stereo 1/8” (3.5mm)
Analog:耳机(Euphony Virtual Surround) –stereo 1/8” (3.5mm)后声道输出
•附件
红外遥控起
带有电缆的电源适配器
EZ-tilt™脚座与增高垫
墙上支架与安装附件
1条–3m光纤电缆
1条–3m 1/8˝ mini phone jack电缆
1条–3m1/8˝ mini phone jack to male stereo RCA 电缆
1条–3m数字同轴RCA电缆
•控制
控制,耳机音量(红外与前方面板都能控制)
低音炮级别(只能红外控制)
来源选择,静音(红外与前方面板都能控制)
环绕/立体声(只能红外控制)
•模式:开机,静音,关闭/待机
•关闭/待机模式耗电:小于等于2W
•重量:
SLIMstage 30 – 16.5 磅(7.5 kg)
SLIMstage 40 – 19 磅(8.5 kg)
SLIMstage 50 – 21 磅(9.5 kg)
•尺寸:
SLIMstage 30(宽x高x深)–31.1” x 3.5” x 3.7” (790 x 88 x 93mm)
SLIMstage 40(宽x高x深)–39” x 3.5” x 3.7” (990 x 88 x 93mm)
SLIMstage 50(宽x高x深)–47.5” x 3.5” x 3.7” (1206 x 88 x 93mm)
包含EZ-tilt脚座的高度都是–4.4” (112mm)
包含EZ-tilt脚座与增高垫的高度都是–5.2” (132mm)
包含墙上支架的深度都是–5” (127mm)
soundmatters认为产品会不断改善,因此,规格如有变更,恕不另行通知。
9. 保修/服务
如果您需要获得免费维修服务,需要满足以下两个条件.
1.将原始收据保存在一个安全的地方。提供收据的副本可活得保修服务
2.确认您的经销商在产品的收据上写有日期,型号,和序号(如果可用)。单独保存购买
信息在一个安全的地方,以给自己一个额外的保障。如果您的收据不知道放到哪里去
了,您的经销商也许可以提供一份副本。
现在花点时间读您的保修期限。
当邮递产品去维修:
•发邮件或者致电soundmatters咨询邮寄的合适地址和退料审查(RMA),返还具有日
期,产品型号和序号(如果可用)的产品收据副本。您需要在运输标签上填写了退料审
查(RMA)号码后,邮寄到soundmatters服务部。
•请使用原始的产品包装材料包装好进行邮寄。
•避免通过邮局进行邮寄。如果只能通过邮局邮寄,请将包裹挂号和买保险。
Soundmatters有限保修
•soundmatters international, inc. (soundmatters)只对原始消费者购买的说明书上描述的产
品进行保修,在购买后的两年内,对产品元件和做工有问题的可以免费更换。
•soundmatters只提供以下免费保修:零件,维修费用,在维修期内出现的故障。这个产品
的保修证是唯一的,其它保修证都对此产品无效。
保修/服务
下一页继续

36
37
简体中文
•soundmatters或者经授权的经销商不对间接的,偶然的,或相应的损害赔偿负责,间接
的,偶然的,或相应的损害赔偿.在某些地区,不允许对于事故及其后果所造成的损失
加以排除和限制,所以在这些地区,不适用于这些除外条款。此保证赋予您特定的合法权
益,根据地区的不同,您可能还享有其他权利。
本项保证限于:
• 从 soundmatters授权的零售商购买产品。soundmatters应要求将供应授权经销商名单。
为了得到服务您必须:
•退回产品,预付运费,邮寄到购买处的soundmatters经销商,soundmatters授权的独立
服务机构,soundmatters授权的国际分销商,或者是soundmatters。如有需要,您可致电
soundmatters客户服务部咨询您当地的授权的独立服务机构的名称和地址。
•以原始收据的副本形式提供购买证明,产品的收据上必须写有日期,型号,和序号(如
果可用)。
此保修证不包括:
•由于使用不当,滥用,事故(包括进水导损坏),错误连接设备,或者将产品与不适合的
设备一起使用导致的损坏。
•购买了超过30天后出现的外观缺陷。不适当的处理导致的外观损失也不能保修。
•产品用于商业目的。
•移除或者重新安装产品的费用。
•当邮寄去维修部途中导致的产品损坏。参见上文有关邮寄程序的信息。
保修证将无效,如果:
•产品标识或产品序号标签被移除或污损,不管什么原因导致。
•产品被其他人保养或者维修过,而非soundmatters或者soundmatters授权的经销商或者服
务代理。
保修信息联系:
soundmatters international, inc
reno, nv 89501
电话:775 981 1460
在美国800-698 SOMA (7662)
邮箱:[email protected]
网站:www.soundmatters.com
“杜比”,“Dolby”和双 D 标志是 Dolby Laboratories 的商标。
由以下美国专利号授权制造:
5,451,942; 5,956,674; 5,974,380; 5,978,762; 6,487,535
和美国与全球的其它专利发证与审查
DTS和DTS Digital Surround是DTS, Inc的注册商标
DTS logos和Symbol是DTS, Inc的商标。
© 1996-2007 DTS, Inc. 版权所有.
EUPHONY HD是DiMAGIC Co. Ltd的商标
Soundmatters是Soundmatters International Inc.的商标。

38
39
繁體中文
安全注意事項
謹慎-觸電的危險-不要開啟
1.閱讀說明書 – 在操作產品之前應該閱讀所有安全與操作說明.
2.妥善保存這些說明書 – 安全與操作說明書,應予以保留,以供日後參考.
3.注意所有警告標誌 – 注意所有產品上及用戶指南內的警告標誌.
4.遵循所有使用說明 – 所有操作與使用都應該遵循說明書.
5.為減少起火或觸電的風險,請不要暴露這台機器在雨中或者潮濕的地方 – 該產品不
能在靠近水的地方使用 – 例如,靠近浴缸, 洗臉盆,廚房水槽,洗衣房,浴缸,在一個
潮濕的地下室,或附近的游泳池等等.該機器不能暴露在有水滴或有水賤出的地方,不
能在上面放置盛有液體的器具,如瓶子.
6.要求用幹布清潔.
7.不要堵塞任何通風口.根據廠商要求安裝 – 為保證產品可靠操作,防止過熱,應把
產品置於適當通風的地方.如不要把產品放在床上,沙發上或類似通風不良的地方.不
要把產品放在與通風不暢的書架或櫃子等類似的地方.
8.不要放置在任何熱源旁,如散熱器,熱記錄器,電爐或產生熱量的其他電器(包括功
放).
9.不要破壞極性或接地插頭安全性.極性插頭具有兩個金屬片,一個略微寬一些.接地
插頭有兩葉片和一插腳.它們能保證您的安全.如果提供的插頭不能插入插座,請讓電
工換插座.
10.電源線和電源適配器 - 只使用產品製造商所提供的電源線和電源適配器.
不要把電源線纏繞在電源適配器上或者別的物體上.如果那樣做可能會導致電源線磨
損或者裂開.這樣子會對安全性造成威脅.
請小心使用及處理電源線,這樣就不會踩到或者被絆倒,或者被物體緊壓著.
從液體中對電源適配器和電源線的保護.例如,不要把電線或電源適配器放到水槽,浴
缸,廁所的附近,也不要放到用清潔液清潔的地板上.液體可造成短路,尤其是如果電線
或電源適配器一直被誤用.液體也可以漸漸的腐蝕電源線的插口或者電源適配器的插
口,那樣會最終導致過熱.
始終確保所有電源線連接器的安全和完全插入到插座.
如果電源適配器或者插口上有顯示腐蝕現象或者顯示過熱的跡象(如變形,塑膠),請
不要使用.
如果電源線的兩端顯示腐蝕或過熱跡象,或者電線出現被破壞現象,請不要使用.
11.僅使用廠商規定的附件.
12.僅與廠商指定或與電器一同售出的推車,架子,三腳架,支架或桌子一
起使用.推動小車/電器時謹防翻倒.把產品放置在不穩定的位置,如不
穩定的購物車,支架或桌子,可能會導致產品跌下,對兒童或成人造成了
嚴重的傷害,並嚴重損害產品.
13.雷電或長時間不使用時請拔掉電源以防止損壞產品.
14.需要維修請向專業服務人員求助.當電器損壞,如電源線或插頭損壞,液體溢出或物
體掉入電器中,電器暴露於潮氣或雨中,不能正常操作或摔落時.
15.產品的電源需要使用指定商標的類型.如果您不清楚您家中的電源適配器的類型,
參考您的產品經銷商或者當地的電源適配器公司.如想用電池或者其他來源給產品供
電,請參考操作說明書.
16.超載 – 為降低火災或觸電危險,應防止牆上插座、延長繩線及整體電源插座超
載.
17.物體或液體落入產品內 – 不要讓物體或液體通過空隙落入產品內,它們可能接觸
危險電壓或短路部分從而導致火災或觸電.只調整使用說明書所涵蓋的遙控操作,如果
不正確的使用別的遙控器來調整,可能會導致損壞,這樣將需要合格的技術員花大量工
作來恢復本產品,使其正常運作.
18.更換零件-當需要更換零件,請務必讓服務技術員使用指定的製造商或具有相同的
特徵的零件代替原零件.擅自改換可能會導致火災,觸電或其他危險.
19.本產品的任何服務或維修完成後,要求服務技術員執行安全檢查,以確定該產品具
有適當的操作條件.
20.不要嘗試自己維修本產品,打開或者移動蓋子可能讓您受到電壓危險或者其他危
險.所有維修工作請交給合格的服務人員.
21.牆上支架的安裝–查閱安裝支架製造商的說明書;確認支架將SLIMstage固定安穩
和牆壁上的釘擰緊使得本產品工作時不會動搖鬆散.
警告 為減少起火或觸電的風險,不暴露這台機器在雨水或潮濕處.
Other manuals for SLIMstage 30
1
This manual suits for next models
2
Table of contents


