Soundoff Signal Armada A300 User manual

DE2-EAMSAA100 0519 Pg. 1
1.800.338.7337 / www.soundoffsignal.com
DE2-EAMSAA300 A300 SIREN
IMPORTANT NOTICE TO INSTALLER:
Make sure to read and understand all
instructions and warnings before proceeding
with the installation of this product. Ensure
the manual and all warning cards are
delivered to the end user of this equipment.
TECHNICAL SPECIFICATIONS
Overall Dimensions: 1.8” H x 5.7”W x 6.3”D
Input Voltage: 10 - 16Vdc (negative ground)
Operating Temperature: -30°C to +65°C
Siren
Operating Current 8 Amps @ 13.6 VDC
(100W Speaker)
Standby Current: <35mA
Output Voltage
:
Max 100W @ 12VDC
Lightning 1: 10A Maximum
Lightning 2: 10A Maximum
!
WARNING
Sirens produce loud sounds that
may damage hearing:
- Roll up windows.
- Wear hearing protection.
- Use only for emergency response.
- Avoid exposure to siren sound
outside of vehicle.
Introduction
A wide range of features comes standard
with Armada® A300 series siren. Included
are four basic siren tones: Wail, Yelp, Hi-Lo
and PHSR. PA, manual and air horn sound
with siren override.
The Armada A300 siren includes a
permanent noise-canceling microphone that
produces high quality voice reproduction
without feedback squeal, and the
microphone’s push-to-talk switch will
override any siren tone for instant PA use.
This series of sirens can provide 100 watt
output and will meet or exceed SAE J1849
and Class A requirements for sound when
paired with an Armada high-power speaker.
Features
•High reliability with durable switching
•External PA gain control
•Full featured siren in a compact package
•Built-in noise-cancelling microphone
•Easily accessible fuse protection
•Meets Class A sound output requirements
•Two level Lighting Controls
•HIGH CURRENT interconnects must be properly terminated. Poor crimp quality can cause heat
build-up and re. Follow crimp connector manufacturer instructions.
•DO NOT install this product or route any wires in the Air Bag Deployment Zone. Refer to vehicle
Owner’s Manual for deployment zones.
•Do NOT use system to disconnect headlights, brake lights or other safety equipment.
•Unit may become hot to touch during normal operation.
•Failure to properly install connectors, fuses or wiring may cause vehicle failure or re.
•Installation must only be performed by trained technician. Installer must determine vehicle wiring
conguration and proper integration of system.
•Use proper wire gauge. All power wires connecting to positive (+) or negative (-) battery terminal
or local chassis ground (-) must be sized to supply at least 125% of max. current and properly fused at
power source.
•Install protective grommets when routing wire through rewall or metal.
WARNING
NOTICE:
Installers and users must comply with all applicable federal, state and local laws regarding use and installation of warning devices.
Improper use or installation may void warranty coverage. To review our Limited Warranty Statement & Return Policy for this or any SoundOff Signal product, visit our website at
www.soundoffsignal.com/sales-support. If you have questions regarding this product, contact Technical Services, Monday - Friday, 8 a.m. to 5 p.m. or after hours 5 p.m. to 8 p.m. EST
at 1.800338.7337 (press #4 to skip the automated message). Questions or comments that do not require immediate attention may be emailed to [email protected].
SUPERIOR CUSTOMER RELATIONSHIPS. SMARTLY DESIGNED LIGHTING & ELECTRONIC SOLUTIONS.
WARNING
!
Do not install this product or route its wires in
the air bag deployment area.
Doing so may cause damage to or reduce
effectiveness of the air bag, or create projectile
that could cause serious injury or death.
To determine air bag deployment area refer to
vehicle manufacturer's manual.

DE2-EAMSAA100 0519 Pg. 2
1.800.338.7337 / www.soundoffsignal.com
DE2-EAMSAA300 A300 SIREN
INSTALLATION
MOUNTING
The Armada® A300 siren may be mounted above the dash, below
the dash, on a tunnel or in a rack with the mounting bracket and
the hardware supplied. Ease of operation and convenience to the
operator should be the prime consideration when mounting the siren
and controls.
Install the siren on the bracket using the M6x12 bolts and M6 at
washers & spring washers supplied.
NOTE: Longer bolts will prevent removal of the chassis from the
cover and may damage internal components.
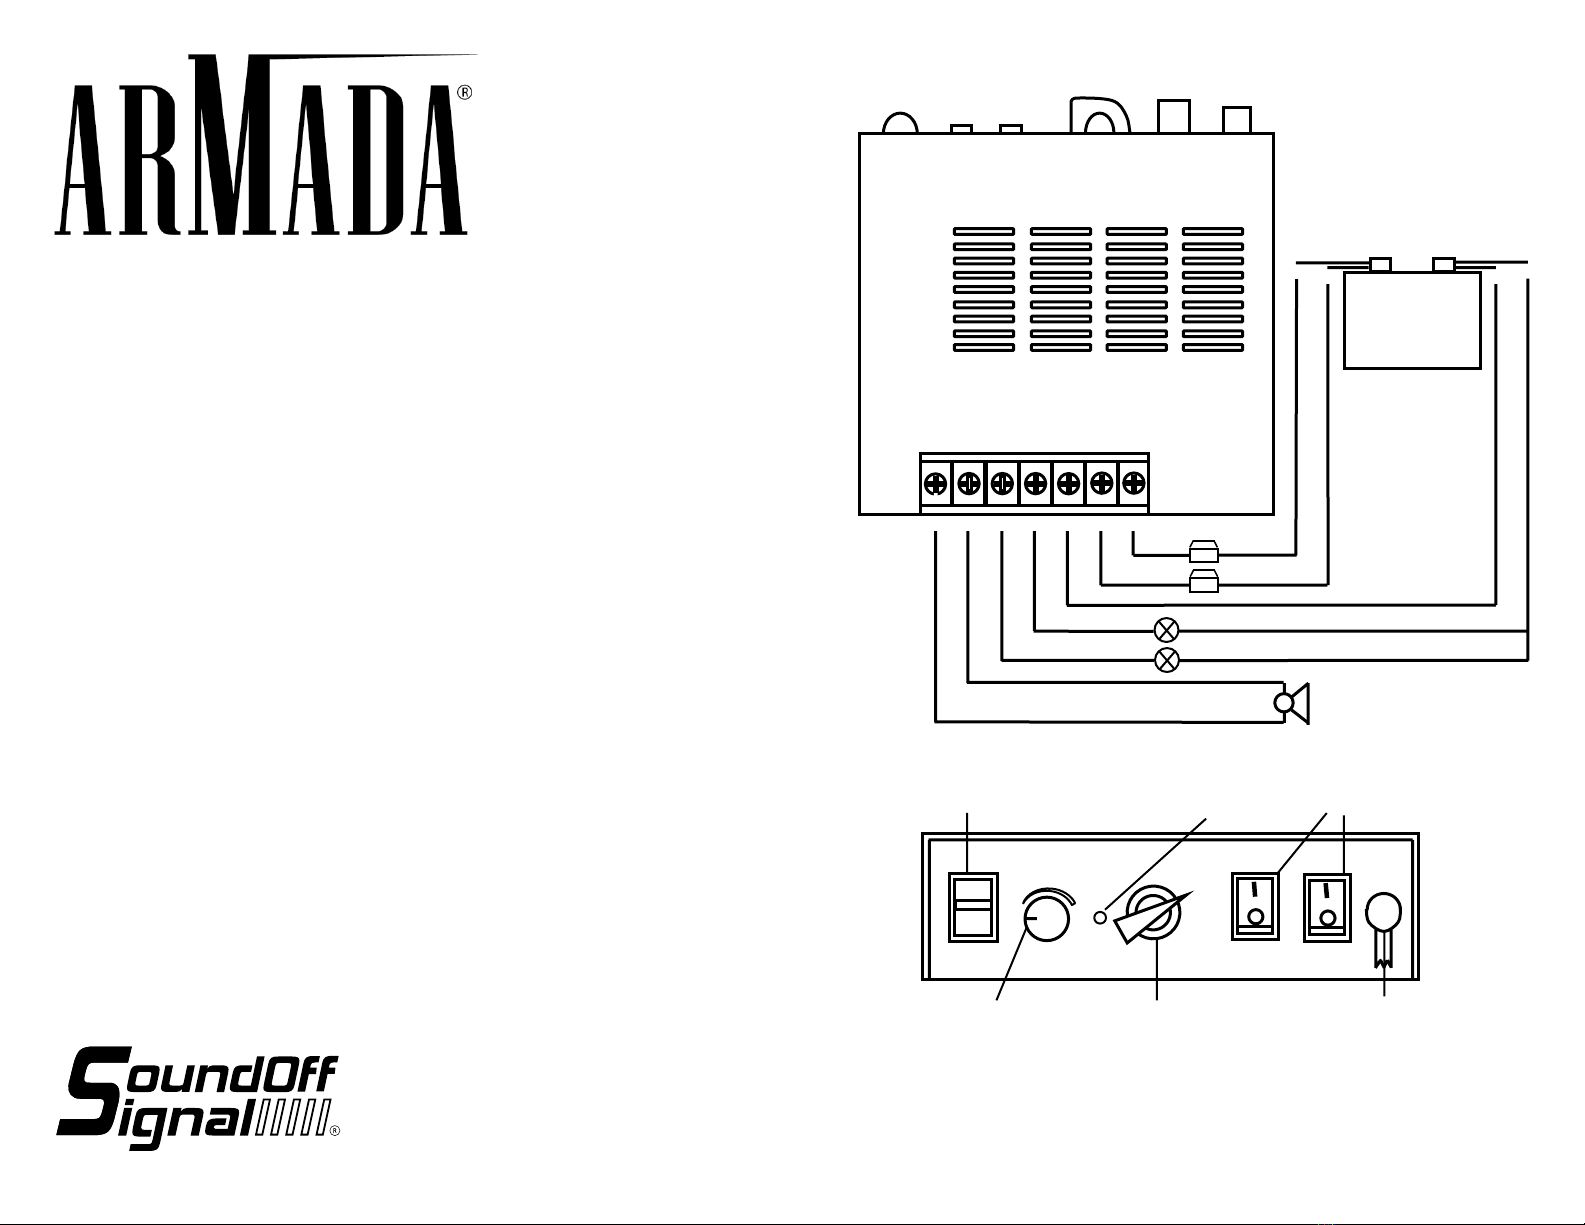
7 POSITION TERMINAL BLOCK CONNECTIONS
+12V - Connect to a positive +12 volt DC source. It is
recommended that the user protect this Wire with a 15 Amp fuse or
circuit breaker located at the source. Use #14 gauge wire.
+12V LTG. - Connect to the positive terminal of the battery with
30 Amp circuit protection. Locate the fuse or circuit breaker at the
battery and use size 10AWG wire minimum.
GRND - Connect to the negative terminal of the battery. This
supplies ground to the siren. Use #14 gauge wire.
LIGHTING2 - Connect to the load to be controlled by LIGHTING2
switch, it can supply a maximum of 10 Amps.
LIGHTING1 - Connect to the load to be controlled by LIGHTING1
switch, it can supply a maximum of 10 Amps.
SPKR - Connect to one of the wires from speaker.
COM - Connect to the remaining speaker lead for 100W speaker.
COM.
SPKR.
LIGHTING1
LIGHTING2
GRND
+12V LTG.
+12 V.
12V
BATTERY
30 A.
15 A.
100W SPEAKER
MAX 10
A
MAX 10
A
Figure 2 – Control Panel
Figure 1 – Wiring Diagram
AIR HORN
MANUAL
VOLUME
POWER
LIGHTING1 LIGHTING2
STBY
WAIL
YELP
HI-LO
PHSR MIC
Mic Jack
Rotary Selector Switch
PA Volume Control&
Power Switch
A
Lighting
Control Switch
Power Indicate
Lamp
Air Horn/Manual
Push Switch
MODEL A300

DE2-EAMSAA100 0519 Pg. 3
1.800.338.7337 / www.soundoffsignal.com
DE2-EAMSAA300 A300 SIREN
ESPECIFICACIONES TECNICAS
Dimensiones Totales: 45mm X 145mm X 160mm
Voltaje de entrada: 10 - 16Vdc
Temperatura de Funcionamiento: -30°C to +65°C
Sirena
Temperatura de Funcionamiento 8 Amps @ 13.6 VDC
(100W Speaker)
Corriente Standby: <35mA
Salida de Voltaje
:
Max 100W @ 12VDC
Lightning 1: 10A Maximo
Lightning 2: 10A Maximum
!
WARNING
Sirens produce loud sounds that
may damage hearing:
- Roll up windows.
- Wear hearing protection.
- Use only for emergency response.
- Avoid exposure to siren sound
outside of vehicle.
Introduccion
Una amplia seleccion de caracteristicas
vienen estandar con la sirena Armada®
serie A300: Wail, Yelp, Hi-Lo y PHSR. PA,
Manual y el sonido de la bocina de aire con
anulación de la sirena.
La Armada de una sirena300 incluye
un micrófono con supresión de ruido
permanente que produce la reproducción
de voz de alta calidad sin realimentación
chirrido, y el micrófono de push-to-talk
interruptor anulará cualquier tono de sirena
para instant PA usar.
Esta serie de sirenas pueden proporcionar
100 vatios de potencia de salida y se
cumplen o superan las normas SAE J1849
y los requisitos de la clase A para el sonido
cuando se empareja con una armada de
altavoces de alta potencia.
Características
• Alta abilidad con conmutación
duradera
•control de ganancia PA externa
•sirena completo en un paquete
compacto
•incorporado micrófono con cancelación
de ruido
•protección de fusible de fácil acceso
•cumple con los requisitos de salida de
sonido de clase a nivel
•dos controles de iluminación.
•Interconexiones de alta corriente debe estar correctamente terminado. Pobre calidad de crimpado
puede causar la acumulación de calor y el fuego. Siga las instrucciones del fabricante del conector de
crimpado.
•No instale este producto o ruta de los cables en la zona de despliegue del airbag. Consulte el Manual
del propietario del vehículo para zonas de implementación.
•No use el sistema para desconectar los faros, luces de freno, u otros equipos de seguridad. •Unidad
pueden ser caliente al tacto durante el funcionamiento normal.
•La instalación incorrecta de los conectores, fusibles o el cableado pueden causar avería o incendio del
vehículo.
•La instalación incorrecta de los conectores, fusibles o el cableado pueden causar avería o incendio del
vehículo.
•Calibre de cable adecuado. Todos los cables de alimentación conectar al borne positivo (+) o en
el terminal negativo (-) de la batería o conexión a tierra del chasis local (-) debe estar dimensionado
para suministrar al menos 125% de la corriente máxima y fusionado correctamente en la fuente de
alimentación.
•Instale el protector de los pasamuros en el enrutamiento de cable a través del rewall o de metal.
WARNING
NOTICE:
Installers and users must comply with all applicable federal, state and local laws regarding use and installation of warning devices.
Improper use or installation may void warranty coverage. To review our Limited Warranty Statement & Return Policy for this or any SoundOff Signal product, visit our website at
www.soundoffsignal.com/sales-support. If you have questions regarding this product, contact Technical Services, Monday - Friday, 8 a.m. to 5 p.m. or after hours 5 p.m. to 8 p.m. EST
at 1.800338.7337 (press #4 to skip the automated message). Questions or comments that do not require immediate attention may be emailed to [email protected].
SUPERIOR CUSTOMER RELATIONSHIPS. SMARTLY DESIGNED LIGHTING & ELECTRONIC SOLUTIONS.
WARNING
!
No instale este producto o ruta de sus cables en el área
de despliegue de la bolsa de aire.
El hacerlo puede dañar o reducir la efectividad de la
bolsa de aire, o crear un proyectil que podría causar
lesiones graves o la muerte.
Para determinar la zona de despliegue de la bolsa de aire,
consulte al fabricante del vehículo’s manual
AVISO IMPORTANTE AL INSTALADOR:
Asegúrese de leer y comprender todas
las instrucciones y advertencias antes de
proceder con la instalación de este producto.
Asegurar el manual y todas las cartas de
advertencia se entregan al usuario nal de
este equipo.
DE2-EAMSAA100 0519 Pg. 4
1.800.338.7337 / www.soundoffsignal.com
DE2-EAMSAA300 A300 SIREN
INSTALACION
MONTAJE
La Armada®A300 sirena puede ser montado encima del
salpicadero, debajo del salpicadero, en un túnel o en un rack con el
soporte de montaje y la tornillería suministrada. Facilidad de uso y
comodidad para el operador debe ser la consideración primordial al
montar la sirena y los controles.
Instale la sirena en el soporte utilizando los tornillos M6x12 y
arandelas planas M6 &Amp; las arandelas de resorte suministrado.
NOTA: Tornillos más largos impedirá la extracción del chasis
desde la cubierta y pueden dañar los componentes internos.
TERMINAL DE 7 POSICIONES - BLOQUE DE CONEXIONES
+12V - Conectar a una fuente de +12 voltios DC positivo. Es
recomendable que el usuario proteja este alambre con un fusible de
15 amp o disyuntor situado en la fuente. Utilice alambre de calibre
#14.
+12V LTG. - Conectar el terminal positivo de la batería con
protección de circuito de 30 amperios. Localizar el fusible o terminal
en la batería y utilizar el tamaño mínimo de 10 AWG.
GRND - Conectar el terminal negativo de la batería. Esto proporciona
conexión a tierra a la sirena. Utilice alambre de calibre #14.
LIGHTING2 - Conectar a la carga controlada por 2 Interruptores de
iluminación, se puede suministrar un máximo de 10 amperios.
LIGHTING1 - Conecte la carga a ser controlado por la iluminación1
interruptor, puede suministrar un máximo de 10 amperios.
SPKR - Conecte uno de los cables de altavoz.
COM - Conecte el cable de altavoz restantes para altavoz de 100W.
COM.
SPKR.
LIGHTING1
LIGHTING2
GRND
+12V LTG.
+12 V.
30 A.
15 A.
100W SPEAKER
MAX 10
A
MAX 10
A
AIR HORN
MANUAL
VOLUME
POWER
LIGHTING1 LIGHTING2
STBY
WAIL
YELP
HI-LO
PHSR MIC
Mic Jack
A
MODEL A300
Interruptor de Control
de Iluminación
Indicador de
Lampara
Interruptor de
bocina de aire
manual
Figura 1 - Diagrama de Cableado
Control de Volumen &
Interruptor
Interruptor Selector
Figura 2 - Control Panel
12V
BATERIA
This manual suits for next models
1
Table of contents
Languages:
Popular Emergency Phone manuals by other brands


Disty
Disty Notruf operating instructions

Code Blue
Code Blue CB 9 Series Admin guide

Wafer Microelectronics
Wafer Microelectronics GSM-HELP Quick user manual

Honeywell
Honeywell ECC-50/100 instruction manual

Linear
Linear PERS-4200 Series Installation & operation instructions

Rath
Rath 2100-PPL Installation & operation manual

Rath
Rath 2100-ELL2 Installation & operation manual

Webb Electronics
Webb Electronics WebbPhone 150 Series user manual

Blue
Blue HP4 Instructional manual

Tunstall
Tunstall ConnectMe Vi+ Installation and programming guide

LifeWatch
LifeWatch Emergency Phone Quick setup guide

HIK VISION
HIK VISION DS-PD1-EB-WS2 quick start guide