Southern Pride SPX-300 User manual
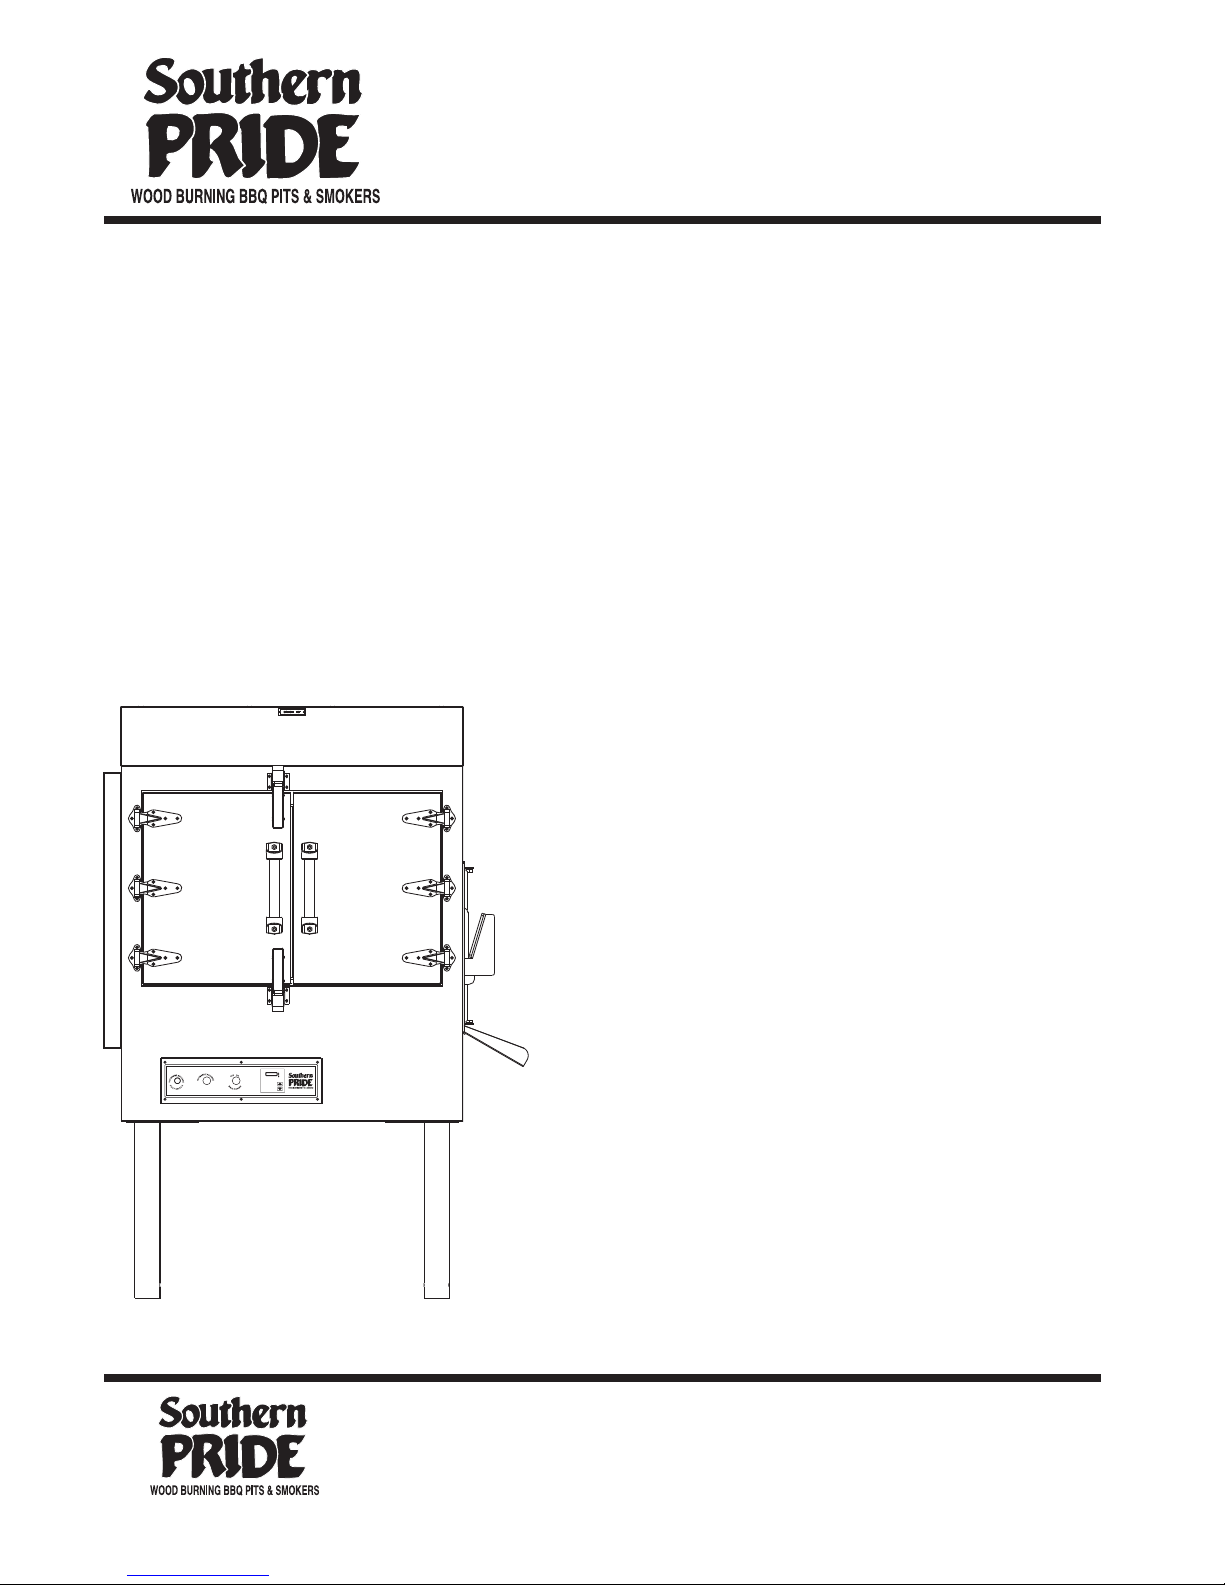
MODEL SPX-300
Nov. 2011 and newer
INSTRUCTION MANUAL
472 South Mill Street, Alamo, TN 38001
sales: 800-851-8180 www.southernpride.com [email protected]m
service: 800-437-2679 service fax: 618-993-0378 part[email protected]m
Shown with optional
VSP Vent Hood System
and optional working
height locking casters.
˚F
˚C
HEATON
˚F
˚C
HEATON
•Increase Temperature
•Decrease Temperature
•Control Off

2
CONGRATULATIONS
In selecting Southern Pride, you have chosen the finest, most advanced
and most fully automatic wood burning barbecue pit available.
With us, “ It’s Simply, a Matter of Pride”.
Please read this Instruction Manual carefully prior to installation and operation
of your Southern Pride pit. Proper installation, operation, cleaning, and maintenance
are essential for your satisfaction and safe operation.
KEEP THIS MANNUAL FOR REFERENCE
TABLE OF CONTENTS
Safety Information . . . . . . . . . . . . . . . . . . . . . . . . . . . . . . . . . . . . . . . . . . . 3
Diagram of Controls & Components . . . . . . . . . . . . . . . . . . . . . . . . . . . . 4
Operating Instructions . . . . . . . . . . . . . . . . . . . . . . . . . . . . . . . . . . . . . . . 6
Cold Weather Operations/Mobile oven note . . . . . . . . . . . . . . . . . . . . . . 11
Cleaning Instructions . . . . . . . . . . . . . . . . . . . . . . . . . . . . . . . . . . . . . . . . 12
Maintenance Schedule . . . . . . . . . . . . . . . . . . . . . . . . . . . . . . . . . . . . . . . 14
Electrical Instructions . . . . . . . . . . . . . . . . . . . . . . . . . . . . . . . . . . . . . . . 16
Burner Specification & Instructions . . . . . . . . . . . . . . . . . . . . . . . . . . . . 20
Replacement Parts List . . . . . . . . . . . . . . . . . . . . . . . . . . . . . . . . . . . . . . . 24
Venting Instructions . . . . . . . . . . . . . . . . . . . . . . . . . . . . . . . . . . . . . . . . . 22
Warranty . . . . . . . . . . . . . . . . . . . . . . . . . . . . . . . . . . . . . . . . . . . . . . . . . . 25
Gas Piping Instructions . . . . . . . . . . . . . . . . . . . . . . . . . . . . . . . . . . . . . . 21

FOR YOUR SAFETY
IF YOU SMELLGAS . . .
1. Open Windows.
2. Do not touch electrical switches.
3. Extinguish any open flames.
4. Immediately call your gas supplier.
DO NOT STORE OR USE GASOLINE OR OTHER FLAMMABLE VAPORS OR
LIQUIDS IN THE VICINITY OF THIS OR ANY OTHER APPLIANCES.
SAFETY INFORMATION
1. The pit area MUST be kept clear and free of combustible materials, gasoline and
other flammable vapors and liquids.
2. The flow of combustion and ventilating air MUST NOT be obstructed from reaching
the pit.
3. The frame of the unit MUST be electrically grounded at all times. See “Electrical
instructions”.
4. Caution should be used when opening and closing the Firebox Door. The door is HOT
during operation.
5. DO NOT remove service compartment access panels when unit is in operation or leave
off during operation.
6. Gas burners require the services of an experienced mechanic for proper setting and
adjustment. If the burner does not appear to be operating properly, DO NOT
ATTEMPT TO ADJUST THE BURNER YOURSELF, but call in a competent
serviceman or contact Southern Pride.
7. DO NOT allow unqualified personnel to perform service work or adjustments on
this unit. To do so, will VOID WARRANTY and could result in a hazardous condition.
8. Be sure any new employees, who might operate the unit, are instructed on operation and
safety information prior to operating the unit.
9. Caution: Ashes removed from the Firebox should be stored in a non-combustible
container with a sealed lid only. Store ashes in a well ventilated area. FUMES COULD
BE HAZARDOUS.
10. WARNING :IT IS EXTREMELY IMPORTANT TO FOLLOW DAILY CLEANING
INSTRUCTIONS. GREASE OR SOLIDS BUILDUP INSIDE THE PIT COULD RESULT
IN A FIRE HAZARD.
11. KEEP THIS INSTRUCTION MANUAL FOR REFERENCE.
3

SOUTHERN PRIDE’S
SPX-300 BBQ OVEN
4
Optional Digital Controls
1
˚F
˚C
HEAT ON
˚F
˚C
HEAT ON
• Increase Temperature
• Decrease Temperature
• Control Off
Standard Controls
2
3
11
4
14
10
6
5
13
7
8
9
˚F
˚C
HEATON
˚F
˚C
HEATON
•Increase Temperature
•Decrease Temperature
•Control Off

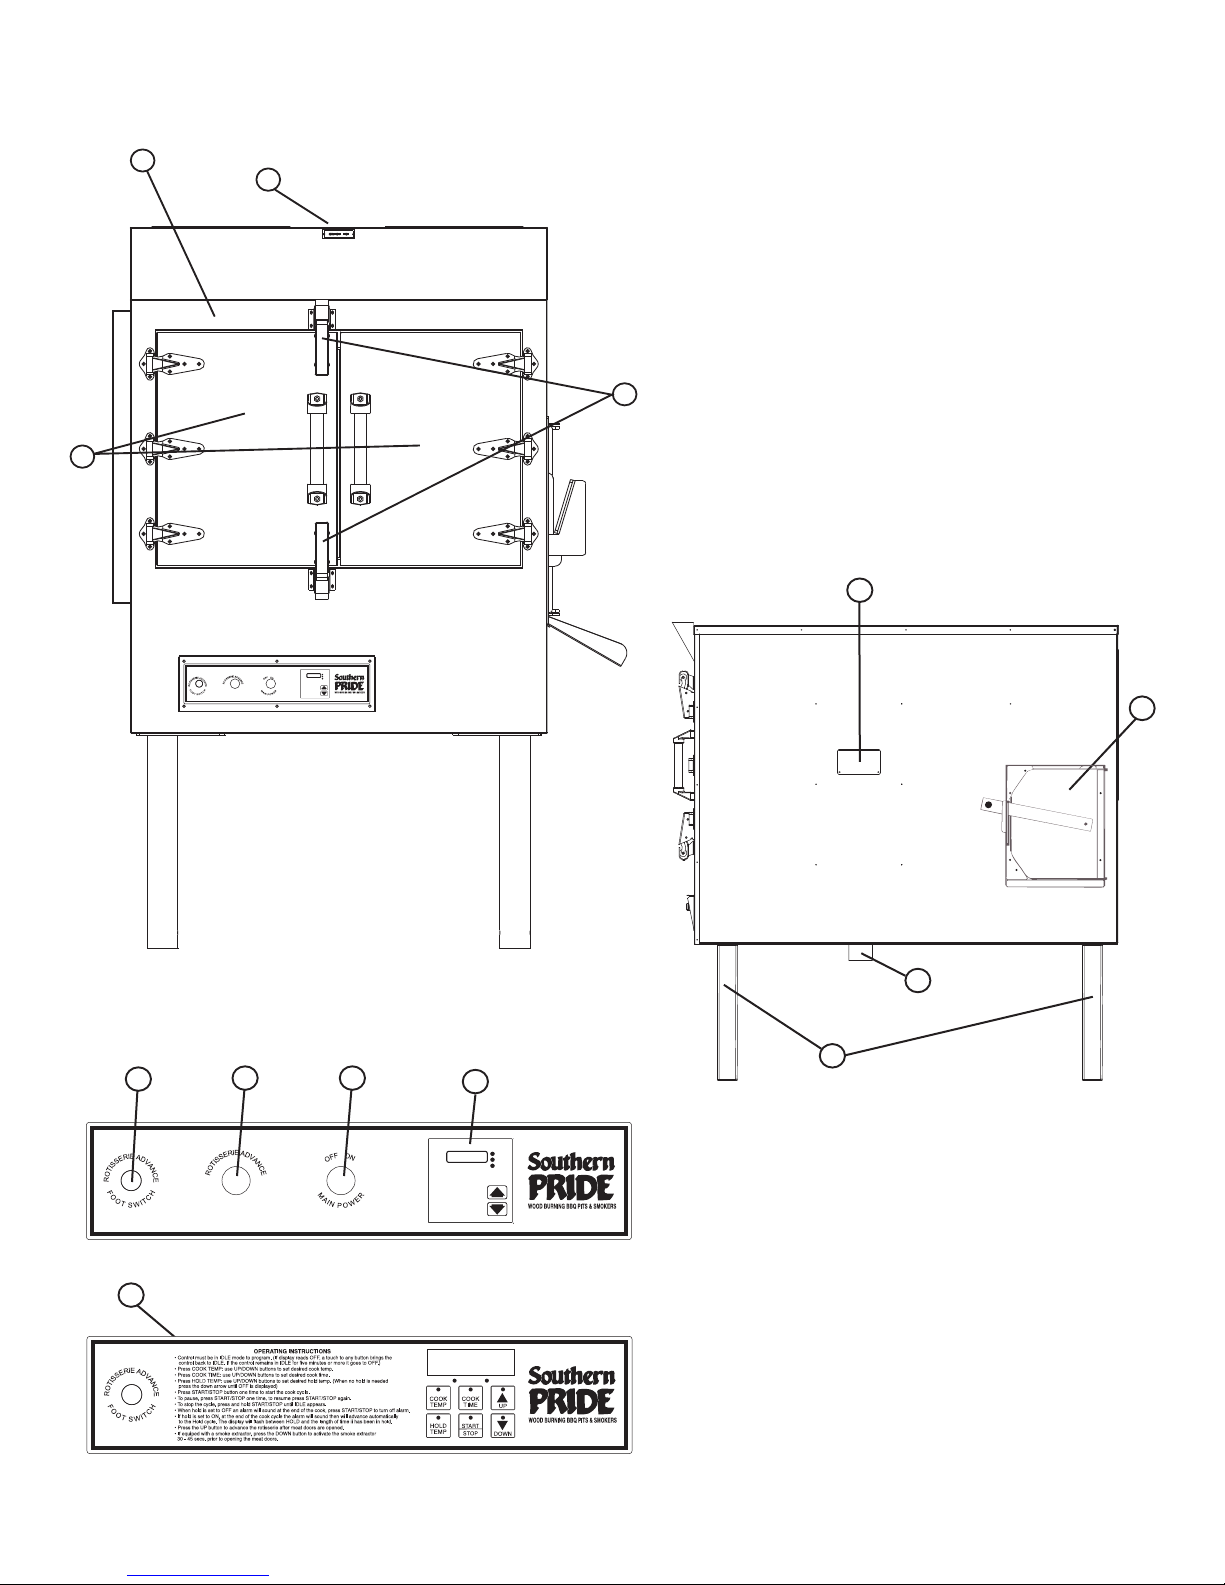
SPX-300 CONTROLS AND COMPONENTS
1. CV CONTROL THERMOSTAT - Adjustable temperature setting (140-325° F) with OFF position.
Maintains desired Pit temperature by controlling the Gas Burner. It also displays the actual temperature
inside the oven during the cook cycle.
2. MAIN POWER SWITCH - Activates the Rotisserie, Convection Fan, Thermostat, and Red
Indicator Lamp. (The Red Indicator Lamp on the Main Power Switch indicates when the switch is
ON.)
3. DOOR INTERLOCK SWITCH - When doors are opened, the Rotisserie, Convection Fan and
Gas Burner are automatically turned off. On ovens with an optional Smoke Extractor the Smoke
Extractor is automatically activated. On ovens with optional VSP Vent Hood Systems the exhaust fan
is automatically switched to high speed.
4. ROTISSERIE ADVANCE FOOT SWITCH - activates the rotisserie when foot switch is depressed.
5. MEAT LOADING DOORS - For access to Racks and Pit interior.
6. MEAT LOADING DOOR LATCHES - Latches apply positive pressure and seals doors.
7. FIREBOX DOOR - Provides access for loading of wood in the Firebox Chamber.
8. CABINET LEGS - Provides adjustment for leveling of the unit.
9. DRAIN VALVE - Is opened after each cooking to drain grease.
10. FLUE COLLAR -For connection of 6” Flue.
11. ROTISSERIE ADVANCE SWITCH - Momentarily activates Rotisserie to advance the food
racks for loading and unloading when the Meat Door is open, or the Main Power switch is OFF.
12. CONVECTION FAN - Provides air flow inside the Oven for even cooking.
13. BEARING COVER - Provides access for Bearing replacement.
14. DIGITAL CONTROL (Optional) - Provides precise control of the oven and adds special
features, such as a Hold Mode, Automatic Cool Down prior to advancing into the Hold Mode and
an Audible Alarm that sounds when the Cook Cycle is complete or when the control advances to
the Hold Mode.
5

6
OPERATING INSTRUCTIONS
1. Load meat on the food racks. DO NOT LET THE MEAT EXTEND BEYOND OR
HANG OVER THE EDGE OF THE RACKS.
CORRECT INCORRECT
Load meat on bottom rack first. May cause food to tip and meat to fall.
This could cause the Rotisserie to jam.
2. To advance the racks with the Meat Doors open, depress the Red Rotisserie Advance Button on
ovens with standard controls, (On digital controls, press the UP arrow button) or step on the
rotisserie advance foot pedal until the racks advance to the next position.
3. After the meat is loaded, depress the Red Rotisserie Advance Button on ovens with standard
controls, (On digital controls press the UP arrow button) or step on the rotisserie advance foot
pedal and allow the rotisserie to make one complete revolution. Check meat clearances to
cabinet and all racks. If necessary reposition the meat on the racks for maximum clearances.
4. Open the Fire Box door and slide the ash scoop out to
remove any ashes or log pieces that might be there
from the previous cook. Dump the ashes into a metal
air tight ash container. Use heat proof gloves if the
ash scoop has hot ashes in it.

CAUTION
DO NOT USE DRY WOOD OR KINDLING.
DO NOT OVERLOAD FIREBOX. TOO MUCH WOOD CAN CAUSE OVER-
HEATING OF THE PIT.
COALS AND ASHES FROM PREVIOUS COOKING MUST BE REMOVED BEFORE
LOADING WOOD.
DO NOTALLOWASHES IN OR NEAR THE BURNER OPENING. KEEPALL LOGS
AT LEAST 6 INCHES FROM THE BURNER.
Correct way to load wood.
6. Be sure Firebox Door and Meat Loading Door Latches and drain valve are secured in the
closed position.
7. To start the cook cycle refer to the next section “How to Program a Menu” depending on
which type of controller you have.
7
5. Put a small amount of wood in the Firebox.
Use 1-2 logs, 4-6 inches in diameter,
12-15 inches long. Use green or slightly
seasoned hardwoods, fruitwoods, or charcoal.
Be sure to keep the wood 6” from the burner
or ashes can accumulate on the burner
and cause it to not work properly. Lay the
logs on top of each other at different angles
to ensure good air flow around each log.

8. To check or unload meat, on units with optional Smoke Extractor; open the meat doors just
enough to activate the Smoke Extractor, for approximately 20 seconds prior to fully opening
the Meat Loading Doors.
9. When the meat is cooked; on digital control models press and hold the start / stop button
until idle appears in the LED, or on ovens with standard controls turn the Main Power
Switch to the OFF position. On models with optional Smoke Extractor, with digital
standard controls, open the meat doors enough to turn it on, wait for 20 seconds prior to
fully opening the Meat Loading Doors. To unload racks, on ovens with digital controls press
the up button to advance the rotisserie, or on an oven with standard controls depress the
Rotisserie Advance Button or on either control types use the pneumatic foot pedal to advance
the rotisserie until the racks advance to an unloading position.
controls, press the down button to activate the smoke extractor, or on units with
10. After each cooking, remove the remaining wood and hot coals from Firebox, then open
Drain Valve and drain grease while the pit is still warm. See step 4.
CAUTION: BE SURE MEAT LOADING DOORS AND FIREBOX
DOOR ARE SECURED IN THE CLOSED POSITION IMMEDIATELY
FOLLOWING A COOKING AND DURING NON-USE PERIODS.
IMPORTANT
The Gas Burner is equipped with an automatic ignition system. To ignite; on ovens
equipped with digital controls press the start / stop button one time to start a menu, or on
ovens with standard controls turn the Main Power Switch to the ON position and set
Thermostat to desired temperature. To shut the Burner OFF, on ovens with digital controls
press and hold the start stop button until idle is displayed in the LED or on standard control
ovens, press the down button on the control until the LED displays “OFF”.
8
WARNING: DO NOT OPEN
DRAIN VALVE WHILE PIT
IS STILL IN OPERATION OR
WHILE BURNING WOOD
AND HOT COALS ARE
STILL IN FIREBOX.

9
Programming a Menu with Optional Digital Controls
The menu consists of a cook temperature, cook time, and choice of having the control advance
to a hold mode after the cook time has elapsed or end the menu when the cook time has elapsed.
• Control must be in the “IDLE” mode, if the control is “OFF” a press of any button will
bring the control back to “IDLE”.
• PRESS the cook temp button, (tEnP 1 will appear in the LED display): PRESS the
up/down buttons to obtain the desired cook temperature.
• PRESS the cook time button, (tinE1 will appear in the LED display): PRESS the up/down
buttons to obtain the desired cook time.
• Press the hold temp. button, (HtEnp will appear in the LED display): PRESS the up/
down buttons to obtain the desired hold temp., if a hold temp. is not desired: PRESS the
down button until “OFF” is displayed in the LED.
• Programming the menu is complete: To start the menu, PRESS the start/stop button one
time. The control will begin the menu.
• To pause the menu PRESS the start/stop button one time, to resume the menu, PRESS the
start/stop button again.
• To cancel or stop the menu, PRESS and hold the start/stop button until “IDLE” is displayed
in the LED.
When the cook cycle is complete there are two possible actions that can be taken. One is if a
hold temperature was programmed into the menu, the control will momentarily sound an audible
alarm, (if equipped) the smoke extractor will be automatically activated, for a period of five mins,
to bring the oven temperature down closer to the programmed hold temperature. Then, “HOLD”
and the length of time the control has been in the hold mode will alternately flash in the LED
display. The control will maintain the hold temperature until the start/stop button is depressed to
“END” the menu, and bring the control to the “IDLE” mode. If the hold temperature was
programmed to “OFF” then “END” will be displayed on the LED display, and an audible alarm
will sound continuously until the start/stop button is depressed, to “END” the menu, and bring the
control to the “IDLE” mode.
Programming a Menu with Standard Controls
• After the product has been loaded into the oven and the meat loading doors have been closed,
and logs placed in the firebox and the firebox door closed and the drain valve is closed, turn the
oven power switch on. The thermostat control on the oven will either come on to the last
temperature used or be off.
• Using the up/down button on the controller set the desired temperature setting. Once the oven
starts the LED display will show the actual internal temperature of the oven, you can toggle
to the set temperature by pressing either up/down button.
NOTE: the controller does not control the length of the cook, it will run until it is turned off so
the user must keep track of the time.
• At the end of the cook cycle press the DOWN button of the control until “OFF” is displayed
in the LED display to turn off the burner.

10
Programming a Menu with Optional Digital Controls Cont.
• The control should be in the “IDLE” mode. (The burner, convection fan, and the rotisserie
will be off)
• When the menu is in progress a PRESS of the down arrow button will activate the smoke
extractor (if equipped with the optional Smoke Extractor, prior to opening the meat doors, if
the doors are not opened the smoke extractor will go off after one minute and the menu will
resume. If the doors are opened the menu will resume when the doors are closed. The smoke
extractor will automatically activate when the doors are opened, and the menu will resume
again when the doors are closed.
• When the doors are open a PRESS of the up arrow button will advance the rotisserie or a
PRESS of the foot pedal will advance the rotisserie when the meat doors are open too.
• Unload the meat from the racks, using the rotisserie advance button to rotate the racks.
• After each cook cycle, remove the remaining wood and coals from the firebox, then open
the drain valve and drain the grease while the oven is still warm.
• After the control has been in the “IDLE” mode for five minutes it will go to “OFF”, a
PRESS of any button will bring the control back to “IDLE”.
CAUTION: BE SURE THE MEAT LOADING DOORSAND
THE FIREBOX DOOR ARE SECURED IN THE CLOSED
POSITION IMMEDIATELY FOLLOWING A COOKING,
AND DURING NON-USE PERIODS.
WARNING: DO NOT OPEN
DRAIN V
ALVE WHILE PIT
IS STILL IN OPERATION, OR
WHILE BURNING WOOD
AND HOT COALS ARE STILL
IN THE FIREBOX.

SMOKER OVEN COLD WEATHER OPERATIONS
When temperatures drop below freezing there are issues that may develop. Listed below are
some of those issues and ways to correct or reduce the effects of the problem.
1. Grease in oven drain solidifies in cold weather. Listed below are things that can be
done to reduce, or correct the effects of this problem.
a. Drain the oven after every cooking to purge the drainpipe of liquids before
they solidify. In extreme cold weather conditions customers have had
success wrapping the drainpipe with electric heat tape and insulating heat
tape and pipe.
2. LED Displays an error 7
a. Ovens with digital cook and hold controllers are effected by cold weather particularly
when the oven is outside or when it is a through the wall installation. This
error typically only happens when the oven has not been used for a significant
duration of time that allowed the oven to become extremely cold usually
temperatures below 32°F. The following action will generally clear the error
7 code
b. Hold a cloth under warm water and wring water out, hold warm rag against
top of thermocouple on the inside of oven for about 20-30 seconds. Remove
rag and close door and start oven
11
NOTES FOR MOBILE OVENS
1. Ashes must be removed from the fire box prior to transport. Ashes can blow around inside
the fire box when the oven is being towed and clog the burner causing it to not work properly.
2. Inspect the hanger locks and keys to ensure the rack hangers are locked prior to transport.
3. The ash chute is removable and could fall off if the fire box door is not properly secured.
Prior to transport check the fire box door and chute or remove the chute prior to transport.

1. Remove ashes and coals from Firebox after each cook cycle.
Ash Disposal: Ashes should be placed in a non-combustible container with a tight fitting
lid. The closed container of ashes should be placed on a non-combustible floor well away
from all combustible material, pending final disposal.
Pull out the ash scoop from under the fire grate
to remove all the ashes and coals from the Firebox.
Note: Ashes must be removed from the fire box
on a mobile smoker prior to transport.
CAUTION: Fumes could be hazardous.
2. Drain grease. (Be sure hot coals and wood are removed from the Firebox before opening
drain valve.)
Open Drain Valve and drain Grease.
CLEANING INSTRUCTIONS
12
4. Thoroughly clean complete interior of pit. Use food service degreaser. Spray degreaser on the
interior of the pit and allow to set for 5-10 minutes. Rinse thoroughly with water hose or
pressure washer. Drain through Drain Valve. Follow the Degreaser Manufacturer instructions
and wear protective gear as needed. Do not spray water into the door interlock switch or the
control panel. Putting a piece of duct tape over the door interlock switch will help make sure
that no water gets into it.
3. Remove food racks and clean thoroughly. (Racks simply lift out of the brackets on the hangers.)
To remove food rack hangers, lift hanger and pull straight back over Rotisserie Wheel Stubs.

WARNING
IT IS EXTREMELY IMPORTANT TO FOLLOW THE ABOVE DAILY CLEANING
PROCEDURES. GREASE OR SOLIDS BUILDUP INSIDE THE PIT COULD RESULT
IN A FIRE HAZARD.
13
Meat Door Latch Removal Instructions
The meat door latches are removable for cleaning.
To Remove:
1. Make sure your BBQ oven is off and has had time to cool down
then open meat doors.
2. CAUTION: The latch rollers are spring-loaded and will spring open
quickly with a lot of force, don’t pinch a finger or hand. Un-cock or
Release the latch roller by pushing up on the roller. See Photo 1.
3. Next use a screwdriver to pop the meat door latch loose from the oven, see photo 2.
4. Once the latch is off, clean it, inside and out as well as the meat door front,
using conventional cleaners.
5. To Re-install the latch: Position it over the latch backing plate as per the photo 3 and slide top of
latch assembly over the backing plate tabs.
6. Next using the palm of your hand or a rubber mallet tap the bottom of the latch, until it locks back
onto the retaining tabs as per the photo 4.
7. CAUTION: The latch rollers are spring-loaded and will spring open quickly with a lot of force,
don’t pinch a finger or hand. You are now ready to cock the latch roller. Cock the latch roller by
pushing down on it until it is set in the fully open position. Make sure latch roller is fully cocked
before you release it. Photo 5.
photo 1
photo 2 photo 3 photo 4 photo 5

14
BI-MONTHLY INTERVAL
1. For Direct Vented ovens with a Smoke Extractor, the Smoke Extractor Damper and chimney
should be inspected at least twice monthly for creosote buildup.
2. The Flue Pipe should be carefully inspected. Remove any solids buildup that has accumulated.
Creosote - Formation and need for removal:
When wood is burned slowly, it produces tar and other organic vapors, which
combine with expelled moisture to form creosote. The creosote vapors con-
dense in the relatively cool chimney flue of a slow burning fire. As a result,
creosote residue accumulates on the flue lining. When ignited, this creosote
makes an extremely hot fire.
IF CREOSOTE HAS ACCUMULATED IT SHOULD BE REMOVED TO
REDUCE THE RISK OF A CHIMNEY FIRE.
1. Inspect Burner Head for accumulation of ashes and creosote. Clean as needed.
2. Inspect Convection Fan Blade for buildup of solids, or out of balance condition. Clean or replace
as needed.
3. Inspect meat Loading and Firebox Door Gaskets. Replace if damaged or leaking.
4. Inspect Smoke Extractor Louver to be sure it closes comletely. Clean or repair
as needed. (If equipped with the optional Smoke Extractor)
5. Inspect the Interlock Switch to be sure the Plunger and Roller move freely. Lubricate with
WD-40 or equivalent as needed.
INSIDE
DOOR
FRAME
MAINTENANCE SCHEDULE
AFTER EACH USE: Drain Grease and empty ashes from the firebox.
DAILY: Remove and clean all of the food racks. Thoroughly clean the complete interior of
the oven, using a food service degreaser (follow instructions on degreaser) and rinse with
a water hose or pressure washer. Drain through the drain valve.
WEEKLY:
When washing the unit, Protect the Door Interlock Switch from getting wet.

15
ANNUALLY
Drive Chain lubrication instructions
1. To lubricate the Drive Chain, disconnect the power supply to the oven and remove the Drive Cover.
2. Use only quality SAE 20 oil for lubricating the Drive Chain.
3. The drive chain for the OT-300 Oven should be lubricated once each year.
4. Use a clean brush to apply oil to the slack side of the Drive Chain.

ELECTRICAL INSTRUCTIONS
ELECTRICAL REQUIREMENTS:
120 Volts A.C., 60 hz.,
2 wire, single phase,
15 amp wiring required.
WARNING:
CHASSIS MUST BE GROUNDED TO
PREVENT POSSIBLE SHOCK HAZARD.
DO NOT ASSUME A PLUMBING LINE
WILL PROVIDE SUCH A GROUND.
WARRANTY IS VOID IF UNIT IS CONNECTED TO ANY VOLTAGE OTHER THAN
SPECIFIED ABOVE AND ON NAMEPLATE.
1. Electrician must provide the conduit and wire for hookup.
2. Power is to be left OFF throughout installation.
3. Electrical Service is connected via the factory supplied power cord located on the left front
corner of the oven.
4. On models with optional Smoke Extractor,
electrician must provide conduit and wire
for hookup from Junction Box above the
Smoke Extractor Motor on the top of the
pit to the Exhaust fan. Make electrical
connections inside the Junction box.
NOTE: THIS IS NOT APOWER SUPPLY
CONNECTION. IT IS FOR AFAN
CONNECTION ONLY.
NOTE: 125 V.A.C., 1/4 hp
maximum connected load,
1100 cfm fan rating recom-
mended.
5. If venting or gas connections are to be
done later, be sure that power is OFF.
16
EXHAUST
FAN
CONDUIT
SMOKE
EXTRACTOR
power
cord

17
SPX-300 gas oven wiring diagram with Standard Controls

18
SPX-300 gas oven wiring diagram with
Digital Roast and Hold Controls

19
ITEMS TO CHECK BEFORE FIRING BURNER
IMPORTANT
WARNING: IMPROPER GAS HOOKUPWILL VOID WARRANTY
AND COULD RESULT IN A HAZARDOUS CONDITION.
1. Gas line MUST be installed by a competent technician and in accordance with
this Manual.
2. Gas line MUST include an easily accessible manual shutoff valve, drip leg, and
pressure gauge port.
3. Gas pipe size MUST be in accordance with the Pipe Capacity Chart in this Manual.
4. Gas line MUST be tested for leaks under pressure.
5. Gas Line MUST be purged to remove any air in the system.
6. Gas line pressure MUST be checked and MUST NOT exceed the maximum
pressure specified in the Burner Specifications in this Manual.
7. Burner Orifice MUST correlate with the type of gas being supplied, as specified in the
Burner Specifications in this Manual.

BURNER SPECIFICATIONS
Burner Model: Wayne P250-EP
Firing Capacity: Maximum Input 75,000 BTU/HR, on Model SPX-300
Fuels: Natural and L.P. Gases
Electrical: 120 V.A.C., 60 hz, 1 ph
Orifice Sizes: Model SPX-300
Natural Gas - #19 (.166)
L.P. Gas - #37 (.104)
NOTE: Orifice and valve setting must correlate with type of gas being
supplied.
Gas Supply Line Pressure: Natural - 4.5” W.C. Minimum L.P. - 11.0” W.C. Minimum
10.0” W.C Maximum 13.0” W.C. Maximum
MANIFOLD PRESSURE:
GAS VALVE: Control Knob must be ON.
WIRING DIAGRAM FOR GAS BURNER P-250EP THERMOCOUPLE PILOT LOCATION
20
Natural - 3.0” W.C. Minimum L.P. - 9.5” W.C. Minimum
3.5” W.C. Maximum 10.0” W.C. Maximum
Table of contents
Other Southern Pride Oven manuals