Sovereign SCS 2000 User manual

45.002.11
Art.-No.: 227917 I-No.: 01017
SCS 2000
Operating instruction Electric chainsaw
" WARNING! PLEASE READ THESE INSTRUCTIONS
BEFORE OPERATING THIS UNIT"
"KEEP THIS MANUAL FOR FUTURE REFERENCE

2
Read and follow the operating instructions and safety
information before using for the first time.
Always wear PPE (Personal Protective Clothing).
Wear cloves!
Wear ear protection!
Beware of electrical voltage
Wear eye protection!

3
1
2 3
14
6
8
13
3
5
16
18
17
2
1
14
15
12 11 10 9
7
2

4
6
4 5
8 9
7
B
A

5
12
10 11
14 15
13
A
B

6
18
16 17
20 21
19
A
AA
CC
B
A
A
A
B
B
B
A
D
C
B

7
24
22 23
26
1
2
3
4
5
6
Ꮯ
27
25

8
Table of contents Page
1. Safety information 9
2. Layout and items supplied 11
3. Proper use 11
4. Installation 11
5. Operation 12
6. Working with the chainsaw 13
7. Technical data 15
8. Maintenance 15
9. Cleaning and storing 15
10. Notes on environmental protection / disposal 16
11. Ordering replacement parts 16
12. Troubleshooting 17

9
Packaging
The unit is supplied in packaging to prevent it from
being damaged in transit. The raw materials in this
packaging can be reused or recycled.
When using the equipment, a few safety
precautions must be observed to avoid injuries
and damage.
앬Read the operating instructions carefully and
comply with them at all times. It is important to
consult these instructions in order to acquaint
yourself with the unit, its proper use and the
important safety regulations.
앬Keep this manual in a safe place, so that the
information is available at all times.
앬If you give the equipment to any other person,
make sure that you pass on these operating
instructions as well.
We can accept no liability for damage or
accidents which arise due to non-compliance
with these instructions.
1. Safety information
Make sure you read through all of the safety
information before using the device for the first time.
Chainsaws are dangerous tools which can cause fatal
injuries if used without due care and attention.
Explanation of the symbols on the machine
(Fig. 27):
1. Read the operating instructions.
2. Wear safety goggles.
3. Wear ear protectors.
4. Never expose the device to rain.
5. If the cable is damaged or cut, disconnect the
power plug from the mains immediately.
6. Maximum cutting depth.
General safety instructions
Workplace
Keep your work area clean and tidy. Untidy
and unlit work areas can result in accidents.
Never use electric power tools in an area
where there is a risk of explosion or where
there are inflammable liquids, gases or dust.
Electric power tools generate sparks that can
ignite the dust or vapors.
Keep children and other people away from
the electric power tool whilst you are using it.
If you are distracted you may lose control of the
tool.
Electrical safety
The plug on the tool must fit into the socket. The
socket must not be modified in any way. Do not
use adapter plugs together with power tools with
a protective earth. Unmodified plugs and
matching sockets will reduce the risk of an
electric shock.
Avoid bodily contact with earthed components
e.g. pipes, radiators, stoves or refrigerators.
There is an increased risk of suffering an electric
shock if your body is earthed.
Keep the tool out of the rain and away from
moisture. The ingress of water into an electric
power tool increases the risk of an electric shock.
Do not use the cable for a purpose for which it is
not designed, for example to carry the tool or to
pull the plug out of the socket. Keep the cable
away from heat, oil, sharp edges and moving
parts. Cables that are damaged or caught up
increase the risk of an electric shock.
If you use an electric power tool outdoors, use
only extension cables that are approved for
outdoor use. The use of an extension cable which
is suitable for outdoor use reduces the risk of an
electric shock.
Do not use an electric power tool if the switch is
defective. An electric power tool that cannot be
switched on or off is dangerous and must be
repaired.
The device can be connected to any 230V mains
outlet. However, the socket outlet must have a
protective earthing contact and must be protected
by an automatic cutout (max. 16 A). Additionally,
a residual current device (RCD) circuit-breaker
with max. 30 mA must be used!
To prevent danger, damaged power cables must
be replaced by the manufacturer or by a service
company authorized to carry out the work by the
manufacturer.
Safety of persons
Be careful, watch what you are doing and be
sensible and responsible when using an
electric power tool. Never use the tool if you
are tired or under the influence of drugs,
alcohol or medication. A single moment of
carelessness when using the electric power tool
could be all it takes to cause a serious injury.
Wear personal safety equipment and always
wear safety goggles. Wearing protective
equipment like a dust mask, non-slip safety
shoes, a protective helmet or hearing protection
can also reduce the risk of injury.
Make sure that the tool cannot start up
accidentally. Check that the switch is NOT
switched on before you insert the plug into

the socket. If you have your finger on the switch
whilst carrying the tool or you connect the tool to
the power supply whilst it is switched on, this
could cause accidents.
Remove all adjusting tools or wrenches
before you switch on the tool. Any tool or
wrench in a rotating part of the tool could cause
injuries.
Do not overestimate your capabilities. Make
sure you have a sure footing and keep your
balance at all times. This will enable you to
control the tool better in unexpected situations.
Wear suitable clothes. Never wear loose
fitting clothes or jewelry. Keep hair, clothing
and gloves away from moving parts. Long
hair, loose clothing or jewelry can be caught by
moving parts.
Do not overload your tool. Use the correct electric
tool for the job in hand. Operate the device only
within the specified output range. Use a suitable
tool which is appropriate for the task: Never use
low-powered machines for heavy duty work. Do
not use electric power tools to perform work for
which they are not intended.
WARNING: Only use the accessories
recommended in these instructions. The use of
other accessories could result in injuries being
caused.
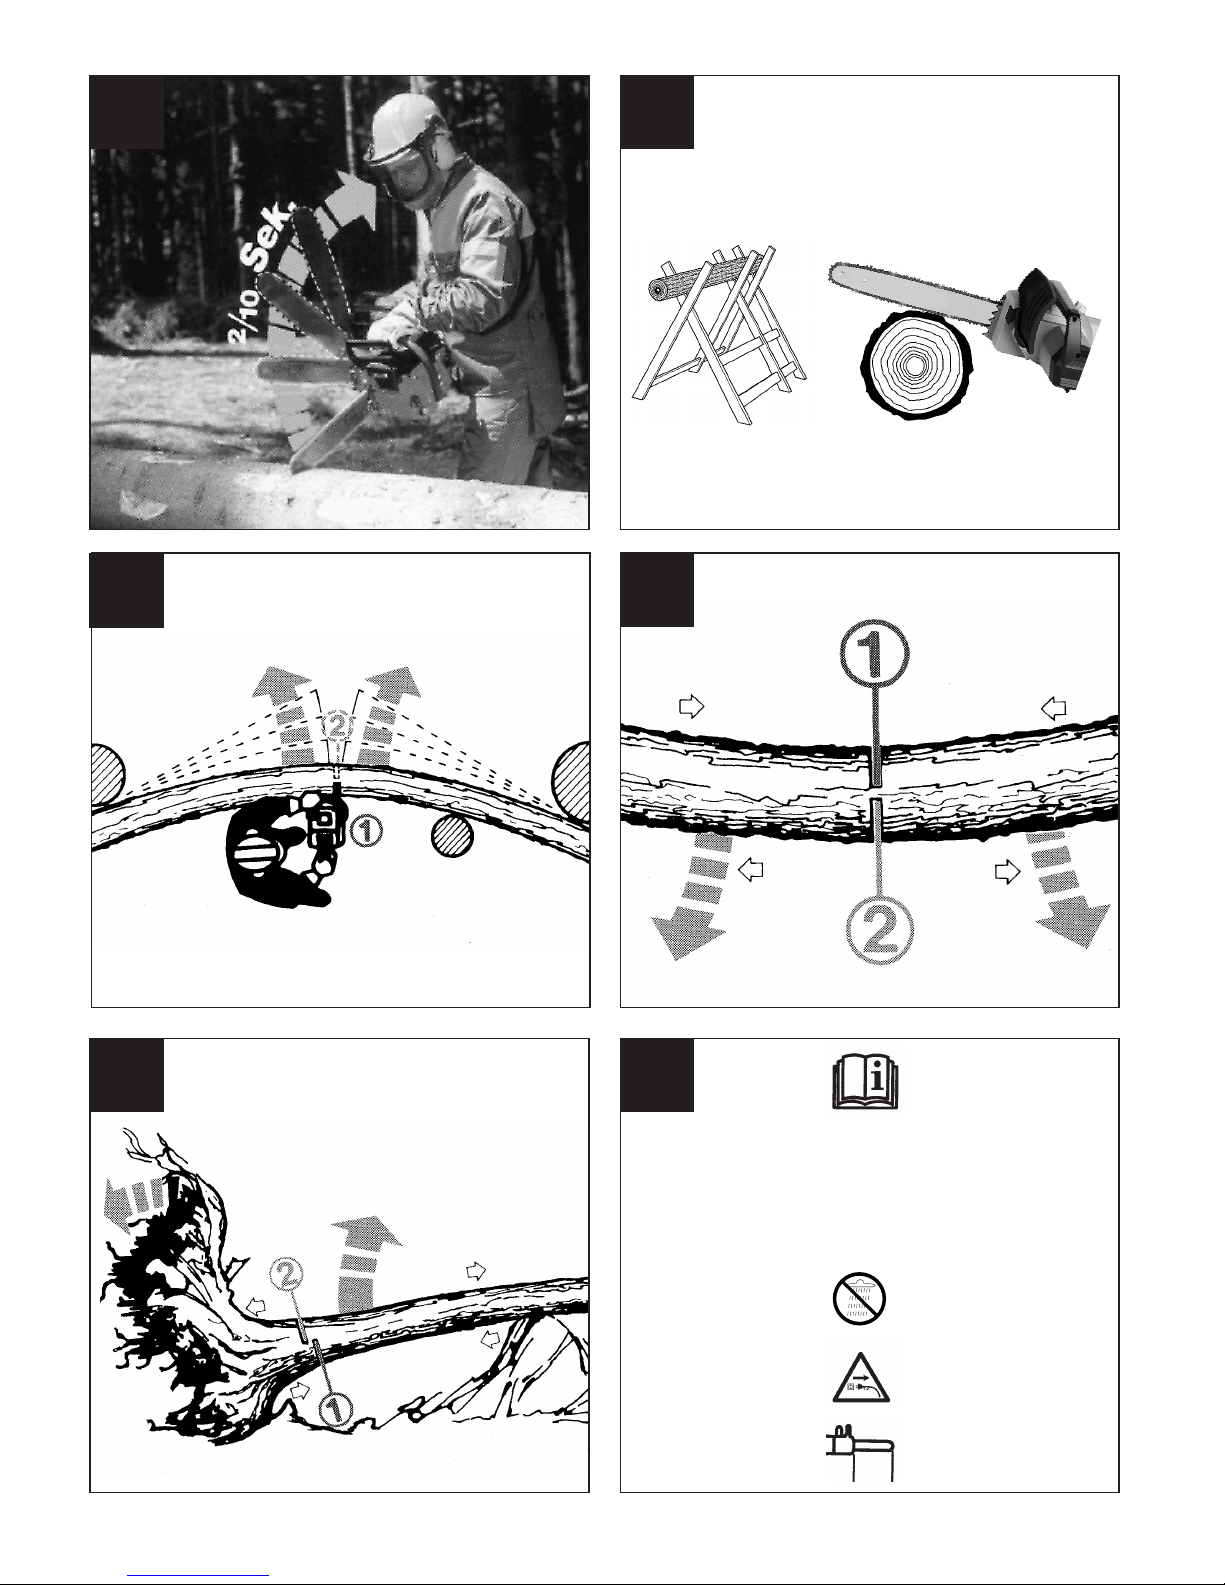
Prevent the running chainsaw from coming
into contact with the ground or wire fences,
and do not use it to cut undergrowth or
trimmed timber.
First-time users should be given a practical
demonstration of how to use the chainsaw by
an experienced chainsaw operator, who
should also explain the necessary protection
equipment and help them to practice cutting
a round piece of wood on a sawhorse or
sawing trestle to start with.
Take care of your electric power tools. Keep
the cutting tools sharp and clean to enable
you to work better and more safely. Check
the power cable of the electric tool on a
regular basis and have it replaced by an
authorized specialist if it is damaged. Check
your extension cables regularly and replace
them if damaged.
Check the electric power tool for damage.
Each time before re-using the electric tool,
carefully check that the safety devices or any
parts showing signs of slight damage are working
properly and as intended. Check that moving
parts are in good working order and do not jam,
and that no parts are damaged. All parts must be
correctly assembled and meet all the conditions
required to ensure that the electric power tool
works correctly. Unless stated otherwise in the
operating instructions, any damaged safety
devices and parts must be properly repaired or
replaced by an authorized service center.
Damaged switches must be replaced by a
customer service workshop. To prevent danger,
damaged power cables must be replaced by the
manufacturer or the customer service
representative of the manufacturer.
Service
Make sure that your tool is only repaired by
qualified personnel using only genuine spare
parts. This will ensure that your tool remains safe
to use.
Special safety instructions for
chainsaws
Always disconnect the mains plug before
performing any maintenance work, when the
chainsaw is not in use and before changing
any tools.
When the chainsaw is running make sure
that you keep all parts of your body away
from the chainsaw. Before starting up the
chainsaw make sure that it is not touching
anything. When you are working with a
chainsaw, a single moment of carelessness is all
it takes to catch up clothing or parts of your body
in the chainsaw.
Do not use the chainsaw while up a tree
unless you are specially trained to do this.
Otherwise you risk injuring yourself if you use the
chainsaw inappropriately whilst up a tree.
When cutting through a branch which is
under tension, take into account how it will
spring back once the cut has been made.
Once the tension in the wood fibers is released
the cut branch could hit the operator and/or seize
control of the chainsaw.
Carry the chainsaw by the front handle with
the chain stationary and the guide rail facing
backwards. Always fit the protective cover
when transporting the chainsaw or putting it
into storage. Careful handling of the chainsaw
reduces the likelihood of accidental contact with
the saw chain while it is running.
Follow the instructions for lubrication, chain
tension and replacement of accessories. A
chain which is not properly tensioned or
lubricated can break or increase the risk of
kickback.
Keep the handles dry, clean and free from oil
10

and grease. Greasy or oily handles are slippery
and will result in loss of control.
Only use the chainsaw to cut wood. The
chain must only be used to perform the work
for which it is intended. For example: Never
use the chainsaw to cut plastic or brickwork,
or building materials which are not made of
wood. Use of the chainsaw for non-intended or
non-approved work can create dangerous
situations.
Hold the saw firmly with both hands, with
fingers and thumbs hooked around the
handles. Steady yourself with your body and
arms in a position in which you can control
the kickback forces. Provided appropriate
measures are taken, an operator should be
capable of controlling the kickback forces. Never
let go of the chain saw.
Avoid abnormal working postures. Never cut
above shoulder height. This prevents
accidental contact with the tip of the rail and
offers better control over the chainsaw in
unexpected situations.
Always use the correct replacement rails and
saw chains recommended by the
manufacturer. The use of incorrect replacement
rails or saw chains may result in breakage of the
chain or kickback.
Follow the manufacturer’s instructions for
sharpening and maintaining the saw chain.
The risk of kickback is increased if the depth
limiter is set too low.
2. Layout and items supplied
(see Fig. 1/2)
1. Claw stop
2. Front hand guard
3. Front handle
4. Rear handle
5. Safety lock-off
6. ON/OFF switch
7. Oil tank cover
8. Chain wheel cover
9. Fixing screw for the chain wheel cover
10. Chain tensioning screw
11. Chain oil fill level indicator
12. Cable strain-relief clamp
13. Power cable
14. Operation/Overload indicator
15. Rear hand guard
16. Cutter rail
17. Saw chain
18. Cutter guard
3. Proper use
The chainsaw is intended for felling trees and for
cutting trunks, branches, wooden beams, boards etc.
and can be used for cross cuts and longitudinal cuts.
It is not suitable for cutting any materials other than
wood.
Please note that our devices have not been designed
for use in commercial, trade or industrial applications.
Consequently, the guarantee will be invalidated if the
equipment is used in commercial, trade or industrial
applications or for other equivalent activities.
4. Assembly
Caution: Do not connect the chainsaw to the power
supply until it has been fully assembled and the chain
tension has been adjusted. Always wear protective
gloves when working on the chainsaw to protect
yourself against injury.
4.1 Assembly of the cutter rail and the saw chain
앬Carefully unpack all parts and check that they are
complete (Fig. 2).
앬Press the chain wheel cover in the direction of the
arrow (1) out of the notched position (Fig. 3).
앬Undo the fixing screw of the chain wheel cover
(Fig. 4).
앬Take off the chain wheel cover (Fig. 5).
앬Lay the chain as shown in the groove which runs
around the cutter rail (Fig. 6/Item A).
앬Insert the cutter rail and chain as shown in the
mounting in the chainsaw (Fig. 6). At the same
time guide the chain around the chain wheel (Fig.
6/ Item B).
앬Attach the chain wheel cover and secure it with
the fixing screw (Fig. 7). Caution: Do not fully
tighten the fixing screw until after adjusting the
chain tension (refer to point 4.2).
앬Press the chain wheel cover in the direction of the
arrow (2) into the notched position (Fig. 3).
4.2 Tensioning the saw chain
Caution: Always disconnect the mains plug before
performing any checks or adjustments. Always wear
protective gloves when working on the chainsaw to
protect yourself against injury.
앬Undo the fixing screw of the chain wheel cover a
few turns (Fig. 4).
앬Adjust the chain tension with the chain tensioning
screw (Fig. 8). Turning the screw clockwise
increases the tension, turning it counter-
clockwise decreases the chain tension. The saw
chain is correctly tensioned if it can be lifted
11

around 3-4 mm in the middle of the cutter rail (Fig.
9).
앬Tighten the fixing screw of the chain wheel cover
(Fig. 7).
Caution: All of the chain links must lie properly in
the guide groove of the cutter rail.
Notes on tensioning the chain:
The saw chain must be properly tensioned to ensure
safe operation. You can tell that the chain tension is
perfect if the saw chain can be lifted by around 3-4
mm in the middle of the cutter rail. As the saw chain
heats up during cutting and thus changes in length,
please check the chain tension every 10 minutes and
adjust it again as required. This applies in particular to
new saw chains. When you have finished working
slacken the chain again, as the chain will shorten
when it cools down. This will prevent the chain from
being damaged.
4.3 Saw chain lubrication
Caution: Always disconnect the mains plug before
performing any checks or adjustments. Always wear
protective gloves when working on the chainsaw to
protect yourself against injury.
Caution: Never operate the chain if it is not lubricated
with saw chain oil. Use of the chainsaw without saw
chain oil or if the oil level is below the “min” mark (Fig.
10/ Item B) will damage the chainsaw.
Caution: Be aware of the temperature conditions:
different lubricants with completely different
viscosities are required at different ambient
temperatures. At lower temperatures you will need
low viscosity oils in order to achieve a sufficient
lubricating film. However, if the same low viscosity oil
is used during the summer it will become even thinner
due to the ambient temperatures alone, and as a
result the lubricating film could break down, causing
the chain to overheat and become damaged. In
addition, the chain oil would burn and produce
unnecessary pollutants.
Filling the oil tank:
앬Place the chainsaw on a flat surface.
앬Clean the area around the oil tank cover (Fig.
10/Item A) and then open the oil tank cover.
앬Fill the tank with saw chain oil. In the process,
make sure that no dirt enters the tank, as this
could cause the oil nozzle to become blocked.
앬Close the oil tank cover.
5. Operation
5.1 Connecting to the mains supply
앬Secure the power cable as shown in Fig. 12 to
protect it against pulling forces.
앬Connect the power cable to a professionally
installed safety mains outlet with ground contact.
5.2 Switching on/off
Switching on
앬Hold the chainsaw by the handles with both
hands as shown in Fig. 13 (thumbs under the
handles).
앬Press and hold the safety lock-off (Fig. 1/Item 5).
앬Switch on the chainsaw at the ON/OFF switch.
You can then release the safety lock-off.
Switching off
Release the ON/OFF switch (Fig. 1/Item 6).
The integrated brake will bring the running chainsaw
to a standstill within a very short space of time.
Always disconnect the mains plug when you stop
working, even if it is only for a short time.
Caution: Always carry the saw by the front handle. If
the saw is plugged in and you carry it by the rear
handle (which is where the switches are located),
then there is a risk that you could accidentally press
the safety lock-off and the ON/OFF switch at the
same time, and the chainsaw could inadvertently start
up.
Explanation of the Operation/Overload indicator
(Fig. 2/Item 14):
Green LED: The green LED lights on when the
device is in use.
Red LED: The red LED lights on if the device is
overloaded. It does not go out until
the device is switched off and back
on again.
5.3 Safety devices – motor brake
The motor brakes the saw chain as soon as the
ON/OFF switch (Fig. 1/Item 6) is released or the
power supply is interrupted. This significantly reduces
the risk of injury that would otherwise be present if the
chain continued to run after being switched off or
disconnected.
Chain brake
The chain brake is a safety mechanism which is
triggered via the front hand guard (Fig. 1/Item 2). If
12

kickback causes the chainsaw to suddenly jerk back
then the chain brake trips and stops the saw chain in
less than 0.1 seconds. You must check the operation
of the chain brake on a regular basis. To do this, fold
the hand guard (Fig. 1/Item 2) forward and briefly
switch the chainsaw on. The saw chain must not start
up.
Pull back the front hand guard (Fig. 1/Item 2) until it
engages to release the chain brake.
Caution: Never use the saw if the safety equipment
is not working properly. Never try to repair safety
related protection systems yourself – always have
any work done by our service department or by a
similarly qualified workshop.
Hand guard
The front hand guard (which also acts as the chain
brake at the same time) (Fig. 1/Item 2) and the rear
hand guard (Fig. 2/ Item 15) protect against finger
injuries resulting from contact with the saw chain if the
chain breaks because it is overloaded.
6. Working with the chainsaw
6.1 Preparations
To ensure that you can work safely, check the
following points before every use:
Condition of the chain saw
Inspect the chainsaw before the start of work for
damage to the housing, the power cable, the saw
chain and the cutter rail. Never use a chainsaw which
is obviously damaged.
Oil container
Fill level of the oil container. Even while working, keep
checking that sufficient oil is in the system. To avoid
damaging the chainsaw, never run the saw if there is
no oil in the system or if the oil drops below the “min”
mark (Fig. 10/Item B).
On average, a single filling will last around 15 minutes
depending on the number of pauses in cutting and
the loads involved.
Saw chain
Tension of the saw chain, condition of the cutting
elements. The sharper the chainsaw, the easier and
more controllable it is to operate the chainsaw. The
same also applies to the chain tension. Again, while
working also check the chain tension every 10
minutes in order to increase your safety. New saw
chains in particular often tend to expand more.
Chain brake
Check the operation of the chain brake as described
in the chapter “Safety devices” and then release it.
Safety clothing
Always wear appropriate tight-fitting safety clothing
like special trousers which protect against cuts,
protective gloves and safety shoes.
Hearing protection and protective goggles.
When felling trees or performing forest work, always
wear a protective helmet with integral face and
hearing protection. This will offer protection against
falling branches and any branches if they spring back.
6.2 Description of the correct procedures for
basic use of the chainsaw
Felling a tree (Figs. 14-17)
If two or more persons are working at the same time
on felling and cutting back then the minimum distance
between the tree being felled and the tree being cut
back should be at least twice the height of the tree
being felled (Fig. 14). When felling trees, care must
be taken to ensure that no other persons are
endangered, no power supply lines are hit and no
material damage is caused to equipment or property.
In the event that a tree comes into contact with a
power supply line, the responsible power supply
company should be informed immediately.
When working with the saw on a slope, the operator
of the chainsaw must be standing at a higher point on
the slope than the tree being felled, as the tree will roll
or slip downhill once it has been felled (Fig. 15).
Before felling the tree you must first plan and if
necessary clear an escape route. This escape route
must lead away diagonally in the opposite direction to
the expected fall direction – this can be seen in Fig.
16 (A= danger zone, B= direction of fall, C= escape
zone).
Before felling the tree you must take into account the
natural inclination of the tree, the location of larger
branches and the wind direction, as this will help you
to correctly determine the direction in which the tree
will fall.
Dirt, stones, loose bark, nails, staples and wire must
be removed from the tree.
Making the felling notch (Fig. 17)
Cut a notch (A) at right angles to the fall direction to a
depth of 1/3 of the tree diameter as shown in Fig. 17.
First make the lower horizontal felling notch (1). This
prevents the saw chain or the guide rail from
becoming trapped when the second felling notch is
13

made.
Making the felling cut (Fig. 17)
The felling cut should be positioned at least 50 mm
above the horizontal felling notch. Make the felling cut
(B) parallel to the horizontal felling notch. The felling
cut should be cut to a depth which leaves a thin strip
(felling hinge strip) (D) which can act as a hinge. This
strip prevents the tree from rotating and falling in the
wrong direction. Do not cut through the strip. When
the felling cut gets close to the strip the tree should
start to fall. If it becomes clear that the tree may well
fall in a different direction to the desired fall direction
(C) or it starts to lean back and traps the saw chain,
interrupt the felling cut and insert wedges made of
wood, plastic or aluminum to open out the cut and
control the lean of the tree until it leans in the required
direction.
When the tree starts to fall, remove the chainsaw
from the cut, switch it off, place it on the ground and
exit the danger zone via the planned escape route.
Watch out for falling branches and take care not to
trip.
Removing branches
Here we are talking about removing branches from
the felled tree. When removing branches, leave any
downward facing branches which are supporting the
tree until the trunk of the tree has been cut up.
Smaller branches should be removed as shown in
Fig. 18 (A= cutting direction when removing
branches, B= keep away from the ground! Supporting
branches should be left until the trunk is cut up) in a
single cut from the bottom to the top. Any branches
which are under tension should be cut from the
bottom to the top to prevent the saw from becoming
trapped.
Cutting the tree trunk into lengths
Here we are looking at the process of cutting the
felled tree into sections. Make sure you have a sure
footing and distribute your body weight evenly onto
both feet. If possible the trunk should be underlaid
and supported with branches, beams or wedges. For
easy cutting follow the simple instructions below.
If the full length of the tree trunk is evenly supported
as shown in Fig. 19 then proceed by cutting from the
top down. Take care not to cut into the ground in the
process.
If the weight of the tree trunk is resting on one end as
shown in Fig. 20, first cut through 1/3 of the trunk
diameter from the underside (A) in order to prevent it
from splintering. Make the second cut from the top
(2/3 of the diameter) to the height of the first cut (B)
(this prevents the chainsaw from being trapped).
If the weight of the tree trunk is resting on both ends
as shown in Fig. 21, first cut through 1/3 of the trunk
diameter from the top (A) in order to prevent it from
splintering. Make the second cut from underneath
(2/3 of the diameter) to the height of the first cut (B)
(this prevents the chainsaw from being trapped).
When working with the saw on a slope, always
position yourself at a higher point on the slope above
the tree as shown in Fig. 15. In order to retain full
control at the moment when the cut goes through,
reduce pressure towards the end of the cut without
releasing your firm grip on the handles of the
chainsaw. Take care to ensure that the chainsaw
does not touch the ground.
After completing the cut, wait for the chain saw to
come to a standstill before removing the chainsaw.
Always switch off the motor of the chainsaw before
moving from tree to tree.
6.3 Kickback
The term “kickback” describes what happens when
the running chainsaw suddenly kicks upward and
backward. Usually, this is caused by contact between
the tip of the cutter rail and the workpiece or the saw
chain becoming trapped.
In the event of kickback, large forces occur suddenly
and violently. As a result, the chainsaw usually reacts
uncontrollably. This can often result in very serious
injuries to the worker or persons in the vicinity. The
risk of kickback is particularly great when performing
cross cuts, angled cuts and longitudinal cuts, as it is
not possible to use the claw stop on these cuts. You
should therefore avoid these cuts as far as possible
and take particular care when they are unavoidable.
The risk of kickback is at its greatest when the saw is
positioned for a cut in the region of the tip of the cutter
rail, as the leverage effect is greatest there (Fig. 22). It
is therefore safest to position the saw flat and as
close as possible to the claw stop before making the
cut (Fig. 23).
Caution:
앬Make sure that the chain tension is always
correctly adjusted.
앬Only use a chainsaw if it is in perfect working
order.
앬Only work with a saw chain that has been
properly sharpened in accordance with the
instructions.
앬Never operate the saw above shoulder height.
앬Never cut with the upper edge or the tip of the
sword.
앬Always hold the chainsaw firmly with both hands.
14

앬Whenever possible, use the claw stop as a
leverage point.
Cutting wood which is under tension
Special care is required when cutting wood which is
under tension. Wood which is under tension from
which it is released by cutting may in some cases
react completely unpredictably and uncontrollably. In
the worst case this could result in extremely severe or
even fatal injuries (Fig. 24-26).
This type of work must only be performed by persons
who have been specially trained.
7. Technical data
Mains voltage: 230 V ~ 50 Hz
Power rating: 2000 W
Cutter rail length: 40 cm
Cutting length, max.: 375 mm
Cutting speed at rated rpm: 13.5 m/s
Oil tank capacity: 300 ml
Weight with cutter rail and chain: 11.5 kg
Protection class: II
Guaranteed sound power level under load 107 dB(A)
Sound pressure level under load 87 dB(A)
Acceleration: (calculated according to EN 50144)
Handle under load 4.52 m/s2
8. Maintenance
8.1 Replacing the saw chain and cutter rail
The cutter rail needs to be replaced if
앬the guide groove of the cutter rail is worn;
앬the nose sprocket in the cutter rail is damaged or
worn.
Proceed as described in the section “Assembly of the
cutter rail and the saw chain”.
8.2 Checking the automatic chain lubrication
You should check the operation of the automatic
chain lubrication system on a regular basis in order to
guard against overheating and the associated
damage to the cutter rail and the saw chain. To do
this, point the tip of the cutter rail towards a smooth
surface (board, section of a cut tree) and allow the
chainsaw to run.
If an increasing oil trace becomes evident during this
process then the automatic chain lubrication system
is working properly. If no clear oil trace is evident then
please refer to the corresponding instructions in
“Troubleshooting”. If the information contained there
still fails to remedy the situation then please contact
our service department or another similarly qualified
workshop.
Caution: Do not actually touch the surface with the
tip of the cutter rail when performing this test. Keep a
safe distance (approx. 20 cm).
8.3 Sharpening the saw chain
Effective working with the chainsaw is only possible if
the saw chain is in good condition and sharp. This
also reduces the risk of kickback.
The saw chain can be re-sharpened by any dealer.
Do not attempt to sharpen the saw chain yourself
unless you have the necessary special tools and
experience.
9. Cleaning and storing
앬Regularly clean the clamping mechanism by
blowing it out with compressed air or cleaning it
with a brush. Do not use tools for cleaning.
앬Keep the handles free of grease so that you can
maintain a firm grip.
앬Clean the device as required with a damp cloth
and, if necessary, mild washing up liquid.
앬If the chainsaw is not to be used for an extended
period of time then you should remove the chain
oil from the tank. Briefly immerse the saw chain
and the cutter rail in an oil bath and then wrap
them in oil paper.
Caution:
앬Always disconnect the mains plug before
cleaning the chainsaw.
앬Never immerse the unit in water or other liquids in
order to clean it.
앬Store the chainsaw in a safe and dry place out of
the reach of children.
10. Notes on environmental protection
/ disposal
The device must be properly disposed of when it
reaches the end of its service life. Cut off the power
cable to prevent it being used by mistake. The device
must not be disposed of as domestic waste. Instead,
in the interests of the environment it should be
disposed of via a designated recycling or disposal
point for electrical equipment. Please contact your
local authorities for information about proper disposal
of the device in your area. Packaging materials and
15

worn accessory parts should also be disposed of at
the designated recycling or disposal points.
11. Ordering replacement parts
Please provide the following information on all orders
for replacement parts:
앬Model/type of the tool
앬Article number of the tool
앬ID number of the tool
앬Part number of the required replacement part
Helpline Numbers:
UK: 0151 649 1500
IRE: 189 094 6244
16

17
Cause Fault Remedy
Chainsaw does not work
at all
Quick stop brake has been triggered Pull the hand protection back to the
normal position.
No power supply Check the power supply.
Defective mains outlet Try an alternative source of electrical
power, replace if necessary.
Power extension cable damaged Check the cable and replace as
required.
Defective fuse Replace the fuse.
Chainsaw operates
intermittently
Power cable damaged Consult a specialist workshop.
Loose connection (external) Consult a specialist workshop.
Loose connection (internal) Consult a specialist workshop.
ON/OFF switch defective Consult a specialist workshop.
Saw chain dry No oil in the tank Fill up with oil.
Oil tank cap breather blocked Clean the oil tank cap.
Oil outlet blocked Clear the oil outlet.
Chain brake does not
work
Problem with the switch mechanism in
the front hand guard
Consult a specialist workshop.
Chain/guide rail hot No oil in the tank Fill up with oil.
Oil tank cap breather blocked Clean the oil tank cap.
Oil outlet blocked Clear the oil outlet
Blunt chain Re-sharpen or replace the chain.
Chainsaw juddering,
vibrating or not sawing
properly
Chain tension too loose Adjust the chain tension.
Blunt chain Re-sharpen or replace the chain.
Worn chain Replace the chain.
Saw teeth pointing in the wrong direction Reinstall the saw chain with the teeth
facing in the correct direction.
12. Troubleshooting
Caution!
Before troubleshooting, switch off the tool and disconnect the mains plug.
The table below contains a list of fault symptoms and explains what you can do to remedy the problem if your
tool fails to work properly. If the problem still persists after working through the list then please contact your
nearest service workshop.

18
kerklärt folgende Konformität gemäß EU-Richtlinie
und Normen für Artikel
tdeclares conformity with the EU Directive
and standards marked below for the article
pdéclare la conformité suivante selon la
directive CE et les normes concernant lʼarticle
verklaart de volgende conformiteit in overeen-
stemming met de EU-richtlijn en normen voor
het artikel
mdeclara la siguiente conformidad a tenor de la
directiva y normas de la UE para el artículo
Odeclara a seguinte conformidade de acordo
com a directiva CE e normas para o artigo
Uförklarar följande överensstämmelse enl. EU-
direktiv och standarder för artikeln
qilmoittaa seuraavaa Euroopan unionin direkti-
ivien ja normien mukaista yhdenmukaisuutta
tuotteelle
erklærer herved følgende samsvar med EU-
direktiv og standarder for artikkel
Tзаявляет о соответствии товара
следующим директивам и нормам EC
Bizjavljuje sljedeću uskladjenost s odredbama i
normama EU za artikl.
Qdeclarå urmåtoarea conformitate cu linia direc-
toare CE μi normele valabile pentru articolul.
Zürün ile ilgili olarak AB Yönetmelikleri ve
Normlar∂ gere©ince aμa©∂daki uygunluk aç∂kla
mas∂n∂ sunar.
z‰ËÏÒÓÂÈ ÙËÓ ·ÎfiÏÔ˘ıË Û˘Ìʈӛ· Û‡Ìʈӷ ÌÂ
ÙËÓ √‰ËÁ›· ∂∂ Î·È Ù· ÚfiÙ˘Ô ÁÈ· ÙÔ ÚÔ˚fiÓ
Cdichiara la seguente conformità secondo la
direttiva UE e le norme per lʼarticolo
lattesterer følgende overensstemmelse i
henhold til EU-direktiv og standarder for produkt
jprohlašuje následující shodu podle směrnice
EU a norem pro výrobek.
Aa következő konformitást jelenti ki a termékek-
re vonatkozó EU-irányvonalak és normák szerint
Xpojasnjuje sledečo skladnost po smernici EU
in normah za artikel.
deklaruje zgodność wymienionego poniżej
artykułu z następującymi normami na
podstawie dyrektywy WE.
Wvydáva nasledujúce prehlásenie o zhode podľa
smernice EÚ a noriem pre výrobok.
eдеклаpиpа следното съответствие съгласно
диpективите и ноpмите на ЕС за пpодукта.
1заявляє про відповідність згідно з Директивою
ЄС та стандартами, чинними для даного товару
.deklareerib vastavuse järgnevatele EL direktiivi
dele ja normidele
Gdeklaruoja atitikti pagal ES direktyvas ir normas
straipsniui
4izjavljuje sledeçi konformitet u skladu s odred
bom EZ i normama za artikl
HAtbilstības sertifikāts apliecina zemāk minēto preču
atbilstību ES direktīvām un standartiem
ESamræmisyfirl‡sing sta›festir eftirfarandi samræmi
samkvæmt reglum Evfrópubandalagsins og stö›lum
fyrir vörur
Konformitätserklärung ISC-GmbH · Eschenstraße 6 · D-94405 Landau/Isar
Elektro-Kettensäge SCS 2000
Art.-Nr.: 45.002.11 I.-Nr.: 01017 Archivierung: 4500210-21-4155050
Subject to change without notice
98/37/EG
2006/95/EG
97/23/EG
89/336/EWG_93/68/EEC
90/396/EWG
89/686/EWG
87/404/EWG
R&TTED 1999/5/EG
2000/14/EG:
95/54/EG:
97/68/EG:
X
X
X
X
EN 50144-1; EN 50144-2-13; EN 55014-1; EN 55014-2; EN 61000-3-2; EN 61000-3-11; KBV V
TÜV Produkt-Service GmbH, Ridlerstraße 31, 80339 München;
M6 07 05 24192 316
LWM = 105,8 dB; LWA = 107 dB
P = 2,0 kW
Landau/Isar, den 26.03.2007
Gottelt
Product-Management
Weichselgartner
General-Manager

19
tFor EU countries only
Never place any electric tools in your household refuse.
To comply with European Directive 2002/96/EC concerning old electric and electronic equipment and its
implementation in national laws, old electric tools have to be separated from other waste and disposed of
in an environment-friendly fashion, e.g. by taking to a recycling depot.
Recycling alternative to the demand to return electrical devices:
As an alternative to returning the electrical device, the owner is obliged to cooperate in ensuring that the
device is properly recycled if ownership is relinquished. This can also be done by handing over the used
device to a returns center, which will dispose of it in accordance with national commercial and industrial
waste management legislation. This does not apply to the accessories and auxiliary equipment without
any electrical components which are included with the used device.
The reprinting or reproduction by any other means, in whole or in part,
of documentation and papers accompanying products is permitted only
with the express consent of ISC GmbH. Technical changes subject to change
Given unfavorable conditions in the power supply the equipment may cause the voltage to drop temporarily. If the supply
impedance “Z” at the connection point to the public power supply exceeds 0,261 Ohm, it may be necessary to take further
measures before the equipment can be used as intended from this power supply. If necessary, you can ask your local
electricity supply company for the impedance value.

EH 05/2007
GUARANTEE CERTIFICATE
Dear Customer,
All of our products undergo strict quality checks to ensure that they reach you in perfect condition. In the
unlikely event that your device develops a fault, please contact our service department at the address
shown on this guarantee card. Of course, if you would prefer to call us then we are also happy to offer our
assistance under the service number printed below. Please note the following terms under which guarantee
claims can be made:
1. These guarantee terms cover additional guarantee rights and do not affect your statutory warranty
rights. We do not charge you for this guarantee.
2. Our guarantee only covers problems caused by material or manufacturing defects, and it is restricted to
the rectification of these defects or replacement of the device. Please note that our devices have not
been designed for use in commercial, trade or industrial applications. Consequently, the guarantee is
invalidated if the equipment is used in commercial, trade or industrial applications or for other
equivalent activities. The following are also excluded from our guarantee: compensation for transport
damage, damage caused by failure to comply with the installation/assembly instructions or damage
caused by unprofessional installation, failure to comply with the operating instructions (e.g. connection
to the wrong mains voltage or current type), misuse or inappropriate use (such as overloading of the
device or use of non-approved tools or accessories), failure to comply with the maintenance and safety
regulations, ingress of foreign bodies into the device (e.g. sand, stones or dust), effects of force or
external influences (e.g. damage caused by the device being dropped) and normal wear resulting from
proper operation of the device.
The guarantee is rendered null and void if any attempt is made to tamper with the device.
3. The guarantee is valid for a period of 2 years starting from the purchase date of the device. Guarantee
claims should be submitted before the end of the guarantee period within two weeks of the defect being
noticed. No guarantee claims will be accepted after the end of the guarantee period. The original
guarantee period remains applicable to the device even if repairs are carried out or parts are replaced.
In such cases, the work performed or parts fitted will not result in an extension of the guarantee period,
and no new guarantee will become active for the work performed or parts fitted. This also applies when
an on-site service is used.
Of course, we are also happy offer a chargeable repair service for any defects which are not covered by
the scope of this guarantee or for units which are no longer covered. To take advantage of this service,
please send the device to our service address.
Sovereign Customer Helpline 0044 (0) 151 649 1500
Table of contents
Other Sovereign Chainsaw manuals

Sovereign
Sovereign SCS 37/1 User manual

Sovereign
Sovereign CS4100A-5 User manual

Sovereign
Sovereign PCS38Z Operation instructions

Sovereign
Sovereign Electric chainsaw Instructions for use

Sovereign
Sovereign HS-CS 37 User manual

Sovereign
Sovereign SCS718A User manual

Sovereign
Sovereign 37 cc User manual

Sovereign
Sovereign SCS 38 User manual

Sovereign
Sovereign SCS 38/45 User manual

Sovereign
Sovereign A011022 User guide