spacewalker HOT-255 User manual

HOT-255 Sound Card
User Manual
(Deluxe)
Spacewalker Sound System

2
NOTICES AND WARNINGS
Federal Communications Commission Radio Frequency Inter-
ference Statement
Note: This equipment has been tested and found to comply with the limits
for a Class “B” digital device, pursuant to part 15 of the FCC rules. These
limits are designed to provide reasonable protection against harmful inter-
ference in a residential installation. This equipment generates, uses and
can radiate frequency energy and, if not installed and used in accordance
with the instructions, may cause harmful interference to radio communica-
tions. However, there is no guarantee that interference will not occur in a
particular installations. If this equipment does cause harmful interference
to radio or television reception, which can be determined by turning the
equipment off and on, the user is encouraged to try to correct the interfer-
ence by one or more of the following measures:
1. Reorient or relocate the receiving antenna.
2. Increase the separation between the equipment and the receiver.
3. Connect the equipment into an outlet on a circuit different from that
to which the receiver is connected.
4. Consult the dealer or an experienced radio/TV technician for help.
Declaration of Conformity
For the following product:
HOT-255 PCI 3D Wavetable sound card
We confirm that it complies with part 15 of the FCC Rules. Operation is
subject to the following two conditions: (1) This device may not cause
harmful interference, and (2) this device must accept any interference re-
ceived, including interference that may cause undesired operation.
Trademarks
All products name are for identification only and are trademarks of their
respective companies.
NOTICES AND WARNINGS

3
CONTENTS
TABLEOF
NOTICES AND WARNINGS ............................................................. 2
FEDERAL COMMUNICATIONS COMMISSION RADIO FREQUENCY INTERFERENCE
STATEMENT ............................................................................................ 2
DECLARATION OF CONFORMITY ................................................................. 2
TRADEMARKS.......................................................................................... 2
TABLE OF CONTENTS ..................................................................... 3
PART 1 INTRODUCTION.................................................................. 7
SPACEWALKER SOUND SYSTEM HOT-255 SOUND CARD ............................. 7
WHAT IS AUDIOPCI™? .......................................................................... 7
WHY PCI?............................................................................................. 7
SYNTHESIZER .......................................................................................... 7
DIGITAL AUDIO....................................................................................... 8
MIDI .................................................................................................... 8
MIXER ................................................................................................... 8
INCLUDED SOFTWARE............................................................................... 9
MULTI-LANGUAGE WINDOWS 95 DRIVER & VOYETRA - AUDIOSTATION ....... 9
SPACEWALKER INSTALL LAUNCHER............................................................ 9
ABOUT THIS MANUAL ............................................................................. 9
PART 2 INSTALLING HOT-255 ..................................................... 10
WHAT YOU NEED ................................................................................. 10
WHAT YOU SHOULD HAVE .................................................................... 10
PREPARING YOUR COMPUTER ................................................................. 10
CONNECTORS ........................................................................................ 12
Modem/TAD In/Out ......................................................................... 12
TV Tuner/IDE/Sony CD Input.......................................................... 12
CD Audio Input................................................................................ 12
Line Out/Headphone........................................................................ 12
Aux Input ......................................................................................... 13
Mic In .............................................................................................. 13
Joystick/MIDI .................................................................................. 13
PLACING THE CARD IN YOUR COMPUTER.................................................. 13
PART 3 INSTALLING AUDIOPCI™ SOFTWARE ...................... 15
WINDOWS 95........................................................................................ 15
CONTENTS

4
Installing/Updating the ENSONIQ AudioPCI™ Driver................... 15
Updating the Current Driver .................................................................... 15
Installing the Multimedia Extensions ....................................................... 17
Configuring the ENSONIQ AudioPCI™.......................................... 18
MIDI Synthesizer Wavesets ..................................................................... 18
Locking the MIDI Waveset ...................................................................... 19
Legacy Emulation .................................................................................... 20
Allow LPT Interrupt Sharing ................................................................... 20
Joystick Port ............................................................................................ 20
Microphone BIAS .................................................................................... 20
Add Mixer to Taskbar .............................................................................. 20
Driver Files .............................................................................................. 21
PCI Resources.......................................................................................... 21
Configuring the ENSONIQ AudioPCI™ Legacy Device.................. 21
Disabling/Uninstalling the ENSONIQ AudioPCI™......................... 23
Disabling the driver ................................................................................. 23
Uninstalling the AudioPCI™ ................................................................... 24
WINDOWS 95 OSR2 ............................................................................. 25
Installing/Updating the ENSONIQ AudioPCI™ Driver................... 25
Updating the Current Driver .................................................................... 25
Installing the Multimedia Extensions ....................................................... 25
Configuring the ENSONIQ AudioPCI™ and Legacy Device........... 26
Disabling/Uninstalling the ENSONIQ AudioPCI™......................... 26
Disabling the driver ................................................................................. 26
Uninstalling the AudioPCI™ ................................................................... 27
WINDOWS NT 4.0................................................................................. 28
Installing/Updating the ENSONIQ AudioPCI™ .............................. 28
Configuring the ENSONIQ AudioPCI™.......................................... 29
Joystick .................................................................................................... 29
Synth Wave File ...................................................................................... 30
ENSONIQ Mixer ..................................................................................... 31
Uninstalling the ENSONIQ AudioPCI™ ......................................... 31
WINDOWS 3.X....................................................................................... 32
Installing/Updating the ENSONIQ AudioPCI™ Drivers ................. 32
Configuring the ENSONIQ AudioPCI™.......................................... 33
ENSONIQ Soundscape Emulation ........................................................... 33
Sound Blaster Emulation ......................................................................... 33
Legacy Emulation .................................................................................... 33
Joystick .................................................................................................... 33
Microphone BIAS .................................................................................... 33
ENSONIQ Mixer ..................................................................................... 34
Uninstalling the ENSONIQ AudioPCI™ ......................................... 34

5
PART 4 USING HOT-255 IN WINDOWS 95 .................................. 35
THREE OPERATING MODES ..................................................................... 35
Windows 95 Mode............................................................................ 35
Windows 95 MS-DOS Prompt.......................................................... 35
Windows 95 MS-DOS Mode ............................................................ 35
Using MS-DOS Mode .............................................................................. 36
How MS-DOS Mode works ..................................................................... 36
CHANGES MADE TO THE SYSTEM............................................................. 36
Files Deleted.................................................................................... 36
Files Added...................................................................................... 36
AUTOEXEC.BAT ............................................................................. 37
CONFIG.SYS ................................................................................... 38
DOSSTART.BAT .............................................................................. 38
INSTALLING GAMES FOR AUDIOPCI™..................................................... 39
Determining Resources.................................................................... 39
Selecting the Best Sound Options in a game .................................... 40
Music Options .......................................................................................... 41
Digital Audio Options .............................................................................. 42
PART 5 USING AUDIOPCI™ APPLICATIONS IN WIN95 ......... 43
ENSONIQ MIXER ............................................................................... 43
Real-Time Effects............................................................................. 43
Recording ........................................................................................ 44
Microphone...................................................................................... 44
Options Menu .................................................................................. 45
MS-DOS MODE UTILITIES.................................................................... 45
APCONFIG.EXE ............................................................................. 45
APMIXER.EXE ................................................................................ 46
MT32.EXE ....................................................................................... 47
PART 6 VOYETRA-AUDIOSTATION INSTALLATION............. 49
INSTALLATION UNDER WINDOWS 95 / 3.X/ NT 4.0................................... 49
APPENDIX A MORE ABOUT MIDI ............................................... 50
WHAT IS MIDI?................................................................................... 50
GENERAL MIDI.................................................................................... 51
APPENDIX B TROUBLESHOOTING IN WINDOWS 95 ............. 53
CONFIGURATION .................................................................................... 53
USING TWO SOUND CARDS .................................................................... 54
MULTIMEDIA COMPONENTS (I.E., MEDIA PLAYER)..................................... 54
AUDIO PROBLEMS.................................................................................. 54

6
VOLUME AND BALANCE LEVELS.............................................................. 55
RECORDING WITH AMICROPHONE............................................................ 55
CD AUDIO ........................................................................................... 56
PROBLEMS WITH GAMES ......................................................................... 56
APPENDIX C ERROR MESSAGES ................................................ 58
APINIT.COM .................................................................................... 58
APCONFIG.EXE ............................................................................... 61
MT32.EXE......................................................................................... 62
APMIXER.EXE ................................................................................. 63
PCI SPECIFIC ERRORS............................................................................ 64
APPENDIX D TECHNICAL SPECIFICATIONS........................... 65
HOST INTERFACE ................................................................................... 65
SYNTHESIZER ........................................................................................ 65
FMSYNTHESIS ..................................................................................... 65
DIGITAL AUDIO..................................................................................... 65
AUDIO MIXING ..................................................................................... 66
INTERNAL AUDIO CONNECTORS ............................................................... 66
CD In:.............................................................................................. 66
TV Tuner In: .................................................................................... 66
Telephone Answering Device (TAD) In/Out: ................................... 67
EXTERNAL AUDIO CONNECTORS .............................................................. 67
Mic In: ............................................................................................. 67
Aux In: ............................................................................................. 67
Line Out:.......................................................................................... 68
CONNECTOR PIN-OUT ............................................................................ 68

7
Spacewalker Sound System HOT-255 Sound Card
The Spacewalker Sound System HOT-255 Sound Card is designed based
on ENSONIQ’s breakthrough AudioPCITM technology to take full advan-
tage of the PCI bus’ architecture, while maintaining compatibility with
older legacy software. Legacy game compatibility was originally a prob-
lem when considering a PCI based sound card solution. The problem was
that existing software and games for the PC had been designed to run on
ISA based sound cards. To function properly, those cards must write di-
rectly to the inherently slow ISA Direct Memory Access (DMA) control-
ler. These signals are not present on the PCI bus. AudioPCI™ allows legacy
software to function as if the ISA signals are present, while utilizing the
faster speed of the PCI bus.
AudioPCI™ technology was developed by ENSONIQ, a recognized leader
in the electronic musical instrument industry. The same advanced chip
designs that function as the engines for ENSONIQ’s line of professional-
level synthesizers, samplers, and effect processors have been used in
AudioPCI™.
What is AudioPCI™ ?
AudioPCI™ technology is a combination of hardware and software that
provides the highest quality in PC sound and the greatest compatibility
with current standards.
Why PCI?
The PCI bus is far superior to the ISA bus. It is capable of transferring data
on a wider 32-bit bandwidth bus. This allows much more data to pass from
the PCI bus to the host processor. The ISA bus is only capable of 16-bit
bandwidth transfers. Using the PCI bus will allow a 4 to 20 times increase
in speed over much slower DMA transfers on the ISA bus. This drastically
reduces the overhead on the host CPU. This tremendous processing power
opens up new possibilities for sound cards. Real-time software based sound
fields are now possible without bogging down the host CPU.
Here’s a brief overview of Spacewalker Sound System HOT-255 Sound
Card’s main features:
Synthesizer
•Provides up to 32 voices of wavetable synthesis.
1
1
PART INTRODUCTION

8
INTRODUCTION
•Includes two and four megabyte General MIDI/ Roland MT-32
sound sets as well as AdLib/SoundBlaster Pro and FM synthe-
sizer emulation.
•Because of the high data transfer rates that the PCI bus will al-
low, HOT-255 is able to utilize a flexible method of storing and
accessing wavetable sounds. All 128 General MIDI instrument
sounds are stored on the PC’s hard drive and accessed using the
computer’s on-board RAM. This technology allows for expand-
able sound sets.
Digital Audio
•Allows the recording of CD-quality stereo sound (up to 16 bits,
48.0 kHz sampling rate) from Aux, CD and TV Tuner Inputs as
well as from the internal synthesizer.
•Allows the recording of sound from the Mic Input with or with-
out 5-volt BIAS power or 30-dB boost.
•Allows the recording of sound from the Modem/TAD Input/Out-
put.
•Playback of stereo wave samples of 8- or 16-bit sound.
•Enables playback of standard PC Wave files (.VOC,.WAV, etc.).
MIDI •Provides an MPU-401 compatible MIDI interface, including
MIDI In and MIDI Out/Thru (requires external cable, not sup-
plied).
•Allows the recording of MIDI events from an external MIDI key-
board controller.
•Enables playback of standard PC MIDI files (i.e., .MID, .ROL,
etc.) to either the on-board synthesizer or to an external synthe-
sizer.
Mixer
Provided software mixer allows synthesizer and digital audio output to be
mixed with signal arriving at the card’s CD, Aux, Mic, Modem and TV
Tuner Inputs.

9
INTRODUCTION
IncludedSoftware
HOT-255 is supplied with installation software, configuration utilities, de-
vice drivers and initialization utilities.
Multi-Language Windows 95 Driver & Voyetra - AudioStation
Provides multi-language Windows 95 driver & Voyetra - AudioStation in
English, German, French, Italian, Dutch, Spanish, Swedish and Japanese.
Spacewalker Install Launcher
User friendly GUI ( Graphic user interface ) Spacewalker Install Launcher,
automatic detection and installation of Multi-Language Windows 95 Driver
& Voyetra - AudioStation.
About This Manual
Many people do not read manuals; however, an ounce of caution is worth
a pound of prevention, so we do strongly recommend that you take a few
moments to go through these pages before installing your HOT-255 hard-
ware and software. In particular, we recommend that you carefully read
the information preceded by the following two symbols, which have these
special meanings:
This is a CAUTION. It lets you know that if you fail to heed the
accompanying message, you could damage your system or software.
Be sure to read these!
This is a hint, tip, or other piece of valuable information that can
save you time and energy, especially during initial installation.

10
PART 2
2
What You Need
To use HOT-255, your computer system should meet the following re-
quirements:
•75 MHz Pentium processor or better
•VGA or SVGA graphics adapter and monitor
•Mouse
•Windows 95, Windows 95 OSR2, Windows NT 4.0, DOS 6.22
or Windows 3.x
•One open PCI expansion slot
•At least 12 MB of free hard disk space installing all HOT-255
software and samples.
•Enough RAM to accommodate the system, plus the waveset cho-
sen (2 MB and 4 MB wavesets included)
•You will also need a set of powered speakers or headphones.
What You Should Have
Check to see that your Spacewalker Sound System HOT-255 package con-
tains all of the following items:
•The HOT-255 sound card in anti-static bag
•The HOT-255 User Manual
•The HOT-255 Installation CD with Manual
Preparing Your Computer
As you install the HOT-255, follow these basic precautions:
Some PC’s maintain power to the motherboard even when the power
switch is turned off.
•If it is necessary to disconnect peripheral equipment cables from
the back of the computer, be sure to note cable positions for proper
reconnection later.
INSTALLING HOT-255

11
INSTALLING HOT-255
•Remove the computer cover’s mounting screws and save them
for its replacement. Slide the cover off the computer and place it
aside while you install the HOT-255.
•Handle the card by the edges only, being careful not to touch
edge connectors or exposed circuitry.
•Keep the board inside its protective anti-static packaging until
you are ready to install it.
•Never place the board on a metal surface.
•Static electricity can damage your equipment, but can be easily
avoided. Before installing any internal optional equipment such
as the HOT-255, consult your computer manufacturer’s manual
regarding grounding, power connection, and peripheral card in-
stallation.
You can ground yourself by wearing an anti-static wrist strap (avail-
able at most electronics stores). To use this wrist strap:
1. Place the wrist strap on your wrist. Look for an alligator clip on
the other end of the wrist strap’s elastic cord. Some wrist straps
require you to snap (attach) the clip to the elastic cord.
2. Attach the alligator clip securely to the edge of a D-shell shaped
connector in one of the computer’s serial ports (the D-shell shape
surrounds the pins) or to an unpainted portion of the computer’s
chassis. To maintain proper grounding, the clip must remain se-
curely attached (grounded) to the serial port connector or to an
unpainted portion of the computer’s chassis throughout the in-
stallation procedure.
If you don’t have an anti-static wrist strap, you can ground yourself
by touching and maintaining continuous contact with an exposed
metal surface of the computer (i.e., an unpainted portion of the
computer’s rear panel) while handling or touching any chips or in-
ternal components such as the HOT-255.
12
INSTALLING HOT-255
Connectors
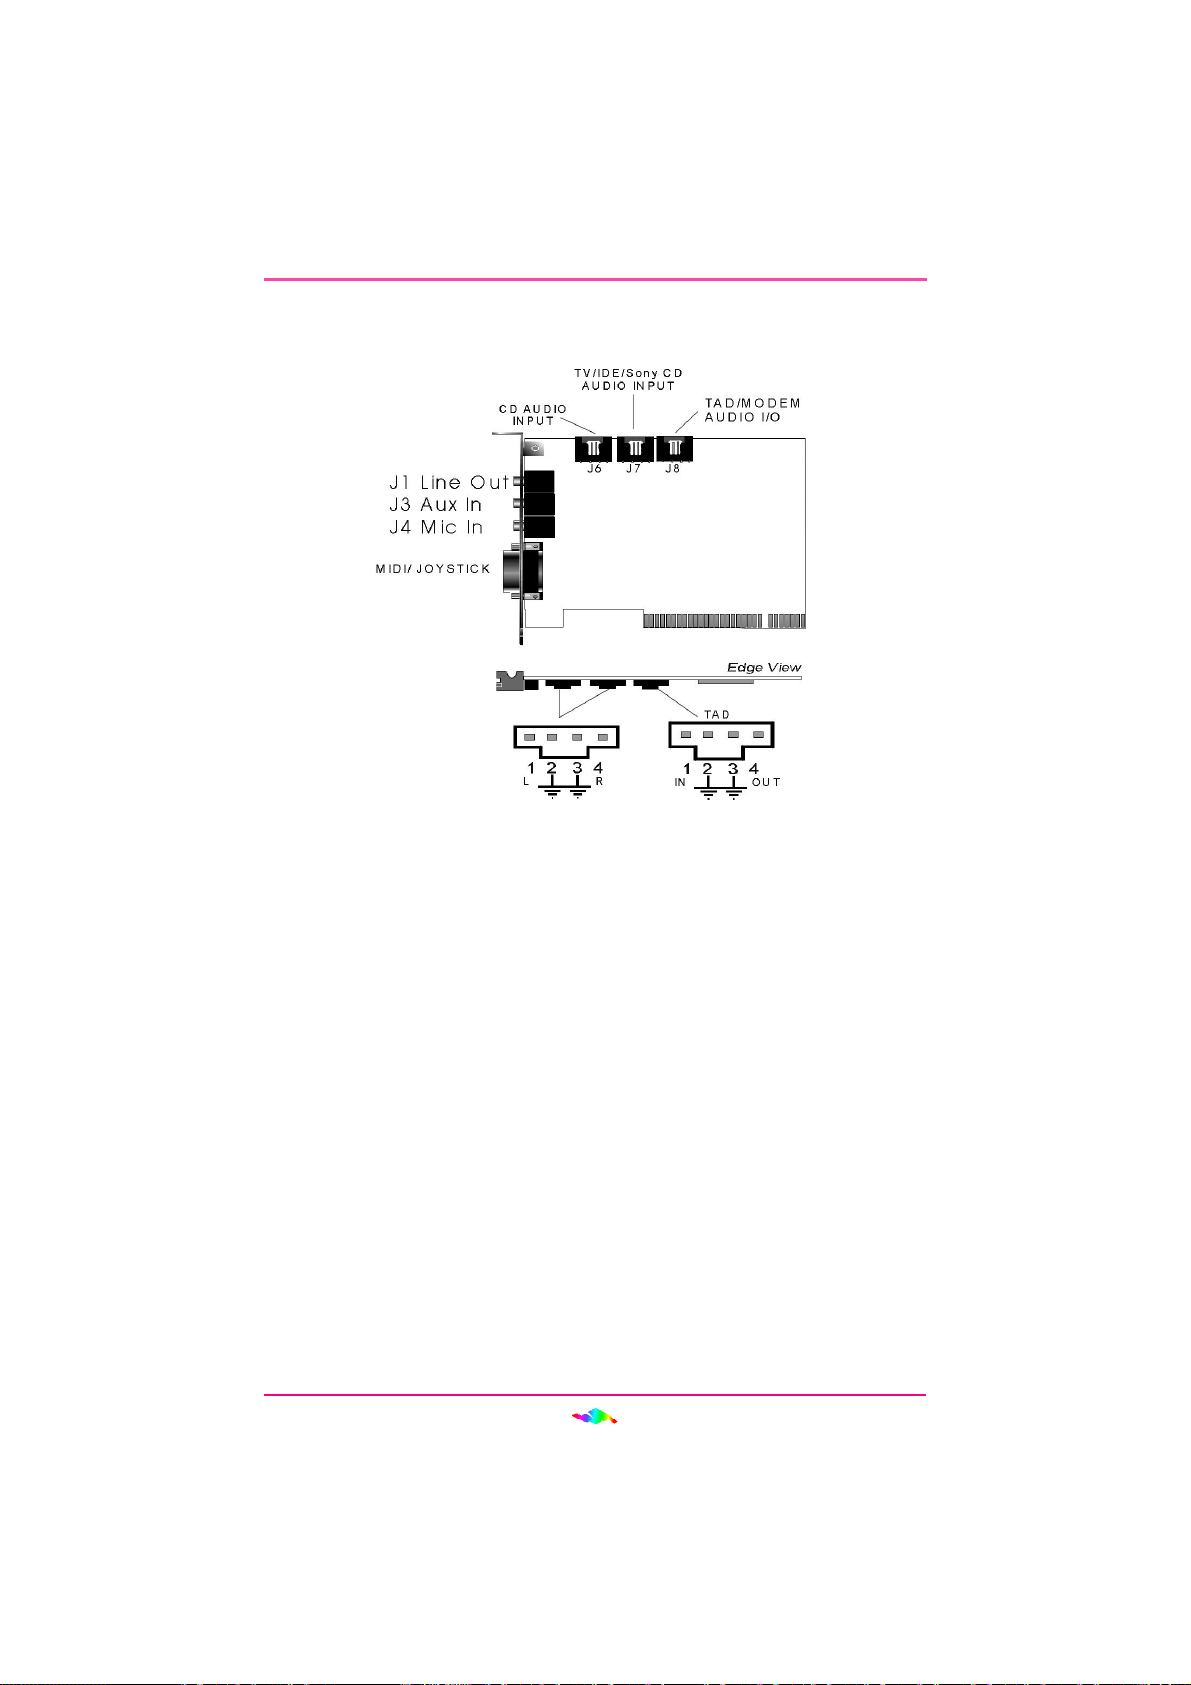
Figure 1: HOT-255 PCI 3D Wavetable Sound Card
MODEM/TAD IN/OUT
Port J8 can be used to connect a modem audio line to HOT-255. You would
use this connector when using telephone answering machine software for
input and output.
TV TUNER/IDE/SONY CD INPUT
Port J7 is used to connect a TV tuner, IDE CD-ROM audio connector, or
a Sony CD-ROM audio connector.
CD AUDIO INPUT
Port J6 is used to attach a CD-ROM audio connector.
LINE OUT/HEADPHONE
J1 is a stereo line level output through which the combined signal of all
internal and external audio sources on the board is output. It can be con-
nected to 1/8-inch TRS stereo headphones or to amplified speakers.
J1
J3
J4

13
INSTALLING HOT-255
AUX INPUT
J3 is a stereo line-level input that accepts a 1/8-inch TRS stereo plug. It
can be used as a source for digital sound recording, a source to be mixed
with the output, or both.
MIC IN
J4 is a 1/8-inch input jack. It can be used as a source for digital sound
recording, a source to be mixed with the overall output signal, or both.
If you use a dynamic microphone you should disable the BIAS power on
the Settings tab of the Windows 95 Driver. If BIAS power is enabled with
a dynamic microphone you may experience distortion. If you use an elec-
tret condenser microphone, enable the BIAS power on the Settings tab of
the Windows 95 Driver.
Note: The Mic BIAS setting is located on the Microphone panel of the
ENSONIQ Mixer in Windows NT 4.0.
You may select to apply a 30-dB gain to the microphone input by checking
the “Boost” box in the Microphone panel of the ENSONIQ Mixer.
JOYSTICK/MIDI
This is a 15-pin D-sub connector. It can be used with standard MIDI adapt-
ers and joystick connectors. The joystick interface will support both single
and dual joysticks. See the “Connector Pin-Out” section on page 67 for
“Figure 8: MIDI/Joystick Connector Pin-Out”.
Placing the Card in Your Computer
•Always consult your system manual before opening your computer
to avoid any damage. Consult your computer manufacturer’s manual
regarding grounding, power connection, and peripheral card instal-
lation.
1. Remove the cover to your computer as described earlier. Your HOT-
255 can be installed in any available PCI expansion slot. Its ap-
proximately 3¼-inch long double connector can identify a PCI ex-
pansion slot.
2. Remove the metal expansion slot cover for the selected slot. Save
the screw for installing the board.

14
INSTALLING HOT-255
3. Hold the HOT-255 by the edges and press the connector gently but
firmly into the expansion slot. Remember PCI cards generally are
installed with the component side facing the opposite direction of
ISA cards.
4. Align the notch in the mounting bracket of the HOT-255 with the
screw hole in the rear panel of the computer case. Use the screw that
you removed from the metal expansion slot cover to secure the HOT-
255 in place. This step is important for proper grounding of the card.
5. Secure all internal cables before you replace the computer cover. If
you are installing an internal CD-ROM drive, make sure you con-
nect it properly.
6. Replace the computer cover.
7. Reconnect any peripheral equipment cables that you may have pre-
viously disconnected.
8. Make the audio connections you desire to HOT-255’s inputs and
outputs.
9. If you wish to use a joystick, a MIDI device, or both, connect an
adapter cable to the HOT-255 joystick/MIDI port.

15
3
3
PART INSTALLING AUDIOPCITM
SOFTWARE
Windows 95
Installing/Updating the ENSONIQ AudioPCI™ Driver
The first time you run Windows 95 after inserting the HOT-255 card,
follow this procedure:
1. Log on to Windows 95.
2. Windows 95 will detect the PCI Maltimedia Audio Device
( ENSONIQ AudioPCI™ ) and prompt you for a driver diskette.
3. At this point, you should insert the HOT-255 Installation CD and
click OK. “Clicking” refers to a single press of the left or primary
mouse button.
4. Type or Browse… to the path of the Install Wizard media followed
by EAPCI.INF to start the program.
( i.e., D:\DRIVER\WIN95\ENGLISH ) Click OK to install the
Windows 95 drivers.
5. Use “Windows 95 Default Driver” if possible to install the Gameport
joystick when prompted and select OK. The Windows 95 installa-
tion media may be required.
6. Next, to ensure compatibility in MS-DOS Mode you should follow
the procedure under “Updating the Current Driver” below.
Updating the Current Driver
To complete a first time installation or if you currently have drivers in-
stalled and wish to update them use the Install Wizard, following the in-
structions below.
1. Open the Run dialog box by clicking on Start Run…
2. Insert the HOT-255 installation CD.
3. In the Run dialog box type or Browse… to the path of the Install
Wizard media followed by INST255.EXE to start the program.
( i.e., D:\INST255.EXE ) Click OK.

16
INSTALLING AUDIOPCITM SOFTWARE
4. The “Spacewalker Install Launcher” will appear, click “Install” but-
ton, the Install dialog will appear and then click “Install Driver for
Windows 95 / DOS” button. ( In the mean time, the Install program
will detect the existence of HOT-255, if HOT-255 doesn’t exist, an
error message will display ).
5. The AudioPCI™ Install Wizard welcome dialog will appear, click
Next.
6. The Install Wizard options will appear. Select “Remove and Install
Software”, then click Next.
7. Click Next, and the Install Wizard will remove existing AudioPCI™
drivers.
8. Click Next again to install the latest AudioPCI™ drivers. This pro-
cess can take several minutes. A meter will indicate the progress of
the installation.
Note: The Windows 95 installation media may be required to com-
plete the installation of the Game port Joystick.
9. To install the latest MS-DOS Mode utilities click Next.
Figure 2 : Spacewalker Install Launcher.

17
INSTALLING AUDIOPCITM SOFTWARE
10.Read the Welcome dialog, then click Next to continue.
11.Use Browse… to enter or select the MS-DOS Mode utilities’ desti-
nation folder if you don’t wish to use the default C:\EAPCI folder.
12.Click Next when the correct Destination Directory is displayed and
click OK to continue.
13.Select “Yes, I want to restart my computer now” and click OK to
close the Install Wizard and complete the installation of AudioPCI™.
Installing the Multimedia Extensions
Windows 95 includes a number of multimedia utilities. If your system
was configured with Windows 95 before the HOT-255 card is installed it
is likely that these utilities are not installed.
Note: To install these extensions, you will need to have your Windows 95
installation media handy.
If you wish to add these utilities:
1. Open the Control Panel by selecting Start Settings Control
Panel.
2. Double-click the Add/Remove Programs icon.
3. Select the Windows Setup tab.
4. In the list of installed components, check Multimedia.
5. Select Details…
6. Choose the components you wish to install and select OK.
Windows 95 will then install the Multimedia extensions. You may be
prompted for the Windows 95 media at this time.
18
INSTALLING AUDIOPCITM SOFTWARE
Configuring the ENSONIQ AudioPCI™
AudioPCI™ requires one 64-byte I/O Range and one PCI Interrupt to func-
tion in Windows 95; however, additional resources must be allocated to
enable legacy compatibility in an MS-DOS Prompt and MS-DOS Mode
applications. See the section entitled “Configuring the ENSONIQ
AudioPCI™ Legacy Device” on page 21 for more information on config-
uring the AudioPCI™ Legacy Device.
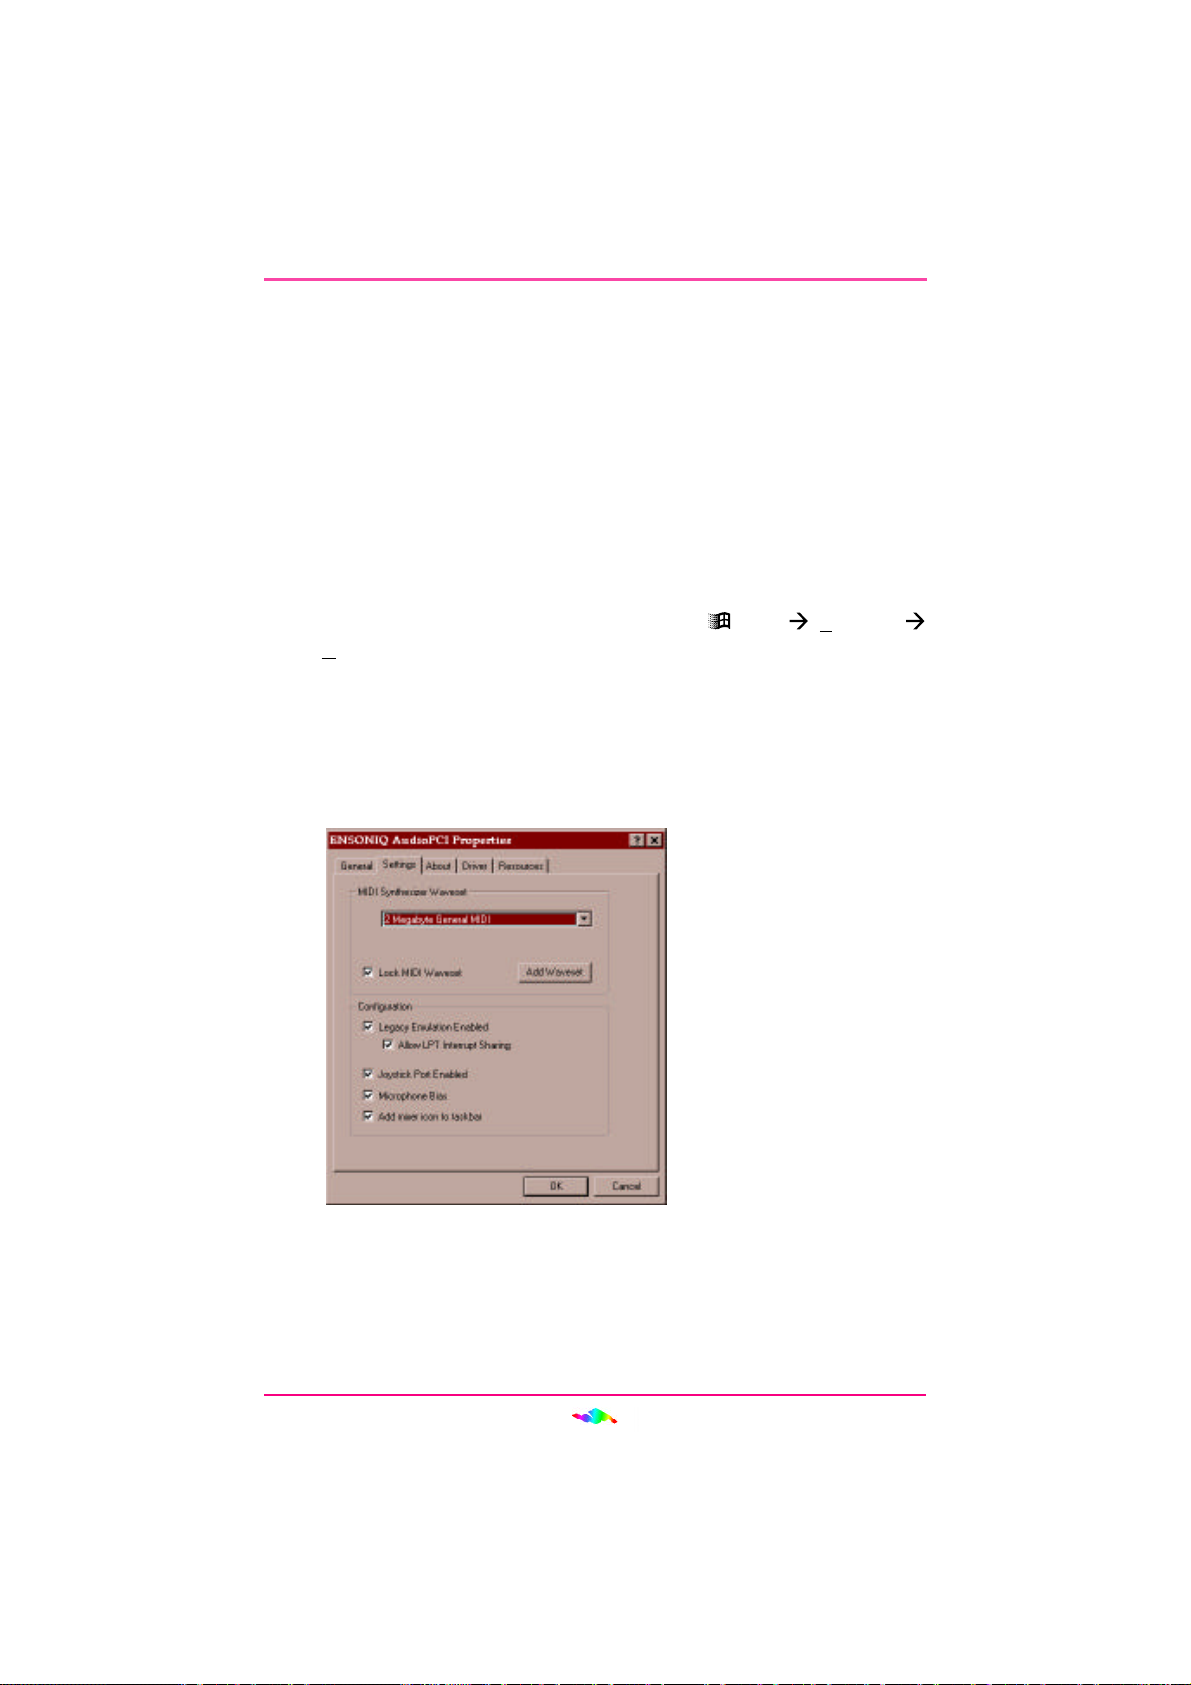
The AudioPCI™ Properties window contains several tabs with the con-
figuration options for the HOT-255. To open the AudioPCI™ Properties
window follow the steps below:
1. Open the Device Manager by selecting Start Settings
Control Panel and double-clicking System.
2. Double-click “Sound, video and game controllers” from the hard-
ware tree under the Device Manager tab.
3. Double-click ENSONIQ AudioPCI™.
Figure 3: ENSONIQ AudioPCI™ Settings Tab
MIDI Synthesizer Wavesets
The first section under the Settings tab contains a drop down menu that
will allow you to choose from either the 2-megabyte wavetable instrument
set or the 4-megabyte instrument set included with AudioPCI™. It is likely
that new wavesets will be available in the future, so an Add Waveset button
is included. Generally, the larger the waveset the better it will sound.

19
INSTALLING AUDIOPCITM SOFTWARE
To select from existing wavesets:
1. Click the down arrow in the “MIDI Synthesizer Waveset” section to
display the drop down box with all the available wavesets.
2. Highlight and click the waveset you wish to use.
3. Click OK to close the ENSONIQ AudioPCI™ Properties window.
To load a new waveset:
1. Click the Add Waveset button in the “MIDI Synthesizer Waveset”
section.
2. Browse… to the new waveset file (*.ECW) and click OK.
Note: The *.ECW file will be copied to the folder indicated by the
SNDSCAPE environment variable in the AUTOEXEC.BAT.
(i.e., C:\EAPCI)
3. The new waveset will appear in the MIDI Synthesizer Waveset drop
down menu. Select it if it is not selected.
4. Click OK to close the ENSONIQ AudioPCI™ Properties window.
Locking the MIDI Waveset
The “Lock MIDI Waveset” checkbox in the Settings tab determines how
the AudioPCI™ manages the waveset memory.
If checked the entire waveset is locked into physical memory each time the
driver is initialized on boot up or the MIDI Device is in use. When the
MIDI Device is closed the waveset is unlocked, so the memory is available
to other applications when the MIDI device is not in use.
If unchecked only the wavetable sounds in use are locked into memory. If
a sound is not being played it will not be locked into memory. This means
that as a complicated MIDI sequence is played there may be a delay as
each instrument is locked to and paged out of memory. The only time this
should be necessary is when another memory-heavy application has a
greater need for RAM than the MIDI device.
For MS-DOS Prompt and MS-DOS Mode applications the entire waveset
is always locked in memory regardless of this setting.

20
INSTALLING AUDIOPCITM SOFTWARE
LegacyEmulation
AudioPCI™ legacy emulation provides applications with the resources
necessary to function in MS-DOS Mode or an MS-DOS Prompt.
AudioPCI™ does not require most of the resources used by non-PCI (also
called ISA or Legacy) devices. To ensure compatibility with applications
designed to function with those non-PCI cards, the AudioPCI™ Legacy
Device is used.
When legacy emulation is enabled in the Settings tab the AudioPCI™
Legacy Device will appear in the Device Manager. See the section en-
titled “Configuring the ENSONIQ AudioPCI™ Legacy Device” on page
21 for more information.
Allow LPT Interrupt Sharing
To conserve system resources LPT interrupt sharing should be enabled.
When this box is checked the AudioPCI™ Legacy Device attempts to use
the same interrupt that the LPT port is using, which is typically 5 or 7.
Joystick Port
To enable the AudioPCITM joystick port in Windows 95 the Gameport Joy-
stick drivers must be installed. The Gameport Joystick driver is provided
with Windows 95. The Gameport Joystick device will appear in the De-
vice Manager after an initial install of the AudioPCI™ or when the “Joy-
stick Port Enabled” box is checked in the AudioPCI™ Settings tab.
Note: If another game card is installed in the system, the “Joystick Port
Enabled” box should not be checked.
Microphone BIAS
If the “Microphone BIAS” box is checked 5-volt BIAS power will be ap-
plied to the Mic Input. This is necessary for electret condenser micro-
phones to function. Uncheck this box when using a dynamic microphone.
MS-DOS Mode and MS-DOS Prompt do not have microphone support.
Add Mixer to Taskbar
When this box is checked the ENSONIQ Mixer will be added to the sys-
tem tray of the taskbar. This checkbox doesn’t affect the Microsoft volume
control, which is controlled by the Multimedia applet of the Control Panel.
Table of contents
Popular Sound Card manuals by other brands


Rosewill
Rosewill RC-701 user manual

Creative
Creative X-FI FATAL1TY - SB X-FI PLATINIUM FATAL1TY QUICKSTART FRONT EN FR DE IT ES... quick start guide

Takstar
Takstar MX3 user manual

Audiotrak
Audiotrak Maya U5 user guide

RME Audio
RME Audio DIGI96/8 PAD user guide

BeagleBoard
BeagleBoard BeagleBone DVI-D System reference manual