Sparc Suzuki RM250 User manual

SPARC! is distributed exclusively
by Horizon Hobby, Inc.
4105 Fieldstone Road
Champaign, IL 61822
©2006
OWNER’S MANUAL
Keep these instructions for future reference as they
contain important information.
9467

2

3

4

5

6
Safety First
• Battery gets hot after use! This is
normal, but be careful.
• Do not operate your vehicle on streets
or in a crowded place. When playing
outdoors, operate your vehicle in a
safe area.
• Avoid rough handling. Do not operate
the vehicle toward other objects or
abuse it.
• When playing indoors, pay attention
not to break glass or damage furniture.
• Keep hair, ngers and loose clothing
away from the wheels.
Battery Cautions
CAUTION TO AVOID BATTERY
LEAKAGE OF 9-VOLT OR 6.0V Ni-Cd
RECHARGEABLE BATTERIES:
• Make sure the batteries are inserted
correctly and follow the toy and
battery manufacturer’s instructions.
• Make sure battery polarity (direction)
is correct.
• Remove battery from vehicle after
use. Battery may be hot.
• Use only recommended battery
type(s).
• Do not short-circuit battery terminals.
• If the vehicle and/or transmitter gets
wet, immediately stop using it.
Otherwise, a short circuit may occur.
• Do not throw batteries into re or
water. Never attempt to disassemble
or weld batteries.
• Do not use or store the vehicle or
charge batteries in a place near a
heater, or in high temperature or
humid conditions.
NOTE: NICKEL-CADMIUM
BATTERIES MUST BE RECYCLED
OR DISPOSED OF PROPERLY
ADDITIONAL IMPORTANT
BATTERY SAFETY
INFORMATION
• Not intended for children under
8 years old.
• Battery replacement should be done
only in the presence of an adult.
• Make sure the batteries are inserted
with correct polarity and follow the
vehicle and battery manufacturer’s
instructions.
• After use, turn the switch off; then,
remove the batteries from the
transmitter and the vehicle for storage.
• Do not attempt to short-circuit,
charge, disassemble or heat batteries.
Do not throw batteries into re.
• If battery uid contacts your eyes,
skin or clothes, immediately wash
them with water and consult a doctor.
THIS PRODUCT USES
A Ni-Cd BATTERY.
MUST BE RECYCLED OR
DISPOSED OF PROPERLY.
Contact your local area office of solid
waste management or other appropriate
local agency for information.
Battery Charging and Care
(Batteries and Charger Included)
Vehicle will not run without a 6.0V
rechargeable Ni-Cd or Ni-MH battery
pack and matching charger, commonly
available for R/C vehicles at many toy
and hobby dealers. Always follow the
instructions that come with your battery
pack and charger. Adult supervision of
battery charging is required.
Warning: The transformer/charger
is not a toy. Vehicle must
only be used with
recommended
transformer/charger.
Running and Charging Times
1. Ni-Cd and Ni-MH battery packs are
not like alkaline batteries. They lose all
their power suddenly, not gradually,
and vehicle will stop very soon after
slowing down becomes noticeable,
with little warning.
2. Running time will be about
7 to 8 minutes for a freshly charged
Ni-Cd battery pack in good condition
(9 to 13 minutes for Ni-MH). Running
time may vary over the life of the
battery, with the rst few charge
cycles yielding shorter run times
than later charges.
BATTERY CHARGING
INSTRUCTIONS
Drain Down—Cool Down—
Charge Up
1. After the rst charge, for best
performance, always run the battery
pack all the way down before
recharging. Run until vehicle stops.
2. Allow the battery pack to cool before
recharging.
Battery Heat
1. Battery gets hot after use! This is nor-
mal, but be careful. Wait until battery
is cool (20 minutes or more if needed)
before charging. Charging batteries
when they are hot will severely reduce
the number of times they can be
recharged.
2. After charging, the battery pack will
be warm. This is normal.
Recharging Instructions
(Adult Supervision Required)
1. Plug wall pack charger into a standard
wall outlet.
2. Connect the battery pack plug to the
charger plug as shown in Section II.
3. Red light on charger will light to show
charger is operating. Normal charging
time is approximately 5 hours.
4. Unplug charger from wall after 5
hours of charging.
5. After charging, battery pack will feel
warm. This is normal.
6. Never leave charger and battery
unattended during charging.
Rechargeable Battery Tips
1. Do not overcharge the battery pack.
Unplug the charger from the wall at
the end of the recommended charging
time. (approximately 5 hours).
2. Ni-Cd or Ni-MH battery packs are
not like alkaline batteries. They lose
all their power suddenly, not gradu-
ally, and your vehicle will stop very
soon after slowing down becomes
noticeable, with little warning. This is
normal, but keep in mind, you need
to get the vehicle back before the
battery power runs out.
3. Store your battery pack discharged.
4. Your battery pack will hold a charge
for a shorter time in hot weather.
Otherwise, you can charge a battery
a day or so in advance of your use.
5. It is better to charge for 5 full hours,
even though the vehicle may operate
with a partial battery charge.
6. When the run time of this battery
pack becomes shorter and shorter,
it is most likely time to replace the
battery pack.
Precautions

7
Please check the headings I–V with
the diagrams in pages 2, 3, 4, 5.
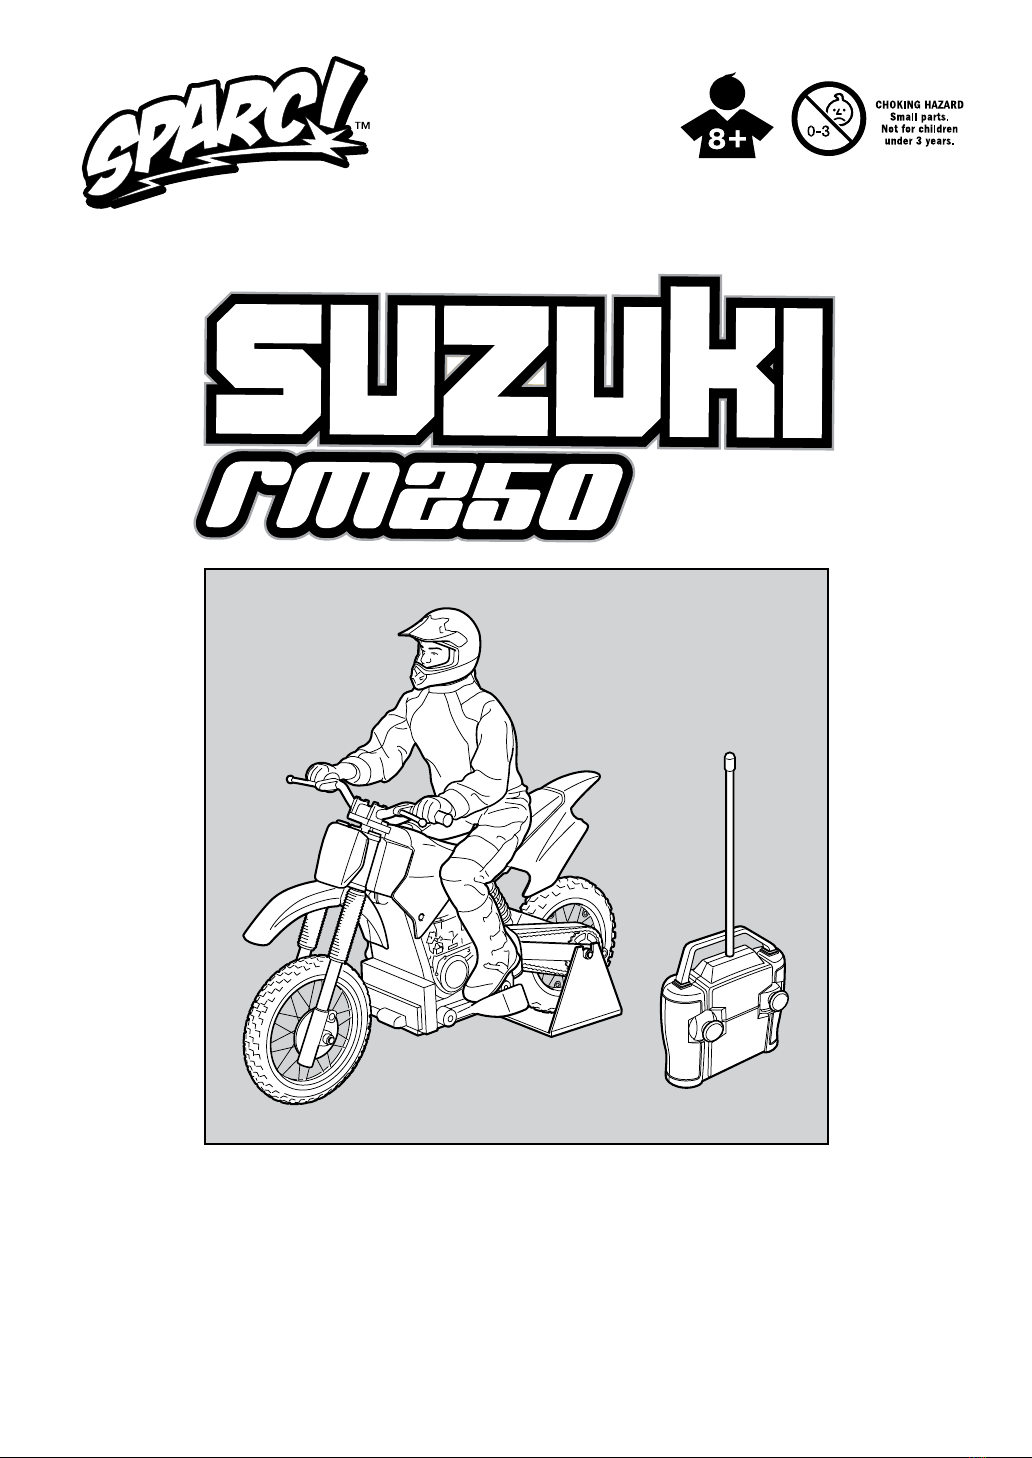
I. CONTENTS & FEATURES
This kit includes:
A. Off-Road Bike x 1
B. Transmitter x 1
C. 6.0V battery pack x 1
D. 9V battery x 1
E. Battery charger x 1
1OFF-ROAD BIKE
(Side View)
1Rider (driver)
The driver has arms and legs with
some moving joints. The helmet is
removable.
2Switch (on the right engine part)
3Front suspension
4Rear suspension
5Stand
6Stabilizer
76V battery latch
2Transmitter
1Transmitter Antenna
2Right/left turn control-stick
3Forward/brake control-stick
4LED lamp
Moving the sticks automatically
turns the switch on and lights the
LED lamp. If the lamp does not
come on or is dimly lit, insufcient
battery capacity is suspected.
Replace the battery with a fresh
one in such a case.
II. BATTERY INSTALLATION
1Transmitter
1Slide open BATTERY DOOR in the
direction shown in the gure, while
lightly pressing its center.
2Insert a 9V BATTERY with the polar-
ity (+/-) as shown on the bottom of
battery compartment.
3Replace BATTERY DOOR.
2OFF-ROAD BIKE
* Be sure to charge the battery
before you use it.
1Use SPARC! 6V Ni-Cd BATTERY
PACK and fully charge it in advance
of your use.
2Remove the vehicle from the stand
3Turn the battery LATCH of the
battery compartment located at
the bottom of the chassis to the
lateral position to prepare for
battery installation.
4Make sure that the main switch of
the vehicle is off, then insert the 6V
Ni-Cd battery pack into the com-
partment in the direction shown in
the photo. Turn the battery LATCH
90-degrees to secure the battery
pack.
The driver is factory-mounted for dis-
play. When running the vehicle, attach
the driver as shown in the gure in “I”.
If the gure becomes detached while
the vehicle is running, reattach it in the
same way.
When running the vehicle straight
ahead, if the vehicle swings left and
right and cannot maintain stable,
straight running, the battery needs
to be recharged. (This is often the
reason that customers ask
for service by mistake.)
This product is not equipped with a
steering adjustment. It may slightly turn
to the left or right while running straight
ahead. In such a case, operate the
sticks of the transmitter to correct the
vehicle to the straight-ahead position.
This vehicle is intended for outdoor
use. Make sure you have plenty of
open space in all directions, and drive
the vehicle on a nonslippery road sur-
face (e.g., asphalt or concrete surface).
III. BEFORE OPERATION
Turn vehicle power on.
IV. VEHICLE OPERATION
The following explains basic operation.
Basic Operation
1FORWARD Push left stick forward.
BRAKE Pull left stick back.
2LEFT TURN Push left stick forward
and right stick to the left.
3RIGHT TURN Push left stick forward
and right stick to the right.
Starting Vehicle
4Hold the rear of the vehicle and
push left stick of the transmitter
forward before the wheel touches
the ground, then softly push the
vehicle to start it.
* The vehicle may not start
depending on the road surface.
Always start on a smooth surface.
Stopping Vehicle
5Gradually slow down or apply
brakes lightly, then push right stick
to the left or right just before the
vehicle stops.
6The vehicle, while turning left or
right, will stop as it leans over to one
side with one of the footsteps landed.
* Avoid harsh braking when stopping
the vehicle, otherwise the vehicle
may become unstable and roll over.
Operation Examples
of High Technique Actions
Since the following action examples
require much practice and skill, you
have to:
1check that the battery pack has
sufcient battery charge
2acquire some training.
Big Jump
7With left stick kept in FORWARD
position, run and allow the vehicle to
jump from the ight deck at the
maximum speed (the ight deck may
not be higher than 30 centimeters).
Jump and Forward Roll
8With left stick kept in FORWARD
position, run the vehicle to the ight
deck at the maximum speed and
pull left stick back to apply brakes
immediately before the vehicle de-
parts from the deck.
V. WARNINGS DURING PLAYING
WITH VEHICLE
1Do not operate your vehicle on
streets or in a crowded place.
2Operating your vehicle into water
may lead to a malfunction of the
precision electronic circuits.
3
Do not store the vehicle near a heater
or in any place where temperature
rises, or in an automobile.
4After use, remove the transmitter
battery and main battery, then store
the vehicle.

8
Battery Safety Information
Batteries may leak uids that can
cause a chemical burn injury or ruin
your toy (product).
To avoid battery leakage:
• Insert batteries as indicated inside
the battery compartment.
• Remove batteries during long
periods of non-use. Always remove
exhausted batteries from the toy
(product). Dispose of batteries safely.
• Do not dispose of the batteries in a
re. They may explode or leak.
• Never short-circuit the battery
terminals.
• Use only batteries of the same or
equivalent type, as recommended.
• Do not charge non-rechargeable
batteries.
• If rechargeable batteries are used
in the bike and/or transmitter, they
are only to be charged under adult
supervision.
IMPORTANT INFORMATION
• DO NOT RECHARGE THE BATTERY
IF IT FEELS HOT. ALLOW IT TO
COOL BEFORE RECHARGING.
• DO NOT ATTEMPT TO USE OR
CHARGE THE BATTERY IF IT
SHOWS SIGNS OF LEAKAGE OR
CORROSION.
• DO NOT DISASSEMBLE THE
Ni-Cd BATTERY.
• IF THE BIKE, BATTERY AND
TRANSMITTER ARE WET,
THOROUGHLY DRY BEFORE
USING OR CHARGING.
• REGULARLY EXAMINE ALL WIRES
AND CONNECTORS. IN THE EVENT
OF DAMAGE, DO NOT USE.
Important:
• If operating time becomes shorter or
tires do not turn with full power, the
capacity of the 9V battery or 6.0V
battery pack is insufcient. The LED
light becomes dimmer as batteries
wear. This is the tell-tale sign you
need to replace the 9V battery or
recharge the 6.0V battery pack.
• Be sure to charge the Off-Road
Bike just before operating it. If you
do not play with the Off-Road Bike
immediately after charging, the
charge is drained and the bike
cannot operate.
• When the battery temperature
gets too high, the circuit shuts off
automatically to protect the receiver
circuit and the battery in the
Off-Road Bike. In such a case, wait
until the battery cools down before
recharging or playing with the vehicle.
• If the rechargeable battery is
repeatedly charged without
being sufciently discharged rst,
the capacity will gradually decrease
(memory effect of battery). This is
a characteristic of rechargeable
batteries.
VI. SAFETY INFORMATION
Adults, this toy is recommended for
children 8 years of age and older.
To ensure that the child’s play is
both safe and fun, please review the
operating instructions and these
general safety rules with the child.
• Keep ngers, hair and loose clothing
away from the wheels while the
Off-Road Bike is switched ON.
• Adult supervision is recommended
when the Off-Road Bike is being
operated.
• To avoid accidental operation,
remove the battery when not in use.
• If the Off-Road Bike and/or transmit-
ter gets wet, discontinue use until
they are completely dry. Thoroughly
wipe off all moisture and allow them
to air-dry completely before use.
• DO NOT drive in the street! Make
sure you have plenty of open space in
all directions (please see Section V).
• Regularly inspect the antenna for
cracks or breaks. DO NOT bend the
transmitter antenna. DO NOT use the
transmitter if the antenna is broken.
• Choking hazard: This product
contains small parts. Keep out of the
reach of children under 3 years old.
• The WEEE symbol, if
present, indicates that
this item contains electrical
or electronic components
which must be collected
and disposed of properly in
respective countries.
TROUBLESHOOTING GUIDE
Points to Check When Operation of Vehicle Is Abnormal
• Make sure the vehicle power is on.
• Make sure the main battery and the transmitter battery have sufcient charge.
• Check that the main battery and the transmitter battery are inserted with correct polarity.
• Check that the antenna of the transmitter is not broken.
• Check that the distance between the transmitter and the vehicle does not exceed 20 meters/65 feet.
• Check that a nearby transmitter is not producing interference or signals with the same frequency. In such a case,
move to another place or wait until the other RC user has nished operating his/her vehicle.
Replacement Parts
SPJ3001 Stablizer Set $5.99
SPJ3005 Transmitter Battery Cover $3.99
SPJ3006 6.0V Ni-Cd Battery $14.99
SPJ3007 6.0V AC Wall Charger $14.99

9
Warranty Period
Exclusive Warranty- Horizon Hobby, Inc., (Horizon)
warranties that the Products purchased (the “Product”)
will be free from defects in materials and workmanship at
the date of purchase by the Purchaser.
Limited Warranty
(a) This warranty is limited to the original Purchaser
(“Purchaser”) and is not transferable. REPAIR OR RE-
PLACEMENT AS PROVIDED UNDER THIS WARRANTY
IS THE EXCLUSIVE REMEDY OF THE PURCHASER.
This warranty covers only those Products purchased
from an authorized Horizon dealer. Third party transac-
tions are not covered by this warranty. Proof of purchase
is required for warranty claims. Further, Horizon reserves
the right to change or modify this warranty without notice
and disclaims all other warranties, express or implied.
(b) Limitations HORIZON MAKES NO WARRANTY OR
REPRESENTATION, EXPRESS OR IMPLIED, ABOUT
NON-INFRINGEMENT, MERCHANTABILITY OR FITNESS
FOR A PARTICULAR PURPOSE OF THE PRODUCT. THE
PURCHASER ACKNOWLEDGES THAT THEY ALONE
HAVE DETERMINED THAT THE PRODUCT WILL
SUITABLY MEET THE REQUIREMENTS OF THE
PURCHASER’S INTENDED USE.
(c) Purchaser Remedy Horizon’s sole obligation
hereunder shall be that Horizon will, at its option,
(i) repair or (ii) replace, any Product determined by
Horizon to be defective. In the event of a defect, these
are the Purchaser’s exclusive remedies. Horizon
reserves the right to inspect any and all equipment
involved in a warranty claim. Repair or replacement
decisions are at the sole discretion of Horizon. This
warranty does not cover cosmetic damage or damage
due to acts of God, accident, misuse, abuse, negligence,
commercial use, or modication of or to any part of the
Product. This warranty does not cover damage due to
improper installation, operation, maintenance, or at-
tempted repair by anyone other than Horizon. Return
of any goods by Purchaser must be approved in writing
by Horizon before shipment.
Damage Limits
HORIZON SHALL NOT BE LIABLE FOR SPECIAL,
INDIRECT OR CONSEQUENTIAL DAMAGES, LOSS OF
PROFITS OR PRODUCTION OR COMMERCIAL LOSS IN
ANY WAY CONNECTED WITH THE PRODUCT, WHETHER
SUCH CLAIM IS BASED IN CONTRACT, WARRANTY,
NEGLIGENCE, OR STRICT LIABILITY. Further, in no event
shall the liability of Horizon exceed the individual price of
the Product on which liability is asserted. As Horizon has
no control over use, setup, nal assembly, modication or
misuse, no liability shall be assumed nor accepted for any
resulting damage or injury. By the act of use, setup or as-
sembly, the user accepts all resulting liability.
If you as the Purchaser or user are not prepared to accept
the liability associated with the use of this Product, you
are advised to return this Product immediately in new and
unused condition to the place of purchase.
Law
These Terms are governed by Illinois law
(without regard to conflict of law principals).
Safety Precautions
This is a sophisticated toy product and must be operated
with caution and common sense and requires some basic
mechanical ability. Failure to operate this Product in a safe
and responsible manner could result in injury or damage to
the Product or other property. This Product is not intended
for use by children without direct adult supervision. The
Product manual contains instructions for safety, operation
and maintenance. It is essential to read and follow all the
instructions and warnings in the manual, prior to assembly,
setup or use, in order to operate correctly and avoid
damage or injury.
Questions, Assistance, and Repairs
Your local hobby store and/or place of purchase cannot
provide warranty support or repair. Once assembly, setup
or use of the Product has been started, you must contact
Horizon directly. This will enable Horizon to better answer
your questions and service you in the event that you may
need any assistance. For questions or assistance, please
direct your email to productsupport@horizonhobby.com, or
call 877.504.0233 toll free to speak to a service technician.
Warranty Inspection and Repairs
To receive warranty service, you must include your original
sales receipt verifying the proof-of-purchase date. Provided
warranty conditions have been met, your Product will be
repaired or replaced free of charge. Repair or replacement
decisions are at the sole discretion of Horizon Hobby.
Pack the Product securely using a shipping carton.
Please note that original boxes may be included, but are
not designed to withstand the rigors of shipping without
additional protection. Ship via a carrier that provides track-
ing and insurance for lost or damaged parcels, as Horizon
is not responsible for merchandise until it arrives and is
accepted at our facility. A Service Repair Request is avail-
able at www.horizonhobby.com on the “Support” tab. If you
do not have internet access, please include a letter with your
complete name, street address, email address and phone
number where you can be reached during business days,
your RMA number, a list of the included items, method of
payment for any non-warranty expenses and a brief sum-
mary of the problem. Your original sales receipt must also
be included for warranty consideration. Be sure your name,
address, and RMA number are clearly written on the outside
of the shipping carton.
All other Products requiring warranty inspection or repair
should be shipped to the following address:
Horizon Product Support
4105 Fieldstone Road
Champaign, Illinois 61822
Please call 877-504-0233 with any questions or
concerns regarding this product or warranty.
WARRANTY

10

11
Table of contents
Other Sparc Toy manuals


