Spartan Camera GoCam User manual

Spartan GoCam™ Cellular Camera
User Manual
(U.S. Cellular™ Version)
Important: Please read this manual
carefully before using your camera.

Thank you for choosing the Spartan GoCam. This manual will
help you get the most out of your new device. You will also
find this manual, other technical articles and more information
about or to use GoWireless Premium service at:
www.spartancamera.com.
If you experience any difficulties to operate this product,
please do not return it to the store. Call Tech Support at
770-582-0004 (9AM – 6 PM EST, Monday – Friday) or email

DRAF
T
i
Table of Contents
Package Contents............................................................1
Camera Body and Ports...................................................1
Camera Buttons...............................................................2
Activate Cellular Service..................................................4
Telephone..................................................................4
U.S. Cellular Store.....................................................5
Set Up the Camera..........................................................5
Connect the Camera to the U.S. Cellular™ Network.......6
GoWireless Premium vs. GoWirelessAuto......................7
GoWireless Premium Setup...........................................10
Overview..................................................................10
Add Camera to the Web Portal................................10
Complete Physical Camera Setup (GoWireless Premium)
.................................................................................12
Complete Camera Setup on the Portal....................13
Test the Camera and Portal.....................................15
Install and Set Up the GoWireless MobileApp.........15
GoWirelessAuto Setup..................................................18
Real Time Control..........................................................20
Camera Settings............................................................22
Test the Camera.............................................................28

DRAF
T
ii
Photo, instant send mode........................................28
Photo, daily report or send mode off........................28
Video........................................................................28
Access Photos or Videos...............................................29
View a Photo............................................................29
Watch a Video..........................................................29
Delete Photo or Video..............................................29
Manual Firmware Update...............................................30
Technical Specifications.................................................31
Manufacturer Limited Warranty......................................32
Terms and Conditions..............................................32
Shipping...................................................................33
Proof of Purchase or Proof of Warranty Coverage...34
Exclusions and Limitations.......................................35
Unclaimed Items......................................................37
Camera Repair.........................................................37
Privacy Policy ................................................................37
How Do We UseYour EmailAddress?.....................38
Do We Use Cookies?...............................................39
Security Measures...................................................39
Retention and Deletion.............................................40
Terms of Use..................................................................41
About Us..................................................................41
Our Customers.........................................................41

DRAF
T
iii
Membership Responsibilities ...................................42
Cost and Pricing.......................................................43
Content Limits..........................................................44
Content & Privacy....................................................44
Limits on Use...........................................................47
Other Important Guidelines......................................47
Things to Keep in Mind............................................50
Image Delivery.........................................................51

DRAF
T
1
Package Contents
Camera 1
A
ntenna 1
Mountin
g
strap 1
USB cable 1
User’s Manual 1
Quick Start Guide 1
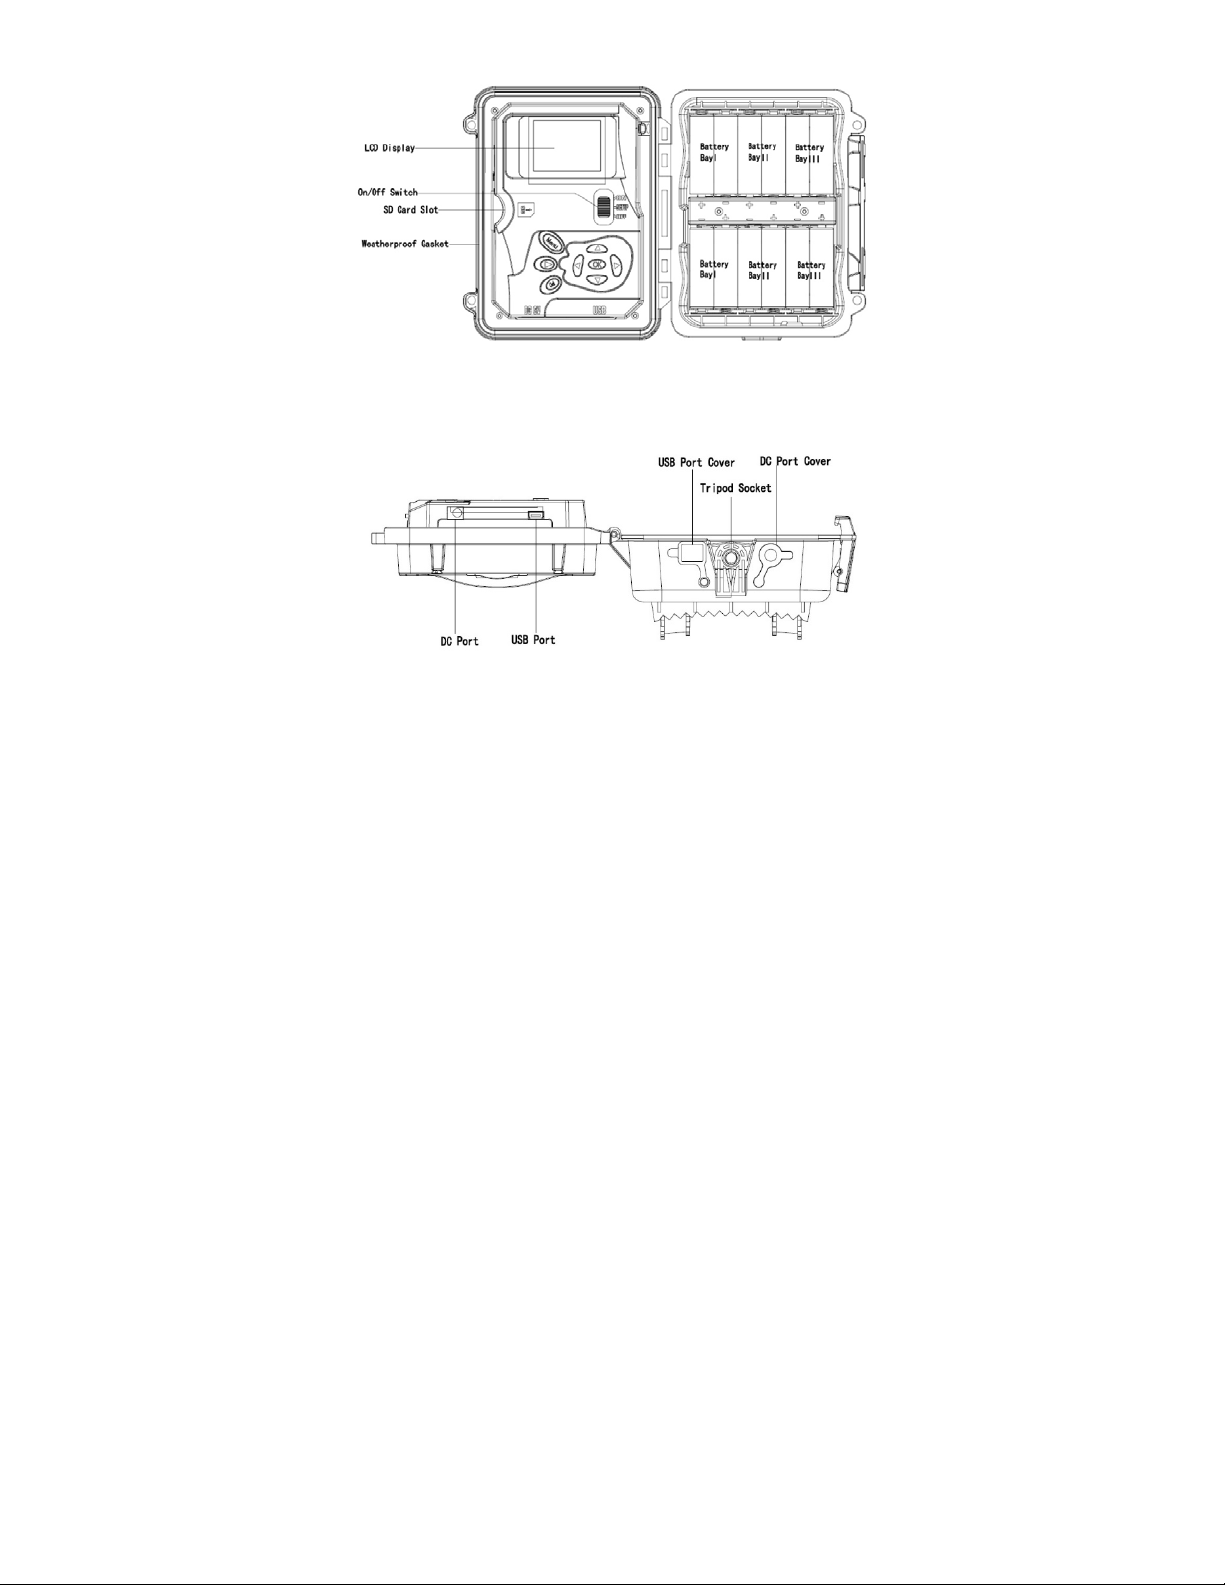
Camera Body and Ports
DRAF
T
2

DRAF
T
3
Camera Buttons
Menu:
oPreview mode: enter the Setup menu.
oSetup mode(menus):Go back one menu level. (If in
a submenu, return to themain menu. If at the main
menu, exit Setup mode.)
oPlayback mode: display the Delete menu so you can
choose to Del One or DelALL.
Arrows:
oSetup mode: move between menu items, change
values.
oPlayback mode: move through photos/videos.
oPlayback mode, photos: zoom in, zoom out.
When zoomed in, press OK then use to
pan the image.
OK:
oMenu mode: save parameter settings.
oPreview mode: take a photo or start recording a video
manually.
oPlayback mode, videos: play/pause video.
Playback button ►: In the preview window, switch
between Playback and Preview modes
Del:
oMenu mode: when entering parameters, works as a
backspace key, deletes the character to the left.

DRAF
T
4
oPlayback mode: delete the current photo/video.
Shortcuts in Preview mode:
oselects Video mode.
oselects Camera mode.
oOK takes a picture or records a video manually.
Mode (Power) Switch: ON at top. SETUP in the middle.
OFF at the bottom.
Activate Cellular Service
Cellular service is required if you want to have photos
delivered, regardless of whether you use GoWireless
Premium or GoWirelessAuto. Cellular service enables the
camera to send photos.
There are two ways to activate cellular service for your
Spartan GoCam. Please read about the two options to obtain
service so you can choose the one that works best for you.
Before you begin, locate your MEID number, which is printed
on a sticker inside the camera.
Telephone
You can activate your U.S. Cellular Spartan GoCam either by
calling the U.S. Cellular support number, 1-888-944-9400, or
by calling 611 from your U.S. Cellular cell phone. Listen to the
menu options and follow the prompts to activate the service.

DRAF
T
5
U.S. Cellular Store
You may take your camera to a U.S. Cellular store and have
an in-store customer service rep activate service for you.
Record your camera’s telephone number:
_________________________
Set Up the Camera
1. With the power switch OFF, insert batteries into the
battery compartment. Use 12 (recommended), 8, or 4
(emergency, left 2 columns) 1.2-1.5vAAbatteries.
The following types of batteries can be used:
High-performance alkaline
Lithium
Rechargeable Ni-MH
For additional battery life, you can connect the camera
to a 6V external battery (optional, with or without solar
panel) that is designed to be used with trail cameras.
2. Insert an unlocked SD card (up to 32 GB) into the SD
card slot.Appropriate SD Memory Cards are available at
your local U. S. Cellular Retail location. Refer to the card
symbol on the case for proper orientation.
3. Withthe rubbergasket between the base of the antenna
and the antenna jack on the top of the camera, screw the

DRAF
T
6
antenna onto the antenna jack. The rubber gasket must be
in place to prevent leaks. Make sure the antenna is screwed
in all the way but be careful not to over-tighten it.
Connect the Camera to the U.S. Cellular™ Network
1. Slide the power switch to the SETUP position.The
camera will enter Preview mode. The screen will display
Searching network…, then U.S.Cellular will appear at
center top of the screen and the signal strength bars will
show in the top right corner.
2. Press the Menu button to access the Setup menu.
3. Navigate to the Wireless tab (far right), then down to
Diagnostic using the buttons:
Press or to move among the tabs (submenus).
Press or move among the submenu items.
Press or to change the value for an item.
Press OK to save all changes you’ve made to in a
particular tab.
Press Menu return to the main menu (tabs) or to exit
Setup mode (back one level).
4. With Activate highlighted, press the OK button.
Apop up box will show
Dialing *228, Please Wait...
Then you’ll see a message that says:
Successful!
Restarting. Please wait.

DRAF
T
7
5. If you will be using GoWireless Premium (recommended,
free to try for the first month), continue to the next section.
If you will be using GoWirelessAuto, go to GoWireless
Auto Setup on page 18.
GoWireless Premium vs. GoWireless Auto
Before you finish setting up your camera, you must decide
whether you will use GoWireless Premium or GoWireless
Auto service. The following table should help you decide.
Every camera comes with one free month of Premium service,
which does not require that you subscribe to anything or
provide any sort of payment information and will not auto
renew unless you purchase credits for service. You are
encouraged to try GoWireless Premium, no strings attached,
to see how you like it. One credit is one month of service for
GoWireless Premium.Additional months of GoWireless
Premium service cost $3-4/month, depending on how many
credits (months) you buy at a time.
Feature GoWireless
Premium
with app1
GoWireless
Premium
without app
GoWireless
Auto
Chan
g
e settin
g
s
A
ll
(
usin
g
portal
)
All (using app) Yes
Yes Yes
N/A N/A
N/A

DRAF
T
8
Feature GoWireless
Premium
with app1
GoWireless
Premium
without app
GoWireless
Auto
Limited,viatext
message
(onlywith
real-time
controlON)
N/A Yes Yes
Picture deliver
y
Portal
App
Email2
Yes
Yes
Yes(upto20)
Yes
N/A
Yes(upto20)
N/A
N/A
Yes (upto 4)
Thumbnail size
Normal
(640 x 480)
Large
(1280 x 960)
Yes
Yes
Yes
Set only via
portal
Yes
Yes
Dail
y
statusrepor
t
Portal
App
Email2
Yes
Yes
Yes
Yes
N/A
Yes
N/A
N/A
Yes
Scheduledevents
(upto9additional
statusreports,
scheduledpictures)

DRAF
T
9
Feature GoWireless
Premium
with app1
GoWireless
Premium
without app
GoWireless
Auto
Portal
App
Email2
Yes
Yes
Yes
Yes
N/A
Yes
N/A
N/A
No
Request hi-res
photo (original
resolution)
Portal
App Yes
Yes Yes
N/A N/A
N/A
Photosstoredon
serverfor30 days Yes Yes No
Firmware update
Overtheair
(
via
portal)
Manually(SD
card)
Yes
Yes
Yes
Yes
N/A
Yes
Cost per month $3-4 $3-4 $0
1Android and iOS versions of the app are available for smart
phones and tablets with newer versions of the OS
2”Email” refers to regular email addresses. Some email
addresses and email formats may not be supported. Spartan
Camera does not guarantee delivery of emails.

DRAF
T
10
GoWireless Premium Setup
Overview
Here is a brief overview of the steps to set up your camera
and get it working with GoWireless Premium:
Register your camera by having it connect to the web
portal.
Add your camera to your account on the website.
Specify the camera settings using the web site.
Install the app on your mobile device (optional).
These are the minimum steps to have premium completed
and working. Photos from your camera will be uploaded and
stored on your GoWireless account for 30 days. Important:
Each night, the oldest photos (31 days and older) will be
automatically purged from the server.
This is a more detailed list of steps to complete GoWireless
Premium setup:
Add Camera to the Web Portal
1. Using a web browser on your computer or phone, go to
www.spartancamera.com.
2. Sign in to your account. If you don’t already have an
account, register for one, then sign in.

DRAF
T
11
3. To set your time zone:
a. From the main menu, MYACCOUNT >Account
Options.
b. Select the region and the time zone, then click the
Update button.
4. To add your camera:
a. From the main menu, select MYCAMERAS >
Management.
b. Click the Add New Camera button.
c. Move the camera switch to SETUP and when you
have a signal, press the Menu button then select the
Wireless menu.
d. Verify that Send Mode is Instant and the Send Via is
GoWireless Prem (default). Press OK after making any
changes.
e. Select Register Camera, press OK, and wait several
seconds. If registration is successful, the camera
screen will show your Module ID (MEID) and the
registration code. If registration is not successful,
repeat this step.
f. On the portal Add New Camera page, type a
description for the camera that will help you to identify
the camera. This is especially important if you have
more than one. If you want the cameras listed in a
particular order in the phone app, assign names that

DRAF
T
12
will sort in alphabetical/numerical order (e.g., 01 SE
corner, 02 NE corner, etc.)
g. Input both the Module ID and the Registration Code.
h. Check the box to agree to the terms of use and privacy
policy.
i. Click the Add this Camera button.
5. If you input the values correctly you will return to the
Camera Management page on the website.
6. Send a Test Picture: When the camera is in SETUPand
Preview mode (make sure the camera logs into the
network), press OK to take a picture then OK again to
send it.
Note: If you can see the picture on the MYCAMERAS >
Manage Photos page, GoWireless Premium is working.All
you need to do now is to tailor your setup for your particular
needs, adding email contacts, updating camera settings, etc.
Complete Physical Camera Setup (GoWireless Premium)
1. After setting up and testing the camera, position it on the
target area and turn it on by sliding the power switch to
ON. Please remember to switch from SETUPto ON after
the camera logs into the network. The camera will take
pictures or videos as programmed.The height you mount
your camera depends on what your targets are, but 3-4
feet off the ground is generally best for wildlife.

DRAF
T
13
2. The green light on the front of the camera should flash
for a few seconds to give you time to move out of the
area. If it continues to flash for more than a few seconds,
you have left the camera in SETUP mode rather than
turning it ON.
3. Important: When you are ready to retrieve the SD card or
change the settings, turn the camera off first by pushing
the power switch to the OFF position. (Even in the OFF
mode, the camera still consumes a small amount of
battery power. You should remove the batteries if the
camera is not in use for an extended time.)
Complete Camera Setup on the Portal
Complete these steps on the portal to finish the GoWireless
Premium setup. Some are optional.
1. Verify that you have credits on your account: Select MY
ACCOUNT> Credit History and verify that you have at
least one credit.Adding a brand new camera will add a
free credit to your account.
2. Change your camera settings: MYCAMERAS > Camera
Settings:
a. Confirm that the region and time zone are correct.
b. Verify that the all the settings are correct.
c. Consider setting some scheduled events. For example,
you may want to set events to take photos at specific
times (e.g., 9AM and 9 PM so that you will get at least

DRAF
T
14
two pictures every day). This is especially useful if your
camera is in a low-traffic area.The scheduled photos
are reassurance that your camera is still there and is
still working and they provide additional events each
day for the camera to contact the server.
d. When you are done, click Schedule a Settings Update.
3. Update the camera firmware (optional, but
recommended):
a. Select MYCAMERAS > Firmware Update.
b. Compare the date of the firmware version on your
camera to the date of the latest version.
c. If the latest version is more recent than the one on
your camera, click Update.
4. Optional, only if some recipients will not be using the
GoWireless app:
a. Add email address(es):
1) Select MYACCOUNT > Email Contacts.
2) Enter one or more email addresses. ”Email” refers
to regular email addresses. Some email addresses
and email formats may not be supported. Spartan
Camera does not guarantee delivery of emails.
3) Click Update.
b. Set delivery options:
1) Select MYCAMERAS > Delivery Options.
2) Select a camera.
3) Check one or more email addresses.

DRAF
T
15
4) Click the Update button.
Test the Camera and Portal
1. Turn your camera on and walk test it or set it for
time-lapse mode with a short trigger interval.
2. View the photos on the web portal:
a. Select MYCAMERAS > Manage Photos.
b. Refresh the browser periodically or check your email.
3. Request a status report:
a. While you are testing the camera, select MY
CAMERAS > Management.
b. Check the box next to one or more cameras.
c. With Request Status selected, click the Go button.
d. Refresh the browser periodically and click Command
History toview the status of the status update request.
You will also receive a status report via email if you
entered an email address for Emailto Send Status
Reports onthe MY CAMERAS >Delivery Options page.
NOTE: Status updates only when you request a status report
or there is a status report scheduled event. The status report
does not update with each photo.
Install and Set Up the GoWireless Mobile App
Overview:The following basic steps will get the app working on
your device.
Other manuals for GoCam
1
Table of contents
Other Spartan Camera Digital Camera manuals


