SpaVida Whirlpool C642 User manual

1
Ordernummer: __________
Seriennummer: __________
Wichtige Informationen:

WICHTIGE SICHERHEITSANWEISUNGEN ZUR VERWENDUNG
BITTE LESEN UND FOR DIE ZUKUNFT AUFBEWAHREN!
2

3
Whirlpool C642
USER
MANUAL
163x163cm
Wasservolumen Minimum: 300 Liter
Wasservolumen Maximum: 400 Liter
Gewicht ca. 120 kg
Montage und Bedienungsanweisung Instructions
for installation & operation
4
Notice
Water and Power sketch Map
Installation sketch
Instructions for use the bathtub
Trouble analysis and obviation
Maintenance
Instructions for use the control panel
System install sketch
Operation instructions
HINWEISE ZUM AUFBAU
BEDIENUNGSANLEITUNG
INSTANDHALTUNG
SICHERHEITSHINWEISE
GEBRAUCHSANWEISUNGEN DES BEDIENUNGSFELDS
14
15
16
17
19
20
22
23
25
5
6
7
7
8
Index

5
HINWEISE ZUM AUFBAU
Vor der Installation
- Stellen Sie sicher, dass der Stromanschluss wassergeschützt und isoliert ist.
- Vermeiden Sie die Benutzung scharfkantiger Werkzeuge und Gegenstände in der Badewanne.
-Sorgen Sie für ausreichend Platz am Aufstellort der Badewanne.
Installation
- Wenn Sie sichergestellt haben, dass die Zuleitungen und Anschlüsse korrekt verlegt sind,
können
o Abfluss: Verbinden Sie den Abflussschlauch unter der Badewanne mit dem dafür
- Richten Sie die Badewanne mithilfe der schraubbaren Füße waagerecht aus.
wasserdicht sind.
- Legen Sie die Anschlüsse für Wasser (½ Zoll), Strom und Abfluss (1 ½ Zoll) gemäß der Skizzen
(siehe unten).
Sie die Badewanne anschließen und mit den Wasser- sowie Stromanschlüssen verbinden.
vorgesehenen Loch im Wannenboden und dichten Sie ihn dort ab.
o Wasseranschluss: Verbinden Sie die Warm- und Kaltwasserleitungen mit den jeweiligen
o Stromanschluss: Stellen Sie sicher, dass der Anschluss wasserdicht und der FI-Schalter
Anschlüssen.
mit der Elektrobox verbunden ist. Schließen Sie dann den Stromstecker an den
Stromanschluss an.
- Prüfen Sie erneut, ob alle Anschlüsse und Zuleitungen korrekt verlegt, angeschlossen und ggf.
- Lassen Sie nun Wasser in die Badewanne, um die Funktionen zu überprüfen.
2
1
BEDIENUNGSANLEITUNG
Wasserdüsenmassage
Schalten Sie die Wasserdüsenmassage über das Computerpanel ein und aus. Mithilfe des Drehknopfes
("knob") können Sie die Luftbeimischung steuern.
Große Wasserdüse einstellen
An den großen Wasserdüsen ("adjustable nozzle") können Sie eine beliebige Richtung des
ausströmenden Wassers vorgeben und die Intensität steuern.
Wasserablauf
Drehen Sie den Wasserablaufknopf ("knob 2") im Uhrzeigersinn für – nicht weiter
als ca. 45 Grad – um das Abflussventil anzuheben, damit das Wasser aus
der Badewanne ablaufen kann. Drehen Sie entgegen dem Uhrzeigersinn um
das Ventil wieder zu schließen und den Wasserablauf zu stoppen.
Reinigung des Ablaufventils
Sollte das Abflussventil nach mehrmaliger Benutzung der Badewanne
verstopft sein, können Sie das Ventil entnehmen und reinigen. Heben Sie
dazu die Abdeckung an und waschen Sie sie aus.
6

7
INSTANDHALTUNG
- Benutzen Sie ein weiches, trockenes Tuch um die Badewanne zu reinigen.
- Kleinere Flecken können mit einem weichen, feuchten Tuch oder Schwamm und Badreiniger
Badewanne zu vermeiden.
entfernt werden. Bitte benutzen Sie keine Nylonprodukte, um Abnutzungserscheinungen in der
- Sollte die Abdichtung abgenutzt sein, erneuern Sie diese bitte.
- Reinigen Sie das Wasserkreislaufsystem alle zwei Wochen. Lassen Sie dazu die Badewanne mit
Wasser volllaufen und schalten Sie sie ein.
- Wenn Sie die Badewanne für längere Zeit nicht genutzt haben, lassen Sie zuerst sauberes
Wasser
den Leitungen zu vermeiden.
für ca. 3 bis 5 Minuten einlaufen und anschließend wieder ablaufen.
- Schalten Sie das Gerät zuerst aus bevor Sie das Wasser ablaufen lassen um Wasserrückstau in
SICHERHEITSHINWEISE
- Lassen Sie die Luftdüsenmassage aus Sicherheitsgründen nicht länger als eine Stunde laufen.
- Lassen Sie zuerst kaltes Wasser in die Badewanne, danach warmes Wasser. Wenn der
- Schalten Sie das Gerät nach der Benutzung aus.
- Die elektrische Installation darf nur durch einen Fachmann durchgeführt werden.
- Verwenden Sie ausschließlich sicheres und wassergeschütztes Equipment.
Wasserstand die Luftmassagedüsen überstiegen hat, können Sie Luftdüsen einschalten.
- Sorgen Sie für eine gleichmäßige Stromspannung, andernfalls kann die Badewanne nicht
benutzt
werden.
Das Produkt fällt unter Sondermüll und darf nicht im Haushaltsmüll entsorgt werden.
* Design- und Größenänderungen vorbehalten.
* Das gelieferte Produkt kann von den Produktabbildungen abweichen.
* Wir behalten uns das Recht auf Änderungen vor.

8
COMPUTERPANEL Gd7001
ANSCHLUSSSKIZZEN
Heater
LEGENDE
Control Panel
Input
ANT
Main box
Water Sensor
Bubble Bath Pump
Speaker
Lamp
Heater
Ozone
Pump
=
=
=
=
=
=
=
=
=
=
=
Computerpanel
Stromanschluss
Antenne
Elektronikbox
Wasserstandserkennung
Luftpumpe
Lautsprecher
Beleuchtung
Heizung
Ozonreinigung
Wasserpumpe
Leakage Switch
Optional
Air pump Water pump

9
COMPUTERPANEL
LEGENDE
Input
Water pump
Air pump
Heater
Speaker
Light
OzoneLevel
Dectection
ANT
=
=
=
=
=
=
=
=
=
Stromanschluss
Wasserpumpe
Lupumpe
Heizung
Lautsprecher
Beleuchtung
Ozonreinigung
Wasserstandser kennung
Antenne
M
M
MASSAGE BATHTUB CONTROLLER
MODEL: GD-7001BT
VOLTAGE: AC220-240V50/60HZ
MAX TOTAL LOAD: 14.2A
WATERPROOFGRADE: IPX4
SPECIFICATION FOR LOAD
WATER PUMP: AC220-240V1000V
AIR PUMP: AC220-240V 750
HEATER: AC220-240V1500W
GAOERDA ELECTRONICS CO.,LTD
10
COMPUTERPANEL
LEGENDE
LCD Display
Downward
Upward
Lamp
Bubble Bath Pump
Pump
Power
Heater
Ozone
Set
FM / AUX
=
=
=
=
=
=
=
=
=
=
=
LCD-Anzeige
Abwärts
Aufwärts
Beleuchtung
Luftpumpe
Wasserpumpe
Ein- / Ausschalten
Heizung (zur Aktivierung 2 Sekunden gedrückt halten)
Ozonreinigung (zur Aktivierung 2 Sekunden gedrückt halten)
Funktionsauswahl (Frequenzspeicher, Radiotuner, Kanal wechseln)
Radio- / CD-Funktion
Halten Sie die () Taste für 2 Sekunden gedrückt, um die Ozonreinigung zu starten. Auf
der LCD-Anzeige wird das O3 Symbol angezeigt.
6.Ozonreinigung
Die Heizung kann nur eingeschaltet werden, wenn die Wasserpumpe aktiviert ist. Halten Sie
zum Start der Heizung die()Taste für 2 Sekunden gedrückt. Auf der LCD-Anzeige wird
das( ) Symbol angezeigt. Blinkt dieses Symbol auf, so können Sie die Heizung
ordnungsgemäß nutzen. Sollte das Symbol dauerhaft leuchten, schaltet sich die Heizung ab, weil
die erforderlichen Voraussetzungen nicht erfüllt sind.
Drücken Sie die ()Taste, um die Luftpumpe einzuschalten. Auf der LCD-Anzeige wird das
() Symbol angezeigt. Drücken Sie die Taste erneut, um die Luftpumpe auszuschalten.
Lassen Sie bitte zuerst ausreichend Wasser in die Badewanne ein. Wenn das() Zeichen
ausgeht, ist der empfohlene Wasserstand erreicht.
3.Heizung
2.Wasserdüsenmassage
5.Beleuchtung
Nach 15 Minuten schalten sich die Ozonreinigung selbstständig aus. Sie können die Reinigung
vorher beenden, indem Sie die Taste für 2 Sekunden gedrückt halten.
Frequenzsuche: Halten Sie die()Taste für 2 Sekunden gedrückt. Auf der Anzeige erscheint
"TUN". Mit den Aufwärts- und Abwärts- Tasten können Sie die Frequenz ändern.
Drücken Sie die ()Taste, um die Radiofunktion zu aktivieren. Auf der Anzeige werden die
Frequenz und die Lautstärke angezeigt.
4.Luftdüsenmassage
Bitte beachten Sie: Wenn der erforderliche Wasserstand nicht erreicht ist, wird die Pumpe nicht
gestartet. Lassen Sie dann bitte
ausreichend Wasser ein. Außerdem schaltet sich die Pumpe automatisch nach 60 Minuten ab.
Frequenz speichern: Drücken Sie die()Taste, um die ausgewählte Frequenz zu speichern.
Es stehen die Kanäle M—01 bis M—10 zur Verfügung.
Gespeicherte Frequenz aufrufen: Drücken Sie die() Ta s t e , u m d e n e n t s p r e c h e n d e n
Speicherplatz aufzurufen. Auf der Anzeige erscheint CH01 bis CH10. Wählen Sie aus den
angezeigten Kanälen die gewünschte Station.
Drücken Sie die ( )Taste, um das Gerät einzuschalten. Auf der LCD-Anzeige erscheint
"SPA". Danach können Sie die gewünschten Einstellungen vornehmen. Drücken Sie die()
Taste erneut, um das Gerät auszuschalten.
Drücken Sie die( )Taste, um die Wasserpumpe zu starten. Auf der LCD-Anzeige wird
dieses Symbol ebenfalls angezeigt. Drücken Sie die() Taste erneut, um die Wasserpumpe
zu stoppen.
Drücken Sie die ( )Taste, um die Beleuchtung ein- bzw. auszuschalten. Auf der LCD-
Anzeige wird das()Symbol angezeigt.
7.Radio
1.Ein- / Ausschalten
11
BEDIENUNGSANLEITUNG

8.Lautstärke
Drücken Sie die Tasten zur Lautstärkeveränderung, um die Lautstärke zu verringern( )
oder zu erhöhen() .
Drücken Sie die ( ) Taste, bis "AUX" aktiv ist. Stellen Sie die gewünschte Lautstärke
mittels Lautstärketasten ein. Bitte beachten Sie: Zur Wiedergabe von CDs ist ein externer CD-
Spieler notwendig.
9.CD-Wiedergabe
12
3. Die Lautsprecher geben keinen Ton wieder.
- Bitte stellen Sie sicher, dass die entsprechenden Kabel richtig angeschlossen sind. Sollten
Ozonreinigung und Beleuchtung nicht funktionieren, überprüfen Sie bitte die Sicherung.
- Bitte stellen Sie sicher, dass der erforderliche Wasserstand erreicht ist.
1. Warum funktionieren Wasserpumpe, Luftpumpe oder Heizung nicht?
2. Funktionen wie Beleuchtung, Lautsprecher und ähnliche sind nicht intakt.
- Bitte stellen Sie sicher, dass das Radio eingeschaltet ist. Überprüfen Sie, ob durch erhöhen
der Lautstärke nun Ton wiedergegeben wird. Sollte dies nicht der Fall sein, stellen Sie bitte
sicher, dass die Lautsprecher richtig angeschlossen sind.
- Bitte überprüfen Sie die Positionierung der Radioantenne und richten Sie sie ggf. neu aus.
4. Es werden nur wenige Radiofrequenz oder Radiostationen mit schlechtem Signal
empfangen.
BENUTZUNGSHINWEISE
4. Bitte achten Sie darauf, dass Sie nur sauberes Badewasser benutzen. Andernfalls können die
2. Bitte berühren Sie keine Oberflächen oder Teile, die mit einem Hochspannungsaufkleber
versehen sind.
1. Bitte lesen Sie die Anleitung sorgfältig und halten Sie sich an die Angaben.
3. Bitte schützen Sie das Computerpanel vor starker Hitze und Feuchtigkeit.
Leitungen beschädigt und verstopft werden.
PROBLEMBEHEBUNG

13
Notice
1.This product needs to be installed and debugged by a qualified electrician.
2.The power supply of this product should has special circuits, there must be good grounding
line of protection, the cable should be fixed for ever, the sectional area of the power supply cable
should be thicker than ≥ 4mm2, users must install electric leakage switches in the supply line
that the movement electric current is 30mA and the specified electric current is 16A.
3.The power as AC 220V ±10%, 50HZ. (Products for export is customized as required).
AC110/60Hz also available.
4.The water pressure as 0.2~0.6Mpa.
5.The temperature of hot water supplied to the bathtub Should be cooler than 70℃.
6. Maintaining must go on under the disconnection power.
2. The products of our company are altered the old and bringing forth the new constantly, if
has content difference with the original manual, will not issue a separate notice, please forgive.
1. The content in this manual, is the total introduction for the function of all types and conf
iguration, it is not all models that have these functions and conf iguration.
9.This equipment not supply to the people who with low corporeity, slow reaction or mental
impedient, and including children, if this or such people need to use this equipment that a
security responsibility for the guidance or assistance of safe is require. Children must be under
the protection of an adult to use this equipment, so as to ensure its process is not in the shower
caused play equipment unknown danger.
8. Strictly prohibit to start the water pump while no water, so as not to damage the seal
gasket of the water pump.
7. A child, old man without self-care ability mustn't use alone.
10.The grounding quipment should always be connected to the fixed cabling. And It should
be install a whole extreme switch on the location of over 3mm of the connection point in the fixed
cabling.
Note:

14
Water and Power Sketch Map

15
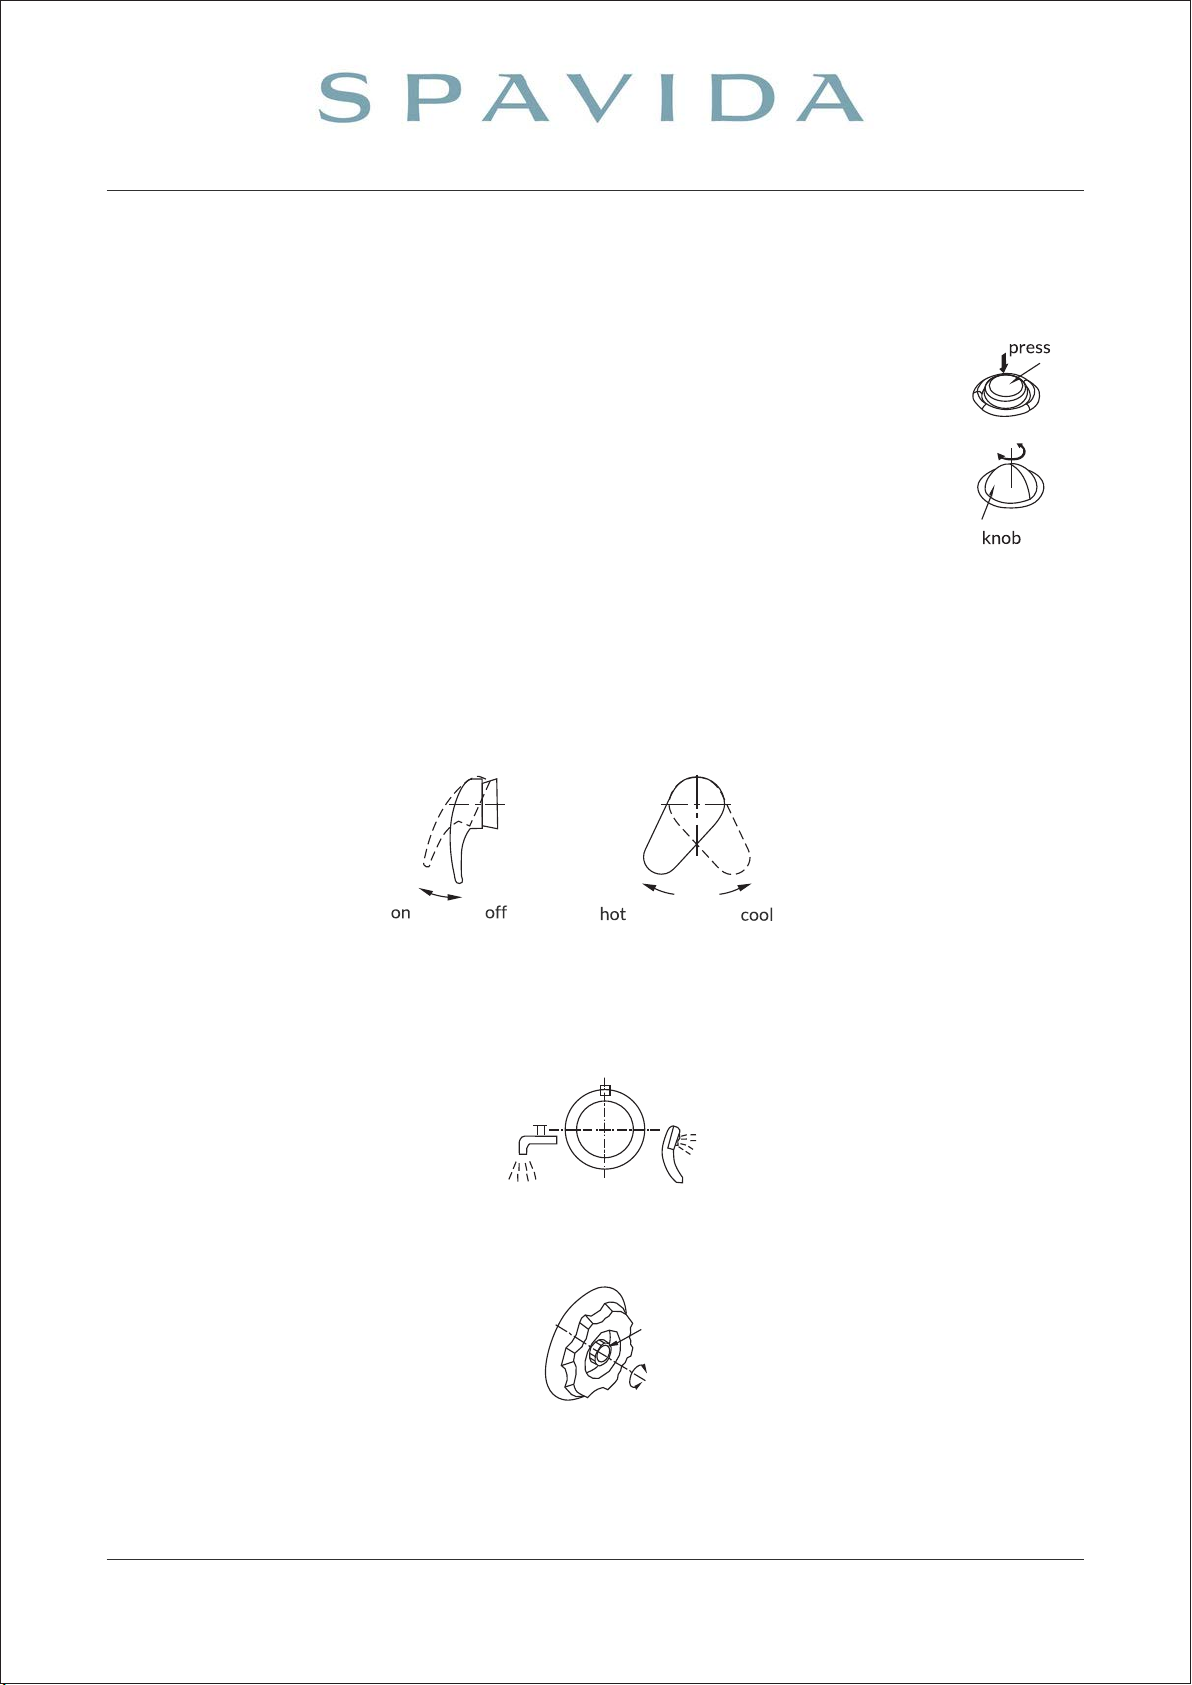
1.Operation methodfor water power massage Press it for the f irst time to open
the circulating water function, press it once again to close. With the help of the
"knob" you can control the air admixture.
and contrariwise the cold water. Control the left and the right angle properly, let the cold and hot
water mixed to reach the temperature that the you needs.
3.Operation method for the cool hot water switch.
Lift the hand of the handle of cool hot water switch outwards, turn left can flow hot water
4.The below ketch shows the distribute water switch, turn the distribute water switch, make
the red point aim at the marks, and the corresponding one can f low water.
5. Usage of the adjustable spray nozzle of waterpower massage of the bathtub.
The adjustable spray nozzle can be deflexion random. namely adjust the direction of spray
water.Can adjust the strength of the waterpower massage by turning the strength switch of the
bathtub.
Adjustable
nozzle
Instructions for use the bathtub
16

17
2
1
1
2
6. Usage of the draining off water device: (with bathtub)
A) Drain off water.
Rotate the knob 2 on bathtub clockwise (about 30° - 45°)(Fig. as below ), can turn on the
valve 1 upwards, so the water in the bathtub can be drained completely.Rotate the knob 2
contrariwise (about 30° - 45°) can close the valve 1.
B) Cleanness of the valve that drain off water:
If the drainage was jammed after the steam room has already been used for some time,
should clean out the deodorizing drainage. (the following sketch)
(with the bathtub) (no bathtub)
7. Usage of the hand shower:
There are six kinds of marks on the hand shower (such as the right sketch),if user swivel the
orientation ornament ring on the shower (such as the left sketch), can experience different
water spray fashion

18
Trouble analysis and obviation
Phenomenon Reason Solution
The water
pump does
not operate
1. The air switch is not tight, and leak
pressure.
2.Air switch are ineffective.
3.The plug not be inserted or power
supply abnormally.
4.There are sundries
that blocks the water pump impeller.
5.The water level not reached the height
stipulated.
1.Insert the air pipe closely.
2.Adjust the air switch.
3.Insert the plug closely.
4.Remove sundries.
5 . Add water to the
suitable height.
Can't adjust
the massage
strength
1. Power supply is abnormal.
2. The strength adjusting does not act.
3.The large air pipe not been inserted
closely.
1.Insert the plug closely.
2.Adjust the strength
adjusting.
3.Insert the air pipe
closely.
The water
pipe leaks
1.Seal gasket is not good.
2.The nut not been locked tightly,
interface place sticking is bad.
3.The inner layer in the water pipe
breaks.
1.Change the seal ring.
2.Screw down the nut,
and seal the interface.
3.change the water tube.
The
submarine
light is not
bright
1.The fuse of the light is melted.
2. No water in the bathtub or the
water not high enough.
3.The light bulb has been out of order.
1.Change the fuse with
specification.
2.Add water to be higher
than the nozzle.
3.Change the light bulb.

19
Maintenance
2.Use the polishing compound to polish and make the surface keep bright.
1.Can clean with liquid detergent and soft cloth,Pay attention to not to use the acetone,
alcohol,ammonia and materials containing organic solvent to wash. If want to pasteurize, don't
use the formic acid and formaldehyde products, Otherwise will damage the bathtub surface.
4.If the room body surface has slight scotch or cigarette burn, can use toothpaste and soft
cloth to polish.
5.Maintenance of chromium-plating parts: Wipe the chromium-plating parts lightly with the
cotton f lannel; make sure not to polish with the coarse cloth.
3.Can wash up surface scale with soft cloth soaked with citric acid, had better soft cloth
soaked with hot citric acid, some dirties cant be wiped out by soft cloth pained with toothpaste.
Can't control The control line not be connected
well.
1. Reconnect the control
line.
The volume key of the keyboard is
turned too high.
1 .Turn volume down
properly.
Whistling in
a talking
The radio
reception
is bad
The total
plug trips
1.There is leakage of electricity in
water pump or in other load.
2.The total outlet itself has already
been damaged.
1.Check and change the leak
electricity load.
2.Change with the same
sharp plug.
1.The Model Y aerial not been drawn
well.
2.The frequency of radio station not
been set well..
3.Users are in the weak signal area.
1.Draw back the “Y” antenna,
and make it to the best
direction
2.set the frequency of radio
station again.If it is not
good to set automatically,
can adjust it manually.

20
8.As using water power massage, don't use the excessive plant cosmetics, in case that the
screen panel of return water be jammed.
9.Should clear up the return water screen panel of the water pump for using every 30hours,
so as not to be jammed.
10.If not use for a long time, should close the master power, for fear that the machine be in
the state of waiting for a long time.
11.As water in the bathtub is higher than the spray nozzle, can you turn on the water pump,
and the operation of the electrical engine of the water pump has stopped, can you drain off
water. For fear that damage the water pump as it runs in idleness at the state of no water.
12. After the bathtub been installed, seal up all connection slot between the bathtub and the
wall body with the white neutral glass cement and can use it formally 24 hours later
13.Before and after the use of this equipment it should be notice to the cleanness sanitation;
In order to aviod any damage to the equipment it’s not allow too rude to use this equipment. Do
not touch with such as ink or feculency to the crust of the equipment; after each use, it’s request
to clearn with soft cotton towels lightly and let it dried naturally; In order to avoid circuit fault,
the circuit can not contact with the water during clearning.
14.The grounding quipment should always be connected to the f ixed cabling.
15.It should be install a whole extreme switch on the location of over 3mm of the connection
point in the f ixed cabling.
6.Maintenance of the bathtub: As the bathtub has the scale or slight scotch, can polish it with
toothpaste and soft cloth.
7.Washing the water power massage device: Add hot water of 40ºC to the bathtub to full,Put
into sanitizer 2 gram per liter water,Start the water power massage system about 5 minutes,Stop
the pump and drain off water, then add the cold water fully,restart about 3 minutes of water
power massage,clean bathtub after stopping the pump and draining off water.
18.If the electrical line damage, it should be call for a professional electrician to check so that
can aviod the danger.
16.In the cold winter ,the temperature should not be set too high when you use it f
irst , set
the steam temperatures slightly higher than the room temperature, then you should raise the
temperature twice till you need.
17.The old hose do not allow repetition use, it should be use the new hose which was
accompanying with this equipment.
Table of contents
Languages:
Other SpaVida Bathtub manuals


Popular Bathtub manuals by other brands

Beliani
Beliani ACUARIO RL-6135N Mounting guide

American Standard
American Standard Rondo Whirlpool 7242.028W Specifications

Clou
Clou InBe IB/05.40102 installation instructions

Access
Access VENETIAN DUAL TOUCH PAD CONTROL 3672 INSTALLATION & OPERATIONAL INSTRUCTIONS

Heritage Bathrooms
Heritage Bathrooms Freestanding Baths installation guide

Wellis
Wellis Flavia WK00135 instruction manual


