Specialized SBC-B16 User manual

1
THIS BRIEF USER MANUAL CONTAINS IMPORTANT INFORMATION. PLEASE READ CAREFULLY AND STORE IN A SAFE PLACE.
This user manual is specific to your Range Extender (RE). It contains important safety, performance, and technical information, which you should read before your first use and keep for reference. You
should also read the entire TURBO SL bicycle manual and the Specialized Bicycle Owner’s Manual (“Owner’s Manual”), because they have additional important general information and instructions
which you should follow. If you do not have a copy of these documents, you can download them at no cost at www.specialized.com, or obtain them from your nearest Authorized Specialized Retailer or
Specialized Rider Care.
When reading this manual, you will note various important symbols and warnings, which are explained below:
WARNING! The combination of this symbol and word indicates a potentially hazardous situation which, if not avoided, could result in serious injury or death. Many of the
Warnings say “you may lose control and fall.” Because any fall can result in serious injury or even death, we do not always repeat the warning of possible injury or death.
CAUTION: The combination of the safety alert symbol and the word CAUTION indicates a potentially hazardous situation, which, if not avoided, may result in minor or
moderate injury, or is an alert against unsafe practices.
The word CAUTION used without the safety alert symbol indicates a situation which, if not avoided, could result in serious damage to the bicycle or the voiding of your
warranty.
INFO: This symbol alerts the reader to information which is particularly important.
WARNINGS AND SAFETY NOTES
Your bicycle is powered by either one or two Lithium-Ion (Li-Ion) batteries. Always adhere to the following instructions when handling or charging the RE or when using the RE on your bicycle:
Only operate the RE between the temperature range of -20° C (-4° F) and +60° C (+140° F).
Only use the RE with the TURBO SL bicycle. Do not use the RE with any other bicycle or any other battery with the TURBO SL bicycle, even if it fits.
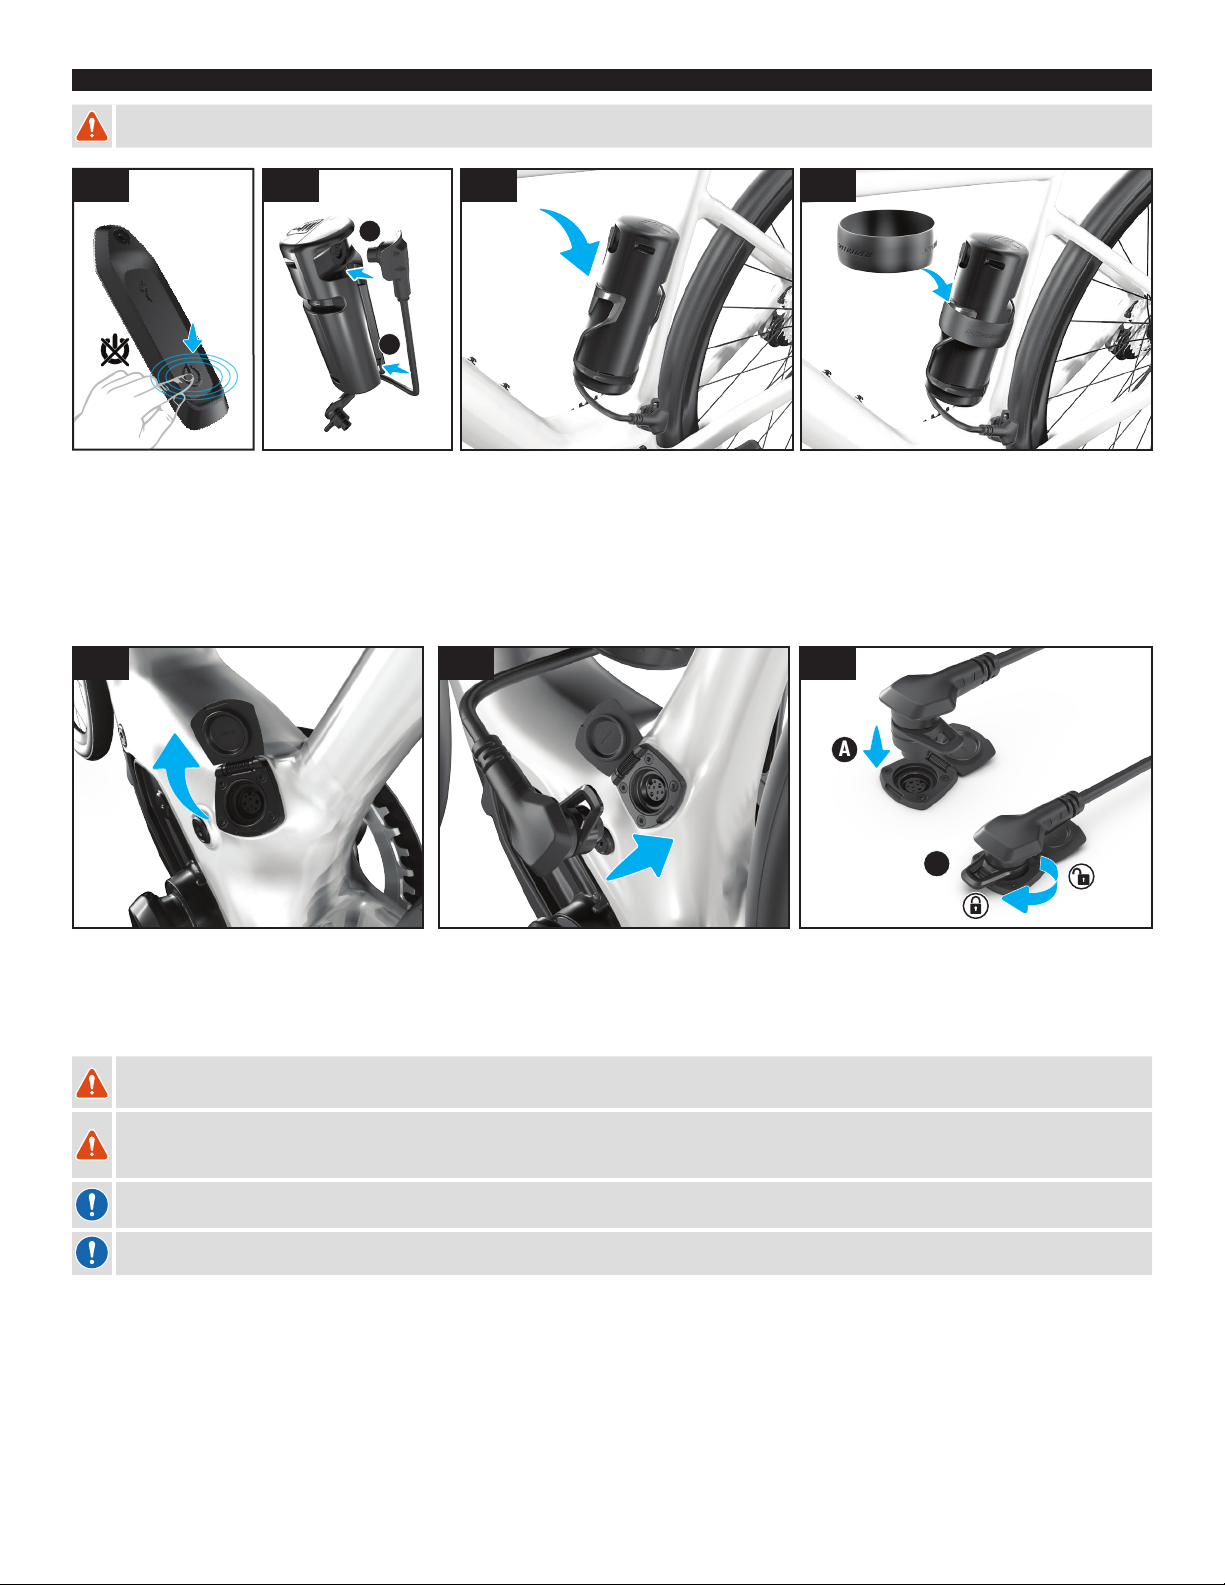
Before riding the bicycle, make sure the RE is properly secured in the bottle cage on the frame.
Always turn the bicycle off before connecting or disconnecting the RE from the charge port.
Turn off the bicycle and unplug the charger or RE from the charge port before performing work of any kind, such as installation, maintenance, cleaning and/or repair. Touching the contacts when the
bicycle is ON can result in electric shock and/or injury.
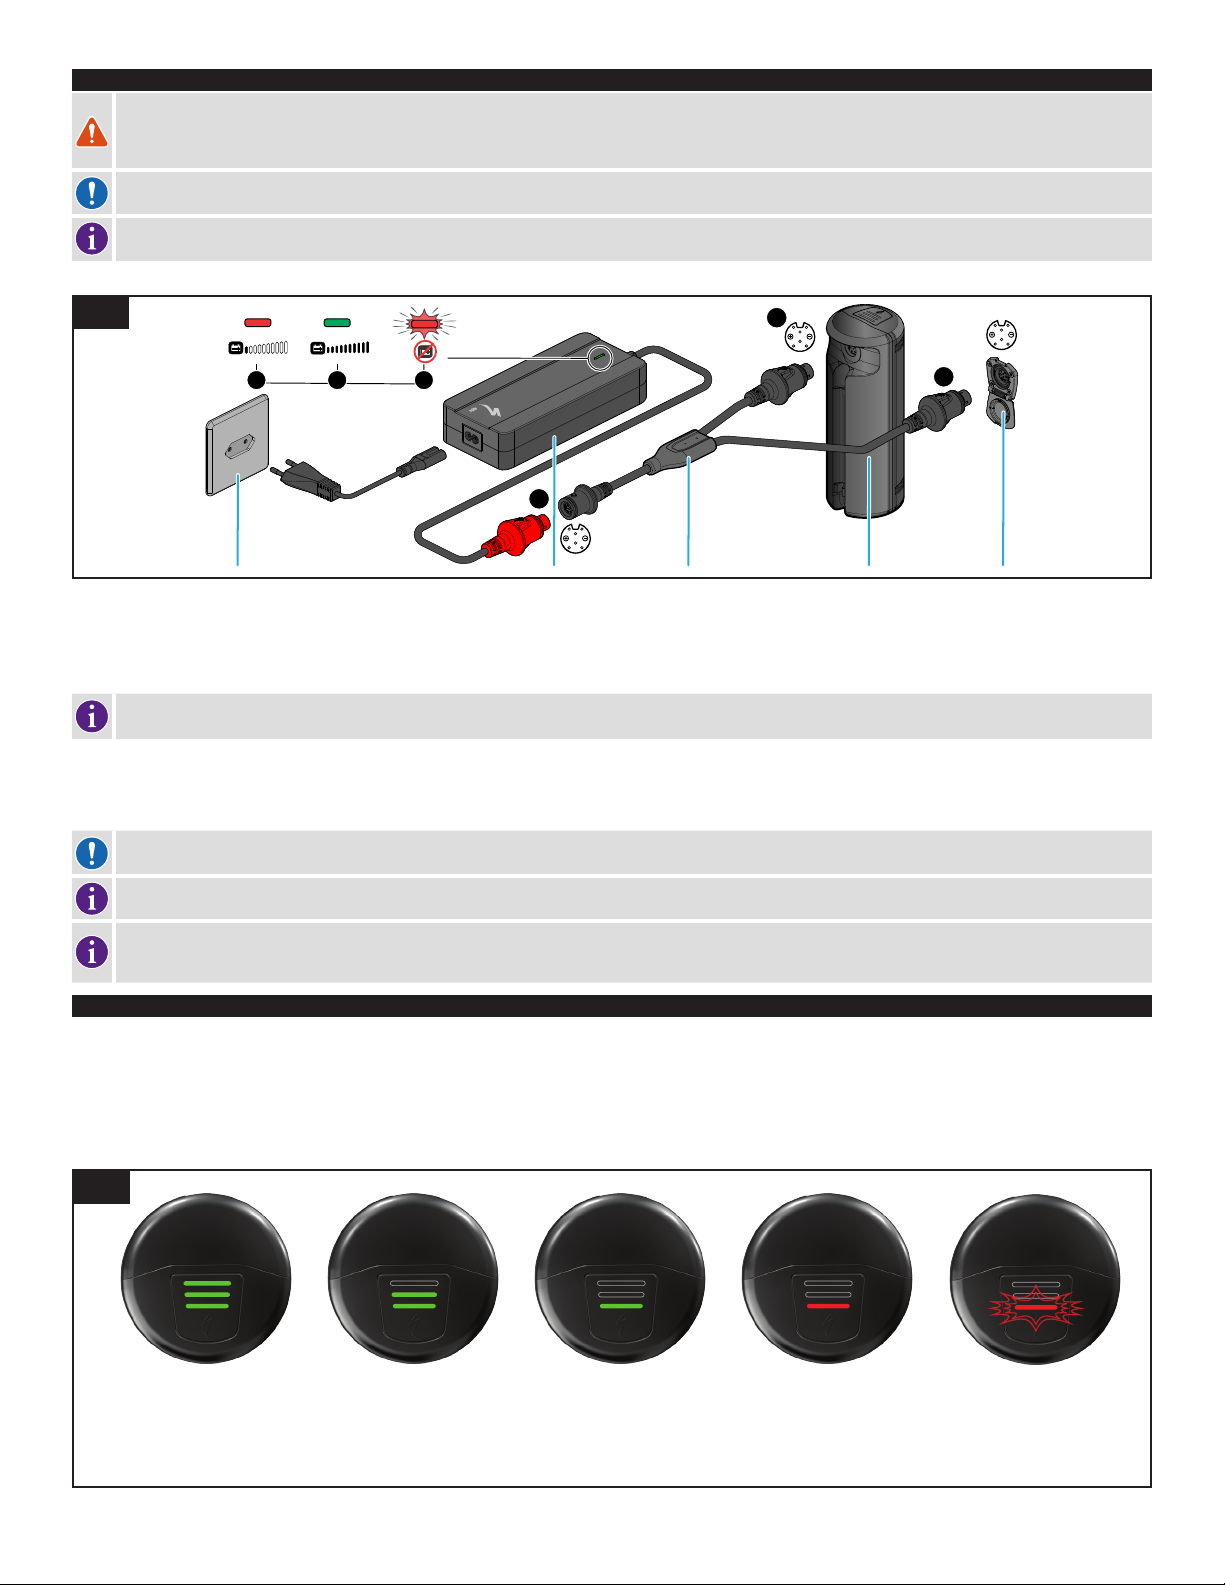
WHEN CHARGING THE RE:
Regularly inspect the RE and charger for damage. Never charge a RE which you suspect is damaged or know is broken, and do not use it.
Make sure the charging socket and plug are clean and dry before connecting and charging the RE.
Only use the supplied charger cord. Ensure the cord plug is fully inserted in the charger before plugging the charger into a power outlet.
Only use the Specialized charger supplied with the bicycle or other chargers approved by Specialized. Inspect the charger before every use for possible damage to the charger itself, the cable
or the charging plug. Never use a charger which you suspect is damaged or know to be broken.
OBSERVE AND OBEY:
Do not modify, open or disassemble the RE. Modification or disassembly may result in a short circuit, fire or malfunction.
Keep the RE away from small metal objects as that can cause a short-circuit.
Do not allow any nails, screws or other small, sharp and/or metallic objects to come in contact with the RE’s charging socket.
Do not allow the RE to overheat. Protect the RE from excessive sun exposure.
Do not expose the RE to an open fire or radiator heat.
Do not submerge the RE in water.
Do not use a RE that shows any signs of damage to the casing or charge port, or is leaking any fluids. Battery liquid can cause skin irritation and burns. In the event of damage that results in skin or
eye contact with any liquid from the battery, immediately flush with water and seek medical assistance.
WARNING! Failure to follow the instructions in this section may result in damage to electrical components on your bicycle and will void your warranty, but, most
importantly, may result in serious personal injury or death. If your RE exhibits any signs of damage, do not use it and immediately bring it to your Authorized Specialized
Retailer for inspection.
WARRANTY
Please refer to the written warranty provisions provided with your bicycle, or visit www.specialized.com. A copy is also available at your Authorized Specialized Retailer.
SPECIALIZED USER MANUAL
RANGE EXTENDER - SBC-B16

2
SETUP
WARNING! Always turn off the RE when not in use and/or when working on the bicycle.
A
B
42
13
Power off your TURBO SL bicycle (fig. 1).
Install the cage on the bicycle according to the instructions supplied with the bottle cage. Only use the recommended bottle cage (Zee Cage II) for the RE.
Insert the power cable plug with the rounded cover (fig. 2 A) into the upper port of the RE. Looking from the side, ensure the connector sits flush on the RE, and the two o-rings are fully
inserted into the port.
Clip the cable into the channel located in the RE housing (fig. 2 B).
Install the RE in the bottle cage (fig. 3).
Secure the RE into the bottle cage using the supplied Specialized band (fig. 4).
A
B
7
56
Locate the charge port on the non-drive-side of the frame near the bottom bracket (fig. 5).
Open the charge port lid (fig. 5-6 ) and insert the RE plug into the charge port (fig. 7 A).
Once the plug is seated correctly, twist the lever on the connector clockwise until fully engaged to lock the cable in place (fig. 7 B).
To verify the RE is successfully connected to the system, check that the green charge level LED lights appear on the TCU (fig 11).
WARNING!: When riding with an RE installed, ensure both ends of the cable are properly connected to the ports as described above. A loose cable can cause damage to your
bicycle and the RE can become an obstruction which may cause you to lose control and fall.
WARNING: Always use the specified bottle cage when using the RE, and always check it before each use for possible damage. Use of an unspecified bottle cage can cause
the RE to come loose and fall out, which can result in injury.
CAUTION: Dirt buildup can result in the RE plug’s locking lever being difficult to rotate. Clean the RE plug regularly with a damp cloth and allow the plug to dry before use.
CAUTION: When installing the bottle cage make sure to use the supplied screws. Longer screw heads can cause damage to the RE.

3
CHARGING THE RE
WARNING! Place the charger and RE on a stable, level surface unaffected by heat. You should charge the RE in a dry, well ventilated area and make sure the charger is
uncovered during the charging process. Ensure that the RE and charger are not exposed to any flammable or dangerous substances. Plug the charger’s plug into an outlet (100
- 240V), using the appropriate plug for the country’s standards, then connect the charging plug with the charging socket on the RE. Specialized recommends charging the RE
in an area with a smoke detector.
CAUTION: Always turn off the bicycle before plugging or unplugging the charger or RE!
Only charge the RE at an ambient temperature between 0° C and +45° C (+32° F and +113° F). If outside temperatures are too hot or too cold, charge the RE inside. For
safety reasons, if the RE is too hot or too cold, it will not charge.
110V | 220V OUTLET
1 2 3
A
C
B
RANGE EXTENDER BICYCLE CHARGE PORT48V CHARGER Y-SPLITER CABLE
8
Use the standard charger supplied with your bicycle to charge the RE. If you want to charge both the internal battery and the RE at the same time, an optional Y-splitter cable can be plugged
into the charger.
Plug the charger’s plug into an outlet (100 - 240V), using the appropriate plug for the country’s standards.
Insert either the bicycle charging plug (A) or the Y-Splitter charging plug (B) securely into the RE Charge port (fig. 8).
The Y-Splitter cable (available from your Authorized Specialized Retailer) will ONLY produce a charge if it’s connected to one RE and one internal battery at the same time.
The charger will not charge if the Y-splitter cable is connected to two REs or two internal batteries, or if more than one Y-splitter cable is connected to the same charger.
When charging is complete, disconnect the charging plug from the charge port.
Unplug the charger from the wall socket.
During the charging process, the diode on the charger will glow red (fig. 8 - 1). When the RE is fully charged, the diode on the charger will turn green (fig. 8 - 2).
CAUTION: If the red diode flashes during the charging process (fig. 8 - 3), a charging error has occurred. In that case, remove the charger from the socket, discontinue use of
the motor support and contact your Authorized Specialized Retailer.
The Battery Management System (BMS) is designed to protect a fully discharged battery from damage for a period of time. However, in order to maintain the best possible
battery performance and lifespan, Specialized recommends regularly recharging the RE to at least 60% full (2 LEDs on the RE charge display fig. 9).
Please note that Li-ion batteries gradually lose capacity depending on age and use. Strongly reduced operating time after fully charging can be a sign that the RE is
reaching the end of its useful life and has to be replaced. Provided the bicycle has been used properly, approximately 75% of the RE’s original capacity should remain after
300 charging cycles or two years. Replacement batteries can be purchased from your Authorized Specialized Retailer.
CHARGE LEVEL DISPLAY
When the RE is attached to the bicycle, the charge level is displayed on the top of the RE (fig. 9), the TCU (fig. 11) located on the top tube, the optional TCD (fig. 10) and in the Mission Control
App.
The TCU, TCD and Mission Control displays adapt to show the state of charge for both internal battery and RE.
To check the state of charge when not connected to the bike, power on the RE by pressing the button on the top. If the RE has been powered off for more than 2 hours, the RE will need a long
push to wake it from deep sleep mode.
RE CHARGE LEVEL
95 % - 100 % 30 % - 94% 10% - 29% 5% - 9% 0% - 4%
9

4
TURBO CONNECT DISPLAY (TCD) CHARGE LEVEL
With both the internal battery and the RE fully charged, the TCD will display both charge levels separately (fig. 10 A) and combined (fig. 10 B).
40-49
30-39
20-29
10-19
0-9
90-100
80-89
70-79
60-69
50-59
40-49
30-39
20-29
10-19
0-9
80-100
60-79
40-59
20-39
0-19
%
=
=
=
=
=
A
B
ARANGE EXTENDER
BATTERY LEVEL
RANGE EXTENDER
BATTERY LEVEL
INTERNAL
BATTERY LEVEL
INTERNAL
BATTERY LEVEL
RANGE
EXTENDER
+
INTERNAL
BATTERY
10
TURBO CONNECT UNIT (TCU) CHARGE LEVEL
With both the internal battery and the RE fully charged, the TCU shows the charge level as overlaying light bars. The internal battery charge level is displayed with 10 blue light bars and the RE
charge level is displayed with 5 green light bars (fig. 11 A).
The RE green light bars will overlay on the first 5 blue light bars of the internal battery light bars (fig. 10 B) and will hide some or all the blue bars depending on their state of charge. When the
charge levels of both blue and green bars are equal the green bars will show on top, when the charge levels drop lower the color with the lowest charge level will show on top.
INT BAT
RE BAT
TOP LAYER
BASE LAYER
90-100 %
80-100%
90-100 %
40-59%
90-100 %
0-19%
40-49%
80-100%
10-19%
80-100%
0-9%
80-100%
0-9%
0-9%
B
90-100
80-89
70-79
60-69
50-59
40-49
30-39
20-29
10-19
0-9
80-100
60-79
40-59
20-39
0-19
%
A
INTERNAL
BATTERY LEVEL
RANGE EXTENDER
BATTERY LEVEL
11
MISSION CONTROL INTEGRATION
When the RE is plugged in, the system default is to discharge both the RE and the internal battery simultaneously. Using the Mission Control App, you can adjust the default to completely
discharge the RE(s) first. This will require you to restart the bike to take effect.
When riding in “RE first” mode, once the RE reaches a low state of charge, the power assistance will be reduced, even if the internal battery is fully charged. This reduction is due to the BMS
protecting the RE from high currents which can damage the RE. Once the RE is completely drained, the TCD will display a 3% drop in range.
KNOW YOUR RANGE
Know the range of your electric bicycle before you start your ride. You can calculate your range by visiting www.specialized.com, selecting your Turbo Bicycle model, then clicking on the range
calculator. In addition to the range calculator, we recommend using the Smart Control feature in the Mission Control App to control your range.
CLEANING
Ensure the charge port lid on your bicycle is closed before cleaning.
Make sure the RE plug is free of water and/or dirt. The port should be clean before use. Make sure the system is switched off before cleaning. Blow out any contamination with low air pressure or
use a soft brush to remove dry contamination.
Make sure the RE plug is completely dry before connecting to a charger or bicycle. Always close the charge port lid when the internal battery is not being charged or the RE is not in use.

5
CAUTION: Never use a high-pressure cleaner when cleaning your RE. Please ensure no water comes into contact with the electrical components while washing. Ask your
Authorized Specialized Retailer for additional information about cleaning your bicycle.
CAUTION: Do not use alcohol, solvents or abrasive cleaners to clean the RE or the charger. Instead, use a dry or slightly damp cloth.
STORAGE
CAUTION: If the RE is not being used for an extended period of time, store it in a dry, well ventilated area. Only store the bicycle at an ambient temperature below +35° C
(+95° F).
CAUTION: If the RE is stored and not in use for extended periods of time, be sure to charge the RE at least every three months so at least 2 LEDs (30-94%) are glowing
green. If the RE is not charged over a period longer than three months, it can cause damage to the RE.
Do not leave the RE connected to the charger for extended periods after the RE is charged.
TRANSPORT
Transporting and/or shipping your RE may be subject to certain restrictions and may require special handling, labelling, and/or packaging. Be sure to inform yourself
beforehand of all applicable legal requirements and regulations in your country or state. Your Authorized Specialized Retailer may also have helpful information available.
When carrying the battery outside the frame, Specialized recommends using an approved battery transport box.
DISPOSAL
LI-
ION
Batteries and chargers must not be disposed of in your household trash! All batteries and chargers must be disposed of in an environmentally friendly manner,
in accordance with the battery disposal regulations in your country or state. Ask your Authorized Specialized Retailer for information about how to dispose of a
battery or charger and any applicable take-back program.
RE TECHNICAL DATA
DESCRIPTION UNIT SPECIFICATION
OPERATING VOLTAGE VOLT 48
CHARGING TEMPERATURE °C 1 — +45
°F +32 — +113
OPERATING TEMPERATURE °C -20 — +60
°F -4 — +140
STORAGE TEMPERATURE °C -20 — +60
°F -4 — +140
DEGREE OF PROTECTION IPX6
WEIGHT KG 1
LB. 2.2
BATTERY SBC-B16
RATED CAPACITY 3.35 AH
ENERGY 160 WH
CHARGER SBC-C06
CHARGE TIME 3:20H
WARNING! Please read the label located on the base of the RE (sample label below) before first use.
SPECIALIZED BICYCLE COMPONENTS
15130 Concord Circle, Morgan Hill, CA 95037 (408) 779-6229
0000139967_UM_R1, 03/19
We may occasionally issue updates and addendums to this document. Please periodically check www.specialized.
com or contact Rider Care to make sure you have the latest information.
Table of contents