Quick Start
Guide
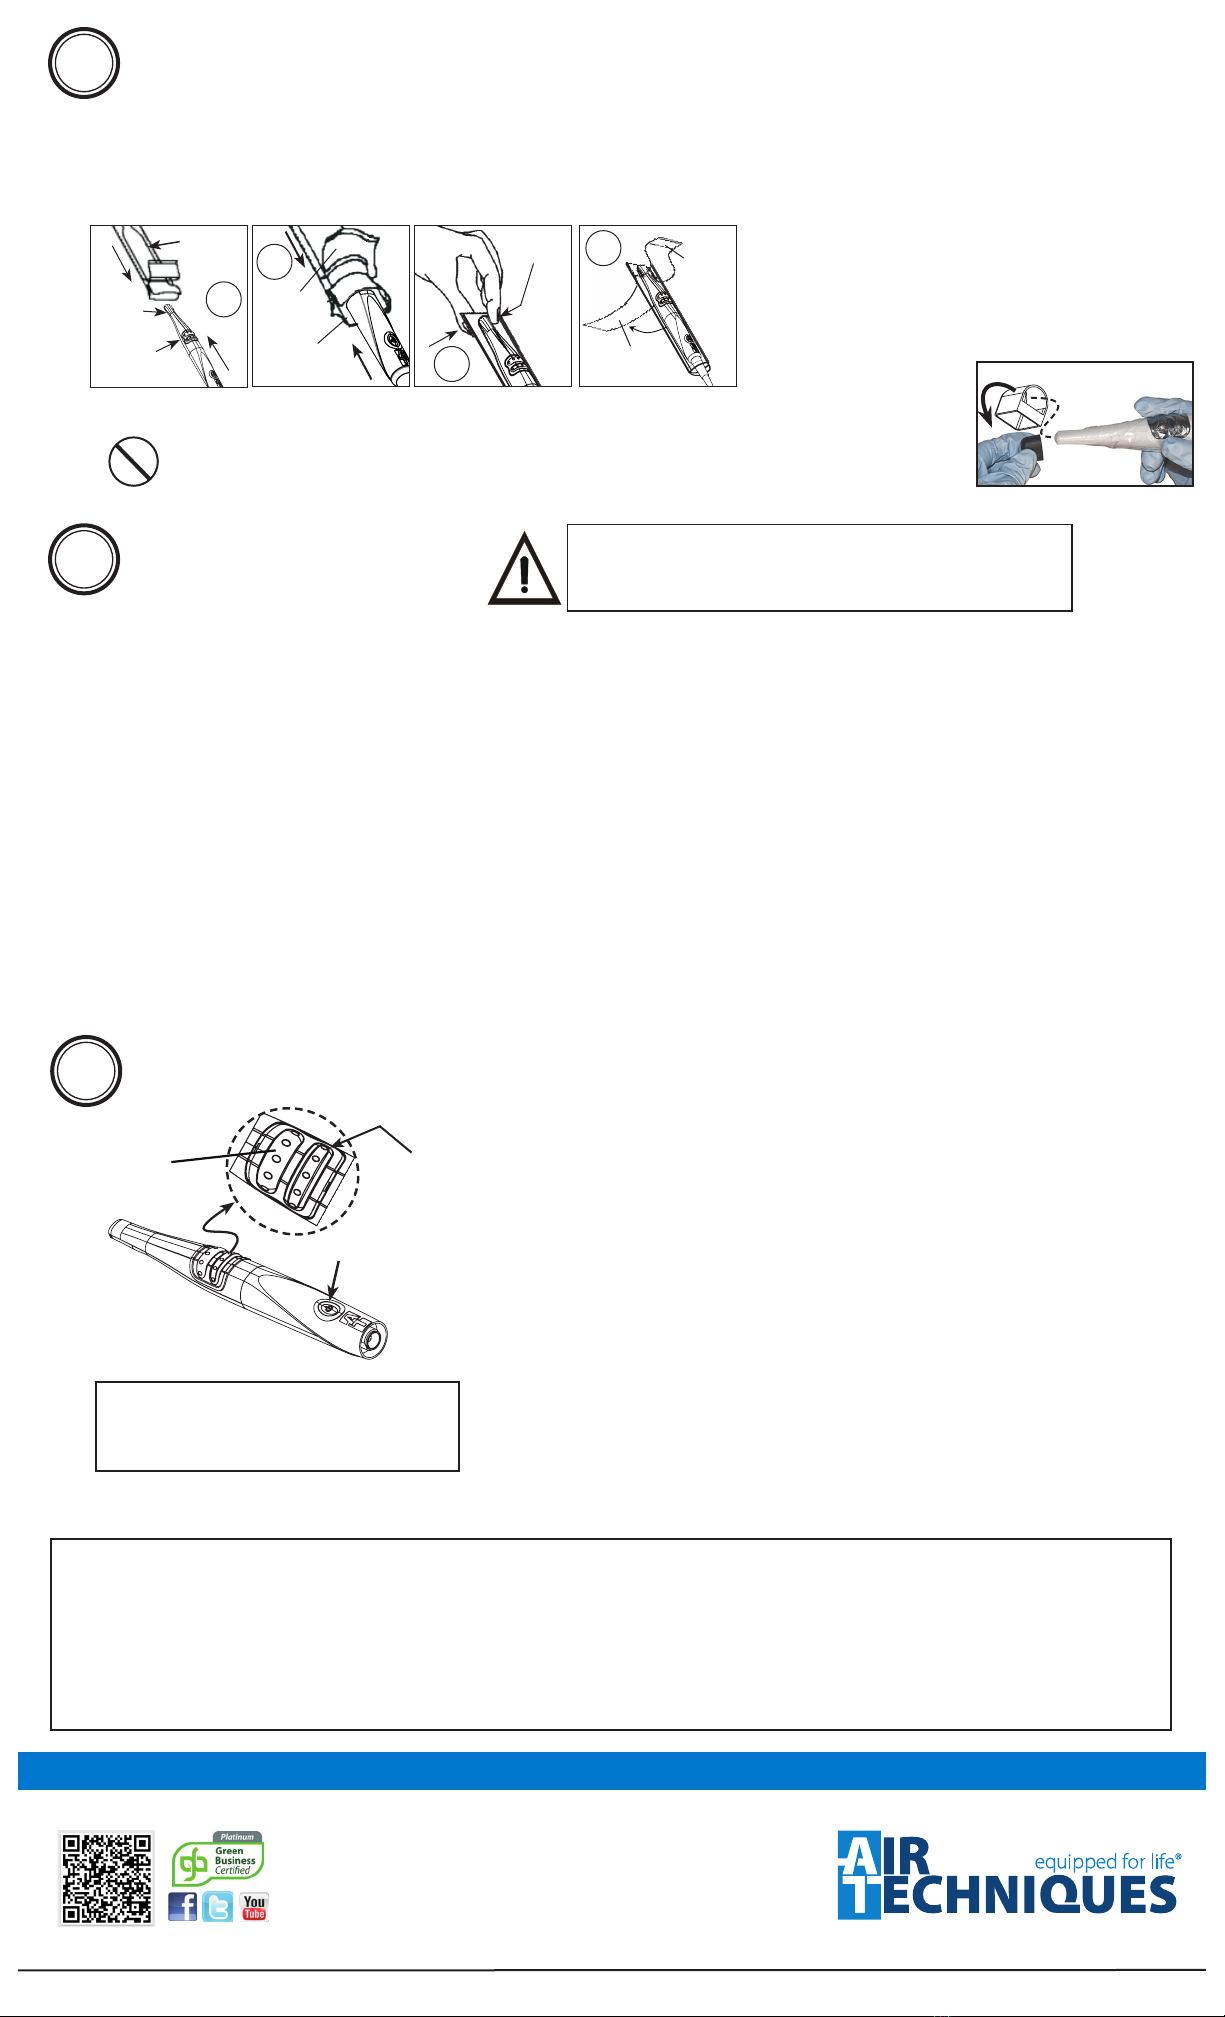
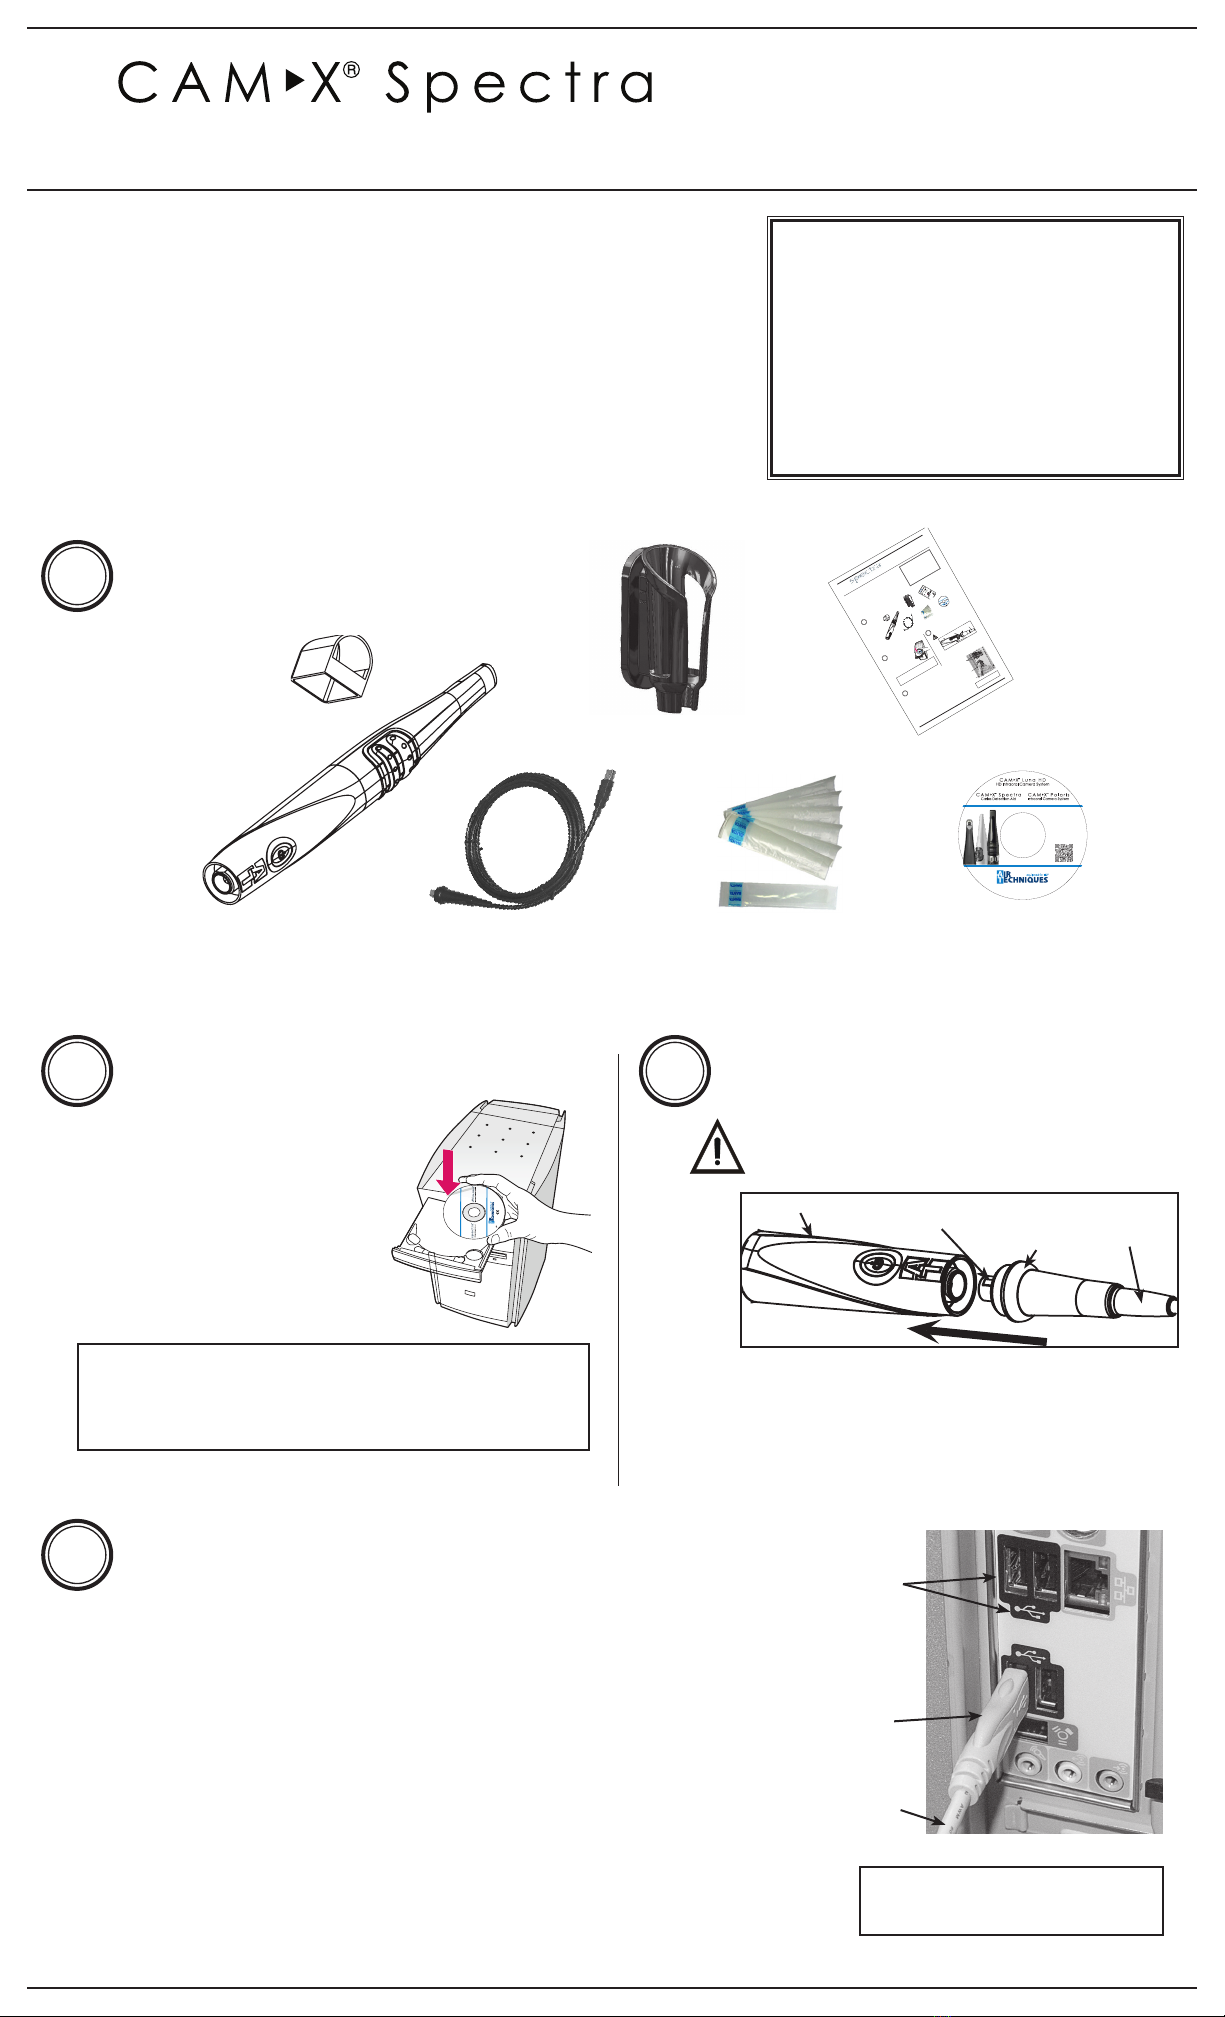
1. Using the black molded connector end of the Handpiece
Cable, align the connector key with the keyway of the
Handpiece connector.
2. Insert straight into Handpiece connector until it securely snaps
into place.
Handpiece Connection
Do not twist or turn the Handpiece Cable connec-
tor. The connector is keyed and mates straight on
with Handpiece connector.
Software Installation
Before connecting Spectra to your
computer or attempting to use it for
the first time, run the Setup program
on the Drivers and Utilities Disk.
This CD contains the necessary
device drivers to communicate with
the imaging software installed on the
user’s computer.
Note: If the startup screen does not appear, double-click My
Computer, double-click the CD drive and then dou-
ble-click Autorun.exe.
23
Connector
Key
Handpiece Quick
Disconnect
Collar Handpiece
Cable
USB Interface Connections
IMPORTANT:
Use a High Power (500 mA) USB 2.0 Port Only
1. Connect the USB Type A connector side of the Handpiece Cable to any
available USB 2.0 high speed, high power port on the user supplied
Computer System.
2. Always make sure to use the same USB port whenever re-connection of the
USB cable is necessary.
3. A self-powered USB hub can be used to extend the handpiece cable
length.
4. Do not use a BUS - powered hub or extension cable.
USB Type A
Connector
Handpiece
Cable
4Typical Computer
USB 2.0 Ports
Note: Desktop computer shown.
Laptop can be used.
Thank You and Congratulations
on your purchase of Spectra, the lat-
est standard definition camera in the dental video imaging product line from
Air Techniques, a leading manufacturer of dental equipment since 1962.
Spectra offers the flexible benefits of USB Plug-N-Play technology that is easily
integrated into any practice. The lightweight one-piece handpiece is extremely
maneuverable and produces crisp, clear images.
This document provides brief information to help you get started using your
Spectra for the first time.
Please refer to the Operator’s Manual PDF file on the Drivers and Utilities
Disk for detailed information.
Online Warranty Registration.
Quickly
register your new Spectra online. Just have
the product model and serial numbers available.
Go to the Air Techniques web site, www.airtech-
niques.com, click the Warranty Registration link
and complete the form. Registration ensures a
record for the warranty period and helps to keep
you informed of product updates and other valu-
able information.
Fluorescence Caries Detection Aid System
1Components
Spectra
Camera Handpiece
Handpiece Holder
with Wall Mount
Disposable Camera
Sheaths Sample Pack
Quick Start Guide
Quick Start
Guide
1
Components
1. Using the black molded connector end of the Handpiece
Cable, align the connector key with the keyway of the
Handpiece connector.
2. Insert straightinto Handpiece connectoruntil it securelysnaps
intoplace.
Handpiece Connection
Do not twist or turn the Handpiece Cable
connector.The connector is keyed and mates
straighton with Handpiece connector.
Software Installation
Before connecting Spectra to your
computer or attempting to use it for
the first time, run the Setup program
on the Drivers and Utilities Disk.
This CD contains the necessary
device drivers to communicate with
theimaging software installed on the
user’s computer.
Note: Ifthestartupscreendoesnotappear,double-click
My Computer, double-clickthe CD drive and
thendouble-click Autorun.exe.
Spectra
CameraHandpiece
Handpiece Holder
with WallMount
Disposable Camera
Covers Sample Pack
Quick StartGuide
QuickS t a r t
Guide
IntraoralVide o CameraSystem
ThePDFversionof Operator’sManualfor PolarisisincludedontheCD.Alsoincludedare
USBDeviceDrivers,DemonstrationProgramandUtilitiesandAdobeAcrobatReader
Authorizedimagingsoftware,purchasedfromyourdealeror other company, must be installed
onthecomputerinordertooperatePolaris.
Makesurethatthecomputer meets all requirements necessary to support thePolaris.See
MinimumComputerSystemRequirementsin the InstructionManual.
1
Components
1.Usingtheblackmoldedconnectorendof the Handpiece
Cable,aligntheconnectorkeywith the keyway of the
Handpiececonnector.
2.InsertstraightintoHandpiececonnectoruntilitsecurelysnaps
intoplace.
HandpieceConnection
DonottwistorturntheHandpieceCable
connector.Theconnectoriskeyedandmates
straightonwithHandpiececonnector.
SoftwareInstallation
BeforeconnectingPolaristoyour
computerorattemptingtouseitfor
thefirsttime,runtheSetupprogram
ontheDriversandUtilitiesDisk.
ThisCDcontainsthe necessary
devicedriverstocommunicatewith
theimagingsoftwareinstalledonthe
user’scomputer.
Note:Ifthestartupscreendoesnotappear,double-click
MyComputer
,double-clicktheCDdriveand
thendouble-clickAutorun.exe.
Sca
n
X
Sw
if
t
In
s
t
a
l
lati
o
n
&
O
p
e
r
a
t
M
a
n
u
a
l
D
i
sk
P/
N
G
8
09
5
Re
v
.
A
Mar
c
h
2
01
3
D
i
s
k
PolarisCameraHandpiece
QuickStartGuide
DisposableCamera
CoversSamplePack
QuickStart
Guide
Qu
ick
S
t
a
r
t
Ins
t
r
uct
io
ns
DigitalImaging
S
ystem
©AirTech
niq
ues,
I
n
c
Co
p
y
rig
h
t
2
0
1
3
•
P
/NG8013,
R
ev.
A
•
M
a
y2
013
Corpora
t
e
H
ead
q
u
arters
12
95W
a
l
tWh
i
tmanRoad|
Melvill
e
,NewYork
1
1747-3
062|Ph
one:+1-800-247-832
4|Fax:+1-
888
-247
-848
1
West
e
rnFac
i
lity
2
9
1
Bonni
e
Lane
,
Sui
t
e
1
0
1
|
Co
ron
a
,
CA
9
28
8
0
-280
4|Pho
n
e
:+1-8
00-247
-
8
32
4
|
F
a
x
:
+
1-
9
5
1-
8
98-
7
646
www.ai
rtechn
iques.com
Sca
n
Q
RCodeformor
eab
out
Sc
a
nX
.
8
Size#2Image
Plates
(2
Pa
c
k
sof4
pl
a
tes)
4Size#0Image
Pl
at
es(2Pack
s
o
f
2p
l
a
t
e
s
)
4Siz
e
#1Im
a
ge
Plate
s(2Packs
of2
plates)
Ba
rri
e
r
En
velopes
Si
z
e#0
(
Box
o
f
1
00
)
Size#1(Boxof10
0)
Size#2(Boxof300)
Quick
S
tart
Instr
uctions
MainScanXS
wif
t
Assem
b
l
y
wi
t
hSize#
2
InletGuideInstalled
2PSPCleani
n
g
W
ip
eSamplePacks
Sca
nXS
wi
ft
I
n
sta
llat
io
n
&
O
pera
ti
n
g
M
a
n
u
al
DiskP/NG
80
9
5Rev
.A
M
arc
h
2013
Dis
k
Sa
m
p
l
e
Cleanin
g
SheetU
SBC
a
bl
e2
4VDCPowerSupply
Adapter
S
ca
nX
Swift
I
n
stallat
ion
&
O
perati
n
g
Man
u
a
l
D
isk
P/N
G8
0
9
5
R
ev.
A
Ma
rc
h
2
0
1
3
Di
s
k
C
DD
isk
&T
r
a
in
ing
DVD
CheckDeliveredCompo
nents
1
I
n
stall
Devi
ceDri
vers
2
De
vi
ceDr
ive
rI
nstall
a
ti
on.
Beforec
on
necti
ngScanX
to
yourcomputeror
att
em
pt
ingt
o
usei
tf
ort
he
first
ti
me
,run
the
S
etup
pro
gram
ontheDrivers
andUtil
it
iesDi
sk
.
Thi
sCDc
ontai
nstheneces
s
ary
d
evice
dr
i
ve
rs
t
o
c
ommuni
c
ate
wi
ththeimaging
software
installed
on
t
h
e
c
o
mp
uter.
No
te:If
thesta
r
t
u
p
screendoes
no
t
ap
pear,
doub
le-clic
k
M
yC
omputer,
d
ouble-click
theCD-ROMico
nand
then
dou
ble-
clickD:\A
utorun.exe
.
N
ote:Au
t
ho
r
izedimagingso
f
tware,pu
r
ch
ased
f
r
o
myou
rd
e
a
l
ero
r
othe
r
co
m
p
a
ny,
mu
s
t
b
einstalledo
n
t
heco
m
put
e
r
ino
r
der
t
ooperate
the
Sca
n
X
Sw
ift.
S
c
an
X
S
w
if
t
I
n
s
t
a
l
l
a
t
io
n
&
O
p
e
ra
t
M
a
n
ua
l
D
is
k
P
/N
G
80
95
R
ev
.
A
M
a
r
ch
2
0
1
3
Dis
k
SoftwareCD
&Training
Video
USB2.0Cable,10
Feet
23
Connector
Key
Handpiece Quick
Disconnect
Collar
Handpiece
Cable
USBInterfaceCon n e c t i o n s
IMPORTANT:
UseaHighPower(500mA)USB2.0PortOnly
1.ConnecttheUSBTypeAconnectorsideof the Handpiece Cable to any
availableUSB2.0highspeed,highpower port on the user supplied
ComputerSystem.
2.AlwaysmakesuretousethesameUSBportwheneverre-connection of the
USBcableisnecessary.
3.Aself-poweredUSBhubcanbe used to extend the handpiece cable
length.
4.DonotuseaBUS-poweredhubor extension cable.
USBTypeA
Connector
Handpiece
Cable
Typical
ComputerUSB
2.0Ports
4
DiskP/NG1415RevF
Software Drivers
and Utilities Disk
23
Connector
Key
Handpiece Quick
Disconnect
Collar
Handpiece
Cable
USB Interface Connections
IMPORTANT:
Use a High Power (500 mA) USB 2. 0 Port Only
1. Connect the USB Type A connector side of the Handpiece Cable to any
available USB 2.0 high speed, high power port on the user supplied
Computer System.
2. Always make sure to use the same USB port whenever re-connection of the
USB cable is necessary.
3. A self-powered USB hub can be used to extend the handpiece cable
length.
4. Do not use a BUS - powered hub or extension cable.
USBType A
Connector
Handpiece
Cable
4
Typical
ComputerUSB
2.0Ports
Note: .nwohsretupmocpotkseD
Laptopcanbeused.
ThankYou and Congratulations
onyour purchase of Spectra , the
latest standard definition camera in the dental video imagingproduct line
fromAir Techniques, a leading manufacturerof dental equipment since 1962.
Spectra offersthe flexible benefits ofUSB Plug-N-Play technologyth at is easily
integrated into any practice. The lightweight one-piece handpiece is extremely
maneuverable and produces crisp, clearimages.
This documentprovides brief information to help you get started using your
Spectra forthe first time.
Please refer to theOperator’s Manual PDF file on the Drivers and Utilities
Disk fordetailed information.
Online Warranty Registration.
Quickly register your new Spectra online.
Just have the product modeland serial numbers
available. Go to the Air Techniques web site,
www.airtechniques.com ,click the Warranty
Registration .mrofehtetelpmocdnaknil
Registration ensuresa record for the warranty
periodandhelps to keepyou informedof product
updatesandother valuableinformation.
Fluorescence Caries Detection Aid System
10mmDistance
Spacers
SamplePack
USB 2.0 Cable,
10 Feet
Melville, NY U.S.A.
Includes:
►Operator's Manuals
• Spectra
• Polaris
• Luna HD
►Software Installation and
Conguration Guide
►Acrobat Reader
►Installation Program
Disk P/N G1415 Rev L
Software Drivers
and Utilities Disk
10mm Distance
Spacers
Sample Pack
USB 2.0 Cable,
10 Feet