Spectral SCS Select User manual
SC-Select-B.pdf (AND-0046-EF).pdf_21 12 18
M6x30mm
VB1080
A
B
CZU1046
D
F
G
H
I
J
VB1139
E
M6x25mm
K
6x60mm
VB1193
N
ZU1759
ZU1619
91-BS0-0016-01SW
L
ZU1540
M
VB1018
4x16mm
Ø16
Bodenstehende E
lem
ente mit
Füßen oder Rollen
/
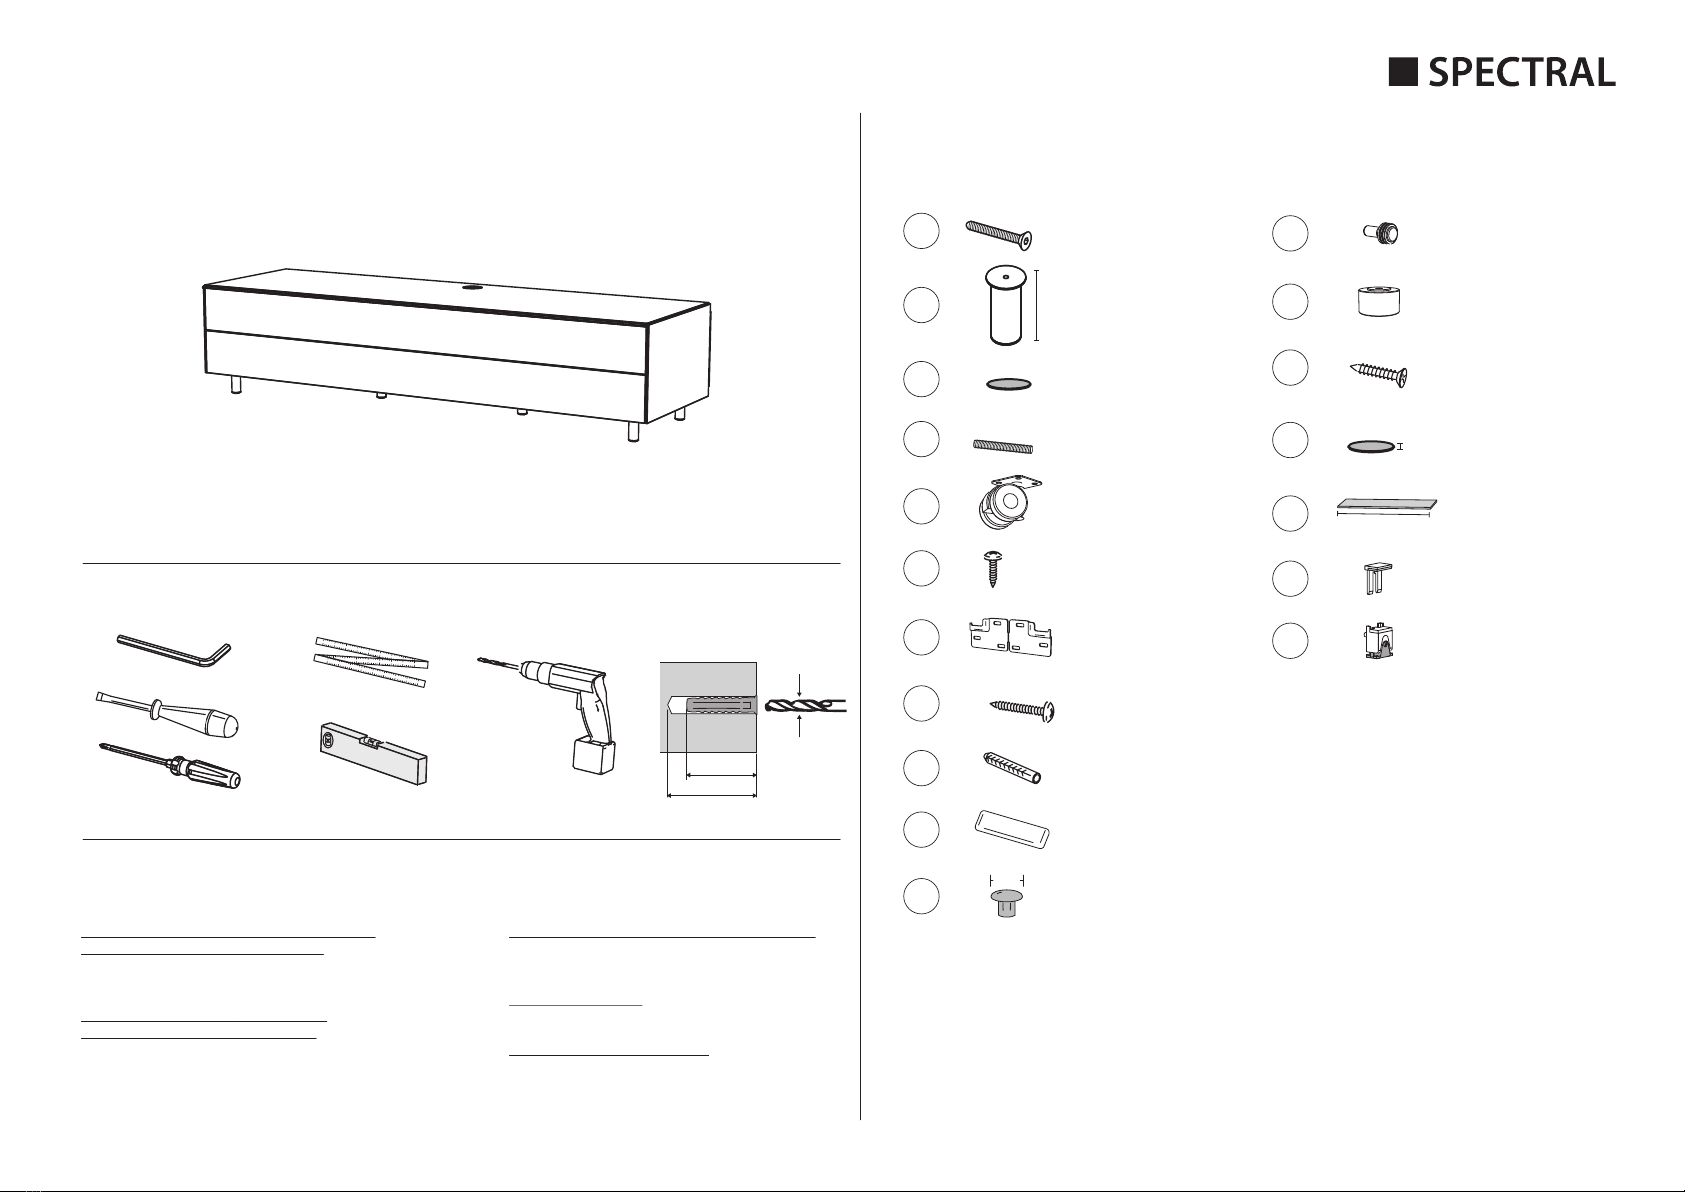
Floorstanding elements with feet or rolls:
Gesamtbelastung / Total load:
Max. 60 kg pro Element / Max. 60 kg per element
Bodenstehende Elemente mit Fußgestell /
Floorstanding elements with foot frame:
Gesamtbelastung / Total load:
Max. 60 kg pro Fußgestell / Max. 60 kg per foot frame
Wandhängende Elemente / Wall mounted elements:
Gesamtbelastung / Total load:
Max. 50 kg pro Element / Max. 50 kg per element
Deckplatte / Top plate:
Max. 45 kg
Glaseinlegeböden / Glass shelves:
Max. 15 kg
Max. Belastbarkeit / Max. load:
BGBE0571
76 mm
O
P
Q
R
VB1212
VB1211
8mm
50mm
min. 60mm
Select
SCS
UX8R VB1243
HZ-Z00-0019-01SW
99-AD1-0035-01RT
91-BS0-4.5025-4ZS
300 mm
4,5x25mm
ZU1843
Ø18mm
1,0mm
Ø34mm
VB1187

kg
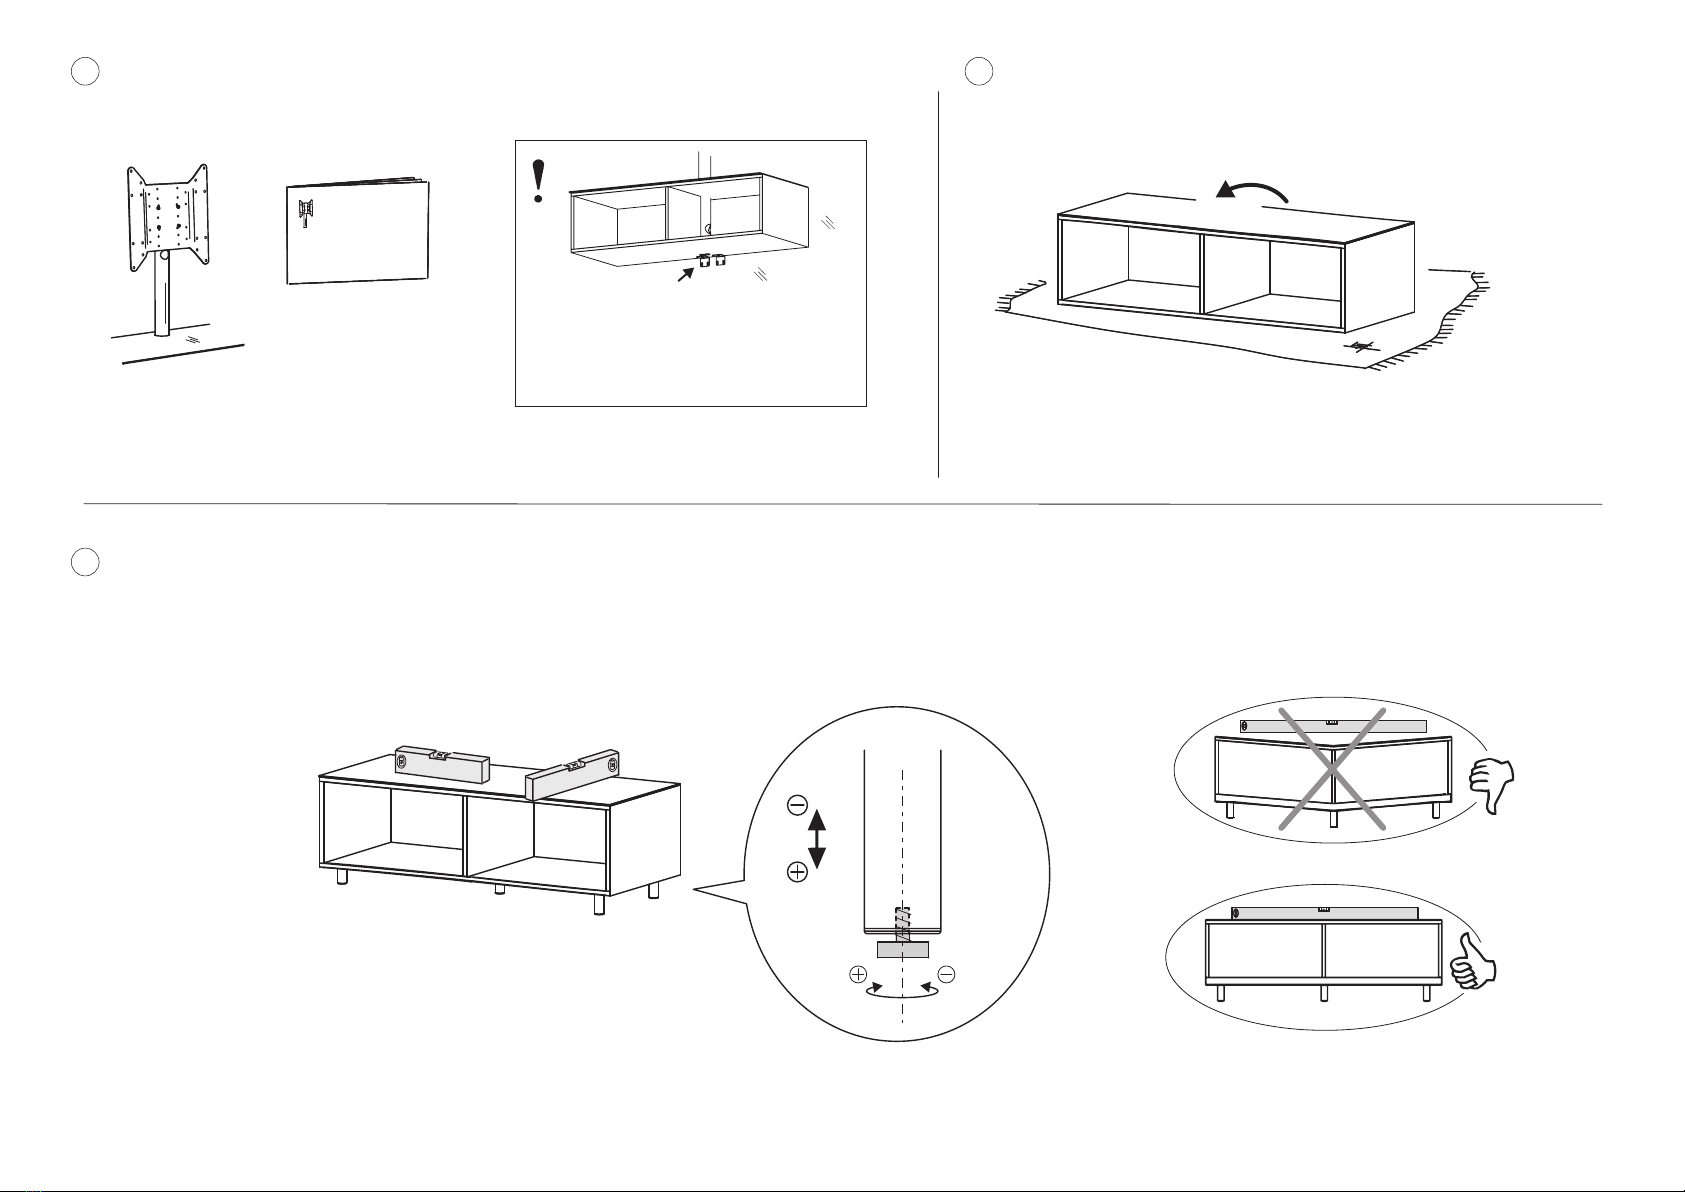
Kombinationen mit
wandhängenden Elementen/
Combinations with
wall mounted elements:
Abstand mind. 4mm/
Distance at least 4mm
!
TV-Gerät möglichst weit
hinten platzieren /
Place TV as far back as
possible
Mäßiges Anziehen von Hand genügt, keine Gewalt
anwenden!
Nicht mit scheuernden Mitteln reinigen!
Wandmontage vom Fachmann überprüfen oder
durchführen lassen!
Das mitgelieferte Befestigungsmaterial ist für Wände aus
Mauerwerk oder Beton vorgesehen.
Da es verschiedene Wandmaterialien gibt, ist im Einzelfall
vom Kunden zu überprüfen, welche Schrauben und
Dübel für die sichere Befestigung geeignet sind.
Die Beschaffenheit der Wand ist hinsichtlich Tragfähigkeit
und Eignung genau zu überprüfen.
Wir übernehmen keine Gewähr/Haftung für den Aufbau
bzw. die Montage.
Konstruktionsänderungen vorbehalten.
Bitte beachten Sie beim Betrieb von Geräten in
Elementen mit geschlossener, luftundurchlässiger Front
die Herstellerhinweise Ihrer Audio- und Videokomponen-
ten bezüglich Belüftung.
Eventuell muss bei Geräten mit starker Hitzeentwicklung
die Front während des Betriebs geöffnet sein, um einen
Hitzestau zu vermeiden.
D
Vissage uniquement manuel. Un serrage excessif peut
endommager la plaque de verre et les éléments.
Ne pas utiliser de matière abrasive ou chimique qui
pourrait détérioré la surface.
Le montage au mur doit être réalisé et/ou vérifié par un
professionnel de l’installation afin d’éviter tout incident
ou dégâts.
Les matériaux d’installation joints sont
destinés à être montés sur des murs en brique ou en
béton.
Selon la nature du mur, choisissez le type de vis et
fixations appropriées pour garantir un montage en
toute sécurité.
Vérifiez avec soin la résistance et l‘aptitude du mur à
soutenir une charge.
Nous ne pouvons être tenu responsable pour des
défauts ou des dégâts causés par un assemblage ou un
montage non conforme. Nous nous réservons le droit
d’apporter des modifications techniques.
Lors de l’utilisation d’appareils dans des éléments dont
la façade est fermée et ne laisse pas passer l’air, observer
les instructions du fabricant des composants audio et
vidéo en matière de ventilation.
Il peut être éventuellement nécessaire d’ouvrir la façade
pendant le fonctionnement des appareils qui dégagent
beaucoup de chaleur afin d’éviter toute surchauffe
F
Alleen handmatig strak aandraaien. Te strak aandraaien kan
schade aanbrengen aan zowel het glas als de hechtings-
plaats.
Gebruik s.v.p. geen materiaal dat kan schuren of chemische
producten aangezien dit schade kan aanbrengen.
Het is noodzakelijk dat de muurbevestiging goed gebeurt of
desnoods door een competent installateur wordt geregeld,
zodat schade of ongelukken en letsel voorkomen worden.
Bijgeleverde bevestigingsmaterialen zijn bestemd voor
montage aan wanden van baksteen of beton.
Aangezien iedere muur van structuur verschilt, is het
belangrijk dat de juiste schroeven worden gebruikt om zo
een veilige muurbevestiging te garanderen.
De fabrikant kan geen verantwoordelijkheid nemen voor
schade ontstaan door verkeerde montage of ophanging.
Onderhevig aan verandering.
Bij het gebruik van apparaten in elementen met gesloten,
luchtdichte front volgt u de instructies van de fabrikant van
uw audio- en videocomponenten op wat betreft de
ventilatie.
Eventueel moet bij apparaten met een sterke warmteontwik-
keling het front tijdens het gebruik geopend zijn om een
warmteophoping te vermijden.
NL
Serrare solo a mano. Un serraggio eccessivo può causare
rottura dei cristalli e di altre componenti.
Attenzione non usare materiali abrasivi o chimici poiché
potrebbero danneggiare la superfice.
E’essenziale che i supporti a muro siano installati o
ispezionati da un installatore competente per scongiurare
danni a persone o cose causati da una scorretta
installazione.
I materiali per l’installazione forniti sono da intendersi per il
montaggio su muri in mattoni o cemento.
Poichè i tipi di muratura possono essere i più diversi, è
opportuno scegliere e utilizzare le viti e i fissaggi più adatti
alla muratura a disposizione.
Verificare con precisione la qualità della parete in termini di
portata e idoneità.
Attenzione ! Nessuna responsabilità potrà esserci attribuita
per problemi causati da una scorretta installazione o
assemblaggio.
Con riserva di modifiche.
Durante il funzionamento dei dispositivi in elementi con
parete anteriore chiusa e che impedisce il passaggio d'aria
bisogna rispettare le indicazioni del produttore dei
componenti audio e video in relazione alla ventilazione.
Eventualmente, con i dispositivi con forte sviluppo di calore
bisogna aprire la parete anteriore per evitare un accumulo
di calore.
I
Ajustar solo con las manos. Un ajuste excesivo puede causar
daños tanto al cristal como a las fijaciones.
Por favor no usar materiales abrasivos químicos, que puedan
causar daños a la superficie.
Es importante que el montaje a la pared lo lleve a cabo o lo
inspeccione un instalador competente para evitar accidentes
o daños.
Los materiales de instalación incluidos se proporcionan para
el montaje en murales de ladrillo u hormigón.
Como los materiales de la pared pueden cambiar, por favor,
seleccionar los tornillos adecuados para conseguir una fijación
segura.
Por favor, se consciente que nosotros no podemos aceptar
responsabilidad por faltas causadas por un mal montaje o
ensamblado.
Salvo modificatión.
Tenga en cuenta las recomendaciones del fabricante en
cuanto a la ventilación para aparatos de audio y componentes
de vídeo con un panel frontal cerrado o hermético.
Puede que en algunos aparatos con calor excesivo sea
necesario abrir el panel frontal durante el funcionamiento
para evitar un sobrecalentamiento.
E
Aperte manualmente os parafusos. Um aperto excessivo
poderá danificar tanto o vidro como as junções.
Não utilizar produtos abrasivos ou quimicos, pois estes
poderão danificar as superficies.
É essencial que os suportes de parede sejam montados e
verificados por um instalador qualificado, de modo a se
evitarem quaisquer acidentes.
Os materiais de instalação juntos são fornecidos para uma
montagem em paredes de tijolo ou de betão.
Conforme o tipo de parede, use o tipo de parafuso indicado
para esta, de modo a se obter uma fixação perfeita e segura.
Não poderemos aceitar quaisquer responsabilidades de
acidentes inerentes a erros de montagem ou instalação
deficiente.
Sujeito a alterações.
Durante a operação de aparelho em elementos com a frente
fechada, impermeável ao ar, tenha em atenção as indicações
do fabricante dos seus componentes áudio e vídeo
relativamente à ventilação.
Eventualmente em aparelhos com um intenso desenvolvi-
mento de calor, a frente deverá estar aberta durante o
funcionamento para evitar uma acumulação de calor.
P
Затягивайте вручную. Излишние усилия при
затяжке могут привести к повреждению
стекла и фурнитуры.
Не используйте абразивные материалы или
химикаты, это может привести к
повреждению поверхности.
Настенный крепеж должен быть проведен и
проверен компетентными установщиками.
приложенные материалы для крепежа
подходят только для стен каменной или
кирпичной кладки или стен из бетона.
Поскольку материалы стен различны,
внимательно подберите соответствующие
болты для безопасной и надежной
фиксации.
структура и строение стены должны быть
проверены на устойчивость и пригодность.
Обращаем Bаше внимание что мы не несем
ответственности за разрушения и
повреждения, вызванные неправильной
сборкой и монтажом.
Возможны изменения.
При эксплуатации устройств с закрытой,
воздухонепроницаемой передней панелью
необходимо соблюдать указания
производителя аудио- и видеооборудования
относительно вентиляции.
Чтобы предотвратить накопление тепла, для
устройств с большим тепловыделением
может потребоваться оставить открытой
переднюю панель во время работы.
RUS
Sadece elle sıkıştırınız. Aşırı sıkıştırma hem cama hem de
düzeneğe zara verebilir.
Lütfen yüzeye zarar verebilecek olan aşındırıcı maddeler
veya kimyasal maddeler kullanmayınız.
Kaza veya yaralanmadan kaçınmak için duvar montajını
yetkili bir kurulumcu ile yapılması veya sonunda kontrol
edilmesi gereklidir.
Duvar malzemeleri değişebileceğinden dolayı lütfen
uygun vidaları ve sabitleme vidalarını emniyetli ve
güvenli montaj için seçiniz ve kullanınız.
Lütfen yanlış bir araya getirme ve/veya montaj yüzünden
meydana gelen hatalar veya hasarlar için sorumluluk
kabul etmeyeceğimize dikkat ediniz.
Cihazları kapalı, hava geçirmez ön cepheye sahip
elemanlarda çalıştırırken, ses ve video bileşenleri
üreticilerinizin havalandırma ile ilgili uyarılarını lütfen
dikkate alın.
Gerektiğinde, yoğun ısı oluşumlu cihazlarda ısı birikiminin
önlenmesi için ön çalıştırma esnasında cephe açık
tutulmalıdır.
TR
Tighten only by hand. Over tightening may cause damage to
both glass and fittings.
Please do not use abrasive materials or chemicals, which may
cause damage to the surface.
It is essential that wall-mounting is carried out or finally
inspected by a competent installer, to avoid accident or injury.
The fastening material provided is intended for installation on
walls made of bricks or concrete.
As wall materials vary, please select and use suitable screws and
fixings to achieve safe and secure mounting.
Check the wall structure thoroughly to ensure its carrying
capacity and suitability will
support the total load.
Please note that we cannot accept responsibility for faults or
damage caused by wrong assembly and/or mounting.
Subject to design change.
Please note the manufacturer's instructions on ventilation for
your audio and video equipment when operating devices in
elements with a closed, airtight front.
It may be necessary to leave the front open during operation to
prevent internal heat accumulation for devices that generate
excessive heat.
GB

90°
1
2
76 mm B
A
C
D
76 mm
C
B
76 mm B
A
C
Nur bei Elementen
mit TV-Halterung:
Zusätzlicher Stützfuß /
Only for elements
with TV mount:
Additional support leg
Elemente mit Füßen /
Elements with feet

3
4
Elemente mit Rollen /
Elements with casters
E
F
E
F
Nur bei Elementen
mit TV-Halterung:
Zusätzliche Rolle /
Only for elements
with TV mount:
Additional caster
Elemente mit Fußgestell /
Elements with foot frame
Siehe Anleitung Fußgestell /
See manual of the foot frame
Foot frame
Manual
Elemente mit TV-Halterung /
Elements with TV mount
Elemente mit Füßen oder Fußgestell /
Elements with feet or foot frame
5
7
6
TV mount
Manual
Siehe Anleitung TV-Halterung /
See manual of the TV mount
Bei wandhängenden Elementen mit TV-Halterung
müssen Stützwinkel montiert werden (im Lieferumfang
der TV-Halterung enthalten) /
For wall mounted elements with TV mount the
mounting of support brackets is required (included in
delivery of the TV mount)

8
G
Wandhängende Elemente /
Wall mounted elements
HI
20mm
20mm
24mm
24mm
incl. Glas/incl. glass
ohne Glas/without glass
463mm 463mm
368mm
4x
1.) 2.)
c)
a)
b)
Wandmontage vom Fachmann überprüfen oder
durchführen lassen!
Das mitgelieferte Befestigungsmaterial ist für Wände
aus Mauerwerk oder Beton vorgesehen.
Da es verschiedene Wandmaterialien gibt, ist im
Einzelfall vom Kunden zu überprüfen, welche
Schrauben und Dübel für die sichere Befestigung
geeignet sind.
Die Beschaffenheit der Wand ist hinsichtlich
Tragfähigkeit und Eignung genau zu überprüfen.
Wir übernehmen keine Gewähr/Haftung für den
Aufbau bzw. die Montage.
DIt is essential that wall-mounting is carried out or finally
inspected by a competent installer, to avoid accident or
injury. The fastening material provided is intended for
installation on walls made of bricks or concrete. As wall
materials vary, please select and use suitable screws and
fixings to achieve safe and secure mounting. Check the
wall structure thoroughly to ensure its carrying capacity
and suitability will support the total load.
Please note that we cannot accept responsibility for faults
or damage caused bvy wrong assembly and/or mounting.
GB
5,5mm
8mm
14mm
22mm
17,5mm
22,5mm
65mm
77mm
ca. 56mm
ohne Deckplatte/
without top plate
ca. 60mm
mit Deckplatte/
with top plate
ca. 40mm

1.) 3.)2.)
2.)
Sicherungsbolzen
lösen /
Loosen safety pin
Sicherungsbolzen
festziehen /
Tighten safety pin
1.)
J
K
9

10
11
Elemente mit Soundsystem /
Elements with sound system
Soundsystem SCA
a) b)
Soundsystem BRA
a) b)
L
Elemente mit Universal Soundbar Ablageblech /
Elements with universal soundbar tray Montage des Universal Soundbar Ablageblechs /
Installation of the universal soundbar tray
Siehe Anleitung
Universal Soundbar Ablageblech
/
See manual of the
universal soundbar tray
Soundbar tray
Manual
BRA
Füße vom Soundsystem abschrauben /
Remove the feet from the sound system
d)
Filzstreifen oben auf das Soundsystem kleben /
Stick the felt strips on the top of the sound system
Soundsystem einschieben /
Insert the sound system
c) Neue Füße anschrauben /
Screw on the new feet
e)
M
N
O
Draufsicht / Top view
ca. 145 mm ca. 145 mm
ca. 10 mm
PFilzstreifen hinten umklappen /
Fold the felt stripes over at the back
Soundsystem einschieben /
Insert the sound system
SCA SCA
SCA
SCA
4x
L
2x
Draufsicht /
Top view
Draufsicht /
Top view
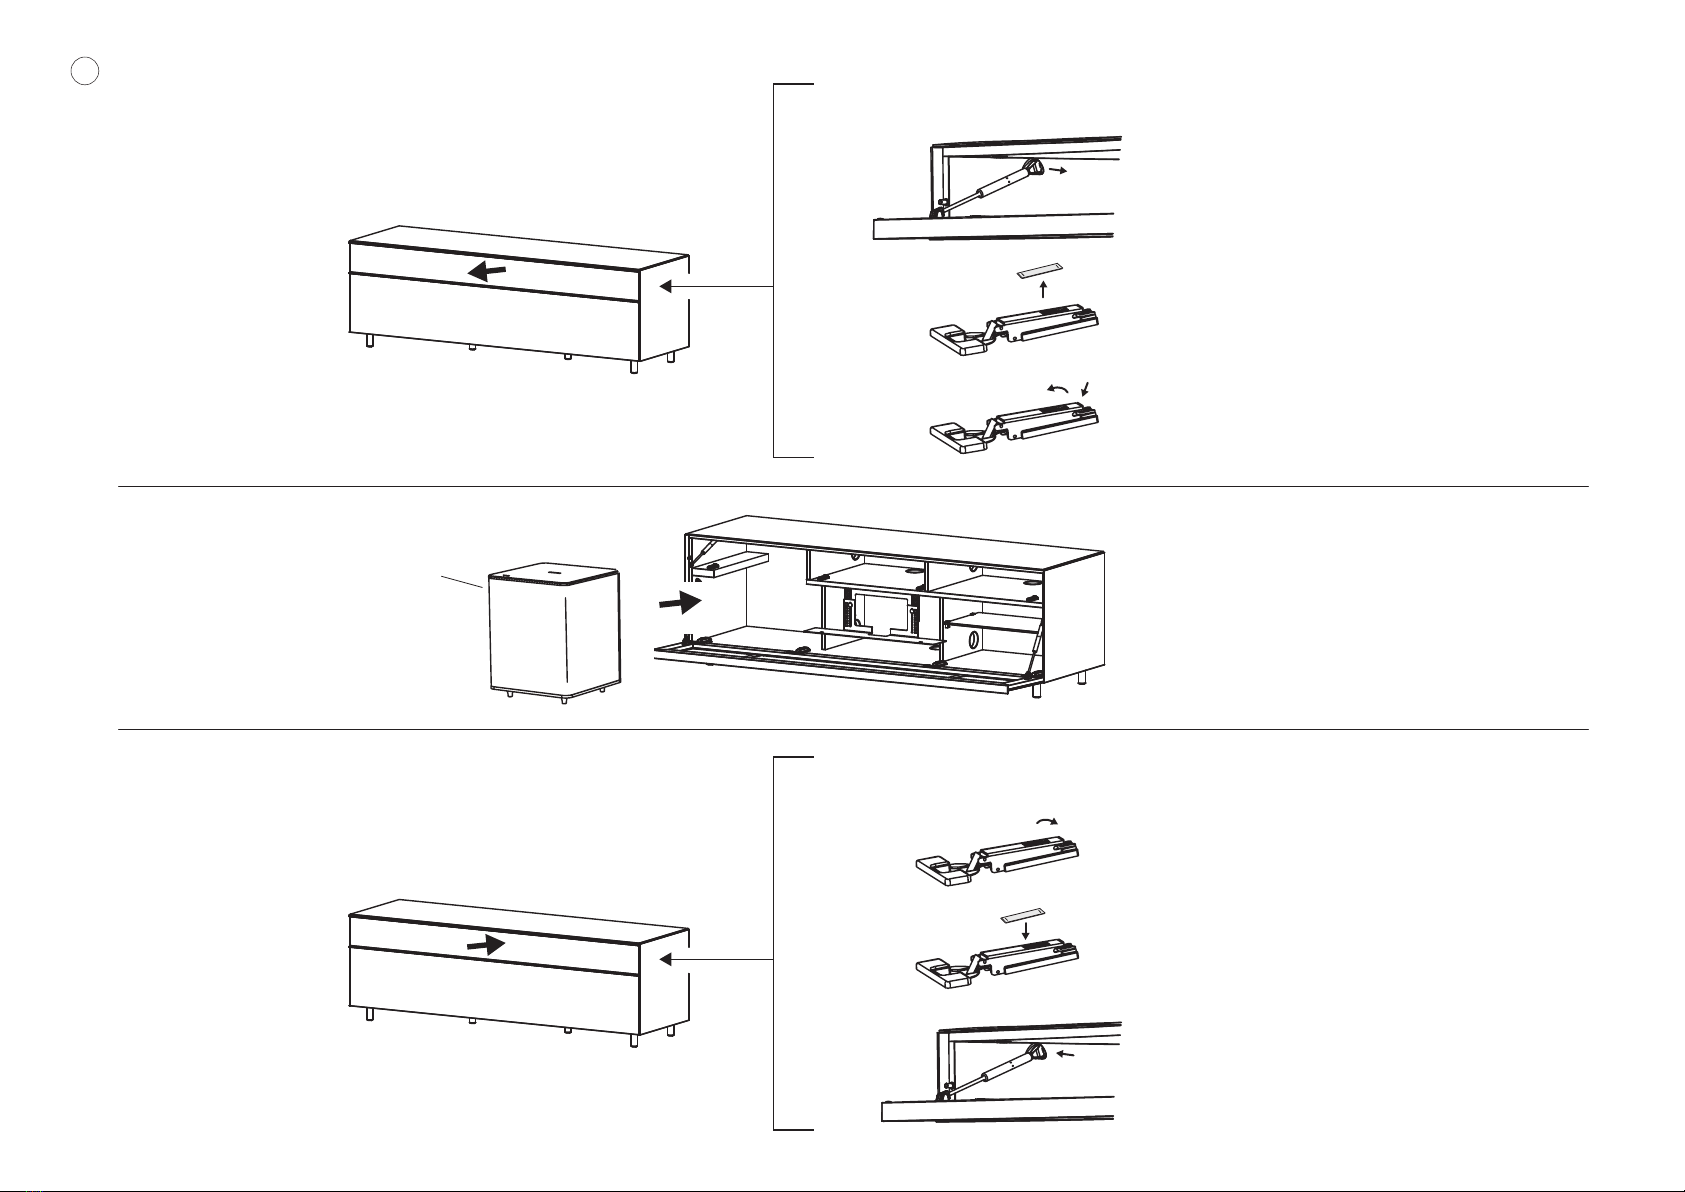
Modell 1656: Subwoofer Integration /
Model 1656: Subwoofer integration
Obere Front demontieren /
Remove the upper front
Klappe entfernen/
Remove the flap
Klappe montieren /
Mount the flap
Subwoofer einschieben /
Insert the subwoofer
Subwoofer
Obere Front montieren /
Mount the upper front
KLICK
1.)
2.)
3.)
Push
KLICK
1.)
2.)
3.)
KLICK
12
1.)
2.)
3.)
2.)1.)
4.)
a) b)
Q
R
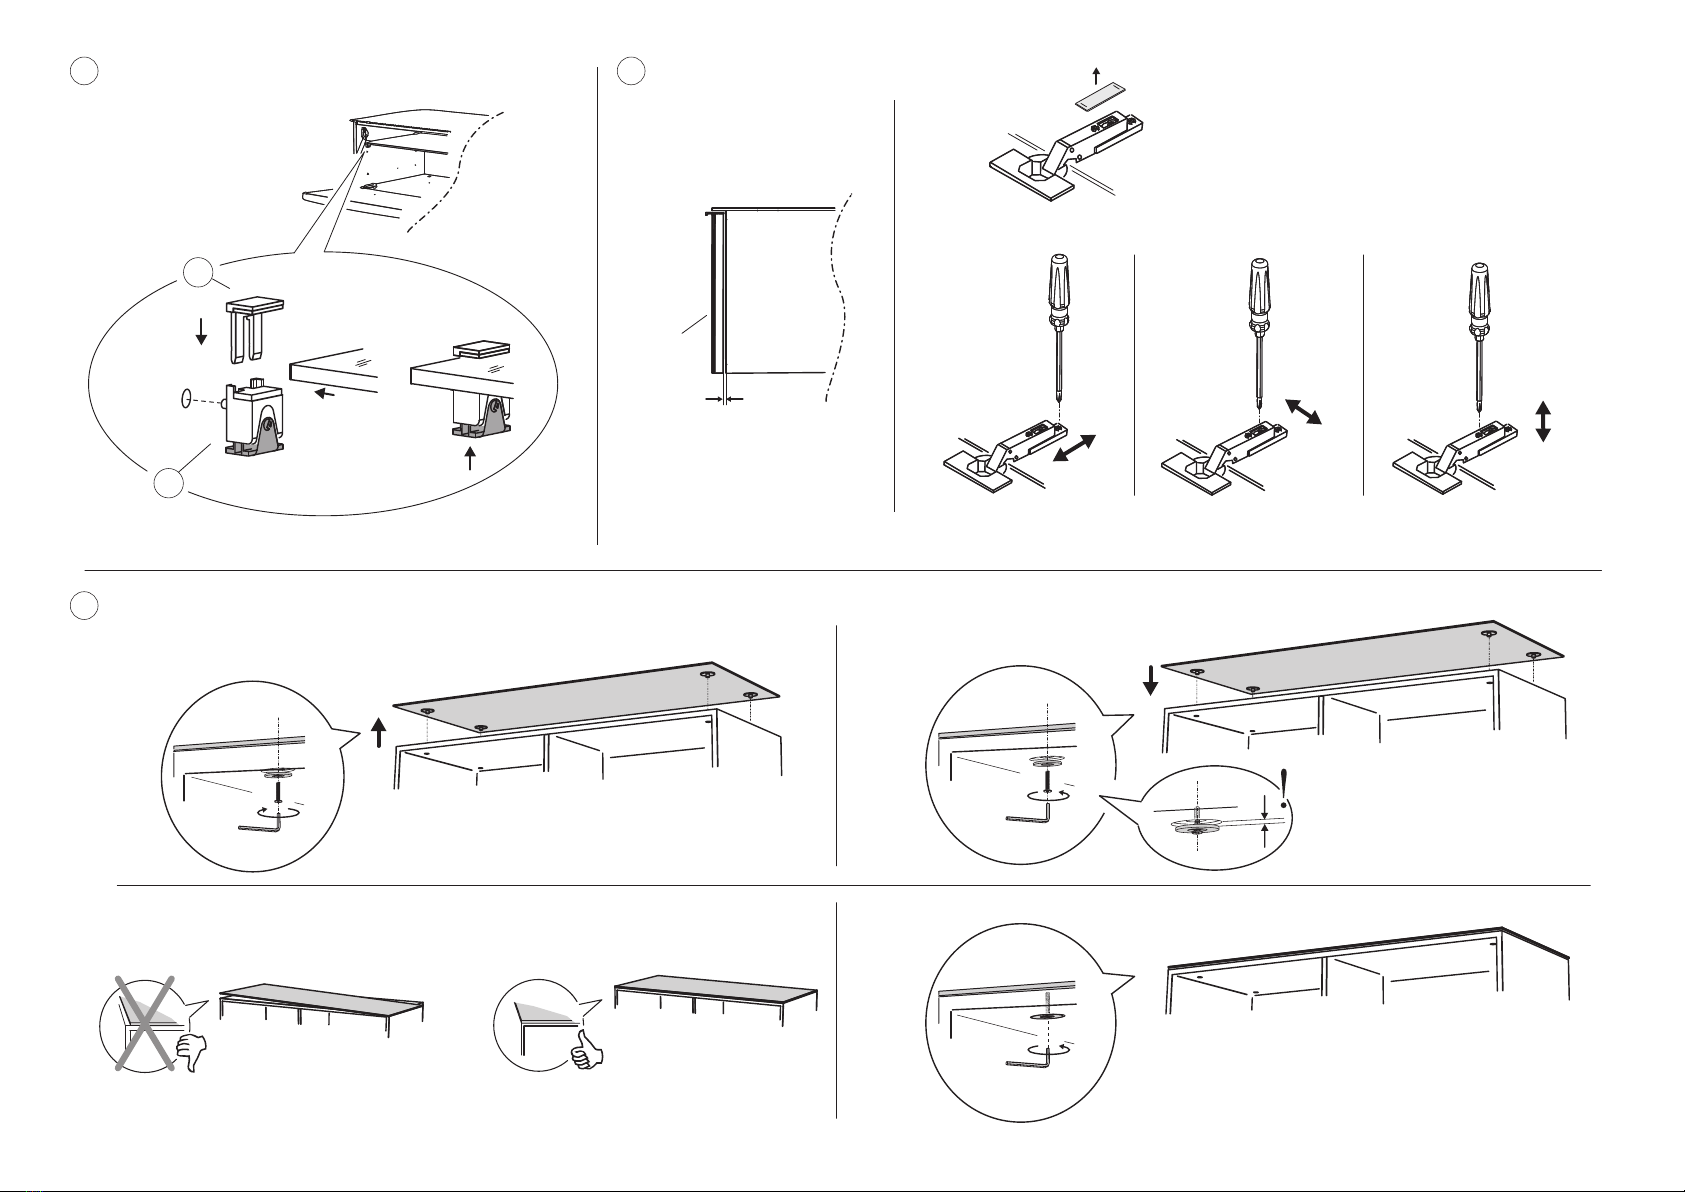
Klappenjustierung /
Flap adjusting
ca. 2,5 mm
Front
13 14
Elemente mit Glaseinlegeböden /
Elements with glass shelves
Replacing the top plate
Deckplatte austauschen /
15
3.)
Other Spectral Indoor Furnishing manuals


Popular Indoor Furnishing manuals by other brands


Stryker
Stryker Tru-Fit 3150 Operation & maintenance manual

Techni Mobili
Techni Mobili ID-2022 Assembly instructions

Bush
Bush WC81410 Assembly manual

Hooker Furniture
Hooker Furniture 1595-75310E-BRN Assembly instruction

kupper
kupper 12530 Assembly instructions

Naturel
Naturel COUNTRY ZRC120PA quick start guide