DHP Baby Relax DA7319B5-BL User manual

INSTRUCTION MANUAL
5-IN-1 CONVERTIBLE
CRIB

*
*
*
*
*
*
*
*
*
*
*
*
*
*
*
*
*
*NEVER use bed with children under 15 months or over 50 lbs.
*ALWAYS follow assembly instructions.
*
*NEVER suspend strings over a bed.
*
*
CAUTION
WARNING
Failure to follow these warnings and assembly instructions could result in serious injury or death.
Read all instructions before assembling crib. KEEP INSTRUCTIONS FOR FUTURE USE.
Check this product for damaged hardware, loose joints, loose bolts or other fasteners, missing parts or sharp
edges before assembly and frequently during use. Securely tighten loose bolts and other fasteners. DO NOT
use crib if any parts are missing, damaged or broken. DO NOT substitute parts.
Infants can suffocate on soft bedding. Never add a pillow or comforter. Never place additional padding under
an infant.
Stop using the crib when child begins to climb out or reaches the height of 35 inches (89 cm).
To reduce the risk of SIDS, pediatricians recommend healthy infants be placed on their backs to sleep, unless
otherwise advised by your physician.
DO NOT place crib near window where cords from blinds or drapes may strangle a child.
Strings can cause strangulation! DO NOT place items with a string around a child's neck, such as hood strings
or pacifier cords. DO NOT suspend strings over a crib or attach strings to toys.
To help prevent strangulation tighten all fasteners. A child can trap parts of the body or clothing on loose
fasteners.
If refinishing, use a non-toxic finish specified for children's products.
When child is able to pull to standing position, set mattress to lowest position and remove bumper pads, large
toys and other objects that could serve as steps for climbing out.
Never use plastic shipping bags or other plastic film as mattress covers because they can cause suffocation.
Replace teething rail if damaged or loose (if teething rail is provided for this model).
CAUTION: ANY MATTRESS USED IN THIS CRIB MUST BE AT LEAST 27-1/4 INCHES BY 51-5/8 INCHES
(69CM BY 131CM) WITH A THICKNESS NOT EXCEEDING 6 INCHES (15CM).
Infants can suffocate in gaps between crib sides and a mattress that is too small.
Follow warnings on all products in a crib.
INFANTS HAVE DIED IN TODDLER BEDS FROM ENTRAPMENT. Openings in and between bed parts can
entrap head and neck of a small child.
STRANGUALTION HAZARD. NEVER place bed near windows where cords from blinds or drapes may
strangle a child.
NEVER place items with a string, cord, or ribbon around a child's neck, such as hood strings or pacifier cords.
These items can catch on bed parts.
ENTRAPMENT HAZARD. To avoid dangerous gaps, any mattress used on this bed shall be a full-size crib
mattress at least 51-5/8 inches (1310 mm) in length, 27-1/4 inches (690 mm) in width, and a max thickness of
6 inches (150 mm).
*
*
*
*
*
*
*
NOTES
Ensure all parts and components are present before beginning assembly.
Assemble on a soft, smooth surface to prevent damage to product finish.
Phillips head screw driver is not included.
DO NOT use power tools.
CAUTIONS: Adult assembly required.
LIMITED WARRANTY
We warrants its product to be free from defects in material and workmanship and agrees to remedy any
such defect. This warranty covers 1 year from the date of original purchase. This warranty is valid only
upon presentation of proof of purchase. This is solely limited to the repair or replacement of defective
furniture components and no assembly labor is included. This warranty does not apply to any product which
has been improperly assembled, subjected to misuse or abuse or which has been altered or repaired in any
way. This warranty gives you specific legal rights and you may also have other rights which vary from State
to State.
WARNING: Should this product become damaged,
and/or components are broken or missing, DO NOT USE.
Assembly will require two people.
Estimated assembly time: 30 minutes.
CARE AND CLEANING
Dust regularly with a soft, lint-free cloth to prevent soil build-up. A damp cloth may be used occasionally to
clean surface. Dry immediately. Do not use any abrasives that may damage finish. Excessive exposure to
sunlight and extreme changes in temperature and moisture can damage wood furniture.
MAINTENANCE
Check bolts/screws periodically and tighten them if necessary.
1 2
3 4
5 6
7
8
9
10
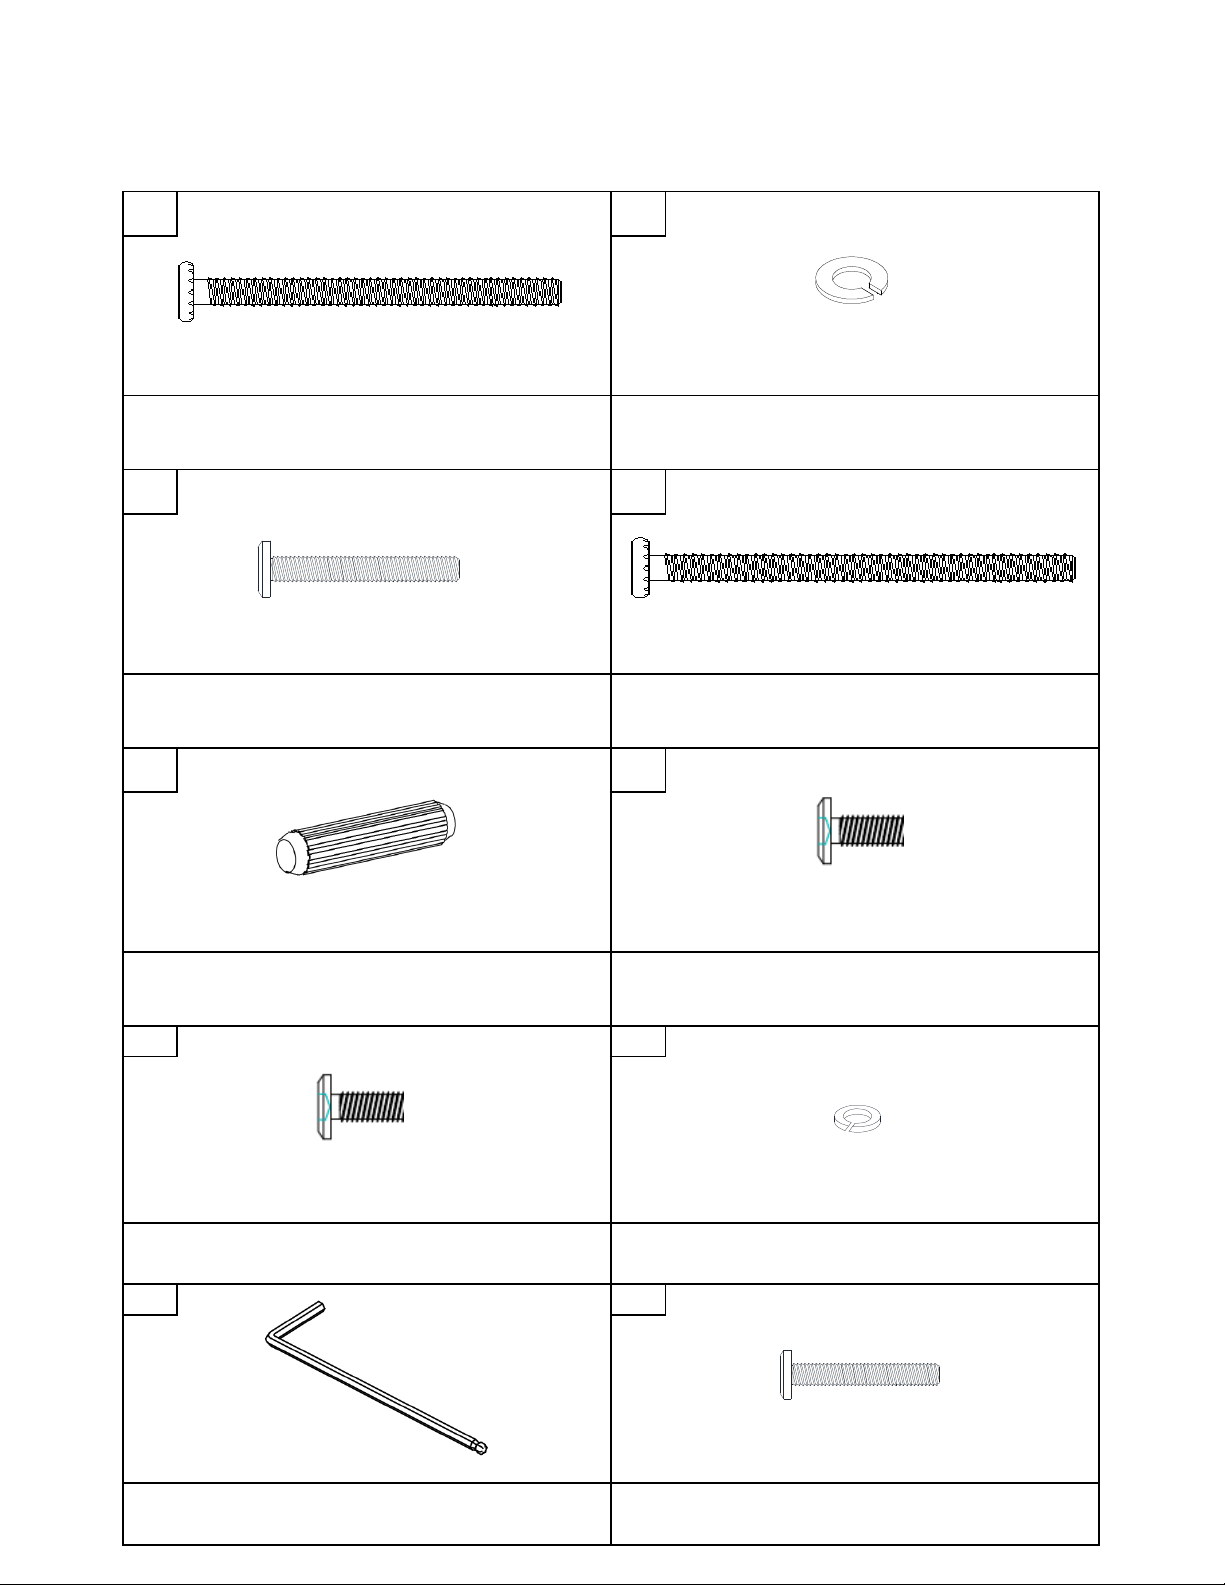
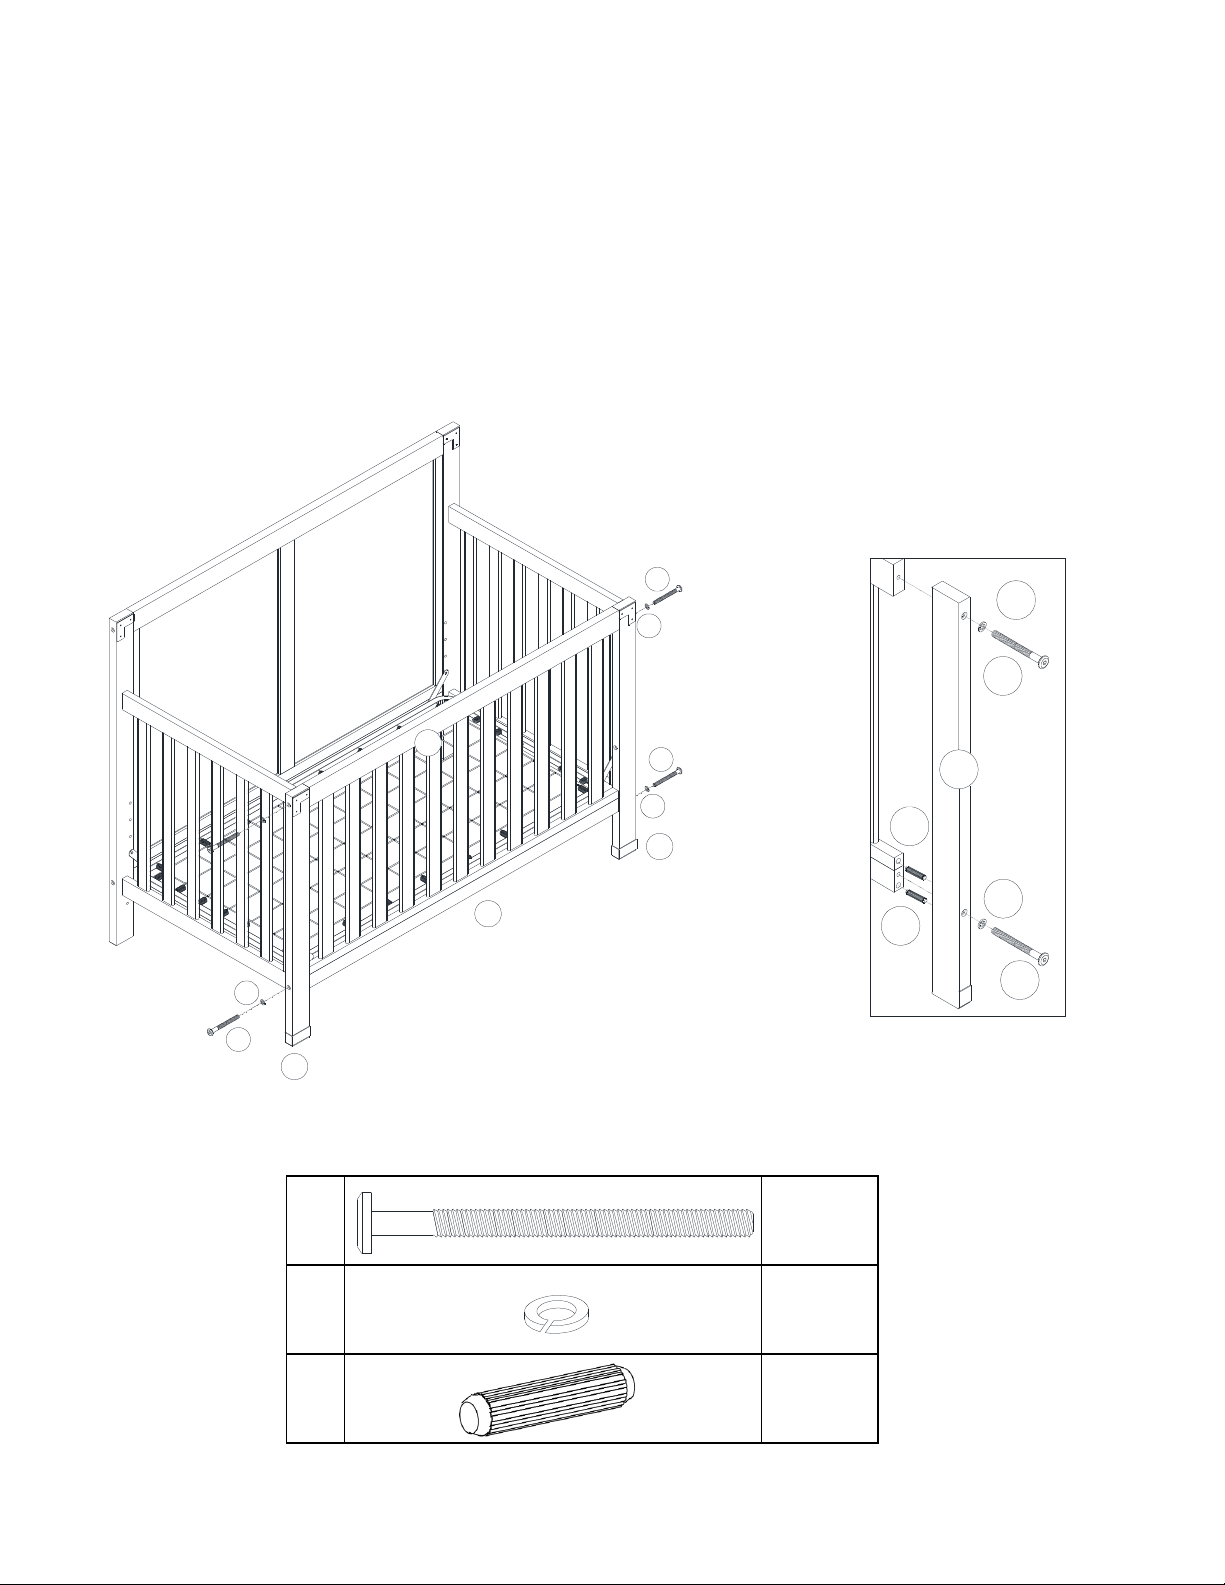
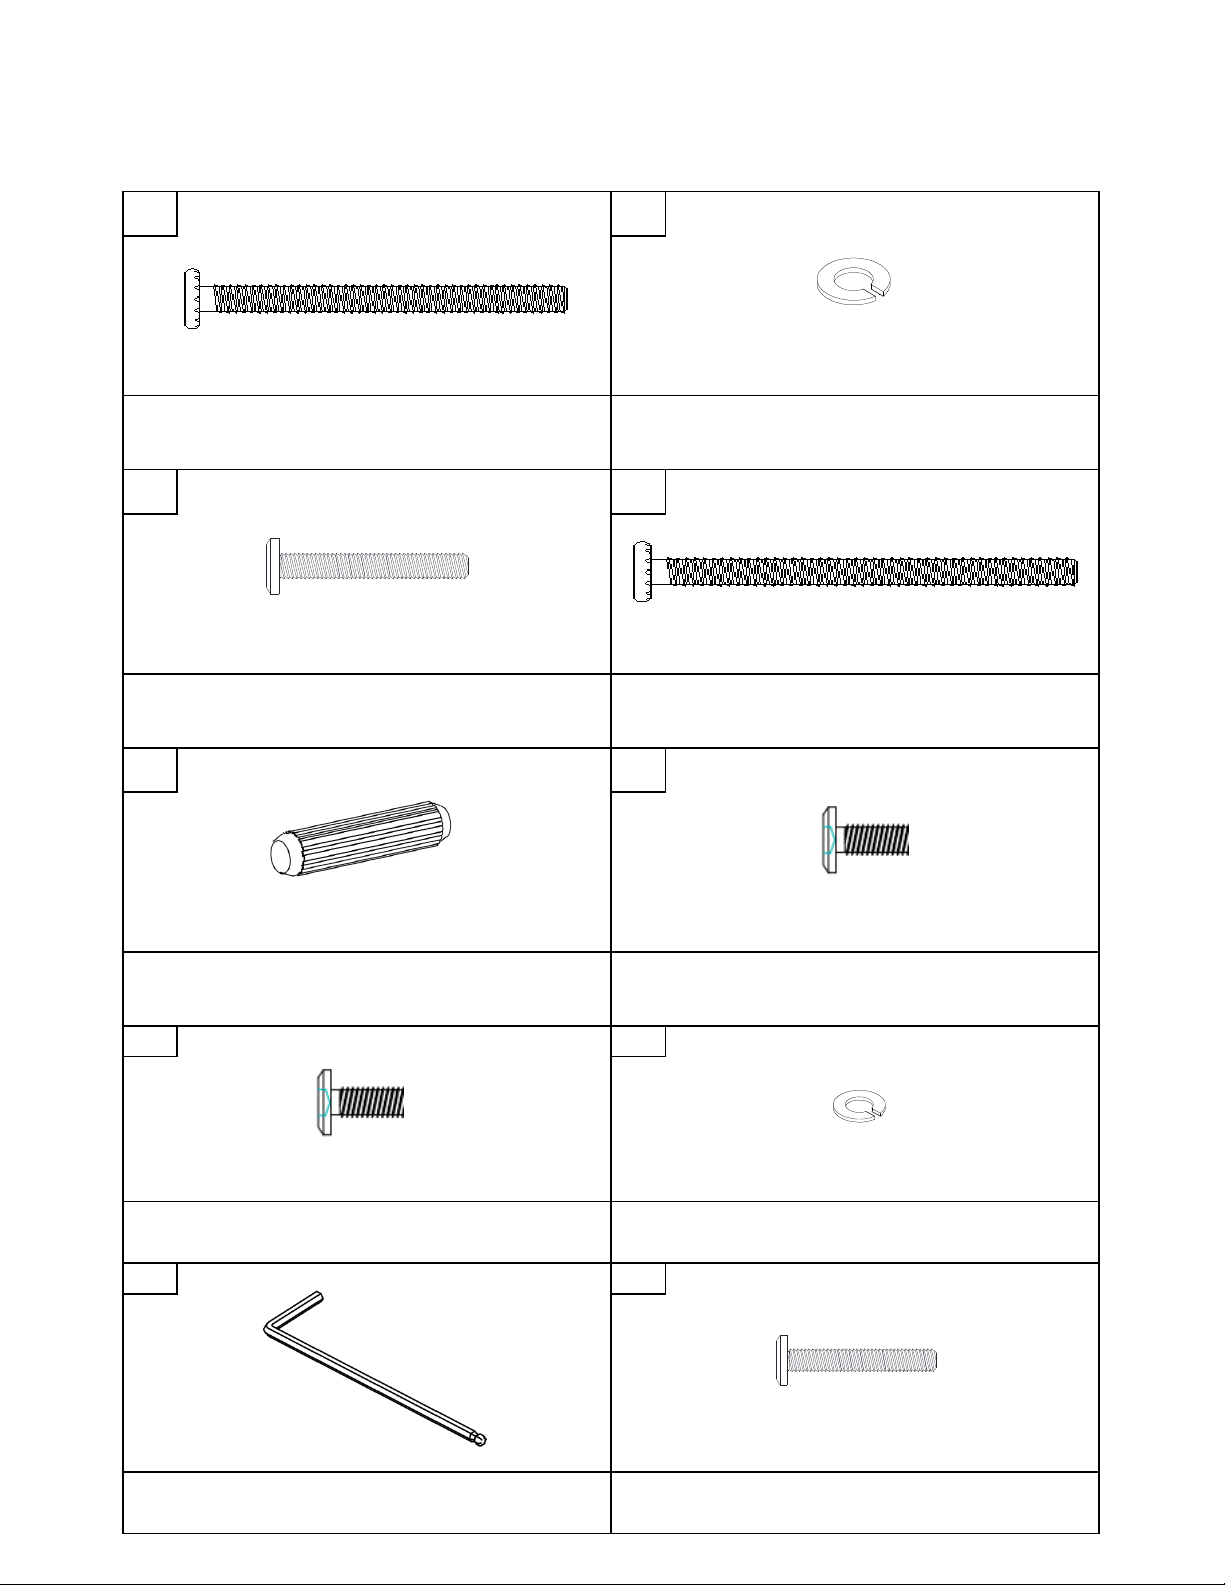
Ø1/4" * 13 * 15 mm Ø1/4" * 11 * 1.2 mm
BOLT SPRING WASHER
16 PCS 16 PCS
5-IN-1 CONVERTIBLE CRIB
HARDWARE LIST
8 PCS 8 PCS
BOLT BOLT
Ø1/4" * 13 * 70 mm Ø5/16" * 13 * 1.5 mm
Ø1/4" * 13 * 45 mm Ø1/4" * 13 * 83 mm
SPRING WASHER
24 PCS
BOLT
2 PCS
Ø10 * 35 mm Ø1/4" * 13 * 15 mm
WOOD DOWEL BOLT
8 PCS 2 PCS
1 PC 4 PCS
Ø1/4" * 13 * 40 mm
ALLEN KEY BOLT
A
B
C
D
E
F
G
H
I
J
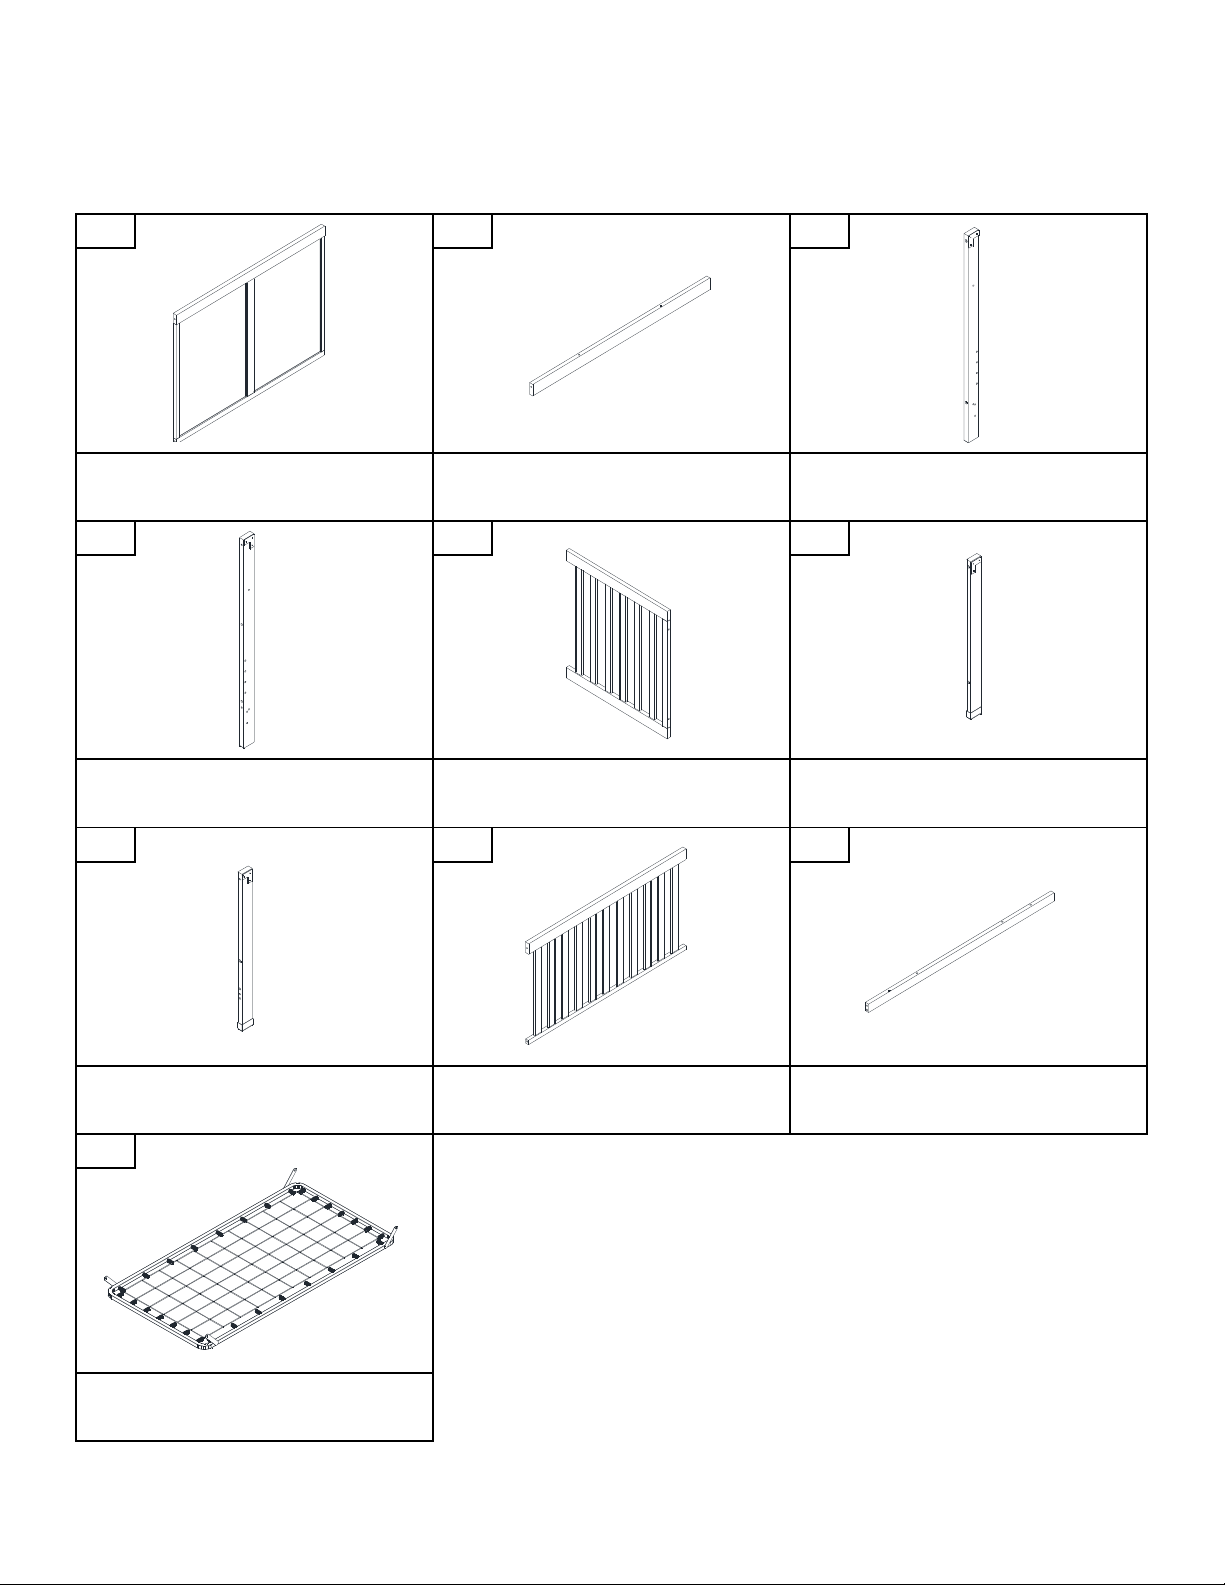
LEFT BACK POST
5-IN-1 CONVERTIBLE CRIB
PARTS LIST
1 PC
BACK RAILBACK PANEL
1 PC 1 PC
1 PC
SIDE PANEL
1 PC2 PCS
RIGHT BACK POST LEFT FRONT POST
RIGHT FRONT POST FRONT PANEL FRONT RAIL
1 PC 1 PC 1 PC
1 PC
MATTRESS SUPPORT
1
2
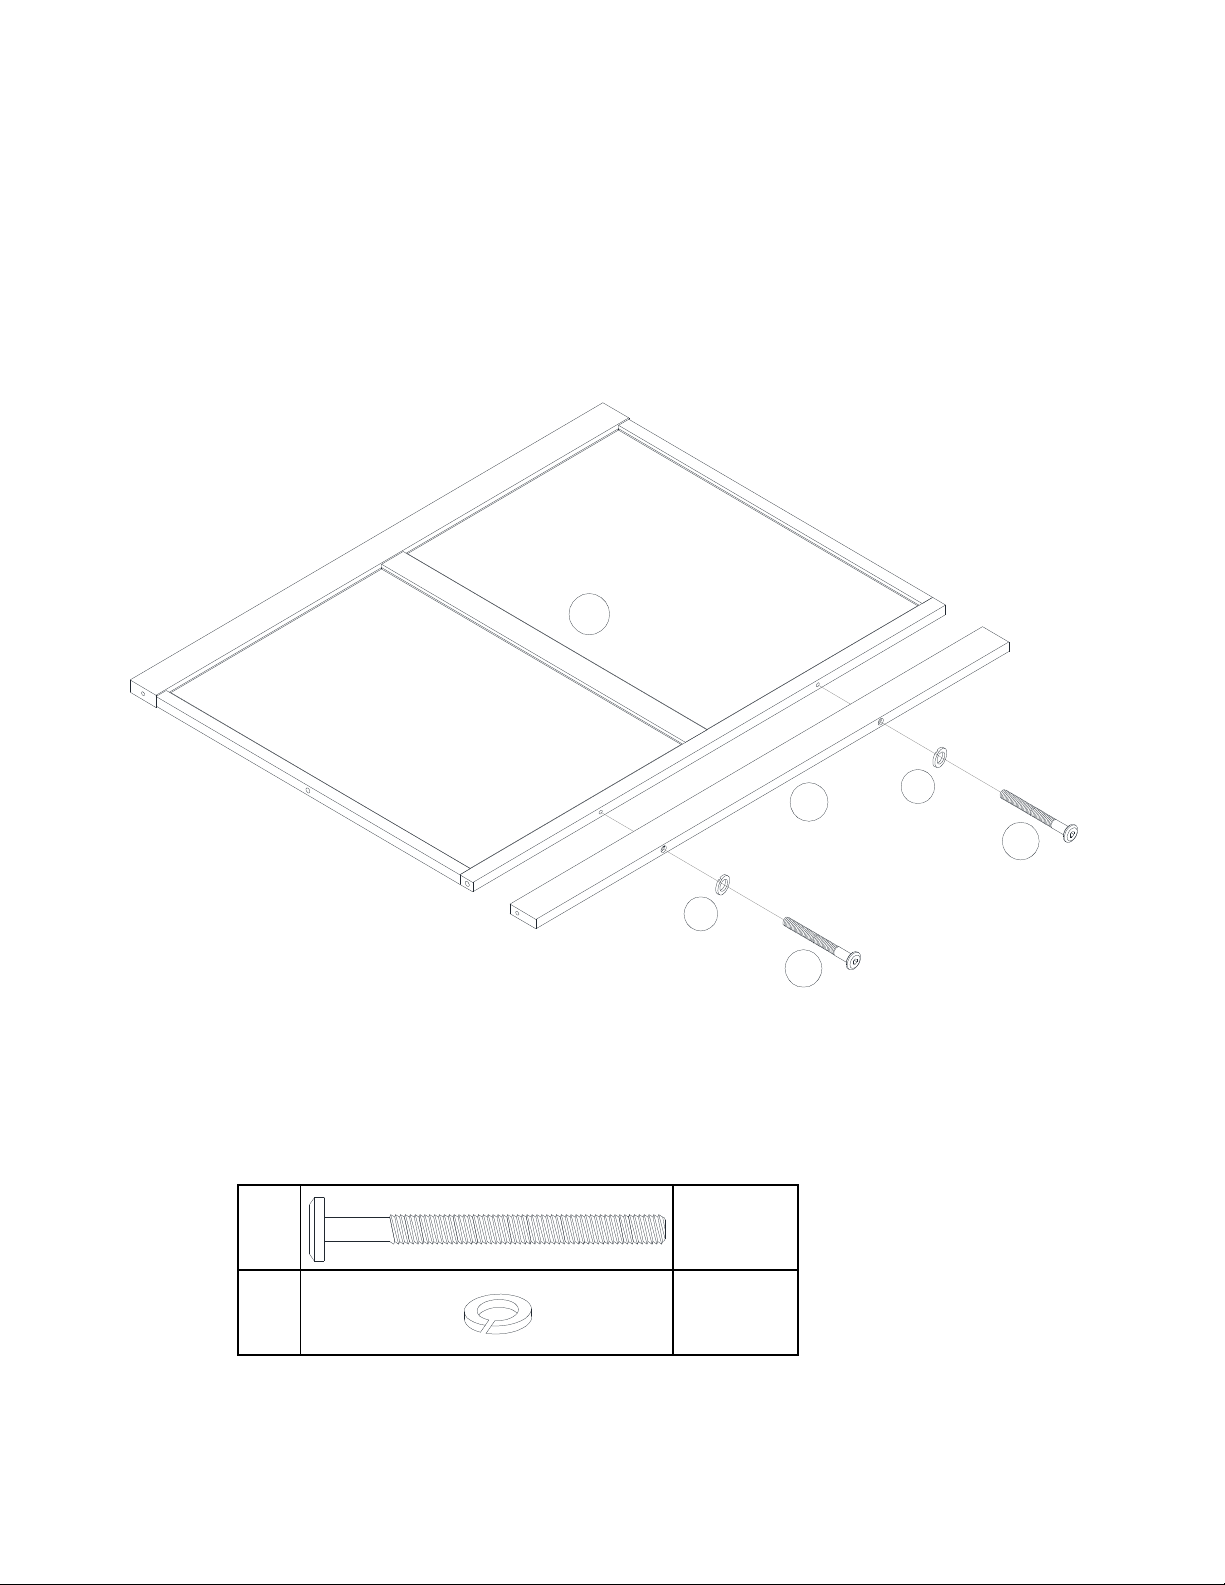
5-IN-1 CONVERTIBLE CRIB
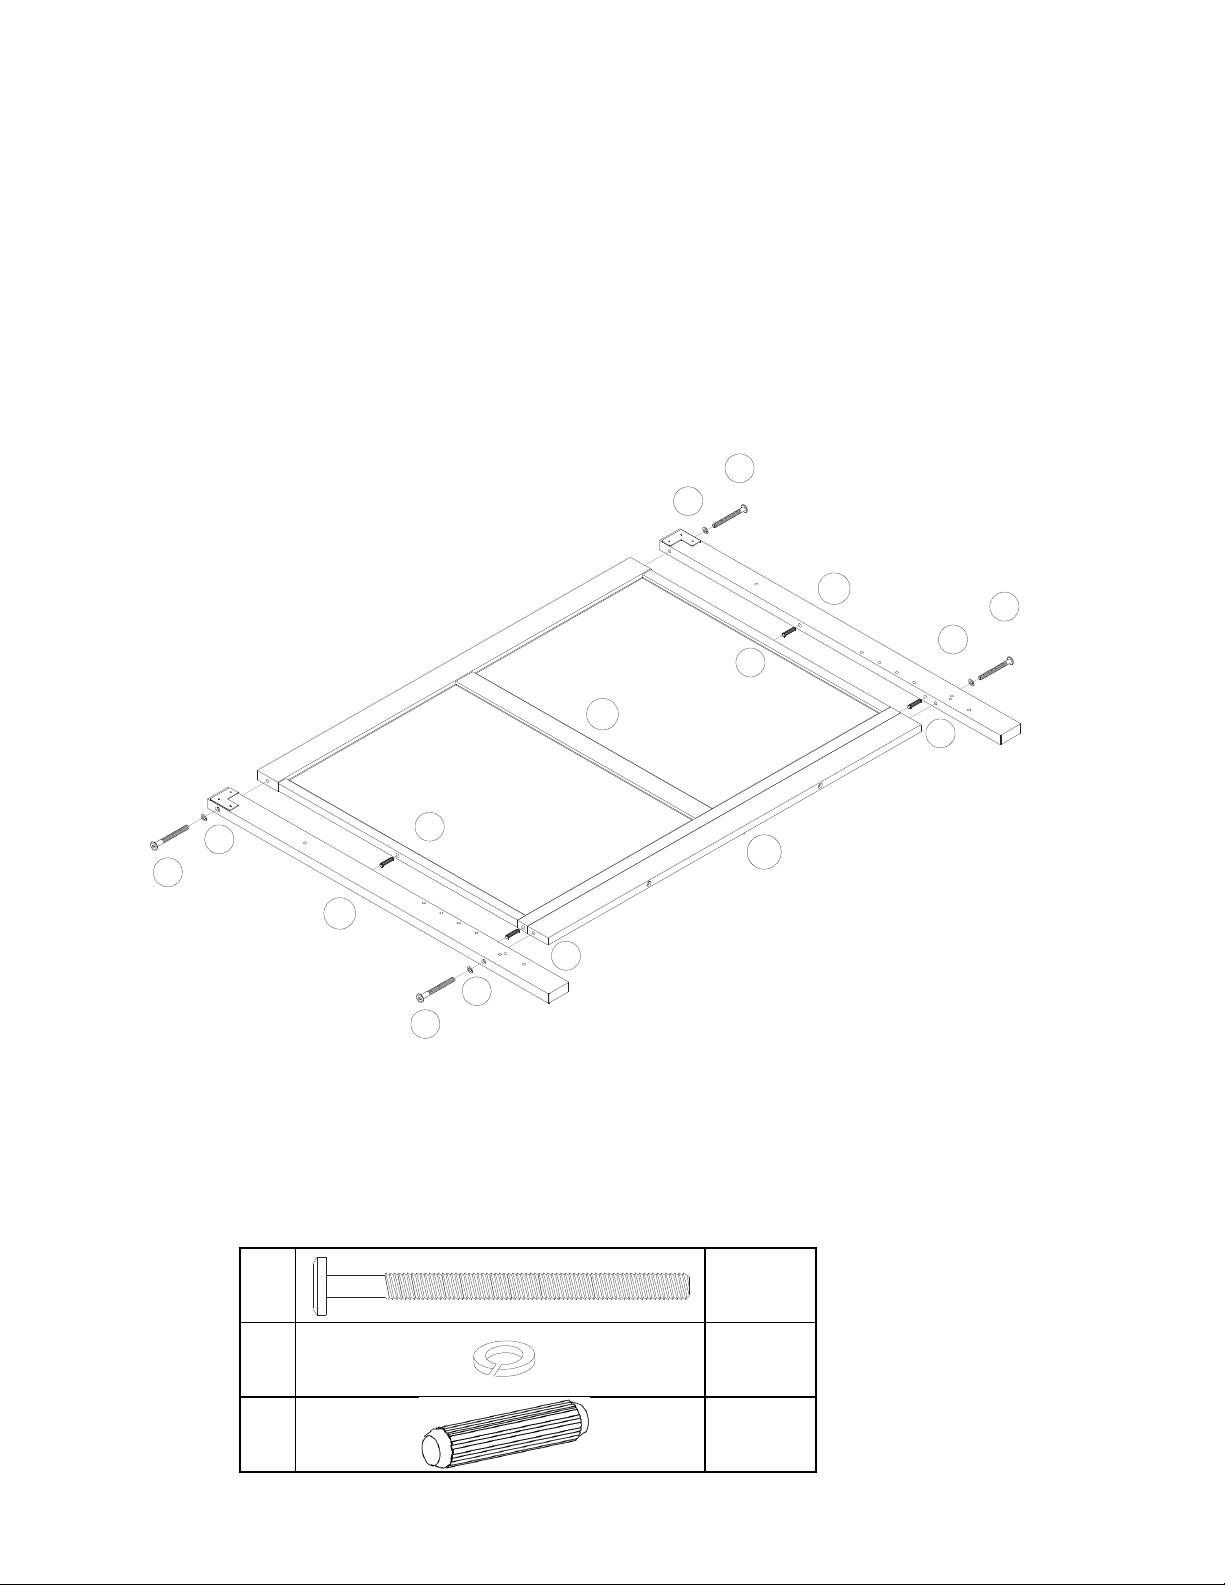
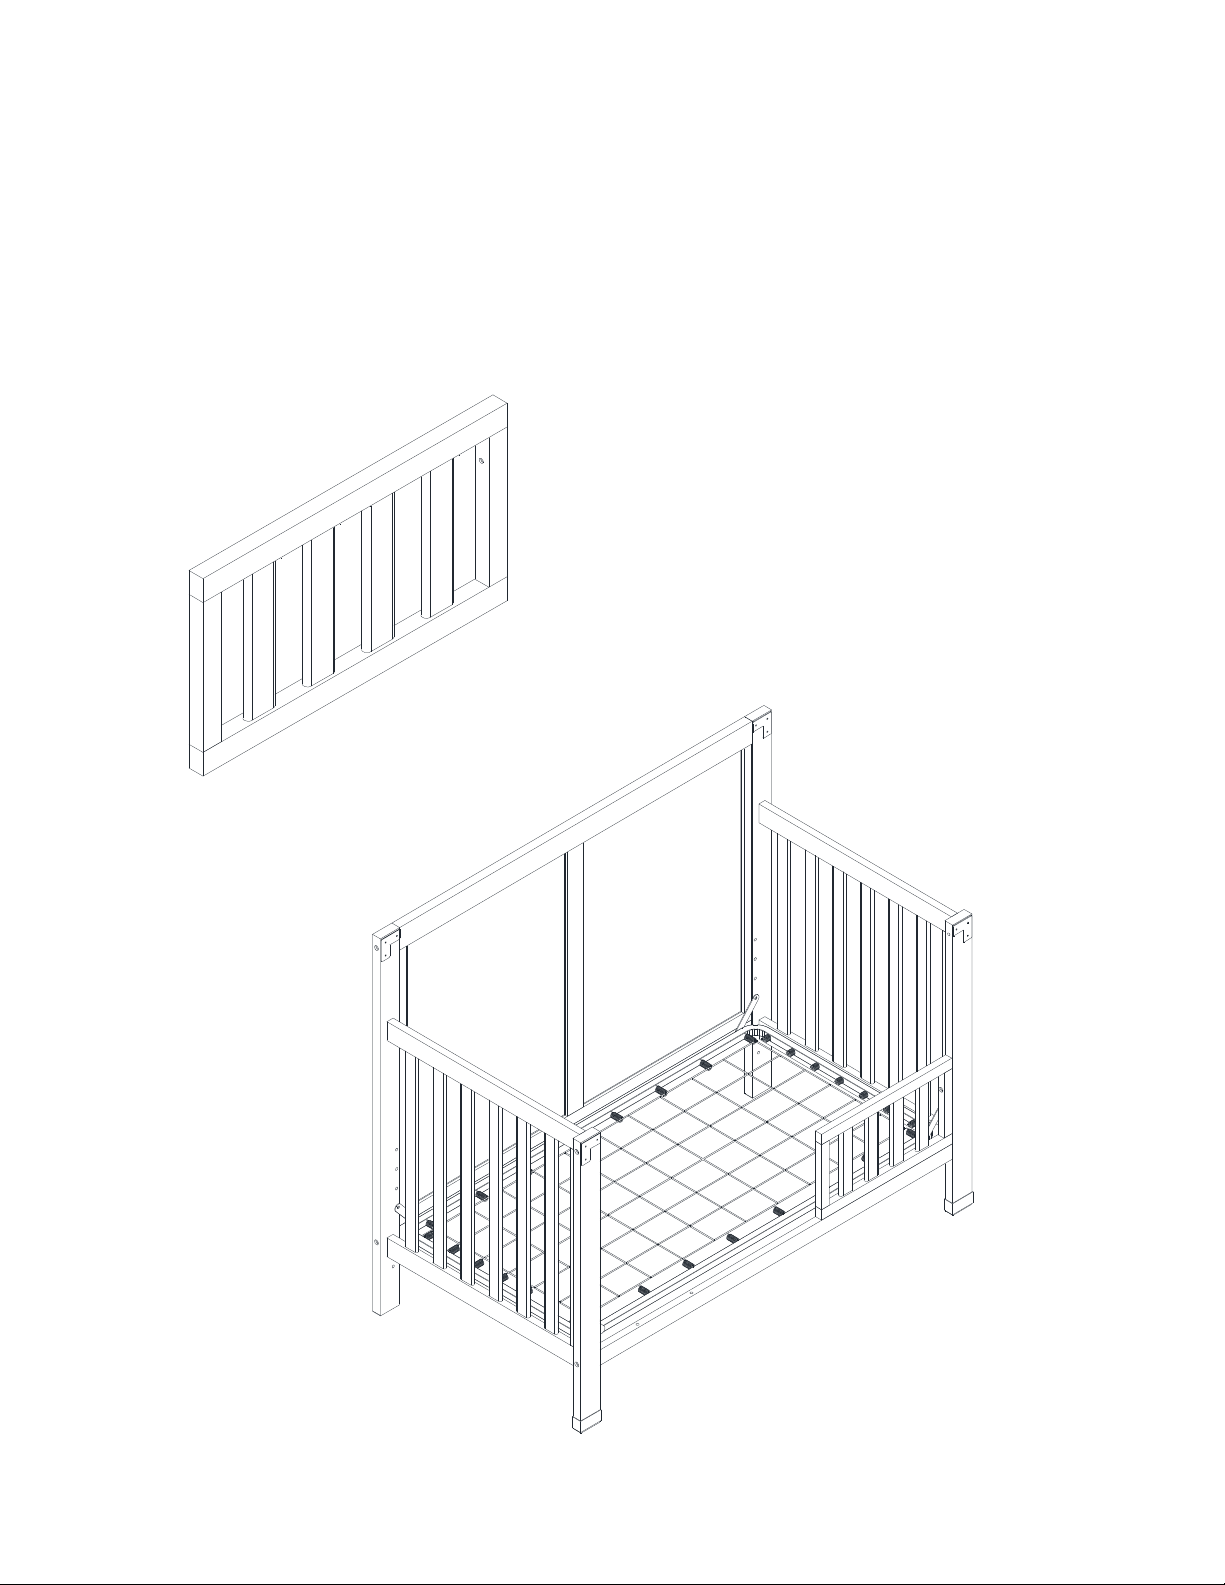
STEP 1:
Attach the back rail (B) to back panel (A) with bolts (1) and spring washers (2). Use Allen
key (9) to tighten the bolts.
2 PCS
2 PCS
2
1
2
1
A
B
4
2
5
4PCS
4 PCS
4 PCS
5-IN-1 CONVERTIBLE CRIB
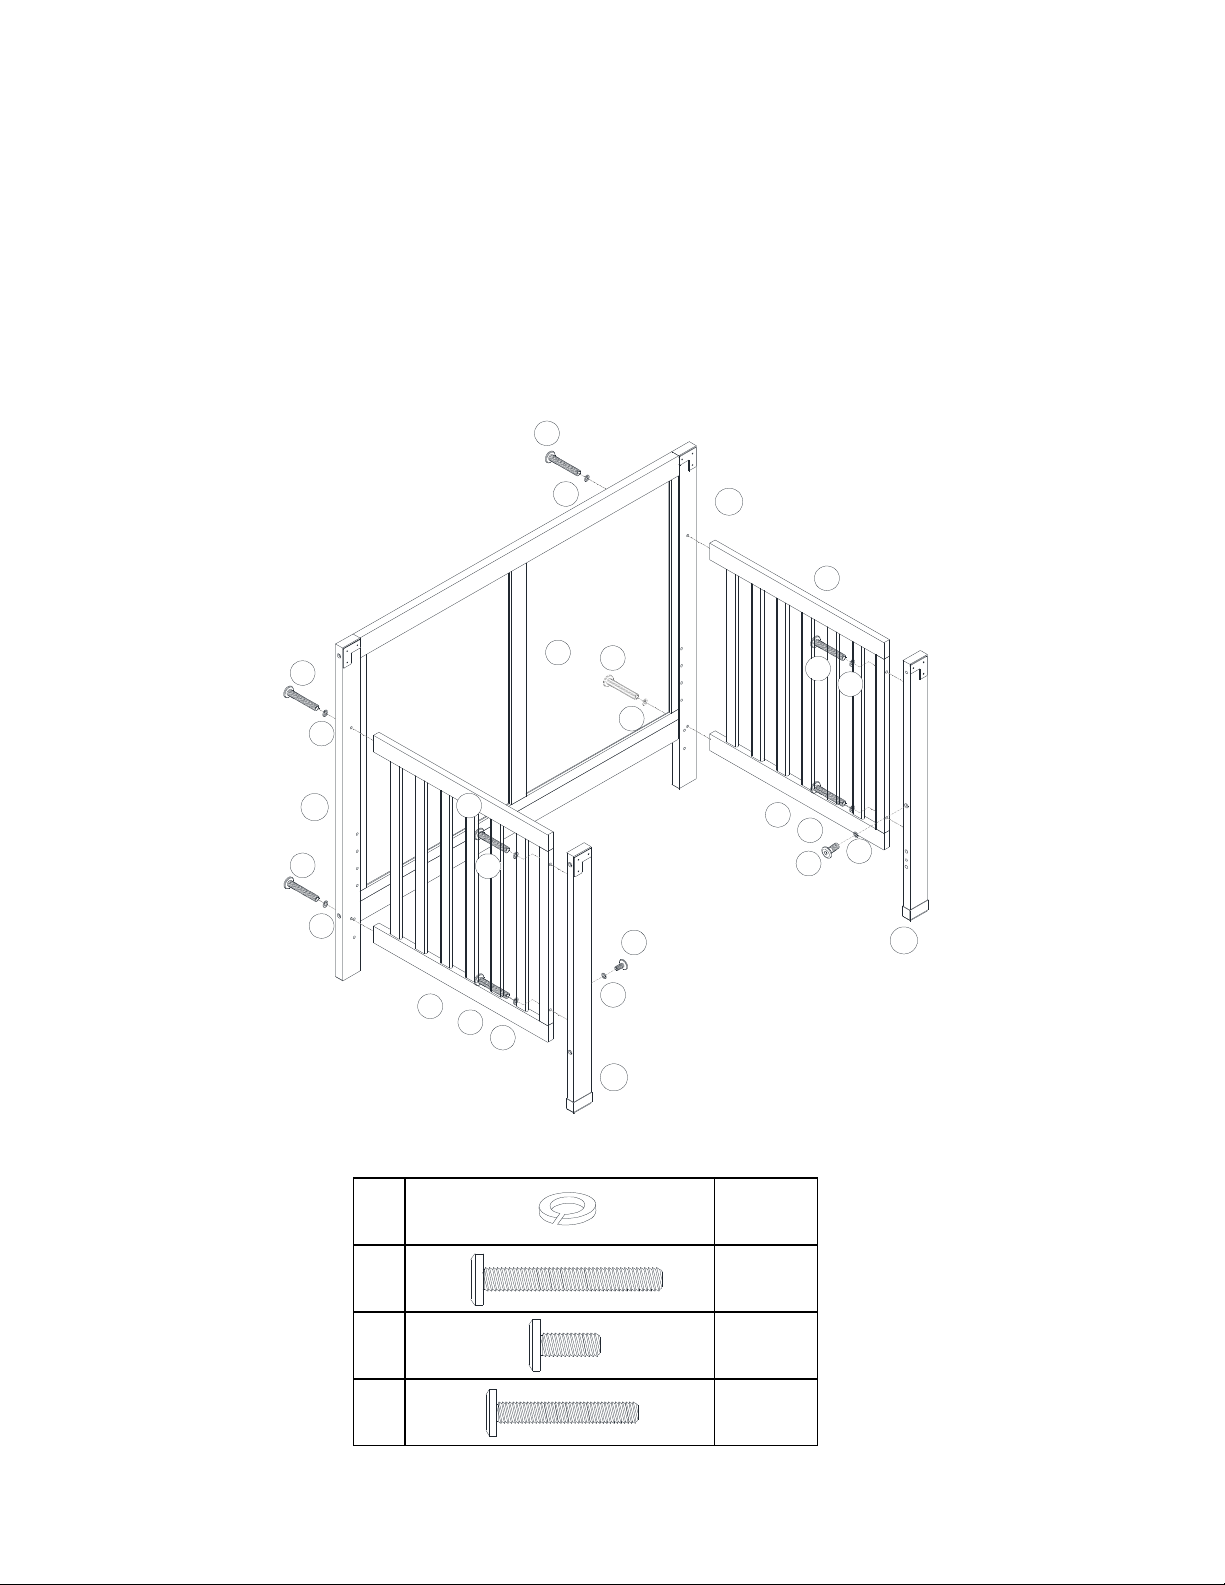
STEP 2:
Insert wood (5) into back panel (A) as shown.
Attach left and right back post (C & D) to the back panel and rail (A & B) with bolts (4) and
spring washers (2). Use Allen key (9) to tighten the bolts.
4
2
A
C
D
4
2
4
2
4
2
5
5
5
5
B
2
3
6
10
5-IN-1 CONVERTIBLE CRIB
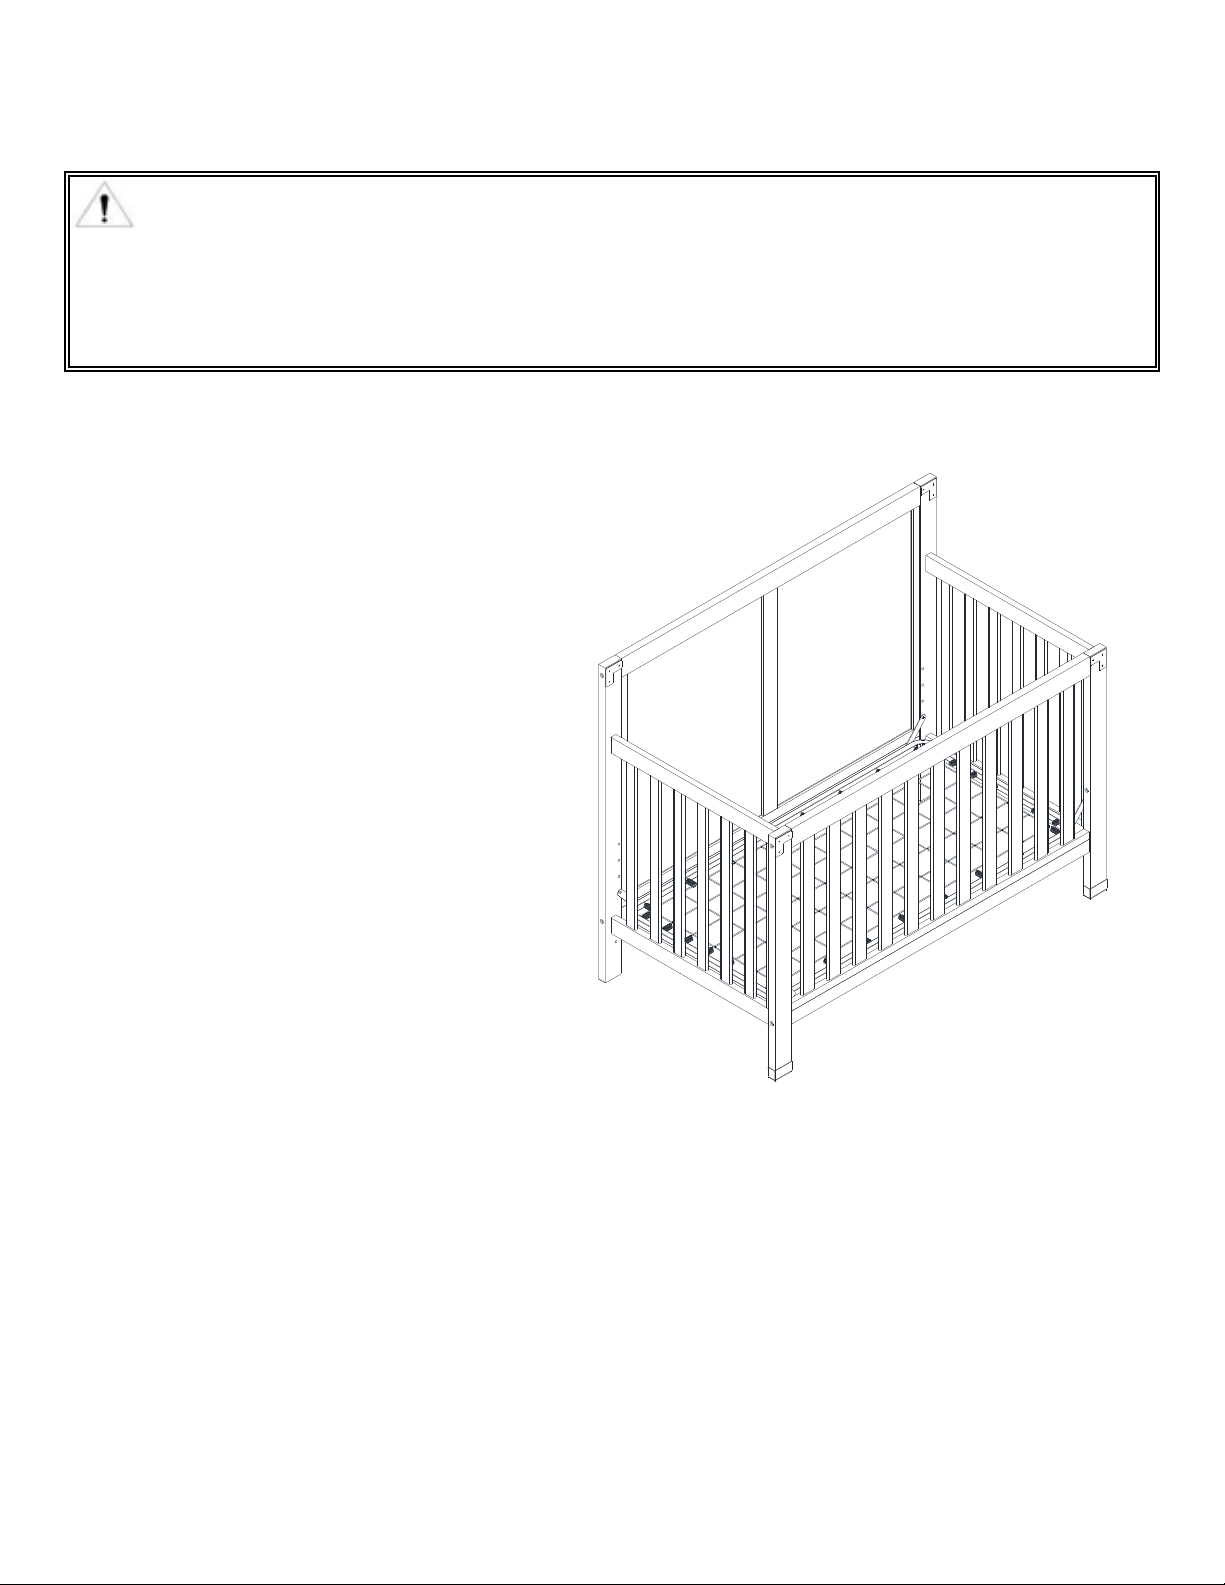
STEP 3:
Attach side panels (E) to the left and right back posts (C & D) with bolts (10) and spring
washers (2). Use the Allen key (9) to tighten the bolts.
Attach left and right front posts (F & G) to the side panels (E) with bolts (3) and spring
washers (2). Use the Allen key (9) to tighten the bolts.
Cover the holes on left and right front posts (F & G) with spring washers (2) and bolts (6).
Use Allen key (9) to tighten the bolts.
10 PCS
4 PCS
2 PCS
4 PCS
10
2
10
2
10
2
3
2
32
32
32
C
D
10
2
62
F
G
E
6
2
A
E
7 8
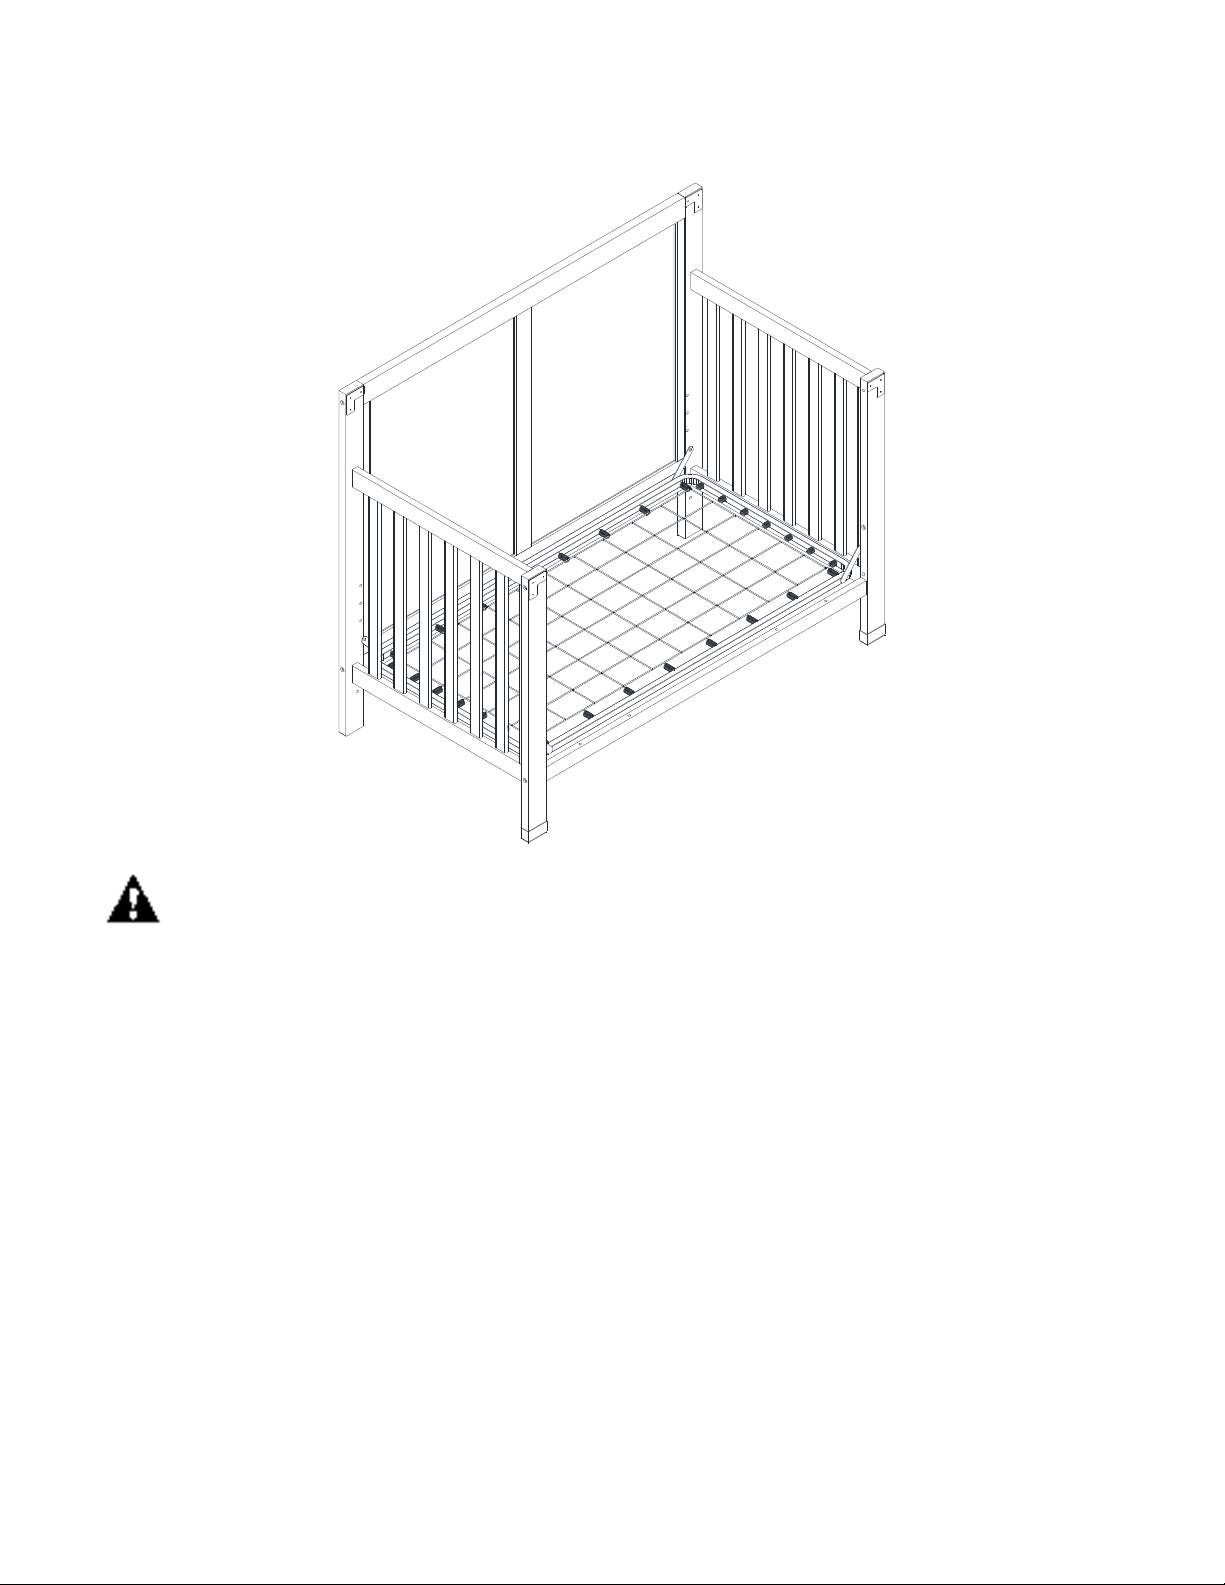
5-IN-1 CONVERTIBLE CRIB
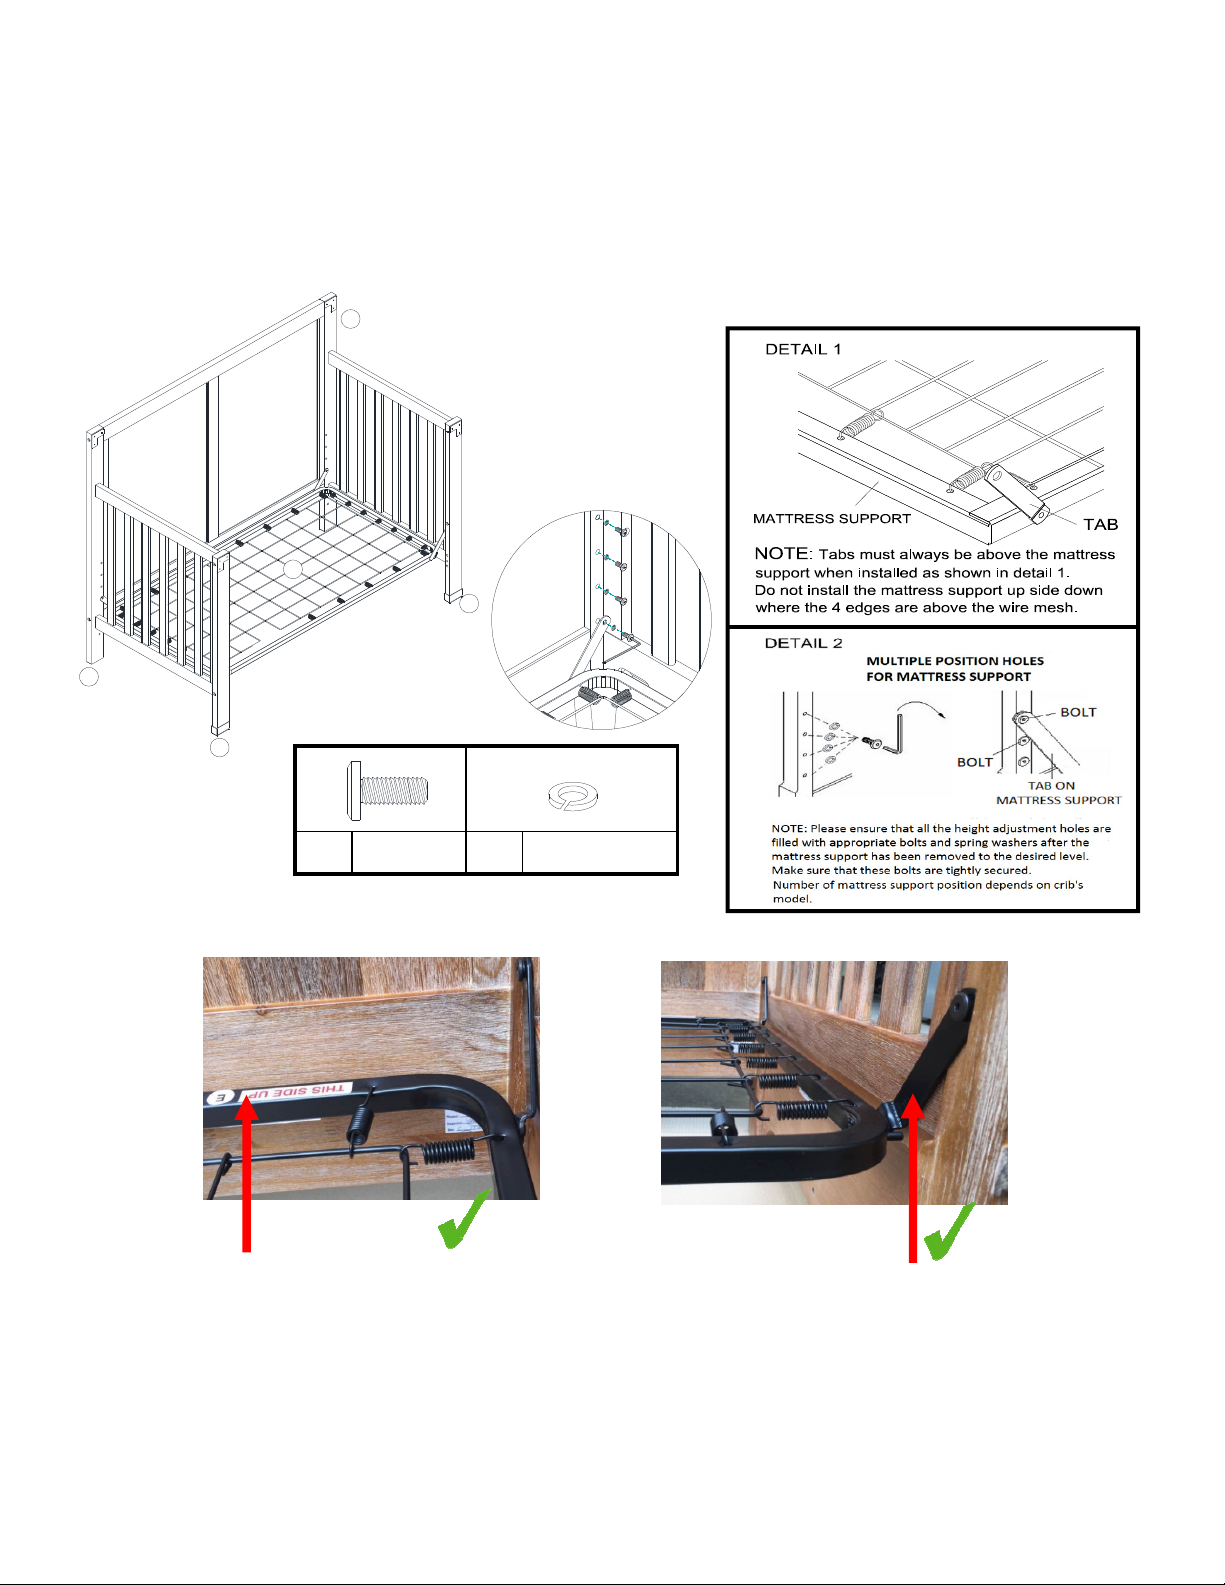
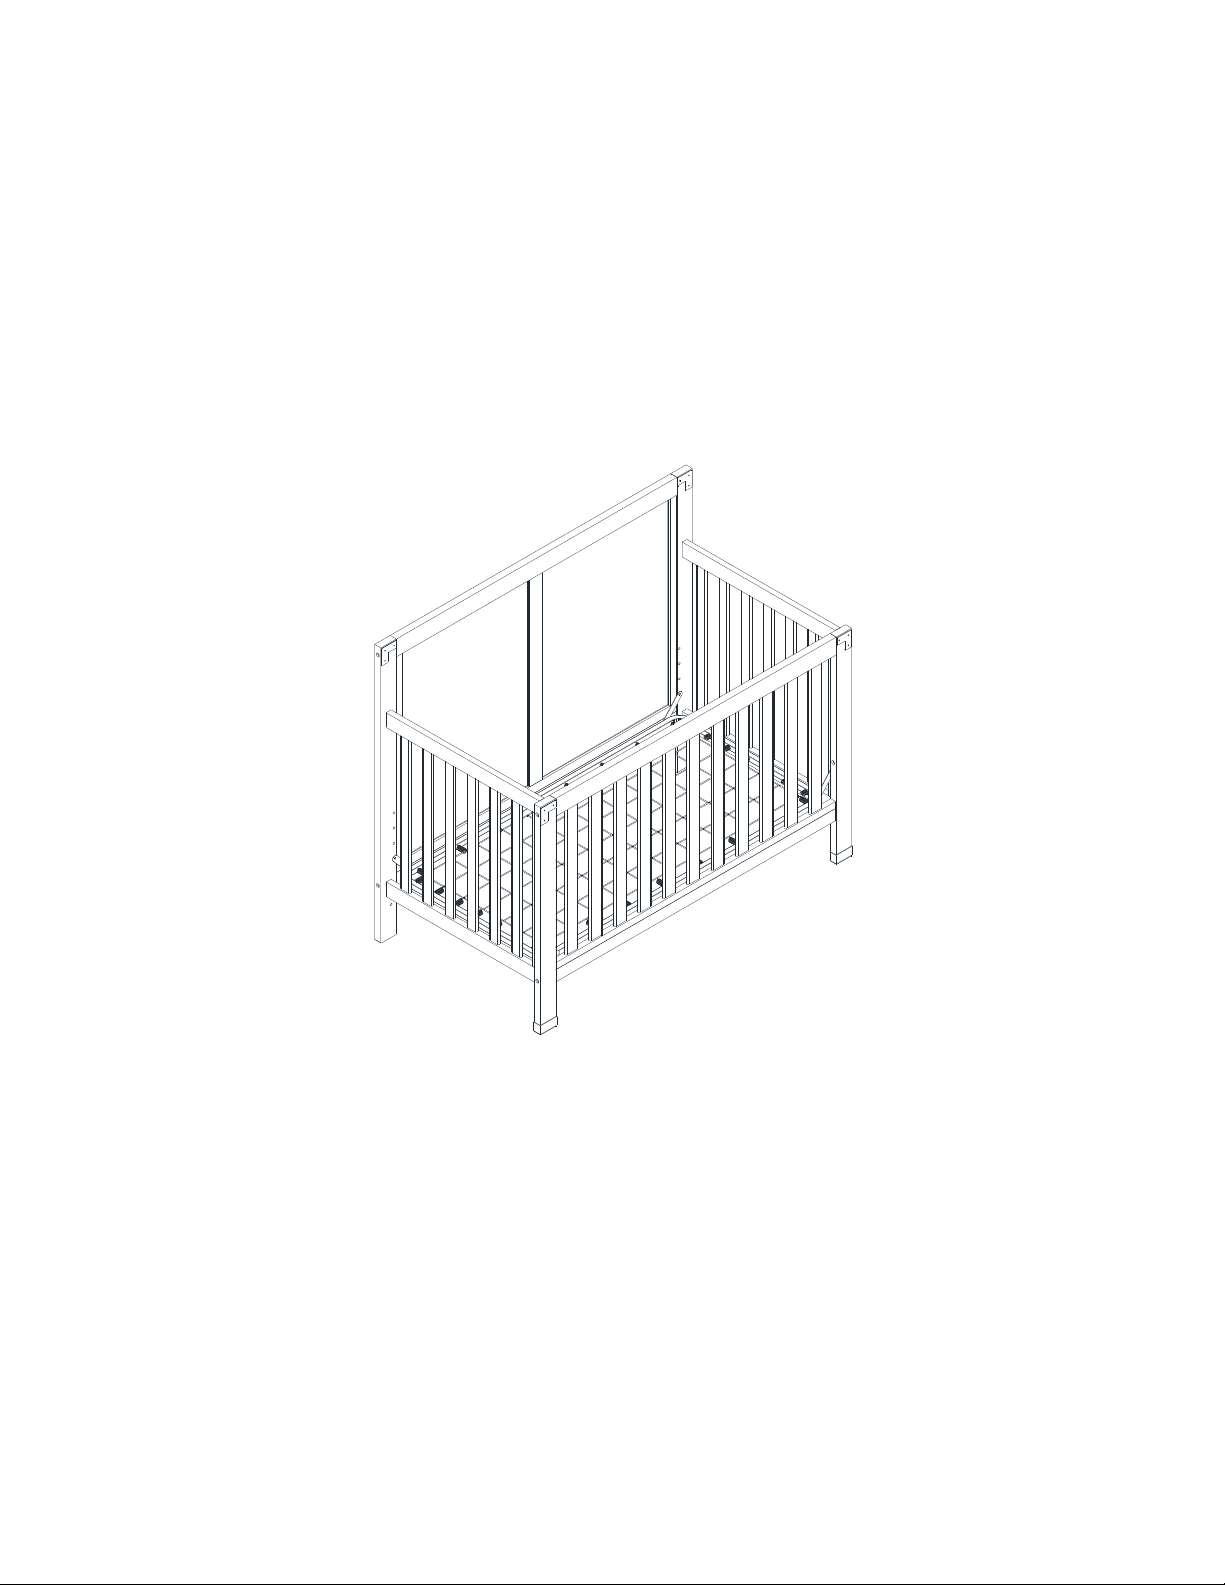
STEP 4:
Attach the mattress support (J) to the left and right back post (C & D) & the left and right front
post (F & G) with mattress support bolts (7) and spring washers (8). Use Allen key (9) to
tighten the bolts.
16PCS 16PCS
CORRECT
*Tabs on corners of
mattress support should
point up.
CORRECT
"THIS SIDE UP"
label shows which
side to face upward.
NOTE: The above photos and drawings showing how to properly attach the mattress
support are for reference only. Crib styles and colors will vary.
C
F
G
D
J
3
2
5-IN-1 CONVERTIBLE CRIB
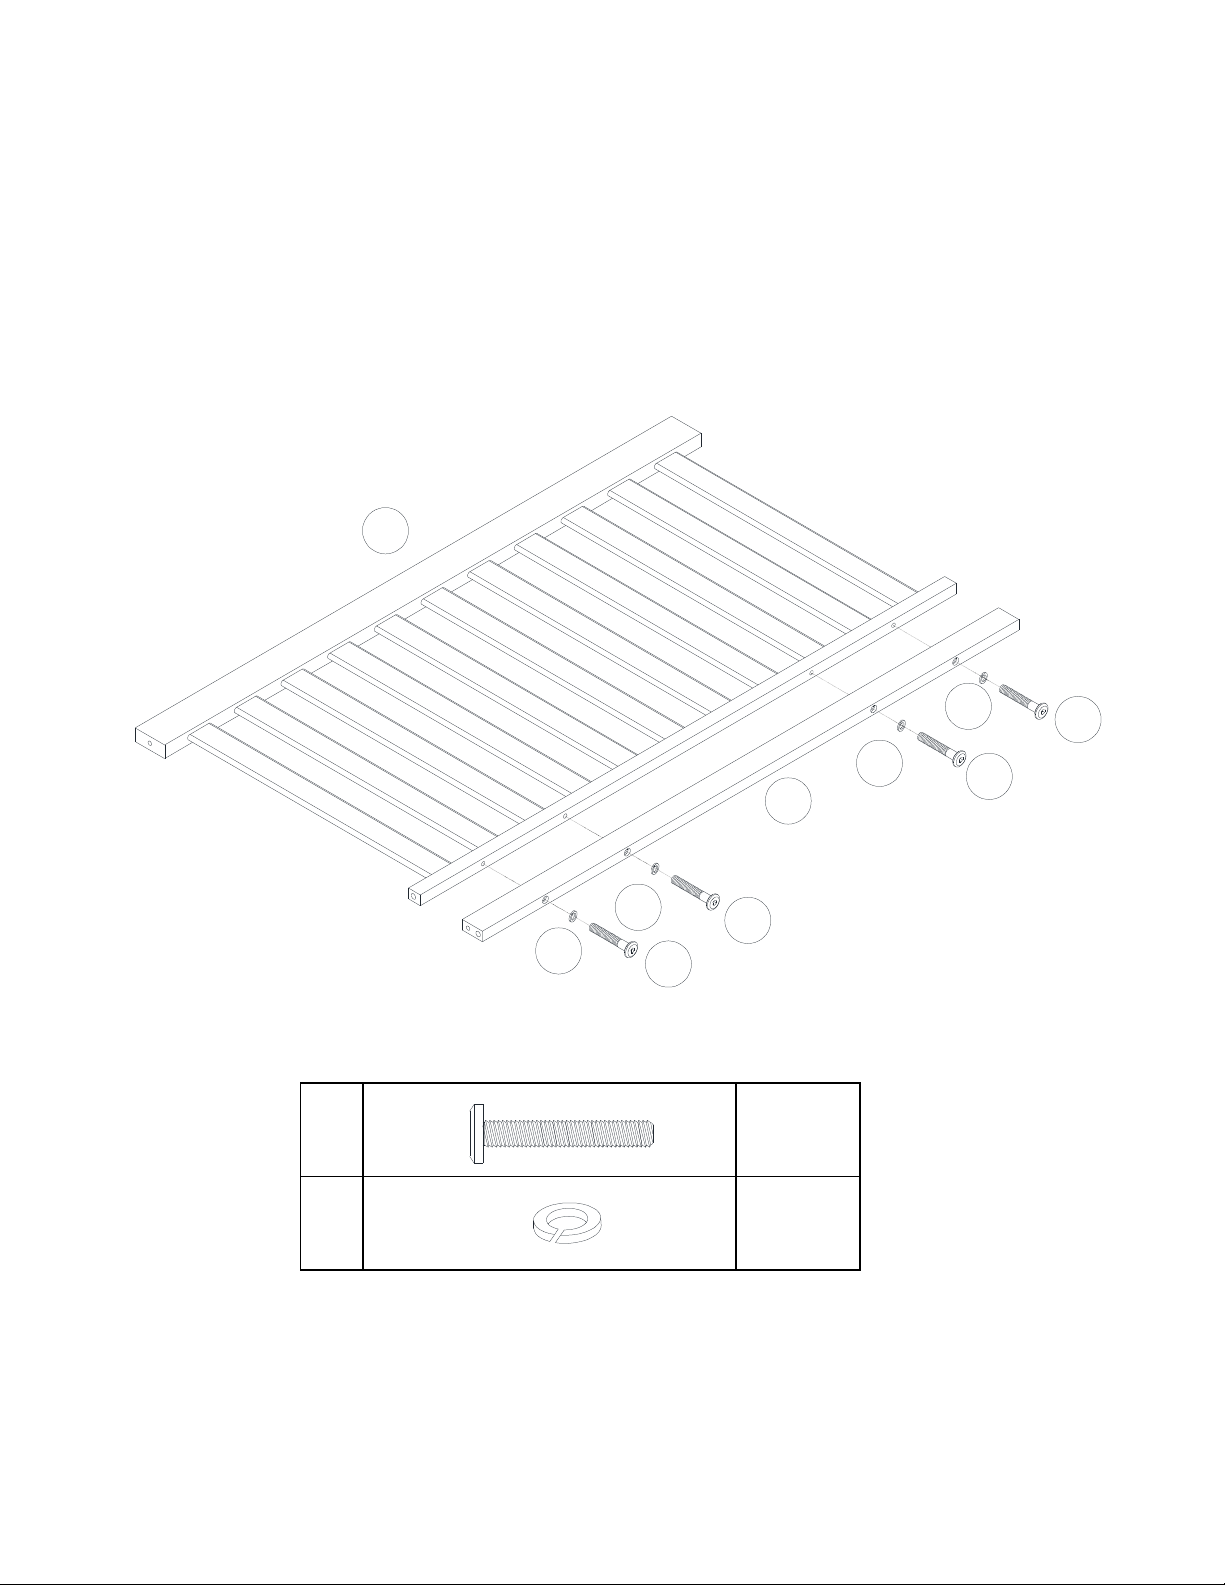
STEP 5:
Attach front rail (I) to the front panel (H) with bolts (3) and spring washers (2). Use Allen
key (9) to tighten the bolts.
4 PCS
4 PCS
3
2
3
2
3
2
H
I
3
2
4
2
5
5-IN-1 CONVERTIBLE CRIB
STEP 6:
Insert wood (5) into front rail (I) as shown.
Attach front panel (H) and front rail (I) to the left and right front post (F & G) with bolts (4) and
spring washers (2). Use Allen key (9) to tighten the bolts (4).
4 PCS
4 PCS
4 PCS
4
2
4
2
F
G
H
I
4
2
5
5
4
2
4
2
F
5-IN-1 CONVERTIBLE CRIB
WARNINGS:
DAY BED ASSEMBLY INSTRUCTION: STARTING FROM CRIB
STEP 1: Detach the front panel (H) from the front posts (F & G) and front rail (I) with Allen Key
(9).
STEP 2: If mattress support (J) is not in the lowest position, unscrew bolts (7) from side panels
(E) and move to the lowest position.
STEP 3: Ensure all bolts are tightly secured.
DAY BED ASSEMBLY INSTRUCTION: STARTING FROM SCRATCH
STEP 1: Follow steps 1 to 4 of the crib assembly instruction.
STEP 2: Attach front rail (I) to front posts (F & G) with bolts (4), spring washers (2) and wood
(5). Use Allen key (9) to tighten bolts.
* Any mattress used in this crib must be at least 27-1/4 inches by 51-5/8 inches (69cm by
131cm) with a thickness not exceeding 6 inches (15cm).
* The day bed is not intended for children under 15 months of age or over 50 pounds (22.7
kgs).
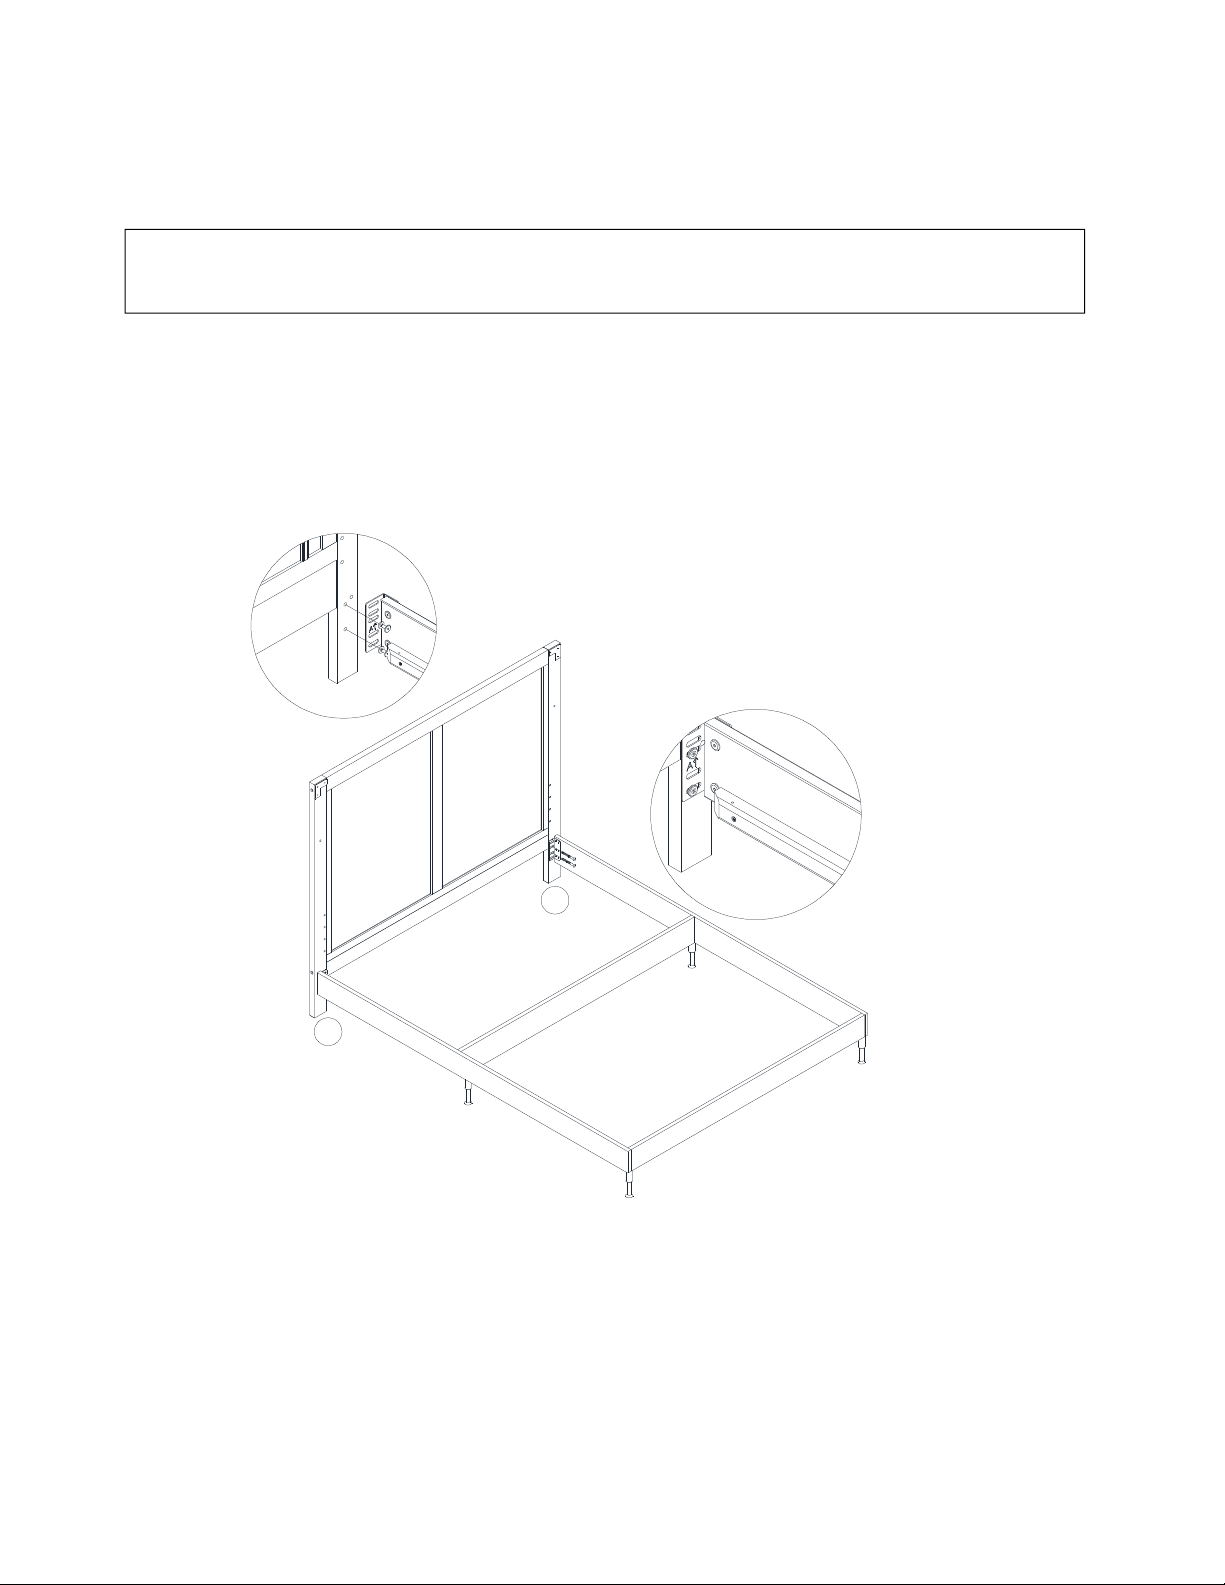
5-IN-1 CONVERTIBLE CRIB
FULL SIZE BED ASSEMBLY INSTRUCTION
(HEADBOARD ONLY)
FULL SIZE CONVERSION RAILS AND LEGS ARE NOT INCLUDED. DIAGRAMS ARE FOR
REFERENCE ONLY. BED RAILS MAY DIFFER FROM ILLUSTRATION.
STEP 1: Attach the full size conversion rails (not
included) to the left and right back posts (C & D) of the
headboard.
IMPORTANT: Store unused parts of "crib", "day bed" or "full size bed" for future use.
ALWAYS STORE THE ASSEMBLY INSTRUCTIONS IN THE POUCH ATTACHED TO
THE MATTRESS SUPPORT (J).
Both Sides
C
D
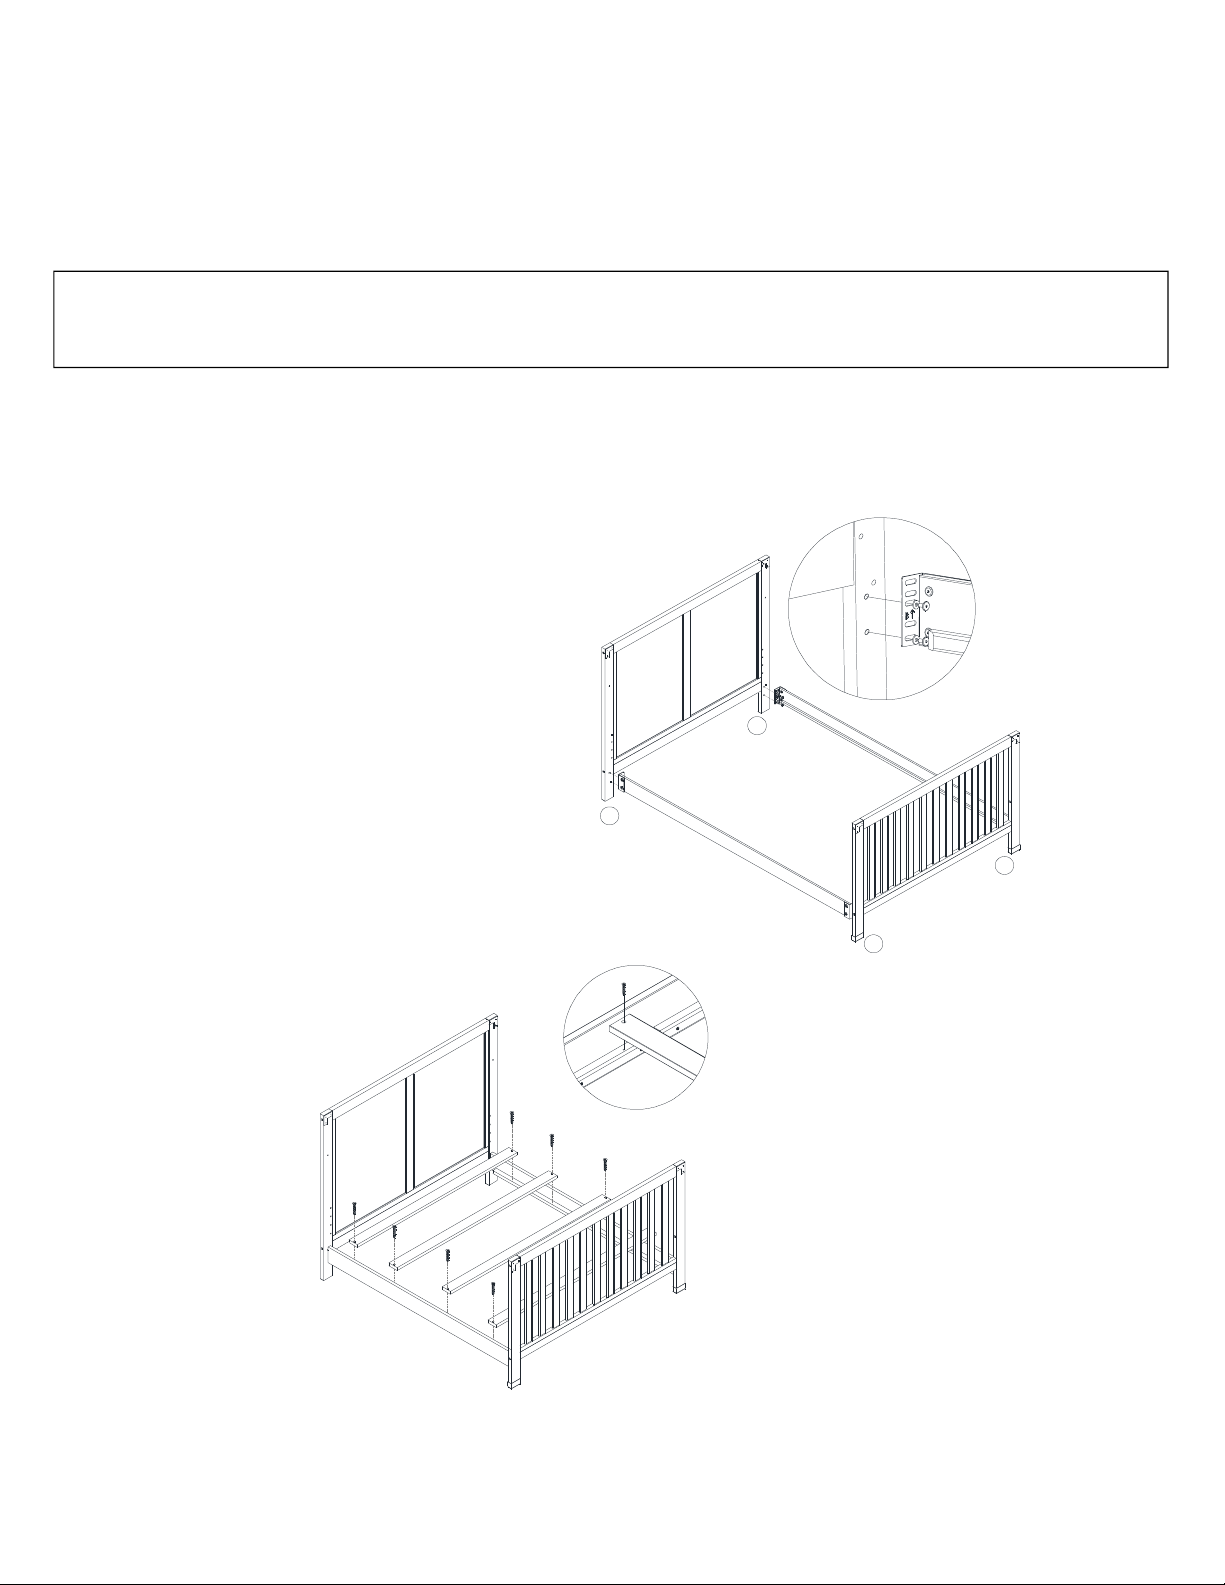
5-IN-1 CONVERTIBLE CRIB
FULL SIZE BED ASSEMBLY INSTRUCTION
(HEADBOARD AND FOOTBOARD ONLY)
IMPORTANT: Store unused parts of "crib", "day bed" or "full size bed" for future use.
ALWAYS STORE THE ASSEMBLY INSTRUCTIONS IN THE POUCH ATTACHED TO
THE MATTRESS SUPPORT (J).
FULL SIZE CONVERSION RAILS AND SLATS ARE NOT INCLUDED. DIAGRAMS
ARE FOR REFERENCE ONLY. BED RAILS MAY DIFFER FROM ILLUSTRATION.
STEP 1: Attach the full size conversion
rails (not included) to the back and front posts (C, D, F & G).
STEP 2: Add the slats (not included).
Both Sides
Both Sides
C
D
F
G
5-IN-1 CONVERTIBLE CRIB
Convert your 5-in-1 Convertible Crib into a toddler bed with the Toddler
Bed Conversion Rail sold separately.
That's it ! You've finished assembling your 5-IN-1 CRIB.
5-IN-1 CONVERTIBLE CRIB
CAUTION: This unit is intended for use only with the products
and/or maximum weights indicated. Use with other products
and/or products heavier than the maximum weights indicated may
result in instability or cause possible injury.
Stop using crib when child begins
to climb out or reaches the height
of 35.4 in. (90 cm).
ANY MATTRESS USED IN THIS
CRIB MUST BE AT LEAST 27-1/4
INCHES BY 51-5/8 INCHES (69CM
BY 131CM) WITH A THICKNESS
NOT EXCEEDING 6 INCHES (15CM).
The DAY BED is not intended for
children under 15 months of age or
over 50 pounds.
DO NOT RETURN PRODUCT TO THE STORE.
If a part is missing or damaged, contact our customer service
department. We will replace the part FREE of charge.
Maximum weight not to
exceed 50 pounds when
used as a crib.
MANUAL DE INSTRUCCIONES
CUNA 5 EN 1
CONVERTIBLE

*
*
*
*
*
*
*
*
*
*
*
*
*
*
*
*
*
*NUNCA utilizar la cama para un niño menor de 15 meses o que pese más de 50 lbs.
*SIEMPRE siga las instrucciones de ensamblaje.
*
*NUNCA cuelgue cordones por encima de una cama.
*
*
ADVERTENCIA
Si no se siguen estas advertencias e instrucciones al armar la cuna, el niño podría sufrir lesiones graves o
morir.
Lea todas las instrucciones antes de armar la cuna. CONSERVE LAS INSTRUCCIONES PARA USO
FUTURO.
Antes de cada uso o de armarla, inspeccione la cuna y asegúrese de que no hayan piezas dañadas,
uniones flojas, piezas que falten o bordes filosos. NO use la cuna si faltan piezas o están rotas. NO
substituya piezas.
Los bebés pueden asfixiarse con accesorios blandos. Nunca agregue almohadas, edredones o relleno.
Cuando el niño pueda pararse o llegue a 35" (89 cm) de altura, no debe seguir usando esta cuna.
Para reducir el riesgo de SMSL, los pediatras recomiendan que los bebés con buena salud duerman boca
arriba, a menos que su médico le dé otras recomendaciones.
NO coloque la cuna cerca de una ventana donde el niño podría ahorcarse con los cordones de persianas
o cortinas.
¡Los cordones pueden causar estrangulamiento! NO coloque objetos con un cordón al cuello del niño,
como el cordón de una capucha o de un chupete. NO cuelgue cordones sobre la cuna ni ate juguetes con
cordones.
Para prevenir el riesgo de estrangulación ajuste todas las uniones. La ropa o partes del cuerpo del niño
pueden quedar atrapados en uniones flojas.
Si cambia la terminación de la cuna, utilice un material no tóxico recomendado para productos para niños.
Cuando el niño sea capaz de pararse, coloque el colchón en la posición más baja y retire almohadillas,
juguetes grandes y otros objetos que podrían servir para que el niño trepe.
Nunca use bolsas ni películas plásticas como cobertura para el colchón, porque pueden causar asfixia.
Remplazar la barandilla para dentición si está dañada o floja (si una barandilla de dentición está incluida
con este modelo)
PRECAUCIÓN: TODO COLCHÓN UTILIZADO EN ESTA CUNA DEBE SER DE POR LO MENOS 27-1/4
PULGADAS POR 51-5/8 PULGADAS (69CM POR 131CM) CON UN ESPESOR NO MAS DE 6
PULGADAS (15CM).
Los niños pueden asfixiarse si quedan atrapados en espacios entre los lados de la cuna y un colchón
demasiado pequeño.
Siga las advertencias en todos los productos en una cuna.
ALGUNOS NIÑOS HAN MUERTO EN LA CAMA PORQUE QUEDARON ATRAPADOS. La cabeza o el
cuello de un niño pueden quedar atrapados en espacios entre las partes de la cama.
PELIGRO DE ESTRANGULACIÓN. NUNCA coloque la cama cerca de una ventana donde los cordones
de persianas o cortinas podrían estrangular al niño.
NUNCA cuelgue objetos con un cordón, cuerda o cinta al cuello del niño, tales como capuchas con cordó
n o chupetes. Estos objetos pueden quedar atrapados entre las partes de la cama.
PRECAUCIÓN
PELIGRO DE BLOQUEO. Para evitar los espacios peligrosos, todo colchón utilizado con esta cama debe
ser un colchón de tamaño normal de por lo menos 51-5/8 pulgadas (1310 mm) de largo, 27-1/4 pulgadas
(690 mm) de ancho y un máximo de 6 pulgadas (150 mm).
*
*
*
*
*
*
NOTAS
Asegúrese de tener todas las piezas y componentes antes de comenzar a armarla.
Ármela sobre superficies blandas y suaves para evitar dañar el pulido del producto.
No use herramientas eléctricas.
Precaución: Un adulto debe armarla.
GARANTÍA LIMITADA
garantiza que el producto está libre de defectos de material y mano de obra y se compromete a remediar
cualquier defecto de este tipo. Esta garantía cubre 1 año a partir de la fecha de compra original. Esta
garantía es válida solamente con presentación de una prueba de compra. Se limita a la reparación o
reemplazo de componentes defectuosos del mueble y no incluye ningún trabajo de armado. Esta garantía
no se aplica a ningún producto que haya sido mal armado, sometido a mal uso o abuso, o que haya sido
alterado o reparado de cualquier manera. Esta garantía le da las derechas legales específicas y usted
puede también tener otras derechas que varíen de estado al estado.
ADVERTENCIA: Si este producto está dañado y/o
ciertas piezas faltan o están rotas, NO LO USE.
Se necesitan dos personas para armarla.
Tiempo estimado para armarla: 45 minutos.
CUIDADO Y LIMPIEZA
Quítele el polvo regularmente con un paño limpio y seco para evitar que haya acumulación. De vez en
cuando se puede usar un paño húmedo para limpiar la superficie. Séquelo inmediatamente. No utilice
productos abrasivos que puedan dañar el lustre. La exposición excesiva a la luz solar y a cambios extremos
de temperatura y humedad puede dañar la madera del mueble.
MANTENIMIENTO
Verifique los pernos y tornillos periódicamente y ajústelos si es necesario.
1 2
3 4
5 6
7
8
9
10
LLAVE ALLEN
4 PZAS1 PZA
PERNO
16 PZAS 16 PZAS
Ø1/4" * 13 * 40 mm
Ø1/4" * 13 * 15 mm Ø1/4" * 11 * 1.2 mm
PERNO ARANDELA RESORTE
TARUGO DE MADERA PERNO
8 PZAS 2 PZAS
8 PZAS 8 PZAS
Ø10 * 35 mm Ø1/4" * 13 * 15 mm
Ø1/4" * 13 * 45 mm Ø1/4" * 13 * 83 mm
PERNO PERNO
PERNO ARANDELA RESORTE
2 PZAS 24 PZAS
LISTA DE ACCESORIOS
Ø1/4" * 13 * 70 mm Ø5/16" * 13 * 1.5 mm
CUNA 5 EN 1 CONVERTIBLE
Table of contents
Languages:
Other DHP Indoor Furnishing manuals


DHP
DHP Ava Metal Daybed TWIN 5508096 User manual

DHP
DHP 4188419WE User manual

DHP
DHP 5458196 User manual

DHP
DHP 4020959 User manual

DHP
DHP Flip 2202429 User manual

DHP
DHP Brooklyn 3291196 User manual

DHP
DHP 4005009N User manual

DHP
DHP DOREL Living DL8747-16 User manual

DHP
DHP 3136096CA User manual

DHP
DHP 5512098 User manual


Popular Indoor Furnishing manuals by other brands


Habitat
Habitat Bergen 817604 quick start guide

Flash Furniture
Flash Furniture NAN-JN-2824S-GG Assembly instructions

KI
KI Aristotle Casegoods Wall-Mounted Overhead... Assembly instructions

Sauder
Sauder Tremont Row 427971 manual

Sister Bay
Sister Bay Laguna 30-1 manual

Sauder
Sauder County Line 415996 Instruction booklet