Connecting Power
Zio endpoint devices can receive power from either an external, 12V/2.5A
power supply, or Power over Ethernet (PoE+, if present) from a PoE+
network switch or stand-alone PoE+ injector.
●If the device does not receive PoE+: Connect the DC 12V power
input on the device to an AC power source, using the supplied
AD-to-DC power adapter or PDU400-12 Power Distribution Unit; or
●If the device receives PoE+: You need not connect anything to
this port. However, if a local power source is available, you can
connect the device to it to provide a backup power source should
PoE+ become unavailable. This will not damage the device.
After a brief power-up sequence, the front-panel POWER LED lights solid
green to indicate that the device is receiving power. On the rear panel,
the ACT and 1G LEDs flash or light solid amber to indicate network
activity and link status.
Your Zio endpoint devices are now operational.
To begin using the Zio Coordinator GUI, open a web browser window. Then,
enter the following URL into the address bar:
<nnn.nnn.nnn.nnn>:8080/zio
where <nnn.nnn.nnn.nnn> is the IP address of a Zio device.
Tip Turn on your source devices and displays before connecting
the Zio endpoint devices to power.
Note
PoE+ is the default power source.
If PoE+ becomes unavailable, the Zio endpoint device will
switch to local DC power and reboot. When PoE+ becomes
available again, the device will switch back to PoE+
seamlessly (without a reboot).
Using the Zio Coordinator GUI
Example
If the device IP address is 192.168.1.200, enter:
192.168.1.200:8080/zio
This Quick Start Guide describes the Zio installation process. The following
topics are discussed:
■Package Contents
■Optional Accessories
■Installation Considerations
■Rack-Mounting Zio
■Connections to Zio
■Using the Zio Coordinator GUI
■IMPORTANT: Ensure That Your Device Firmware Is
Up-To-Date
■One or more of the following:
●Zio S2000 Series Encoder, with 12V/2.5A DC power supply and
mounting hardware
●Zio D2000 Series Decoder/Multiviewer, with 12V/2.5A DC power
supply and mounting hardware
RGB Spectrum offers the following, optional Zio accessories:
■10-Position Rack-Mount Enclosure
■Rack-mount Power Distribution Unit (Model PDU400-12), to provide
12VDC power to multiple Zio devices from a single AC power source
Ventilation
Ensure that the vents on either side of the device are not blocked.
Provide a minimum of 1.5 inches (38 mm) of free air space around
the chassis.
Mounting
RGB Spectrum offers an optional mounting cage that allows multiple Zio
devices to be installed in a standard, 19-inch equipment rack. Contact
RGB Spectrum for more information.
Package Contents
Optional Accessories
Installation Considerations
Zio Quick Start Guide 7
Ambient Heat
Keep the ambient temperature constant and below 35 °C (95 °F). Do not
install near any heat sources such as radiators, heat registers, stoves, or
other apparatus (including amplifiers) that produce heat.
Cables and Connections
●Turn off all equipment before making any connections.
●For best performance and to minimize cable clutter, use Category 2
(High-Speed) HDMI cables that are only as long as necessary to
connect two devices.
Do not exceed the maximum recommended cable length of 9
feet (2.74 meters).
●For network connections:
◆At a minimum, use high-quality, Cat 5e or Cat 6 cables. If you
plan to use Power over Ethernet (PoE+), you must use Cat
6a Screened Shielded Twisted Pair (SSTP) cable.
◆Do not use crossover cables.
◆Ensure that the cables are properly terminated and free of
damage.
●Ensure that the cables are securely connected.
Important Do not stack multiple Zio devices on top of one
another. Use the optional mounting cage.
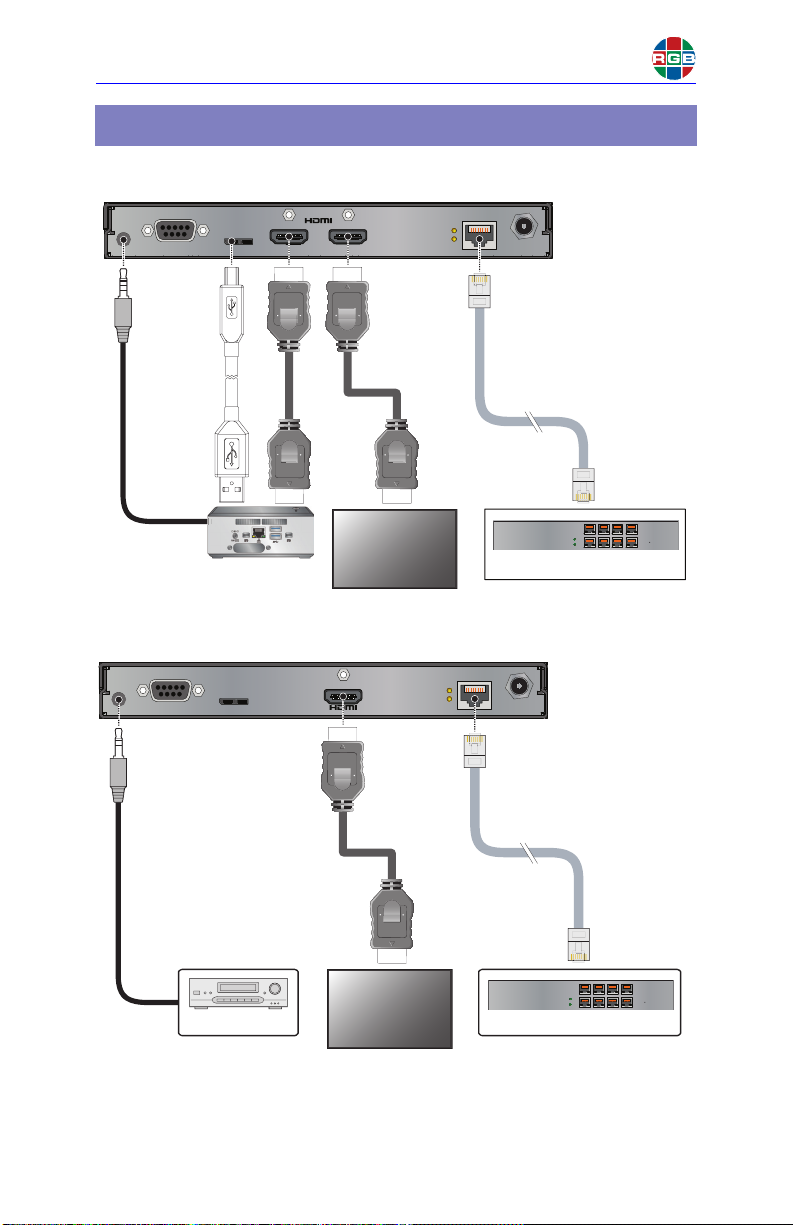
VIDEO
Connect your source device to the HDMI IN jack on the Zio
S2000 Series Encoder, using a High-speed HDMI cable.
Optionally, connect a display device to the HDMI OUT jack
on the Zio S2000 Series Encoder to monitor the incoming
video signal.
Connect your display device to the HDMI OUT jack on the
Zio D2000 Series Decoder, using a High-speed HDMI
cable.
ANALOG AUDIO (OPTIONAL)
Table 1 provides pinout information for the Encoder Audio
In and Decoder Audio Out connectors.
SERIAL (OPTIONAL)
Connect a PC or other serial control device to the RS-232
port. Use a standard, straight-through serial cable with a
9-pin, male, sub-miniature D connector.
Figure 1-1 RS-232 Controller Connection
Table 1 Audio Connector Pinouts
Pin Number Pin Name Description
1 Tip Decoder Audio Out (Left)
2 Ring Decoder Audio Out (Right)
3 Ring Common/Ground
4 Sleeve Encoder Audio In (mono)
RS232
AUDIO
1
2
345
7
89 6
to Automation/
Control System
or PC
2 Receive Data
(to ctrl. system)
3 Transmit Data
(from ctrl. system)
5 Ground
(none of the other pins are used)
Zio Quick Start Guide 6 Zio Quick Start Guide 3