Spectrum 6120 User manual

Soil Compaction Tester
Item # 6120
PRODUCT MANUAL
ENGLISH
DOCU-M0133

THANK YOU for purchasing the Soil Compaction Tester.
READ THIS MANUAL carefully to learn how to operate and service your
Soil Compaction Tester correctly. Failure to do so could result in per-
sonal injury or equipment damage.
THIS MANUAL SHOULD BE CONSIDERED a permanent part of your
Soil Compaction Tester and remain with the Soil Compaction Tester
when you sell it.
WARRANTY
This product is warranted to be free from defects in material or
workmanship for one year from the date of purchase. During
the warranty period Spectrum will, at its option, either repair or
replace products that prove to be defective. This warranty does
not cover damage due to improper installation or use, lightning,
negligence, accident, or unauthorized modications, or to incidental
or consequential damages beyond the Spectrum product.
Before returning a failed unit, you must obtain a Returned
Materials Authorization (RMA) from Spectrum. Spectrum is not
responsible for any package that is returned without a valid
RMA number or for the loss of the package by any shipping
company.
Introduction
i
3600 Thayer Ct.
Aurora, IL 60504
(331) 212-6725 or (800) 248-8873
Ext. 6725
Fax: (815) 436-4460
Email: [email protected]
www.specmeters.com

Contents
ii
Warranty and Service.............................................................................. i
What is soil compaction?...................................................................... 1
What are the impacts of a soil compaction problem?........................ 1
What to do about a soil compaction problem? ................................... 2
What is a Soil Compaction Tester? ...................................................... 2
Best time to use the Soil Compaction Tester ...................................... 3
Unpacking the Soil Compaction Tester................................................ 3
Using the Soil Compaction Tester ........................................................ 4
Contact Information ............................................................................... 5
CAUTION: The Soil Compaction Tester may cause harm if used
improperly. Please use the pointed tips with care.

WHAT IS SOIL COMPACTION?
Soil compaction can occur in any type of soil. Years of trafc and till-
age can cause soil particles to group together and ll in air spaces in
the soil creating a “plow pan” below the tillage area. When this hap-
pens, a hard layer is formed making it difcult for moisture and roots to
penetrate the soil.
Some soil types are more susceptible to compaction than others; but
once a compaction layer is formed, and moisture and trafc continues,
the compaction layer will continue to get denser and thicker.
WHAT ARE THE IMPACTS OF A SOIL COMPACTION
PROBLEM?
1. Compacted soil is much harder to work. This will cause you to use
more power and take longer to till, wasting fuel, time and money.
2. You may already be aware of soil compaction but not have the tools
to determine if it is a problem. For example, unnecessarily trying to
correct soil compaction by tilling to a deeper depth can be a waste of
time and money.
3. Your crop yield can be reduced by as much as 50% because of poor
root and plant development.
1
Operation
TYPICAL COMPACTION SITUATION
Disc Depth Abnormal Root
Development
100 lbs.
Uncompacted
Plow Pan Roots Cannot
Penetrate
Moisture is Trapped
Above and Below
400 lbs.
Compacted
Subsoiling Depth 75 lbs.
Uncompacted
Plowing Depth
3”
9”
15”

4. Compacted soil can prevent water from penetrating deeper into the
soil. This can reduce plant development and yield especially during
dry periods with no rain. Compaction can also lead to surface water
retention making the eld more difcult to work in the spring and
fall seasons.
5. In compacted soil, fertilizers, pesticides and herbicides can more eas-
ily be washed away and not absorbed or even become more concen-
trated causing plant damage. This can result in reduced crop yield.
WHAT TO DO ABOUT A SOIL COMPACTION PROBLEM?
If you have determined that you have a soil compaction problem and at
what depth the compaction exists, your solution could be as easy as one
of the following:
• Reducing trafc in the affected areas of the eld.
• Seeding cover crops that will improve water management.
• Choosing a tillage tool that will penetrate the compacted area of the eld.
Your local agricultural extension ofce is a good source of information
to help you determine what can be done to help correct and prevent soil
compaction problems.
WHAT IS A SOIL COMPACTION TESTER?
Your Soil Compaction Tester is a penetrometer which measures the com-
paction of soil and is based on the ASAE S313.3 standard. The Tester is
supplied with two tips: a small tip (1/2” diameter) for use in rm soil and
a large tip (3/4”diameter) for use in soft soil. The dial has two scales (one
for each tip) that are calibrated in pounds per square inch of the base
area of the cone shaped tip.
THE DIAL IS COLOR-CODED FOR REFERENCE:
Green (0 - 200 psi)
Good Growing Conditions
Yellow (200 - 300 psi)
Fair Growing Conditions
Red (300 psi and above)
Poor Growing Conditions
2
Operation
NOTE: The gauge is
engineered to have
a positive load, thus
the needle does not
always contact the
pin on the low end
of the green scale.
This will not affect
the readings for
either index scale.
2
Operation
Compacted soil can prevent water from penetrating deeper into the4.
soil. This can reduce plant development and yield especially during
dry periods with no rain. Compaction can also lead to surface water
retention making the eld more difcult to work in the spring and
fall seasons.
In compacted soil, fertilizers, pesticides and herbicides can more eas-5.
ily be washed away and not absorbed or even become more concen-
trated causing plant damage. This can result in reduced crop yield.
WHAT TO DO ABOUT A SOIL COMPACTION PROBLEM?
If you have determined that you have a soil compaction problem and at
what depth the compaction exists, your solution could be as easy as one
of the following:
Reducing trafc in the affected areas of the eld.•
Seeding cover crops that will improve water management.•
Choosing a tillage tool that will penetrate the compacted area of the eld.•
Your local agricultural extension ofce is a good source of information
to help you determine what can be done to help correct and prevent soil
compaction problems.
WHAT IS A SOIL COMPACTION TESTER?
Your Soil Compaction Tester is a penetrometer which measures the com-
paction of soil and is based on the ASAE S313.3 standard. The Tester is
supplied with two tips: a small tip (1/2” diameter) for use in rm soil and
a large tip (3/4”diameter) for use in soft soil. The dial has two scales (one
for each tip) that are calibrated in pounds per square inch of the base
area of the cone shaped tip.
THE DIAL IS COLOR-CODED FOR REFERENCE:
Green (0 - 200 psi)
Good Growing Conditions
Yellow (200 - 300 psi)
Fair Growing Conditions
Red (300 psi and above)
Poor Growing Conditions

3
Operation
BEST TIME TO USE THE SOIL COMPACTION TESTER
The best time to use the Tester is in early spring before you till the soil.
The soil should have a good moisture content because the moisture
content and soil texture will affect the readings of the Soil Compaction
Tester.
It is best to compare the readings of the same soil type and moisture
content. Check a fence row and then check the eld area for comparison.
Several tests should be made in an area to get a more accurate reading.
The Soil Compaction Tester will help you determine if you have a com-
paction layer and, if so, the depth of the layer. After tilling, the Tester
will determine how deep you actually worked the soil and if your tillage
operation solved the problem.
UNPACKING THE SOIL COMPACTION TESTER
Remove the Soil Compaction Tester from the box. An adjustable shock
collar is installed on the shaft of the Soil Compaction Tester next to the
plastic housing. This collar is used during shipping and storage to protect
the dial from damage should an impact on the shaft occur.
Loosen the wing nut on the shock collar and slide it down at least an inch
away from the plastic housing. Visually inspect the Tester for damage.
The gauge is lled with nontoxic, non-ammable silicone oil. You may
notice a small air bubble in the dial face which is perfectly normal. The
silicone oil is used to dampen the shock to the gauge in case the Tester
is dropped. If the silicone oil is leaking from the dial contact the Spectrum
customer service department.
Your Soil Compaction Tester has a built in hanger hole in the back. Using
the supplied nail, the Tester can be conveniently hung and stored on a
wooden beam, wall or even above a work bench.
Storage of the Tester by hanging prevents damage during times when it
is not in use.

4
Operation
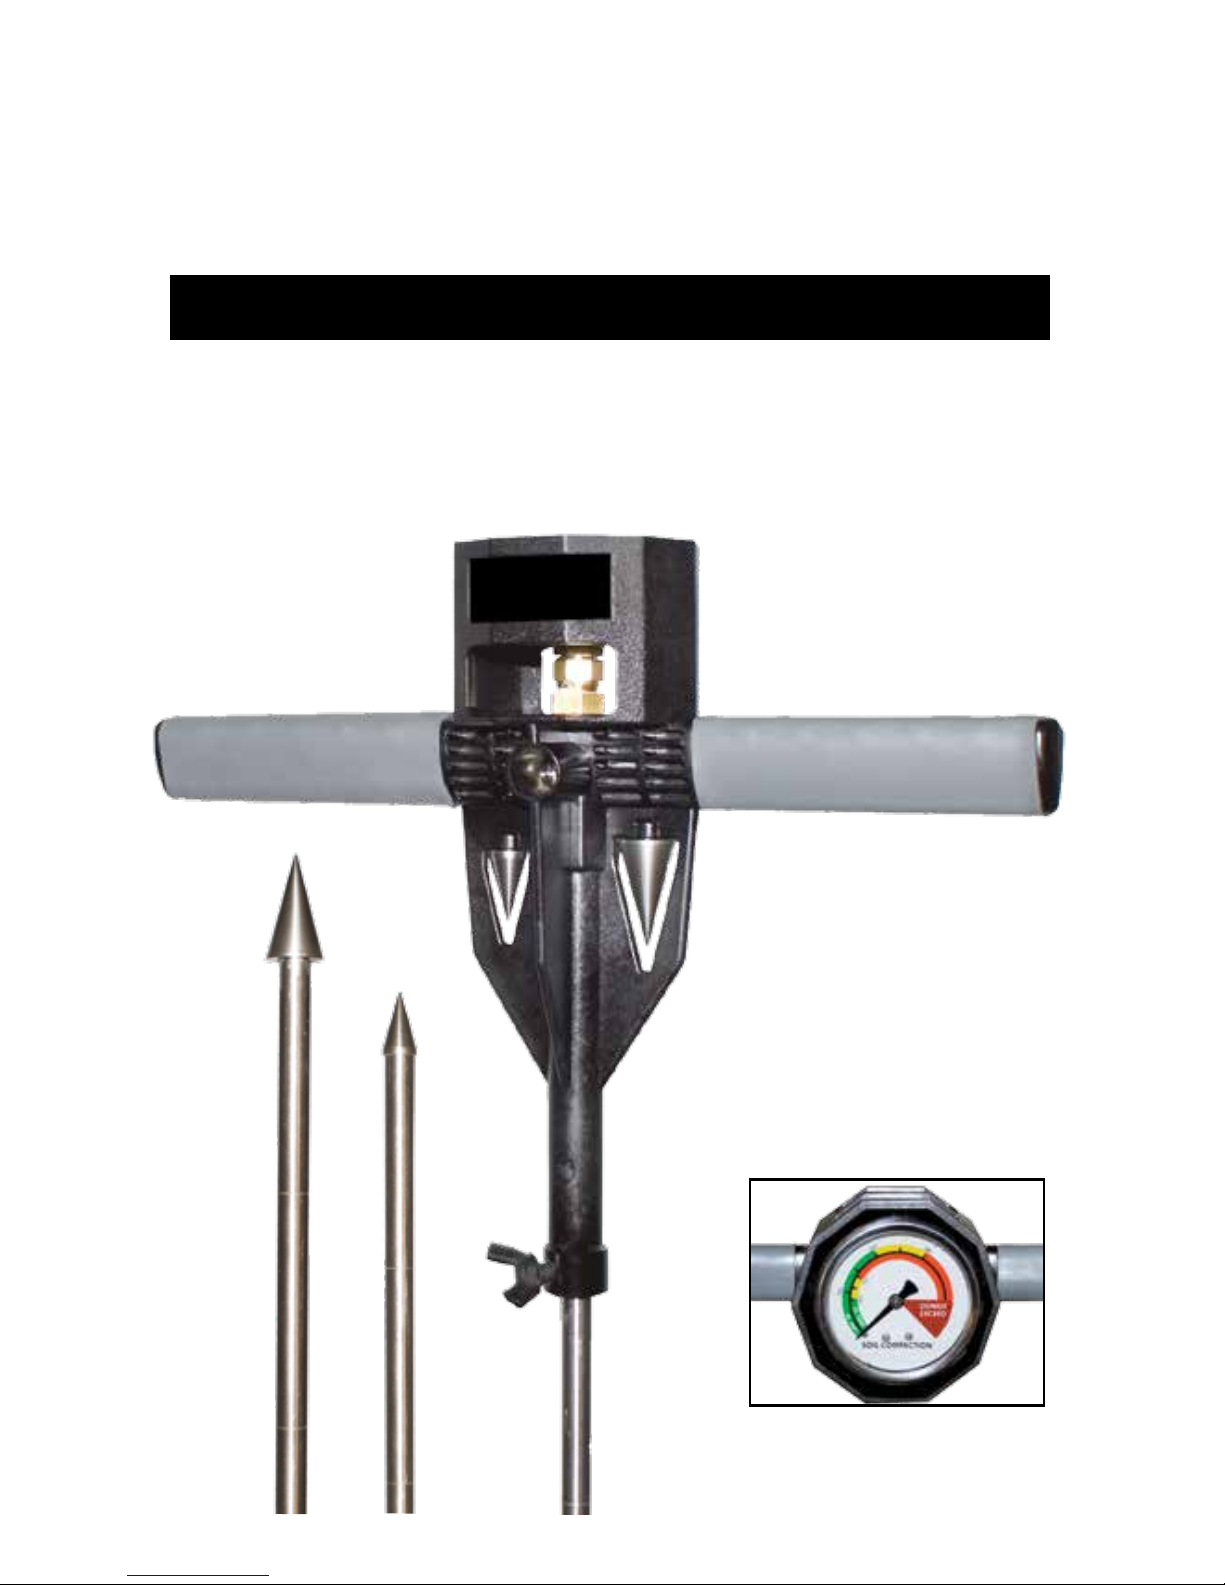
USING THE SOIL COMPACTION TESTER
1. Loosen the wing nut on the shock collar and slide the collar down the
shaft at least 1” away from the plastic housing.
2. Your Tester includes 2 tips (large and a small) that are stored in the
Tester housing. The tips can be removed by simply unthreading them
from the housing. (The tips are threaded on to the housing not
snapped on).
Choose the tip that best suites the type of soil you have. The small
tip is used for rm soil and the larger tip is used for loose soil.
*It is recommended that you start with the small tip and obtain some
readings. If you feel the readings are very low or the soil is very
loose then change to the larger tip.
Once you have chosen a tip, thread the tip on to the end of the Soil
Compaction Tester’s shaft.
Note: No valid readings can be obtained from the Tester if a tip is not
attached to the end of the shaft.
3. Position the tip of the Tester on the ground in the area you wish to
test. Apply even downward pressure on both handles of the Tester to
keep the shaft and tip penetrating the soil at a slow even pace.
4. The Tester shaft is marked at three inch intervals for easy depth
measurement. As the Tester’s shaft penetrates the soil, the gauge
readings at the 3”, 6”, 9” 12”, 15” and 18” depths should be recorded.
(Be sure to use the correct scale for the size tip that you are using on
the shaft as indicated on the dial face)
5. A compacted layer can be determined by the gauge indicator in-
creasing upward into the red range and then moving back down into
the yellow or green after passing through the compacted layer. The
depth of the beginning of the compacted layer and depth of leaving
the compacted layer should be noted.
Note: multiple readings must be taken from each area of the eld.
To get an accurate determination of whether or not you have a soil
compaction problem and at what depth the problem exists. The same
procedure should be repeated in other areas of the eld as well. One
area may not represent the condition of the whole eld.
6. When the Tester is not in use, loosen the shock collar’s wing nut and
slide the shock collar up the shaft until it comes in contact with the
plastic housing and tighten the wing nut. This will help prevent dam-
age to your Soil Compaction Tester.

5
HANGER HOLE NAIL
3600 Thayer Ct.
Aurora, IL 60504
(331) 212-6725 or (800) 248-8873
Ext. 6725
Fax: (815) 436-4460
Email: [email protected]
www.specmeters.com
Table of contents
Other Spectrum Test Equipment manuals