Speed Concepts HD-3G User manual

User’s manual
HD-3G
Video Recording System
Copyright 2011 Speed Concepts Ltd.
™

Copyright 2011 Speed Concepts Ltd. 2
HD-3G
Video Recording System
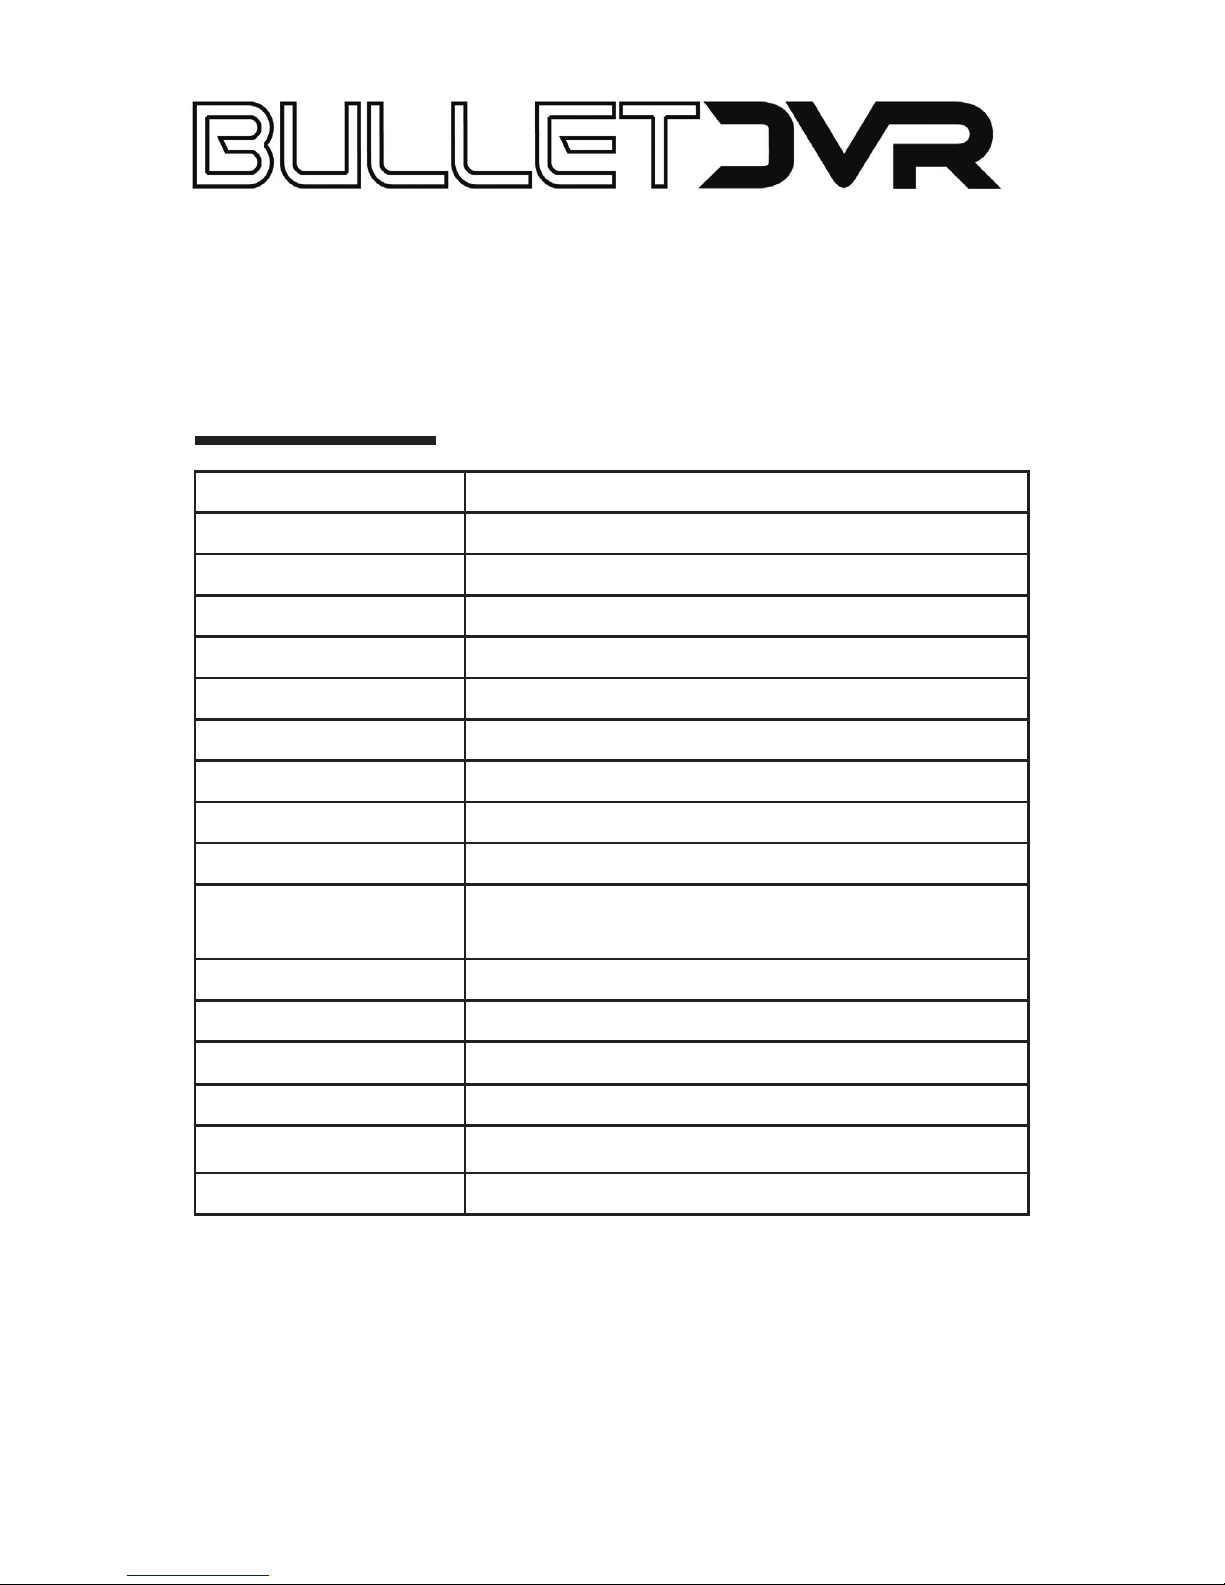
Table of Contents:
page
Control buttons................................................................................3
Explaining the control buttons.........................................................4
Battery Maintenance.......................................................................5
Memory card installation.................................................................5
Explaining the Conguration Menus...............................................6
Video Mode settings........................................................................7
Photo Mode Settings.......................................................................8
Playback Mode...............................................................................9
File Storage...................................................................................10
GPS Conversion Software............................................................10
Connecting to an HDTV set..........................................................11
Specications...............................................................................12
™
HD-3G Video Recording System User’s manual

Copyright 2011 Speed Concepts Ltd.
Mode button
Power button
Menu button
Record button
Reset switch
Joystick button
Auto-record Switch
PTT Switch
Radio Plug
3
™
Lens
Night vision switch
LCD Screen
Mounting Point
LED Flash Light
SD Card
GPS Receiver
HDMI Out
AV Out USB
HD-3G Video Recording System User’s manual

Explaining the control buttons:
• Joystick
The joystick button has four different functions:
Left= LCD On/Off
Up= Zoom in
Down= Zoom out
Press= Flip Image/OK
• Record
Press to start/stop a recording or to take a snapshot.
• Mode
Press to switch modes: Video, Photo, Playback
• Power
Press to start the unit and press & hold to shut down
• Menu
Press the menu button under any mode, to bring up the
conguration screen for that specic mode. You can navigate
through the different menus, pushing up or down on the joystick,
and pushing left or right to change it. When you’re done, press the
menu button again to exit.
• Night vision
Toggle the switch to the left to activate nightvision mode.
Switch it back to the right to turn it off.
• Autorecord switch
Up = Off , Down = On
• PTT Switch
Push-To-Talk Radio Switch
• Radio Plug
For compatible motorolla radios
4
™Copyright 2011 Speed Concepts Ltd.
HD-3G Video Recording System User’s manual

Battery Maintenance
The HD-3G camera uses a rechargeable, high capacity Lithium-
Polymer battery pack, capable of providing over 6 hours of run
time on a single charge. We recommend charging the battery
completely before the rst use. A full charge takes around 10
hours to complete.
• Charging the Unit
Connect the supplied cable into the A/V plug of the camera, and
the USB connector into the AC wall charger, then connect to any
wall outlet. The led indicator on the charger will remain red while
charging, and turn to green once completed.
• Memory Card Installation
Insert the card into the camera, with the metal pins facing the LCD
screen. Slide in the plastic card cover and fasten it in place with
the supplied screw. Caution: Do not over tighten the screw!.
5
The required card type is SDHC, and you can use up to 32Gb
capacity. We recommend using the Kingston brand, with a
Class 4 or 6 rating.
Caution: Never remove/insert the memory card while power is
applied, or you risk damaging the data integrity on the card!
™Copyright 2011 Speed Concepts Ltd.
HD-3G Video Recording System User’s manual

Explaining the Conguration Menus
Each of the 3 available modes (Video, Photo & Playback) allows
you to change different settings, to adjust the camera to the
ambient light conditions and also to congure other system
settings. Press the menu button once to enter the conguration
screen, and by default you will be shown the options for camera
adjustments (Image B). If you need to change the system
settings, move the joystick up, then right, to get to the system
settings menu (Image C).
When you power on the system, the default mode is always the
video mode. Use the mode button to select the mode for which
you need to change settings, and press the Menu button to enter
the conguration screen of the selected mode.
Password Protection
In order to protect the les from being deleted, and settings
from being changed by an unauthorized party, these options are
password protected. The default password is 999888 and can be
changed by the administrator, using the joystick button.
Image B Image C
6
™Copyright 2011 Speed Concepts Ltd.
HD-3G Video Recording System User’s manual

7
™Copyright 2011 Speed Concepts Ltd.
HD-3G Video Recording System User’s manual
Video Mode settings
• Size = Select the desired resolution: 1920x1080 @ 30fps,
1440x1080 @ 30 fps, 1280x720 @ 30 fps, 848x480 @ 60 fps.
• EV = Exposure compensation. Override the automatic settings
of the camera. Select + for sharper or – for darker settings.
• White Balance = Select the lighting conditions: Auto,
Fluorescent, Tungsten, Cloudy or Sunny.
• Contrast = Standard, Soft, Hard.
• Sharpness = Standard, Soft, Hard.
• Effect = Add some special effect to your video: Off, Vivid,
Monochrome, Negative, Sepia or Art.
• Duration = Preset amount of time for recording:
No (continuous), 15, 30 or 45 minutes.
• Recycle = Set time of recording before overwriting occurs:
No (continuous), 1, 5, 10 and 15 minutes.
• Volume = Adjust the playback volume from 0 to 8
• Language = English only.

Photo Mode Settings
• Date = Congure the current date.
• Clock = Congure the current time.
• Format = If you are having problems with the memory card,
you can re-format it.
• System Reset = Restore to original factory settings.
• Auto Off = Shut down the unit automatically after a set period
of time: OFF, 1, 3 or 5 minutes.
• Light Frequency = Select the lighting frequency for your
country: Europe 50 Hz or north America 60 Hz.
• Stamp = Add the time/date over the recorded video.
• GPS OSD = On Screen Display of the GPS Data
• Password = Must be 6 digits, select SET to change the
default password.
• ID = Unique factory assigned number used to identify this unit.
• Version = Camera rmware version number.
8
™Copyright 2011 Speed Concepts Ltd.
HD-3G Video Recording System User’s manual

9
™Copyright 2011 Speed Concepts Ltd.
HD-3G Video Recording System User’s manual
Playback Mode
When you enter the Playback mode, if there are no videos or
images stored on the memory card, the message NO FILE will
appear on a blue screen.
Otherwise, the rst image or video will be shown. If the image
has the play stamp on it , it means the le is a video. You can
browse all images and videos using the joystick button, moving
right to go to the next item and left to go back.
If you move it down, all les will be shown in thumbnails mode,
and you can navigate through them more quickly. Press OK on
the joystick to view the selected le in full screen. If you press
OK on a video le, playback will begin. If you press OK again, it
will pause it. When a video is playing, you can fast forward it by
moving the joystick to the right. Doing so once will speed up to 2x,
again for 4x and another time for 8x speed. You can do the same
thing if you need to go backwards, by moving the joystick to the
left.
Playback volume
Moving the joystick Up or Down while a video le is playing, will
raise or lower the volume accordingly.
Deleting les
To delete a le, press the Menu button while you are viewing it.
This will bring up the le delete menu. To avoid deleting les by
an unauthorized party, you must set password before you can
delete it.
• Size = Image resolution: 5 or 8 Mega pixels
• EV = Exposure compensation
• Quality = Image quality: Normal, Good, Fine.
• White Balance = Select the ambient light that best suits
the lighting conditions
• Contrast = Standard, Soft, Hard.
• Sharpness = Standard, Soft, Hard.
• Effect = Add a special effect to your image.
• Self Timer = 10 seconds delay before a picture is taken.
• Burst = Number of images that will be taken each time you
press the Record button: No, 3 pics, 5 pics.

File Storage
Use the supplied USB cable to connect the camera with your
computer. You can easily transfer the les from the memory card
to any PC or MAC that way, without having to remove the card
from the unit.
Once connected, Power on the camera, and you will see 3
options: MSC, CHARGE and POWER.
Select MSC to allow your computer to search for data on the
memory card. You will nd 2 locations with data stored, one for the
memory card and one for the small internal memory. If no memory
card is present, it will only show the internal memory storage.
Selecting CHARGE will allow you to recharge the battery from
your computer. Select POWER ON to use the camera normally.
10
™Copyright 2011 Speed Concepts Ltd.
HD-3G Video Recording System User’s manual
GPS Conversion Software
The Compact Disc provided with your HD-3G camera contains a
le conversion utility for Windows PC computers. You will need it
to convert the raw GPS data into a format that can be read by 3rd
party applications, such as Google Earth and others.
Note: Before you can record the GPS data along with your video,
the G logo must appear on the LCD screen, meaning that the
sattelittes are locked in. This can take a few minutes after the
camera is powered on(cold start)
Before the rst use, copy the GPS folder from
the CD-ROM to any location on your computer.
Then go to That location and launch the KML
Converter application.

11
™Copyright 2011 Speed Concepts Ltd.
HD-3G Video Recording System User’s manual
Connecting to an HDTV set
The HD-3G camera can be connected to any HDTV (1080p
resolution is recommended) to see the image on a large screen
while you are monitoring, recording or to playback your les.
Connect the supplied HDMI cable between the camera unit and
the HDTV monitor, and press the power button. The display that
usually appears on the LCD screen of the camera unit will now be
shown on the larger HDTV set. Note that during monitoring, the
image will be mirrored, but the actual recording will be normal.
Select the raw GPS data le from the memory card (with a .txt
extension) that you wish to convert. Click on “...” to browse your
les.Enter an optional description name for the data, then click
on “Convert to KML le”. The same le name will be created on
the card, but with a .kml extension. Now open this le using your
favorite GPS mapping application, to view the recorded route.
Specications
Sensor Canon ½” CMOS
Max. Resolution 2592x1944 pixels, 8 mega pixels Int.
Zoom 4x Digital Zoom
Display 2.0” TFT LCD Screen
Video Output HDMI CTS1.2, 1080p output
Video Format .mov H.264 le type
Frame&Bitrate 30fps @ 12 Mb/s, 60fps @ 5 Mb/s
Storage Internal 32Mb, SD card up to 32 Gb.
Audio Internal mic (AAC format) and speaker
Flash Infra-red night vision mode
Battery type/
capacity
Lithium-Polymer 3.7v, 4000 mAh
Runtime 6 hours of recording, 10 hours of stand-by
Connectivity USB 2.0 and HDMI out ports
GPS Logging Refresh rate 1 Hz
Dimensions 62 x 98 x 31 mm (2.4” x 3.8” x 1.2”)
Weight 143 gr. (5 oz)
Waterproong Conforms to IP67 standards
Distributed by:
Speed Concepts Ltd
1284 Des Seigneurs #94086,
Terrebonne, QC,
J6W 5V4 Canada.
www.speedconcepts.ca
™
HD-3G
Table of contents
Popular DVR manuals by other brands

Crest Electronics
Crest Electronics CDVS-4100 Series Setup and user's manual

Digital Watchdog
Digital Watchdog VMAX480 user manual

LUXSAR
LUXSAR VDR420 instruction manual

TruVision
TruVision TVR 46 installation instructions

Security Camera King
Security Camera King DVR-HD016240M user manual

DSE
DSE DK-CS4-DVR user manual


