Speedaire 4XP65J User manual
Operating Instructions
1
WORK AREA
•Never spray closer than 25
feet to the compressor!
If possible,
Please read and save these instructions. Read carefully before attempting to assemble, install, operate or maintain the product described. Protect
yourself and others by observing all safety information. Failure to comply with instructions could result in personal injury and/or property damage!
Retain instructions for future reference.
Speedaire®Gravity Feed
Spray Guns
Description
Speedaire gravity feed spray guns
are designed to perform a variety of painting, coating, and
finishing applications using the power of compressed air.
Danger indicates an
imminently
hazardous situation which, if not
avoided, WILL result in death or serious
injury. Warning indicates a
potentially
hazardous situation which, if not avoided,
COULD result in death or serious injury.
Caution indicates a
potentially
hazardous situation which, if not
avoided, MAY result in minor or
moderate injury.
Notice indicates
important information, that if not
may cause damage to equipment.
Unpacking
After unpacking the unit, inspect
carefully for any damage that may
have occurred during transit. Make sure
to tighten fittings, bolts, etc., before
putting unit into service.
Do not operate tool if
damaged during hipping,
handling or use. damage could result in bursting
and cause injury or property damages.
Operating Instructions
4XP65J
Safety Guidelines
This manual contains information that is
very important to know and understand.
This information is provided for SAFETY
and to PREVENT EQUIPMENT PROBLEMS.
to help recognize this information,
observe the following symbols.
This product
contains chemicals,
including lead, known to the State of
California to cause birth defects and
other reproductive harm. Wash hands
after handling.
Keep hose away from sharp objects.
Bursting air hoses may cause injury.
Examine air hoses regularly and
replace if damaged.
You can create dust when
you cut, sand, drill or grind
materials such as wood,
paint, metal, concrete,
cement or other masonry. This dust
often contains chemicals known to
cause cancer, birth defects, or other
reproductive harm. Wear protective
gear.
General Safety Information
1. Read all manuals
included with this
product carefully. Be
thoroughly familiar with
the controls and the proper use of
the equipment.
2. Follow all local electrical and safety
codes as well as the United States
National Electrical Codes (NEC) and
Occupational Safety and Health Act
(OSHA).
CALIFORNIA PROPOSITION 65
•
Always work in a clean environment.
To avoid injury or damage to the
workpiece, do not aim the spray gun
at any dust or debris.
• Keep visitors away and NEVER allow
children or pets in the work area.
Form 5S6321 Printed in China
09666
Version 0
SAW100 10/12
locate compressor in separate room.
Never spray into the compressor,
compressor controls or the motor.
•Do not spray flammable
materials in vicinity of
open flame or near
ignition sources. Motors,
electrical equipment
and controls can cause electrical
arcs that will ignite a flammable
gas or vapor. Never store flammable
liquids or gases in the vicinity of the
compressor.
•Do not smoke or eat when spraying
paint, insecticides, or other
flammable substances.

Operating Instructions
2
Speedaire®Gravity Feed
Spray Guns
General Safety Information
(Continued)
• Use a face mask/
respirator and protective
clothing when spraying.
Always spray in a well
ventilated area to
prevent health and fire hazards.
Refer to Material Safety Data Sheets
(MSDS) of spray material for details.
•Always wear eye
protection
•Never use oxygen, carbon
dioxide, combustible
gases or any bottled gas as an air
source for the spray gun. Such gases
are capable of explosion and serious
injury to persons.
•Do not misuse this product. Excessive
exposure to vibration, work in
awkward positions, and repetitive
work motions can cause injury to
hands and arms. Stop using any tool
if discomfort, numbness, tingling or
pain occur, and consult a physician.
•Never aim or spray at yourself or
anyone else or serious injury could
occur.
•Do not spray acids, corrosive
materials, toxic chemicals, fertilizers
or pesticides. Using these materials
could result in death or serious
injury.
•When spraying and cleaning, always
follow the instructions and safety
precautions provided by the material
manufacturer (Refer to MSDS).
• Do not overreach.
Keep proper footing
and balance at all
times. Proper footing
and balance enables
better control of the spray gun in
unexpected situations.
• Stay alert. Watch what you are doing
and use common sense when operating
the spray gun. Do not use the spray gun
while tired or under the influence of
drugs, alcohol, or medication. A moment
of inattention while operating the spray
gun increases the risk of injury to
persons.
TOOL USE AND CARE
• Do not use pressure
that exceeds operating
pressure of the spray
gun or any of the parts
(hoses, fittings, etc.) in
the painting system.
• Over pressurizing the spray gun is
able to result in bursting, abnormal
operation, breakage of the spray gun
or serious injury to persons.
• Always verify prior to using the spray
gun that the air source has been
adjusted to the rated air pressure or
within the rated air-pressure range.
• Avoid unintentional starting. Be sure
the trigger is off before connecting to
the air supply. Do not carry the spray
gun with your finger on the trigger or
connect the spray gun to the air supply
with the trigger on.
• Disconnect the spray gun from the air
source before, changing accessories,
cleaning, servicing or storing the spray
gun. Such preventive safety measures
reduce the risk of starting the spray gun
unintentionally.
•
Check for misalignment or binding of
moving parts, breakage of parts, and
any other condition that affects the
spray gun’s operation. If damaged, have
the spray gun serviced before using.
Many accidents are caused by poorly
maintained spray guns. There is a risk of
bursting if the spray gun is damaged.
• Failure to install appropriate water/
oil removal equipment may result in
damage to machinery or workpiece.
• Always use a pressure regulator on
the air supply to the spray gun.

Operating Instructions
3
Model 4XP65J
Introduction
The spray gun is a vital link in any
finishing application. In addition to
operating the spray gun properly, techniques
of surface preparation and paint preparation
must be understood. These instructions will
explain the differences among various spray
technologies and serve as a guide in the
proper operation and techniques of spray
painting. Refer to the Replacement Parts
Manual for model specific information.
SPRAY GUN TERMS
Atomization – Conversion of bulk
liquid to spray droplets (mist).
Bleeder – In this mode, air passes
continuously through the gun whether
spraying or not. This mode is generally
used when the air is supplied by a
continuously running compressor that
does not have a tank
Bleeder / Non-Bleeder – Indicates
whether air flows through the gun
continuously or as the trigger is pulled.
External mix – Process where the air
and paint are mixed just after leaving
the nozzle. This type of mix should be
used for fast drying paints and when a
high quality finish is needed.
Feed –Method used to bring paint into
the gun for spraying.
Fluid Control knob –Used to control
the amount of paint being mixed with
air.
Gravity Feed –Method of paint feed
similar to the siphon feed method.
However, the cup is inverted to create a
positive fluid pressure at the nozzle.
Internal Mix –Process where the air
and paint are mixed inside the air cap
just before being sprayed. This method
is best for heavy bodied, slow drying
paints and can only be used with the
pressure feed method. Do not use fast
drying paints with internal mix. The
paint will dry inside and quickly clog
the air cap.
Mix –The mixing of paint and air when
spraying.
Non-Bleeder –In this mode, air
flows only when the trigger is pulled.
This type of operation is used with a
compressor equipped with a tank or
with a large factory air system.
Paint tank –An auxiliary pressurized
paint reservoir that allows continuous
spraying of large amounts of paint
without stopping for refills as with a
canister. It also allows using the spray
gun at any angle without causing paint
to drip.
Pattern Control knob –Used to form
the proper pattern (size and shape) of
paint as it is sprayed from the gun to
the workpiece.
Pressure Feed –Method of paint
feed where a canister or paint tank is
pressurized to force paint to the gun.
Either internal or external mix air caps
are used with this method. Pressure
feed is generally used for spraying
heavy bodied paints or for large size
projects.
Siphon Feed –Method of paint feed
where atmospheric pressure creates a
partial vacuum to siphon paint to the
gun. Only external mix air caps are used
with this method. Siphon feed is used
with light bodied paints.
Viscosity –A measurement of the
resistance to the flow of liquids.
Spray Gun Set-up
The pressure for atomization is
controlled at the air source. The
amount of fluid is adjusted by the fluid
control knob, the paint viscosity and
the air pressure.
The gravity feed cup screws onto the
top of the gun body creating a positive
fluid pressure in the nozzle (See
Figure 2).
Operating Instructions
4
Speedaire®Gravity Feed
Spray Guns
Preparation
1. Thoroughly mix and thin paint in
accordance with the paint
manufacturer’s instructions. Most
materials will spray readily if
thinned properly.
2. Strain material through cheese
cloth or a paint strainer.
3. Fill the canister about 3/4 full and
start the air compressor.
4. Set up a piece of cardboard or
other scrap material to use as a
target and adjust for best spray
pattern.
5. Test the consistency of the material
by making a few strokes on a
cardboard target. If material
still appears too thick, add a
small amount of thinner. THIN
WITH CARE!! Do not exceed
paint manufacturer’s thinning
recommendations.
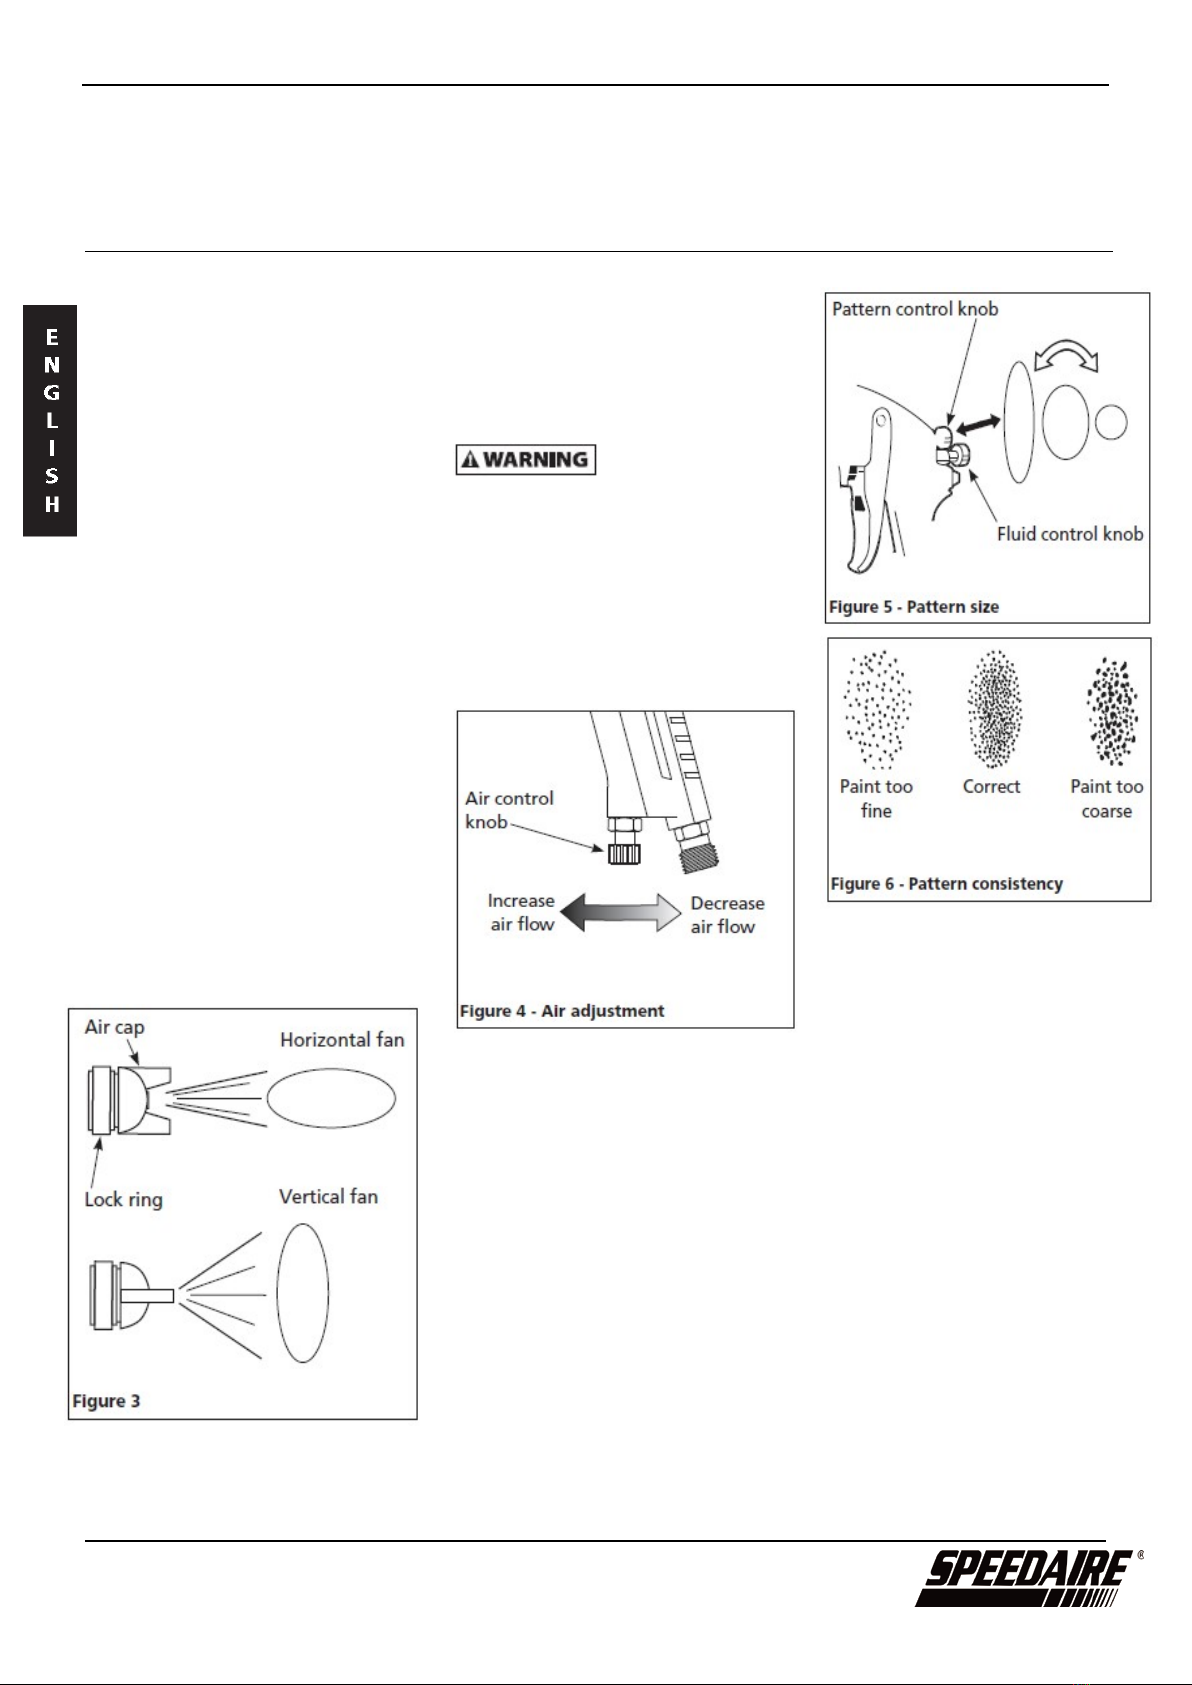
FAN DIRECTION
The direction of the fan (horizontal or
vertical) can be changed by loosening
the lock ring and turning the air cap 90
degrees (See Figure 3). Hand tighten
lock ring after adjustment.
PATTERN ADJUSTMENT
1. Adjust air pressure to the spray gun
according to the recommendations
supplied with the spray material. This
air pressure usually falls between
40 psi - 60 psi. Do not exceed
spray gun
maximum pressure.
Adjust air pressure with the trigger
pulled and air control knob (if
applicable) fully open. If reduced air
pressure is desired for some areas of
the spray job, use the air compressor’s
regulator or air control knob to
reduce pressure as necessary (See
Figures 4).
2. Set pattern size to desired
shape. For full pattern, open
pattern control knob by turning
counterclockwise. For a round
pattern, turn pattern control knob
clockwise (See Figure 5).
3. Turn fluid control knob fully
clockwise until closed (See
Figure 5).
4. Trigger a short burst while
turning fluid control knob
counterclockwise. Observe the
spray pattern on the target and
adjust the fluid control knob until
the desired pattern (atomization) is
obtained (See Figure 6).
If the spray is too fine (excessive
overspray), caused by too much air for
the amount of paint being sprayed,
reduce the air pressure or open the
fluid control to spray more material.
If the spray is too coarse (spitting globs),
reduce the amount of material with the
fluid control knob or thin the paint.
5. The fluid control knob can be used
to finely adjust pattern consistency.
Before spraying the workpiece, practice
a few minutes on a cardboard target to
ensure the pattern size and consistency
are set correctly.
Operating Instructions
5
Model 4XP65J
Operation
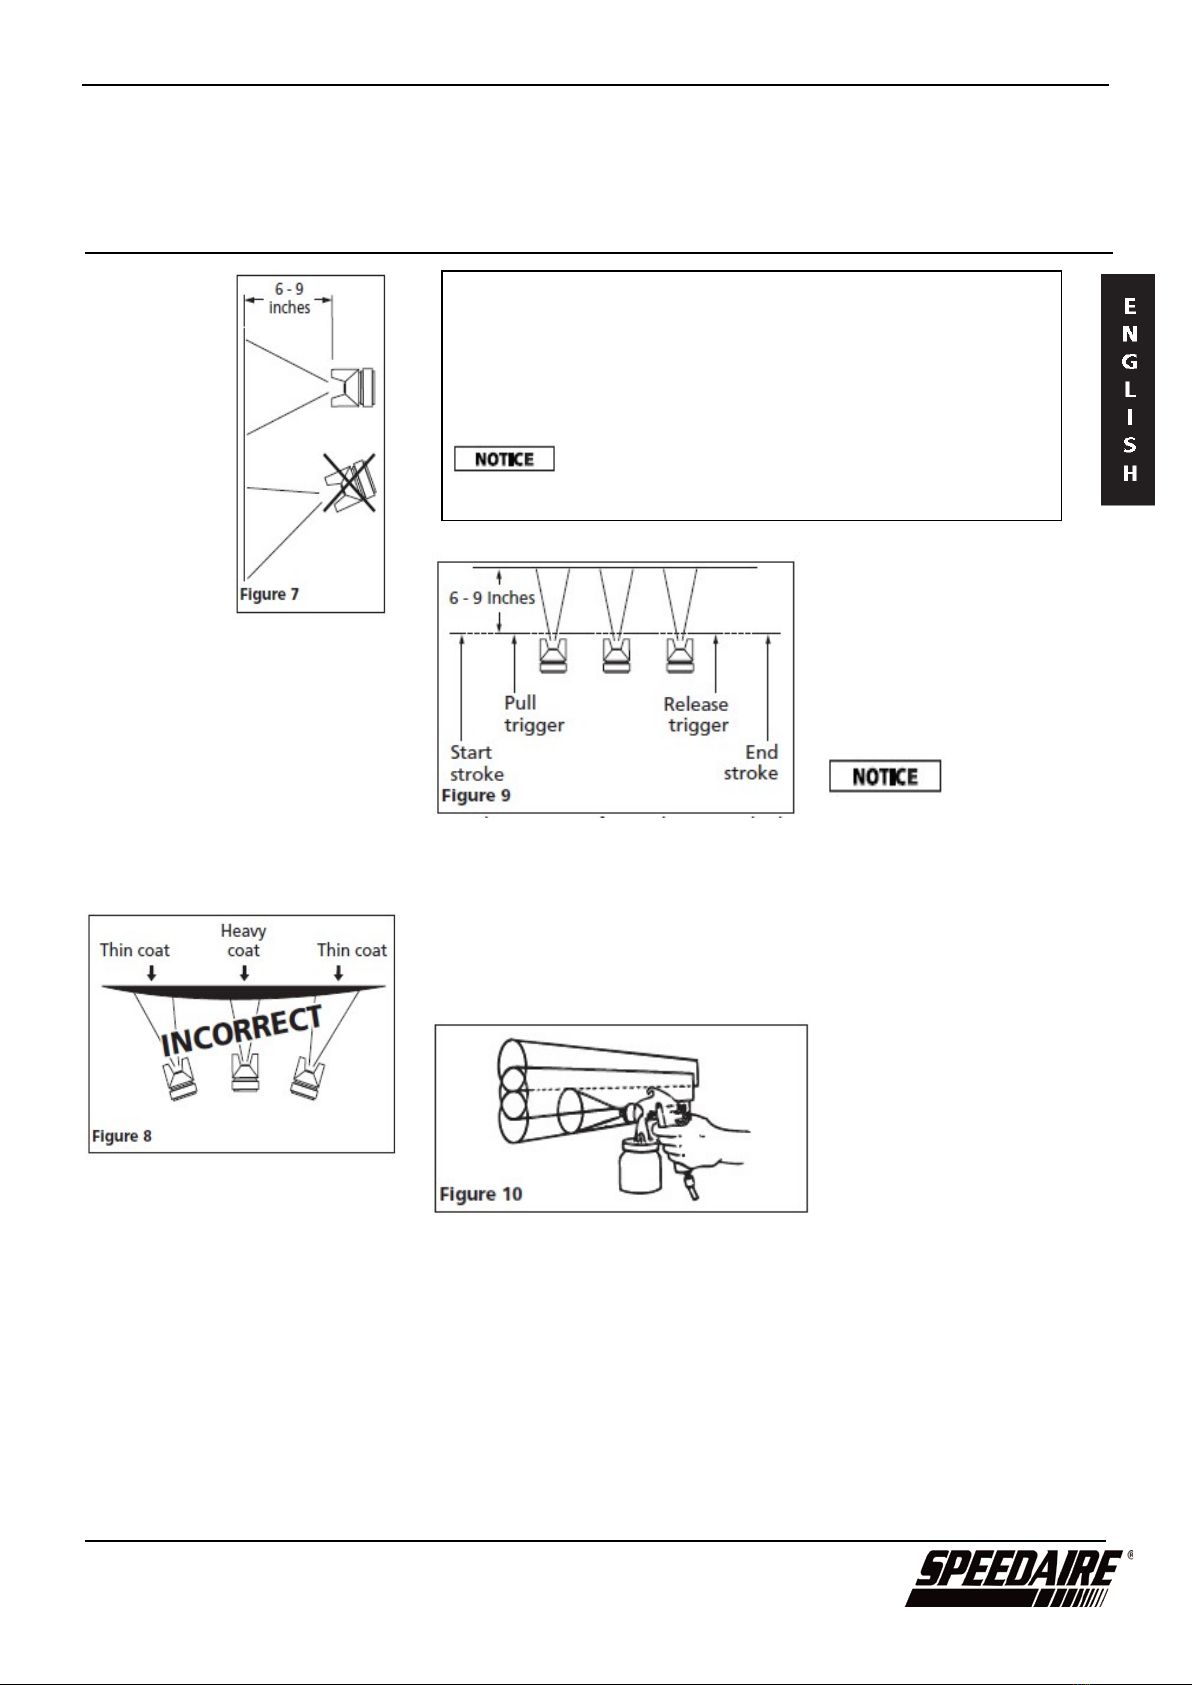
1. Begin
spraying.
Always keep
the gun at
right angles to
the work (See
Figure 7)
2. Keep the
nozzle about
6 to 9 inches
from the
work surface
throughout
the stroke and
always keep the gun in motion
while spraying. Stopping gun
movement in mid-stroke will cause
a build up of paint and result in
runs. Do not fan the gun from
side to side while painting. This
will cause a build-up of paint in
the center of the stroke and an
insufficient coating at each end
(See Figure 8).
3. Trigger the gun properly. Start the
gun moving at the beginning of
the stroke BEFORE SQUEEZING
THE TRIGGER and release the
trigger BEFORE STOPPING GUN
MOVEMENT at the end of the
stroke. This procedure will feather
(blend) each stroke with the
next without showing overlap or
unevenness (See Figure 9).
Maintenance
DAILY CLEAN-UP
Local codes may require specific cleaning
methods and equipment. Follow local codes
and manufacturer’s recommendations for the
use and disposal of spray materials
and solvent.
Clean spray gun
immediately after
use. Paint and other materials dry
quickly in the small passages rendering
gun useless due to the difficulty of
removing hardened paint from the
passages inside the gun.
NOTE: In the instructions below, the use
of the word “solvent” refers to the
specific solvent for the material used
(examples: lacquer thinner for lacquer, etc.
.
1. Remove and empty the canister;
then rinse with a solvent
recommended for the paint or
other material used.
2. Refill canister with clean solvent
and attach to the gun. Spray solvent
through the gun while shaking the
gun vigorously. Wipe the gun
exterior with a solvent soaked rag.
Repeat until the gun is clean.
3. Remove the air cap and soak in
solvent until clean. Use a small
brush for stubborn stains if
necessary. Toothpicks or small
brushes may be used to clean air
WATER / OIL IN COMPRESSED AIR
All compressor pumps discharge some condensed water, oil or contaminates
with the compressed air.
IMPORTANT: This condensation will cause “fish eyes” to appear in the paint job.
Install appropriate water / oil removal equipment and controls as necessary for the
intended application. Locate filters as close to spray gun as possible.
Failure to install appropriate water / oil removal equipment
may result in damage to machinery or workpiece.
4. The amount of paint being applied
can be varied by the speed of the
stroke, distance from the surface
and adjustment of the fluid control
knob.
5. Overlap strokes just enough to
obtain an even coat (See Figure 10).
NOTE: Two thin coats of paint will yield
better results and have less chance of
runs than one heavy layer.
6. Use a piece of cardboard as a shield
to catch overspray at the edges of
the work to protect other surfaces.
Use masking tape to cover other
areas if needed.
Table of contents
Languages:


