SpiroHome Clinic User manual

Ultrasonic Spirometer
User Manual
Welcome to SpiroHome
Before using your SpiroHome Clinic device and mobile application, please ensure that
you have read this user manual, all labeling and information provided the product. This
user manual is for SpiroHome Clinic (Ref No: 02000). The user manual can be
downloaded and/or printed from SpiroHome websites and SpiroHome Apps.
02504.12
SUS-TD-031 R12
2/75

CONTENTS
REVISION RECORD 1
CONTENTS 3
INTRODUCTION 4
PRODUCT DESCRIPTION 4
WHAT’S IN THE BOX 4
INTENDED USE 4
RESTRICTIONS ON USE AND CONTRAINDICATIONS 5
PARAMETERS 6
OPERATION 9
OPERATING ENVIRONMENT 9
SETTING UP YOUR DEVICE 9
DEVICE INDICATORS 11
PERFORMING A LUNG FUNCTION TEST 12
General Method For Performing a Spirometry Test with The SpiroHome Clinic: 12
Types of Breathing Maneuvers 14
End of the Tests 19
Understanding the test quality 20
SIGNS AND SYMBOLS 21
TECHNICAL FEATURES 23
SAFETY WARNINGS AND PRECAUTIONS 23
MAINTENANCE 25
CALIBRATION-CHECK 26
Preparation of Calibration Check 26
CLEANING AND DISINFECTION 27
THE SPIROWAY DISPOSABLE 28
BATTERIES 29
DISPOSAL OF SpiroHome 30
TROUBLESHOOTING 30
ORDERABLE ACCESSORIES 32
TERMS OF WARRANTY 33
ELECTROMAGNETIC COMPATIBILITY 33
MANUFACTURER INFORMATION 37
SUS-TD-031 R12
3/75

1. INTRODUCTION
1.1. PRODUCT DESCRIPTION
The SpiroHome Clinic is a portable spirometer that pairs (via Bluetooth®) and operates with
smart devices running with iOS, Android, or Windows. The SpiroHome Clinic measures and
displays certain parameters of the lung function of the user. The user performs a spirometry test
as described in the Performing A Lung Function Test section of this user manual. Briefly, as the
user exhales into the device through its mouthpiece, internal ultrasonic sensors detect the
velocity of the expired air, the device converts this information into spirometric data and displays
it via the SpiroClinic application. The SpiroClinic app prompts and guides the user throughout
the test for accurate data collection and registration.
The app can be downloaded on Apple’s App Store, Google Play Store, Microsoft Store. The
device is powered by 2 x AAA batteries. The SpiroHome Clinic works with the SpiroWay
Disposable mouthpiece.
1.2. WHAT’S IN THE BOX
Your SpiroHome Clinic box contains:
· SpiroHome Clinic Device (a)
· SpiroHome Clinic Cap (b)
Caution: Please check to ensure that there is no visible damage on any of the components of
the SpiroHome Clinic. If the damage is present, do not use or attempt to repair the device,
please contact the manufacturer directly.
1.3. INTENDED USE
The SpiroHome Clinic is intended to be used as a portable spirometer used in lung function
testing for several parameters. See Parameters section for more information about measured
parameters. The SpiroHome Clinicis indicated for:
- children (over the age of 5), adolescents or adults who have been diagnosed with a
chronic pulmonary disease including, but not limited to, asthma, chronic obstructive
SUS-TD-031 R12
4/75

pulmonary disease and cystic fibrosis. These measurements can be used for the
detection, assessment and monitoring of diseases affecting the lung function.
and should be used by:
- Healthcare professionals, test operators, physicians, clinicians, occupational health
professionals etc.
1.4. RESTRICTIONS ON USE AND CONTRAINDICATIONS
Any diagnosis of conditions or prescribed treatments should be made only by a qualified
healthcare professional who, in addition to the test results provided by SpiroHome Clinic will
take into consideration the outcomes of a medical examination, the patient’s clinical history and
results of any other tests deemed necessary.
SpiroHome Clinic is a multi-user device. The device can log the information and test results that
belong to each specific patient. For each new patient, a new patient account must be created on
the SpiroClinic app, so that each user's personal information and test results can be stored and
logged.
A new SpiroWay Disposable mouthpiece must be used for each new user.
The spirometry test should only be performed by users who do not experience any shortness of
breath and are in good health for performing a lung function test. Test results of patients who do
not meet these conditions may not be reliable. A correct spirometry test depends greatly on the
patient’s ability to correctly perform the expiratory/inspiratory maneuver as described in this
manual. Failure to perform a correct maneuver may lead to inaccurate and unacceptable
results. The device should not be used if the accuracy and reliability of test results may be
jeopardized by external factors.
Performing spirometry can be physically demanding. The forced expiratory maneuver used in
spirometry increases intrathoracic, intraabdominal, and intracranial pressures. Potential risks of
spirometry are primarily related to maximal pressures generated in the thorax and their impact
on abdominal and thoracic organs, venous return and systemic blood pressure, and expansion
of the chest wall and lung. The physical effort required can increase myocardial demand.
Caution must be used for patients with medical conditions that could be adversely affected by
these physiological consequences. Although such risks are likely to be minimal for spirometry in
most patients, the potential risks associated with testing should always be weighed against the
benefit of obtaining information about lung function. Spirometry should be discontinued if the
patient experiences pain during the maneuver. Patients with potential contraindications that
would prevent testing in the primary care setting may be tested in a pulmonary function
laboratory where operators are more experienced and there may be access to emergency care
if needed. Furthermore, because spirometry requires the active participation of the patient,
inability to understand directions or unwillingness to follow the directions of the operator will
usually lead to submaximal test results.
SUS-TD-031 R12
5/75

Relative Contraindications for Spirometry;
Due to increases in myocardial demand or changes in blood pressure;
➢Acute myocardial infarction within 1 wk
➢Systemic hypotension or severe hypertension
➢Significant atrial/ventricular arrhythmia
➢Noncompensated heart failure
➢Uncontrolled pulmonary hypertension
➢Acute cor pulmonale
➢Clinically unstable pulmonary embolism
➢History of syncope related to forced expiration/cough
Due to increases in intracranial/intraocular pressure;
➢Cerebral aneurysm
➢Brain surgery within 4 wk
➢Recent concussion with continuing symptoms
➢Eye surgery within 1 wk
Due to increases in sinus and middle ear pressures;
➢Sinus surgery or middle ear surgery or infection within 1 wk
Due to increases in intrathoracic and intraabdominal pressure;
➢Presence of pneumothorax
➢Thoracic surgery within 4 wk
➢Abdominal surgery within 4 wk
➢Late-term pregnancy
Infection control issues;
➢Active or suspected transmissible respiratory or systemic infection, including tuberculosis
➢Physical conditions predisposing to the transmission of infections, such as hemoptysis,
significant secretions, or oral lesions or oral bleeding
Please ask the patient if they have or suspect having any of the conditions above before use of
the SpiroHome Clinic.
1.5. PARAMETERS
The SpiroHome Clinic records and displays the following spirometry data:
Parameters
Definition
Unit
FVC
Forced Vital Capacity — The volume of air that can forcibly be
blown out after full inspiration
L
SUS-TD-031 R12
6/75

FEV0.75
Forced Expiratory Volume within 0.75 seconds: The volume of air
that can forcibly be blown out within 0.75 seconds, after full
inspiration.
L
FEV1
Forced Expiratory Volume within 1 second
L
FEV3
Forced Expiratory Volume within 3 seconds
L
FEV6
Forced Expiratory Volume within 6 seconds
L
FEV0.75/FVC
The ratio of FEV0.75 to FVC
--
FEV1/FVC
The ratio of FEV1to FVC
--
FEV3/FVC
The ratio of FEV3to FVC
--
FEV6/FVC
The ratio of FEV6to FVC
--
PEF
Peak Expiratory Flow — The maximal flow rate achieved during
the maximally forced expiration initiated at full inspiration.
L/s
MMEF
Mean Mid-Expiratory Flow — synonymous with FEF25-75
L/s
FEF25
Forced Expiratory Flow at 25% of vital capacity — synonymous
with MEF75
L/s
FEF50
Forced Expiratory Flow at 50% of vital capacity — synonymous
with MEF50
L/s
FEF75
Forced Expiratory Flow at 75% of vital capacity —synonymous
with MEF25
L/s
FEF25-75
Forced Expiratory Flow from 25% to 75% of vital capacity —
synonymous with MMEF
L/s
MET25-75
Mıd-Expıratory Tıme — synonymous with FET25-75
s
FEV0.75/FEV6
The ratio of FEV0.75 to FEV6
--
FEV1/FEV6
The ratio of FEV1to FEV6
--
FEF50/FVC
The ratio of FEF50 to FVC
1/s
MMEF/FVC
The ratio of MMEF to FVC
1/s
FET
Forced Expiratory Time
s
BEV
Back extrapolated volume
L
SUS-TD-031 R12
7/75

FIV1
The forced inspiratory volume within 1 second
L
FIVC
Forced inspiratory vital capacity
L
PIF
Peak inspiratory flow
L/s
FIF25-75
Forced inspiratory flow at 25% of vital capacity — synonymous
with MIF75
L/s
FIV1/FIVC
The ratio of FIV1to FIVC
--
R50
(FEF50/FIF50)
The ratio of flow at 50% of expiration and flow at 50% of
inspiration — synonymous with FEF50/FIF50
--
VC
Vital capacity, from slow expiration
L
VCin
Inspiratory vital capacity, from slow inspiration
L
VCex
Expiratory vital capacity, from slow expiration
L
ERV
Expiratory reserve volume
L
IRV
Inspiratory reserve volume
L
IC
Inspiratory capacity from end of tidal breathing
L
Rf
Respiratory frequency
1/min
VT
Tidal Volume
L
MVV
Maximum voluntary ventilation
L/min
MVV6
Maximum plat voluntary ventilation for 6 seconds
L/min
MVVtime
Duration of the trial in seconds
s
The recommended number of trials per spirometry session is 3, however, the user may perform
up to 8 trials. The best values obtained from the spirometry tests performed in one session are
displayed on the app interface. Users and healthcare professionals have the option to view the
results of each spirometry trial performed in a spirometry session separately.
The device also provides a reference value (obtained from large epidemiological studies) based
on the patient’s height, weight, age, sex and ethnicity. Test results from spirometry tests are
compared to the reference value and displayed as a percent predictive value indicator of the
patient’s respiratory health. The patient’s personal best value for a spirometry session should be
discussed with them for medical interpretation.
SUS-TD-031 R12
8/75

Caution: Interpretation of spirometry results or diagnosis of medical conditions, if any, is to be
made by a physician or allied health care professional with sufficient training in the performance
and interpretation of spirometry.
2. OPERATION
2.1. OPERATING ENVIRONMENT
The SpiroHome
®
Clinic is designed for use in a clinical setting, by more than one user.
The required operation conditions for the SpiroHome
®
Clinic are:
Temperature: +15°C to +35°C
Relative Humidity: 10% to 85%
Pressure: 700 hPa to 1060 hPa
The SpiroHome
®
Clinic should only be used within the ambient temperature, relative humidity
and ambient pressure ranges given above.
Storage / Transport Environment
The required storage conditions for the SpiroHome
®
Clinic are:
Temperature: -20°C to +60°C
Relative Humidity: 5% to 85%
Pressure: 700 hPa to 1060 hPa
The required transport conditions for the SpiroHome
®
Clinic are:
Temperature: -20°C to +60°C
Relative Humidity: 10% to 85%
Pressure: 700 hPa to 1060 hPa
The SpiroHome
®
Clinic should not be used in the presence of flammable liquids or detergents,
nor in the presence of inflammable anaesthetic gases (oxygen or nitrogen).
The device should not be used in direct air currents (e.g. wind), sources of heat or cold, direct
sun rays or other sources of light or energy, dust, sand or any other chemical substances.
2.2. SETTING UP YOUR DEVICE
1. Download the SpiroClinic App from the App Store, Google Play Store, or Microsoft Store
into a smart device or PC.
SUS-TD-031 R12
9/75

2. Follow the steps given in the app to create an account for a new user or login to an
existing account.
3. Remove the battery cover by sliding it,
place the batteries in the correct
orientation, slide the battery cover back to
the closed position and press on the power
button to switch the device on as shown.
4. Enable Bluetooth on the smart device or PC and pair the SpiroHome Clinic with the
smart device or PC, following the instructions on the app.
SUS-TD-031 R12
10/75
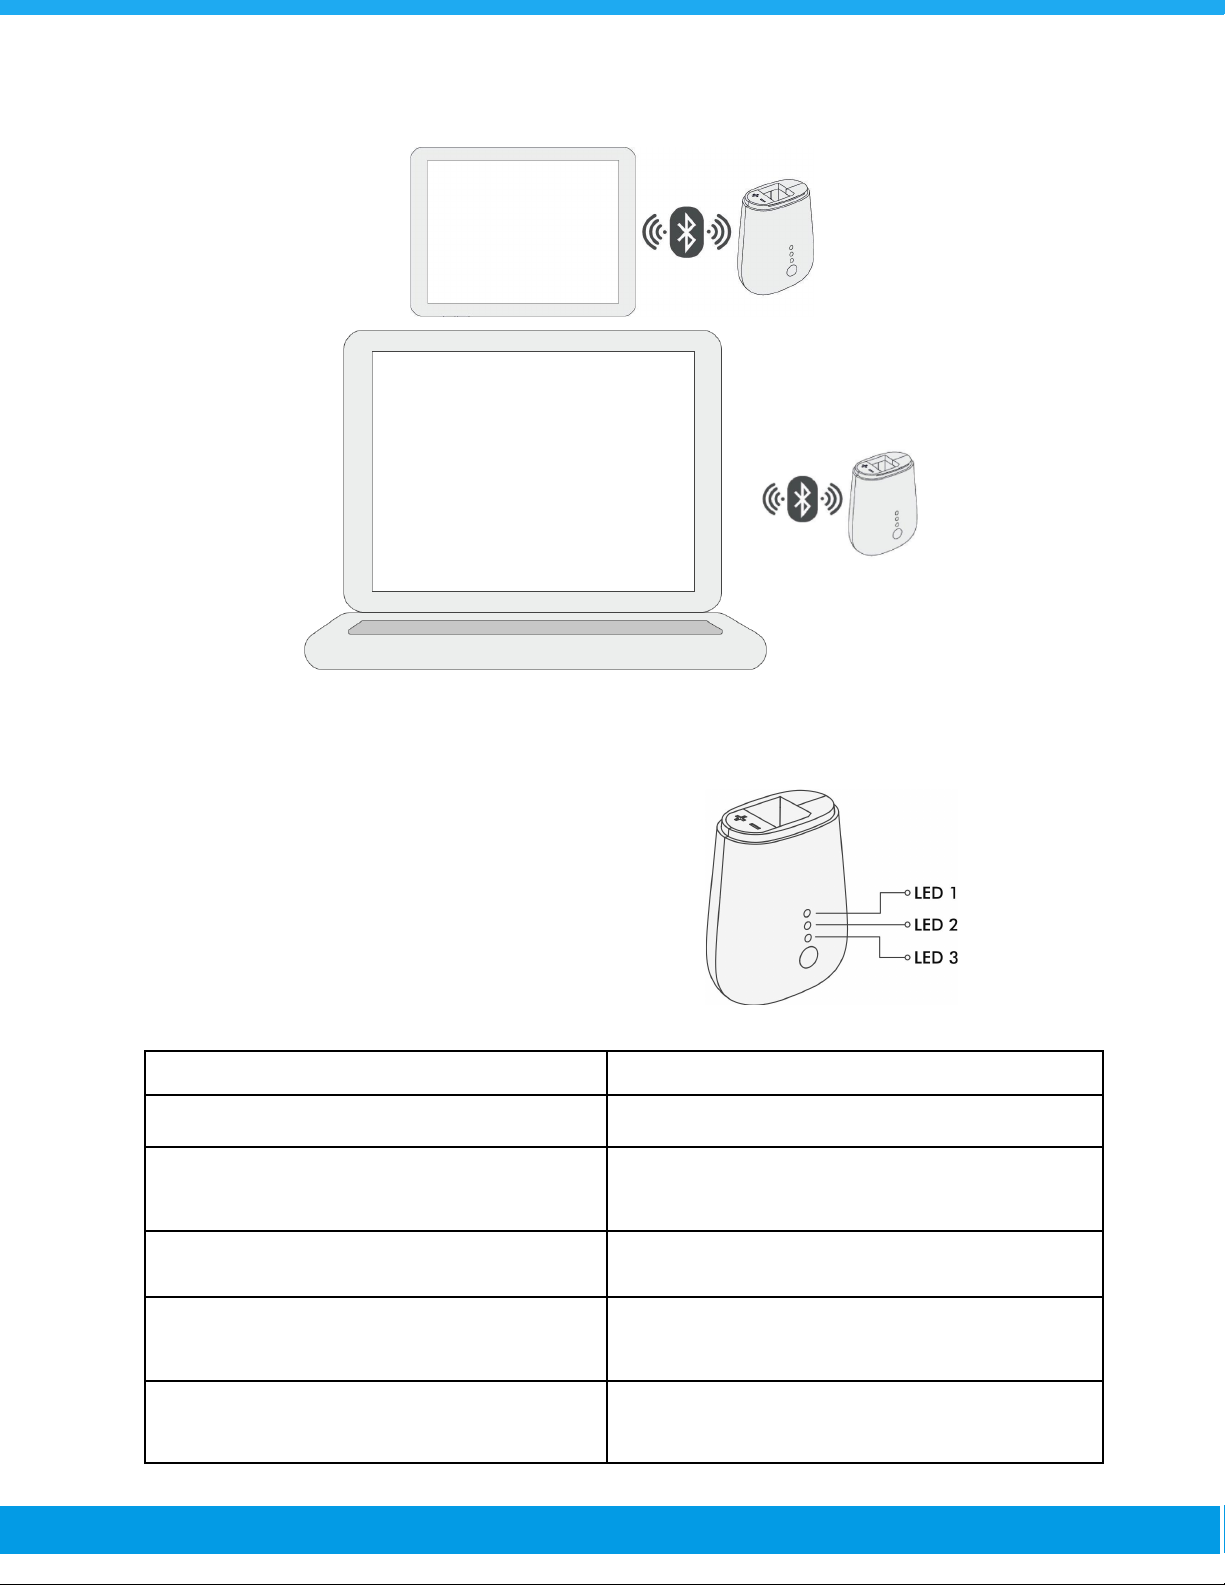
2.3. DEVICE INDICATORS
There are 3 LED lights located on the front of
the device. The LED lights may be turned on
or flashing various colors and/or in various
patterns. The LED lights indicate the current
status of the device. Please see the following
information for guidance on LED light
indications.
LED Display
Indication/s
None of the LEDs is on.
The device is switched off.
LED indicators are consecutively flashing
green.
The device is switching on.
LED number 3 is a constant green.
The device is switched on.
LED number 2 is fading on and off in blue.
The device is connected to the app. Bluetooth®
connection has been established.
LED number 2 and LEDs 1 and 3 together are
flashing yellow in turn.
The zero flow level adjustment is setting up.
SUS-TD-031 R12
11/75

LED number 1 is a constant blue.
The device is ready for a test.
During a test, LED number 1 is constant
yellow.
The test has timed-out (there has been no
inhalation/exhalation over a period of time)
During zero flow level adjustment LED
number 1 is constant yellow.
The zero flow level adjustment has been
unsuccessful.
All LEDs are flashing red.
There is a foreign object between the sensors.
(Check device error in troubleshooting section)
LEDs are consecutively flashing yellow.
Over-the-air connection is being established.
LED number 3 flashes red three times.
Battery low warning.
LEDs flash in reverse order and remain
switched off.
The device is switching off.
2.4. PERFORMING A LUNG FUNCTION TEST
There are several types of tests and different parameters related to lung function that can be
involved in a spirometry test. Each type of spirometry test requires a specific breathing
maneuver in order to detect the parameters related to that particular test type. However, the
general method of performing a spirometry test remains the same for all test types. Please keep
reading for more information about test types, test parameters, breathing maneuvers and
understanding the quality of test results.
2.4.1. General Method For Performing a Spirometry Test with The
SpiroHome Clinic:
1. Open the cap of the SpiroHome Clinic device.
2. Remove the Spiroway Disposable mouthpiece from its plastic packaging and insert it all
the way into the SpiroHome Clinic in the correct orientation (as shown).
SUS-TD-031 R12
12/75
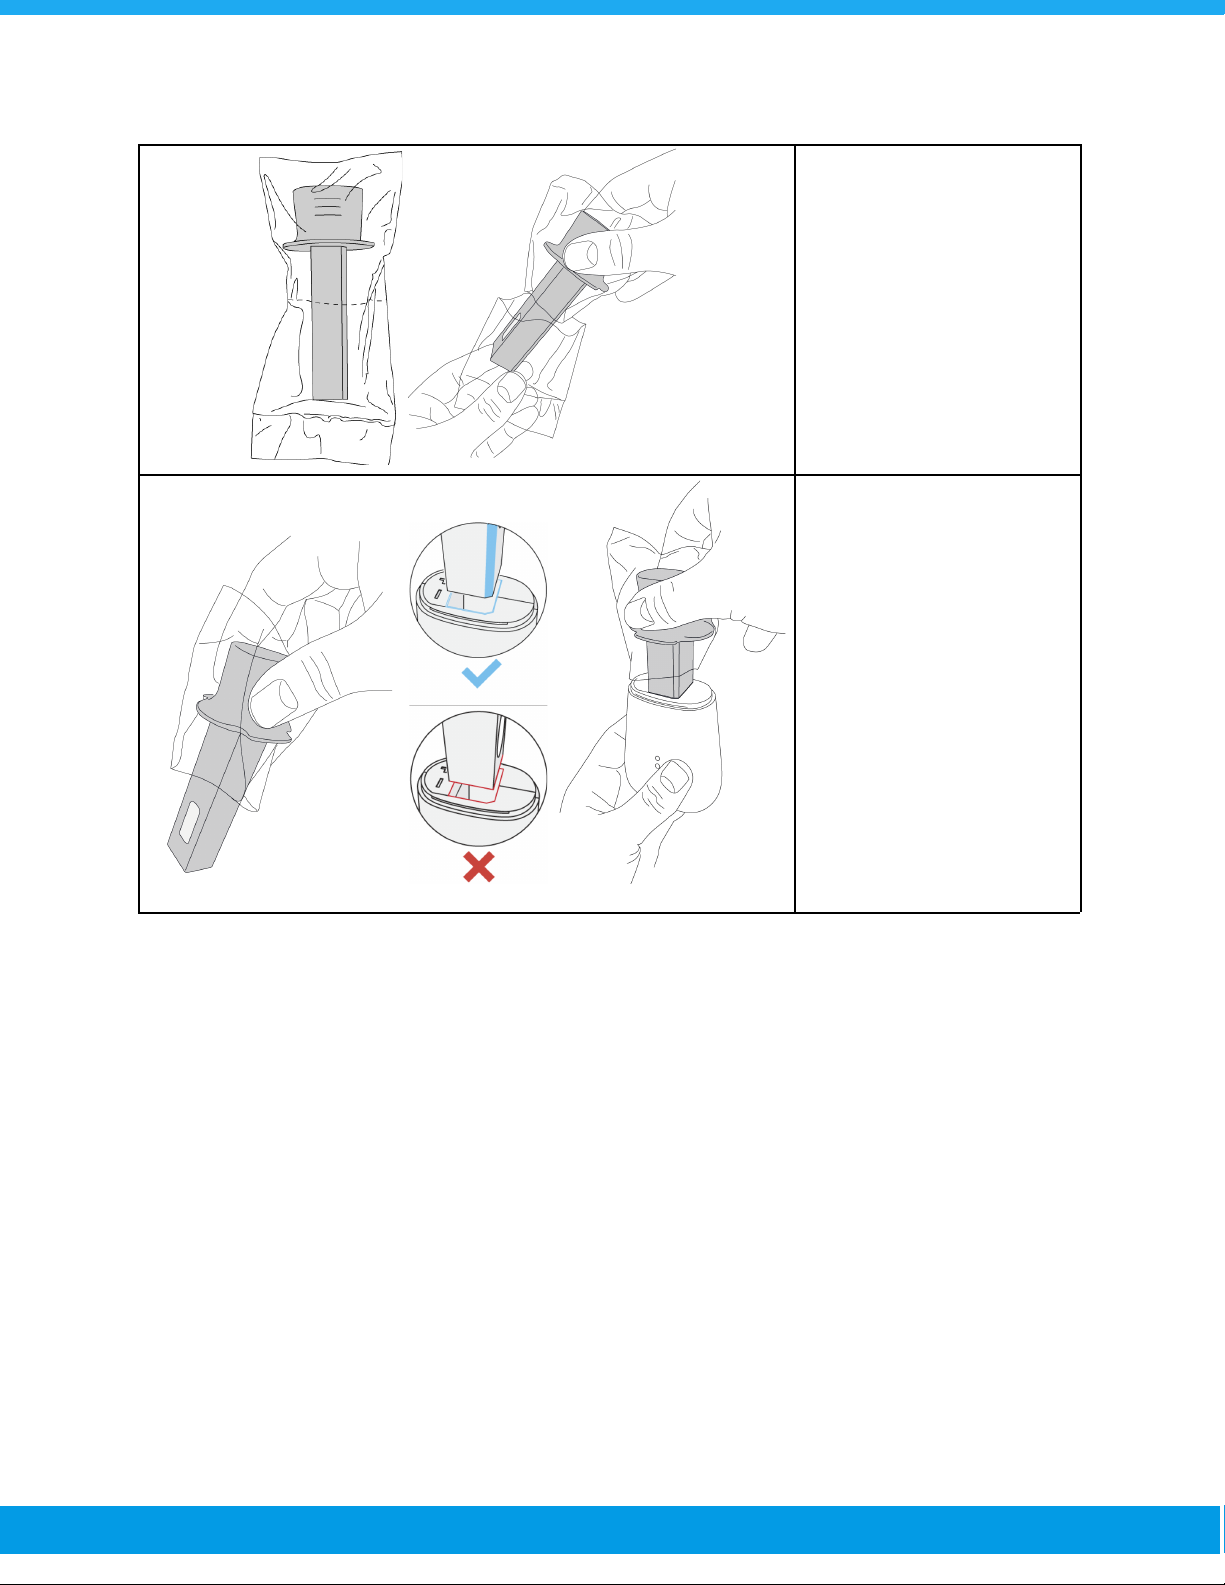
Tear the bottom part of the
mouthpiece’s plastic
package and do not touch
the mouthpiece with bare
hands.
Hold the mouthpiece with
the upper part of the
plastic package.
Insert the mouthpiece all
the way into the
SpiroHome Clinic device
in the correct orientation
3. A ‘click’ will be heard when the mouthpiece is inserted correctly all the way into the
device.
4. Open the Spirohome App on a smart device. If you are not registered, register to the
Spirohome app by creating a new user account and then log in. If the patient is not
registered, enter the patient information from the new patient section and register the
patient.
5. Select the patient name from the patient list and tap the plus button on the screen to
start the test procedure from the patient details page.
SUS-TD-031 R12
13/75

6. The first steps will be to select test mode and enter the ambient conditions like
temperature and relative humidity (in some test modes) and then adjustment zero flow
level for the device. To perform zero flow level adjustment stabilize the device during the
zero flow level adjustment. Alternatively, place the device on a flat surface and allow the
zero flow level adjustment to be completed. Make sure that there is no airflow around the
device during the zero flow level adjustment.
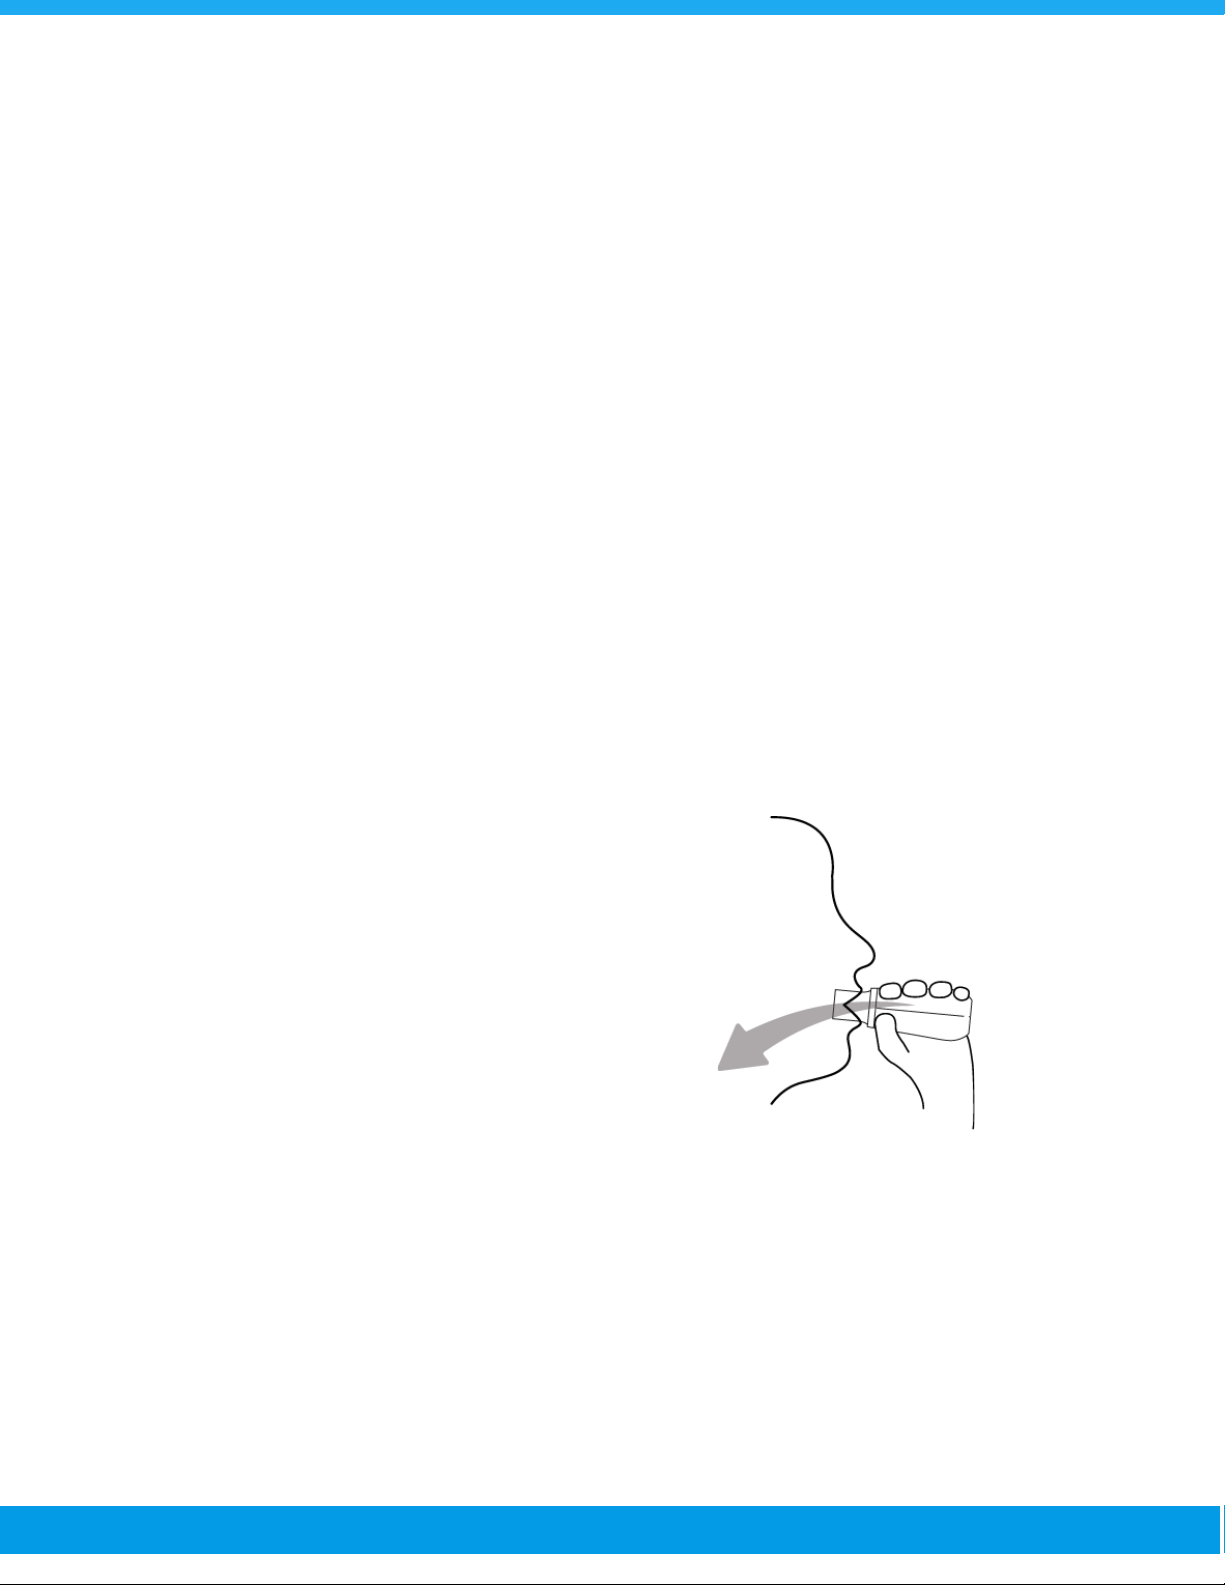
7. The app will prompt the operator to start a spirometry test. Let the patient sit with his
back straight and his feet resting on the ground. The patient must place the mouthpiece
in their mouth, past their teeth (necessary for measurement accuracy) and form a tight
seal around the mouthpiece with their lips.
8. The patient should now perform the breathing maneuver related to the particular
SUS-TD-031 R12
14/75
spirometry test. Please continue to the Type of Breathing Maneuvers section for more
information.
2.4.2. Types of Breathing Maneuvers
➢Expiration-Only (Ex-Only) Test Breathing Maneuver:
1. Ensure that the device is connected. Select the Ex-Only test mode and the test screen
will appear.
2. Read and follow the steps on the SpiroClinic application.
3. Then adjust the zero flow level for the device.
4. Patient will need to perform a forced expiratory maneuver.
a. Tidal Start On: To ready the patient, direct him/her to inhale and exhale
normally a couple of times, then ask to take a fast and deep breath, filling lungs
completely. Do not let the patient to hold breath for longer than 2 seconds.
b. Tidal Start Off: If the Tidal Start toggles off from the app settings, the patient
does not need to breathe normally several times into the mouthpiece before a
forceful expiration, and the test begins with a direct forceful expiration. When
the patient is ready, direct them to fill lungs quickly and completely with air.
5. Ask the patient to place the
mouthpiece in his/her mouth, past
his/her teeth and ensure that his/her
lips are tightly sealed around the
mouthpiece, then the patient takes a
fast and deep breath, filling his/her
lungs as much as possible. The breath
taken should not be kept for more than
2 seconds.
6. Keeping his/her lips sealed tightly around the mouthpiece, the patient must blow out the
inhaled air and empty his/her lungs as hard and fast as the patient can into the
mouthpiece and keep blowing until completely emptying his/her lungs without breaking
the seal of his/her lips.
7. If it takes more than 15 seconds to empty all the air from his/her lungs with the right
performance, the test will be completed automatically. The patient may use a nose clip to
help him/her to exhale only through his/her mouth during the forced exhalation
maneuver.
8. The patient may remove the mouthpiece from his/her mouth and resume normal
SUS-TD-031 R12
15/75

breathing once the breathing maneuver has been completed.
9. The test results will be displayed on the app screen. Give feedback to the patient on
his/her effort by looking at the test results. The patient will need to perform 2 more tests
by repeating this breathing maneuver. However, please make sure that the patient has
time to rest between tests and feels well enough to continue.
NOTE: The difference between Tidal FVC and FVC is that the patient should breathe normally
at the beginning of the test, in Tidal FVC test mode. In FVC test mode, the data starts to be
calculated with any exhale maneuver, but in Tidal FVC mode, the data starts to be calculated
with the deep exhalation maneuver.
➢Full Loop Test Breathing Maneuver:
1. Ensure that the device is connected. Select the Full Loop test mode and the test screen
will appear.
2. Enter the required ambient conditions (makes sure you entered the correct values as the
measurement may be significantly affected by a wrong value) like temperature and
relative humidity and then adjust zero flow level for the device. To get ready, the patient
should inhale and exhale normally a couple of times.
3. Ask the patient to place the mouthpiece in his/her mouth, past his/her teeth and ensure
that his/her lips are tightly sealed around the mouthpiece, then take a slow and deep
breath, filling his/her lungs as much as possible.
4. Patient will need to perform a forced expiratory maneuver.
a. Tidal Start On: To ready the patient, direct him/her to inhale and exhale
normally a couple of times, then ask to take a fast and deep breath, filling lungs
completely. Do not let the patient to hold breath for longer than 2 seconds.
b. Tidal Start Off: If the Tidal Start toggles off from the app settings, the patient
does not need to breathe normally several times into the mouthpiece before a
forceful expiration, and the test begins with a direct forceful expiration. When
the patient is ready, direct them to fill lungs quickly and completely with air.
5. After the patient exhales whole air from the lungs, without breaking the seal of his/her
lips, the patient must inhale completely to fill his/her lungs. When performing this
breathing maneuver, the patient must make sure to keep blowing until the patient has
completely emptied his/her lungs. The patient may use a nose clip to help him/her to
inhale and exhale only through his/her mouth during this breathing maneuver.
6. The patient may remove the mouthpiece from his/her mouth and resume normal
breathing once the breathing maneuver has been completed.
7. The test results will be displayed on the app screen. Give feedback to the patient on
his/her effort by looking at the test results. The patient will need to perform 2 more tests
SUS-TD-031 R12
16/75

by repeating this breathing maneuver. However, please make sure that the patient has
time to rest between tests and feels well enough to continue.
NOTE: The difference between Tidal FVL and FVL is that the patient should breathe normally in
the beginning of the test, in Tidal FVL test mode. In FVL test mode, the data starts to be
calculated with any exhale maneuver, but in Tidal FVL mode, the data starts to be calculated
with the deep exhalation maneuver.
SUS-TD-031 R12
17/75

➢The Maximum Voluntary Ventilation (MVV) Test Breathing Maneuver:
1. Ensure that the device is connected. Select the MVV test mode and the test screen will
appear.
2. Enter the required ambient conditions (makes sure you entered the correct values as the
measurement may be significantly affected by a wrong value) like temperature and
relative humidity and then adjust zero flow level for the device.
3. Ask the patient to place the mouthpiece in his/her mouth, past his/her teeth and ensure
that the patient's lips are tightly sealed around the mouthpiece.
4. When the test starts, the patients should inhale and exhale normally at least 4 times,
then inhale and exhale completely filling and emptying their lungs, repeatedly,
uninterrupted, deeply, without breaking the seal of their lips for at least 12 seconds. The
patient may use a nose clip to help him/her to inhale and exhale only through his/her
mouth during this breathing maneuver.
5. Actively encourage the patient to breathe deeply and rapidly move as much air as
possible for at least 12 seconds.
6. The patient may remove the mouthpiece from his/her mouth and resume normal
breathing once the breathing maneuver has been completed.
7. The test results will be displayed on the app screen. If the test fails, give feedback and
guide the patient for another trial. Encourage them to breathe deep and fast and try to
reach at least 12 seconds.
➢The Slow Vital Capacity (SVC) Test Breathing Maneuver:
1. Ensure that the device is connected. Select the SVC test mode and the test screen will
appear.
2. Enter the required ambient conditions (makes sure you entered the correct values as the
measurement may be significantly affected by a wrong value) like temperature and
relative humidity and then adjust zero flow level for the device.
3. Tell the patient to wear a nose clip and ask the patient to place the mouthpiece in his/her
mouth, past his/her teeth and ensure that his/her lips are tightly sealed around the
mouthpiece.
4. When the test starts, the patient should inhale and exhale normally at least 4 times, then
the patient should inhale as deep as the patient can and fill his/her lungs completely.
5. After that, the patient should exhale the whole air in his/her lungs gently and slowly until
the patient feels that all the air in his/her lungs feels completely empty without breaking
SUS-TD-031 R12
18/75

the seal of his/her lips.
6. When performing this breathing maneuver, the patient must make sure to keep blowing
until the patient feels like the patient has completely emptied his/her lungs.
7. The test can also be performed by performing the breath maneuver in the opposite
direction. When the test starts, the patient should inhale and exhale normally at least 4
times, then the patient should exhale as deep as the patient can and empty his/her lungs
completely. After that, the patient should inhale all the air in his/her lungs until s/he feels
completely full without breaking the seal of his/her lips.
8. The patient may remove the mouthpiece from his/her mouth and resume normal
breathing once the breathing maneuver is complete.
9. The test results will be displayed on the app screen. Give feedback to the patient on
his/her effort by looking at the test results. The patient will need to perform 2 more tests
by repeating this breathing maneuver. However, please make sure that the patient has
time to rest between tests and feels well enough to continue.
2.4.3. End of the Tests
Once all tests have been satisfactorily completed, you will be able to view the session results on
the results page of the app. After the end of the spirometry session, remove and immediately
dispose of the mouthpiece via pushing the notch without touching the top part of the
mouthpiece. Turn the device off by pressing the power button, close the cap off and store the
device according to the storage requirements until the next use.
2.5. UNDERSTANDING THE TEST QUALITY
After each test session, quality grading will be displayed on the app to provide information about
how well the breathing maneuver was performed. Note that the acceptability of the test is purely
SUS-TD-031 R12
19/75

decided by the doctor/operator etc. This grade refers to the consistency of the patient's
maneuvers, not the health of the patient's lungs.
Grading of the FVC and FEV1parameters in children and adults, according to the American
Thoracic Society (ATS) and European Respiratory Society (ERS) guidelines;
Summary of Acceptability, Usability, and Repeatability Criteria for FEV1and FVC
Acceptability and Usability Criterion
Required for
Acceptability
Required for
Usability
FEV1
FVC
FEV1
FVC
Must have BEV ≤5% of FVC or 0.100 L, whichever is greater
Yes
Yes
Yes
Yes
Must have no evidence of a faulty zero-flow setting
Yes
Yes
Yes
Yes
Must have no cough in the first second of expiration*
Yes
No
Yes
No
Must have no glottic closure in the first second of expiration*
Yes
Yes
Yes
Yes
Must have no glottic closure after 1 s of expiration
No
Yes
No
No
Must achieve one of these three EOFE indicators:
1. Expiratory plateau (≤0.025 L in the last 1 s of
expiration)
2. Expiratory time ≥15 s
3. FVC is within the repeatability tolerance of or is greater
than the largest prior observed FVC †
No
Yes
No
No
Must have no evidence of obstructed mouthpiece or spirometer
Yes
Yes
No
No
Must have no evidence of a leak
Yes
Yes
No
No
If the maximal inspiration after EOFE is greater than FVC, then
(FIVC — FVC) must be ≤0.100 L or 5% of FVC, whichever
is greater ‡
Yes
Yes
No
No
Repeatability criteria (applied to acceptable FVC and FEV1values)
Age > 6 yr:
The difference between the two largest FVC values must be ≤0.150 L, and the
difference between the two largest FEV1values must be ≤0.150 L
Age ≤ 6 yr:
The difference between the two largest FVC values must be ≤0.100 L or 10% of the
highest value, whichever is greater, and the difference between the two largest
FEV1values must be ≤0.100 L or 10% of the highest value, whichever is greater
EOFE = end of forced expiration
*For children aged 6 years or younger, must have at least 0.75 seconds of expiration without
glottic closure or cough for acceptable or usable measurement of FEV0.75
†Occurs when the patient cannot expire long enough to achieve a plateau (e.g., children with
high elastic recoil or patients with restrictive lung disease) or when the patient inspires or comes
off the mouthpiece before a plateau. For within-maneuver acceptability, the FVC must be
SUS-TD-031 R12
20/75

greater than or within the repeatability tolerance of the largest FVC observed before this
maneuver within the current prebronchodilator or the current post-bronchodilator testing set.
‡Although the performance of a maximal forced inspiration is strongly recommended, its
absence does not preclude a maneuver from being judged acceptable, unless extrathoracic
obstruction is specifically being investigated.
Grading System for FEV1and FVC (Graded Separately)
Grade
Number of Measurements
Repeatability:
Age >6 yr
Repeatability:
Age ≤6 yr *
A
≥ 3 acceptable
Within 0.150 L
Within 0.100 L *
B
2 acceptable
Within 0.150 L
Within 0.100 L *
C
≥ 2 acceptable
Within 0.200 L
Within 0.150 L *
D
≥ 2 acceptable
Within 0.250 L
Within 0.200 L *
E
≥ 2 acceptable
> 0.250 L
> 0.200 L *
OR 1 acceptable
NA
NA
U
0 acceptable AND ≥ 1 usable
NA
NA
F
0 acceptable and 0 usable
NA
NA
*Or 10% of the highest value, whichever is greater; applies for age 6 years or younger only.
NA: Not Applicable
2.6. SIGNS AND SYMBOLS
Please note the following label, signs and symbols provided for the safe use and storage of the
SpiroHome Clinic.
Markings
Descriptions
Markings
Descriptions
“Manufacturer”
This symbol accompanied by the
name and the address of the
manufacturer adjacent to the
symbol
User Manual
SUS-TD-031 R12
21/75
Table of contents
Other SpiroHome Measuring Instrument manuals

Popular Measuring Instrument manuals by other brands

GREISINGER
GREISINGER GMH 5450 operating manual

Veris Industries
Veris Industries E54C3C installation guide

Maxtec
Maxtec Handi+ R218P12 Operating manual and instructions

JONARD TOOLS
JONARD TOOLS ACM-1000 instruction manual

AEMC
AEMC 3910 user manual

Power Test
Power Test Superflow SF-Black Widow Operator's manual


