SPL TRE Z34 User manual

© 2018 SPL Parts, Inc
www.splparts.com Questions?: 512-691-9002 [email protected]om
Front Tie Rod Ends Kit
Installation Instructions
SPL TRE Z34

© 2018 SPL Parts, Inc
www.splparts.com Questions?: 512-691-9002 [email protected]om
Thank you for your purchase of this SPL performance suspension product.
Please follow these instructions exactly to ensure that the product is able to
function to the best of its ability, and you can achieve the most performance
out of your vehicle.
1. Raise the front of the vehicle and place jack stands in the OEM
recommended locations.
2. Remove the front wheels from the car and put them aside.
3. Remove the factory tie rod ends. These parts are circled in red in
the image above.
4. Insert the tie rod shank (3) into the spindle. Use the two supplied
5/8” regular (non-locking) nuts (7) and jam the nuts together to
help hold the tie rod shank. Torque the nut on top of the knuckle to
75 ft.-lbs. Do not use an impact gun or over torque, as the
strength of the tie rod end will be severely compromised. SPL Parts
is not liable for any issues due to overtorque.

© 2018 SPL Parts, Inc
www.splparts.com Questions?: 512-691-9002 [email protected]om
5. Remove the two nuts and install the spacers. As pictured on the
left, the tie rod ends are installed with one adjustment spacer (flat
ring spacer) and one misalignment spacer (large cone shaped
spacer). Install the locking nut on the bottom. This nut will take
some effort to thread (about 20 ft.-lbs. of torque) as it is a metal
crimping locking nut. Torque to 80 ft.-lbs.
The following pictures show possible bump steer adjustment settings, using
various combinations of spacers. The stock tie rod end corresponds to the
setting in image #3 (with two adjustment spacers and no misalignment
spacer).
For most installations on stock knuckles, we recommend using the setting
in the fourth image above (one misalignment spacer, no adjustment
spacers).
1
2
3
4
5
6

© 2018 SPL Parts, Inc
www.splparts.com Questions?: 512-691-9002 [email protected]om
Verify there are no clearance issues with the knuckle, subframe, or other
suspension arms before putting the car back on the ground.
Check for binding or any problems by rotating the steering wheel lock-to-
lock. Check that the spherical bearing does not bind (the edge of the ball
bearing hitting or close to hitting the housing) under any situation as shown
in the pictures below. After installing, run the suspension and the steering
rack from lock-to-lock through its travel to make sure there is no contact
between the arms.
Note that the inner tie rod end can rotate freely, so the picture on left is not
binding even though the edge of the ball is touching the housing.
If uncertain, try rotating the inner tie rod by using a wrench on the hex part
of the inner tie rod. To do this, tighten down the two jam nuts that go
against the hex buckle of the outer tie rod end. Any excess thread below the
bottom nut can be trimmed or cut off as needed (e.g. for wheel or steering
bump stop clearance).
When getting the car aligned, please adjust toe by turning the inner tie rod.
Do not turn the tie rod end buckle, as this will not adjust toe.
Length adjustment of outer tie rod ends
SPL tie rod ends are preset to a specific length, but in certain cases it may
be necessary to make the outer tie rod ends longer or shorter. The outer tie
rod ends can be lengthened or shortened on the car using the following
procedure:
1. Loosen the jam nuts on both sides of the hex buckle.
2. Hold the inner tie rod fixed and turn the hex buckle to thread in/out
the rod end (spherical bearing side). Note that both the rod end and
the inner tie rods are right hand thread. Threading in/out the rod
end will in turn thread out/in the buckle on the inner tie rod side.
3. Once the outer tie rod end is long/short enough, tighten down the
jam nut on the rod end side. Note that for safe thread engagement,

© 2018 SPL Parts, Inc
www.splparts.com Questions?: 512-691-9002 [email protected]
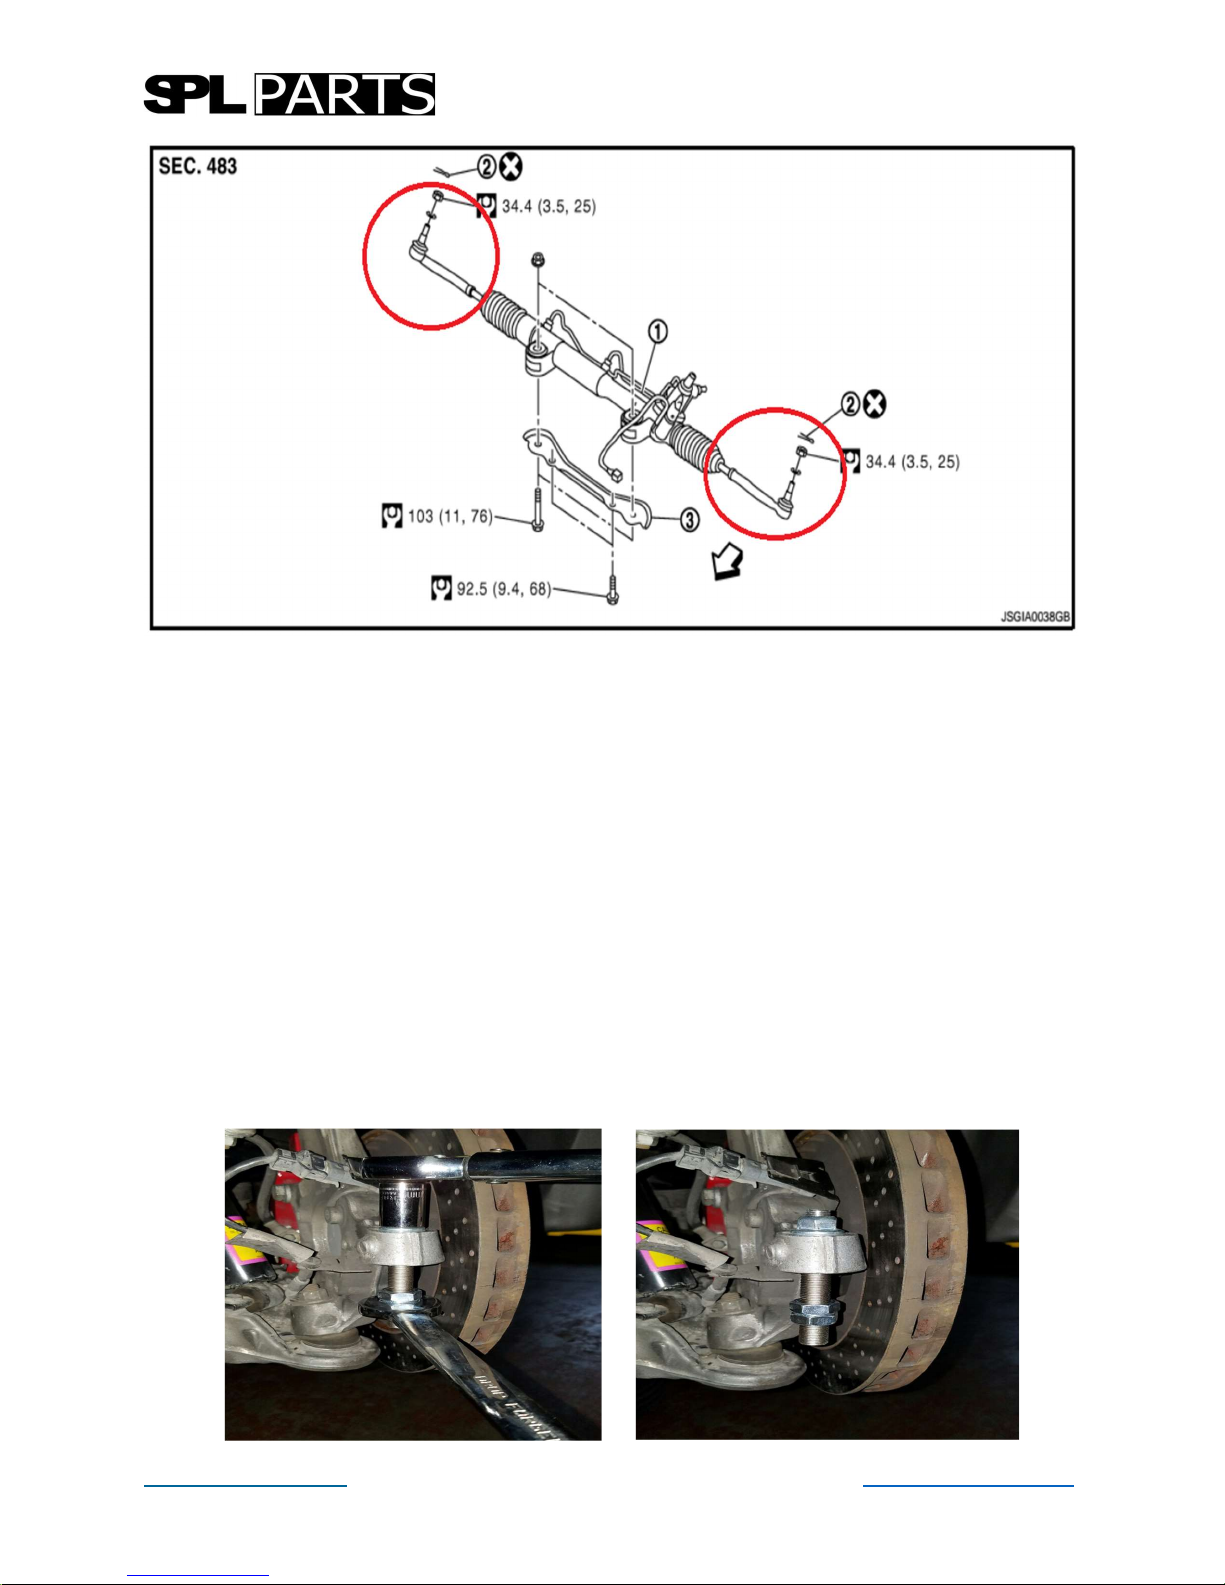
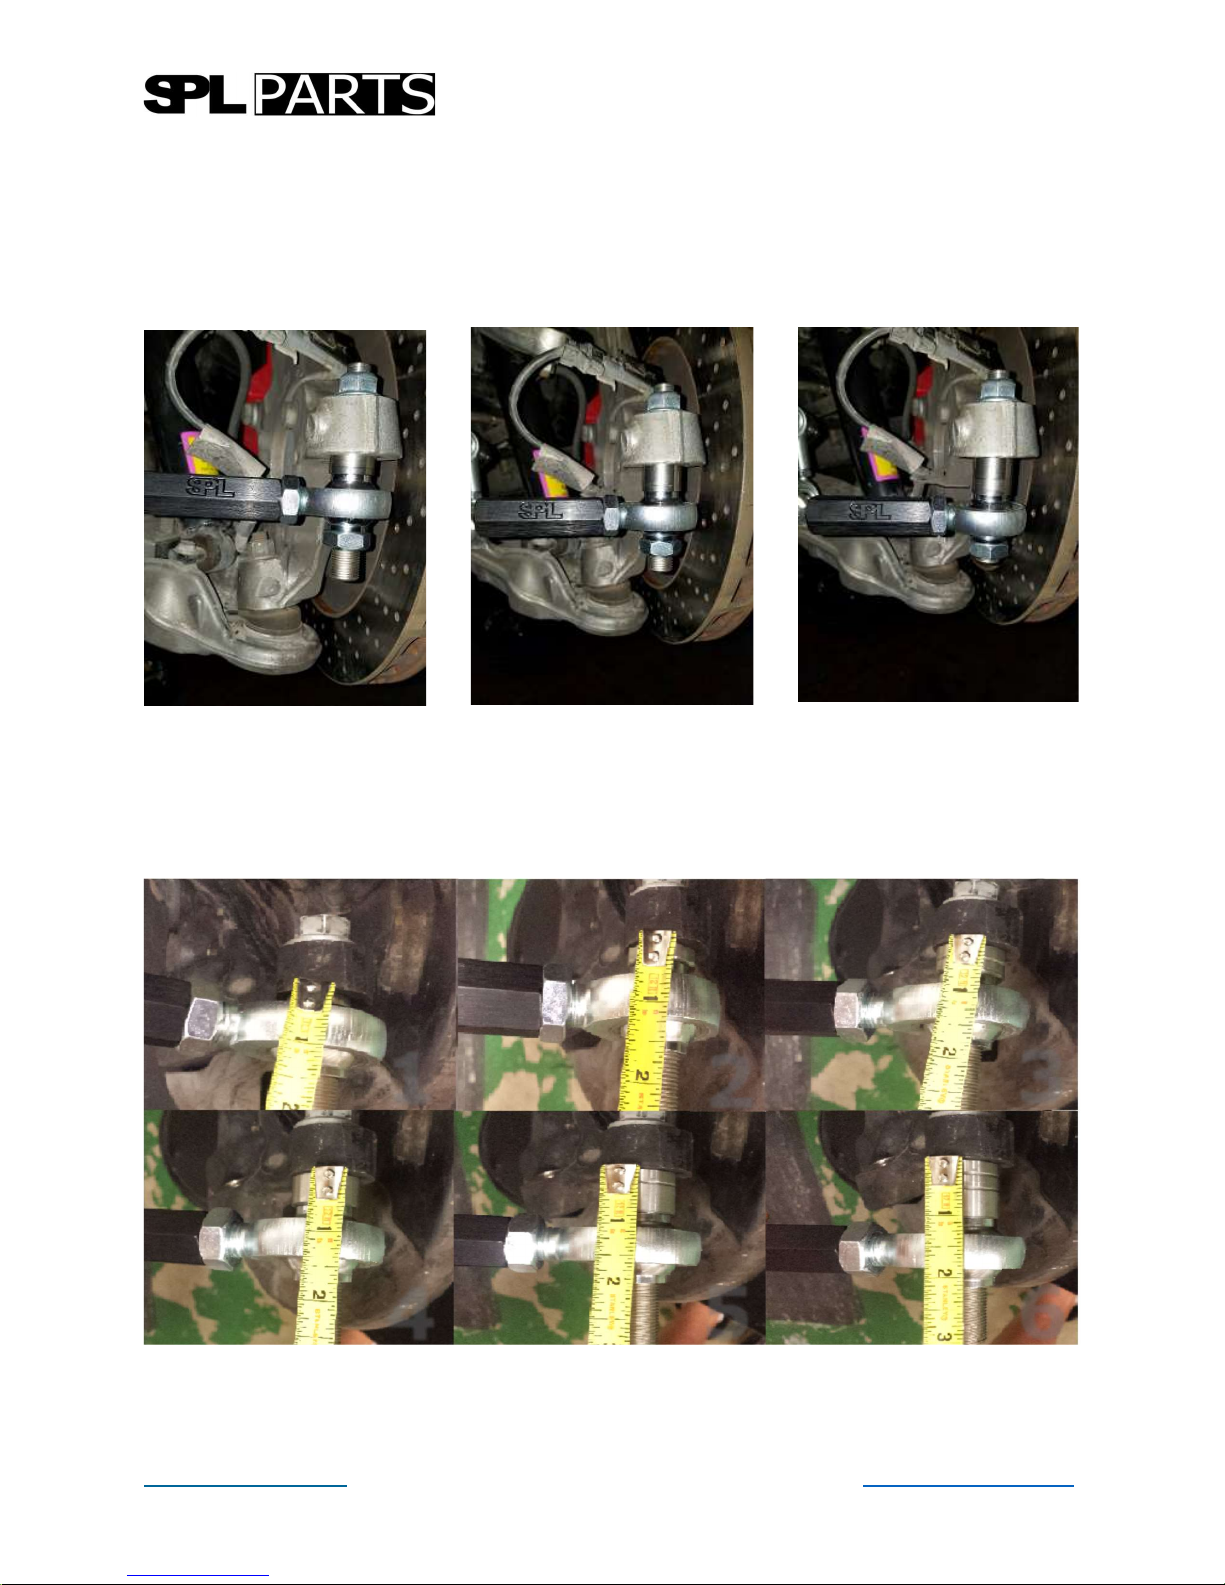
the maximum amount of exposed thread on the rod end should not
exceed 0.7".
4. Follow the normal procedure of turning the inner tie rod to adjust
the toe.
Be safe, and enjoy your new upgrade!
ONE-YEAR LIMITED WARRANTY AND DISCLAIMER
All SPL brand products are intended for Off Road Use Only and carry a one
year limited warranty. See below for details. All other branded products
carry their respective manufacturer warranty.
SPL PRO suspension products warranted to be free of defects in material and
workmanship for one (1) year from the date of purchase.
If a product fails to meet specifications, SPL PARTS INC will, at its election,
repair, replace, or make appropriate adjustment, if SPL PARTS INC deter-
mines to its satisfaction that the product is defective in material or work-
manship, i.e. contains a defect arising out of the manufacture of the product
and not a defect caused by other circumstances, including, but not limited to
accident, misuse, abuse, unforeseeable use, neglect, alteration, improper in-
stallation, improper adjustment, improper repair, or failure caused by other
equipment or interaction with other equipment. SPL PARTS INC is not re-
sponsible for labor charges, removal charges, installation, or other incidental
or consequential costs. In no event shall the liability of SPL PARTS INC ex-
ceed the purchase price of the product.
SPL PARTS INC makes no other warranties, either expressed or implied, in-
cluding limitation warranties as to merchantability or fitness for a particular
purpose. SPL PARTS INC shall not be liable for, and buyer assumes all risk
of, any advice or failure to provide advice by SPL PARTS INC to buyer re-
garding the product or use and installation of product. SPL PARTS INC shall
not be liable for any special, incidental or consequential damages.
If the purchaser of the product shall fail to pay when due any portion of the
purchase price, or fail to meet any terms required under contract agreed on
at time of purchase, all warranties and remedies granted may be termi-
nated.
Using any SPL arm as a tie/strap down point for a dyno session or
transport will void the warranty.
Table of contents
Other SPL Automobile Part manuals
Popular Automobile Part manuals by other brands

BD
BD Automobile Parts installation instructions

Edelbrock
Edelbrock 5700 Series installation instructions

Edelbrock
Edelbrock 5202 installation instructions

Edelbrock
Edelbrock Honda XR400 Instruction supplement

Edelbrock
Edelbrock 15018 installation instructions

Edelbrock
Edelbrock 72552 installation instructions