Splash Lab TSL.R.030 Series Instruction Manual
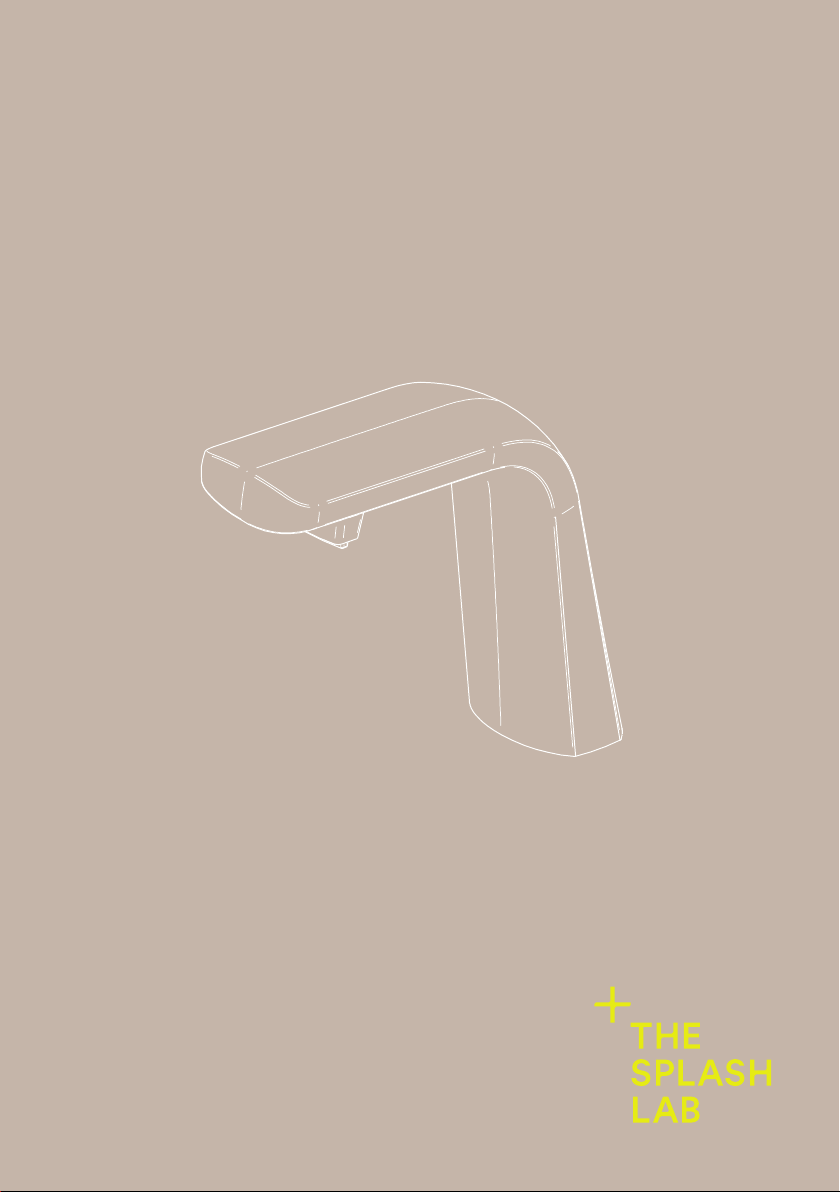
TSL.R.030
ribbon hand dryer
installation + maintenance

3Safety and Warnings
4Box Contents
5Technical Data
6Before You Install
8How to Install
14 Commissioning
16 Operation
16 Maintenance
17 Cleaning
18 Troubleshooting
21 Diagram
22 Spare Parts / Accessories
23 Warranty
Back Cover Contact Details
contents
2TSL.R.030 RIBBON HAND DRYER MANUAL

General information
+1 310 410 5008
5450 W 83rd St, Los Angeles CA90045
500 7th Ave, New York NY10018
Technical support
technical@thesplashlab.com
For further contact information visit:
www.thesplashlab.com
TSL.R.030 ribbon hand dryer
Read and save these instructions
WARNING !
To reduce the risk of fire, electric shock or injury to persons, observe the following:
+ Use this unit only in the manner intended by the manufacturer. If you have any
questions, contact the manufacturer (see back page for details)
+ This equipment should be installed in a way that ensures all electrical parts are
kept dry.
+ A means of electrical isolation must be incorporated in the fixed wiring, in
accordance with the current local regulations in force.
+ Disconnect the power supply before performing any maintenance on the product
+ Children should not play with this equipment. Cleaning and maintenance shall not
be performed by children without supervision.
+ This equipment is designed to be used in commercial and public areas; it is not
intended for domestic or residential use.
+ Replace fuse only with the same type and rating of fuse.
+ Ensure wiring and cover is installed correctly before connecting to live power
supply.
+ If in doubt, consult an electrician.
+ This product is not intended for use in a domestic or residential application.
+ The dryer must be installed in accordance with the electrical installation
regulations in force at the time of installation.
+ The hand dryer must be earthed.
TSL.R.030 RIBBON HAND DRYER MANUAL 3
Original instructions

4TSL.R.030 RIBBON HAND DRYER MANUAL
box contents
A
B
C
D
E
F
G
K
H
J
ADryer head assembly
BHand dryer motor unit
CPower cable
DAnti-rotation collar (already installed)
EGasket
FAnti-rotation washer
GFixing nut
HMotor mounting screws
IHex wrench
JAir hose

TSL.R.030 RIBBON HAND DRYER MANUAL 5
Finishes TSL.R.030.C.E120 Bright Polished Stainless steel
TSL.R.030.CS.E120 Brushed Stainless steel
TSL.R.030.CP.E120 Brushed Copper
TSL.R.030.BK.E120 Brushed Black
TSL.R.030.BR.E120 Brushed Brass
TSL.R.030.BZ.E120 Brushed Bronze
Voltage 110 - 120V ac; 60Hz
Current 7.6 - 8.4A
Power consumption 0.84 - 1.0kW
Standby power 0.3 - 0.4kW
Drying time <15 seconds
Weight 17lb 13oz
Material AISI 304 stainless steel
Noise levels 70.6dB
Heating element 500W
Motor type Brush type; dual ball bearings
Motor power 500 - 350W
Air speed 367 ft/s
Air flow 25.3 cu ft/min
Sensor range 5” +/-1”
Security cut-off time 30 seconds
Motor thermal protection Auto resetting thermostat set at 275°F
Heater thermal protection Auto resetting thermostat set at 185°F
Thermal cutout fuse set to 288°F
Insulation Class 1
IP rating IP35
Approvals CE, UL, RoHS
Warranty 1 year parts and labour; additional 4 years parts
only (Motor brushes excluded as these are a
wearing part, and dependant on usage)
technical data
6TSL.R.030 RIBBON HAND DRYER MANUAL
Location
Ribbon hand dryers are supplied with 18”
of flexible hose, so the dryer motor unit
must be fitted within 18” of the head unit,
to ensure that the motor air-outlet head
can be connected
Basins
Use of a The Splash Lab Monolith basin
is recommended for use with the Ribbon
range of products.
If an alternative basin is used, then
appropriate mounting points must
be created in basin or countertop to
accommodate the Ribbon products.
Power supply
A 15A fused supply must be provided for
connection to the mains power supply.
Disclaimer: Circuits should only use
80% of their given amperage to prevent
overloads. The standard US 120V 15 Amp
circuit should only use up to 12 of its 15
amps.
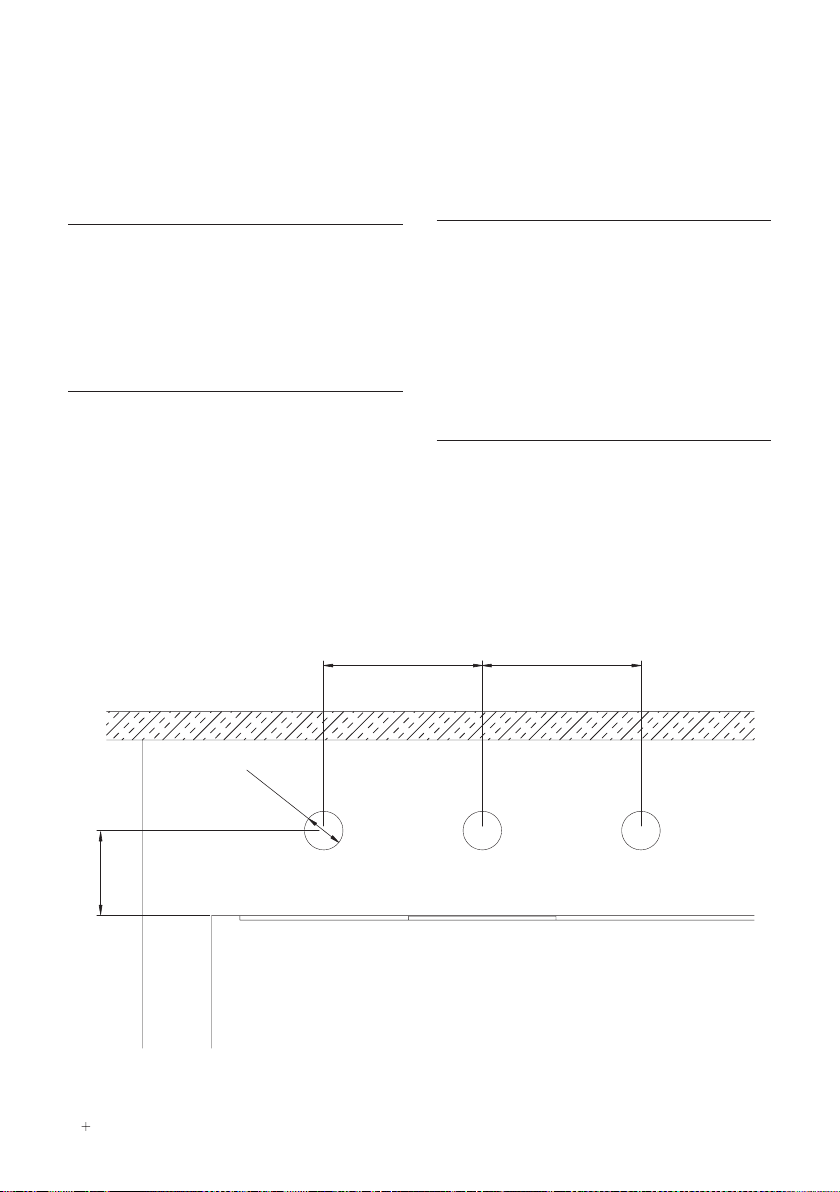
Spacing
If the Ribbon hand dryer is installed with
other units from the Ribbon range, these
should be fitted at 5 1/2” centres.
before you install
5 1/2" 5 1/2"
Ø
1 3/8"
3"

TSL.R.030 RIBBON HAND DRYER MANUAL 7
before you install
2-1/8" 6"
7-5/16"
4-3/8"
5-5/8"
3/8" MIN
1-3/8" MAX
Default
Sensor
Range
3/4"-5-1/8"
Mains
Power Supply
5-7/8"
12-1/16"
10-3/4"
11-3/4" - 12-9/16"7-9/16"
Ø1-5/16"
THROUGH HOLE
2-11/16"
Ø1-1/4"
FRONT SIDE
8TSL.R.030 RIBBON HAND DRYER MANUAL
how to install
1
Drill hole 1 3/8” diameter in counter-top, if
not already cut.
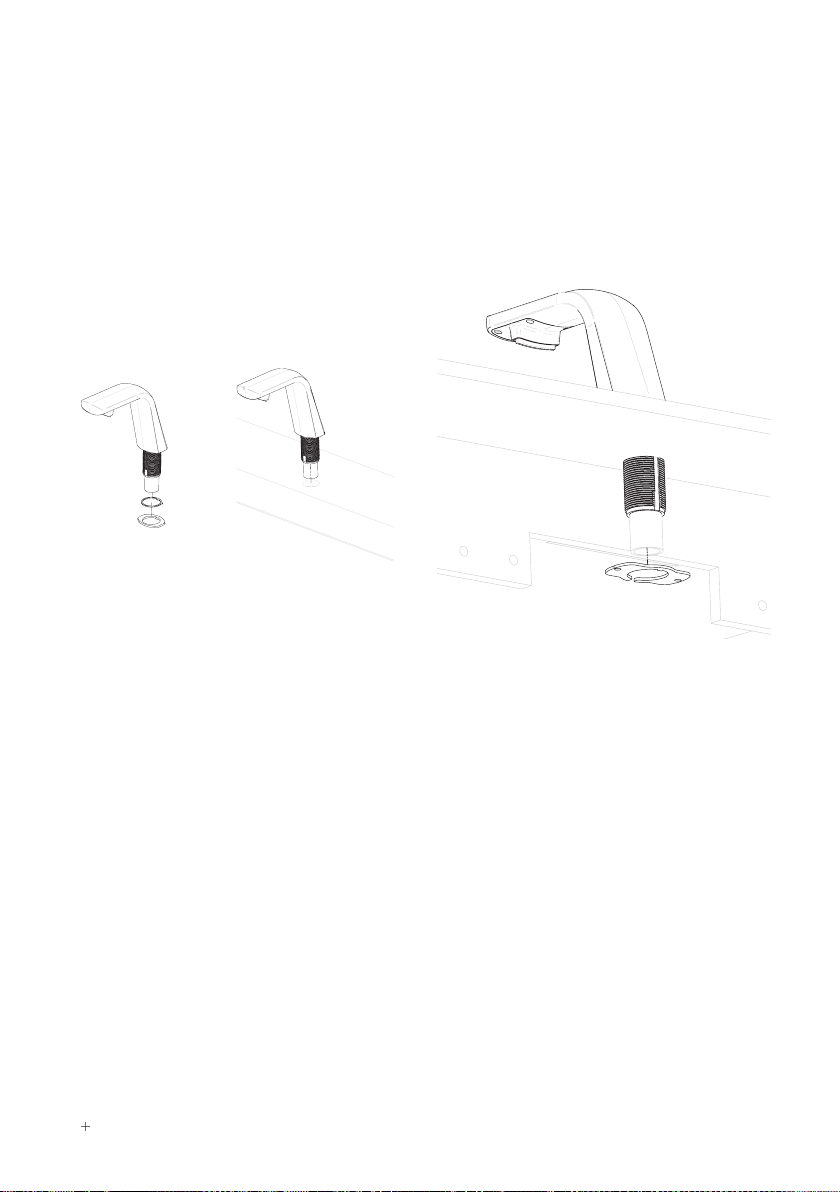
2
Fit anti-rotation washer from below basin

TSL.R.030 RIBBON HAND DRYER MANUAL 9
3
Fit fixing nut, and secure using spanner.
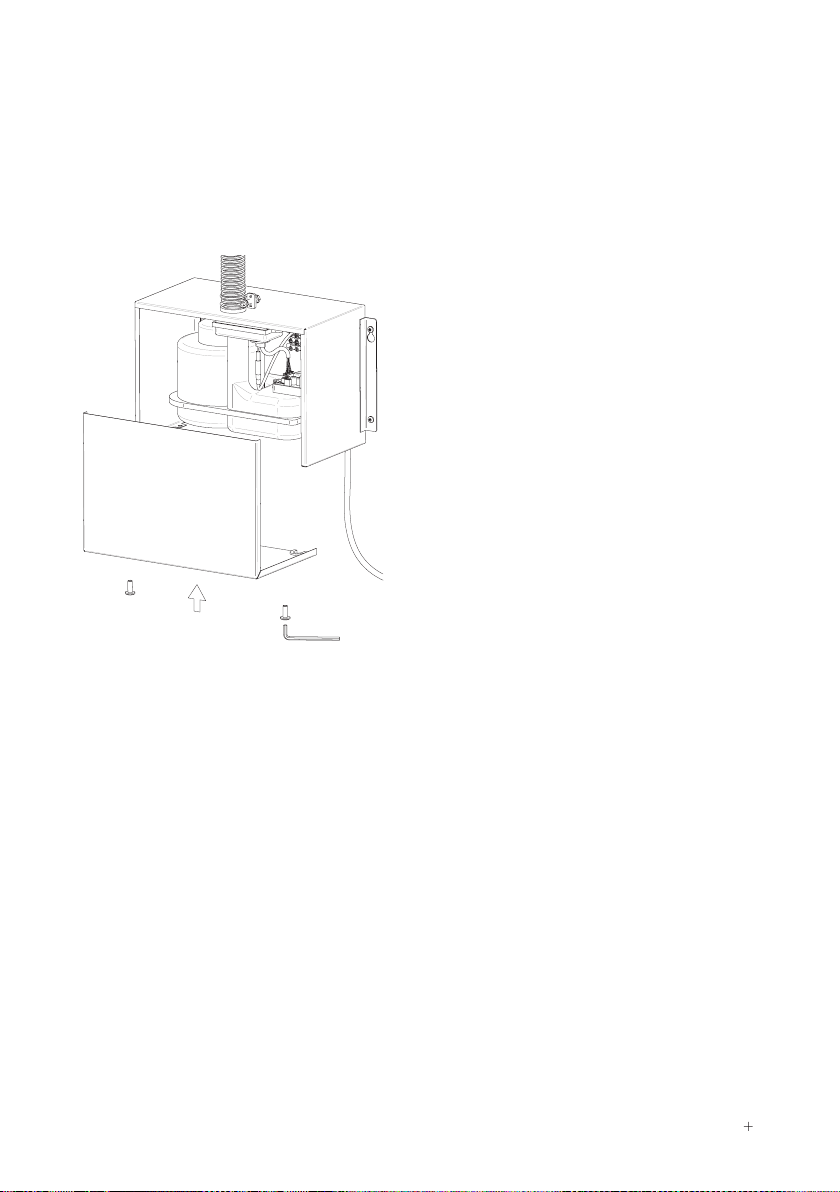
4
Remove cover-fixing screws from
underside of dryer motor using the
security hex key provided, and then
remove the cover.

10 TSL.R.030 RIBBON HAND DRYER MANUAL
how to install
5
Fit the dryer motor unit to wall or cabinet,
within 18” of the dryer nozzle already
installed on the basin / countertop.
6
Thread the power cable through the
knockout in the back or base of the dryer
and feed to connector block. Connect
the cables as marked on the dryer unit.

TSL.R.030 RIBBON HAND DRYER MANUAL 11
7
Thread the sensor and earth cables
through the air-hose.
8
Feed cables into air outlet nozzle and
then through cable exit grommet.

12 TSL.R.030 RIBBON HAND DRYER MANUAL
how to install
9
Connect the sensor cable to the 6-pin
fitting on the PCB control, and the
ground cable to the corresponding earth
connector in the dryer motor unit.
10
Connect air hose onto outlet nozzle on
dryer motor and tighten hose clamp.
TSL.R.030 RIBBON HAND DRYER MANUAL 13
11
Re-fit the dryer cover and tighten the
fixing screws.
14 TSL.R.030 RIBBON HAND DRYER MANUAL
commissioning
Turn on the power supply to the dryer, and then test that the dryer will operate when
the user’s hands are placed within the detection range.
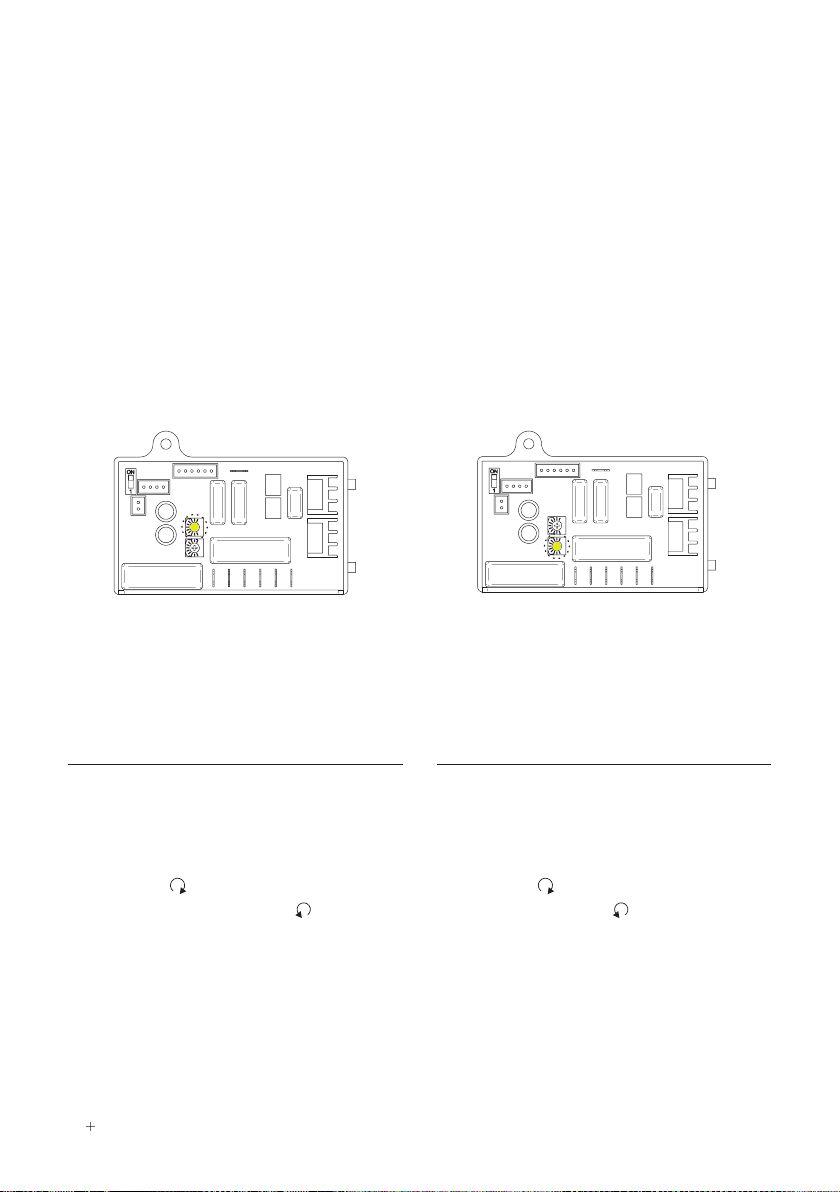
The motor speed and sensor range can be adjusted to suit user preference and the
environment, if required. The heater element can also be switched off if desired.
Warm air speed adjustment
1. Switch off the power, loosen the cover
screws and remove the cover.
2. Use small Phillips head screwdriver
to turn variable resistor shaft. Turn
clockwise to increase the motor
speed; turn anticlockwise to reduce
the motor speed
Sensor range adjustment
1. Switch off the power, loosen the cover
screws and remove the cover.
2. Use small Phillips head screwdriver
to adjust the variable resistor. Turn
clockwise to increase the sensitivity;
turn anti-clockwise to reduce the
range.
TSL.R.030 RIBBON HAND DRYER MANUAL 15
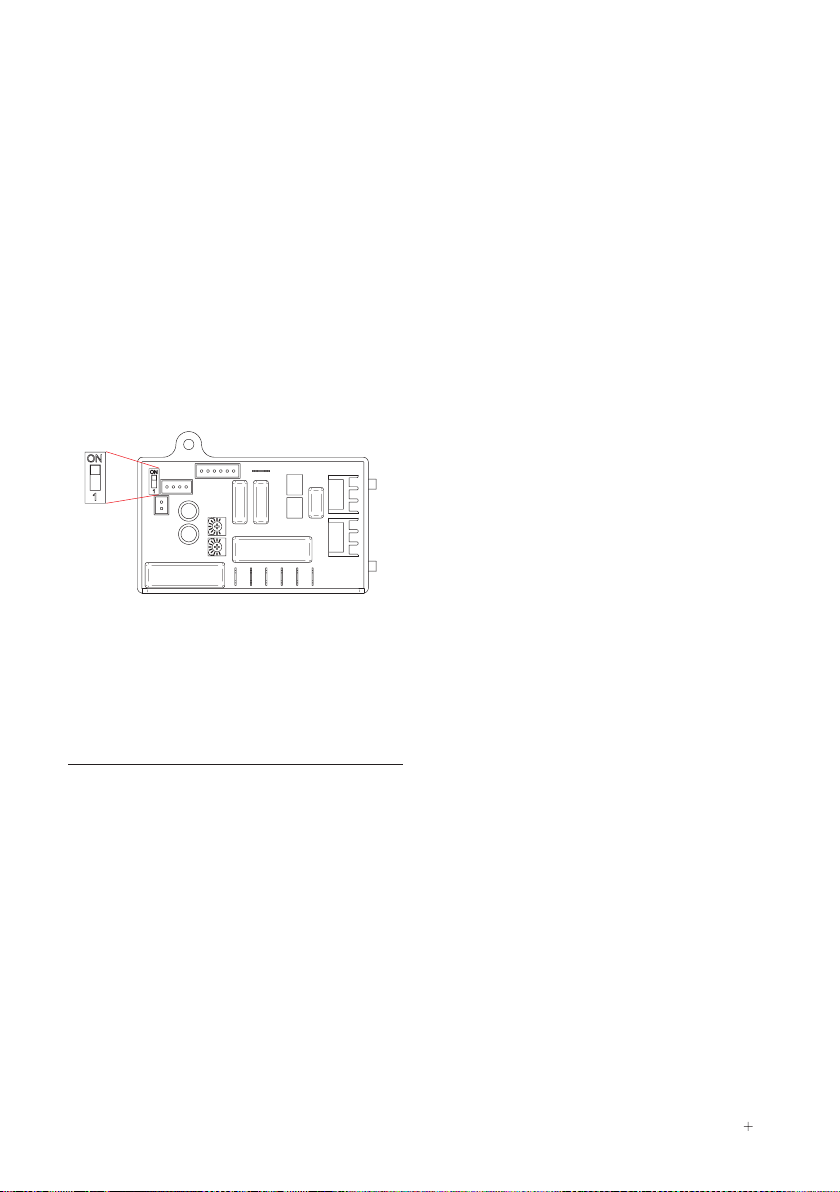
Heater Element Switch ON/OFF
1. Switch off the power, loosen the
cover screws and remove the cover.
2. Adjust the heater switch on the
PCB with a small plastic or wood
flat blade probe.
2-1 Slide the switch to ‘ON’ :
Enables heater
2-2 Slide the switch to ‘1’ :
Disables heater

16 TSL.R.030 RIBBON HAND DRYER MANUAL
operation
+ The user is to shake excess water off their hands.
+ The user then places their hands within the detection range of the sensor to
activate the hand dryer.
+ The motor will start and air is blown onto the user’s hands.
+ The motor will stop when the user’s hands are removed from the detection range.
maintenance
+ The hand dryer should be serviced on a regular basis to ensue long service life of
the unit.
+ Isolate the unit from the power supply before any servicing or maintenance work is
carried out.
+ Remove the cover by unscrewing the fixing screws on the underside of the cover.
+ Remove any dust or foreign body from the air intake and (both inside and outside
the dryer). Where necessary, use a brush or vacuum cleaner.

TSL.R.030 RIBBON HAND DRYER MANUAL 17
cleaning
All grades of stainless steel will stain or discolour if due care and attention is not taken.
The surface must be regularly cleaned to ensure a long service life of the hand dryer.
Use a soft cloth or sponge with a mild solution of soapy water as part of the regular
washroom janitorial routine. Do not use abrasive or cream cleaners as these will
damage the surface finish.
If the hand dryer is subjected to a highly chlorinated environment eg swimming pools
or marine coastal locations, a further treatment, in addition to the regular cleaning as
described above, is recommended by the application of a household cleaning product
containing silicone.
If further information is required, contact The Splash Lab technical team for more
detailed stainless-steel care guidelines.

18 TSL.R.030 RIBBON HAND DRYER MANUAL
Corrective Actions for Initial Installation Failures
If the dryer will not run:
+ First ensure that the breaker supplying the dryer is operational. If it is, disconnect
the power and remove the dryer cover. Taking suitable precautions to avoid shock
hazard, reconnect the power and check for voltage at the terminal block. Verify
that connections are made correctly.
The dryer cycles by itself or runs constantly:
+ Ensure that there is no obstruction on or in front of the IR sensor. Clean any dirt or
debris off the sensor lens. If problem persists, replace sensor.
The dryer makes a loud noise and does not run for a complete cycle:
+ Ensure that the supply voltage is correct. Dryer will make a loud humming noise
if the input voltage is too high. Verify voltage requirement on unit rating label and
correct supply as required. (If circuit board module has been damaged, replace it
and the infra-red sensor module.)
The dryer runs but air stream is low pressure and/or low velocity:
+ Ensure that the supply voltage is correct. Dryer will run weakly if the input voltage
is too low. Verify voltage requirement on unit rating label and correct supply as
required.
troubleshooting
We are always looking to improve. If these did
not solve your problem please contact us and
we will endeavour to help.
Tel: +1 310 410 5008
Email: technical@thesplashlab.com

TSL.R.030 RIBBON HAND DRYER MANUAL 19
Corrective Actions for Initial Installation Failures
If the dryer will not run:
+ First ensure that the breaker supplying the dryer is operational. If it is, disconnect
the power and remove the dryer cover. Replace the CBM and IR sensor module.
Taking suitable precautions to avoid shock hazard, reconnect the power and
check for Voltage at the terminal block.
The IR sensor only sees close range objects:
+ Ensure that there is no obstruction on or in front of the IR sensor. Clean any dirt
or debris off the sensor lens. Check variable resistor for sensor range setting, If
problem persists, disconnect the power and remove the dryer cover and replace
CBM, IR sensor module.
The heater gets hot but no air stream is produced:
+ Disconnect the power. Remove the dryer cover. Check variable resistor for speed
setting Disassemble the blower- motor/ fan housing. Replace the fan motor.
Reassemble.

20 TSL.R.030 RIBBON HAND DRYER MANUAL
troubleshooting
Corrective Actions for Initial Installation Failures
The dryer only blows cold air during a full cycle:
+ Disconnect the power. Remove the dryer cover and check/ ensure heater switch
is ON. Disassemble the blower-motor/fan housing. Test the thermostat for open
circuit. Check the heater element for signs of burning or breakage. Damaged
element must be replaced.
The air stream is low pressure and velocity:
+ Check the output nozzle for obstructions. If none are present, disconnect the
power. Remove the dryer cover. Remove any dust/lint buildup from intake vent
slots. Check VR for speed setting. Disassemble the blower / motor/ fan housing.
Check the motor brushes for worn condition (1 1/4” graphite remains) and replace
them, if necessary. Check motor brushes for wear; if less than 1 1/4” is remaining,
replace brushes.
This manual suits for next models
6
Table of contents
Other Splash Lab Dryer manuals


