SPORTS ART E81G User manual

i
...i
iESlG
ELLIPTICAL
i OWNER'S
MANUAL
:
:
F'T^'ESS
SPORTSART
E81G
ELLIPTICAL
TRAINER
TABLEOFCONTENTS
1.
INTRODUCTION
2.
SAFETYGUIDELINES
3.
ASSEMBLINGYOUR
ELLIPTICALTRAINER
Listof
parts.....
Stepby
Step
Instructions.
4.
E81G
DISPLAY
Display
Layout.
Display
Specifications........
Display
Controls..
DefaultValue.
Keypad.
ProgramOverview.
Glute.
WTLoss
(HRC
6s%)
/Cardio
(HRC
80%).
Pause.
ENDOF
WORKOUT..........
5.
Fuse
Replacement....
6.
WIRINGSCHEMATIC.....
1
2
3
5
12
12
13
15
15
16
17
17
18
18
19
20

INTRODUCTION:
Congratulationson
purchasing
one
of
thefinest
piece
of
exercise
equipment
on
the
markettoday,
the
SportsArtE81G
constructedofhigh
quality
materials
and
designedforyearsof
trouble-free
usage,the
SportsArt
E81Gwill
bean
integral
part
of
your
fitnessregimen.
Thisoutstanding
piece
ofequipment
provides
varied
choicesandfunctionsto
meet
your
exerciseneeds.Butbeforeusing
your
Spofts
ArtE81G,werecommendthat
you
familiarize
yourself
with
this
Owner'sManual.Whether
you
are
afirst
time
user
ofan
ellipticaltraineroraseasoned
professional
,understandingthecorrectuseof
theequipmentwillenhance
your
ability
toachieve
your
exercise
goals
safelyand
successfully.
Exercisehandle - Stationarvhandle
lnsrde
shouldercover
Shouldercover Right
vertrcal
arm
Pedestal
Leftvertical
arm
Strrde
railfront
c0ver
Pedestalbasecover Reartopcover
Leveler
Stride
rail Rear
side
cover
Rotating
cover
Rear
foot
cover
Transport
wheel
---t
Stride
rarl
backcover

SAFETY
GUIDELINES:
Please
read
andfollow
thesafety
guidelines:
. Keep
this
owner's
manual
forfuture
use
andreference.
. Read
thisowner's
manual
andfollow
the
instructions.
' Assemble
and
operate
theSports
Art
E81G
Elliptical
Trainer
on
asolid,level
surface.
. Never
allow
children
on
ornear
themachine.
' Inspect
themachine
before
eachuse.
Make
sure
all
parts
areassembled,
andall
nuts
andbolts
are
tightened.
Donot
use
themachine
if
theunit
isdisassembled
in
any
way.
. Do
not
place
themachine
orits
parts
nearwater
oranyliquid.
' Wear
proper
workout
clothing.
DoNOT
wear
loose
clothing.
Donot
wear
shoes
withleather
solesorhigh
heels.
Tie
alllong
hair
back.
' Don't
rock
the
unitfrom
sideto
side,
anduse
carewhen
mounting
and
dismounting
the
unit
' Donot
use
anyaccessories
that
aren't
specifically
recommended
by
the
manufacturer.
These
might
causeinjuries
orcause
the
unittofail.
' Work
within
your
recommended
exerciselevel.
Do
NOTwork
toexhaustion.
' lf
you
feel
any
pain
orabnormal
sensations,
sroP YouR woRKour, and
consult
your
physician
immediately.
. Theweight
limit
for
thiselliptical
trainer
is265
LBS
( 120
KGS)
' Allow
sufficient
space
onboth
sidesof
theelliptical
for
userstomount
and
dismount
themachine.
' lf
anything
about
themachine
seems
amiss,
please
stop
your
workout
immediately
and
contact
your
authorized
dealer
forrepairs.
' Before
beginning
any
exercise
program,
consult
with
your
doctor.
ltis
recommended
that
you
undergo
acomplete
physical
examination.
CAUTION:
Keep
your
hands
andfeet
awayfrom
moving
parts.

ASSEMBLING
YOUR
ELLIPTICAL
TRAINER
Thank
you
for
purchasing
this
product.
We
go
through
great
efforts
to
ensure
the
quality
ofeach
product.
lf
you
find
this
product
tobedefective
in
anyway,
ptease
contact
SportsArt
or
your
dealer.
Notethat
some
parts
may
get
mixed
amongst
packaging
material
during
shipment.
Please
locate
allthe
parts
first
before
you
discard
the
packaging
materiil.
The
packing
for
this
elliptical
was
designed
to
protect
it
during
shipment.
please
storethe
original
packing
material
in
asafe
place
in
case
you
need
to
transport
the
unit
inthe
future.
LIST
OFPARTS:
Washers
and
screws
are
screwed
intothe
frame.
Please
remove
the
screws
and
washers
before
attempting
to
assemble
the
product.
Locate
the
following
parts,
all
ofwhich
are
packed
in
the
product's
box.
1.Left
vertical
arm
+shoulder
covers
fuB
2.Right
vertical
arm
+shoulder
covers
A/B
3.Stride
railfront
covers
A"2:8"2
4.Pedestal
base
cover
5.
Stride
railrear
cover(left)
6.
Stride
railrear
cover
(right)
7.Left
footplate
B.Right
footplate
9.Tool
kit
10.Cushion
pads

1.Left
verticalarm
+shoulder
coversfuB 2.Right
verticalarm
+shoulder
covers
fuB
*\, *T a-
r \.., 'flH
gt-.'
3.Stride
railfrontcovers
A*2;B*2
R
L) B
A -(: ,-.o .'{t
.t
t\-
l:
i;
-==':)
T- \
r '.
t"-
\,: !
\r '-
-\,. -,
A't'
5.Stride
railrearcover
(left)
4.Ped cover
estal
base
,a\
7.
6.
'..\ )
"....0
Stride
railrearcover
(right)
9.
Toolkit 10.Cushion
pads
:\.
-\ -'.....--/
'.a@-
.4/2
-) I
4
B.
Rightfootplate
s
ELLIPTICALASSEMBLY
Frame
assembly
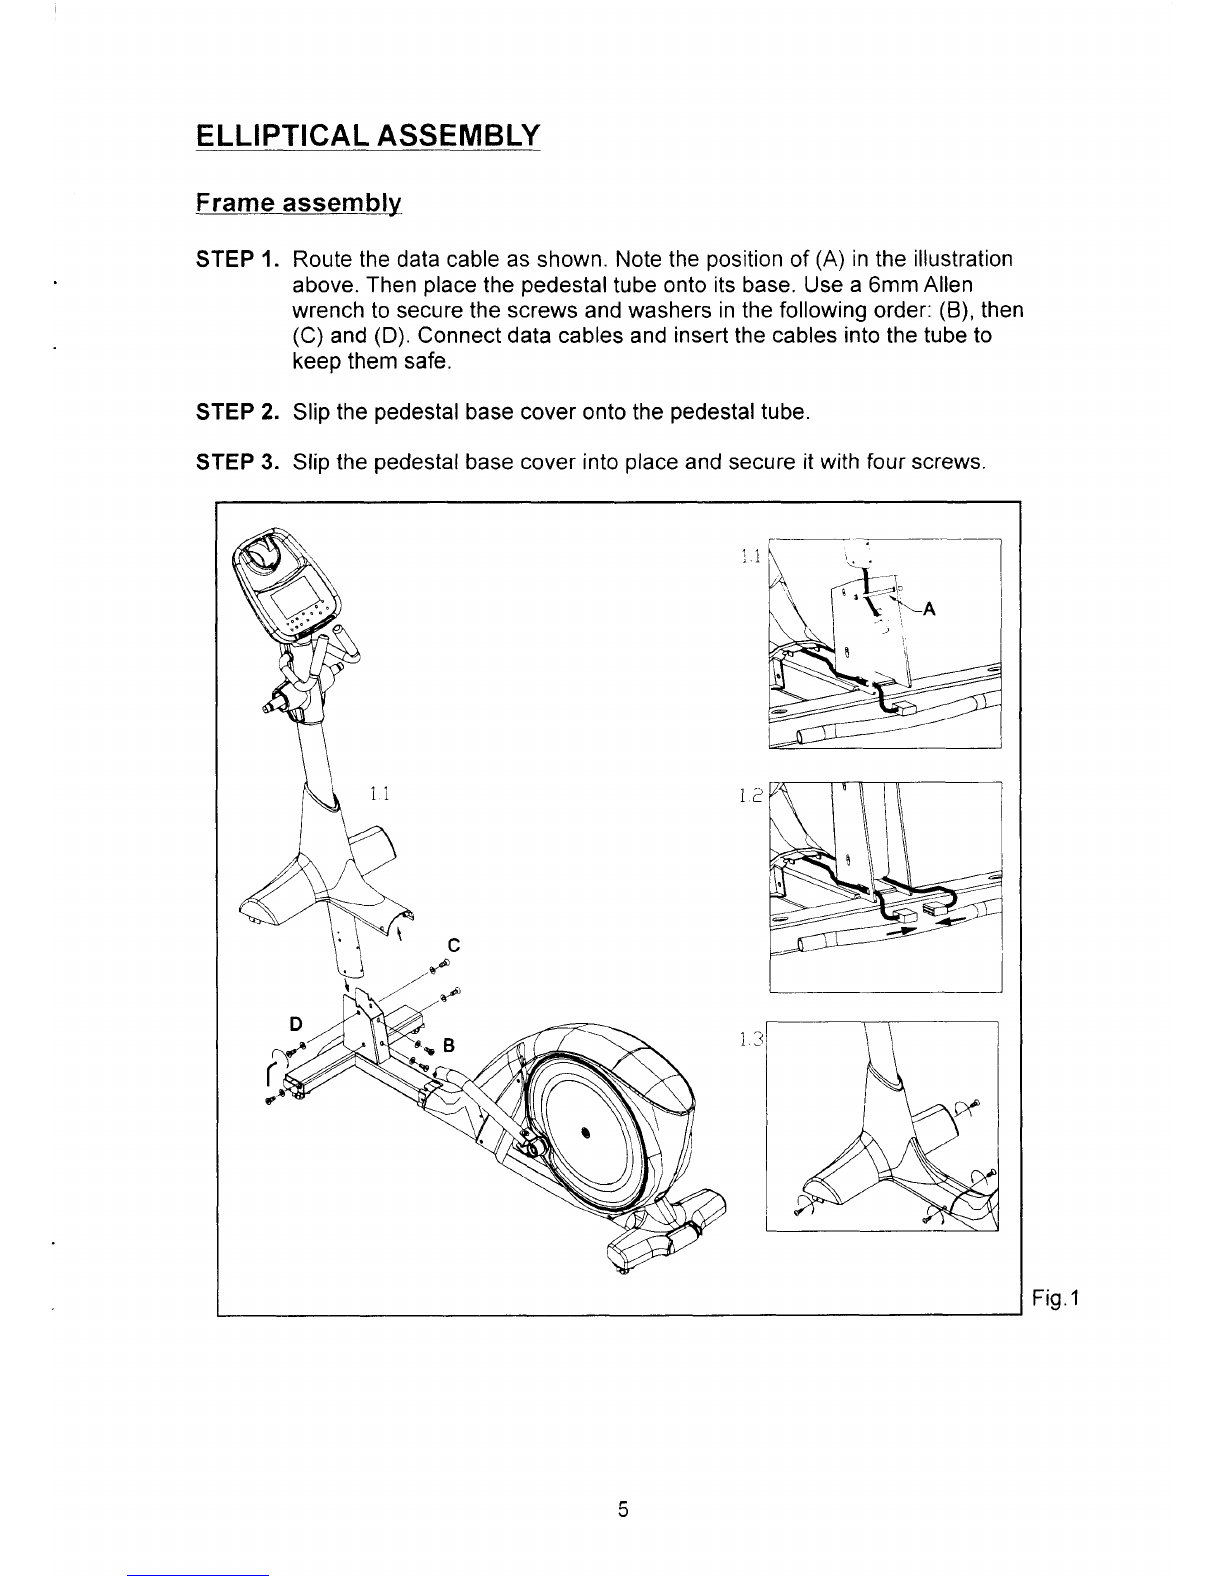
STEP
1. Routethedatacableasshown.Notethe
position
of
(A)
in
theillustration
above.
Then
place
the
pedestal
tube
ontoitsbase.Use
a6mm
Allen
wrenchtosecurethe
screws
andwashers
in
the
following
order:
(B),
then
(C)
and
(D).
Connectdatacablesand
insert
the
cablesinto
the
tubeto
keepthemsafe.
STEP
2. Slip
the
pedestal
basecoverontothe
pedestal
tube.
STEP
3. Slipthe
pedestal
base
cover
into
place
and
secure
itwithfourscrews.
I
-d
/^
.'t -s4
eB
Fig.1
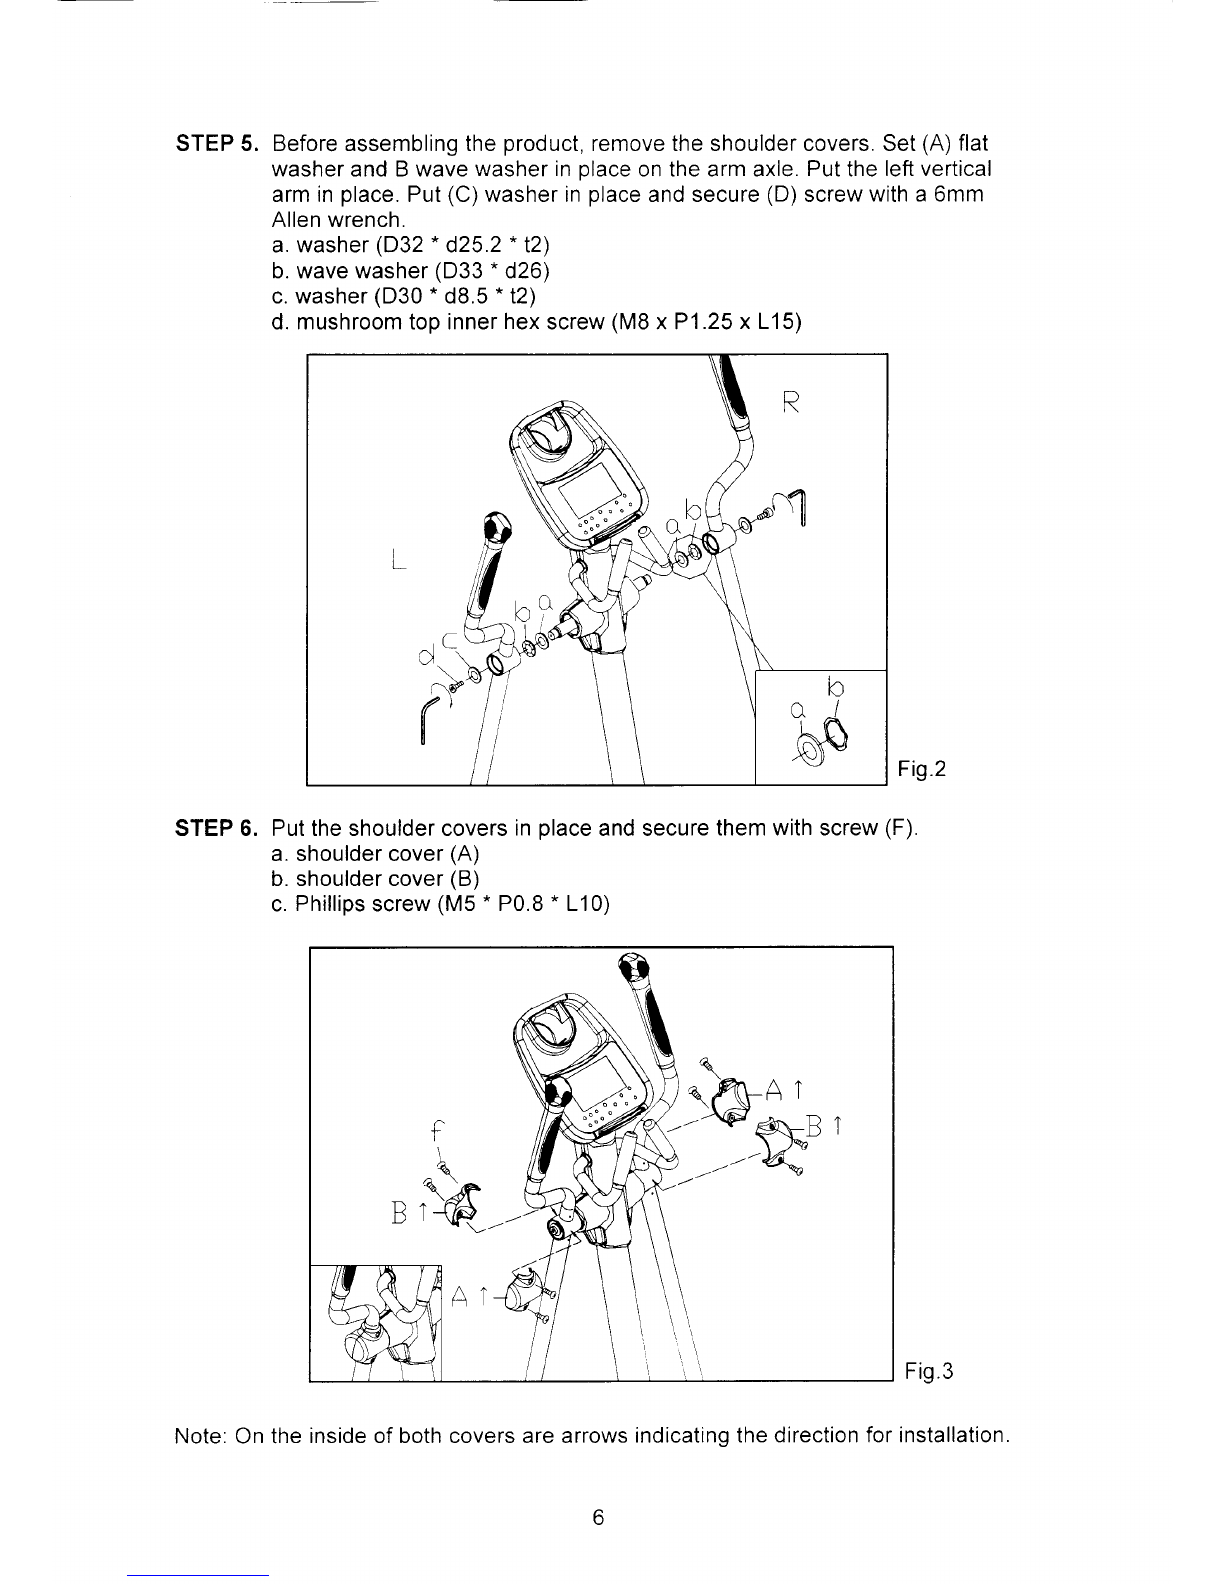
STEP5. Beforeassemblingthe
product,
removetheshouldercovers.Set
(A)
flat
washerandBwave
washerin
olaceonthearmaxle.
Put
the
leftvertical
armin
place.
Put
(C)
washerin
place
andsecure
(D)
screw
witha6mm
Allenwrench.
a.washer
(D32
. d25.2-t2)
b.wavewasher
(D33
. d26)
c.washer
(D30.
d8.5
. t2)
d.mushroomtopinner
hex
screw
(M8
x P1.25
x L15)
Fig.2
STEP6. Puttheshouldercovers
in
place
andsecure
themwithscrew
(F).
a.shouldercover
(A)
b.shouldercover
(B)
c.
Phillips
screw
(M5
. P0.8
. L10)
Fig.3
Note:Onthe
insideofbothcoversarearrows
indicatingthe
directionforinstallation.
h
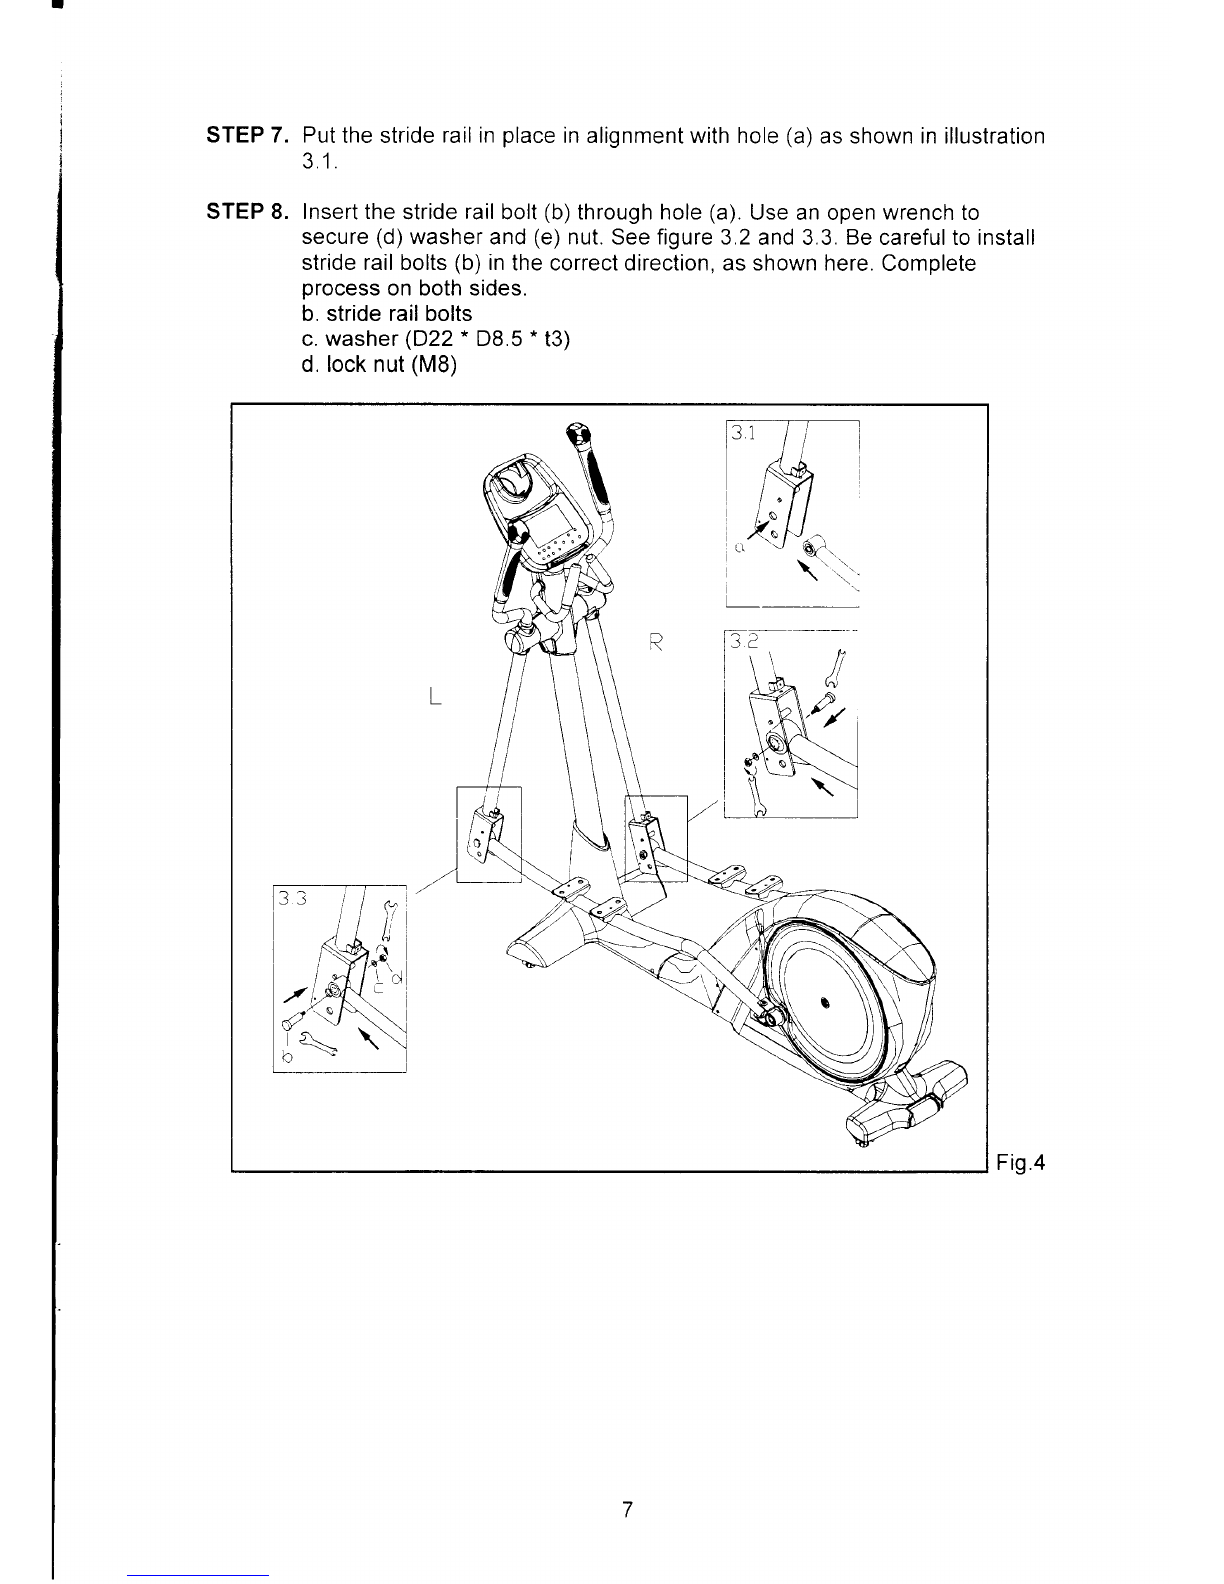
STEP7. Put
thestride
railin
place
inalignmentwithhole
(a)
asshowninillustration
AA
J. t.
STEP8. Insertthe
stride
rail
bolt
(b)
throughhole
(a).
Useanopenwrenchto
secure
(d)
washer
and
(e)
nut.Seefigure
3.2and3.3.
Be
carefultoinstall
striderailbolts
(b)
in
thecorrectdirection,asshownhere.
Complete
process
onbothsides.
b.striderailbolts
c.washer
(D22.
D8.5
. t3)
d.locknut
(MB)
I
3i !
Ie=- \
b
Fig.4

STEP5. Before
assemblingthe
product,
remove
theshouldercovers.Set
(A)
flat
washerandB
wavewasher
in
place
onthearmaxle.
Put
theleftvertical
armin
place.
Put
(C)
washerin
place
andsecure
(D)
screwwitha6mm
Allenwrench.
a.washer
(D32
-d25.2.t2)
b.wavewasher
(D33
. d26)
c.washer
(D30
. d8.5
. t2)
d.mushroomtop
innerhexscrew
(M8
x P1.25x L15)
Fig.2
STEP
6. Puttheshoulder
covers
in
place
andsecurethem
with
screw
(F).
a.shouldercover
(A)
b.
shoulder
cover
(B)
c.Phillipsscrew
(M5
. P0.8
. L10)
Fig.3
cCt
^>
('
Note:
Onthe
insideof
bothcoversarearrowsindicatinqthe
direction
forinstallation

STEP
10.First,install
(d)
stride
railinner
cover
andsecure
itwithscrew
(a).
Then
installcover
(c)
and
secureit
with
screw
(b).
a.Phillips
headscrew
(M5.P0.08.15)
b.Phillips
headscrew
(M5*P0.08-15)
c.stride
railrearcover
(left)
d.stride
rail
inner
cover
e.stride
railbackcover
(right)
Fig.7
9
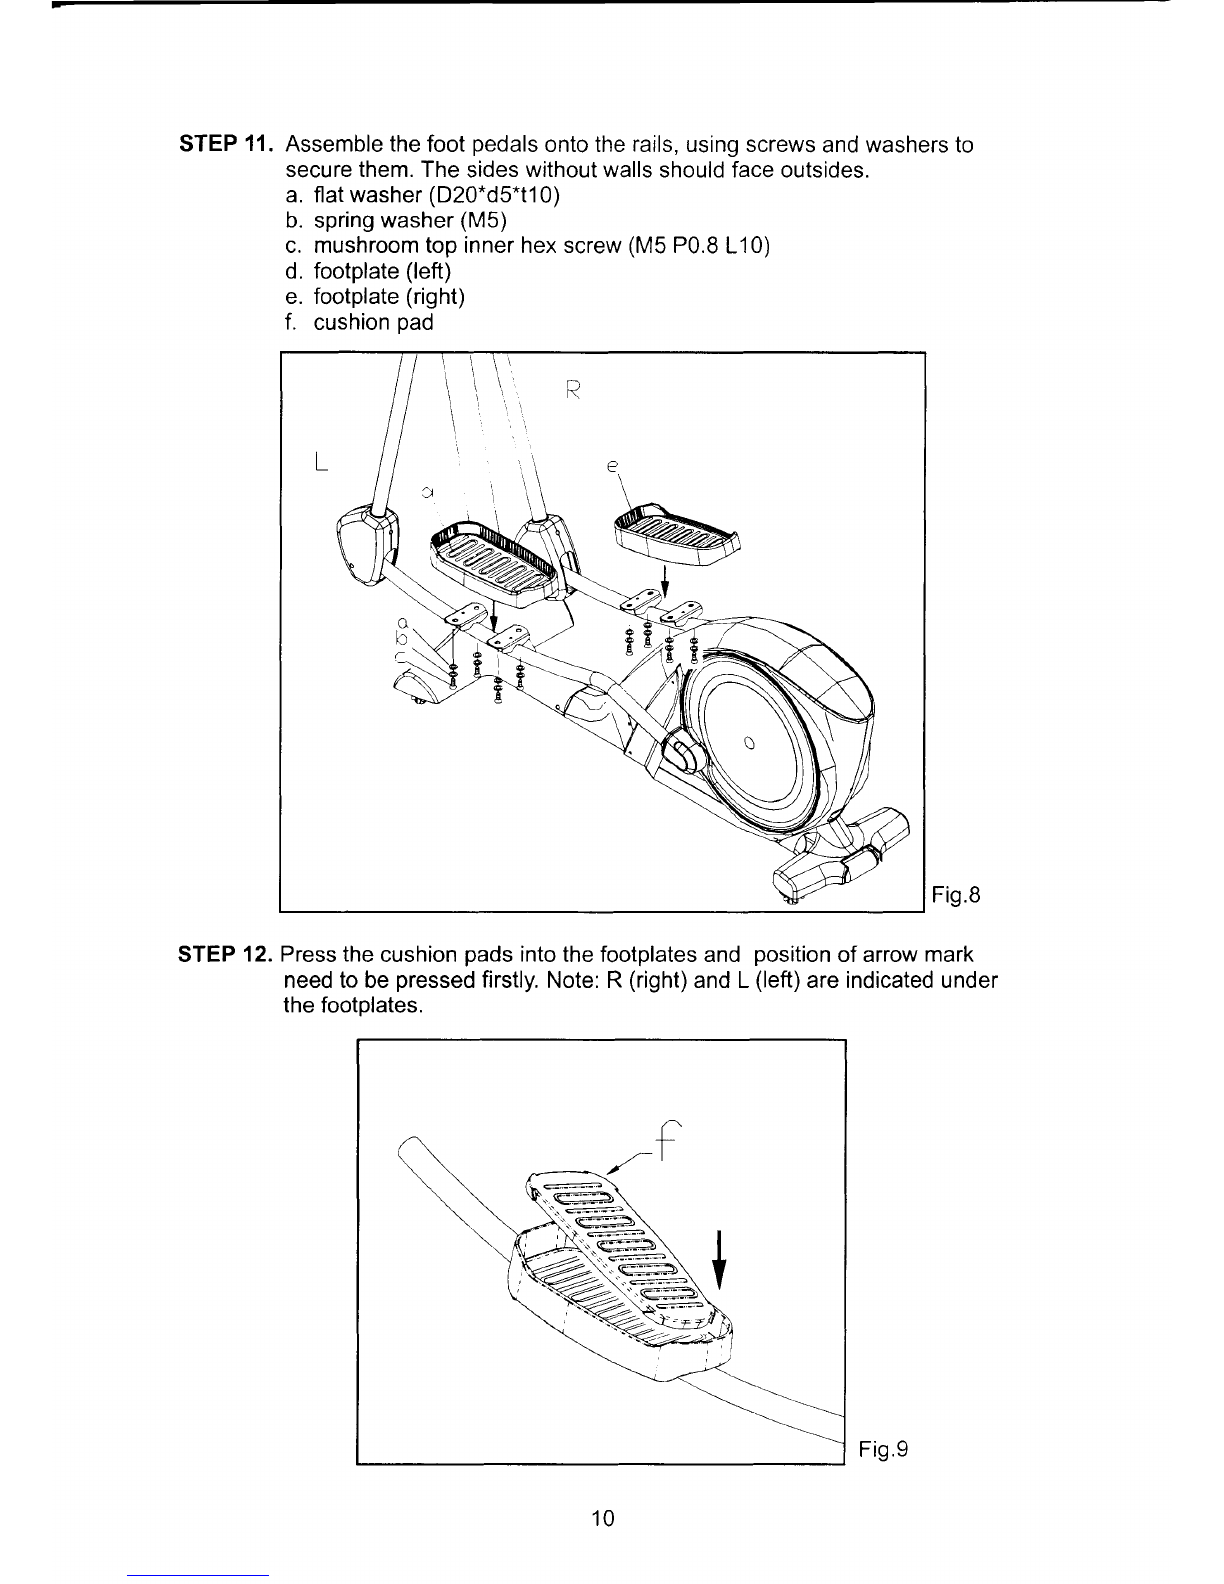
STEP
11.
Assemblethe
foot
pedals
ontothe
rails,
usingscrews
andwashersto
securethem.The
sides
withoutwalls
shouldfaceoutsides.
a.flatwasher
(D20.d5.t10)
b. spring
washer
(M5)
c. mushroomtopinnerhexscrew
(M5
P0.8
L10)
d. footplate
(left)
e. footplate
(right)
f. cushion
pad
Fig.B
STEP
12.Pressthe
cushion
pads
into
thefootplatesandposition
ofarrow
mark
needtobe
pressed
firstly.
Note:R
(right)
andL
(left)
areindicatedunder
the
footplates.
10
Fig.9

FOOTLEVELADJUSMENT
STEP
1. lf
the
unitrocks
or
isnotlevel,
adjust
levelersatthefront
of
theunit.First,
adjustthefoot
(A),
thensecureitin
place
bytightening
washer
(B)
against
theframe,asshown.
Fig.10
Connectto Power
The
power
socket
is
atthelower
rear
part
oftheellipticaltrainer.Insert
the
power
cordasshown.
4a
tl
Fig.11

E81G
DISPLAY
DisplayLayout
F TirES,s
Workout
feedback
windowsinclude:
WORKOUTLEVEL,
HR;TIME,TOTAL
STRIDES;
STRIDES/MIN,
CALORIES;
DISTANCE.WA
rff.&qwt
iA
t'-"';iru;iruUf"""
,. LEVEL JI
-
\7
o
&
TOT'CIIHEART?ATE
9
Plocebothhondsfirnly*lti contoctsensoo
forba* rcsults.
DISPLAY
SPECIFICATIONS
WORKOUT
LEVEL
(Level
ofresistance):
I - 14
WATT0-9999
TIME:
0 : 00-99: 59
(Range
from5:00
- 99:00)
TOTAL
STRIDES:0-9999
STRIDES/MIN:
10
- 120
CALORIES:0.0-9999
(K-cal)
12
Dot
Matrix
Display
l-ffi-]
l. PruSTART
2. SGlGctUSER
3. S.kctAGE
,f. S.IGGIWEIGHT
9. Scl6t PROGRAII
6. sGl€ctTll{E

DISTANCE:
0.00-9999Mileor0.0-9999Km
HEARTRATE:40-250
USER:ltcanbestored
personal's
setdataof
4
persons.
AGE:10-99
Weight:
66-330lbs;130-150kgs
PROGRAM:TRACK.RANDOM
. INTERVAL.GLUTE
.CARDIO.
WTLoss
BasicFunctions
1.DotMatrixshows
programprofiles
andotherinformation.
2.WorkoutFeedbackdisplaysworkoutinformationincludingWORKOUTLEVEL&
?
HR
. TIME&TOTALSTRIDES
. STRIDES/MIN&CALORIES
. DISTANCE&WATT.
3.KeypadsincludeTRACK
. RANDOM
. INTERVAL
. GLUTE
. CARDIO
. WT
LOSS
. WORKOUTLEVEL
A . WORKOUTLEVEL
V . QUICK
START
.
START
. CHANGE
. ENTER
. STOP/HOLDTORESET.
DisplayControls
StartingDisplay:Whenthe
machine
firststartsup,thedoxmatrixwindowshows
"E81".
1.
QUICK
START
Press
the
QUICK
START
key
to
immediately
startexercising.
Time
accumulates
from0:00.lfentering
QUICK
STARTmode,the
"TRACK
LED"lightsand
TRACK
workoutmode
begins.(Time
countsupfrom0:00.)
2.
QUICK
STARTunderUsermode
A.Inusermode,
press
ENTER,then
press
QUICK
START.
The
user's
previous
usersettingworkoutmodeandworkouttimeappear.
B.During
the
workout,when
you
press
STOP,
QUICK
START
mode
ends.
Theworkoutfeedbackwindowwilldisplaytheuser'stotalworkouttimeand
totalcalories.TheDotMatrix
windowwill
show
"ACCU
DATA".
Then
the
startingscreen
will
appear.
IJ

3.START
A.USERsetting
Afterturningontheequipment,
press
theSTARTkey,the
USERLED
lights
up
"1"
appearsinthedotmatrixwindow.Press
A or
V to
view
users:Pressingup
produces
USER1* USER2'- USER3
-- USER4
-' USER1
- USER
2
- USER3...,etc.
PressingVproducesUSER4
'USER3-- USER2- USER1 : USER4
- USER3- USER
2....PressENTER
toconfirm
your
userselection
and
to
enter
Agemode.
ii!When
you
selectthe
USER,
thetotal
workout
time,
kilometer,
andcalories
for
thatuser
willappear.
-i.
The
user'stotal
workout
timeappearsas
hh:mm
(hours.
minutes).lfworkout
timeexceeds
99: 59,minutes
disappear.
Hoursaccummulate
to9999.
Toeraseauser'saccumulativeinformation,intheuserscreen,holdSTOP
+
ENTER
for
three
secondstodelete
theUSER
Record.The
display
will
beep
onceand
then
show
theusersettingscreen.
B.AgeSetting
Whenthe
AGE
LED
flashes,
press
AV toinput
your
age.PressENTERto
confirm
your
choiceand
proceed
to
the
weight
setting.
C.WeightSetting
WTLEDflashes,
press
the
AV key
to
input
your
weight.
The
defaultvalue
is165lbs
or75
kgs.PressENTERto
confirm
yourchoice
and
proceed
tothe
program
mode.
D,ProgramSelection
(1)
TheProgramLEDwillflash.TheDotMatrixwindowwillshow
"SELECT
PROGRAM
",
promptingyou
tochooseaprogram.
(2)
Pressthe
program
keyof
your
choice,then
press
ENTERtoconfirm
your
choice.
E.Time
TheTimeLEDdisplaystheuser's
previous
workouttime.Pressthe
A or
V
keytoestablish
workout
duration.
Range.
5:00-99:00.
PressENTERto
confirm
your
choice.
14

DefaultValue
1.
Total
distance
In
theusermode,
press
WORKOUT
LEVEL
V +
WORKOUTLEVEL
A for
three
minutes.
Total
distance
appears
as
eight
digits
acrossthetimeanddistance
windows.
Distanceunits,MILE
orKM,
appear
in
theDotMatrixwindow.Press
ENTER
toproceed
tototaltime.
2.
Total
time
Time
appears
aseight
digitsacross
time
and
distancewindows.HOUR
appears
in
theDotMatrix
window.
Press
ENTERto
proceed
tothelmperial/Metric
parameter.
3. SetupLBor KG
Press
Aor V to
toggle
between
"LB
"(metric
system)or
"KG"
(imperial
system).
PressENTER
toconfirm
your
choice
and
returnto
thestartupscreen.
Keypad
1.WORKOUT
LEVEL
LIV Basic
Operation
(1)
Inworkout
mode,
press
WORKOUT
LEVEL
|'IY toadjust
workout
setting.
(2)
In
usersettingmode,useWORKOUTLEVEL
A/V toadjust
user's
age/weighVworkouttime.
2.
CHANGE
Thisdisplay
showsfourtypesoffeedback.
Itautomatically
cycleseversixseconds
as
follows:
WORKO
UT LEVEL.----'HR . TlME.---- TOTALSTRIDES . STR
IDES/MIN.-------
CALORIES
. DISTANCE.-*-WATT.
Press
CHANGEkeyto
lock
on
one
group
ofinformation
currentlydisplayed.
Press
CHANGEkeyagainto
switchtodifferent
group
ofdisplay.Finally,
press
CHANGEkey
again
toresume
scanning.
3.QUICK
START
(1)
Press
the
QUICK
STARTkey
tostart
exercisingwithout
first
inputting
user
information.
15
(2)
While
intheuser
window,
pressing
the
QUICK
START
key
makesthe
display
showtheuser'sexercise
program
andworkouttime.
lf
the
previous
userdidn't
exercise
in
any
program,
TRACKmodeanda
workout
time
of30minuteswill
appear.
4.ProgramModeExplanation
Whentheindicator
lights
up,
pressprogram
mode
- INTERVAL
. RANDOM
.
TRACK
. GLUTE
. CARDIO
. WTLOSStostartexercising.
5.STOP/HOLD
TORESET
STOP:
Press
this
keytostop
your
workout.
RESET:Hold
this
keyfortwosecondstoreturn
tothe
startingscreen.
6.
ENTER:Enterall
informationand
press
theENTER
key
toconfirm
your
choice.
ProgramOverview
TRACK
1.
0.25
mile/perlap
2.Preset
resistancelevelis1.Adjusttheworkout
levelby
pressing
WORKOUT
LEVEL
l.IY .Workoutlevelisfrom1to 14.
RANDOM
1.TheRandomProgramcontainsan
infinitenumberof
programs.
Continueto
press
the
RandomProgramkeyuntil
you
find
your
preferred
course.
Then,startexercising.
Timecountsdowninrandom
mode.
2.Press
WORKOUTLEVEL
LIV toadjust
resistance.
INTERVAL
Choosethe
INTERVALmodeand
input
your
desiredworkouttime
asfollows:
1.Thedot
matrixwindowshowsthe
message
"ENTER
WORK
TIME
".
TheTimeWindowlightsup.
PressWORKOUTLEVEL
l.IY tomake
your
setting
Pressthe
ENTERkevtoconfirm
vour
choice.
2.
The
dot
matrixwindowshows
themessage
"ENTER
RESTLEVEL."
Workout
LevelWindowlightsup.
PressWORKOUTLEVEL
LIV toestablish
the
restresistancelevel.
Press
the
ENTERkevtoconfirm
vour
choice.
16

3.Thedotmatrixwindow
shows
the
message
"ENTER
WORK
TIME.
"
TheTime
Windowlightsup Press
WORKOUTLEVEL
LIY toestablishthe
workout
time.
Press
the
ENTER
key
to
confirm
your
choice.
4.The
dot
matrixwindow
shows
the
message
" ENTERWORKLEVEL."
Workout
LevelWindowlights
up.
Press
WORKOUTLEVEL
LIV toestablish
work
level.Press
the
ENTERkey
toconfirm
your
choice.
GLUTE
1.Glute
programs
are
designedspecifically
toexercisethe
glute
musclesofthe
body.There
arethree
workout
modes.Press
theGLUTEkeyto
togglebetween
thethreemodes
asshown:
LIGHT_-
MEDIUM
- HEAVY
---
LIGHT.
2.PressWORKOUTLEVEL
LIV toadjust
current
workoutlevel.
WTLoss( HRC6s%
)/ CARDIO
( HRC80%
)
These
programs
allow
you
toexercise
atatargeted
heartrate
byautomatically
changingresistancelevels
andthestridespeed.
1.Target
Heart
Rates.
(1).VVf
LOSS:65%
Heartrate
Control:
(220
-AGE)
x65%
(2).CARDIO:
80%Heartrate
Control
: (220
-
AGE)
x809/o
2.In
these
programs,
ifnoHeart
Ratesignalis
detectedduringtheworkout,a
message
"NO
HEART
RATE
READING,PLEASECHECKTRANSMITTER"
will
appear
onthescreen.The
program
will
notchange
the
resistancelevelunder
this
circumstance.
3.Once
you
enter
acardio
program,
thefollowingfigures
appear:
The
HRindicatorflashes
and
the
user's
actual
heart
rateappears.
USER AGE WT KG LB
n f trn frnltrIr trIrlllnlnln n trtrr
E D'- -.,'-
ItIII trI n n tr
I n I I I trtrtr[ u
f f l-r ltlllllDlllDlll <-l
tr U r L_t
u n IlI I U I tr I n I X n trI n!
NU
T Nf I[tr DIN tr TINIIITNTINTTTN
nnnnnlft t]!nnntr !DUntrnnnn
lI J-+ DDDIDDDI e',t IDlItrtrnID
n n r-lL--l
r-L
I IlIl I lltll ! ! n n ! tr n D !
17
3-1.
(1)
Flash
heart
figure
(2)
Target
heart
rate.
(3)
Actual
RPM
(4)
Suggested
RPM
3-2.
Preset
values
is
SPM.
These
programs
will
detect
the
user's
heart
rate
and
adjustresistance
levels
accordingly.
3-3.
lfthe
user
stops
exercising,
"STEP
TO
START"
appears
twice
onthe
dotmatrix
display.
lf
thereis
still
noone
pedaling,
thenreverts
to50
SpM.
PAUSE
1.
When
you
stopexercising.
theword
"PAUSE"
scrolls
across
the
dotmatrix
window.
Resume
exercising
or
press
the
START
key
toend
"PAUSE"
action
and
to
return
tothelast
screen.
2. AfterPause
is
activated,
stopexercising
for
over
twominutes
toreturn
to
starting
display.
END
OFWORKOUT
'1.
When
theworkout
timecounts
down
to
"0",
andthe
display
beeps
sound
forthree
times(every
05
second).
Theinformation
displaywindows
show
your
workout
TotalTime,
Total
Calories,
andAverage
HR.The
DotMatrix
window
shows
the
words
"ACCU
DATA".
2.
Attheend
ofone
workout
cvcle.
(1)The
displayreturns
to
initialbanner
if
the
workoutwas
started
by
QUICK
START.
(2)
lfthe
workout
was
started
under
the
program
mode,the
displayreturns
to
Program
mode
andPROGRAM
indicator
flashes.
The
LED
windowwill
show
"SELECT
PROGRAM
ORPRESS
START".
You
can
press
new
workout
or
you
can
press
START
toreset
user
information.
18
Table of contents
Other SPORTS ART Elliptical Trainer manuals


