Sportscaster R101 User manual
XM Satellite RRadio RReceiver
IInnssttrruuccttiioonnMMaannuuaall
Model RR101
Important: This manual contains important safety and operating information. Please read, understand,
and follow the instructions in this manual. Failure to do so could result in personal injury, death, and/or
damage to your Sportscaster, accessories, and/or to your vehicle or property.

This device complies with Part 15 of the FCC Rules.
Operation is subject to the following two conditions:
1. This device may not cause harmful interference, and
2. This device must accept any interference received,
including interference that may cause undesired
operation.
The AGT XM Sportscaster Satellite Radio Receiver incorporates an
FM transmitter and is therefore classified as an intentional
transmitter. Changes or modifications to the unit not expressly
approved by AGT can void your authority to operate this
equipment.
IMPORTANT: The FCC and FAA have not certified the AGT XM
Sportscaster Satellite Radio Receiver for use in any aircraft
(neither portable nor permanent installation). Therefore, AGT
cannot support this type of application or installation.
This is the safety alert symbol. It is used to alert you to
potential personal injury hazards. Obey all safety messages
that follow this symbol to avoid possible injury or death.

Table oofCContents
3
Table of Contents
A Brief History 4
About Advanced Global Technology 4
About XM Satellite Radio 4

ABBrief HHistory
A Brief History
Thank you for purchasing the new AGT Sportscaster Satellite Radio Receiver-smaller,
lighter, and more versatile than any receiver available.
• Dock your Sportscaster into cradles that are easily installed in your vehicle or your
home. Connect your Sportscaster's power, and antenna connectors and you are
ready to enjoy XM Satellite Radio.
• A built-in FM transmitter allows you to hear XM programming on your car or home
FM radio, using an unused frequency on the FM band.
• Available accessory kits make your Sportscaster useable in the home or on the go.
About Advanced Global Technology
Advanced Global Technology (AGT) is a worldwide leader in mobile, home and portable
electronics and audio technology. With its exciting line of satellite radio products,
AGT offers a broad portfolio of products to answer a wide variety of information and
entertainment needs-in the vehicle, home, office, and portable environments.
About XM Satellite Radio
XM Satellite Radio is the nation's leading provider of satellite radio with more than 6
million subscribers. XM offers more than 160 digital radio channels: 100% commercial-
free music channels, ranging from hip hop to opera, rock to bluegrass, big band to
reggae; 71 talk radio channels, including news, sports, comedy, and children's pro-
gramming; and 21 channels of round-the-clock traffic and weather reports.
Subscribers pay $12.95 a month for the XM service, which was named Best Radio
Service by the music industry's leading magazine Billboard at the 2004 Digital
Entertainment Awards. Exclusive programming on XM includes Major League
Baseball® games for every team, all season long. You can listen to XM on a variety of
satellite radio receivers for the vehicle, home, and portable use. In-dash XM radios are
available in more than 120 vehicle models for the 2006 model year. XM is broadcast
via satellite from coast to coast, so you can listen to XM continuously as you travel
across the country.
* To receive the XM service, you must subscribe to XM. Available in the continental United States and Canada only. Satellite radio reception depends
on the ability of the antenna to receive a signal. The signal may not be available in buildings or if obstructed (e.g., by mountains, trees, bridges, etc).
4

Let’s GGet SStarted
5
Let's Get Started
First, some important reminders:
We know you're eager to turn on your new Sportscaster and listen to XM, but please
take a moment to read through this instruction manual.
Warning: This manual contains important safety and operating information.
Please read, understand, and follow the instructions in this manual. Failure to do so
could result in personal injury, death, and/or damage to your Sportscaster,
accessories, and/or to your vehicle or property.
Warning: When using this product it is always important to keep your eyes on
the road and your hands on the wheel. Not doing so could result in injury and/or
death to you or to others and/or in property damage.
Caution: Use your Sportscaster only with the enclosed components or approved
accessories. Do not modify wires or other connectors in any way; you could cause a
malfunction, which could damage your Sportscaster and will void your warranty.
Caution: Refrain from using food or drinks near your Sportscaster. Spilling food
or drinks on the unit can damage it. Also, improperly installing the antenna cable
can cause leaks, which can damage your Sportscaster and/or your vehicle.
Let’s GGet SStarted
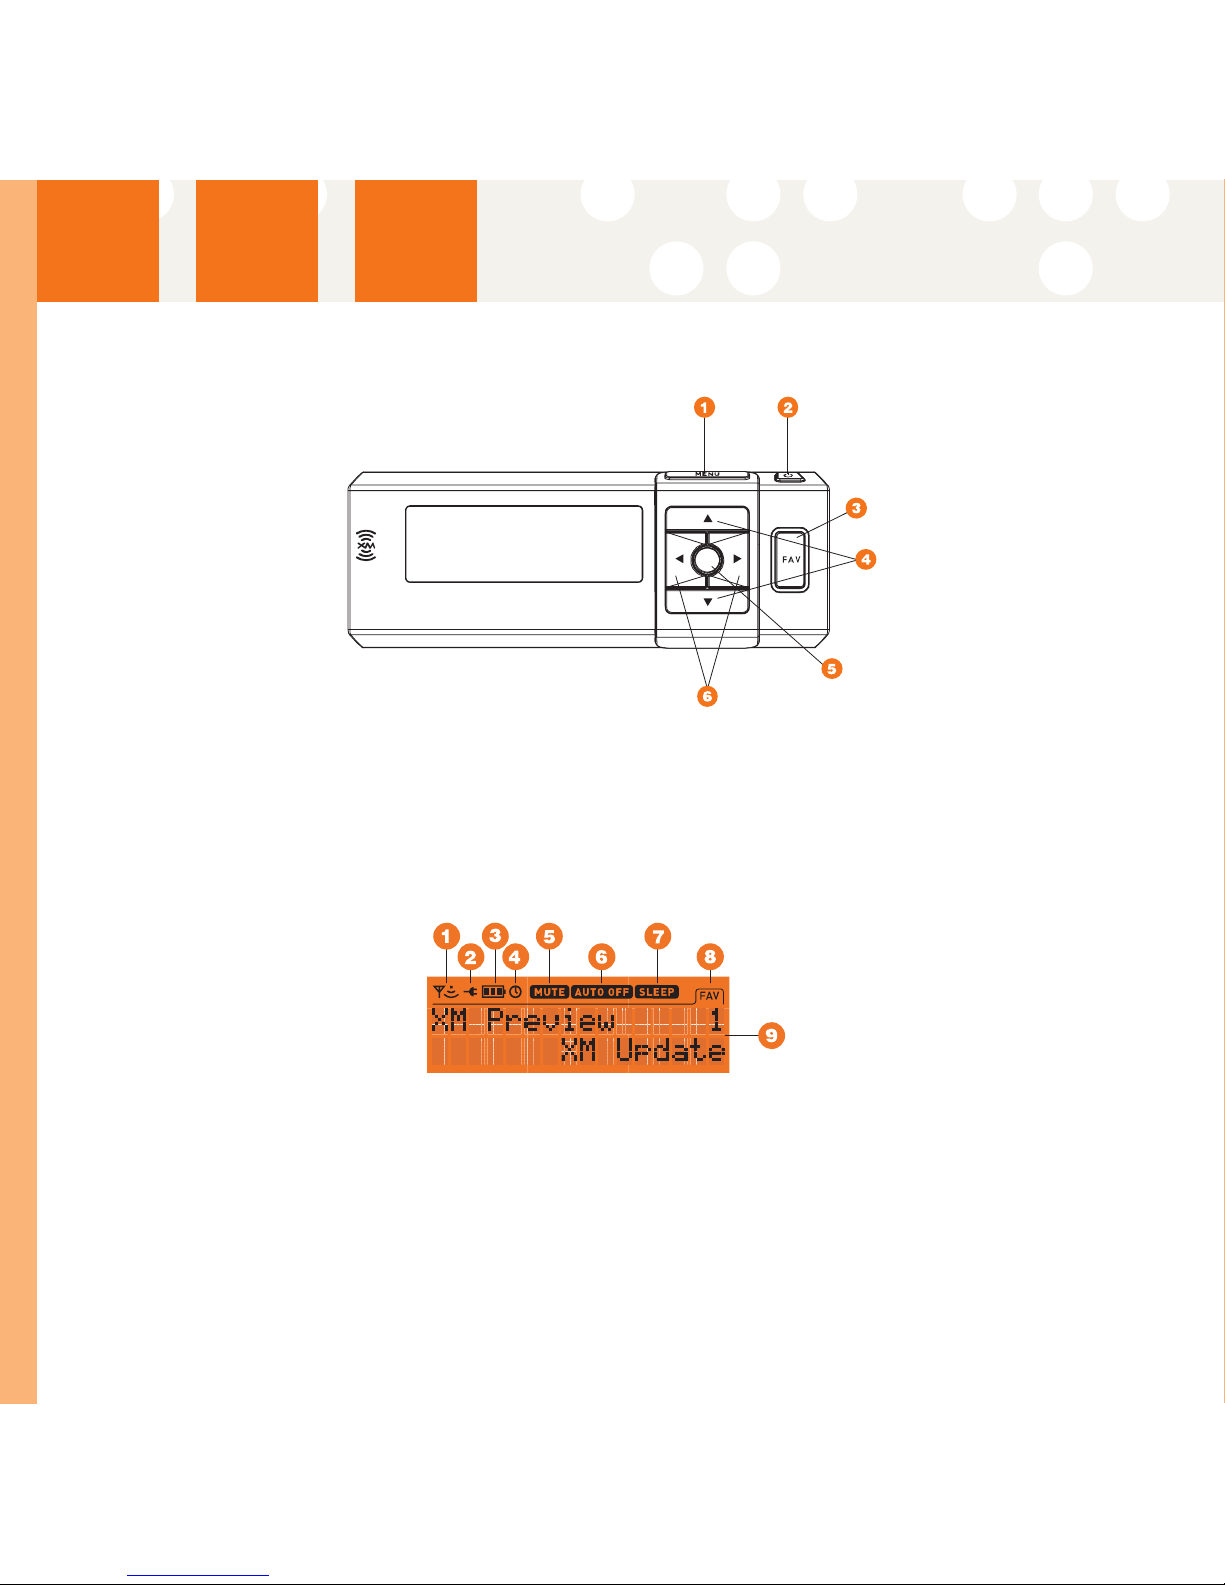
Controls
1. MMeennuu- access advanced features and configuration options
2. PPoowweerr
3. FFaavv((FFaavvoorriitteess))- store up to 30 of your favorite channels
4. UUppaannddDDoowwnnAArrrroowwss- change channels, menu options
5. SSeelleecctt- enter, change display mode options
6. RRiigghhttaannddLLeeffttAArrrroowwss- change categories, menu options
Display
1. SSiiggnnaallSSttrreennggtthhIInnddiiccaattoorr- 1 to 3 bars
2. PPoowweerrCCoonnnneeccttiioonnIInnddiiccaattoorr- displayed when connected to external power
3. BBaatttteerryyIInnddiiccaattoorr- displays battery strength and charging status
4. AAllaarrmmIInnddiiccaattoorr- displayed when alarm clock feature is active
5. MMuuttee
6. AAuuttooOOffffIInnddiiccaattoorr- displayed when auto shutdown feature is active
7. SSlleeeeppIInnddiiccaattoorr- displayed when sleep mode feature is active
8. FFaavv((FFaavvoorriitteess))- displayed when favorite tuning mode is active
9. AAddddiittiioonnaallIInnffoo- channel name, channel number, category name, artist, song title,
time and other information.
6

Let’s GGet SStarted
7
Remote Control
1. MMeennuu- access advanced features and configuration options
2. PPoowweerr
3. FFaavv((FFaavvoorriitteess))- store up to 30 of your favorite channels
4. UUppaannddDDoowwnnAArrrroowwss- change channels, menu options
5. SSeelleecctt- enter, change display mode options
6. NNuummbbeerrss- enter a channel directly
7. MMuuttee
8. RRiigghhttaannddLLeeffttAArrrroowwss- change categories, menu options
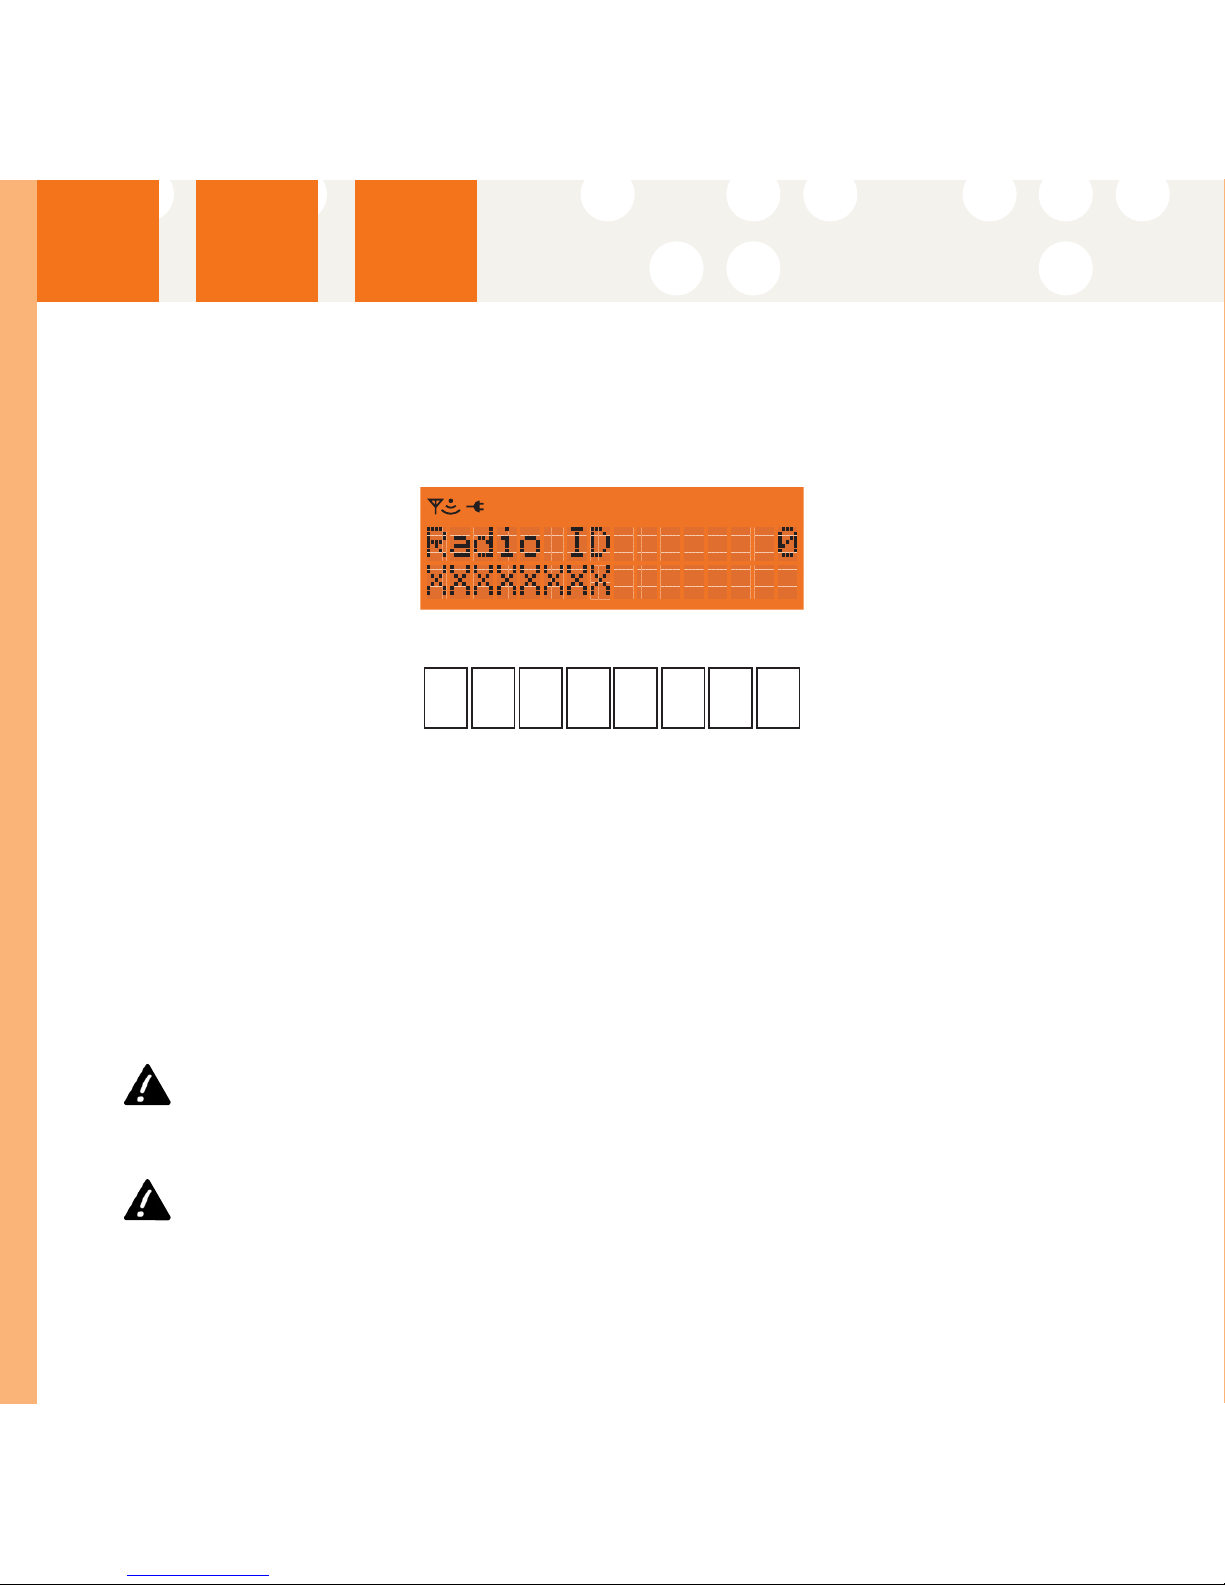
Activating YYour SSportscaster
Activating Your Sportscaster
Use the Up and Down Arrow buttons to tune Channel 0, then push the "SSeelleecctt"
button. You should see an 8-character XM Radio ID in the display. The XM Radio ID is
also Printed on the package.)
Please write the XM Radio ID here:
Note: Carefully check your XM Radio ID. The lletters II,OO,SS,aand FFaare nnot uused.
Activate your XM Satellite Radio service by contacting XM at
http://activate.xmradio.com or by calling 1.800.XM.RADIO (1.800.967.2346).
You will need your XM Radio ID and a major credit card.
XM will send a signal from the satellites to activate the full channel lineup. Activation
normally takes 10 to 15 minutes, but during peak busy periods, you may need to keep
your Sportscaster on for up to an hour to complete the activation process. When you
can access the full channel lineup on your Sportscaster, you're done!
Warning: When using this product it is always important to keep your eyes on
the road and your hands on the wheel. Not doing so could result in injury and/or
death to you or to others and/or in property damage.
Warning: Failure to do so could result in personal injury, death, and/or damage
to your Sportscaster, accessories, and/or to your vehicle or property.
8

Installation
9
Installation
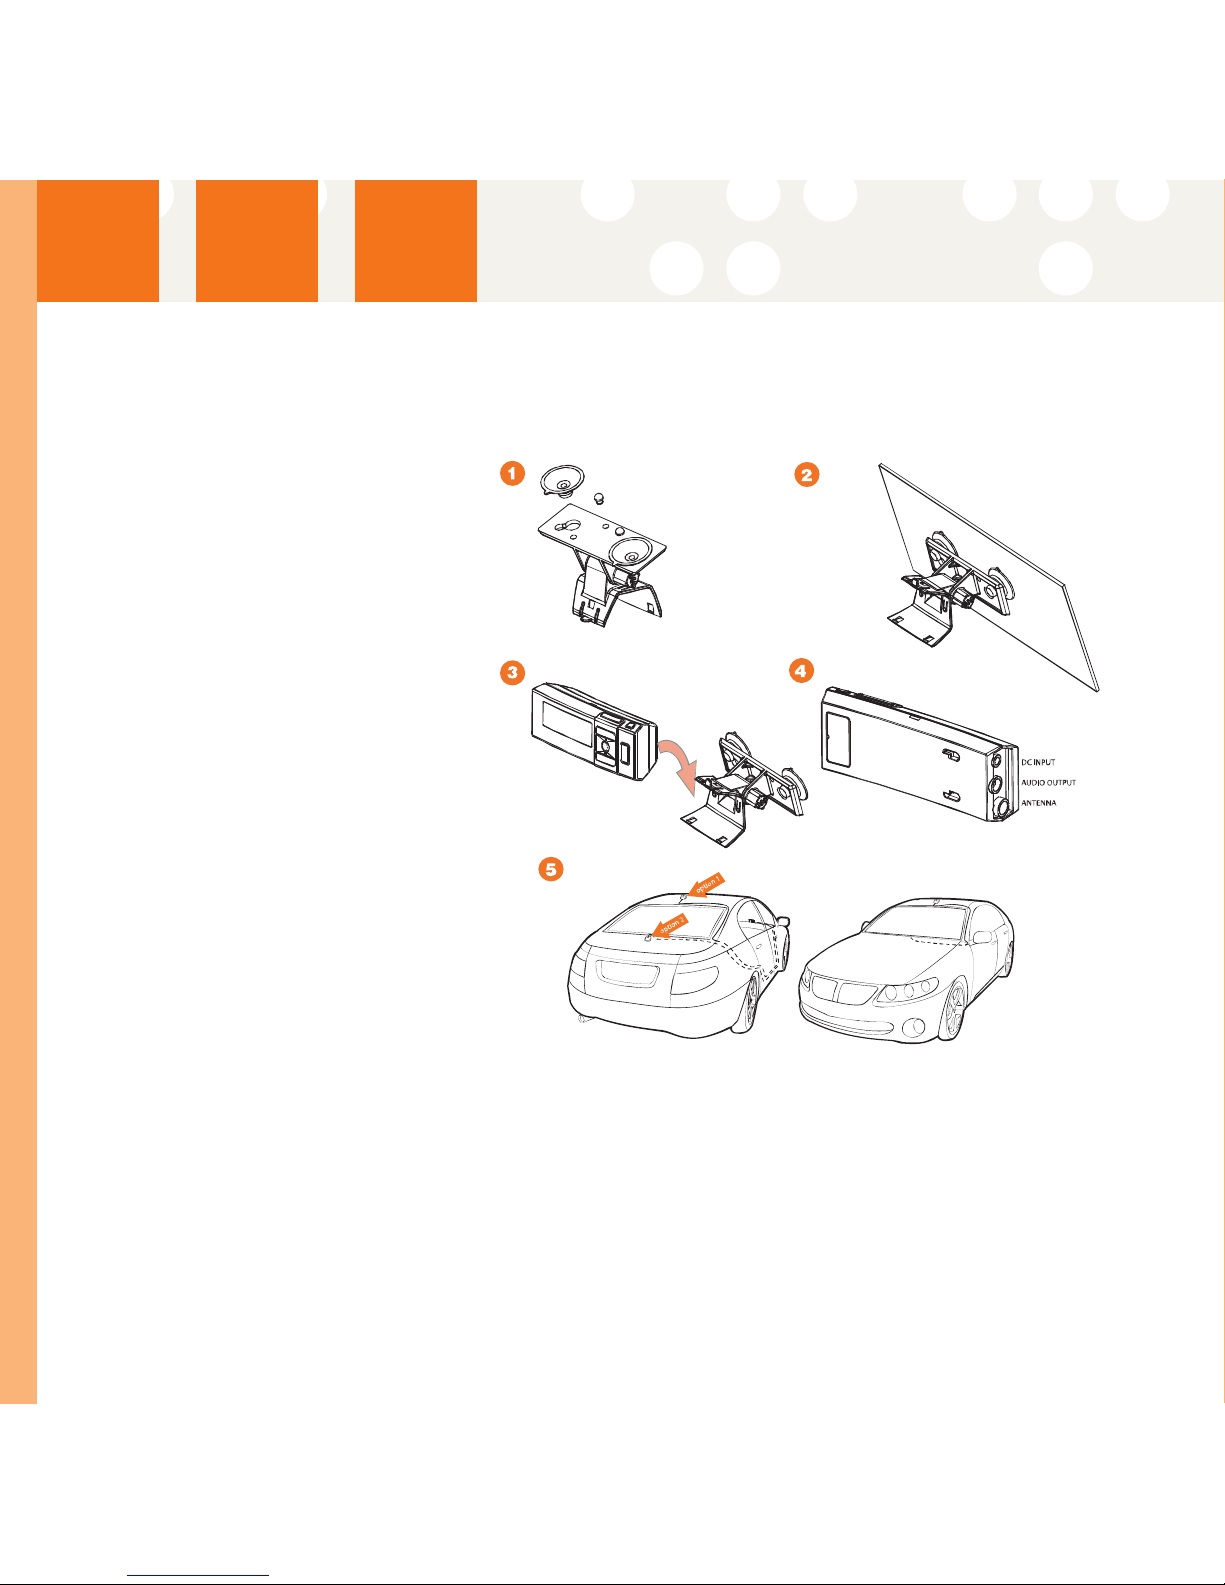
Mounting to the Dashboard or Console
If using the AMPs mounting
holes to fasten the Sportscaster
vehicle mount to your dash or
console, Bolt or screw the
Sportscaster vehicle mount in
place and proceed to step 3.
1. Remove the protective film
from one side of the supplied
double sided tape. Press
firmly to secure the tape to
the bottom of the vehicle
mount. (Figure 1).
2. Remove the protective film
from the remaining side of
the double sided tape. Place
the vehicle mount in the
appropriate location on the
vehicle's dash or console and
press firmly. (Figure 2).
3. Push the Sportscaster into
the vehicle mount until it
locks into place. (Figure 3). To
remove the Sportscaster,
push the release tab on the
top of the vehicle mount
upward and pull the Sportscaster forward.
4. Connect the DC Power, antenna and audio connectors (if required) to the appropri-
ate jacks. (Figure 4).
5. For best reception, place the XM antenna on the vehicle’s metallic roof, at least 6”
from any window or sunroof. It can be placed in the front, middle, or rear of the
roof. (Figure 5).
If the car is a convertible, you may mount the antenna on the metal trunk lid. It
should be at least 4” from the rear window. Ensure that the antenna and cable
don’t interfere with the opening or closing of the convertible top and the trunk lid.
Installation
Installation
Mounting to the Windshield
1. Insert the 2 suction cups into
the larger side of the holes
on the vehicle mounting
bracket and slide outward to
lock in place. (Figure 1).
2. Loosen the thumb screw and
rotate the Sportscaster
vehicle bracket to the
appropriate angle for your
vehicle's windshield.
Retighten the thumb screw.
Place the suction cups on the
Sportscaster vehicle mount in
an appropriate location on
your windshield. Press firmly
to secure the Sportscaster in
place. (Figure 2).
3. Push the Sportscaster into
the vehicle mount until it
locks into place. (Figure 3). To
remove the Sportscaster XM
Satellite Radio Receiver, push
the release tab on the top of
the Sportscaster vehicle
mount upward and pull the
Sportscaster forward.
4. Connect the DC Power, antenna and audio connectors (if required) to the appro-
priate jacks. (Figure 4).
5. For best reception, place the XM antenna on the vehicle’s metallic roof, at least 6”
from any window or sunroof. It can be placed in the front, middle, or rear of the
roof. (Figure 5).
If the car is a convertible, you may mount the antenna on the metal trunk lid. It
should be at least 4” from the rear window. Ensure that the antenna and cable
don’t interfere with the opening or closing of the convertible top and the trunk lid.
10
Installation
11
Installation
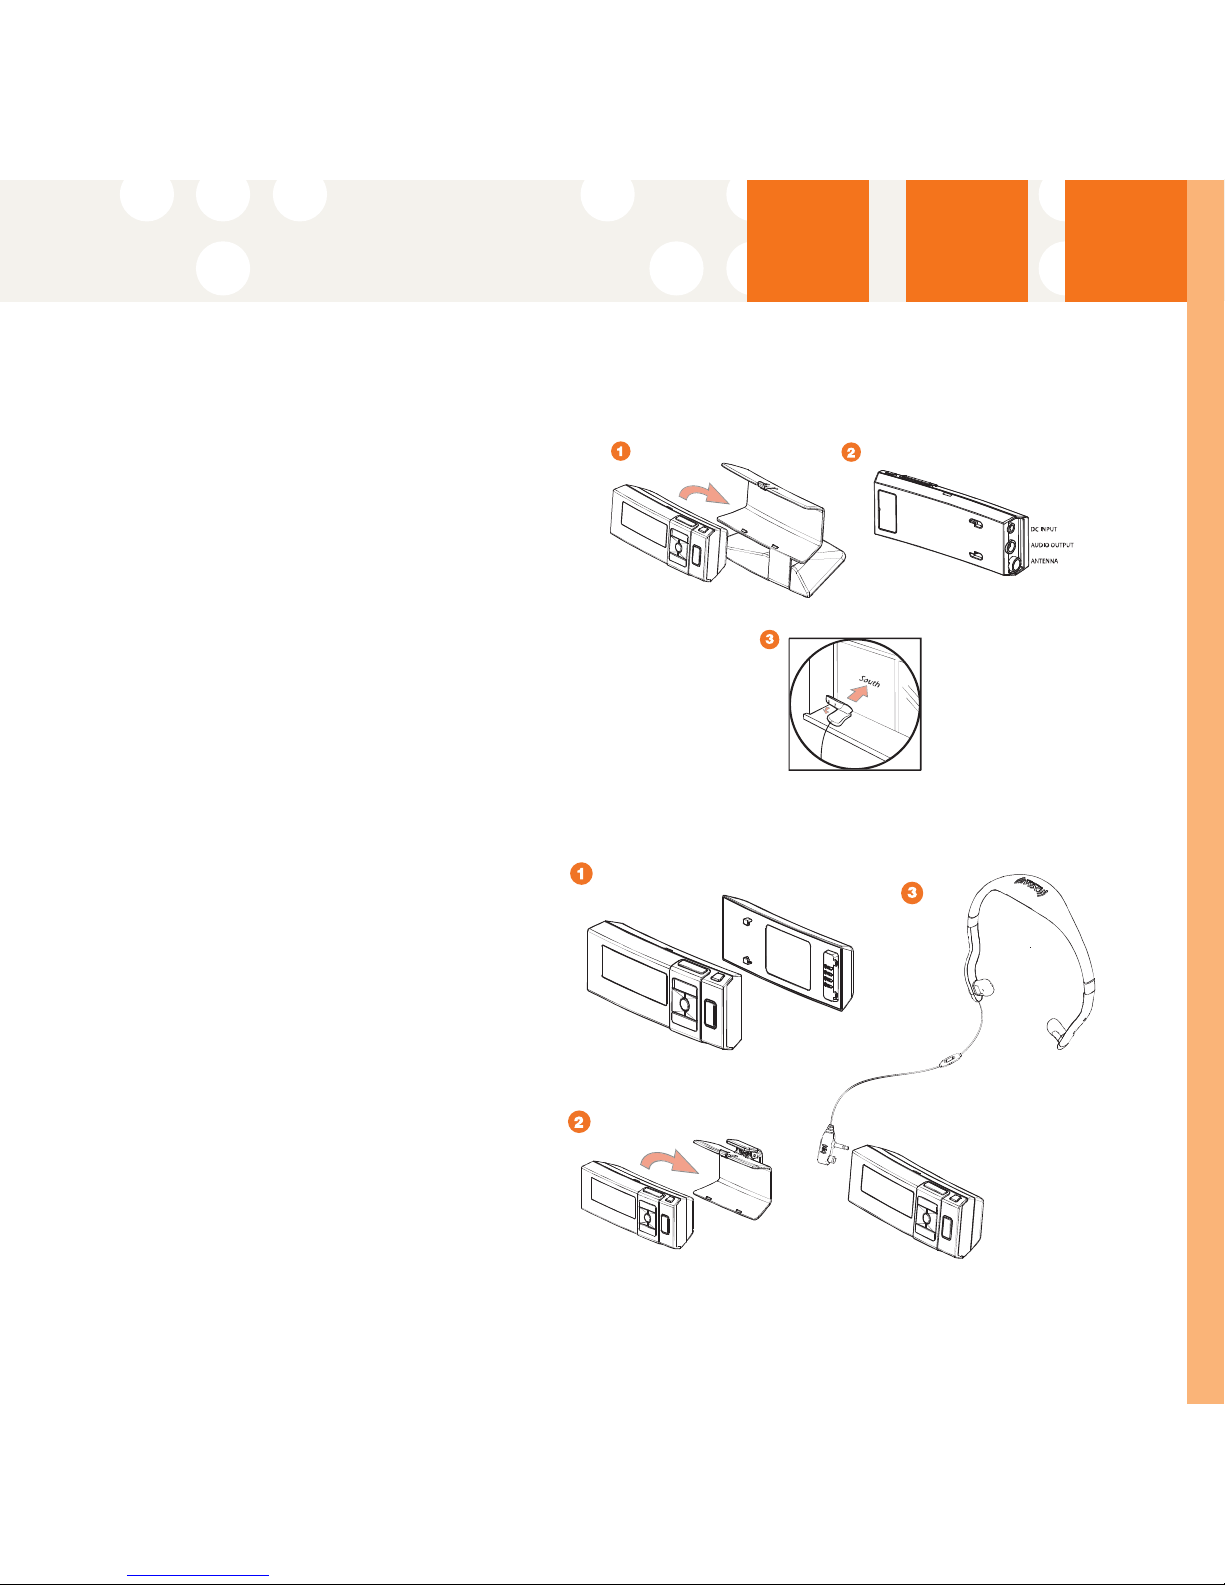
Mounting in the Home
1. Push the Sportscaster into the
home mount until it locks into place.
(Figure 1). To Remove the
Sportscaster, push the release tab
on the top of the home mount
upward and pull the Sportscaster
forward.
2. Connect the AC Power, antenna and
audio cable (if required) to the
appropriate jacks. (Figure 2).
3. Place the antenna on a window or
an exterior wall so that it points
south. (Figure 3).
Installation
Using the Wearable Kit
1. Attaching the battery to your
Sportscaster is simple. First, install
battery by lining up the battery
with the slots in the back of your
Sportscaster. Next, slide the bat-
tery into place until it is locked.
(Figure 1). For a complete charge,
the battery must be charged for
approximately 3 hours. The battery
life is approximately 4 hours.
2. To attach the belt clip onto your
Sportscaster, push the
Sportscaster into the belt clip until
it locks into place. (Figure 2). To
remove the Sportscaster, push the
release tab on the top of the belt
clip upward and pull the
Sportscaster forward.
3. Plug the connector of the integrated XM antenna headset into the connectors
with the wire exiting upwards as shown in (Figure 3).

Listening ttoXXM
Listening to XM
Tuning Categories and Channels
CCaatteeggoorriieess
The XM channels are arranged by categories. The Left and Right Arrow buttons move
Sportscaster forward or backward through the available XM categories. Pressing the
select button enters first channel in that category. The Up and Down Arrow buttons
are then used to tune to a channel from within the selected category. After
displaying the desired channel, press the select button to tune that channel.
You can tune through all the available XM channels in all categories using the "All
Channels" Category option within the Category listings.
DDiirreeccttTTuunniinnggvviiaaRReemmootteeCCoonnttrrooll((oonnllyy))
You can select a channel directly by entering its channel number with the Remote
Control numeric buttons. Channel 12 can be entered as "1", followed by "2", and
pressing the Select button. You may also input "0", followed by "1", and "2". If the
Select button in not pressed within ten seconds, the Sportscaster returns to the
previously tuned channel.
Note: Channel numbers which do not have channels assigned to them, that are blocked, or that
are not authorized for the Sportscaster will not be displayed during navigation.
CChhaannnneellss00aanndd11
You can navigate to channel 0 or 1 from within the "All Channels" Category option or
by direct tuning via the Remote Control. Channel "0" displays the Radio ID, Channel
"1" is the XM preview channel
FAV (Favorite Channels)
The FAV feature allows you to store up to 30 of your favorite channels.
Press the FAV button and the display will show the following:
The top line will show FAV, the lower line shows the number of Favorites stored out
of the 30 locations available (X of 30 stored).
12

Listening ttoXXM
13
SSttoorriinnggFFaavvoorriitteess
If you would like to store a favorite channel, tune to the desired channel and press
the FAV button for 2 seconds. The message "Favorite Stored" is displayed on the first
line, the lower line will display the Channel Name and Channel Number for 3 seconds.
EExxcceeppttiioonnssttooSSttoorriinnggFFaavvoorriitteess
If 30 favorites are already stored, Sportscaster will indicate that the favorite
locations are full.
If a channel has already been stored, the channel can not be stored again. In this
case the Favorite Exists message will appear:
TTuunniinnggFFaavvoorriitteess
There are two ways to tune to your Favorite channels:
1. Pressing the FAV button moves the Sportscaster through the stored Favorites in
succession. Favorites are accessed in the order they are stored.
2. Press the Up and Down Arrow buttons to navigate forward or backward through
the stored Favorites.
Customizing Your Favorites
MMoovveeFFaavvoorriitteettooTToopp
You can move any stored Favorite channel to the first position in your Favorites list.
To move the favorite channel you are currently listening to, press and hold the Select
button down for 2 seconds. The following message appears on the display.
Select Yes to move the stored channel to the first position. A confirmation meassage
indicating 1 of 30 stored is displayed. Select No to return to the first stored favorite.

Listening ttoXXM
DDeelleettiinnggFFaavvoorriitteess
To delete a Favorite channel, tune to that channel. Press and hold the FAV button
down for 2 seconds. The following message will appear.
Select Yes to delete that channel. A confirmation meassage indicating Favorite
Cleared is displayed. Select No to return to the first stored favorite.
EExxiittiinnggFFaavvoorriitteessMMooddee
Press either of the Left or Right Arrow buttons to Category tune and exit Favorites
mode. The FAV indicator will be deactivated on the display.
14
Personalizing YYour SSportscaster
15
Personalizing Your Sportscaster
You can easily adapt your Sportscaster to suit your listening habits. Simply press the
Menu button to see the options you can customize. Pressing the Menu button enters
the menu options mode. The menus are then navigated using a combination of the
Select, Menu, and the Up/Down/Left/Right Arrow buttons.
Any Menu option that has a sub-menu is displayed with a right-facing arrow.
Pressing the Right Arrow or Select button will enter the submenu(s).
When a menu option is selected the display flashes to indicate the selection is
stored. The Sportscaster returns to the initial display of the current submenu.
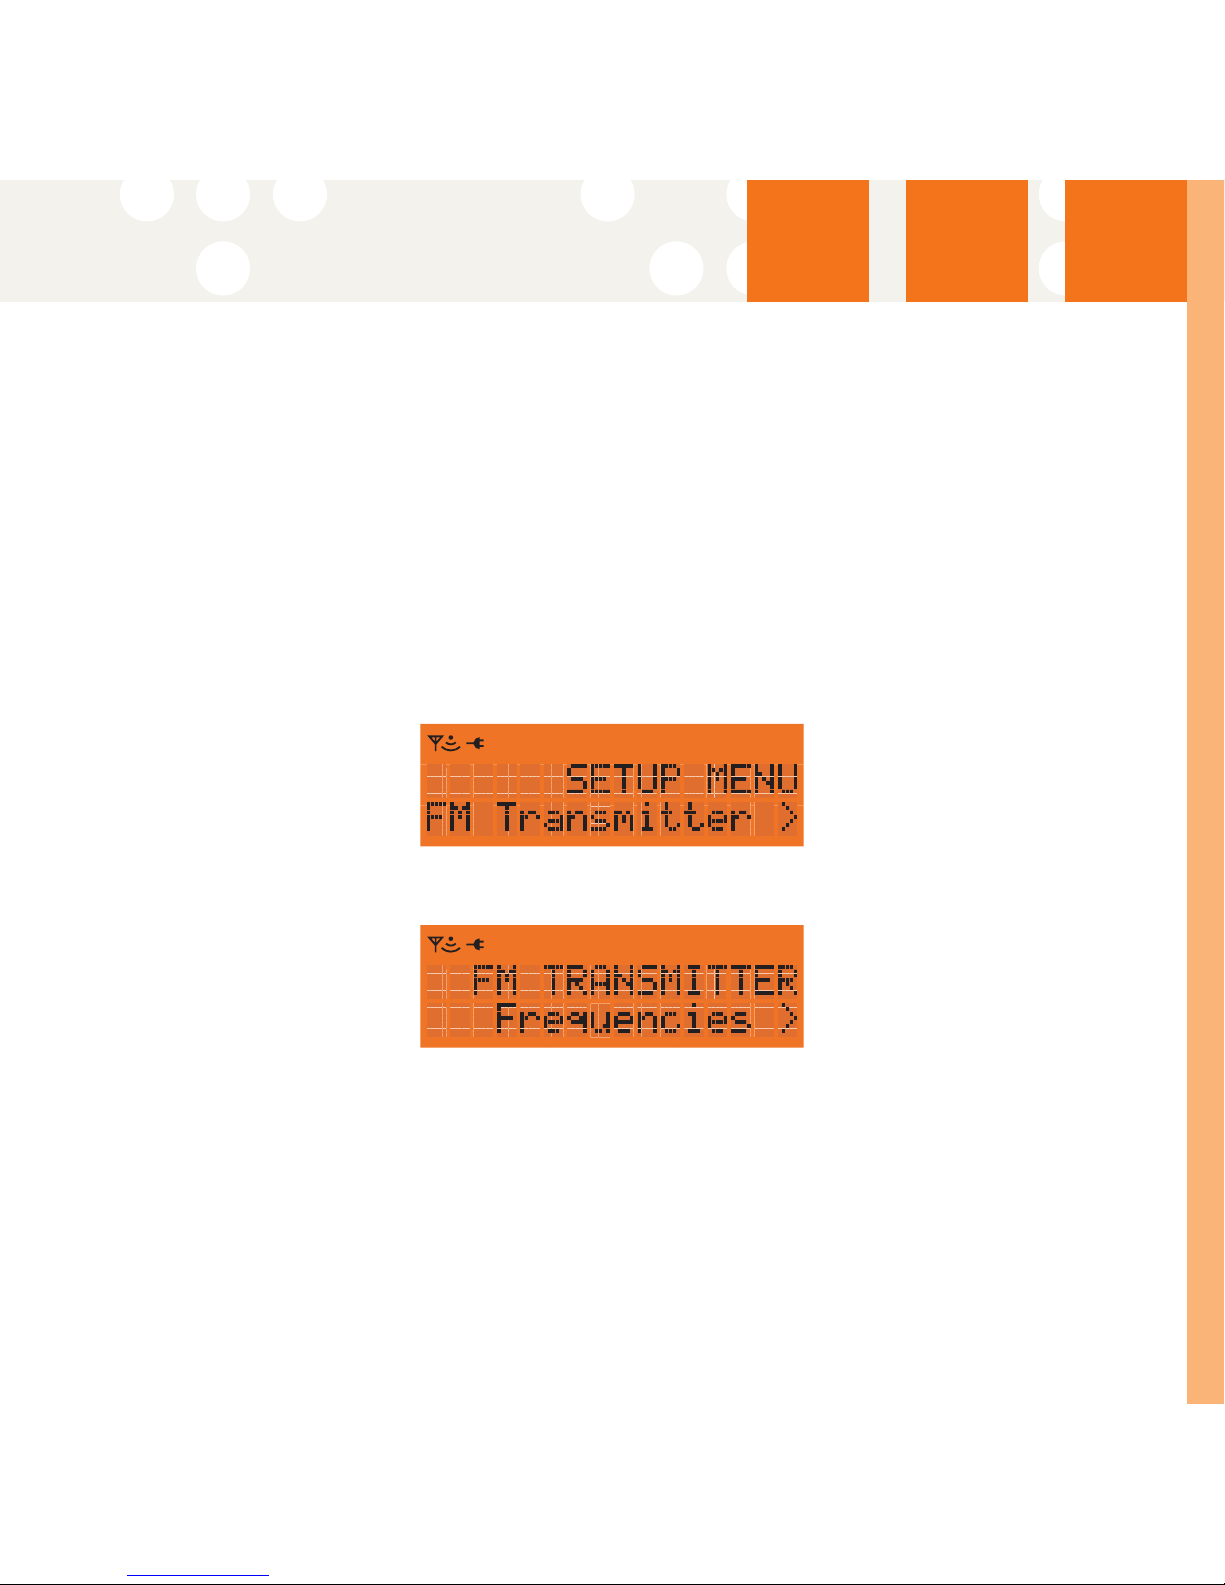
FM Transmitter
FFrreeqquueenncciieess
This feature will enable the Sportscaster to broadcast XM content via a wireless
Transmitter on an FM frequency between 88.1MHz to 107.9MHz.
Note: 88.1 is the default frequency.
1. Press the Menu button to enter the Setup Menu.
2. Press the Up and Down Arrow buttons to navigate to FM Transmitter.
3 Press the Select or Right Arrow button to enter the FM Transmitter sub menu.
4. Press the Up or Down Arrow buttons to navigate to Frequencies.
5. Press the Up Arrow button to choose an available frequency that is not being
used by an FM Broadcaster in your area.
6. Press the Select button to store the frequency.
Note: The FM frequency you select may need to be changed when traveling. This is due to the
differences in signal strength of local FM stations and is not a problem with your
Sportscaster.
Personalizing YYour SSportscaster
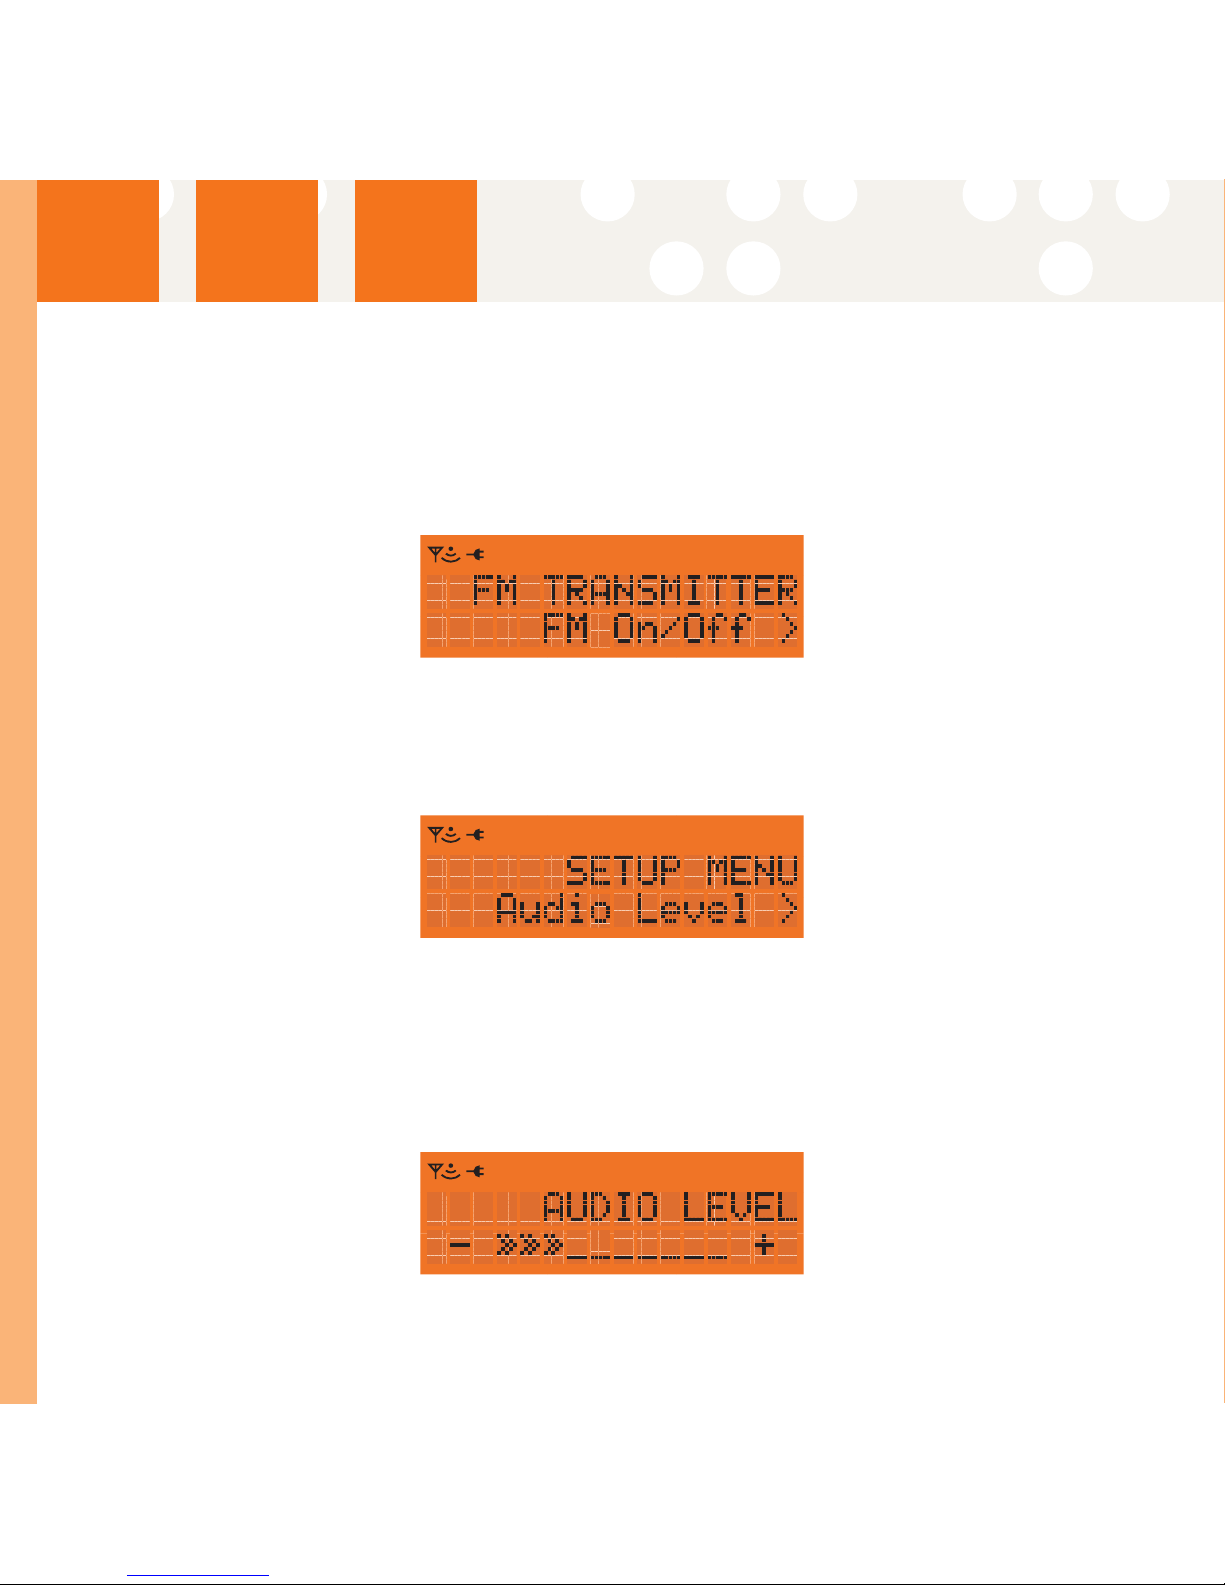
If the FM transmitter is Off the user is prompted to turn the FM transmitter On after
selecting a frequency.
FFMMOOnn//OOffff
Press the Up/Down Arrow buttons to FM On/Off.
Note: FM Off is the default setting.
Press the Select button to turn FM Transmitter On or Off as desired.
Note: The FM transmitter is automatically turned off when using Sportscaster in portable mode
with the optional wearable kit to conserve battery power.
Audio Level
The Audio Level option adjusts the Sportscasters audio output. There are 10 levels of
adjustment available.
1. Press the Menu button to enter the Setup Menu.
2. Press the Up or Down Arrow button to navigate to Audio Level.
3. Press the Select or Right Arrow button to enter the Audio Level sub menu.
4. Press the Left or Right Arrow button to adjust the audio level to your comfort.
5. Press the Select button to store the new setting.
Note: The default setting is level 3.
16
Personalizing YYour SSportscaster
17
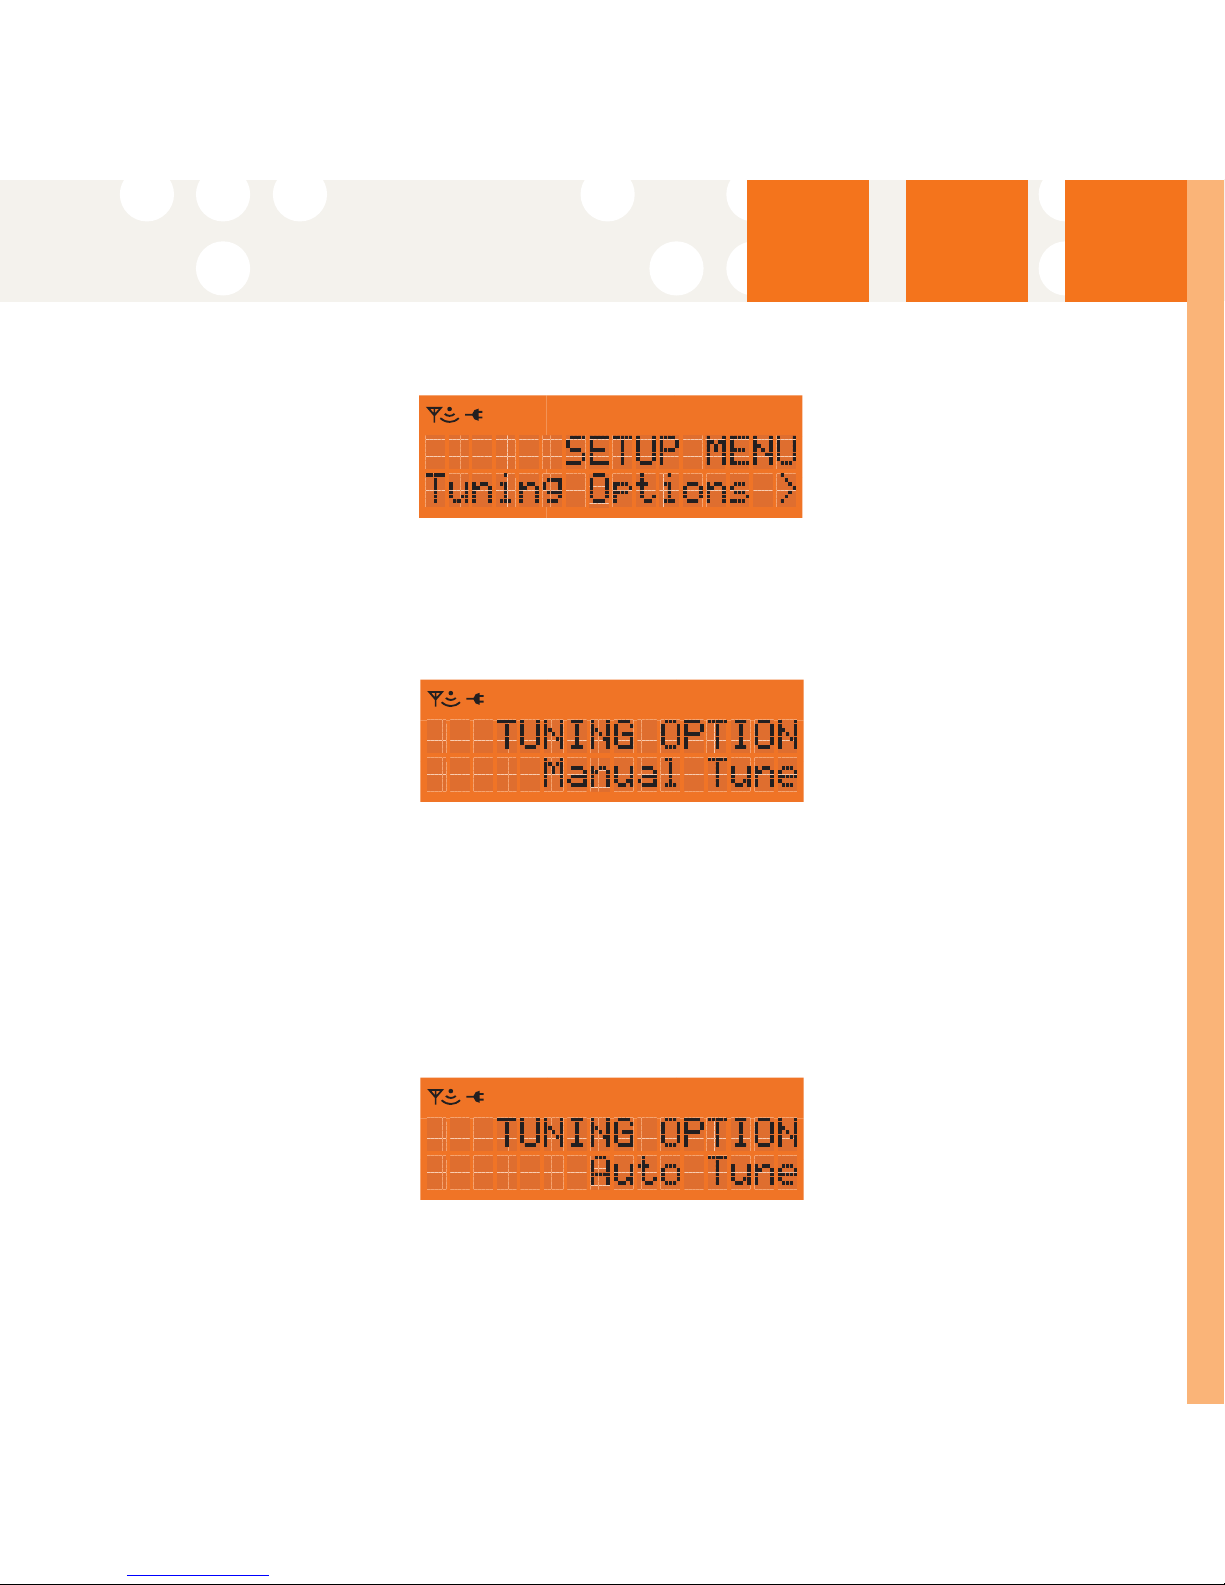
Tuning Options
The Tuning Options are used to set the method that channels are tune. There are
two tuning options available.
MMaannuuaallTTuunnee
Manual Tune mode allows the user to choose channels by viewing the programming
and tuning the desired channel only after pressing the Select button.
1. Press the Menu button to enter the Setup Menu.
2. Press the Up or Down Arrow button to navigate to Tuning Options.
3 Press the Select or Right Arrow button to enter the Tuning Options sub menu.
4. Press the Up or Down Arrow button to navigate to Manual Tune.
5. Press the Select or Right Arrow button to set Manual Tune mode.
Note: The default setting is Manual Tune.
AAuuttooTTuunnee
Auto Tune will tune to each channel when the channel is viewed without pressing
the Select button.
1. Press the Menu button to enter the Setup Menu.
2. Press the Up or Down Arrow button to navigate to Tuning Options.
3 Press the Select or Right Arrow button to enter the Tuning Options sub menu.
4. Press the Up or Down Arrow button to navigate to Auto Tune.
5. Press the Select or Right Arrow button to set Auto Tune mode.
Personalizing YYour SSportscaster
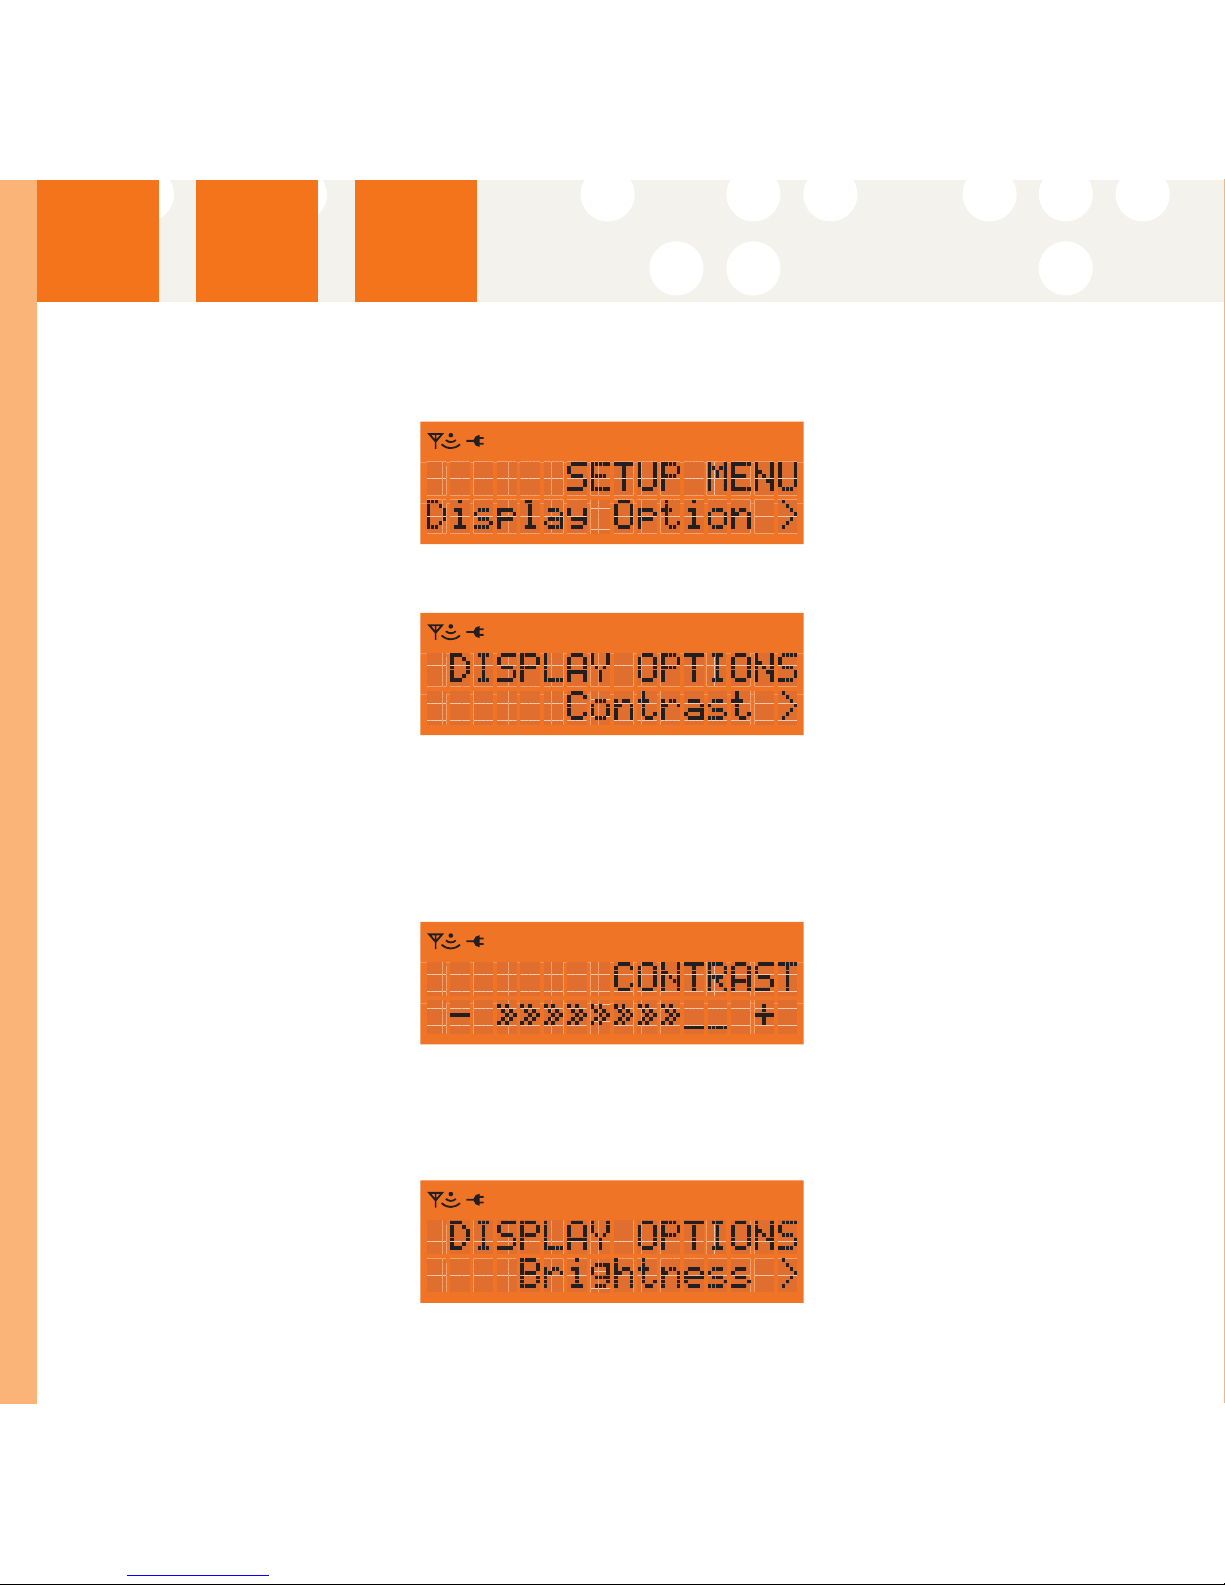
Display Options
CCoonnttrraasstt
This option is used to adjust the Sportscasters display contrast. There are 10 levels
of adjustment available.
1. Press the Menu button to enter the Setup Menu.
2. Press the Up or Down Arrow buttons to navigate to Display Options.
3 Press the Select or Right Arrow button to enter the Display Options sub menu.
4. Press the Up or Down Arrow buttons to navigate to Contrast.
5 Press the Select or Right Arrow button to enter the Contrast setting screen
6. Press the Left or Right Arrow button to adjust the contrast to your desired level.
7. Press the Select button to store the new setting.
Note: The default setting is level 8.
BBrriigghhttnneessss
This option is used to adjust the Sportscasters display brightness. There are 10 levels
of adjustment available.
18

Personalizing YYour SSportscaster
19
1. Press the Menu button to enter the Setup Menu.
2. Press the Up or Down Arrow button to navigate to Display Options.
3 Press the Select or Right Arrow button to enter the Display Options sub menu.
4. Press the Up or Down Arrow button to navigate to Brightness.
5 Press the Select or Right Arrow button to enter the Brightness setting screen
6. Press the Left or Right Arrow button to set the brightness to your desired level.
7. Press the Select button to store the new setting.
Note: The default setting is level 8.
CCyycclleeDDiissppllaayy
This option alternates the Sprtscaster through the three available displays modes at
five second intervals. See below for a description of the available views.
1. Press the Menu button to enter the Setup Menu.
2. Press the Up or Down Arrow buttons to navigate to Display Options.
3 Press the Select or Right Arrow button to enter the Display Options sub menu.
4. Press the Up or Down Arrow buttons to navigate to Cycle Display.
5. Press the Select or Right Arrow button to enter the Cycle Display sub menu.
6. Press the Up or Down Arrow buttons to select On or Off.
7. Press the Select or Right Arrow button to store the new setting.
Note: The default setting is Cycle Display Off.

Personalizing YYour SSportscaster
SSccrroolllliinngg
This option defines the way information is displayed. There are two modes available
Scroll Display and Page Display. Scroll Display shows the information that extends
beyond the available 16 characters on the display by scrolling the text from right to
left. Page Display shows the current viewable text that will fit on the screen, and
then replaces it with the missing text.
1. Press the Menu button to enter the Setup Menu.
2. Press the Up or Down Arrow buttons to navigate to Display Options.
3 Press the Select or Right Arrow button to enter the Display Options sub menu.
4. Press the Up or Down Arrow buttons to navigate to Scrolling.
5. Press the Select or Right Arrow button to enter the Scrolling sub menu.
6. Press the Up or Down Arrow button to select Scroll Display or Page Display.
7. Press the Select or Right Arrow button to store the new display setting
Clock Features
This menu option will allow access to all of the time based features available with the
Sportscaster.
AAllaarrmm
This option powers the Sportscaster on at a preset time. The Alarm feature will only
turn the Sportscaster on if the Sportscaster is currently powered off. Settings for
the Alarm are permanently stored and still active after Sportscaster is powered off.
When Alarm feature is enabled the Alarm indicator will be active on the display.
1. Press the Menu button to enter the Setup Menu.
2. Press the Up or Down Arrow buttons to navigate to Clock features.
3 Press the Select or Right Arrow button to enter the Clock features sub menu.
4. Press the Up or Down Arrow buttons to navigate to Alarm.
5 Press the Select or Right Arrow button to enter the Alarm screen
6. Press the Up or Down Arrow buttons to navigate to On/Off.
7. Press the Select or Right Arrow button to enter the Alarm On/Off sub menu.
8. Press the Up or Down Arrow button to navigate to Alarm On or Alarm off.
9. Press the Select or Right Arrow button to place the Alarm in the desired state.
Note: The default setting for the Alarm is Off.
20
Table of contents
Other Sportscaster Receiver manuals


